Showing posts with label Decor. Show all posts

Monday, June 7, 2021

Reviewing Farmhouse Decor Ideas: Character Wood and Metal

I have a small home that is currently under construction. The exterior is purposefully barn-like. The siding is sheet metal and the side facing the road is windowless. I plan for the interior to also suggest (suggest or scream - I'm not quite sure yet) barn interior. While shopping and planning I have found that the look I am imagining is not always easy to find examples of but my plans are slowly coming together.

on ReviewThisReviews


One problem I have had while shopping and researching decor ideas is that search words such as "rustic", "country" and "cabin" brings results of bears, moose, mountains, bentwood, and plaids. All very lovely, and very appropriate for the mountain ridge where my home is being built, but not quite the look I am going for. Many "farmhouse decor" searches yield lovely photos that include monotone white decor and flower bouquets. Again, quite gorgeous but not exactly what I'm going for. 

I am looking for barn doors, concrete floors, metals and wood combinations. While there are entire books written on other home styles; contemporary, coastal, southwestern, industrial, and more, the books on the "rustic" style comes closest to my goal. But aren't quite what I'm after.

One of our contributors is an incredibly talented DIYer. Lucky for me, Renaissance Woman shares projects that are exactly what I'd like to make for my future home. She shared how she made a DIY Pallet Book Nook. In that project she utilized character wood (from pallets) and corrugated metal to turn a small, odd space in her home into a uniquely wonderful spot to read, hangout, and relax. She shares the definition of character wood; "weathered wood that captures your imagination." This style is very much what I'm imagining.


Renaissance Woman's DIY Pallet Book Nook

If you enjoy her DIY Pallet Book Nook article, you can find more of her reviews under her tab here. She is quite talented.

This wine rack is a much smaller example of barnhouse decor. In this example, it can be purchased fully assembled. But people with DIY talent could easily make their own.


Rustic Barn Door Wine Rack


Not everyone needs or wants a wine rack. But most everyone likes to have a wall clock in plain view for convenience. And how much better if that wall clock compliments the decor.  This wood and metal clock is a wonderful example of my definition of barnhouse decor.


Vintage Farmhouse Clock

Sliding barn doors are one of the most notable farmhouse (barnhouse) features. They are so popular that not only are they functional doors but they are also a part of furniture, wall-hangings, featured in paintings, and more. I have even seen printed shower curtains that mimic wooden barn doors.

I want a barn door. I have watched video tutorials and hope to make my own sliding barn door to cover at least one window. There are versions that do not required angled cuts and I think I can manage simple straight cuts and assembly. I am hoping for both functionality (blocking sun on hot days in that south-facing window) and visual appeal (a barn door hung in my barn). 

If I decide I am unable to build my own sliding barn door there are many options for purchase. This is just one example:

sliding barn door kit; assembly required

While I've never shopped at Pottery Barn, I have noticed that some of their wood furniture fits my idea of the farmhouse style. If you don't already shop there, you may want to take a peek.

If you are looking for some barnhouse inspiration, I hope these ideas spark your imagination. 


Note: The author may receive a commission from purchases made using links found in this article. “As an Amazon Associate, Ebay (EPN) and/or Esty (Awin) Affiliate, I (we) earn from qualifying purchases.”


Monday, May 31, 2021

How to Install a New Faucet


How to install a new faucet
How to install a new faucet - Reviewed

It was time to replace that old bathroom faucet. It was an old single lever push, pull-type, and was difficult to turn on and off, especially for our youngest grandson.

Replacing a faucet whether it is a bathroom faucet or a kitchen faucet is not that difficult. But sometimes Murphy’s Law takes over, and what can go wrong, will go wrong. The problem I had was my shut-off valves were frozen so I could not turn off the water under the sink. This was not a problem, I just had to turn off the main water supply and replace the shut-off valves and supply lines under the sink. But this review will only instruct you on how to install a new faucet.

 I am by no means an expert and I am not a plumber by trade. I can tell you how to do this because I have done it many times before.

Installing a new Faucet Step-by-Step:

Step 1

The first thing you need to do is to turn off the water supply. Most bathroom and kitchen sinks have shut-off valves under the sink, if not you will have to turn off the main water supply.

Step 2

Once you are sure the water is off, turn the faucet on to let the water out. Then, remove the hot and cold supply lines using an adjustable wrench. You will also have to unlatch the sink stopper lever from to ball lever on the drain. Leave the ball lever in the drain, as you will need to attach the new sink stopper lever to it later.

Step 3

Now remove the retaining nuts that are holding the old faucet, a basin wrench is the handiest tool for this task. After removing the old faucet measure the hole pattern on the sink. Make sure you purchase a new faucet that will fit the hole pattern in your sink.

Step 4

After removing the old faucet, clean any residue left behind with a tub and tile cleaner and paper towels. If you must use a putty knife, use a plastic one.

Step 5

Your new faucet will have a built-in gasket, but you will still need a bead of caulk or plumber’s putty around each hole. This is needed to make a good seal.

Step 6

Place the new faucet and fasten the retaining nuts to hold it in place. It’s always a good idea to have somebody hold the new faucet in place while you get the new basin nuts snug. Be careful not to over tighten, you can use the basin wrench, but I like to just hand tighten.

Step 7

Now fasten the hot and the cold-water supply line to the new faucet. You may need to wrap Teflon tape around the new faucet threads. Follow the manufacturer's instructions on the new faucet. Now, it is time to connect the sink stopper lever to the ball lever in the drain. You will find several adjustments on the sink stopper lever.

Step 8

Remove the aerator from the new faucet and turn on the water supply. Then, turn on the cold water. The aerator is the little screen inside the faucet spout. This is to make that it does not clog with any debris that may be in the water lines. Replace the aerator and check for leaks. That is all there is to it.

Find more  Crafts & DIY projects on Review This here: ReviewThisCrafts.com

This basin wrench will be your best friend when replacing a faucet.

Superior Tool 03811 Eleven Inch Basin Wrench-Infinitely Adjustable 11Superior Tool 03811 Eleven Inch Basin Wrench-Infinitely Adjustable 11Superior Tool 03811 Eleven Inch Basin Wrench-Infinitely Adjustable 11


Note: The author may receive a commission from purchases made using links found in this article. “As an Amazon Associate, Ebay (EPN) and/or Esty (Awin) Affiliate, I (we) earn from qualifying purchases.”


Tuesday, May 4, 2021

How to Maximize Space in a Small Bedroom


How to maximize space in a small bedroom
Making the best of a small room - reviewed

We have a nice 3 bedroom home with plenty of room. Although, one of the bedrooms happens to be a small 8' x 10' room. This is the room that our granddaughters stay in when they come for a visit.

We had a bookcase full of books and toys, along with a tote full of toys and a full size bed in this small room. This did not leave much room for the girls to play.

Fran decided that it was time for a makeover in this room. First she emptied the bookcase and got rid of it. We needed to make the best of this space so the girls had room to play. For those of you who don't know who Fran is, she is my better half forever.

This small room makeover was all Fran, all I did was assemble all of the furniture and place it where she wanted it. 

Maximize Space in a small room:

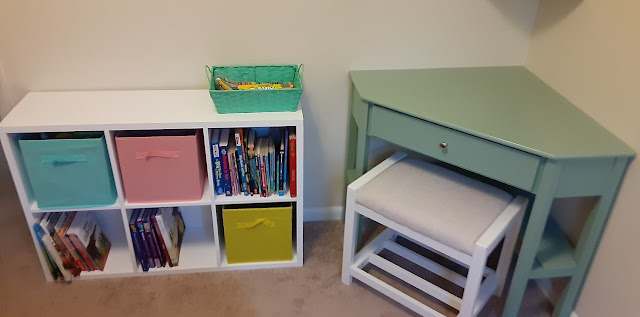
Ellen Corner DeskEllen Corner DeskCheck the Price


First Fran wanted a space where the girls could do some projects such as crafts, drawing, coloring, or reading.

We moved the full-sized bed to one corner of the room and placed this corner desk in the opposite diagonal corner of the room.

The corner desk measures 42" across and has a drawer and shelves for storage. 


Vanity StoolVanity StoolCheck the Price


Since a desk chair would take up too much space, Fran decided on this vanity stool.

This stool fits perfectly under the desk when it is not in use. When it is pulled out for use there is still plenty of room to get by between the stool and the bed. Did I mention that the cushion top is very comfortable.


Storage CubeStorage CubeCheck the Price

Now, it was time to clean up all of that clutter and empty that tote full of small toys, crayons, and makers. Fran picked out this cube storage organizer.

This was a perfect fit next to the desk and along the wall to fill the space to the entrance door of the room.

These storage cubes are a great idea for craft rooms, bedrooms, playrooms, or a small office.

The cube has six storage spaces and each space will hold 60 pounds.


Sorbus Foldable Storage CubeSorbus Foldable Storage CubeCheck the Price


To store all of those little things Fran found these colorful foldable storage cubes.

They fit perfectly into the cubes of the storage organizer. These a perfect for games, crayons, makers, and small toys.


Fran hand picked every one of these items for a specific purpose in this small bedroom. She created a comfortable and useable space for our granddaughters. This was an easy project for me, as I said earlier all I had to do was assemble. All of these items were easy to assemble and all had excellent assembly instructions.

child sitting at a corner desk

Here is a photo of our youngest granddaughter hard at play using their new corner desk. They are very happy with the new changes to their room away from home.

Find more reviews on this topic on Review This Here:


Note: The author may receive a commission from purchases made using links found in this article. “As an Amazon Associate, Ebay (EPN) and/or Esty (Awin) Affiliate, I (we) earn from qualifying purchases.”


Tuesday, April 20, 2021

Restoring Lawn Furniture


Restoring Lawn Furniture
Restoring Lawn Furniture - Reviewed

Here is how I restored some old wooden lawn furniture. My parents bought this furniture back in the 80s for their new patio and used it for many years.

Many years ago I was helping my mother clean out her basement where this furniture was stored. I told her that I would carry it up to the patio and she said no I'm just going to throw it away.

 I wouldn’t hear of it, so she said if you want it, to take it to your house. I had the two chairs and one lounge chair stored in my garage for a couple of years. Then, I decided it was time to take it out and use it on my deck.

At that time all this furniture really needed was cleaned up. After several years of use on my deck, the furniture was in need of some tender loving care. Pictured are the two chairs all restored and ready for the summer.

Materials I used to restore this lawn furniture:

·         Fine Sandpaper (120 Grit)

·         Tack Cloth

·         Exterior Deck and Patio PaintSpray Paint 

·         New Lawn Furniture Cushions

Tools I used for this DIY:

Wire Brush

Screwdriver

Socket Set

3-inch nylon paintbrush

Here is how I restored my lawn furniture:

1. Over the years some of the screws and bolts began to loosen. Using a screwdriver and socket set I tightened all of the screws and bolts.
2. I then wire brushed all of the springs under the cushions to remove the rust. Then, made sure they were all secured to the wooden sides of the furniture.
3. Using the wire brush again. I Wire brushed all of the wood surfaces to remove any of the loose paint.
4. The last step of preparation, I sanded all of the wooden surfaces with fine sandpaper. I used 120 Grit. Then take the tack cloth and wipe the surfaces to remove any dust or sanding residue.
5. I painted the furniture with a latex deck and patio paint that you can buy at any hardware store. I carefully painted the furniture with a 3-inch nylon paintbrush.

About every three or four years I follow the same process to keep this lawn furniture looking good. This lawn furniture is over 40 years old and we are still using it and it is so comfortable.

More ReviewThis DIY Projects Here: ReviewThisCrafts.com

Here are a few of the simple tools that I used for this project:

Wire Brush,Heavy Duty Stainless Steel Wire Scratch Brush for Cleaning Rust with 10Wire Brush,Heavy Duty Stainless Steel Wire Scratch Brush for Cleaning Rust with 10Check the PriceLLNDEI 3/8”Drive Impact Socket Set,Standard SAE(5/16 to 3/4-Inch) Metric Size(8-22mm), 95 Piece, CR-V Steel Deep&Shallow Kit, Adapters, Ratchet Handle, Screwdriver Bit Set, Spark Plug Socket, 6 PointLLNDEI 3/8”Drive Impact Socket Set,Standard SAE(5/16 to 3/4-Inch) Metric Size(8-22mm), 95 Piece, CR-V Steel Deep&Shallow Kit, Adapters, Ratchet Handle, Screwdriver Bit Set, Spark Plug Socket, 6 PointCheck the Price6 in 1 Screwdriver set with Comfortable Non-Slip Grip, Multi-tool Screw Driver Bit Set multipurpose, All in 1 Nut Driver with Phillips/Slotted Super Quality Steel Bits, with Built-in bit holder6 in 1 Screwdriver set with Comfortable Non-Slip Grip, Multi-tool Screw Driver Bit Set multipurpose, All in 1 Nut Driver with Phillips/Slotted Super Quality Steel Bits, with Built-in bit holderCheck the Price


Note: The author may receive a commission from purchases made using links found in this article. “As an Amazon Associate, Ebay (EPN) and/or Esty (Awin) Affiliate, I (we) earn from qualifying purchases.”


Sunday, February 7, 2021

Review of Blackout Window Panel Drapes - Highly Recommended

A Review of Room Darkening Drapes - Yes. Recommended.

 Let me start this review by getting right to the point; I highly recommend these blackout drapes.

My son selected them for his recently re-vamped bedroom.  Actually, I suggested them (based on reviews and price), and he said "what-ev." Lol. Boys ... I've raised four of them, so I can safely say they are men of few words. However, few words or not, he loves these drapes.

The Nicetown Blackout Window Panels do exactly what they advertise they do - they blackout the light. 

These Drapes Completely Block the Morning Sun

My son's room faces east, so it gets the full morning sun. Certainly, that's a lovely feature when you're awake, not so much when you're trying to sleep.

In the morning, while he was still sleeping, I opened his door expecting to see some sunlight, and to my surprise, there was zero light in the room.

Honestly, I was shocked. I expected there to be some faded light peeking through, but nope, nothing. His room was night-time dark in the morning.

He said, and I quote, "it was so dark, I had to check my clock and was shocked that it was noon." He enjoyed his morning sleep-in. 

Closed Room Darkening Drapes in My Son's Room

How Many Panels Do You Need for a Window

I'm a bit fussy about having too little drape for a window.

My son's window, from outside frame to outside frame, both width, and height, measures 51 inches by 51 inches. However, from the top of the curtain rod to the bottom of the window, the measurement is 54 inches long. 

The choices in size widths are 29, 42, and 70. The length choices are 18, 36, 45, 54, 63, 72, 84, and 90 inches. 

To ensure proper window coverage, we purchased two sets of the 42 by 63-inch drapes. Thus we have four panels; two panels on each side.

We decided on the slightly longer measurement of 63 inches versus the 54-inch length for fear that the 54-inch drape would be slightly short, and allow the light to peek through.

To completely block the light, make sure the drape seams (where each drape meets) are pulled so that you can't see the window at all. Otherwise, the morning light might peek through.

The finished look of the drapes - open - two sets of drapes


Affordability? Absolutely

We were able to cover this window for under $75 (Canadian). The curtain rod was already installed; just the drapes had to be replaced.

How Many Colors Do These Drapes Come In?

Lots. Lots of colors. When I last checked, there were about 20 colors to choose from.

Would We Rebuy These Drapes?

Yes. In fact, my first granddaughter is due to arrive in August, and we're planning on choosing a set for her room. They're ideal for a nursery since they completely block the morning and day light. 


Check out the bedding we selected for his room here. The bedding is also good value for the money.


Note: The author may receive a commission from purchases made using links found in this article. “As an Amazon Associate, Ebay (EPN) and/or Esty (Awin) Affiliate, I (we) earn from qualifying purchases.”


Tuesday, February 2, 2021

Home Storage Cabinet

Home Storage Cabinet
Home Storage Cabinet - Reviewed

Sometimes finding more storage space in your home can be a real challenge. As a Christmas gift, our daughter got us three sets of large bath towels.

Now, the challenge for us was where to put them. We decided on a small storage cabinet for our bathroom. I measured the space we had available and we began to search.

We decided on this Bar Cabinet with wine storage from Bush Industries. Now I know this sounds crazy you are probably wondering why on earth would we buy a wine storage cabinet for bath towels.

Well, let me tell you why. This is the most versatile storage cabinet I have ever seen. It measures 32-inches wide which is a perfect fit for the space we had available. The 42-inches high was great because Fran did not want a tall cabinet, and 16-inches deep makes it a perfect fit for the large towels.

This cabinet is designed to be used for a variety of uses. You can use this cabinet as a Coffee Bar, or Wine Cabinet, or general storage in an office, kitchen, or bathroom. So, if you are looking for some added storage around the house this cabinet will fit the bill.

Wine and Storage Cabinet Features:

Two accented glass doors with tempered glass.

Three fixed shelves.

Four adjustable shelves.

The Stemware rack will hold a dozen 12-ounce wine glasses.

The shelves will hold nine bottles of your favorite wine.

Wine Storage Cabinet

Bush Industries is a leading manufacturer of ready-to-assemble furniture for your home, office, or business. Offering a variety of desks, workstations, bookcases, storage furniture and so much more.

The unit was very well packaged, I found no damaged parts. Every part was labeled and easy to read. Each piece of hardware was packaged separately and labeled with the part numbers so there was no guesswork as to what screw went to what part.

The instructions were quite easy to follow and they tell you what steps to skip if you’re just setting the cabinet up as a storage cabinet.

The above photo is from the instruction sheet. On the left, it shows just a storage cabinet, on the right, it shows the wine cabinet.

When I first saw this I was concerned, I thought how am I going to know how to set this up without the wine storage. 

But not to worry, as I stated above the instructions tell you what steps to skip to set the cabinet up for just storage.

After we set this up as our bathroom storage for the towels. I assembled the adjustable shelves with the wine racks and set them on shelves in my basement. Now I have a wine rack for nine bottles of wine.

Bush Furniture Bar Cabinet with Wine Storage, Pure WhiteBush Furniture Bar Cabinet with Wine Storage, Pure WhiteCheck the Price

 p


Find more product reviews here: ReviewThisProducts.com

For more Decor Ideas on ReviewThis: ReviewThisDecor.com


Note: The author may receive a commission from purchases made using links found in this article. “As an Amazon Associate, Ebay (EPN) and/or Esty (Awin) Affiliate, I (we) earn from qualifying purchases.”


Sunday, January 31, 2021

6 Handy Work From Home Office Gizmos and Gadgets

Review of Handy Home Office Accessories & Gadgets

Since many of us are working from home these days, acquiring just the right gadgets and gizmos for our desks can be fun! 

For me, it's fun. Maybe, you're like, "no clutter, please." These six items don't really clutter the office up; they're all useful.

My family tends to give me gifts that fit nicely into my home-office set-up. Since I spend so much time here, I appreciate every little thing I get from them.

Here are six handy items that I've either purchased or received as gifts you may also want to consider.

Handy Home Office Gizmos and Gadgets

1. A Calendar Mousepad

My 2021 calendar mouse pad is on order. Last year, I decided that I needed a handy calendar that didn't have to hang on the wall or be buried in a drawer. The perfect solution was a mouse pad that doubles as a calendar. Sure, you can't write on it, but who cares! If I need to quickly glance at a particular date while viewing the whole year at a glance .... bingo! Problem solved.

Here's My 2020 Mousepad Calendar - 2021 Just Ordered - Waiting for Arrival

I find the calendar mouse pad handy when I travel to my mother's house. I'll work from there, and since the year is displayed in one handy spot, boom, I have a calendar at my fingertips, literally. The best part is I don't have to look at my phone or google a calendar. The mousepad gives me immediate access when working.

I'll end up with a collection of calendar mousepads as the years go by, but how cool is that? After many years of collecting them, God willing, I was considering sticking them in a photo frame for the wall and pinning a small photo in the middle of each year to represent the major event for that year. I guess the covid virus will be the 2020 photo? Um, maybe not. We'll see. 

I would love 2021 to represent something positive about my riddle books, or better yet, my first grand-daughter due in August. There you have it, she gets the 2021 photo billing.

2. HomeMedics Hand-Held Massager

This thing is so darned convenient! This massager is very inexpensive and needs batteries - yah, that part sucks, but honestly, it's worth having on hand. Sitting at my desk can cause tightness and cramps in my thighs and knees. When I'm in the middle of a project and not willing to get up and walk around, I grab that little massager and use it in those painful spots. Works great. 

3. Motivational Words

These can come in many forms. For some, it's a quote on the wall or a plaque on the desk. For me, it's a gift from my grandsons. They gave me three rocks, each printed with a motivational word; "wish, hope, dream." I love these rocks! Here they are:

Wish, Hope, Dream Rocks on My Desk

4. Candles, Yes, Candles, Lots of Candles

Over the holidays, I received three new candles, and I've used two of them completely, and it's only the end of January, lol. These particular candles came in lovely pastel-colored, small glass containers. They fit perfectly on our kitchen window ledge, so I've cleaned them and plan on planting herbs inside in the spring. If fire freaks you out, go for the led battery operated version. The ambient light, no matter which you use, is lovely, and of course, the scent of a real candle can be calming. Lemon, my fave - #anythinglemon.

5. Plants - Plants Are a Must

Plants clean the air. For that reason alone, I include them in a room. Certain plants are ideal for rooms with a lot of electronics, such as Spider Plants. I have one of those plants by our family room TV.

 Fresh flowers are nice and are normally only on my desk when given as a gift. For that reason, I keep plants. I have two plants, one on my desk and one on my credenza: They're easy to keep, they can handle indirect light, and I only water them once a week. I insert a fertilizer stick once a month or so. They're self-sustaining, and the greenery is lovely. This year I plan on adding a floor plant to the room.

Here's the plant on my desk. It's approximately six years old. It was originally at my mom's house, and during her snowbirding days, she'd give her plants to me.

Plant on my Desk - About six years old now - Easy to care for

6. A Portable Heater or Cooler

There's an electric fireplace in my office; however, I prefer the stand-up portable heater. I live in Canada, it's winter, and we're having a cold spell right now. The heater is a gawd-send during the winter months. You can find ones that offer both heating and cooling. However, with central air, the cooling option isn't necessary for us. 

What I like most about the heater is the soothing effects of it at night. When I'm working late, and the room is cold, I pull the heater within one foot of where I'm sitting, and the heat pours over me. When I've had enough, I turn it off. I'm actually turning it on and off all night long. This was a gift that I said I didn't want (since I have a fireplace) - I was wrong. Best gift evah!

I hope your workspace is cozy and filled with encouraging and handy gizmos and gadgets; working from home is much better when it is. Turn your office or desk space into a reflection of yourself.


Note: The author may receive a commission from purchases made using links found in this article. “As an Amazon Associate, Ebay (EPN) and/or Esty (Awin) Affiliate, I (we) earn from qualifying purchases.”


Tuesday, January 19, 2021

How to Plan for a Move


How to Plan for a Move
How to Plan for a Move - Reviewed
Getty free images

Moving is a daunting and stressful task. I've read that moving is one of the most stressful things that you'll ever do. So, if you’re going to be moving here are some helpful tips and tricks that I’ve learned from doing this several times myself. I’m by no means a professional mover; these ideas are based on my own experiences.

 Moving from one end of town to the other is stressful enough. When you move away from your home to another town it’s really tough. There are many more things to consider.


There are so many things to consider, where do you start?

My best advice is to start by making a list of things that you'll need to do. In other words, begin to make a plan. These things don’t need to be in any specific order right now, just start to write things down. 

Following are some things that you’ll need to consider:

  • If you're hiring a moving company make sure to read and understand all of their policies. Look for online reviews and make sure they are reputable. 
  • A new school for your children, this was always number one on our list. Especially if you're moving to another city. When we moved from Pennsylvania to Western New York this was a high priority for us. You'll need to get all of their school records transferred to the new school.
  • New Doctor and Dentist for you and your children. You'll need to transfer all medical records.
  • Change your address and forward mail to the new address.
  • Finding a new neighborhood, everybody wants to live in a nice area. Find a local realtor in the new city to help with this.
  • New bank or credit union for checking and banking.

Moving companies will do everything including packing for you. packing is something we always did ourselves. Most people don't want strangers packing their belongings.

Things you'll need are boxes, packaging material, such as bubble wrap, or kraft paper and tape. My preferred packaging material is bubble wrap and it is expensive. 


Packaging Material Tip:

To save some money, check with small to mid-sized manufacturers in your area. Most times these places receive materials with packaging such as bubble wrap and often throw it away. Most times all you have to do is ask and you can get it for free.

Double Wall 18x18x28Double Wall 18x18x28" Heavy-Duty BoxesCheck the Price

For dishes and breakable items, you'll want to use these double-wall corrugated boxes. The double-wall gives you added protection for anything that's breakable.

Wrap dishes in paper or bubble wrap and place them on end, not flat and stacked. Cups and glasses should be standing up.

Make sure that you fill all empty spaces with paper or bubble wrap so dishes, cups, and glasses can't move.

These boxes are expensive so, you only want to use them for kitchen breakables and other breakables such as lamps, vases, and pictures.


Small Moving Boxes - 16x10x10 - Cardboard BoxSmall Moving Boxes - 16x10x10 - Cardboard BoxCheck the Price


These are the perfect size boxes for heavy items. Such as books, tools, CD's, silverware, canned goods.

The idea here is that the box is small so it will fill up fast and the box won't be too heavy to handle. The last thing you want to do is overload a box.

You can also use these boxes for pots and pans since they are not breakable items.


For blankets, sheets, pillows, and clothing look for wardrobe boxes 20 x 20 x 34 with a bar for hanging clothing. These are much larger but the items are light. These boxes are also expensive. You hang your clothing and then pack pillows and blankets on the bottom.

Moving within your current area is one thing but if you're moving to another city or state it takes a little more planning. If you're planning a move I hope you find these tips and tricks helpful.


Find more DIY tips on ReviewThis Here: ReviewThisCrafts.com

You'll need to decorate your new home see these decorating tips on Review This Here: ReviewThisDecor.com


Note: The author may receive a commission from purchases made using links found in this article. “As an Amazon Associate, Ebay (EPN) and/or Esty (Awin) Affiliate, I (we) earn from qualifying purchases.”


Sunday, January 17, 2021

Review of a Bedding Set and Throw Pillow Covers - Ideal for Teens and Young Adults


Review of An Affordable Bedding Set for Teens and Young Adults

One of my sons recently switched to another bedroom in our home. In the process, he opted to make a few changes to his decor.

After scrolling through Amazon to find a bedding set that wasn't too expensive, he selected the Queen Size "Madison Park Essentials Cozy Bed in a Bag Comforter Set." The set he selected was charcoal and tan. You'll notice several designs and colors to choose from.

What is Included in The Madison Park Bedding Set:

  • A comforter
  • A sheet set which includes the fitted sheet, flat sheet, and two pillowcases with the queen set
  • A bed skirt
  • Two matching shams
  • One decorative pillow
The nice thing about this set is the price. At the time we purchased it, it was just over the hundred dollar range on Amazon Canada, and is under that range on Amazon USA.


Here's a Photo of  the Tan Madison Park Bedding Set in My Son's Bedroom:


Madison Park Bedding Set - Photo from My Son's Room

What I Like About the Bedding Set:

  • I like the price. Since you get the sheets, the comforter, the skirt, pillowcases and throw pillow, I feel it's a good price.
  • I like the design. It's masculine enough for a boy's room, but of course, it could work for either a girl or a boy.
  • The bedsheets are very nice. They're not "cheap feeling" like can sometimes happen with these less expensive bedding sets.
  • The bedsheets washed nicely as well. Granted, we've only washed them once.
  • It looks gorgeous with his black and tan decor. The photo doesn't do it justice.
  • The comforter is a satisfactory thickness. 

What I Don't Like About the Bedding Set:

  • I don't like the feel of the comforter. That's a personal thing. My son likes it. It's kind of a shimmery finish. I'm not sure if I'm describing it accurately - but it's not heavy fabric.
  • Since the comforter's fabric isn't heavy in texture, my concern is that it may pull at the seams easier or not hold up in the wash.

Here's A Close Up Photo:


The Throw Pillow Covers


This set does not include the two black throw pillows, throw blanket, and the two body pillows featured in our photos.

We used the body pillows (two of them) to raise up the pillows for decorating purposes. On top of the body pillows are two regular-sized pillows that feature the pillowcases from the sheet set. Positioned in front of that stack of pillows are two pillows with the comforter's matching shams.

We ordered two pillow covers to cover two existing throw pillows we already had. We selected throw pillow covers with a furry texture to provide contrast. I highly recommend them. They don't shed, and they look terrific. Here are the throw pillow covers we purchased on Amazon.

Also on order are two black body pillow covers to complete the set.

Do I Recommend This Bedding Set?


For a teenager's room, child's room, even a guest room, absolutely. However, I would want a higher quality, more durable set for the primary bedroom.


Madison Park Essentials Cozy Bed in a Bag Comforter SetMadison Park Bed in a Bag Comforter Set


Note: The author may receive a commission from purchases made using links found in this article. “As an Amazon Associate, Ebay (EPN) and/or Esty (Awin) Affiliate, I (we) earn from qualifying purchases.”


Sunday, January 10, 2021

Review of LED Rechargeable Strip Lights for Closets, Kitchens and More

LED Rechargeable Strip Lighting - No Batteries Required

I purchased LED rechargeable strip lights for my son's closet as a small Christmas gift, and wow, great product.

LED Strip Lighting for Closets and More

My son loves ambient lighting and has positioned stip-lighting behind his desk, his piano, and bed headboard, and they look amazing. However, those particular strip lights require electricity, and that's fine for furniture pieces near an outlet, but not for a closet.

In my search for a creative gift, I came across strip lights that are rechargeable. My first thought was, what-the-heck is rechargeable strip lights? First of all, I despise lights that require batteries. Batteries are simply an added cost. So the word "rechargeable" piqued my interest.

My son's closet is big enough to step into, and I wanted to get lighting for it without resorting to something that requires batteries.

In my search, I came across these Medulla Strip Lights and decided to give them a try. Good decision. They're fantastic. 

Here's how they look in his closet:


One set was enough to reach across the back of the closet. The closet is about 5.5 feet wide. He positioned the lights along the back wall of the closet. You can put them under the top shelf; however, he felt they would be better across the back. 

Here's Another Look at His Closet:


Settings on the Led Strip Lights

On his model, there are three settings; On, Off, and Auto. Also, the brightness can be adjusted up or down. Auto activates the motion sensor - which is fantastic. The lights stay off until it senses motion when you open your closet. That helps to preserve battery life.

Easy to Install With Built-In Adhesive

Simply peel the protective backing off of the strip lights and install them where you want. They secured perfectly for my son. His were placed on wood. The rechargeable unit also has adhesive on it and can easily be positioned where you want to put it.

How Long Does the Battery Last?

The instructions indicate that when you have the strip lighting set at Auto (Motion Sensor), assuming you open and close your closet 5 times a day, the charge should last approximately 30 days. My son hasn't had it that long yet and hasn't had to do a recharge.

How Do You Recharge LED Strip Lighting?

This unit has a USB port and a short USB cord. Simply plug it into a USB outlet. I imagine you could use your computer to recharge; however, we have a power cord with built-in USB slots, so we intend on using that.

Other Places You Can Put this Convenient Strip Lighting:

  • Staircases
  • Under bedframes for kids for added lighting when they step out of bed.
  • Sheds and Garages
  • Under kitchen cupboards
  • Dark corners that need lighting from time to time
  • The back of headboards for ambient lighting
  • Home entertainment systems
More Info On Recharging the Battery

Below Margaret asked some good questions that I thought would better be mentioned up here:

Does the Recharging Unit Detach for Charging?

Yes, it does. Simply pull it out from the end where the connection is made to the lights.

More Info on Recharging

My son plans on using a recharging brick (you know, the ones from cell phones). He'll simply plug the charging unit into the brick, and then plug the brick into the wall. The unit comes with a short cord to attach the closet charging unit to the brick. Of course, you can plug it into a laptop or PowerBar with USB connections as well. I think the brick connection is the easiest. 

How the Charging Unit Attaches to the Wall

The unit comes with a magnetic strip with an adhesive backing. Simply place the magnetic strip on the wall (stick it), then the rechargeable unit attaches to the magnetic strip for easy removal when it's time to recharge.


Note: The author may receive a commission from purchases made using links found in this article. “As an Amazon Associate, Ebay (EPN) and/or Esty (Awin) Affiliate, I (we) earn from qualifying purchases.”


Most Recent Reviews on Review This Reviews


Search for Reviews by Subject, Author or Title

The Review This Reviews Contributors


SylvestermouseSylvestermouseDawn Rae BDawn Rae BMbgPhotoMbgPhotoBrite-IdeasBrite-IdeasWednesday ElfWednesday ElfOlivia MorrisOlivia MorrisTreasures by BrendaTreasures by BrendaThe Savvy AgeThe Savvy AgeMargaret SchindelMargaret SchindelRaintree AnnieRaintree AnnieLou16Lou16Sam MonacoSam MonacoTracey BoyerTracey BoyerRenaissance WomanRenaissance WomanBarbRadBarbRadBev OwensBev OwensBuckHawkBuckHawkDecorating for EventsDecorating for EventsHeather426Heather426Coletta TeskeColetta TeskeMissMerFaeryMissMerFaeryMickie_GMickie_G


Review This Reviews is Dedicated to the Memory of Our Beloved Friend and Fellow Contributor

Susan DeppnerSusan Deppner

We may be apart, but
You Are Not Forgotten


“As an Amazon Associate, Ebay (EPN) and or Etsy (Awin) Affiliate, I (we) earn from purchases.” Disclosure Statement

X