Showing posts with label DIY. Show all posts

Monday, June 7, 2021

Reviewing Farmhouse Decor Ideas: Character Wood and Metal

I have a small home that is currently under construction. The exterior is purposefully barn-like. The siding is sheet metal and the side facing the road is windowless. I plan for the interior to also suggest (suggest or scream - I'm not quite sure yet) barn interior. While shopping and planning I have found that the look I am imagining is not always easy to find examples of but my plans are slowly coming together.

on ReviewThisReviews


One problem I have had while shopping and researching decor ideas is that search words such as "rustic", "country" and "cabin" brings results of bears, moose, mountains, bentwood, and plaids. All very lovely, and very appropriate for the mountain ridge where my home is being built, but not quite the look I am going for. Many "farmhouse decor" searches yield lovely photos that include monotone white decor and flower bouquets. Again, quite gorgeous but not exactly what I'm going for. 

I am looking for barn doors, concrete floors, metals and wood combinations. While there are entire books written on other home styles; contemporary, coastal, southwestern, industrial, and more, the books on the "rustic" style comes closest to my goal. But aren't quite what I'm after.

One of our contributors is an incredibly talented DIYer. Lucky for me, Renaissance Woman shares projects that are exactly what I'd like to make for my future home. She shared how she made a DIY Pallet Book Nook. In that project she utilized character wood (from pallets) and corrugated metal to turn a small, odd space in her home into a uniquely wonderful spot to read, hangout, and relax. She shares the definition of character wood; "weathered wood that captures your imagination." This style is very much what I'm imagining.


Renaissance Woman's DIY Pallet Book Nook

If you enjoy her DIY Pallet Book Nook article, you can find more of her reviews under her tab here. She is quite talented.

This wine rack is a much smaller example of barnhouse decor. In this example, it can be purchased fully assembled. But people with DIY talent could easily make their own.


Rustic Barn Door Wine Rack


Not everyone needs or wants a wine rack. But most everyone likes to have a wall clock in plain view for convenience. And how much better if that wall clock compliments the decor.  This wood and metal clock is a wonderful example of my definition of barnhouse decor.


Vintage Farmhouse Clock

Sliding barn doors are one of the most notable farmhouse (barnhouse) features. They are so popular that not only are they functional doors but they are also a part of furniture, wall-hangings, featured in paintings, and more. I have even seen printed shower curtains that mimic wooden barn doors.

I want a barn door. I have watched video tutorials and hope to make my own sliding barn door to cover at least one window. There are versions that do not required angled cuts and I think I can manage simple straight cuts and assembly. I am hoping for both functionality (blocking sun on hot days in that south-facing window) and visual appeal (a barn door hung in my barn). 

If I decide I am unable to build my own sliding barn door there are many options for purchase. This is just one example:

sliding barn door kit; assembly required

While I've never shopped at Pottery Barn, I have noticed that some of their wood furniture fits my idea of the farmhouse style. If you don't already shop there, you may want to take a peek.

If you are looking for some barnhouse inspiration, I hope these ideas spark your imagination. 


Note: The author may receive a commission from purchases made using links found in this article. “As an Amazon Associate, Ebay (EPN) and/or Esty (Awin) Affiliate, I (we) earn from qualifying purchases.”


Monday, May 31, 2021

How to Install a New Faucet


How to install a new faucet
How to install a new faucet - Reviewed

It was time to replace that old bathroom faucet. It was an old single lever push, pull-type, and was difficult to turn on and off, especially for our youngest grandson.

Replacing a faucet whether it is a bathroom faucet or a kitchen faucet is not that difficult. But sometimes Murphy’s Law takes over, and what can go wrong, will go wrong. The problem I had was my shut-off valves were frozen so I could not turn off the water under the sink. This was not a problem, I just had to turn off the main water supply and replace the shut-off valves and supply lines under the sink. But this review will only instruct you on how to install a new faucet.

 I am by no means an expert and I am not a plumber by trade. I can tell you how to do this because I have done it many times before.

Installing a new Faucet Step-by-Step:

Step 1

The first thing you need to do is to turn off the water supply. Most bathroom and kitchen sinks have shut-off valves under the sink, if not you will have to turn off the main water supply.

Step 2

Once you are sure the water is off, turn the faucet on to let the water out. Then, remove the hot and cold supply lines using an adjustable wrench. You will also have to unlatch the sink stopper lever from to ball lever on the drain. Leave the ball lever in the drain, as you will need to attach the new sink stopper lever to it later.

Step 3

Now remove the retaining nuts that are holding the old faucet, a basin wrench is the handiest tool for this task. After removing the old faucet measure the hole pattern on the sink. Make sure you purchase a new faucet that will fit the hole pattern in your sink.

Step 4

After removing the old faucet, clean any residue left behind with a tub and tile cleaner and paper towels. If you must use a putty knife, use a plastic one.

Step 5

Your new faucet will have a built-in gasket, but you will still need a bead of caulk or plumber’s putty around each hole. This is needed to make a good seal.

Step 6

Place the new faucet and fasten the retaining nuts to hold it in place. It’s always a good idea to have somebody hold the new faucet in place while you get the new basin nuts snug. Be careful not to over tighten, you can use the basin wrench, but I like to just hand tighten.

Step 7

Now fasten the hot and the cold-water supply line to the new faucet. You may need to wrap Teflon tape around the new faucet threads. Follow the manufacturer's instructions on the new faucet. Now, it is time to connect the sink stopper lever to the ball lever in the drain. You will find several adjustments on the sink stopper lever.

Step 8

Remove the aerator from the new faucet and turn on the water supply. Then, turn on the cold water. The aerator is the little screen inside the faucet spout. This is to make that it does not clog with any debris that may be in the water lines. Replace the aerator and check for leaks. That is all there is to it.

Find more  Crafts & DIY projects on Review This here: ReviewThisCrafts.com

This basin wrench will be your best friend when replacing a faucet.

Superior Tool 03811 Eleven Inch Basin Wrench-Infinitely Adjustable 11Superior Tool 03811 Eleven Inch Basin Wrench-Infinitely Adjustable 11Superior Tool 03811 Eleven Inch Basin Wrench-Infinitely Adjustable 11


Note: The author may receive a commission from purchases made using links found in this article. “As an Amazon Associate, Ebay (EPN) and/or Esty (Awin) Affiliate, I (we) earn from qualifying purchases.”


Thursday, May 6, 2021

Stitching Wood With Copper Wire


Stitching Wood With Copper Wire

For those who see beauty in imperfection, wood stitching is an appealing art form.  When I recently found a cracked tabletop, my first inclination was to replace it with something less damaged.  However, as I further considered the nature of this wood piece, I realized it was the crack that gave the table its real character.  

As Leonard Cohen expressed in his song "Anthem," forget your perfect offering, there is a crack, a crack in everything.  So, I thought, why not highlight rather than hide the flaw?  The flaw is the offering... is the song.

I had never attempted to stitch wood with copper wire before today, but I've been wanting to try this technique.  I am learning through trial and error what works.  I'll share my process here and a few tips.

First, I didn't care for the glossy wood finish, or the cheap look of the table itself.  Sanding alone did not fix that.  Torching everything took care of it.  It's a method known as Shou Sugi Ban.  Fire is a sure way of taking something lacking a wow factor and making it instantly memorable.

drilling holes in wood


drilling holes in wood

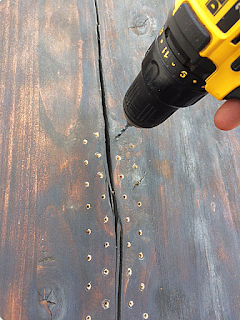
After charring the tabletop, I drilled holes in preparation for the wire stitching.  Using my butane torch, I burned the wood inside and around the holes (so the raw wood wouldn't show).

flattening copper wire

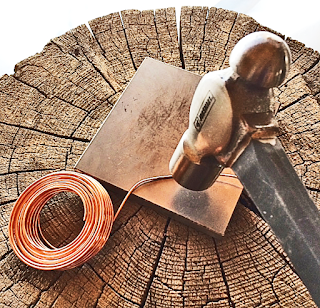
Using a steel block and hammer, I flattened the copper wire.  The copper looks better when it lies flush with the wood surface.

lacing pattern for stitching wood with copper wire

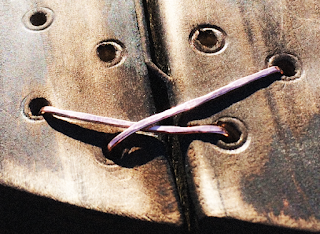
Now, I am experimenting with lacing patterns.  The trick, it seems, is to double back and bring two stitches up through a single hole.  I have discovered that the wire has to be carefully handled after being pounded flat.  A few pieces of wire have snapped in half when I started stitching the wood.  Lesson learned.  (And I have gone back and sanded down the indentations left by the drill around the holes pictured above.)

I am intrigued, so far, with my project.  The uniqueness of what is being created from something others might consider broken is what draws me to this work in progress.  This table is reminding me that there is beauty to be found in brokenness.  The crack is where the light gets in.

Stay tuned for the part two final reveal.  I can't wait to see it myself, as these kinds of projects tend to take on a life of their own.  I never know ahead of time just where the wood and other elements will lead me.  It's the adventure of it all that keeps me coming back for more.


Note: The author may receive a commission from purchases made using links found in this article. “As an Amazon Associate, Ebay (EPN) and/or Esty (Awin) Affiliate, I (we) earn from qualifying purchases.”


Tuesday, July 21, 2020

Easy Wall Decor Ideas


Easy Wall Decor Ideas
Easy Wall Decor Ideas Reviewed

We decided to downsize a few years back. With the kids all grown up, we didn't need a large two-story house just for the two of us. So, we found a nice one-story house with two and a half baths, and as luck would have it a full finished basement.

We furnished our new finished basement with the living room furniture from our old house, So, now we had to go out and buy new furniture for the living room or live in our new basement. By the way, our finished basement is a perfect place for our grandchildren to play when they visit.

Our previous home had two built-in wall shelves between a window in the living room. This allowed us to display pictures, knick-knacks, and books.

We don't have any built-in shelves in the new house. We had to look for some inexpensive ideas to add some accents to the walls other than just picture frames.

Easy Wall Decor Ideas: 

The above picture is a simple wall shelf and candleholder we had in storage. We added this to our dining area. I looked on-line and found 48-inches as a recommended height from the floor. That seemed way too low, so, I set it at 65-inches from the top of the shelf to the floor. It is perfect to display our tea set. So far zero dollars spent.

Easy Wall Decor


This shelf is another one we had in storage. this one we added to the living room, But Fran didn't like the color of this one so I painted it to match walls. This is a perfect shelf for some candle holders and a small picture. Once again zero dollars spent.

Easy Wall Decorations


Now the wall at the end of the hallway that leads to the bedrooms was blank. This photo memory quilt filled that space quite nicely. With pockets for small photos, this is a great way to display some fun memories.

Simple wall shelves are a great and inexpensive way to add some accents to your walls and display your collectibles and photos. Some other ideas for wall decor are Pictures, wall clocks, and so many choices of Peel and Stick vinyl wall decor.


Here are some inexpensive ideas for wall shelves

Amada Floating Shelves Wall Mounted, Rustic Paulownia Wood Wall Shelves Set of 3 for Bedroom, Bathroom, Living Room, Farmhouse Kitchen, GrayAmada Floating Shelves Wall Mounted, Rustic Paulownia Wood Wall Shelves Set of 3 for Bedroom, Bathroom, Living Room, Farmhouse Kitchen, GrayCheck the PriceBAMFOX Floating Shelves,Wall Shelf Set of 3,Wall Mounted Floating Shelf with Large Storage for Bedroom Bathroom Living Room Kitchen OfficeBAMFOX Floating Shelves, Wall Shelf Set of 3, Wall Mounted Floating Shelf with Large Storage for Bedroom Bathroom Living Room Kitchen OfficeCheck the Price


SEe


Note: The author may receive a commission from purchases made using links found in this article. “As an Amazon Associate, Ebay (EPN) and/or Esty (Awin) Affiliate, I (we) earn from qualifying purchases.”


Wednesday, June 17, 2020

Easy Bathroom Makeover

peel and stick flooring
Easy Bathroom Makeover Reviewed

Do you have a small bathroom in need of a quick, easy, and inexpensive makeover?

I use the word easy, I don't want to make you think that you just wave a magic wand and puff it's all done.

There is certainly some work involved but, it is really not that difficult.

We have a half bath in our house that really needed a new floor. Since we were going to replace the floor we thought it was a good idea to paint the walls and trim work. 


The first task for our new project was to remove the toilet and get it out of the way. If you're removing a toilet you'll need to clean up the wax seal and then stuff a rag in the hole to prevent the smell of sewer gas. 

The next step was to remove the old floor, I think this was the hardest part. Next, I removed all of the baseboards.  Do this carefully so you break of damage it.

We choose a light mint green paint for the walls although when we started to paint it was a little darker than we expected. So, I used the white paint that I had for the trim work and added a teaspoon at a time to lighten up the green.

Easy Bathroom Makeover: Install the new floor

Now it was time to install the new floor. We used peel and stick flooring. You can find some very durable and inexpensive peel and stick flooring. In total, we bought 45 sqft. of tile and paid only $25.00 for the floor. Prices will vary depending on what you buy.


Before you install a new floor you have to make sure that the subfloor is clean and flat. It's a good idea to use a Shop-Vac to get all of the dust off the floor.

Tools you will need:
Measure and divide the room in half by both length and width. Intersect the lines in the center of the room using a straight edge or chalk line.

Once the center is marked, start to lay the tiles from the center of the room out to the edges. You will have an even space on length as well as the width of the room from your last tile to the wall.

At this point, you will need to measure and cut the remaining tiles around the room. They are very easily cut with a sharp razor knife.

The following short video will show just how easy it is to measure and install a new floor.


Now that the floor was in I painted and re-installed the baseboard and re-installed the toilet. Overall it was a pretty easy project. That means if I can do this anybody can.

You might also want to know How to Re-Caulk your bathtub


Note: The author may receive a commission from purchases made using links found in this article. “As an Amazon Associate, Ebay (EPN) and/or Esty (Awin) Affiliate, I (we) earn from qualifying purchases.”


Wednesday, May 13, 2020

Conair Home Haircut Kit

Conair Home Haircut Kit
With salons and barbershops across the country mostly closed, it seems that long hair of the '70s may be coming back in style.

What a great time to review my Conair Home Haircut Kit. Conair is an easy to use clipper for all of your home grooming needs.

Most guys I know get their haircut on a regular basis like once every two weeks or once a month.

I'm one of those guys that always wait until my hair is so long that I can't stand it. I don't know why because the salon that cuts my hair is only two blocks from where I live.

I find, the older I get the less hair that I have. Although in my younger days I had sideburns that would have made Elvis jealous.

My hair grows faster on the sides than on top. So, for in-between hair appointments, I bought this Conair 10 piece haircutting system. I have had this for several years now and it still works like new.

This makes it so easy to trim the sides and around my ears to keep me looking neat and respectable until my next appointment.

Conair Home Haircut Kit Includes:

  • The Barber Clipper to Cut.
  • Four guide combs, 1/8", 1/4", 3/8", 1/2" for detailing.
  • Cleaning brush and oil to keep it clean.
  • Barber Comb
  • Blade Guard
  • Styling Clip, this is something that I never need.
Here are some tips and tricks if you're new to cutting your own hair or someone in the family. It's one thing to hack up your hair, but, if you hack up one the kid's hair you may be in big trouble.

Always start with the largest comb. Start cutting from the bottom of the side around the ears and work your way to the top. Don't cut the top of your hair yet. Once you get a little confidence you can move to the shorter combs.

For the top, use the comb to lift the hair. Cutover the top of the comb, starting from the front to the back to blend the hair to the sides.

The kit also includes a full set of instructions for cutting hair. If you're new to this, don't worry with a little bit of practice you'll be cutting hair like a pro just like me.


Note: The author may receive a commission from purchases made using links found in this article. “As an Amazon Associate, Ebay (EPN) and/or Esty (Awin) Affiliate, I (we) earn from qualifying purchases.”


Tuesday, April 14, 2020

Make Your Own Face Mask Review

Protect Yourself With A No-sew Mask

Let's review how to make your own face mask for those times that you have to leave home on an essential trip. Most of us are trying our best to stay safe and stay in place but there are times we need to leave for a few reasons. We don't want to use the types of protective masks that our first responders and health professionals need (no need to diminish their supplies!). We can make our own without needing a sewing machine to do it.

bandana face mask
Make a face mask with a bandana or other fabric.
Image courtesy of pixabay.com
I made my own using a bandana that I had in the house. You can use any fabric that is cut into the proper size for your mask but if you have a bandana  it is even easier. Mine was left over from the days when it was cool to wear one in your hair. We wore them to cover our hair or folded up more like a headband but I digress. If you have one that you wear or perhaps you have used as a cute kerchief for your dog...it will do.

The thing I liked about making my own mask was that I could easily wash it after using it and have it ready for the next time I needed to go out. In my case I had what I needed in the house. A bandana and two rubber bands. That is it, that is all you need to make one for yourself.

Watch this video to see how to make three different types of face masks:


As you can see from the video it isn't difficult to make any of the versions that he shows. I chose the one using the bandana because I knew I had one and from what I had read the cotton fabric seemed to offer the most protection because it is woven tighter. 

So, be creative, choose something that fits your personality. The main thing is to keep your nose and mouth covered if you have to be out in public for any length of time at all. I use mine when I know I will be in a situation where social distancing is difficult like the grocery store. 

When I return from any trip where I have worn my mask, I take it off when I get home toss it in the washing machine and then wash my hands for twenty seconds just in case there was anything on the outside of the mask. Once it has been laundered, I make it again and put it in a plastic bag to wait for the next time I venture out.

How about you? Have you made your own protective mask?


Note: The author may receive a commission from purchases made using links found in this article. “As an Amazon Associate, Ebay (EPN) and/or Esty (Awin) Affiliate, I (we) earn from qualifying purchases.”


Thursday, March 19, 2020

Make Your Own Public Restroom Survival Kit Reviewed

Make Your Own Public Restroom Survival KitProtect Yourself in Public Restrooms! 


My husband and I enjoy making day trips as well as traveling. What I hate most about traveling whether for a day, or even a week, is the necessity to use public restrooms.  

By now, we have all heard that you should use a paper towel to open the bathroom doors since so many people do not wash their hands before touching the door knobs.  As if that is not enough to make you cringe, I was recently told that drug addicts will clean their needles by poking them in the toilet paper in the restroom stall.  This takes things to a whole new level of contamination concern.  

To be fair, I did check Snopes to determine if needle cleaning in public restrooms is a valid concern and found that none of the health services questioned had ever heard of that happening.  Still, it made me hesitate to trust the provided toilet paper in public restrooms.

For me and my family, I have decided better safe than sorry.  After all, we know there are germs in any restroom.  With the flu, a multitude of viruses, and the concern for cleanliness, why take the risk if not absolutely necessary? 

Some might consider this an extreme and unnecessary precaution.  Perhaps it is.  But, like any other precautionary measure, if it gives you peace of mind, why not.  You are certainly not hurting anyone else by carrying your own public restroom survival kit.


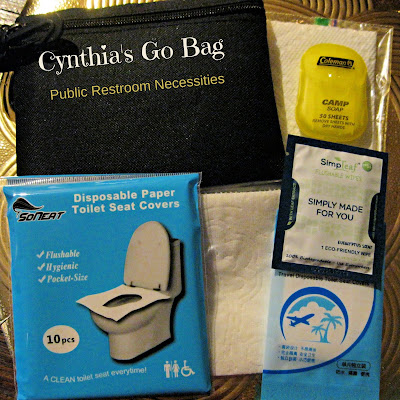
Items Needed for Your Public Restroom Survival Kit

Make Your Own Public Restroom Survival Kit
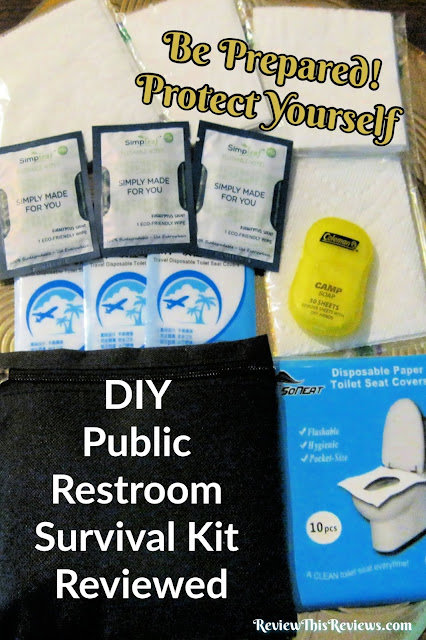
I assemble my own public restroom survival kit.  I include individually wrapped toilet seat covers, my own toilet paper in a sandwich bag, flushable single pack wet wipes, camp soap sheets, and a few of my own paper towels. 

I carry two different types of toilet seat covers.  One is the typical paper cover that you see in many public restrooms.  The other is a plastic toilet seat cover.  The plastic seat cover is not flushable, but I find it required in some public rest stops.  Even though it is made to encase the seat cover, I simply lay it on the seat.  If I won't sit on it, I certainly will not lift that seat to "gift wrap" it.

You all can stop laughing now!  No, I am not a germaphobe, but over the years I have truly seen some pretty nasty things in public restrooms.  I won't go into the graphic details and descriptions.  Suffice it to say, I've seen enough to know I believe in the proverbial "ounce of prevention".  In this case, I would alter that saying slightly to state an ounce of protection.

If you think I am alone in this concern, allow me to point out that Amazon.com even offers a pre-assembled public toilet kit.


In a pinch, I would totally invest in that "go bag"!  Because I have time to prepare my own survival kits packed with my preferred supplies, I don't mind putting them together myself.  

If you plan on traveling by plane, you may prefer a clear bag for supplies in your carry-on.  There are no liquids in my public restroom survival kit, but a clear bag might keep baggage inspectors from opening it and touching everything.  Hand sanitizer would need to go in your clear liquid carry-on bag.  If you are traveling by car, you can choose any tote bag.

I prefer a tote bag that will clip to my jeans belt loops or my camera backpack loops.   This is a nice inexpensive trio that I found.  I only need the medium sized bag in this set for my restroom survival kit, but I can always find different uses for the other two.
 

 50PCS Travel Disposable Toilet Seat CoversCheck Price Charmin Ultra Soft Cushiony Touch Toilet PaperCheck Price Simpleaf Flushable Single Pack Wet Wipes | Eco- FriendlyCheck Price Coleman Camp Soap Sheets, Travel Soap Sheets - 50 countCheck Price


How Do I Know I Am Not a Complete Germaphobe?


A real germaphobe would recommend two more items!  After all, the dirtiest places in a public restroom are the floors, the toilet handle, and the faucet.

Eek!  Perhaps I should rethink this!   After all, I do wear my shoes in the car and in my home!  And, those gloves and shoe covers are disposable.

 Dealmed Medical Exam Gloves – 200 Count Small Nitrile Gloves, Disposable GlovesCheck Price Blue Shoe Guys Professional Grade Disposable Boot & Shoe Covers BootiesCheck Price


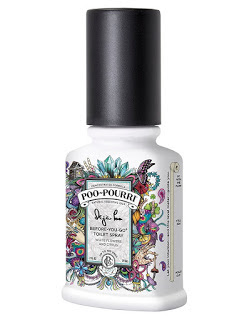
And if you really want to do things right, be sure to include your Poo-Pourri! It was previously reviewed by Dawn Rae and would make a fabulous addition to your public restroom survival kit. 
 
poo pourri

When you are out and about, be sure to be prepared, stay safe, and "rest" protected in those public restrooms!


Read More Health Related Reviews
Here On Review This Reviews!


House of Sylvestermouse


Note: The author may receive a commission from purchases made using links found in this article. “As an Amazon Associate, Ebay (EPN) and/or Esty (Awin) Affiliate, I (we) earn from qualifying purchases.”


Tuesday, March 17, 2020

DIY Hand Sanitizer Reviewed

Make Your Own Hand Sanitizer

Chances are you can't find hand sanitizer on your local shelves. Let me review how to make your own to use when soap and water aren't available to you. It is much easier than you might think!

hand sanitizer
DIY Hand Sanitizer
image courtesy of pixabay.com

We are all in the same boat with the flu & various viruses that terrorize the world. The importance of keeping our hands clean and the surfaces around us goes without saying. When it comes to being able to keep a bottle of hand sanitizer with us on those occasions that we have to go out for supplies is pretty much impossible. The hoarders and the opportunists have cleared the shelves across the nation. Not to worry, you can actually make your own.

What You Will Need:

  • 1 empty hand soap or sanitizer dispenser
  • Isopropyl alcohol (rubbing alcohol) 99% alcohol volume
  • Aloe Vera Gel
  • Essential Oil or lemon juice to make it smell nice (optional)
  • Large measuring cup with spout to mix and pour from

Hand Sanitizer Recipe:

3/4 cup isopropyl (rubbing alcohol)
1/4 cup aloe vera gel
10 drops of essential oil or lemon juice

Pour all of the ingredients into a large bowl or a measuring cup with a spout. Mix together with a spoon first and then whisk the solution to form a gel. Pour the mixture into an empty bottle for easy use and transport and then label it with the words "Hand Sanitizer".

That's it, it is that easy. Just a reminder that it is still better to wash your hands with soap and water for at least 20 seconds. Use the sanitizer when you are out and can't wash your hands. I like to place a dab on a tissue to wipe off the handle of the grocery cart before I place my own hands on it. 

Not sure how long the 20 seconds is? Sing the Birthday song through two times while washing your hands. Remember to pay attention to the tips of your fingers and between your fingers. 

Stay safe, follow the guidelines and we will all get through this together as a nation. 


Note: The author may receive a commission from purchases made using links found in this article. “As an Amazon Associate, Ebay (EPN) and/or Esty (Awin) Affiliate, I (we) earn from qualifying purchases.”


Thursday, November 7, 2019

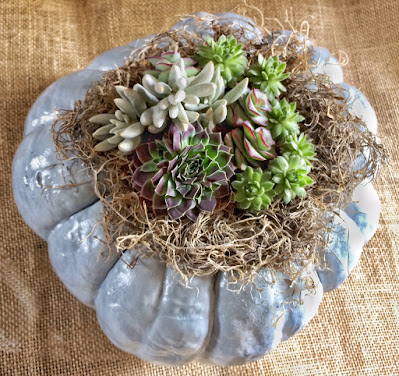
DIY Pumpkin Succulent Centerpiece


diy Pumpkin Succulent Centerpiece

It's pumpkin season!  Now is the perfect time to round up some pumpkins and create unique centerpieces as a festive touch for your holiday celebrations.  A DIY pumpkin succulent mini garden will be the perfect addition to your Thanksgiving decor.  Not only will it be a real attention-getter when you host guests for the holidays, but you will have the benefit of enjoying your new container garden long after you finish all those turkey left-overs.

Here's What You Need:
  1. One large flat pumpkin 
  2. A variety of succulents
  3. Clear gel glue
  4. Spray adhesive
  5. Moss
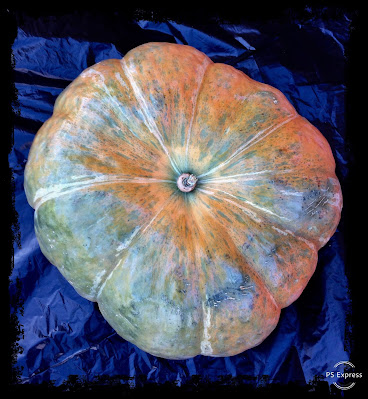
real pumpkin
It's best to use a flat pumpkin with a slightly indented center .
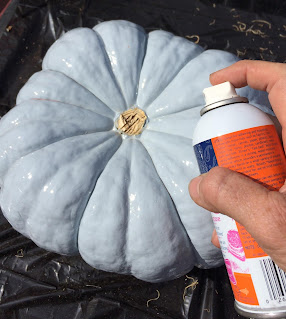
While I prefer to use a pumpkin in its natural state, I chose to paint mine for this demo project.  I used a lovely Solstice Blue paint color (a subtle blue-gray) that will blend in with the woodland theme I am using for my holiday decorations.  It reminds me of the beautiful shadows you see on fresh snow.  A neutral colored pumpkin better accents the succulents.

removing a pumpkin stem for diy project
Removing the Stem

Once the paint was dry, I used my Dremel with a cut-off wheel to remove the pumpkin stem. 

spraying on craft bond
Spraying on Elmer's Craft Bond 
I then sprayed adhesive on the center top of the pumpkin where the moss will be placed. 

pressing and gluing  moss on pumpkin
Press Moss Into the Adhesive
While the adhesive was still fairly wet and tacky, I pressed a nest of moss onto the sticky surface.  It seems I got a little moss happy.  Could have used a bit less moss, but it would have made a big mess to attempt to remove it.  I let the adhesive set for several minutes before moving to the next step.

cactus with roots showing
Preparing the Roots for Planting

While the adhesive was setting up, I gently removed the soil from the cacti roots in preparation for planting them on the surface of the moss.  I also separated the succulent clusters so I would have more options for spreading out individual plants.

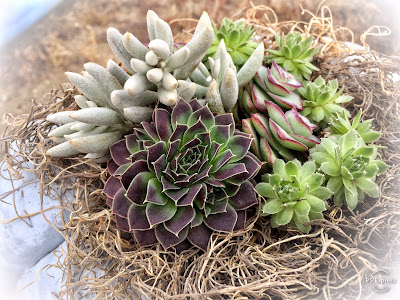
Pumpkin Succulent Centerpiece
Vary Succulent Colors, Textures, and Heights
Start your succulent placement with your largest plant.  Visually, it is most pleasing to the eye to position the first cactus off-center and toward the edge of the pumpkin.  It is also a good idea to group your taller cacti near that first featured plant.  You will use clear gel glue to fasten your succulents to the moss.  Don't worry!  The glue won't hurt your succulents.

mist the moss on a pumpkin centerpiece
Time to Lightly Mist the Moss
Once your pumpkin succulent centerpiece is complete, carefully give the moss a light misting of water.  You will provide moisture to the moss about once a week.  It's important not to let water pool under your plantings.  It will lead to premature rot.  Simply tip your pumpkin slightly to the side to drain any excess water after each misting.  

To extend the life of your pumpkin, and to give your succulents what they need, carefully choose a location away from heaters.  Try to situate your succulent container garden such that your cacti get the sunlight they need without getting too much heat on the pumpkin.  Likewise, take care to protect your succulents from freezing if you will be displaying your centerpiece on a porch or outdoors.

One last tip:  Place your pumpkin on a piece of cork or thick cardboard to keep the bottom from early decay (especially if placed in a location where surface dampness occurs).  Take care to protect your indoor furniture with the use of a waterproof planter mat.

With proper care, your pumpkin succulent centerpiece should last several weeks.  Once the pumpkin has reached the end of its season of life, you can either cut off the top of the pumpkin and plant it on top of appropriate cacti soil, or transplant the newly rooted succulent cuttings to another container.  Of course, you may also choose to use a faux pumpkin to eliminate this step.

It's easy to see why these pumpkin centerpieces are so popular.  Besides being unusual and visually stunning, they let you take your creativity to a whole new place.  This DIY centerpiece is sure to be a fun conversation-starter at your next gathering.  Why not make one to share for a hostess gift?  Who wouldn't love such a thoughtful gesture? 

Enjoy this project and my best wishes to you for a blessed holiday season.


Note: The author may receive a commission from purchases made using links found in this article. “As an Amazon Associate, Ebay (EPN) and/or Esty (Awin) Affiliate, I (we) earn from qualifying purchases.”


Wednesday, March 27, 2019

What You Need to Know about Basic Birdhouse Construction

birdhouse on a tree

Basic Birdhouse Construction, What you Need to Know.


For years I have built birdhouses for friends and family and for myself.  Why?  Well let's just put it this way, I love my garden and I love nature.  When I'm working outdoors there is nothing more special than being able to watch the birds and the bees while taking a short break.

To say that I enjoy their antics would be an understatement.  You will find me out in the garden at almost any hour of the day, just to see what there is to see.  Most of the time it is the birds and the insects that I purposely attract to my garden that give me the thrills of the day.  And because I love them so much, I want my friends to enjoy them that much too!

I want to focus on birdhouses in this review, because, while everyone loves birds, enticing them into your garden is a special thrill!   Seeing them rear their babies is even more fun.  If you have children or grandchildren, it is also a wonderful time to teach them some nature lessons and life lessons too.


Birdhouse Basics

If you have a yard, you have a great place to start.  Flowers, shrubs and a tree or two would be ideal as well.  A water source or a bird bath will surely entice some lovely feathered friends to come for a visit.  After that, if you want to build some birdhouses, that will help them to target you for their next place to live!

It is said that if you build it, they will come! (Taken from the movie ............The Field of Dreams.)  This may be true for birdhouses and it may not be true.  Some birds really don't care what their homes look like, but they are particular about the size and the placement.  Other birds will readily nest in any dry and sheltered spot, Robins in particular will nest in a dry space and not really need or want a birdhouse.

If you are hoping to attract certain kinds of birds to your yard, you need to build a house that they will really like.

Placement of that birdhouse will also be important.  Some birds require homes set at a certain height and proximity to other essentials  for their welfare.  Water and food sources being the most important ones.

Some birds are solitary nesters and others need to live in community.  So again depending on the birds you want to attract, you will need to take these things into consideration as well.

I have found this book on Amazon will help you build birdhouses, but also takes into account each different species likes and dislikes.  Working with an ornithologist, these plans have been made for specific birds.  It doesn't help you to build a house that no one wants to occupy.  So build something that you know they will appreciate and you will be rewarded with the lovely sounds of birds thanking you.


Here you will find plans to make up to 19 different types of birdhouses. Each one can be executed by the novice as well as the expert woodworker. These are great projects for Moms and Dads to make with their children.  The basic houses are wooden and can be left plain or dressed up with colors.

Three things that you should never do!

While we are on the subject of attracting birds to your garden, I want to make absolutely sure that you don't do these things:
  1. DO NOT put out lengths of yarn for birds to use as nesting material.  
  2. DO NOT put out dryer lint for the birds
  3. DO NOT put out pet hair for their use either.
You may ask WHY NOT!
Here are the reasons,  yarn, unless it is cut up into tiny (less than an inch long) pieces, can actually act as a noose that works it's way around baby birds necks.  When they try to fly out of the nest, they strangle.  Birds are used to  scavenging for nesting materials and they know what they want in there.  If you feel inclined to help them, rake up your grass and leave little piles of dried grass for them to find.  

Dryer lint is also a definite no-no.  Most people use fabric softeners of some sort with  their dryers and the chemicals in those sheets or liquids also ends up in the lint.  These chemicals may harm the babies either by contact, or by ingestion.  Don't do it!

Pet Fur is also a no-no.  If your pet is taking medications, or you use flea powders or flea shampoos on them, their fur is also "contaminated".  Baby birds are naked (just like human babies) when they are born.  Anything that cause a reaction to their tender little bodies should be avoided at all costs.
baby birds
Naked baby birds!


It would be much better for you to spend your time reading a little about what they would appreciate and then building a nice house for them to enjoy.  The most perfect part of this whole idea is that you will build one house, but that two families will get to enjoy it.  The bird family and your family too!

More about Birds from the writers at Review This Reviews:


You can read more about the life cycle of a Robin at Tracey's Review of that incredible sight at her home.
Birdwatching and Photography go hand in hand.  One of Review This Reviews writers, Mary Beth Granger, has shown and taught us how to capture some beautiful pictures of the birds in her area. If you love Bluebirds you can read up right here!  Or if Woodpeckers tickle your fancy, you can check out some great pictures and facts Review of Woodpecker Facts and Photography 


Note: The author may receive a commission from purchases made using links found in this article. “As an Amazon Associate, Ebay (EPN) and/or Esty (Awin) Affiliate, I (we) earn from qualifying purchases.”


Tuesday, November 13, 2018

DIY Floor Cleaner Recipe Reviewed

Works on all floor types

diy floor cleaner
Make your own cleaning solution
I would like to review a DIY floor cleaner recipe with you today. It is perfect to use on all hard floor surfaces, it is non-toxic and it is easy on the budget. What more could a gal ask for?

Since purchasing my Kray Spray Mop I have been looking for good cleaning solution recipes to use. I can use just plain water and white vinegar but I wanted something a little more robust. One that would clean well, not streak and be environmentally friendly. I found one that I love and just about all of the ingredients were already in my pantry. 

All Purpose Floor Cleaner Recipe

  • 2 cups warm water
  • 1/2 cup white vinegar
  • 1/4 cup rubbing alcohol
  • 3 drops dish washing soap
  • 5 to 10 drops of essential oil
You will also want a container to keep your solution in for future use. I use an empty 1 gallon vinegar bottle to store mine in. It is a good idea to store the floor cleaner away from any heat. 

This particular formula works well because each ingredient serves a purpose in the cleaning process. The water acts as a base for the other ingredients and it helps to loosen any grime on the floor. The white vinegar acts as a disinfectant and a degreaser. I might add that even though vinegar is acidic this diluted mixture should not harm stone floors. The rubbing alcohol also helps to degrease and disinfect but its main purpose in this floor cleaner is to help the floor dry quickly and not leave any streaks. The dish soap will dissolve any bonds between the dirt and the floor, it cleans, and it also breaks down any greasy residue on your floor. Use a basic dish soap that is not oil based (causes streaking and smearing). The dish soap should not have moisturizers, bleach or antibacterial substances. You might think that the added anti-bacteria would be helpful but you don't need it because you already have the vinegar and alcohol for that purpose. The essential oil just works to offset the smell of the vinegar and rubbing alcohol. Watch carefully which essential oil that you use because the ones that are compounds are usually oil based. The oil will cause smears and streaks just like it would if there is oil in your dish soap. 

And that is it! This floor cleaner is that easy to make and you will love the cleanness of your floor plus this solution leaves a nice shine, too. So, if you are looking for a floor cleaner that is economical, safe for children and pets, cleans super well and is easy to make try this do it yourself recipe for mopping your floors. I really don't think that you will be disappointed!


Note: The author may receive a commission from purchases made using links found in this article. “As an Amazon Associate, Ebay (EPN) and/or Esty (Awin) Affiliate, I (we) earn from qualifying purchases.”


Most Recent Reviews on Review This Reviews


Search for Reviews by Subject, Author or Title

The Review This Reviews Contributors


SylvestermouseSylvestermouseDawn Rae BDawn Rae BMbgPhotoMbgPhotoBrite-IdeasBrite-IdeasWednesday ElfWednesday ElfOlivia MorrisOlivia MorrisTreasures by BrendaTreasures by BrendaThe Savvy AgeThe Savvy AgeMargaret SchindelMargaret SchindelRaintree AnnieRaintree AnnieLou16Lou16Sam MonacoSam MonacoTracey BoyerTracey BoyerRenaissance WomanRenaissance WomanBarbRadBarbRadBev OwensBev OwensBuckHawkBuckHawkDecorating for EventsDecorating for EventsHeather426Heather426Coletta TeskeColetta TeskeMissMerFaeryMissMerFaeryMickie_GMickie_G


Review This Reviews is Dedicated to the Memory of Our Beloved Friend and Fellow Contributor

Susan DeppnerSusan Deppner

We may be apart, but
You Are Not Forgotten


“As an Amazon Associate, Ebay (EPN) and or Etsy (Awin) Affiliate, I (we) earn from purchases.” Disclosure Statement

X