Wednesday, May 15, 2024

How to Organize and Digitize Old Slides EASILY ~ A Product Review

My other half and I had a big problem! We both grew up in the 1960's and 70's when cameras were filled with films that had to be taken to the store  and then processed.  We would have to wait a week or so until we knew whether the pictures were any good or not.  Most of the time we used our Kodak Brownie Cameras, as the better ones were way out of our price affordability.  Even our parents took pictures with those cameras. Now what happened to all those pictures and were they memories that we wanted to keep or were they just garbage photos?

Well it's spring time and that means cleaning up, clearing out and donating lots of things to various charities.

But one box had us in a quandry!  It was full of slides and negatives from who know when, where or how long they were in there. 

Could these be long lost family pictures or just a bunch of scenic areas that we would not recognize without some obvious sign posts?

https://amzn.to/3xRhrwu

This is the mess that we were faced with. We were pretty sure there would be some pictures in there that we would like to keep.  But, how do you do that without taking this mess to a dedicated service that will scan these?  And at what cost to us?

Looking into a professional service, we found out that it would cost us .25 cents to 1.00 per slide to be digitized.  

That was a cost that we just could not swallow.  You would pay for each slide whether they were worth keeping or just junk shots.  So this was not an option for us.

Thank goodness for the internet and Amazon!  A quick search and you can find out just about anything.

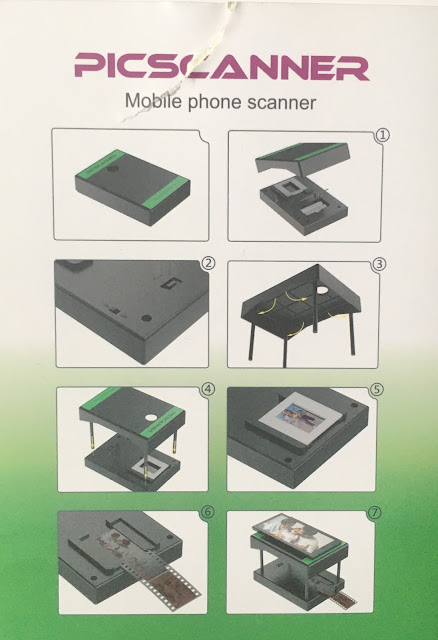
For just under 15.00 you can get a PICSCANNER !  What, you may ask is a Picscanner?  Well it's a small platform for your mobile phone.  The platform is about 3 inches away from the bed of the scanner.  This allows your phone to actually take a picture of your slide or negative. This is what the box looks like and you can see exactly how it works:

https://amzn.to/4bJiUTY


 Upload it to your computer and voila, you have a digital copy of what was a slide or negative. Just like this one:

old picture


This is a digital copy of a negative film strip. With a few programs on the computer it is easy to turn this negative into a proper picture.  Like this:

old picture


It works great!  What I really like about this easy to use slide digitizer is, that it is inexpensive and it lets you see what is on that slide or negative without having to print it first.  Once you see what's there, you just might decide that is is worth having it printed professionally!  But, I bet that most of them will just go into a Picture file on your computer. You have not spent hundreds of dollars on getting worthless (to anyone but yourself) pictures digitized.  

Today with our cell phone cameras and digital professional cameras, we can skip this step completely.  But again if you were born in the 50's , 60's and 70's, I'm sure that this Picscanner will be a valuable tool for anyone who has boxes and boxes of negatives or slides kicking around. Just imagine being able to take all those slides and negatives, organize them and keep the great ones and discard all the rest.  It's a job to do it, but, when it's done you will enjoy the fruits of your labors!

As an added bonus, this would make a great Father's Day Gift too!  Most of the Dad's I know are the techy types that love to fiddle with a new toy!  

Happy Photo Editing to all!


**These pictures are my own, the Cups in the Photos are "One of a Kind" handpainted and fired by my uncle!


Note: The author may receive a commission from purchases made using links found in this article. “As an Amazon Associate, Ebay (EPN), Esty (Awin), and/or Zazzle Affiliate, I (we) earn from qualifying purchases.”


Tuesday, May 14, 2024

Reviewing Ten Tips For A Beautiful Garden On A Budget

Weigelia in flower

Gardening is an amazing, absorbing hobby and one that I love. However, 
especially these days, it can get very expensive. 

There are now so many things you can buy for the garden and plants have become more expensive to buy. We may not all always have lots of cash to spend on the garden and this should not deplete our enjoyment of this wonderful hobby and enjoyment of any outdoor space we have.  

Gardening on a small budget doesn’t have to mean sacrificing a lovely garden or a creative approach to gardening, in fact sometimes quite the opposite. Here are some inexpensive or free garden ideas we can implement to save money where we can so that your garden does not need to suffer if you are on a tight budget.

If you do have more to spend you can spend on really lovely items. Many gardeners do these garden tricks without being on a tight budget to save money !  

Purple large flower clematis


1. Grow From Seed And Take Cuttings.

Growing your own salads, vegetables, annuals, and perennials from seeds is cost-effective and truly rewarding. We can use egg boxes to grow your seeds in rather than buying seed trays. 

Rather than buying them part grown from the garden centre or buying salad from the shop  start growing from seed. You can use old margarine or yoghurt pots and really any clean washed container really to start the seeds. 

If you grow Bamboo you can harvest the canes and use them to make your own plant supports and tripods which saves money on buying them. 

 Take cuttings of plants you love in your own garden and ask friends, family and neighbours if you can take cuttings of plants you admire in their gardens. You can use these to increase your supply of plants for free. I love taking cuttings and seeing them grow. Do take more cuttings than you need as some may not take. 

 If you are very successful and do not need all the cuttings you can see if any friends, family or neighbours would consider a swap with you.  

 You could also try to sell the cuttings at a car boot sale or use an honesty box outside  your home to sell the excess cuttings. 


Purple geraniums

2. Repurpose.

 Get thinking creatively about materials you already have around the house and garden. Think before you throw anything away if it can be used in the garden in a creative or useful way. 

Reuse old equipment as planters, for example old sinks can be reused in the garden as a planter, an old plastic dog bed can become a small pond. You are only limited by your imagination!


3. Buy Second Hand Tools And Share Equipment

 Look for second-hand gardening tools or discuss tool sharing with your friends, family or neighbours. Some of our best spades and forks have been found at car boot sales and even at an Antique shop.

You may only need some expensive tools a couple of times a year, so makes sense if you can club together to buy together and share or alternatively see if you can rent any tools. 

Get a sharpening stone to keep tools in good order and last longer. Also oil tools that require it to make them last longer. 


4.Look for Free And Discounted Plants

Keep an eye out for free or discounted plants.

I am always searching for the section in garden centres where they put the old last season plants that did not sell or ones that look shabby. I call them my  "rescue" plant section and usually with a little care and watering you can being them back to life and have paid a fraction of the cost.  

 Sometimes neighbours or local gardening groups share excess plants.

golden rubekia and blue flowers


5. Paint Your Fence

 We have just done this to give the garden a different look. Painting protects it from the weather which is always good and smartens up an old fence. 

You can either go for black or brown or a dark green to blend or make your fence a bold feature by painting it a bright colour.

All it takes is a pot of paint and a little work.

We went for black Cuprinol fence paint this time as we have found it to be durable and gives a good coverage and colour.  

The plants really stand out against it and the black colour helps to make the garden feel bigger as the dark colour recedes. 


clematis montana pink flower on black fence


6. Mulch Pots And Containers. 

Highlight your containers and pots by adding a decorative mulch. It is surprising what a difference this can make to a container. As it is a small space you can look to buy decorative mulches like pebbles, slate, shells or black river rocks

Mulch helps conserve moisture in the soil and suppresses weeds, while also giving your display a beautiful finish. As you will not use much in a container you can use a good quality decorative mulch which will give a dramatic impact.


7. Make Your Own Bird Bath

I advocate for every garden to have a bird bath as it is one of the single most important things for garden birds for water and bathing. If you can afford one of the beautiful iron or decorative ones then that is great. 

However if money is tight you can make your own bird bath. You will need a terracotta or stone pot, a saucer, and glue suitable for outside work. Simply turn the pot upside down, glue the saucer to the bottom of the pot, wait until the glue has dried and then fill it with fresh clean water. The birds will love you for it. 

Alternatively simply use old  plastic or terracotta saucers, or even an upturned bin lid and fill with water. Place them in a safe area for birds and watch them enjoy a place to drink and bathe.


8. Make Your Own Plant Labels. 

Reuse ice cream or lollipop sticks or any similar product to label your plants in containers, seeds or in the garden. They may not last as long as more expensive or beautiful bought plant labels,  but they are useful as a temporary measure for seeds and you can replace them when they wear out. 

Personally I strike a balance using free or cheap plant labels for seeds and more expensive but durable metal plant labels for more permanent plants


9.Lighting In The Garden

Sorting  our gardens with  lighting makes them a useable and lovely space to be in the evenings.

However employing an electrician to fix up outdoor electrical lighting can be very expensive. An alternative is to use Solar-powered lights which are more cost-effective, portable and require no installation costs.


10. Protect Your Pots.

Instead of buying expensive terracotta feet to raise pots off the ground to improve drainage, prevent waterlogging and frost damage,  try using old bricks you may have and placing pots on those. 


Even though gardening is one of my main hobbies and interests, I employ most of these money saving tips. It means that I then have money to spend on other things for the garden that I may need or want!


Read More Gardening Reviews on 

ReviewThisGardening.com


Growing Vegetables in Outdoor Containers Reviewed

 Read More Articles By Raintree Annie 


Note: The author may receive a commission from purchases made using links found in this article. “As an Amazon Associate, Ebay (EPN), Esty (Awin), and/or Zazzle Affiliate, I (we) earn from qualifying purchases.”


Monday, May 13, 2024

DASH Everyday Stand Mixer Review

Ready to downsize? Has the stand mixer become a counter hog? A kitchen tool that can be decorated but is too heavy to move? Looking for a smaller or mini stand mixer? The Everyday Stand Mixer by DASH is a mini mixer with six speeds and a 3 quart bowl with a retro look. 

The Dash Everyday includes a set of beaters and a set of dough hooks along with a book of directions and recipes. Six colors are available: black, aqua, cream, pink, red and white accented with silver trim.

standmixer


Weight

The weight or lack of is one of my favorite features of the mixer. So easy to move on the counter. So easy to store under the counter. The power the mixer generates with such a light weight is quite unexpected!

Convenience

The light weight of the Everyday stand mixer was a major factor in my consideration of a mini stand mixer. The prior stand mixer was heavy and needed alot of space on the counter. The space the Everyday stand mixer needs is minimal.

Measuring in at 1.93 pounds for the DASH Everyday compared to 25 pounds for the well known brand 5 QT stand mixer, the Everyday is so easy to move and store whether on the counter or in a kitchen cabinet. The low weight is my favorite feature of the Everyday mixer,

Sound

The DASH is very loud. The reviews mentioned the unit is loud. It is. Not so loud to need earplugs, but definitely loud enough to prevent conversation.

Again, no comparison between the big name brands. My five quart model was not whisper quiet; but a conversation could be held in close proximity while the mixer was working. 

Construction

The look of the mixer is pleasant to the eye. Sleek and minimal. The exterior and buttons are plastic; the buttons are push buttons which do require a bit of labor to push.

Cost 

Apples to oranges stereotype comparison. $449 for the 5 qt namebrand stand mixer vs $49 for the Everyday mixer.

Performance

I have been experimenting with recipes I have made for years in the higher priced stand mixers; so does the Everyday get the job done. It has and it does. Is the process as streamlined or as quiet as the name brand stand mixers? No. 

The speed of the mixer is very very fast! At times the mixer does seem a bit out of control with the speed, but the stability has been solid thus far.

Reviews

The reviewers were correct. As a consumer the information is easily accessible so I was not surprised regarding the features. I highly recommend sifting through the reviews particularly if you are downsizing from the larger capacity big name brand to this mixer. 

I purchased the Everyday with the hopes it would feel a void between the large steel stand mixers and hand mixersf. The Everyday did mix dough and recipes which require a long mixing time such as meringue with ease.


Note: The author may receive a commission from purchases made using links found in this article. “As an Amazon Associate, Ebay (EPN), Esty (Awin), and/or Zazzle Affiliate, I (we) earn from qualifying purchases.”


Sunday, May 12, 2024

Revitalize Your Lawn with Scott's EZ Seed Lawn Patch and Repair - A Five Star Review

Revitalize Your Lawn with Scott's EZ Seed Lawn Patch and Repair - A Five Star Review

Let me start by saying that this is the only seed I use to repair and replant small and large lawn sections. I'm an absolute fan of this product! It works! 

It's pricier than regular seed, but you can read why it's worth every penny below. I especially love it because there's little prep to do. I'll usually rake, slightly turn the dirt a bit on the exposed sections, give it a bit of water, and then toss the seed on. I like to use a healthy amount. Just be sure to water it regularly during the growing process. 

Within six weeks, often before that, the lawn is fully grown.

A lush, green lawn is the pride of any homeowner, but maintaining it can be a challenge, especially when faced with bare patches and thinning grass. Enter Scott's EZ Seed Patch and Repair, a revolutionary solution designed to breathe new life into your lawn effortlessly. Packed with essential nutrients and cutting-edge technology, this product has become a go-to for homeowners like me who want to rejuvenate outdoor spaces with minimal effort.

What's in Scott's EZ Seed Patch and Repair?

  • Water-retaining mulch: Holds moisture around seeds for better germination.
  • Premium seed blend: Contains a mixture of high-quality grass seeds suited for various growing conditions.
  • Fertilizer: Fertilizer is included. It provides essential nutrients for seedling growth and establishment.
  • Biodegradable tackifier: Helps seeds adhere to the soil, preventing washout and promoting vigorous root development.

Why is Scott's EZ Seed Preferred?

  • Easy application: Simply spread water and watch it grow – no special tools or equipment are required - although I do a little bit of prep as described above just to help things along.
  • Versatility: Suitable for repairing bare spots, thinning areas, and overseeding existing lawns.
  • Quick results: Visible improvements in as little as 7 days, with full coverage in 4-6 weeks.
  • An all-in-one solution (the best part!): It eliminates the need for multiple products, saving time and money.

What Do People Use Scott's EZ Seed For?

  • Patching bare spots: Whether caused by pet damage, heavy foot traffic, or harsh weather conditions, EZ Seed seamlessly fills in gaps.
  • Thickening thin areas: Sparse patches and thinning grass can be quickly addressed, resulting in a more uniform lawn.
  • Enhances existing lawn: Enhances the overall health and density of existing lawns, promoting a lush, vibrant appearance.
  • Revitalizing problem areas: Troublesome zones such as shaded or high-traffic zones can be rejuvenated easily.

Why Does Scott's EZ Seed Work So Well?

  • Triple action formula: Combines seed, mulch, and fertilizer for optimal growth conditions.
  • Advanced technology: The tackifier component ensures seeds stay in place, even on sloped surfaces, for improved germination rates.
  • Proven performance: Trusted by homeowners and lawn care professionals alike, Scott's EZ Seed has established a reputation for reliability and effectiveness.

With Scott's EZ Seed Patch and Repair, achieving a lush, green lawn has never been easier. Say goodbye to unsightly bare spots and thinning grass – with just a few simple steps, you can transform your outdoor space into a vibrant oasis that enhances your home's curb appeal. It's our go-to lawn seed repair each year when needed.


Note: The author may receive a commission from purchases made using links found in this article. “As an Amazon Associate, Ebay (EPN), Esty (Awin), and/or Zazzle Affiliate, I (we) earn from qualifying purchases.”


Saturday, May 11, 2024

The Bad Weather Friend by Dean Koontz - Book Review

We have all known ‘fair weather friends’. But it is not fair weather all the time. What everyone could use is a ‘bad weather friend’ who is there for you in good times and bad! Dean Koontz latest novel, The Bad Weather Friend, deals with that premise. 


Rainy Weather scene


Once again we have a new Koontz novel to enjoy. This one is a little bit on the Science Fiction side and a good amount in the humor area.


Main Characters:


Benny Catspaw - a kind man with a sunny disposition who is enjoying his life.


Harper - a waitress at Benny’s favorite diner who is also a PI-in-Training.


Spike - A Craggle. A Craggle’s main function is to protect those who are too nice for their time and culture. Spike becomes Benny’s Craggle.


Synopsis


Benny’s life was going along smoothly until the day he lost his job, his reputation, his girlfriend, and his favorite chair. One would think that Benny is just being paranoid. But, no! Someone is out to get him. He just doesn’t know who or why. Nevertheless, he soon learns that there is a faction out there who feel compelled to destroy Benny because he is so nice! The nice people in the world do not fit into the way this group wants their world to be! 


Then, a giant crate is delivered to  Benny, from an uncle he never heard of, accompanied by a video message that states All Will Be Well in Time!


Inside the crate is a seven-foot-tall self-described “bad weather friend” named Spike! Spike will take care of it. He’ll find Benny’s enemies. He’ll deal with them. 


Summary


Benny and Harper end up joining Spike in seeking out and eliminating this group, or at least making their threats useless. As the story draws to a conclusion, Benny & Harper find they are very compatible as a couple, and Spike, the Craggle, becomes a valued friend for life. 


If you want to know what a ‘Craggle’ is, you’ll have to read the story! A delightful Dean Koontz story his fans will love.


*Book Review of The Bad Weather Friendwritten by Wednesday Elf


Note: The author may receive a commission from purchases made using links found in this article. “As an Amazon Associate, Ebay (EPN), Esty (Awin), and/or Zazzle Affiliate, I (we) earn from qualifying purchases.”


Friday, May 10, 2024

Lego Creator 3 in 1 Forest Animals Set: Red Fox, Owl & Squirrel #31154 Reviewed

lego fox
Lego has been a part of our lives and home decor for decades.  While I have played my part by sorting and organizing pieces, I have never built a Lego set.  I love the Botanical Collection introduced in 2021, but haven't started building a set myself.  However, that is all about to change.

For years, I have perused the Lego catalog seeking out new sets to give my son, hoping I could find one he would like, but had not seen before.  Recently, I discovered the #31154 "Lego Creator Forest Animals: Red Fox" that was released on March 1, 2024 and is now available on Amazon.  I am so excited!  

I love that fox!!!  

This is one of the sets that you can choose from a few options which animal you wish to build.  It comes with instructions for the fox, an owl or a squirrel.  They all use the same pieces simply put together in a different way to create a specific animal.  I happen to love owls and squirrels too, but I will be building the fox.  It is highly unlikely I will ever take him apart so if I want an owl or a squirrel, I will need to buy another set.  

Now, I just need to enlist my son to sort the piece the pieces for me so I can start building immediately. 


Lego Forest Animals Set:  Red Fox, Owl & Squirrel

This Lego set has 667 pieces and is recommended for 9+ ages.  Once built, the animals are posable thanks to the special moveable pieces included.  For instance, the fox can sit or stand, open his mouth, or even turn his tail & head. The owl can turn her head.  

As with a real life squirrel, the squirrel is ready to scour the ground for food and has his very own acorn to have and hold.  Plus, he can stand on 2 or 4 feet which is also very lifelike.   

  • Build a fox, owl or squirrel
  • Owl on perch stands 7 inches  (tallest statue form)
  • Posable animals with movable features
  • 667 pieces
  • Recommended for ages 9+ 
lego creator 3 in 1


More Lego Sets & Shelves Reviewed 

Lego The Office SetLego Bouquet Roses Set #10328 Reviewed
Give or build a Lego Bouquet of Roses. Lego roses make a lovely decoration of flowers that won't die. They are the perfect gift for someone you love.

Lego The Office SetLego The Office Set #21336 Reviewed
If you love the tv series, The Office, you will definitely love The Office Lego Set. Lots of The Office specific fun pieces included, plus minifigures

Lego Disney CastleLego Carousel Creator Expert Set #10257 Reviewed
The Lego Carousel Creator Expert Set #10257 is a fabulous & beautiful design. Somewhat challenging to build but worth it. Animal rides & carousel move

Lego Disney CastleLEGO Creator Winter Toy Shop Reviewed
The Lego Creator Winter Toy Shop is fun to build AND fun decor, even as a centerpiece, during the holidays. Toy shop in the winter scene is fabulous!

Lego Disney CastleLEGO Disney Castle Set - Cinderella's Castle Lego Set #71040 Reviewed
With its impressive details, arched doorway, stunning spires & turrets, the Lego Disney Castle Set is a fabulous replica of the real Cinderella Castle.

Scooby-Doo Mystery Mansion LegoScooby-Doo Mystery Mansion Lego Kit Reviewed
Lego & Scooby Doo fans will love this awesome Lego set. The Scooby-Doo Mystery Mansion is the perfect treat for Halloween or anytime for kids & adults.

Winnie the Pooh LegoDisney Winnie the Pooh #21326 Lego Set Reviewed
Those who love Winnie-the-Pooh & Legos are thrilled with the Winnie Lego set! It includes Pooh, Piglet, Tigger, Eeyore, Rabbit & Poohs treehouse home.

Lego Display ShelvesThe Perfect Lego Display Shelves Reviewed
Completed Lego sets need a safe place for display. I recently purchased the perfect bookcase shelves for Lego display!


Note: The author may receive a commission from purchases made using links found in this article. “As an Amazon Associate, Ebay (EPN), Esty (Awin), and/or Zazzle Affiliate, I (we) earn from qualifying purchases.”


Thursday, May 9, 2024

Book Review-Stiletto to the Pedal


Book Title - Stiletto to the Pedal
Stiletto to the Pedal
Karen Whalen's newest book will be published on May 15, 2024.  It is book 5 of the tow truck series but also works as a stand-alone book.  If you love mysteries, but you are also looking for something light and humorous, these fascinating novels by Ms Whalen are for you.

Brief Summary of Book

In the newest cozy mystery by Karen Whalen, Delaney Morran, has a visit from the IRS collections with an ultimatum to pay up or loose her assets.  Delaney is sure this must be a mistake, but in the time it takes to retrieve her records from her accountant the accountant ends up dead.  

As in the previous mysteries, Delaney is once again involved in finding the killer.  This time in her accountant's murder.  Along the way she has the help of Tanner, another tow truck driver and her ex-boyfriend and her current love Sheriff Ephraim Lopez.  

Delaney is known for her love of shoes and even has a stiletto design on her tow truck.  She inherited the tow truck from her Dad and is doing her best to have a successful career in a business she knew nothing about.

The Tow Truck series of mysteries are light-hearted and fun, but are sure to keep you guessing about the mystery involved.


Reviews from other Books in the Tow Truck Series


Purchase the Books on Amazon

The Tow Truck Series is available on Amazon.  Here is a link to the latest book Stiletto to the Pedal


Note: The author may receive a commission from purchases made using links found in this article. “As an Amazon Associate, Ebay (EPN), Esty (Awin), and/or Zazzle Affiliate, I (we) earn from qualifying purchases.”


Wednesday, May 8, 2024

Clean Makeup Brushes in Seconds With This Terrific Brush Cleaner Spray

As a beauty and skincare enthusiast who loves wearing makeup, I am passionate about using good quality makeup brushes and caring for them properly to keep them clean, hygienic, and performing at their best. Recently I shared my tutorial for the best way to clean makeup brushes without ruining them, including my tips for cleaning brushes with water and a good quality brush soap cleanser without getting water inside the ferrule that covers the glued join between the bristles and the handle, which can cause shedding and shorten the useful life of your makeup tools. 

In that tutorial, I discussed using an alcohol-based sanitizing spray periodically in between washings. Today, I am reviewing another type of spray-on brush cleaner: Jenny Patinkin Spray Away Instant Makeup Brush Cleaner. Spray Away is a new favorite for me that instantly removes even heavily pigmented makeup from bristles easily in just seconds and leaves my brushes dry and ready to use again immediately. It also helps keep the inside of my brush case clean and free from makeup residue.

Jenny Patinkin Spray Away Instant Makeup Brush Cleaner

Developed by a "Lazy" Professional Makeup Artist

Spray Away was developed by pro makeup artist, beauty expert, brand founder and bestselling author Jenny Patinkin, who wrote Lazy Perfection, The Art of Looking Great Without Really Trying. Patinkin's eponymous line of beauty tools is all about simplicity, sustainability, and effectiveness with minimal effort. Spray Away definitely fits with her beauty philosophy. 

Cleans Makeup Brushes Completely in Seconds!

As someone who relies on good quality makeup brushes, I've tried my fair share of brush cleaners and this one truly stands out.

Watch me demonstrate how Jenny Patinkin Spray Away Instant Makeup Brush Cleaner lives up to its name, allowing me to remove all traces of a heavily pigmented, vivid blush and a dark brown eyeshadow from some of my favorite makeup brushes from BK Beauty. 

Note: If you prefer, you can watch my Spray Away brush cleaning demonstration on YouTube.

Works Beautifully on Brushes With Densely Packed Bristles

As you can see from my demonstration, Spray Away Instant Makeup Brush Cleaner works perfectly on brushes of any size, from large foundation and blush brushes to small eyeshadow and eyeliner brushes, as long as they have densely packed bristles like the ones from BK Beauty that I show in the demo.

The only thing you need in addition to the Spray Away is a towel. I prefer to use a large microfiber cloth.

If you have any brushes with long, loose bristles, you'll want to stick to washing those with water and a brush soap type cleaner, such as Jenny Patinkin Makeup Brush Soap.

Gentle Yet Effective

I also appreciate the gentle yet effective nature of the formula. Spray Away removes even stubborn makeup buildup effectively without damaging the bristles or compromising their softness.

Dries Almost Immediately

One of the most impressive aspects of this cleaner is its quick-drying formula. Spray Away evaporates almost instantly, allowing you to use your brushes immediately after cleaning. This is a game-changer for those moments when you need to switch between colors or brushes on the fly.

A Clean Beauty Product

According to the brand, Spray Away is oil-free, dye-free, waterless, paraben-free, vegan, and free from the types of chemicals commonly found in makeup brush sprays.

It also leaves behind a subtle, pleasant scent that adds a touch of luxury to the cleaning process.

A Great Gift for Any Makeup Lover

Anyone who wears makeup should be cleaning their brushes regularly: washing weekly or bi-weekly and doing quick cleanings in between washings to keep brushes hygienic and performing well.

The Jenny Patinkin Spray Away Instant Makeup Brush Cleaner, some microfiber cloths and the Jenny Patinkin Luxury Vegan Makeup Brush Soap would make a great gift!

Overall, Jenny Patinkin's Spray Away Instant Makeup Brush Cleaner has earned its place as a staple in my beauty arsenal. Its convenience, quick-drying formula, and effectiveness make it a standout product that I wholeheartedly recommend to anyone looking to streamline their brush cleaning routine


Clean Makeup Brushes in Seconds With This Terrific Brush Cleaner Spray by Margaret Schindel

Read More Beauty Reviews by Our Review This Reviews Contributors

Read More Product Reviews by Our Review This Reviews Contributors

Read More Gift Reviews by Our Review This Reviews Contributors


Note: The author may receive a commission from purchases made using links found in this article. “As an Amazon Associate, Ebay (EPN), Esty (Awin), and/or Zazzle Affiliate, I (we) earn from qualifying purchases.”


Tuesday, May 7, 2024

How to Grow Potatoes in a Bag


growing potatoes


If you want to grow your own potatoes, but you don't have a yard, or your soil is too hard, or even if you just don't want the work of having to dig them up, I have a great and easy solution!

Grow your potatoes in a bag!  I know it sounds ridiculous, but it is actually easy and fun.  It's also a great way to get lots of tasty and healthy spuds to eat!  Anyone can do it, you don't even need to buy any seeds because potatoes are grown from other adult potatoes.

How to Sprout Potatoes to Plant:

It is best to start with organic potatoes, since they are less likely to be a funky hybrid that can't be sprouted or have toxic insecticides on them or even in them.  You can use red or white potatoes.

Wash the potatoes well and then place them in direct sunlight.

In two to three weeks you will have sprouts.  When they get an inch or so long, you are ready to begin the planting process.


red potatoes


Cut the potatoes, with one sprout on each piece.  Leave the potato connected to the sprout, because as it rots it will be fertilizer to the new plant

It is very important that, before planting, you let the cut potatoes sit for two or three days so the cut portion of the potato can dry out and form a protective layer.  If you plant newly cut potatoes, diseases, fungus, worms and insects can easily burrow into the fresh cut flesh and kill the sprout.

While your potatoes are sprouting and curing, order your grow bags.  You can find them on Amazon for a good price, about $2.50 to $3.00 a piece, less if you order a larger quantity.  I usually get the 5 gallon size.  They look like this:

bag


growing bag


They also have bags that have a roll up flap on the side near the bottom, but I find these to be more expensive and the flap are basically useless because the growing potatoes should not be bothered by opening the side of the bag and poking around.  


How to Grow Potatoes in Bags:


1. Fold the bag down till it is about 6 inches tall.

2. Put 3 inches of good dirt in the bottom of the bag.

bag for growing


3. Set three to four potato pieces in the dirt with the cut side down, sprout side up and cover with 3 inches of dirt.

4. Water well.

5. Keep the soil moist but not mud and when the plants are 6 inches tall, unroll the bag about 4 inches and add more dirt, up to the bottom leaves.

8. When the plant has grown to 8 inches above the dirt, unroll the bag again, and add more dirt, up to the bottom leaves.

9. Keep doing this until the bag has dirt three inches from the top.

10. Make sure to keep them watered.  If you repeatedly let the bag dry out, the potatoes will shrink and wrinkle and not be edible.  You will have to water them more often than if they were planted in the ground.

11. When the potato vines turn yellow and look wilted, stop watering them and wait about two weeks.

12. Pick up the bag and turn it upside down in a wheelbarrow or washtub and you will find fresh, tasty and pesticide free home grown potatoes.

This is what one of my bags looked like when the plants came up:


sprouts

Don't be upset if all the sprouts don't come up.  The fewer the plants the more room there is for the remaining plants to grow bigger potatoes.  You must make sure to keep them watered, it is the defining factor of whether you get a nice harvest or a big disappointment.

You don't have to use these bags, you can use any kind of bag that will take to weight of dirt pressing against the sides of it.  Canvas tote bags, plastic feed bags, reusable grocery bags, any kind of bag will do.  Just make sure if you use a plastic bag to poke lots of holes in the bottom so it has good drainage.

Grow bags are a great way to grow some of your own food in a very small space.  You can grow any type of veggie or fruit plant you want in bags, it does not have to be potatoes.  I have also grown peppers and cucumbers and I have friends that use them for tomatoes and they love them!  They take up so little space you can even use them on an apartment balcony or condo patio.  You don't need to have land to grow your own food!  The best thing is, at the end of the harvest you just empty them, fold them up and put them away till next year.  A real space saver!

_____________________________________


Note: The author may receive a commission from purchases made using links found in this article. “As an Amazon Associate, Ebay (EPN), Esty (Awin), and/or Zazzle Affiliate, I (we) earn from qualifying purchases.”


Most Recent Reviews on Review This Reviews


Search for Reviews by Subject, Author or Title

The Review This Reviews Contributors


SylvestermouseSylvestermouseDawn Rae BDawn Rae BMbgPhotoMbgPhotoBrite-IdeasBrite-IdeasWednesday ElfWednesday ElfOlivia MorrisOlivia MorrisTreasures by BrendaTreasures by BrendaThe Savvy AgeThe Savvy AgeMargaret SchindelMargaret SchindelRaintree AnnieRaintree AnnieLou16Lou16Sam MonacoSam MonacoTracey BoyerTracey BoyerCheryl Paton Cheryl PatonRenaissance WomanRenaissance WomanBarbRadBarbRadBev OwensBev OwensBuckHawkBuckHawkDecorating for EventsDecorating for EventsHeather426Heather426Coletta TeskeColetta TeskeMissMerFaeryMissMerFaeryMickie_GMickie_G


Review This Reviews is Dedicated to the Memory of Our Beloved Friend and Fellow Contributor

Susan DeppnerSusan Deppner

We may be apart, but
You Are Not Forgotten


“As an Amazon Associate, Ebay (EPN) and or Etsy (Awin) Affiliate, I (we) earn from purchases.” Disclosure Statement

X