Showing posts with label tutorial. Show all posts

Thursday, May 31, 2018

Vintage Lamp Bird Bath - DIY Tutorial and Review

vintage lamp repurposed as a bird bath

I was visiting my muse the other day, Pinterest, when I came upon the most delightful inspiration.  Have you seen the creative bird baths that are being made from vintage lamps?  I'm pretty sure I would never have thought of this fun, and ingenious, idea on my own.  As one who loves to give cast off items new life, this was the perfect project for me.  In case you also enjoy whimsical garden features, I am sharing my DIY process to prime your pump.

glass serving dish

First, I needed an old lamp and bird bath basin, so I took a little field trip to a couple of thrift stores.  Goodwill had exactly what I needed.  On my first shopping expedition, I found a glass serving dish that reminded me of a sunflower.  Amazingly, that is the exact vision I had for the theme of my creation.  Who knew an egg platter could be so lovely?

crystal or glass lamp

Next, I went on the hunt for the right lamp to complement my new bird bath dish, and to serve as its base.  Because thrift stores are always receiving new donations, I found the perfect lamp on my very next trip to the store.  The crystal, marble, and brass features, along with the size of the lamp, were just right in every way.  I couldn't wait to get home and put the finishing touches on my vintage bird bath.

lamp bulb holder

Step One: Unscrew the light socket and remove it from the top of the lamp.

lamp electrical cord

Step Two:  Clip the electrical cord and pull it out through the lamp base.  

sections of crystal lamp

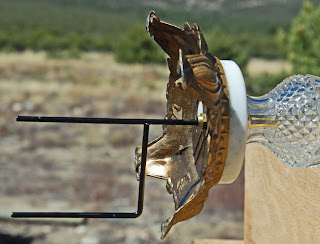
Step Three:  I removed each individual section of the lamp and reassembled the pieces to better support the basin section of my bird bath.  I moved the brass leaf section to the top of the column and reversed it (turned it upside down) to serve as the support arms for my glass dish.  

brass holder on lamp

Step Four:  Though I had intended to glue the platter directly to the brass arms, I found that they weren't totally level, so I riveted a circular metal candle holder to the brass piece.  I spray painted the metal silver since it would show through the bottom of the water basin.  I wanted a natural looking reflection.

serving dish on lamp holder


gluing a glass plate to a lamp candle holder

Step Five:  I used E6000 glue to affix the glass dish to the candle holder.  I ran a bead of glue all along the circular rim on the bottom of the egg platter and carefully applied pressure for a minute or two after centering the dish on the metal plate.  Then, I let the glue cure for a couple of days.

e6000 glue

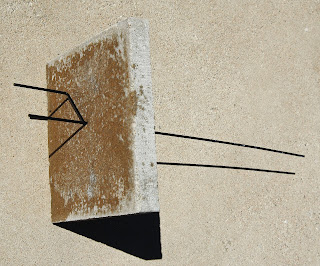
Step Six:  Since I don't want my glass bird bath to tip over and shatter, I ran a metal post up into the center column where the cord used to be housed.  I purchased an inexpensive plant hanger at the dollar store.  It has stakes to anchor the base of the lamp into the ground.  I measured the height of the lamp and then cut off the hook top of the planter stake.  For extra insurance, since the winds are often incredibly strong where I live, I drilled a hole through the center of a cement patio paver and inserted the metal rod through it before installing the rod inside the lamp.  Now my bird bath is very stable and far less likely to get knocked over by the wind or wild critters.  As a bonus, it now has a level platform on which to stand.  I'll be planting flowers around the paver to make it more attractive.

metal post


patio pavement square and metal post


metal post placed through patio pavement square


vintage lamp bird bath


Your steps may not be identical to mine, because every lamp is slightly different, but there are enough similarities to give you a sense of how to go about assembling your bird bath.  You may be able to find a lamp that already has a glass shade.  In that case, you won't need a separate glass dish.  I preferred knowing that my glass dish would not be toxic to birds and I didn't have to seal any holes that had been drilled through a lamp shade.  

I am very pleased with my unique bird bath.  It is so satisfying to take an unwanted item or two and turn them into a conversation piece.  More than that, I feel like I am showing a little love to the beautiful creatures who share my garden habitat.  It has been an especially dry season.  With the mountain creek dried up at the moment, it feels wonderful to provide a source of sustenance for the precious birds that fill my life with their sweet presence and songs.

Let me know if you decide to make your own bird bath or garden art with a vintage lamp.  I would love to see how you use your creative gifts.


Note: The author may receive a commission from purchases made using links found in this article. “As an Amazon Associate, Ebay (EPN) and/or Esty (Awin) Affiliate, I (we) earn from qualifying purchases.”


Thursday, May 17, 2018

DIY Mason Jar Bird Feeder - Tutorial and Product Review

diy mason jar bird feeder and hummingbird
One of my favorite things in all the world is to spend time observing and photographing wild birds.  Most avid bird-watchers and photographers know that providing food is one way to ensure a steady stream of visitors and photo moments.  For some time now, I have wanted to make a new feeder for the birds that bring me such great pleasure.

Right away I knew that a mason jar bird feeder would be perfect for my country home.  Who doesn't love the charm of the ever-popular mason jar?  I thought I would share this project and a few tips for those out there who might also enjoy treating their feathered friends.  It is likely you already have most of what is needed for this easy do-it-yourself craft.  Let's get started.


Supplies Needed

  1. A regular mouth canning jar.
  2. A chick feeder base.
  3. A bowl or plate for the canopy over the jar.
  4. E6000 glue (or another super strength clear adhesive).
  5. Birdseed.
  6. Chain or picture wire (plant or basket hanger).
  7. Optional: Decorative knob.
dish for diy mason jar bird feeder
Step One:  Acquire a regular mouth canning jar and proportionately sized dish for its canopy.  You can find inexpensive mason jars at thrift stores, any of the dollar stores, craft stores, etc.  Though I already had some canning jars at home, I fell in love with The Pioneer Woman's embossed Betsy mason jars.  In addition to being especially lovely, the jars are 32 ounces, which means you won't have to fill your bird feeder as often as with smaller containers.

chick feeder base
Step Two:  Buy a screw-on chick feeder base that fits a regular mouth mason jar.  Most feed stores will have them, or you can purchase one online.  I get mine locally from either Tractor Supply Company or Big-R.  Typically, I pay $2.99-$3.99, depending on whether I buy a plastic or a galvanized metal feeder.  There are usually a few colors from which to choose.  My store has red, green, yellow, purple, and the galvanized silver feeders.


drilling a hole in a dish
Step Three:  Determine if you are going to hang your feeder or place it on a post.  If you plan to hang your bird feeder, you may wish to use a decorative knob on the canopy (to provide an anchor point for a chain or hanging wire).  The ceramic knob I chose couldn't be glued on, so I used my Dremel and a tile bit to drill a hole in the center of my canopy dish.  The bit worked perfectly and created a very neat little hole for the screw that holds the knob in place.  Tip:  Keep the surface wet and go slow while you are drilling.  Angle the bit slightly.


dish with screw through it
Step Four:  Insert a screw and use two washers (one for the interior screw and one for the exterior knob) to protect the bowl's surface.  I used a 3/4-inch long machine screw (#8) that fit the thickness of the bowl and the knob threads.  Tip:  Be careful not to over-tighten the screw.  You wouldn't want to crack that beautiful bowl (part of the vintage floral pasta bowl set by The Pioneer Woman).  *You can skip steps three and four if you choose a scalloped edge bowl and hook your plant hanger chains between the rounded curves.


mason jar and e6000 glue
Step Five:  Apply E6000 glue on the bottom rim of the mason jar (around the entire rim).  Follow the instructions on the glue label to ensure the best adhesion results.


glass jar attached to dish
Step Six:  Center bottom of mason jar inside canopy bowl and apply gentle pressure while the glue is bonding.  Set aside for the glue to cure.  Depending on the temperature and weather conditions, curing time can take 1-2 days.  It's important not to rush this step.

*In this photo, you are looking down inside the open mouth of the jar.  You can see how it is centered over the screw for the canopy knob.  Tip: Use a flathead screw so the jar rim can sit flush on the bowl.


diy mason jar bird feeder
Step Seven:  After the glue is fully cured, fill mason jar with birdseed.  I used safflower seed.  Supposedly, squirrels won't bother a feeder with this kind of seed.  It is also said to keep bully birds from hogging all of the seed.  Safflower seed attracts the kind of birds I am hoping to feed.  I plan to hang my feeder, but decided to wait one extra day to ensure the glue is totally cured.

Because my hummingbirds are attracted to red feeders, I am thoughtfully considering the best location for this bird feeder.  You can see from the introductory photo on this page that the first bird to check out my new feeder was a hummer.

I love how my DIY mason jar bird feeder project turned out (so much so that I am making more than one feeder).  In addition to the Betsy mason jars, the dishes I purchased for the canopies are a part of The Pioneer Woman Collection.  The pattern on the red bowl matches the embossed pattern on the glass jar.  I bought everything at Walmart.

Now I'm excited to see who shows up at the feeder today. 


Note: The author may receive a commission from purchases made using links found in this article. “As an Amazon Associate, Ebay (EPN) and/or Esty (Awin) Affiliate, I (we) earn from qualifying purchases.”


Most Recent Reviews on Review This Reviews


Search for Reviews by Subject, Author or Title

The Review This Reviews Contributors


SylvestermouseSylvestermouseDawn Rae BDawn Rae BMbgPhotoMbgPhotoBrite-IdeasBrite-IdeasWednesday ElfWednesday ElfOlivia MorrisOlivia MorrisTreasures by BrendaTreasures by BrendaThe Savvy AgeThe Savvy AgeMargaret SchindelMargaret SchindelRaintree AnnieRaintree AnnieLou16Lou16Sam MonacoSam MonacoTracey BoyerTracey BoyerRenaissance WomanRenaissance WomanBarbRadBarbRadBev OwensBev OwensBuckHawkBuckHawkDecorating for EventsDecorating for EventsHeather426Heather426Coletta TeskeColetta TeskeMissMerFaeryMissMerFaeryMickie_GMickie_G


Review This Reviews is Dedicated to the Memory of Our Beloved Friend and Fellow Contributor

Susan DeppnerSusan Deppner

We may be apart, but
You Are Not Forgotten


“As an Amazon Associate, Ebay (EPN) and or Etsy (Awin) Affiliate, I (we) earn from purchases.” Disclosure Statement

X