Showing posts with label Margaret Schindel. Show all posts

Wednesday, December 1, 2021

Luscious Low Carb Keto Triple Peppermint Cheesecake Brownies Recipe

Peppermint and chocolate are a flavor match made in heaven, especially around the holidays! These luscious, big, fudgy low carb peppermint cheesecake brownies feature a yummy a mint cheesecake swirl and are topped with a melted peppermint chocolate bar topping.

My new low carb peppermint cheesecake brownies recipe is so rich and decadent, no one will guess they are a keto friendly treat unless you tell them. You, your family and your holiday guests of all ages will love them! 

Here’s my review of this quick and easy low carb keto mint brownies recipe.

Triple Peppermint Cheesecake Brownies - Keto, Low Carb and Luscious

Although this image show them in an 8-inch square pan cut into 16 squares, which I did for the first batch, I now bake them in a 9-inch square pan and cut them into 20 rectangular bars (four "columns" and five "rows") for a larger serving, which is how I have written the recipe.

However, these are so rich that you can easily cut them into smaller portions and still have a very satisfying portion with fewer calories and carbs if you prefer.

How to Make Keto Triple Peppermint Cheesecake Brownies

Makes 20 brownies.

Tools, Supplies and Equipment

9" square pan (I love my heavy-duty USA Pan Bakeware 9-inch Square Cake Pan, Nonstick & Quick Release Coating)

If You Care unbleached baking parchment

Electric mixer with mixing bowl

A second mixing bowl (I used the 3-quart bowl from my OXO Good Grips 3 Piece Stainless Steel Mixing Bowl Set with non-skid bottoms, which I love)

Silicone spatula

Table knife (for swirling the cheesecake and brownie batters)

Cooling rack

Aluminum foil

Ingredients

Butter or coconut oil (to grease the corners of the pan and the baking parchment)

For the peppermint cheesecake batter: 

8 oz full fat cream cheese, softened 

1 egg, room temperature 

3/4 teaspoon Watkins pure peppermint extract 

3 tablespoons BochaSweet sugar replacement granulated sweetener (my favorite, but often out of stock) or Swerve granular sugar replacement 

For the chocolate fudge brownie batter: 

1 bag Good Dee's Soft Baked Keto Brownie Mix, Double Batch Bag 1 lb bag 

1 cup (2 sticks) Kerrygold salted butter (or other grass-fed butter), melted and cooled 

4 large eggs, room temperature 

1 teaspoon Watkins pure peppermint extract 

56g (132 chips) Lily’s peppermint white chocolate baking chips (no sugar added)

For the mint chocolate topping layer:

2.5 oz (70 g) bar of The Good Chocolate zero sugar 65% dark chocolate peppermint

Directions

Preheat the Oven and Prepare the Baking Pan.

  • Preheat the oven to 350 °F.
  • Cut two lengths of unbleached baking parchment to fit the 8-inch square baking pan, leaving at least one piece long enough for the ends to hang over the edges of the pan. (I like to cut both pieces long.) The overhanging ends will serve as handles to help you lift out the baked and cooled brownies.
  • Grease the corners of the pan and the baking parchment (excluding the overhanging flaps) with butter or coconut oil. Set the prepared pan aside.

Make the Peppermint Cheesecake Batter.

  • Put the softened cream cheese into the bowl of the electric mixer and beat until soft and smooth, scraping the bottom and sides often with the silicone spatula.
  • Add the egg, peppermint extract and BochaSweet sweetener. Beat on medium speed until well blended. Set the peppermint cheesecake batter aside.

Make the Peppermint Chocolate Chip Brownie Batter.

  • Empty the 1-lb. bag of Good Dee's Soft Baked Keto Brownie Mix, Double Batch into the second mixing bowl. Stir in the melted and cooled butter with the silicone spatula until well combined. 
  • Stir in the 4 eggs and peppermint extract until well blended. (Do not beat, whip or overmix the brownie batter.)
  • Stir in the peppermint white chocolate baking chips.

Layer and Marble the Brownie and Cheesecake Batters.

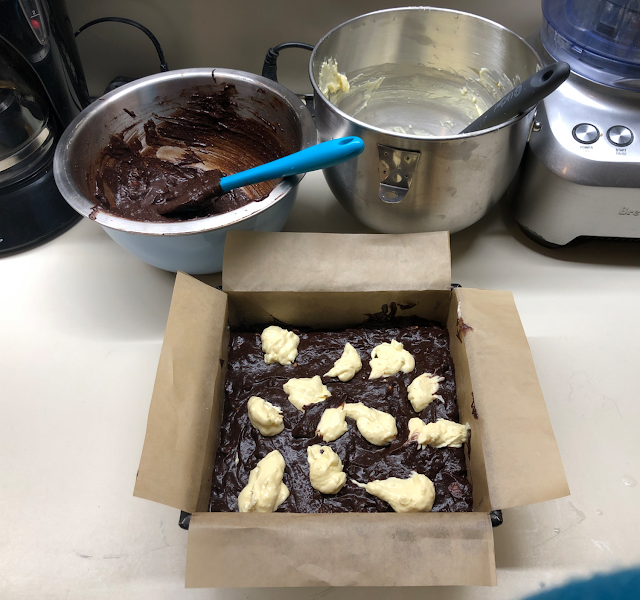
  • Spread half the chocolate brownie batter in an even layer in the prepared pan. Top with half the peppermint cheesecake batter, dropping it onto the brownie batter layer in large, evenly spaced dollops.

First layers of peppermint brownie batter with dollops of peppermint cheesecake batter
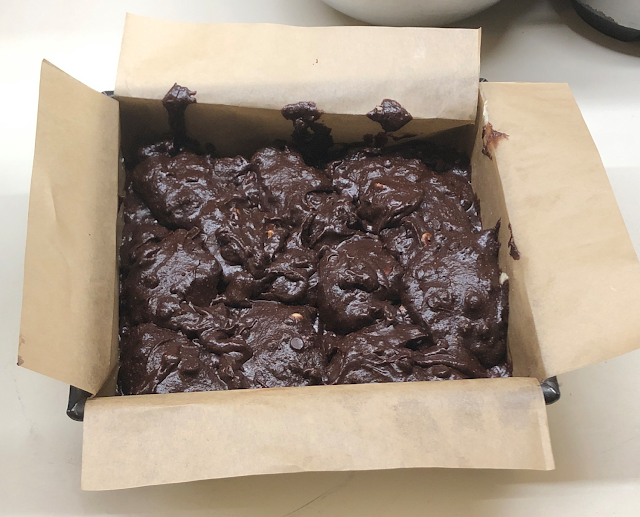
  • Scrape the remaining chocolate brownie batter into the pan, covering the peppermint cheesecake batter without disturbing it too much. 

Remaining peppermint brownie batter dollops covering the peppermint cheesecake batter dollops

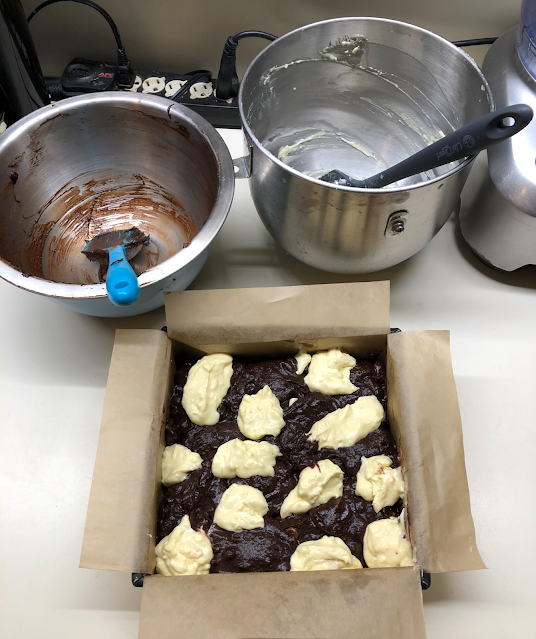
  • Then, drop dollops of the remaining peppermint cheesecake batter over the top. If possible, try to stagger the locations of these dollops to place them in between the previous cheesecake dollops. (If you can’t tell where the lower dollops are when they are covered by the brownie batter, no worries!)

Remaining peppermint cheesecake batter dollops added

  • Swirl a table knife through all four layers of batter so it’s loosely marbled, taking care not to mix the batters too much. You want the chocolate brownie batter to remain brown and the peppermint cheesecake batter to remain white as much as possible.

Peppermint brownie and peppermint cheesecake batters marbleized in the pan

Bake the Brownies and Add the Mint Chocolate Topping.

  • Place the pan in the preheated oven and bake at 350 °F for 30–40 minutes, just until the center tests almost done with a toothpick. The brownies will continue to bake in the hot pan as they cool.
  • As soon as the brownies test done, move the pan to a cooling rack.
  • Immediately unwrap The Good Chocolate dark chocolate peppermint bar and break it along the score lines into six squares. Place the chocolate squares on top of the piping hot brownies, spacing them evenly about 1.5 inches away from the edges of the pan.

Hot, baked peppermint cheesecake brownies topped with squares of The Good Chocolate dark chocolate peppermint bar

  • Carefully lay a sheet of aluminum foil over the top of the hot pan, tenting the foil loosely so it doesn’t touch the surface of the chocolate. Do not try to crimp/seal the edges of the foil to the edges of the pan.
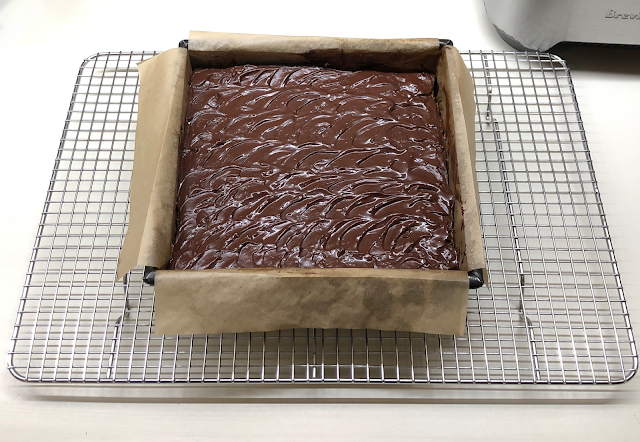
  • Remove the foil after about 15 minutes and set it aside. Carefully spread the melted chocolate over the brownies in a thin, even layer.

Melted peppermint dark chocolate squares spread over top of brownies in pan

Finish Cooling, Chill Briefly and Cut Into Squares.

  • Allow the brownies to continue cooling in the pan on the cooling rack for at least an hour.
  • Cover the cooled pan of brownies with the reserved foil and place it in the refrigerator for 60-90 minutes, just until the surface of the mint chocolate topping layer firms up.
  • Use a spatula to loosen the parchment from the edges of the pan, if necessary. Run a sharp knife under hot water and immediately wipe it dry, then use the warmed knife to slice through just the hardened mint chocolate coating layer to score it into 16 squares, as shown. Then score a line down the center of each square to make 32 rectangles (not shown).
Note: The photo shows the dark chocolate peppermint candy bar coating scored into 16 squares, which is how I had cut them before I photographed them. Once we tasted them and realized just how rich these brownies are, we subsequently decided to cut each big square in half to make narrower brownie bars.

Scoring the chilled and hardened mint chocolate topping layer while still in the pan

  • Use the overhanging baking parchment paper handles to lift the uncut brownies out of the pan and onto a cutting board. 
  • Using the scored lines in the chocolate coating as a guide, cut the brownies into 32 pieces.
  • Place them in a covered food storage container, layered between waxed paper or parchment paper, if necessary, and refrigerate until ready to serve.

Finished keto triple peppermint cheesecake brownies on a decorative Christmas serving platter
These low carb keto triple peppermint cheesecake brownies are so rich and decadent, we decided to cut them in half after I photographed them and we tasted them.

Nutrition Facts

Calories and Macros (Estimated)*:

Serving: 1 brownie (1/20 recipe)

Calories: 207

Net Carbs: 2.5g

Total Carbs: 23.9g

Fiber: 8.5g

Sugar: 0.2g

Added Sugar: 0.0

Sugar Alcohols: 3.2

Protein: 3.8g

Fat: 18.3g

Saturated Fat: 10.6g

Cholesterol: 79.1

*This nutrition data was calculated by the Carb Manager Premium app after I entered the ingredients and amounts into the Create Custom Recipe function.

A Delicious and Festive Christmas Gift (Especially for Anyone Following a Low Carb or Keto Diet!)

I have always loved giving homemade Christmas cookies and other festive baked goods to family members and friends around the holidays. A beautifully wrapped holiday-themed decorative tin lined with a doily and filled with these fabulous low carb keto triple peppermint cheesecake brownies would make a festive and much appreciated gift for anyone. For someone who is watching their sugar and carbs, make sure to include the recipe. Better yet, make up a low carb keto holiday gift basket including these brownies, the recipe and the ingredients so your gift recipient can make more of them after the ones you gifted them have been eaten!

The Perfect Pairing of Low Carb Keto Holiday Dessert Recipes

For the ultimate holiday sweet treats indulgence, pair my Low Carb Keto Peppermint Cheesecake Brownies Recipe with my Ultimate Keto Hot Chocolate Recipe!

Luscious Low Carb Keto Triple Peppermint Cheesecake Brownies Recipe by Margaret Schindel

Posts About My Keto Diet Journey

My First Year on The Keto Diet

Preparing to Succeed on the Keto Diet, Part One

Preparing to Succeed on the Keto Diet, Part Two

Low Carb Muffins & Cupcakes: Treats to Enjoy on a Keto Diet

Low Carb Keto Chocolate Yogurt Granola Chip Pudding Recipe

Good Dee’s Keto Cookie Low Carb Baking Mix Review

Hamama Microgreens Growing Kit Review & Success Tips

My Favorite Hamama Microgreens Seed Quilt Accessories

Keto Cheddar Cheese Biscuits With Chives Recipe

The Ultimate Keto Hot Chocolate Recipe

The Best Low Carb Keto Gift Ideas: Keto Gift Guide

The Best Low Carb Keto Cinnamon Muffins

Wholesome Yum Keto Bread Mix and Yeast Bread Recipe

The Good Chocolate 100% Organic No Sugar Dark Chocolate Review

The Best Advice to Maintain Your Keto Diet Weight Loss

My New Irresistibly Delicious Keto Cheese Crackers Recipe

Luscious Low Carb Keto Triple Peppermint Cheesecake Brownies Recipe

Quick & Easy Livlo Blueberry Scones Keto Baking Mix Review

Snack Better With The Best Healthy Keto Cookie Dough Bites

The Best Quick and Easy Low Carb Keto Pizza Recipe

The Best Quick and Easy Low Carb Keto Shortcake Cupcakes Recipe

Comparing the Best Keto-Friendly Chocolate Hazelnut Spreads - No Added Sugars

The Best Low Carb Keto Sandwich and Burger Buns Mix

Blueberry Biscuit Scones — New, Easy, Low Carb Keto Recipe

The Best Keto Pizza Crust Mix With 0 Net Carbs

An Unusual, Delicious Strawberry Chocolate Tea With 0 Calories

Delicious Sugar-Free Keto Cookies That OREO Fans Will Love

Healthy Pistachio Cherry Chocolate Chip Marshmallow Cereal Treats Recipe

Easy, Decadent, High Protein, Sugar-Free Rocky Road Cottage Cheese Ice Cream

The Best Quick & Easy Low Carb Sausage and Ricotta Calzones

How to Make Refreshing Vanilla Italian Soda (With or Without Cream)


Reviews of the Keto Diet by Barbara C. (aka Brite-Ideas)

My Personal Keto Testimonial

How I Stayed Committed to the Ketogenic Way of Eating

Read More Recipe Reviews by Our Review This Reviews Contributors

Read More Product Reviews by Our Review This Reviews Contributors

Read More Reviews About Health and Wellness by Our Review This Reviews Contributors

Read More Holiday Reviews by Our Review This Reviews Contributors

Read More Christmas Reviews by Our Review This Reviews Contributors


Note: The author may receive a commission from purchases made using links found in this article. “As an Amazon Associate, Ebay (EPN) and/or Esty (Awin) Affiliate, I (we) earn from qualifying purchases.”


Wednesday, November 3, 2021

How to Make a Stylish Beaded Coil Wrap Bracelet

Main image: Beaded Coil Wrap Bracelet Tutorial

Beaded bracelets are wonderful accessories that can add a pop of color to any outfit. Unlike necklaces and earrings, bracelets allow you to enjoy looking at them throughout the day while you’re wearing them. Vintage beaded coil wrap bracelets from the 1940s and 1950s designed by top jewelry icons of that era, such as Miriam Haskell and Robert DeMario, are coveted by vintage jewelry collectors. They have also come back into fashion repeatedly, for good reason.

While bracelets with clasps can be quite challenging to fasten and unfasten, even with a bracelet helper tool, beaded coil wrap bracelets made with memory wire are a cinch to put on and take off your wrist. During my three decades of designing, making and, periodically, selling one-of-a-kind beaded jewelry, my coil wrap bracelets featuring vintage beads have remained among my most popular jewelry designs, regardless of fashion trends.

In this jewelry tutorial, I’ll review how I made my most recent memory wire coil wrap bracelet with a mix of contemporary and vintage beads, which is a birthday gift for a very dear friend. The friend for whom I made this one owns several beaded coil wrap bracelets I’ve designed for her in different colors. She loves wearing them so much that when I asked her what type of jewelry she would like me to make as her birthday gift this year, she requested another coil wrap bracelet, this time in shades of olive green.

These beautiful, classy, distinctive bracelets make wonderful gifts for any jewelry lover (including yourself), and especially for someone who has difficulty putting on or taking off her favorite bracelets with clasps. 

Beaded Memory Wire Wrap Bracelet Tutorial

Materials, Tools and Supplies You Will Need

  • Assorted beads in a range of sizes, shapes, materials and surface finishes.
    • I used a combination of rare vintage glass beads, vintage Swarovski crystals, contemporary glass beads, including Japanese and Czech seed beads and glass pearls, and small (2mm and 3mm) 14k gold-filled beads. 
    •  I've written an article on The Best Sources for Vintage Beads, Findings and Jewelry Components, if you are interested in using vintage beads in your memory wire beaded coil wrap bracelet designs. Buying beaded jewelry at thrift stores, auctions and estate sales and taking them apart can be a great way to buy more unusual and vintage beads less expensively. 
    • You can also make beautiful bracelets with inexpensive beads from the crafts store, if you prefer. 
  • A bead board.
    • While not strictly required, a bead board will make it much easier to plan out, play "what if" and rework parts of your design. 
    • The BeadSmith bead board I use has three channels for designing multi-strand bracelets and necklaces, a flocked surface to help keep beads from rolling around too much as you are laying out your jewelry designs, six recessed compartments of different sizes to hold and organize beads, findings and other jewelry components, and a plastic cover to protect your work-in-progress from dust and keep your laid-out design in place in between work sessions. 
  • Steel bracelet memory wire. 
  • Memory wire cutters.
    • Memory wire is extremely hard steel wire that will ruin the cutting jaws regular jewelry wire cutters intended for softer metal wire, such as silver, gold or copper. I highly recommend using either memory wire cutters made specifically for this purpose or a heavy-duty wire cutter from the hardware store.
      • An old, heavy-duty toenail clipper with straight or slanted (but not curved) jaws that you don't mind ruining is another option.
  • Bead stoppers.
    • These are steel coil spring clamps that prevent beads from slipping off stringing wire. I find they are also useful when stringing beads on memory wire bracelets.
    • I have both the basic Beadalon wire bead stoppers, which I am showing in this project because they are less expensive, and the cushioned Soft-Flex wire bead stoppers, which I prefer because they are more comfortable to use and less likely to escape from your fingertips.
    • As an alternative, you can try using ribbed clear silicone ear wire clutches, if the holes fit your memory wire.
  • Memory wire end caps.
    • Memory wire end caps are half-drilled metal beads that are glued onto the trimmed ends of the memory wire to keep the rest of the beads in place on the finished memory wire wrap bracelet and leave a smooth, rounded end that won't scratch or snag on clothing.
    • Choose silver-plated or gold-plated end caps to match your wire or spacer/accent beads.
    • Alternatively, you can use heavy-duty memory wire looping pliers to turn a small loop at each end of the wire. Finishing the ends with small loops also gives you the option of making and attaching beaded dangles to them.
  • Strong, two-part epoxy glue that dries clear. 
  • Wooden toothpicks and scrap cardboard.
    • Toothpicks and pieces of cardboard cut from shipping cartons or cereal boxes are the perfect disposable mixing tools and palettes for preparing and applying small amounts of clear two-part epoxy to the ends of the wire.
  • Close-fitting latex or nitrile exam gloves.
    • You'll wear these to protect your fingers while sliding small spacer beads and memory wire end caps onto the epoxy-coated wire ends. Choose gloves that are aren't too large, too loose or too thick to maintain the dexterity required to hold the small memory wire end cap beads securely and quickly maneuver the wire into the small holes before the epoxy sets.
    • I find that unpowdered nitrile exam gloves work great for this purpose. 
  • Ultra-fine point permanent marker.
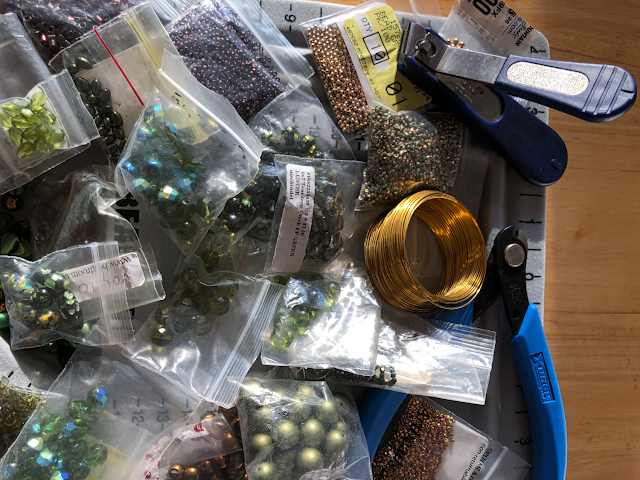
Bead board with assorted beads and jewelry making tools

Step 1: Choose Your Color Scheme and Assemble a Varied Selection of Beads to Design With

First, decide what your main color will be. Choose a wide variety of beads in different shades of that color, sizes, shapes and finishes. Then, decide on a couple of complementary accent colors. Start with a broader selection than you think you will need. I find that I can never predict exactly which beads will end up in my final design, and the more choices you have to play with, the more creative you can be.

My friend wanted the dominant color of her bracelet to be olive green. This photo shows just some of the light to dark olive-toned vintage and contemporary beads I selected from my very large collection for this design, along with some small accent beads in gold, bronze and deep red shades, from garnet to cinnabar.

Bead board with coil of bracelet memory wire and memory wire cutters

Step 2: Cut Your Memory Wire to the Desired Finished Number of Coils, Plus Some Extra 

A memory wire wrap bracelet can have as few as two coils or as many as you can fit on your arm! I usually prefer to make by beaded coil wrap bracelets either three or five coils wide.

Although it's possible to leave the entire memory wire coil uncut until you have finished stringing all your beads from one end, I find it much easier to cut the purchased memory wire coil to a more manageable length and add beads from both ends, since I always make multiple design adjustments as I go along.

It's important to cut the wire longer than you want your finished bracelet to be, for a few reasons. You need enough extra wire at both ends to hold onto as you get closer to stringing the last of your beads and to allow space to clamp the wire ends with the bead stoppers so the beads won't slide off one end while you are adding beads to the other end. Also, the width of the beads will increase the diameter of the coils, so if you start with just three coils of wire you might end up with only two coils once the beads have been added. Wider or longer beads also prevent the memory wire from curving as much, which also enlarges the beaded coils and takes up more of the wire. 

So, if I'm planning to make a three-wrap beaded coil bracelet, especially if I will be including 8mm and larger focal beads in the center of my groupings, I will usually cut five or  six coils memory wire and then trim the excess after all my beads have been strung and I am happy with the design.

Remember to use either a memory wire cutter or another heavy-duty wire cutter whose cutting jaws won't be ruined by this very hard wire!

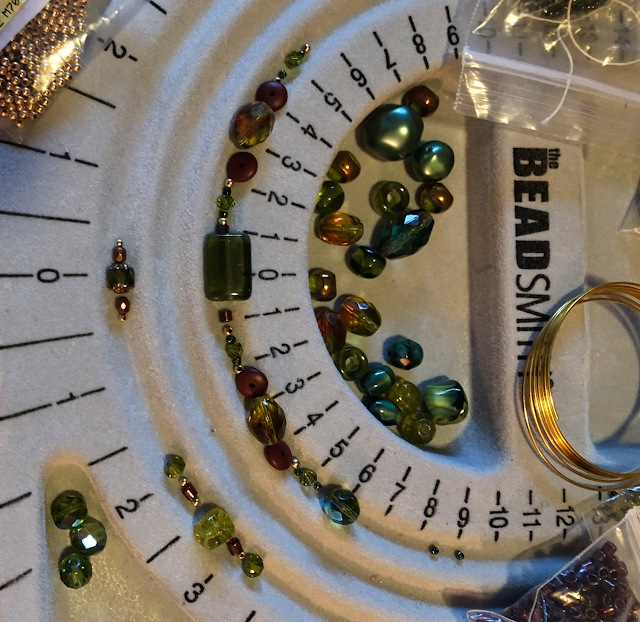
Bead board with beads laid out in beginning of design

Step 3: Begin Playing With Design Ideas

You can string your beads in a random pattern, if you wish. The most important thing is to have a harmonious mix of bead colors, shapes, sizes and finishes. 

I prefer creating memory wire wrap bracelet designs that combine apparent randomness with symmetry. I do this by creating "bead stations," small groupings of odd numbers of beads in symmetrical patterns, usually featuring a larger bead in the center flanked by smaller and medium-size beads interspersed with tiny spacer beads. I find that this creates a pleasing "rhythm" and "flow" to the design.

Occasionally, I will include a larger grouping of symmetrically arranged beads, such as the one I experimented with in the upper channel of the three-strand bead design board shown in the photo above.

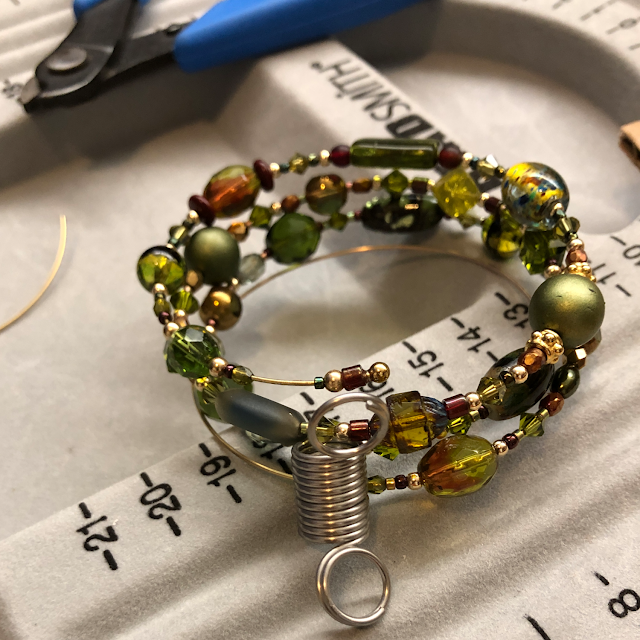
Beads strung on memory wire held in place with a bead stopper clamp

Step 4: Start Stringing Your Beads Onto the Memory Wire

Once you feel comfortable with the initial direction of your beaded coil wrap bracelet design, it's time to start stringing your beads onto the memory wire. Clamp a bead stopper about half a coil away from one end, then start stringing the beads in your desired order or pattern.

I usually repeat some of the smaller and medium-size spacer beads from one "bead station" grouping when designing the adjacent grouping, making slight changes and using a different center focal bead for each successive pattern. 

Beads strung onto bracelet memory wire

Step 5: Adjust as Needed So the Bead Stations Complement Their Neighbors, Both to the Sides and On the Other Coils

I've found that it's nearly impossible to create a final multi-strand beaded coil wrap bracelet design before stringing the beads on the memory wire. 

While the mechanics of cutting memory wire, stringing beads and finishing the ends are fairly simple, designing the bracelet so that the colors, sizes, shapes and patterns of each bead grouping complement not only the ones to either side on the same coil but also their counterparts on the adjacent coils is definitely a challenge (a bit like playing the three-dimensional chess game from Star Trek, lol). 

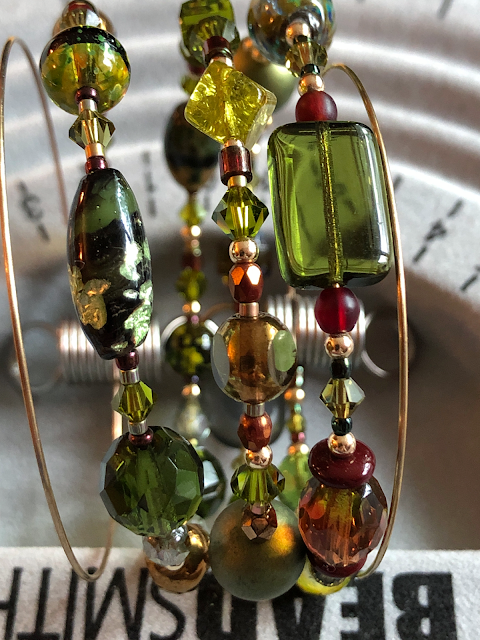
As you can see from the photos, my final design turned out to be significantly different from the initial pattern groupings I was experimenting with at the beginning in order to get all three parallel beaded coils to fit together nicely.


Extreme close-up of final beaded coil wrap bracelet design before trimming and finishing the wire ends

Step 6: Do a Final Alignment Check

Snug the beads down firmly, gently stretching the coils apart and adjusting the bead stopper clamps, if necessary, to ensure there are no gaps where the wire shows between the beads.

Then, do a final check to make sure you're happy with the way the beads on each coil align with those on the other coils. Even though I am careful to keep re-snugging the beads as I go, I usually have to make a few minor adjustments after snugging the beads one last time.

Gluing the last few beads to one end of the memory wire

Step 7: Glue The Last Several Beads to One End of the Bracelet, Then Trim the Memory Wire and Glue on the End Cap

Place one end of the memory wire into the jaws of the memory wire cutter. Using just enough force on the handles to compress the wire without cutting through it, make adjacent, parallel grooves along the first 1/2-inch of one end of the memory wire. This will create some "tooth" on the smooth metal surface to help the epoxy adhere better. Use an ultra fine point permanent marker to place a small mark about 3–4 mm from the tip of the wire.

Next, prepare a very small amount of the J-B Weld clear two-part epoxy. Put on your exam gloves, then squeeze equal amounts from both sides of the syringe dispenser onto a scrap of cardboard and mix them together thoroughly and quickly with a clean toothpick.. 

Clean off the tip of the toothpick, then use it to pick up a drop of the prepared epoxy mixture and apply it to the small section of wire where you made the grooves, starting at the mark you made about 3–4 mm from the tip and spreading it inward along the remainder of the grooved section. Quickly remove the bead stopper clamp and slide the last several beads down onto the glued section of wire, taking care not to get any of the epoxy on the last 3–4 mm of the grooved end of the wire. Slide one more bead down next to the glued beads, replace the bead stopper next to it to keep the glued beads in place while the epoxy sets, then prop the bracelet with the exposed tip of the wire facing upward.

When the epoxy has not only set but also cured, tug firmly on the glued beads to make sure they are securely attached. Then, slide a memory wire bead cap onto the clean end of the memory wire to gauge how much of the wire to trim. Remove the end cap and use the memory wire cutters to remove the excess length. 

Helpful Tip

Trim a little less wire from the end than you think you need to. Removing a bit more, if necessary. However, if you trim off too much, there won't be enough wire to allow the epoxy to bond it securely to the end cap. It's better to leave the wire a smidge too long and have a tiny gap between the last bead and the end cap than to trim it too short.

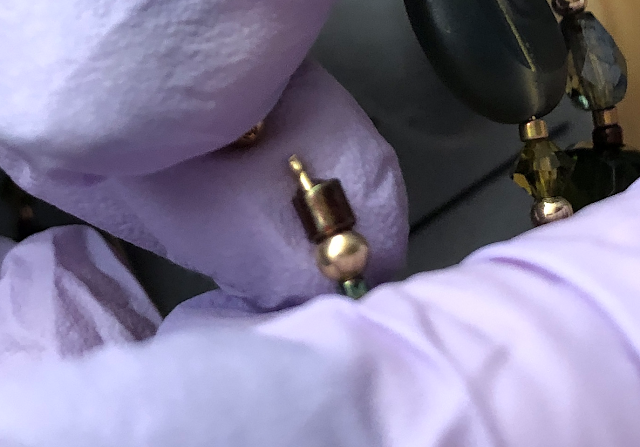
Close-up of gloved fingers aligning the hole of the memory wire end cap to the glued, trimmed wire end
Coat the tip of the trimmed and ridged wire end with a dab of epoxy and align the end cap hole.

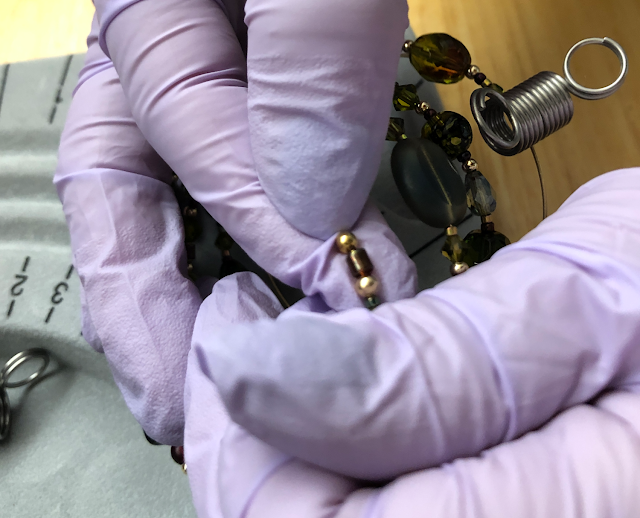
Close-up of pressing the end cap onto the glue-coated wire end
Then, quickly and carefully, push the end cap firmly onto the glued tip of the memory wire.

Using a fresh piece of cardboard and a fresh toothpick, prepare another small amount of two-part epoxy. Quickly apply a dab to the exposed end of the trimmed wire, align the hole of the memory wire end cap and guide it onto the wire tip. Hold the end cap securely in place for at least 60 seconds, applying pressure from the end with a clean, gloved fingertip. Slowly and carefully remove the pressure, then prop the bracelet with the freshly glued end pointing upward, so that gravity continues to pull it down onto the clipped wire tip. 

Allow the epoxy to cure fully, then give the end cap a tug to make sure it is firmly secured to the end of the wire before moving on to Step 8.

Step 8: Trim and Glue the Other End of the Bracelet

Finishing the second end is a bit trickier than the first. Slide the loose beads down the bracelet wire, snugging them firmly against the glued beads at the other end. Use the ultra fine point permanent marker to mark the wire at the last loose bead. Then, carefully slide several beads off that end of the wire and place them in order in a channel of the flocked bead board, making note of which end of the row of beads was at the end of the wire.

Use the memory wire cutters to indent parallel lines into the section of memory wire adjacent to the remaining strung beads, as before. Put on the exam gloves, prepare a small amount of epoxy, re-snug the beads and apply the glue to the section of exposed wire between the end of the strung beads and the mark you made. Quickly slide the beads you removed back onto the wire in the correct order and snug them down onto the glued section. Wipe off any visible epoxy that might have squeezed out onto the adjacent exposed wire. Replace the bead stopper and allow the epoxy to cure fully.

When the glue has cured, carefully remove the bead stopper and tug firmly on the glued beads to ensure that they remain firmly attached to the wire. Examine the adjacent wire carefully, scraping off any tiny areas of cured epoxy residue with a utility blade. 

Trim the excess wire, testing the length of the remaining exposed wire at the tip with the memory wire end cap and leaving just slightly more than the depth of the end cap bead hole. If necessary, use the memory wire cutter to impress additional closely-spaced parallel indents into the exposed wire end.

Prepare a small amount of epoxy and glue on the bead cap, applying pressure with a gloved fingertip for at least 60 seconds as before, then prop the bracelet with the freshly glued tip facing up and allow it to cure fully.

Tug on the end cap bead to ensure it is well secured to the end of the wire.

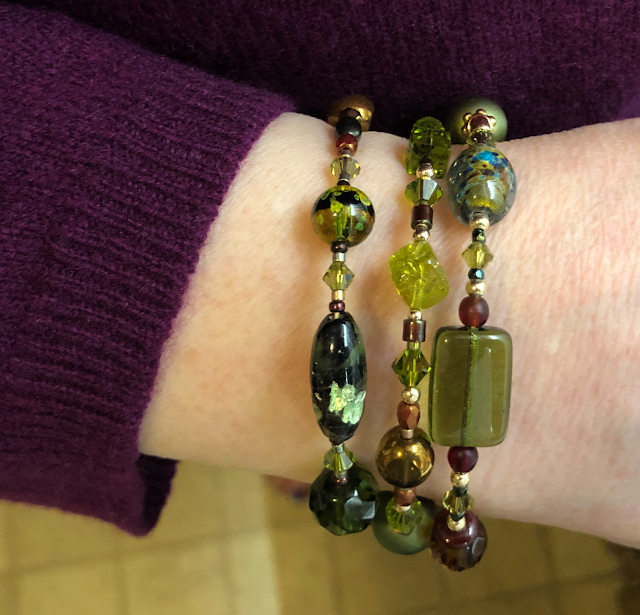
Finished beaded coil wrap bracelet being worn on woman's wrist
I'm modeling the finished, one-of-a-kind, vintage beaded memory wire wrap bracelet I designed and made as a birthday gift for my dear friend Sally.

Wear or Give Your Beaded Coil Wrap Bracelet With Pride! 

Although I collect rare vintage glass beads and Swarovski crystal beads and love to use them in my jewelry designs, making beautiful beaded memory wire coil wrap bracelets can be as easy or challenging and as inexpensive or costly a project as you decide to make it. 

Wouldn't it be fun to get some inexpensive beads from craft stores and find and disassemble beaded jewelry at bargain prices from yard sales and thrift shops, then pick up some memory wire, a heavy duty wire cutter and some epoxy and invite your favorite teens or college students over for a jewelry making "play date?"

I hope you decide to give this beaded coil wrap bracelet project a try. If you do, I would love to see what you make!


How to Make a Stylish Beaded Coil Wrap Bracelet by Margaret Schindel

Read More Crafts & DIY Reviews by Our Review This Reviews Contributors

Read More Gifts Reviews by Our Review This Reviews Contributors


Note: The author may receive a commission from purchases made using links found in this article. “As an Amazon Associate, Ebay (EPN) and/or Esty (Awin) Affiliate, I (we) earn from qualifying purchases.”


Wednesday, October 20, 2021

The Best Acrylic Fabric Paints for Painting Clothes and Accessories

Acrylic fabric paints, iron-on appliques and other embellishments are a fun and easy way to transform ordinary t-shirts, sweatshirts, denim jackets and jeans into special, one-of-a-kind clothing designs. 

Even if you don’t feel especially artistic, it’s extremely easy to add striking hand painted designs to basic wardrobe items by applying acrylic fabric paint through a stencil with a foam pouncer. 

Embellishing clothing with fabric paints is also a wonderful project to do with kids. Both my fashionista niece and her younger brother used to love taking solid color T-shirts and creating their own hand painted and stenciled designer tees, which they wore with pride.

Some fabric paints also work well on other materials, including leather and vinyl, so they’re great for painting shoes, sandals, handbags, belts and other accessories to give them a whole new look with fresh colors, color blocking, patterns or painted accents.

I have researched and used different types, brands and formulas of fabric paints in different price ranges. In this review I will share my favorite acrylic fabric paints for decorating clothing and accessories. 

The Best, Most Versatile Acrylic Fabric Paints for Embellishing Clothing & Accessories

Why Use Acrylic Fabric Paints?

Acrylic fabric paints, also called acrylic textile paints, are formulated specifically for use on fabric clothing and other textiles. Unlike fabric dyes and alcohol-based textile paints or inks, they do not spread and saturate the fibers. Most work best on untreated or pre-washed, natural fabrics and synthetic fabrics whose fiber content contains at least 50% natural fibers. 

Acrylic textile paints are usually thinner, penetrate fibers better and dry more flexible than standard acrylic paints formulated for art or craft uses. Fabric paints also contain a binder that helps them adhere much better to natural fibers after the paint dries and is heat-set (usually with an iron). This binder makes the painted designs more durable, so they can better withstand repeated washing and resist cracking, peeling or flaking when the fabric is gently stretched or folded, such as when you put on, move around in, take off or put away your painted clothing.   

More transparent colors usually have a thinner consistency and are softer to the touch when dry compared to more opaque fabric paints. They are great for lighter color fabrics, since the color of the clothing will show through them. For the same reason, opaque fabric paints will show up much better on darker clothing, although they are slightly thicker and will dry a bit stiffer than more transparent formulas.

Good Quality Fabric Paints Give the Best Results

Jacquard makes moderately priced, high-quality, highly pigmented paints, dyes, mica powders and other art and craft supplies. Jacquard's Textile, Neopaque and Lumiere lines are my go-to acrylic paints for painting fabrics.

Jacquard Textile acrylic paints "Exciter Pack" assortment

Jacquard Textile 

Jacquard Textile paints have a medium- to light-bodied consistency and come in 39 semi-transparent colors. Mixing any of the other colors with 123 White will create a pastel shade. You can make any color more transparent without affecting the quality or consistency by mixing it with Jacquard Textile 100 Colorless Extender. (Another option, which I don’t recommend, is diluting the paints with up to 25% water, since it will reduce their viscosity and negatively affect the quality.)  Mixing any other Jacquard Textile color with #220 Super Opaque White will make it more opaque. 

The Jacquard Textile Color Exciter Pack is an economical assortment that includes small bottles of nine of the most useful colors in the line. It's a great way to try these paints without investing a lot of money.

Jacquard Textile colors can also be mixed with Jacquard Lumiere, Neopaque or Dye-Na-Flow paints or with Jacquard Pearl Ex Powdered Pigments to create custom colors and effects.

Jacquard Neopaque and Lumiere

Neopaque is Jacquard’s line of light-bodied, opaque acrylic paints. They come in 21 colors plus a Flowable Extender medium that can be used to make the colors more transparent without altering the paint’s texture, consistency, adherence and other key properties. Lumiere is a companion line of 33 beautiful metallic and pearlescent paint colors designed to complement the Neopaque solid colors and have similar characteristics. My favorite Lumiere paints are the color-shifting duo-chrome colors!

Even though the Jacquard Neopaque and Jacquard Lumiere lines have not been optimized specifically for painting on fabrics, like the Jacquard Textile line, they have many of the same characteristics and are also considered fabric paints. After they have dried and been heat-set, both Neopaque and Lumiere paints adhere to textiles very well, remain flexible and resist cracking, peeling and chipping. I have used them to paint fleece sweatshirts, both freehand and with stencils, and they have withstood many washings well.

Both formulas are opaque, highly pigmented and provide good coverage, even on dark fabrics. You can mix any Neopaque or Lumiere shade with Neopaque Flowable Extender to make it more transparent without changing its consistency, thickness, flexibility, adherence or other important characteristics. 

Similarly to the Jacquard Textile line, you can mix pastel shades by blending a small amount of Neopaque White into any of the other Neopaque colors.

Jacquard Neopaque and Lumiere acrylic paints
I've been using my first Jacquard Neopaque and Lumiere acrylic paint Exciter Packs for many years. 

There are also a Lumiere Exciter Pack with 9 pearlescent and metallic colors and a Lumiere & Neopaque Exciter Pack with 7 metallic Lumiere shades plus black and white Neopaque. As with the Textile line, these two Exciter Packs are a great way to get a nice variety of colors in smaller quantities for a very affordable price. I have purchased both of these Exciter Packs as well as full-size bottles of the Neopaque black and white and Lumiere duo-chrome colors I use most. I recently bought another of the Lumiere assortments because some older colors have been discontinued and newer ones added.

Another advantage of Jacquard Lumiere and Neopaque acrylic paints is that they adhere well to a wide range of surfaces including paper, wood, rubber, vinyl, leather and rubber, in addition to fabric, and can be used for many different types of projects. I have gotten more than my money’s worth out of mine. 

For example, I completely transformed an old pair of boring, frumpy, beige comfort sandals by painting the leather with Lumiere for the uppers and black Neopaque to edge the sole, and then sewing on some faux jeweled trim. 

Beige sandals before and after being painted with aqua and blue Jacquare Lumiere acrylic paints

Heat-Set Fabric Painting Medium 

You also can achieve successful results by mixing permanent, highly pigmented art or craft acrylic paints 50/50 with a good quality fabric medium, such as Golden GAC 900 Heat-Set Fabric Painting Medium or Martha Stewart Tintable Fabric Medium. 

Pébéo Setacolor

If you are painting a very special piece of clothing or textile, you may want to consider the Pébéo Setacolor line. These superb fabric paints come in an extensive range of beautiful colors and finishes. Although they are more expensive than the Jacquard fabric paints, superior quality, performance and product selection make Pébéo Setacolor products a favorite among many professional painted clothing artists and enthusiasts. 

Pébéo Setacolor Light Fabrics are transparent and include 44 matte, metallic, glitter, and fluorescent shades. Pébéo Setacolor Opaque comes in 77 matte and “shimmer opaque” shades with glitter, pearlescent, metallic and iridescent finishes that dry softer, smoother and more flexible than most other opaque textile paints. There are also Pébéo Setacolor 3D fabric paints that come in tubes with small nozzles that are great for adding raised outlines or dimensional accents to your painted clothing designs. 

The most affordable way to try these terrific paints is with one of the 10-color introductory sets, the Pébéo Setacolor Light Fabrics Discovery Kit or the Pébéo Setacolor Opaque Discovery Kit

Use Fabric Paints and Stencils for Beautiful, Affordable, One-of-a-Kind Handmade Gifts 

Stencils are made in just about any pattern or theme you could want and require no artistic talent to use.

I have used inexpensive fabric stencils of flowers, gardening tools and bees to decorate a sweatshirt for my mother-in-law who loves to garden. 

One of my husband’s favorite gifts from me is a forest green sweatshirt I purchased for him many years ago and stenciled with a cascade of metallic and pearlescent autumn leaves. It has been worn and washed so many times that the fleece is pilling, and the color has faded. By now, the paint isn’t quite as bright or shiny as it once was, either, but it’s still hasn’t cracked, flaked or worn off, and he still wears it proudly.

Man wearing dark green sweatshirt with a stenciled metallic autumn leaves design
My husband still loves and wears this sweatshirt I stenciled for him many years ago. 

You can use alphabet stencils to personalize a T-shirt, hoodie or other garment with the gift recipient’s name or add a meaningful word or message. 

Older children will also love using fabric paints and stencils to turn simple, inexpensive pieces of clothing into personalized gifts for special friends and family members.

Stenciled or hand painted tablecloths, napkins, placemats and table runners also make wonderful gifts. Painting them with snowflakes, pointsettias and other seasonal designs makes any holiday a bit more festive. 

I hope I have inspired you to give fabric paints a try!

The Best Acrylic Fabric Paints for Painting Clothes and Accessories


The Best Acrylic Fabric Paints for Painting Clothes and Accessories by Margaret Schindel


Read More Crafts Reviews by Our Review This Reviews Contributors

Read More DIY Reviews by Our Review This Reviews Contributors


Note: The author may receive a commission from purchases made using links found in this article. “As an Amazon Associate, Ebay (EPN) and/or Esty (Awin) Affiliate, I (we) earn from qualifying purchases.”


Wednesday, October 6, 2021

My New Irresistibly Delicious Keto Cheese Crackers Recipe

Cheddar cheese crackers are one of the few things I've really missed since I embarked on a healthy ketogenic diet in 2019 (and lost nearly 60 pounds). The only acceptable replacement I've found for those famous, small, square cheese crackers in the bright red box with the cutesy name were Defy Foods' yummy keto cheddar crackers, which were sold only online, cost significantly more than their unhealthy, conventional cheese crackers counterparts and, sadly, are no longer made.

Recently, I began experimenting with my own homemade keto cheese crackers recipe, inspired by recipes from two of my favorite low carb recipe developers. I combined elements of both their recipes and added some powdered, dehydrated, real cheddar cheese for an extra flavor boost. This past weekend, I finally perfected my version. Both my husband and I couldn't be more thrilled with the results!

I am delighted to share my delicious new keto cheese crackers.

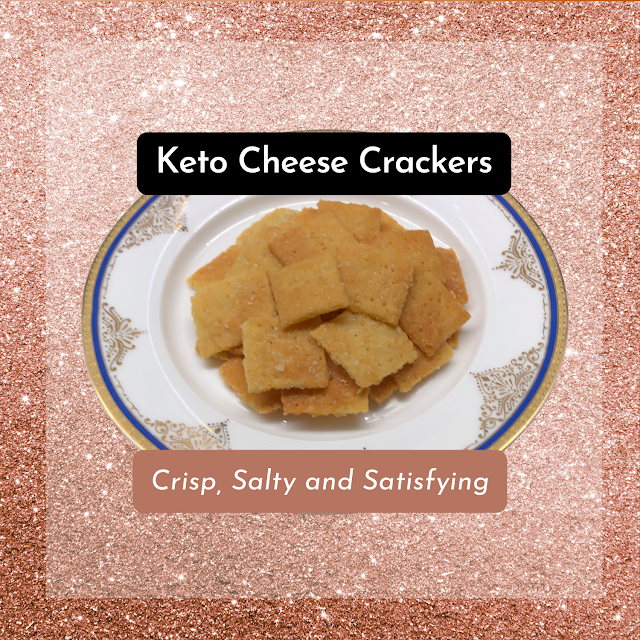
Crisp, Salty and Satisfying Keto Cheese Crackers
My healthy, homemade low carb crackers are bursting with real cheddar cheese flavor

My Inspiration for This Recipe

When I decided to try my hand at making homemade cheddar cheese crackers, I started by searching for recipes on my two favorite low carb keto recipe developers' blogs, Carolyn Ketchum's All Day I Dream About Food</ > and Maya Krampf's Wholesome Yum. Carolyn and Maya are two of my go-to gurus for reliable, delicious recipes that support my low carb lifestyle. 

Carolyn's Keto Cheese Crackers with Pepper Jack looked great, but I'm not a big fan of pepper jack cheese or red pepper flakes. I also wasn't sure that adding garlic powder to the dough would give me the classic flavor I was looking for. The recipe also called for brushing the thinly rolled out dough with melted butter and then sprinkling it with coarse salt before baking. While it sounded delicious, I preferred to start with fewer ingredients and fewer steps for my first attempt.

Maya's Low Carb Keto Cheese Crackers Recipe had fewer ingredients and steps. However, the optional nutritional yeast "for cheesier flavor" wasn't something I had on hand, since I didn't care for the taste the few times I had tried using it as a substitute for grated cheese.

Recipe Experiment #1: Tasty, But Not Quite There Yet

Since I wanted my crackers to have a strong cheddar cheese flavor, I replaced the optional nutritional yeast in Maya's recipe with Vermont sharp cheddar cheese powder. 

The resulting crackers were quite tasty. However, I wanted them to have a stronger cheddar flavor and be a bit more buttery and salty. In addition, the small, fragile squares of thinly rolled dough were quite prone to tearing as I transferred them to the parchment-lined baking sheet.

Recipe Experiment #2: We Have a Winner! 

For my second batch, I changed a few things when I was making Maya's cheddar dough:

  • I substituted twice as much Vermont sharp cheddar cheese powder for the optional nutritional yeast.
  • I increased the amount of salt from 1/4 teaspoon to 3/8 teaspoon. 
  • After stirring together the dry ingredients, instead of combining them with the egg first, I stirred them into the melted cheese along with the egg.

I also made several other changes based on Carolyn's pepper jack cheese crackers recipe:

  • The dough was rolled out on a silicone baking mat sprinkled with almond flour (using parchment paper on top to prevent the dough from sticking to the rolling pin). After pricking and cutting the  dough, it was much easier to just slide the mat onto the baking pan instead of lifting and transferring the fragile squares of raw dough.
  • I used a pizza cutter to slice the sheet of dough into approximately 1-inch squares. (I also didn't worry about trying to cut perfectly parallel and perpendicular lines, since I wouldn't succeed in any event!).
  • Before putting the crackers in the preheated oven, I brushed them with melted butter and sprinkled them with coarse salt.
  • This time, I baked the crackers at 300 ℉ instead of 350 ℉, left them in longer, turned off the oven when they were barely golden brown and left them inside to finish developing their color, cool slowly and crisp up.

Maya and Carolyn are extremely talented, very experienced low carb recipe developers. Combining elements from both their recipes and adding the Vermont sharp cheddar cheese powder turned out to be a winning strategy. This new version produced dozens of perfectly crisp, deliciously salty, buttery cheddar cheese crackers that tasted absolutely amazing! 

My husband adored them, too. (In fact, he might easily have devoured the entire batch on the spot if I hadn't set aside a small plate of these crackers to photograph for this recipe!)

Plate of prepared keto cheese crackers

Wholesome, Homemade Low Carb Cheddar Cheese Crackers That Everyone Will Love

I'm really excited to share my new keto cheese crackers recipe! 

For the many people who follow a low carb or ketogenic diet and have been searching in vain for buttery, salty, flavor-packed low carb crackers that don't cost an arm and a leg, these scrumptious bite-sized savory snacks will satisfy those cravings. Unlike the conventional grocery store kind, these are made with minimally processed, "real food" ingredients. 

These crisp, delicious, high protein cheese crackers are tasty enough for everyone can enjoy, whether or not they are trying to cut back on highly processed foods with empty calories.

They're wonderful to bring to holiday parties or get-togethers with family and friends any time of year. You can indulge without "cheating" on your low carb diet and no one who tastes them will guess that your homemade cheddar crackers are made with almond flour instead of wheat flour.

Who says you can't enjoy holidays treats without gaining weight?

How to Make Keto Cheese Crackers

These irresistible keto cheese crackers are quite easy to make. However, low carb baking is quite different from conventional baking methods. Here are a few important tips to keep in mind, especially if this is your first experience baking with almond flour.

Plate of keto cheese crackers surrounded by recipe ingredients

Choose High Quality Ingredients for the Best Taste and Texture

This recipe calls for only a few ingredients, so the quality of each one will have a major impact on the taste and texture of your homemade crackers. 

For the best flavor, buy a block of good, sharp (or very sharp) Vermont cheddar cheese and grate or shred it yourself just before making this recipe. Cabot Creamery cheddar, which Carolyn Ketchum recommends, is one of my favorite brands, too. 

I used King Arthur Better Cheddar Cheese Powder for these keto cheese crackers, which I had purchased for another recipe and like very much. King Arthur Baking Company (formerly King Arthur Flour) has a a well deserved reputation for excellence and baking expertise. I have relied on their products and recipes for decades. 

It's important to use fresh, finely ground and blanched almond flour for most low carb keto baking recipes. My favorite is Maya Krampf's Wholesome Yum premium almond flour.

You will need two kinds of salt: fine sea salt (or table salt, if you prefer) and coarse or flaked salt. For the dough, I used Redmond Real Salt Ancient Fine Sea Salt, an unrefined, unprocessed sea salt with trace minerals and no additives. It's comparable to pink Himalayan sea salt, but has been "mined in Utah since 1958 from an ancient seabed protected from modern pollution."

After pricking, cutting and brushing the thinly rolled out dough with melted butter, I sprinkled the tops of the crackers with a combination of coarse sea salt and crushed Maldon sea salt flakes before baking. The Maldon sea salt flakes were too coarse to use straight from the package, but crushing them with my fingers and mixing them with the regular coarse sea salt turned out to be the perfect topping.

Use a Silicone Baking Mat and Unbleached Baking Parchment to Roll Out the Dough

Rolling out and cutting the dough on a silicone baking mat and then sliding it onto your baking sheet is much easier than rolling the dough between sheets of baking parchment and cutting and transferring the small, fragile squares to the pan. The best known brand, Silpat, commands a premium price. Fortunately, I've also had good luck with much less expensive silicone baking mats.

It's essential to cover the raw dough with a large sheet of baking parchment paper when you're rolling it out, so that it doesn't stick to the rolling pin. These days, I only use unbleached baking parchment. (Who wants to risk leaching chlorine bleach into their homemade baked goods?) I find the flat, 12" x 16" pre-cut sheets of unbleached baking parchment much easier to use than wrestling with a piece torn from a roll whose curl stubbornly refuses to flatten out. 

Use a Large, Microwave-Safe Bowl and a Sturdy Silicone Mixing Spatula for Making the Keto Cheese Crackers Dough

I often use my 2-quart Pyrex measuring cup as a large mixing bowl, especially for recipes that require melting ingredients such as butter, chocolate or cheese in the microwave. The handle provides a good grip on the microwave-safe glass bowl as you incorporate the dry ingredients and the egg into the melted cheddar cheese.

The best tool for the job is a sturdy, stiff rubber spatula. I prefer the DI ORO Seamless Series Large Silicone Spatula for this purpose, which was named "Winner: Best All-Purpose Spatula" in Cook's Illustrated's March 2017 Silicone Spatulas Equipment Review (paid subscription required)

Roll Out the Dough as Thinly and Evenly as Possible 

The thinner you roll the dough, the crisper your crackers will be. Try to roll out the sheet of dough to as uniform a thickness as possible, which will help the crackers bake at the same rate. (You may want to make the dough near the edges slightly thicker to prevent the outermost row of crackers from browning too quickly.)

Use a Pizza Wheel With a Plastic Blade to Cut the Dough Into Strips and Then Squares

The plastic blade cuts through the dough cleanly without slicing into your silicon baking mat. It's also faster, easier and safer than cutting the small squares with a knife. The OXO 1065872 Good Grips 4-inch Pizza Wheel and Cutter for Non-Stick Pans is very similar to the one I own (which is no longer made) and gets excellent customer product reviews.

If You Are Using a Countertop Oven, Divide the Dough Into Quarters and Bake It in Four Batches

The built-in double wall ovens that came with our 1950s ranch-style house died several years ago. Since then, we have been making do with a countertop oven. (If you are considering one, I encourage you to read Sylvestermouse Cynthia's recent Calphalon Performance Cool Touch Countertop Toaster Oven product review.) 

Unbaked keto cheese crackers on silicone mat in small baking pan

Obviously, having to use a much smaller silicone baking mat and pan (approximately 8.5" x 12.5") that could fit inside my large toaster oven took much longer than using a large silicone mat and baking sheet and baking in a full-size oven. However, as you can see from my photos, it is certainly doable. 

Keto Cheddar Cheese Crackers Recipe

Plate of keto cheese crackers
These buttery, low carb crackers will satisfy your cravings without kicking you out of ketosis. They're yummy enough to share with carb-loving friends and family of all ages, so they're perfect for holidays, football games, parties, kids' lunchboxes and everyday snacks. 

Prep Time   20 minutes

Cook Time  30–60 minutes

Total Time   50–80 minutes

Servings       8–10

Ingredients

  • 6 ounces sharp cheddar cheese
  • 1 ½ cups finely ground and blanched almond flour (plus extra for dusting)
  • 2 Tbsp good quality sharp cheddar cheese powder
  • 3/8 tsp fine sea salt
  • 1 large egg, lightly beaten, at room temperature
  • 1 Tbsp butter, melted
  • Coarse salt for sprinkling

Instructions

  1. Preheat the oven to 300 ℉. Place a large silicone baking mat on your counter, table or other work surface and sprinkle it with almond flour.
  2. Grate or shred the sharp cheddar cheese into a large microwave-safe bowl or a 2-quart (8-cup) Pyrex measuring cup. 
  3. Stir together 1 ½ cups of the almond flour with the cheddar cheese powder and salt.
  4. Microwave the cheese on High at 30-second intervals, stirring with a large, sturdy rubber or silicone spatula until the cheddar is completely melted and has a smooth consistency. 
  5. Stir in the almond flour mixture and the egg and use the spatula to "knead" the dough against the the sides of the bowl. Then, turn out the dough onto a lightly greased sheet of parchment or waxed paper and use your hands to squeeze and finish kneading the dough into a compact ball. The dough should be soft and pliable and feel a bit oily. If it's too sticky to work with easily, you can either chill it for 15 minutes or so or work in another tablespoon or two of almond flour.
  6. Flatten the ball of dough and shape it into a square patty, then place it in the center of the prepared silicone baking mat. Cover it with a large sheet of baking parchment (or wax paper) and roll it out as thinly and evenly as possible (no more than 1/8-inch thick).
  7. Use a pizza wheel with a plastic cutting disc to slice the sheet of dough into small squares or rectangles approximately 1-inch wide (although you can make them wider, if you prefer). You should end up with between 5 dozen and 8 dozen (60–100) crackers, depending on how thinly you roll the dough and what size you make your squares or rectangles.
  8. Prick the tops of the crackers with a fork or toothpick, brush them with the melted butter and sprinkle them with the coarse salt. Then transfer the silicone mat carefully onto a large baking sheet and place it in the preheated oven. 
  9. Bake until the crackers turn a light golden brown and the edges begin to crisp up (approximately 15–30 minutes, depending on the size and thickness), then turn off the oven and allow them to remain inside until they are firm to the touch. Keep a close eye on the color of the pieces around the edges. If they are browning faster than the ones in the center, remove the darker pieces and let them cool at room temperature while the rest of the crackers cool down more slowly inside the warm oven. 

I like to store these keto cheese crackers in single layers, separated by paper towel, inside an airtight tin or large Stasher silicone food storage bags, which are extremely easy to seal and unseal. Layering them with paper towels helps absorb ambient moisture and keep them crisp. However, if they last more than a day or two, you can just pop them back into a 300 ℉ oven for a few minutes. Just be sure to keep an eye on them so they don't get too brown.

My New Irresistibly Delicious Keto Cheese Crackers Recipe by Margaret Schindel

Posts About My Keto Diet Journey

My First Year on The Keto Diet

Preparing to Succeed on the Keto Diet, Part One

Preparing to Succeed on the Keto Diet, Part Two

Low Carb Muffins & Cupcakes: Treats to Enjoy on a Keto Diet

Low Carb Keto Chocolate Yogurt Granola Chip Pudding Recipe

Good Dee’s Keto Cookie Low Carb Baking Mix Review

Hamama Microgreens Growing Kit Review & Success Tips

My Favorite Hamama Microgreens Seed Quilt Accessories

Keto Cheddar Cheese Biscuits With Chives Recipe

The Ultimate Keto Hot Chocolate Recipe

The Best Low Carb Keto Gift Ideas: Keto Gift Guide

The Best Low Carb Keto Cinnamon Muffins

Wholesome Yum Keto Bread Mix and Yeast Bread Recipe

The Good Chocolate 100% Organic No Sugar Dark Chocolate Review

The Best Advice to Maintain Your Keto Diet Weight Loss

My New Irresistibly Delicious Keto Cheese Crackers Recipe

Luscious Low Carb Keto Triple Peppermint Cheesecake Brownies Recipe

Quick & Easy Livlo Blueberry Scones Keto Baking Mix Review

Snack Better With The Best Healthy Keto Cookie Dough Bites

The Best Quick and Easy Low Carb Keto Pizza Recipe

The Best Quick and Easy Low Carb Keto Shortcake Cupcakes Recipe

Comparing the Best Keto-Friendly Chocolate Hazelnut Spreads - No Added Sugars

The Best Low Carb Keto Sandwich and Burger Buns Mix

Blueberry Biscuit Scones — New, Easy, Low Carb Keto Recipe

The Best Keto Pizza Crust Mix With 0 Net Carbs

An Unusual, Delicious Strawberry Chocolate Tea With 0 Calories

Delicious Sugar-Free Keto Cookies That OREO Fans Will Love

Healthy Pistachio Cherry Chocolate Chip Marshmallow Cereal Treats Recipe

Easy, Decadent, High Protein, Sugar-Free Rocky Road Cottage Cheese Ice Cream

The Best Quick & Easy Low Carb Sausage and Ricotta Calzones

How to Make Refreshing Vanilla Italian Soda (With or Without Cream)


Reviews of the Keto Diet by Barbara C. (aka Brite-Ideas)

My Personal Keto Testimonial

How I Stayed Committed to the Ketogenic Way of Eating

Read More Recipe Reviews by Our Review This Reviews Contributors

Read More Product Reviews by Our Review This Reviews Contributors

Read More Reviews About Health and Wellness by Our Review This Reviews Contributors


Note: The author may receive a commission from purchases made using links found in this article. “As an Amazon Associate, Ebay (EPN) and/or Esty (Awin) Affiliate, I (we) earn from qualifying purchases.”


Most Recent Reviews on Review This Reviews


Search for Reviews by Subject, Author or Title

The Review This Reviews Contributors


SylvestermouseSylvestermouseDawn Rae BDawn Rae BMbgPhotoMbgPhotoBrite-IdeasBrite-IdeasWednesday ElfWednesday ElfOlivia MorrisOlivia MorrisTreasures by BrendaTreasures by BrendaThe Savvy AgeThe Savvy AgeMargaret SchindelMargaret SchindelRaintree AnnieRaintree AnnieLou16Lou16Sam MonacoSam MonacoTracey BoyerTracey BoyerRenaissance WomanRenaissance WomanBarbRadBarbRadBev OwensBev OwensBuckHawkBuckHawkDecorating for EventsDecorating for EventsHeather426Heather426Coletta TeskeColetta TeskeMissMerFaeryMissMerFaeryMickie_GMickie_G


Review This Reviews is Dedicated to the Memory of Our Beloved Friend and Fellow Contributor

Susan DeppnerSusan Deppner

We may be apart, but
You Are Not Forgotten


“As an Amazon Associate, Ebay (EPN) and or Etsy (Awin) Affiliate, I (we) earn from purchases.” Disclosure Statement

X