Showing posts with label Margaret Schindel. Show all posts

Wednesday, May 20, 2020

Copper Chef Black Diamond Nonstick Cookware Review

Copper Chef Black Diamond nonstick cookware has a diamond-reinforced, black ceramic coating and textured cooking surface that make these pans the most durable, scratch-resistant, best-performing nonstick cookware I've tried — and I've tried a lot!

Copper Chef Black Diamond - The Best Nonstick Cookware
©2020 Margaret Schindel, all rights reserved

Several years ago, I began replacing our large collection of old nonstick cookware. All the pans had visible scratches in the coating after years of use, so they no longer had their nonstick qualities. I also didn't want to risk the possibility of accidentally ingesting a speck (or flake) of loosened Teflon, especially since the older Teflon coatings were manufactured with PFOA.

Since I had a lot of pans to replace (my husband and I both cook a lot!), I research the newest generation of nonstick coating options and cookware. I tried a T-Fal skillet and, later, an OXO Good Grips nonstick frying pan, both recommended by Cook's Illustrated at the time, as well as a highly-rated set of two skillets from Sur La Table, but I found they scratched too easily for my household's needs (my husband tends to be a bit hard on pans!).

Original Copper Chef Nonstick Cookware

A few years ago, my mother-in-law bought us a set of the original Copper Chef pans, after she had bought herself some and loved them. This line is now called the Copper Chef Signature Series.

The set she gave us included a shallow square 9.5" fry pan, a deep square 9.5" pan, a square basket insert for deep frying or draining pasta, a steamer insert, a square tempered glass lid that fit both pans, and a cookbook.  You can learn more about one of the original Copper Chef pans from my fellow Review This Reviews contributor Cynthia (Sylvestermouse), in her review of the original Copper Chef square fry pan.

Admittedly, I was skeptical about the quality of "As Seen on TV" nonstick cookware purchased from an infomercial. I also didn't understand the appeal of a square skillet or pan instead of the traditional round shape. However, I soon discovered how much better and more durable the ceramic nonstick cooking surface was, compared to the others I had tried. I also liked how much more surface area and capacity the square pans provided compared to round ones of the same diameter, and how much easier it was to slide a spatula under the edge of an omelet or crepe, for example.

After six or so months of heavy use, we were pleasantly surprised at how well those two nonstick pans were holding up, so we decided to expand our collection with the Copper Chef Square Fry Pan 5 Piece Set, which included an 9.5-inch square griddle pan with a glass lid, an 11" square griddle pan with a glass lid, and an 8" ridged grill pan.

Copper Chef Black Diamond Nonstick Cookware: Even Better Than the Original Signature Pans!

About a year later, my husband and I were confident enough in the durability of the Cerami-Tech coating and the excellent heat conductivity of the built-in stainless steel induction plates, which worked so well on our glass stovetop, to expand our collection even  more. 
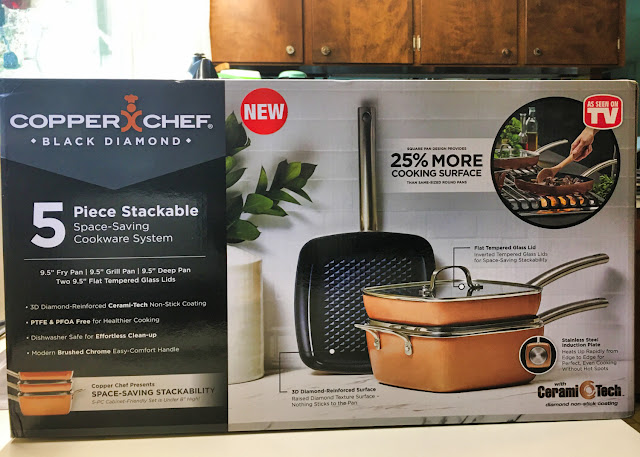
That's when I discovered that the company had introduced a new, improved line: Copper Chef Black Diamond nonstick cookware.

Boxed 5-piece set of stackable space-saving Copper Chef Black Diamond nonstick cookware
My first Copper Chef Black Diamond 5-piece stacking non-stick cookware set
©2020 Margaret Schindel, all rights reserved

We chose the Copper Chef Stackable Black Diamond 5-piece Non-Stick Fry Pan Set, which comes with a 9.5" square grill pan (with grilling ridges), a 9.5" square griddle pan with the raised diamond pattern interior bottom, a 4.5-quart, 9.5" deep square pan with the same raised texture on the inside bottom, two 9.5" tempered glass square lids (which fit all three pans, as well as most of our other Copper Chef pans), and a recipe book.
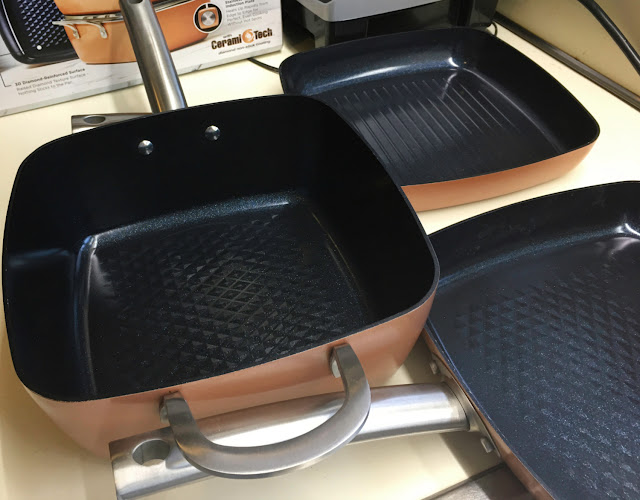
Textured interior bottoms of Copper Chef Black Diamond nonstick pans in 5-piece set
Raised 3D interior texture on Black Diamond pans
©2020 Margaret Schindel, all rights reserved

Here are the key features that make Copper Chef's Black Diamond nonstick cookware line superior to the company's original Signature line of pots and pans.

Diamond Reinforced Ceramic Coating + 3D Textured Interior Bottom = Even Less Sticking

Not only are these pans extremely attractive, with their copper-colored exteriors and black interiors, they also are more durable, because the Cerami-Tech nonstick coating is reinforced with thousands of tiny diamond particles. In addition, the inside bottoms of the Copper Chef Black Diamond pans (except the ridged grill pans, which don't need it) have a raised, diamond pattern surface, rather than the original, totally flat surface, which enhances their nonstick performance.

Oven-Safe Coating

The deep square pan also works well as a casserole, since the pans are oven safe. Both the Cerami-Tech diamond-reinforced ceramic nonstick coating on the interior and the regular Cerami-Tech coating (the same as on the original CC pans) on the exterior of this cookware are temperature-resistant up to 850° F. The tempered glass lids, however, are only temperature-resistant up to 350° F, so make sure not to exceed that temperature or let the glass lids get too close to the heating elements. Another option is to cover your casserole with aluminum foil.

Quick and Easy Cleanup After Cooking

I highly recommend hand washing any nonstick cookware, regardless of any marketing claims that the pans are dishwasher safe. Fortunately, if you care for these pans properly, they clean up quickly and easily with just a sponge, mild liquid dish soap and hot water. Check out my helpful cleaning and care tips toward the end of this product review.

Space-Saving, Stackable Design For Convenient Storage

All three pans can be stacked, a space-saving feature we love and took advantage of until my husband finally built us a wall-mounted bar of hanging hooks for storing our growing collection of nonstick pots, pans and lids in our very small galley kitchen.

Three Copper Chef Black Diamond square nonstick pans, stacked, with lids
The pans stack compactly in this space saving cookware design
©2020 Margaret Schindel, all rights reserved

When the two frying pans (flat bottom and grill pan) and the deep pan (more like a saucepan or pot) are stacked, the collective dimensions, including the long handles, are 19.5" X 10 X 7.75" — not a lot of space for two frying pans and a pot, each with 25% more cooking area than round equivalents!

Not All Brands of Copper Ceramic Coated Nonstick Cookware Perform Well

As we expanded our collection, we tried pans with copper ceramic nonstick coating from a few other brands and discovered that, while they may all look similar (and, in some cases, nearly identical), the quality of some brands isn't on a par with that of Copper Chef. For example, we bought an 11" square griddle pan for my husband, who wanted it to make French toast, that looked like it matched our collection. However, it didn't have the built-in stainless steel induction plate, so it didn't heat up as quickly or evenly as our Copper Chef pans.

SHINEURI 5 piece nonstick copper cookware set
We love the SHINEURI 5 piece nonstick
copper cookware set we purchased
on Amazon

The good news is that we also discover some winners among the competitor brands. At the time, Copper Chef wasn't making any round pots or pans, and we wanted a set of small and medium covered nonstick saucepans to replace the ones we threw out, as well as a couple of small to medium size round skillets for making omelets and such.

I was delighted with both the quality and the appearance of the SHINEURI 5-piece nonstick copper ceramic cookware set we purchased, which has the reverse color scheme of our Copper Chef Black Diamond pans and looks terrific with them. The 1.5 quart and 2.5 quart saucepans with glass lids and the open 8" sauté pan look as though they were designed and manufactured by the same designer and factory as the original Copper Chef Signature pans. Even the slightly domed lids and hollow stainless steel handles look exactly like the original CC pans, and they also perform just as well as those, although not as well as the Black Diamond pans.

Fortunately, the Copper Chef Black Diamond line has since expanded and now includes round pots and pans.

Another high performer we purchased from a competing brand was the Home Hero 8" round nonstick skillet with glass lid, which also had the built-in stainless steel induction plate and has performed as well as our original Copper Chef pans, although it doesn't look quite as nice, in my opinion, and doesn't have the textured interior bottom or diamond-reinforced nonstick coating of the Black Diamond pans.

Copper Chef Black Diamond Nonstick Cookware Makes a Great Gift

We loved our 5-piece set of square Black Diamond pans so much that we bought two more sets as Christmas gifts, one for my in-laws and one for my brother. The recipients agree that these are by far the best nonstick pans they have ever owned.

Set of copper cooking utensils with silicone tips for nonstick cookware on Amazon
You can buy this gorgeous set of
copper metal and black silicone
cooking utensils on Amazon

Anyone who cooks would likely be delighted to receive a set of these good-looking, durable, well-designed, nonstick pans. As a bonus, the company's packaging is attractive and perfect for gift-giving.

If you or your gift recipients prefer round pans to square ones, this Copper Chef Black Diamond 10-piece set is another excellent choice. It comes with an 8-inch open fry pan, a 10-inch round skillet with curved sides and a tempered glass lid, a 2-quart saucepan with a glass lid, a 4.5-quart casserole pan with see-through glass lid, a roasting rack, and a nonstick-safe serving spoon and slotted spatula. My husband and I both think we'd get a lot of use out of this set, which would complement our existing pieces nicely. We plan to add these nonstick pans to our collection eventually.

Either of these Copper Chef nonstick cookware sets would make a wonderful gift for someone special — including yourself!

For an even more special gift, consider adding this set of beautiful black silicone nonstick cooking utensils with copper handles. I think they would look absolutely stunning with Copper Chef Black Diamond nonstick cookware, the company's original Signature line of pans,or similar copper ceramic nonstick pans from competing brands.

I confess to being quite tempted to put these on my birthday or holiday wish list, even though I already own plenty of perfectly functional cooking utensils for nonstick pans. They're just so pretty...and they really do look as though they were custom-designed to go with the Black Diamond pans, don't they?

Care and Cleaning Tips

The manufacturer says these pans are dishwasher safe. However, I strongly recommend hand washing them, because dishwasher detergent is abrasive. (That's why drinking glasses that are washed in the dishwasher frequently will become cloudy over time; that cloudiness is caused by the abrasiveness of the detergent gradually etching the surface of the glass!)

Fortunately, hand washing these pans is a breeze if you follow these tips:

  • Don't use these pans over high heat, and don't preheat them completely empty; wipe or spray on at least a thin film of butter or oil before preheating. (This advice goes for any brand or type of nonstick cookware.)
    • Use a regular (not nonstick) pan for searing meat.
  • Use hot, soapy water and a regular cellulose sponge, a nubby silicone sponge or, my personal favorite, a Scrub-It non-scratch sponge, which has a soft microfiber cloth side and a gentle "scrubber" side that is safe for nonstick pans, as long as you don't use it to scrub them aggressively.
    • I learned the hard way that a Scotchbrite or similar scrubby sponge is too abrasive for cleaning the Cerami-Tech nonstick coating, which covers both the inside and outside of the Copper Chef pans (other than the stainless steel induction plate and handle).
  • When the pans have cooled from hot to warm, either wash them before they have fully cooled or just fill the kitchen sink with hot, soapy water and leave them them to soak until you're ready to wash them.
  • Caveat: If you want to use a steel wool pad to scour the built-in stainless steel induction plate on the bottom, take care to keep the steel wool away from the exterior Cerami-Tech nonstick coating. 
    • As you can see in the following side-by-side photo of two of our Copper Chef fry pans, my husband and I learned the hard way that if you aren't careful to keep the steel wool scouring pad only on the bare metal of the induction plate, the steel wool fibers will quickly remove the adjacent nonstick coating.
Bottoms of original and Black Diamond Copper Chef nonstick fry pans after cleaning correctly and incorrectly
©2020 Margaret Schindel, all rights reserved

Pan on the left: Original Copper Chef fry pan with repeatedly burned-on food,
cleaned with a scrubber sponge, plus overzealous scouring of the built-in
stainless steel  induction plate with a steel wool scouring pan.

Pan on the right: Copper Chef Black Diamond pan, cleaned with a regular sponge.
The stainless steel induction plate was scoured with steel wool, being extremely
careful around the edges to avoid accidentally removing the adjacent nonstick coating
.

Similarly, if you want the Cerami-Tech coating on your pans to retain its nonstick properties as long as possible, I recommend using only plastic or silicone cooking utensils designed for non-stick cookware with these pans, something Tristar, which manufactures Copper Chef and other cookware brands, also advises.
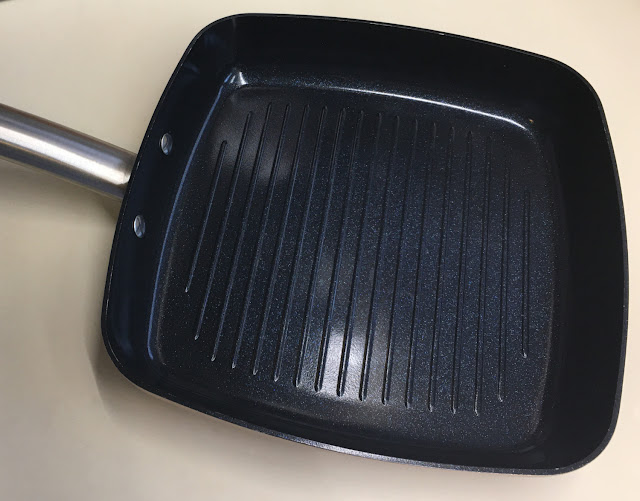
Inside of Copper Chef Black Diamond nonstick grill pan
©2020 Margaret Schindel, all rights reserved
Close-up shot of the ridged interior bottom  of the nonstick grill pan

As you can see from this close-up of our grill pan, our Copper Chef Black Diamond pans — which have been in heavy, daily use for a long time now — not only still perform beautifully but also hold up remarkably well, as long as you care for them properly!

The Inexpensive, DIY Pot and Lid Storage Rack My Husband Built for Our Copper Ceramic Nonstick Cookware

When our collection of copper ceramic nonstick coated pans continued to expand, my husband — my very own MacGyver — put together an inexpensive, space-saving pot rack next to our stove, using just leftover wood strips and some coat hooks. Sadly, the beautiful, half-round, French-looking wrought iron pot rack I had purchased long ago for my Manhattan apartment doesn't work in our ranch-style home now. (Not only do we have many more pots and pans to store, but we also have only a short, narrow "mini hallway" between the stove and the side entrance to our house, which opens into our kitchen. So, our pot rack needs to be fairly flush to the wall to allow the door to open.)

One of the things I really like about his design it that, because each coat hook has an upper and a lower hook, the lids to our collection of nonstick pots and pans now have a convenient "home" for storage when they're not in use, since the glass lids can't be stacked. As you can see, it even holds our two large stainless steel mesh spatter shields!

It was meant for functionality rather than looks, but you could easily stain and varnish the wood, and even use a router to shape a scalloped edge, if you like.
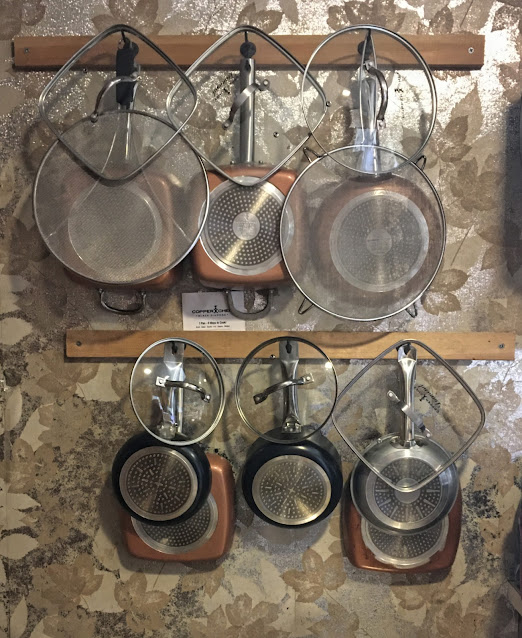
Homemade wall-mounted rack for storing pots, pans and lids
©2020 Margaret Schindel, all rights reserved
My clever husband's inexpensive DIY pot rack for our nonstick pans,
lids and spatter screens

Happy nonstick cooking!

Copper Chef Black Diamond Nonstick Cookware reviewed by Margaret Schindel

Read more of my product reviews.

Read more product reviews from all of our Review This Reviews contributors at ReviewThisProductReviews.com.


Note: The author may receive a commission from purchases made using links found in this article. “As an Amazon Associate, Ebay (EPN) and/or Esty (Awin) Affiliate, I (we) earn from qualifying purchases.”


Wednesday, March 25, 2020

Puracy Natural Dish Soap: Eco-Friendly, Effective, Made in the USA

Puracy Natural Dish Soap is an effective, safe and eco-friendly alternative to traditional dishwashing liquids whose cleaning power comes from caustic chemicals. In today's review, I'll explain why it quickly became one of my favorite cleaning products.

What I Love About Puracy Natural Dish Soap

Looking For a Safer, More Environmentally Friendly, Yet Effective Plant-Based Dish Soap

Several years ago, my husband and I started hand-washing our dishes, pots and pans more often and using our dishwasher less frequently, as part of our effort to be more environmentally responsible and less wasteful. I also wanted to find a safer, “greener” dish soap, a plant-based cleaner that could cut through grease effectively on our dishes, pots and pans without the harsh chemicals used in most popular dishwashing liquid brands, such as Palmolive, Dawn and Ajax. Many of those chemicals may be not only harmful to humans, animals and plants, but also cause chronic aquatic toxicity, poisoning our rivers, seas, oceans and water supply.

Not So Green "Green Cleaners"

The two best-known brands of plant-based cleaners at the time were Mrs. Meyers and Seventh Generation. I tried Mrs. Meyers Clean Day Liquid Dish Soap, which was a Whole Foods Market Eco-Scale certified green cleaning product, but stopped using it after only a week or two. In addition to the overpowering scent, which gave me a headache every time I washed the dishes, I found out that the Environmental Working Group, a nonprofit organization dedicated to protecting human health and the environment, had given it an “D” rating, which EWG defines as “HIGH CONCERN - Likely hazards to health or the environment.”

Next, I looked into Seventh Generation Natural Dish Liquid, Free & Clear, since I was familiar with the brand name and had seen numerous ads for the company's plant-powered cleaning products. The marketing was excellent and I was optimistic. Having learned my lesson, however, I decided to check out their EWG rating before trying out their product myself. The good news was that my caution paid off. The bad news was that EWG gave it a "C" rating, defined as "MODERATE CONCERN - Some potential for hazards to health or the environment. At least some ingredient disclosure."

Back to the Drawing Board

Unfortunately, neither Amazon nor any of our local stores sold the only dishwashing liquid with an  earned the EWG Verified rating, the organization's highest endorsement. So, I switched my focus to dish soaps EWG-rated “A," defined as “LOWEST CONCERN - Few/no known or suspected hazards to health or the environment. Good ingredient disclosure." Once I eliminated any product that wasn't carried by our favorite stores and or on Amazon, only a handful of potential candidates remained in the running.

After trying to learn as much as I could about the products and the companies that made them, I felt confident about my final choice.

Puracy Natural Dish Soap Checked All the Boxes

Puracy Natural Dish Soap 16-oz. squirt bottle
Puracy Natural Dish Soap is safe and gentle enough
to use as an alternative to liquid hand soap, if needed.
(Don't use traditional dishwashing liquid to wash your hands!)


Highly Recommended by EWG, Business Insider and Consumers

  • Rated "A” for safety and environmental impact by EWG
  • Chosen as the best dish soap overall by Business Insider: "Puracy Natural Liquid Dish Soap is our top pick because it's effective on grease, safe for the environment, and gentle on your hands."
  • Thousands of 4- and 5-star customer reviews on their website and on Amazon

Safe for Families, Pets, and The Environment

  • No harsh chemicals, sulfates (SLS, SLES, SCS), triclosan, formaldehyde, parabens, phosphates, MEA, DEA, TEA, chlorine, bleach, petrochemicals, animal by-products, allergens, perfumes, dyes, or caustics
  • Hypoallergenic, non-toxic, gluten-free, vegan
  • BPA-free, recyclable packaging
  • Concentrated formula that requires less soap to clean more dishes
  • Cleans effectively even in areas with hard water
  • 99.5% natural ingredients, only 0.5% synthetic ingredients
  • Naturally-derived scents that, to me, smell better and are much subtler compared to other plant-based cleaners I have used
    • The Green Tea & Lime scent is my favorite, and I also love smell of the Citrus & Sea Salt. I’m looking forward to trying the Organic Lemongrass as well.

Made in the USA

  • All Puracy products are American made by a family-owned small business based in Austin, Texas

Trustworthy, Socially and Environmentally Responsible Company

  • Transparent marketing and product labeling
  • Gives back to the local community
    • Puracy donates a portion of the proceeds from every purchased to local families in need
    • Puracy’s packaging features original hand-drawn artwork that helps support local artists
  • Cruelty-free
    • No animal testing, certified cruelty-free by PETA and Leaping Bunny
  • 100% biodegradable formula, easy to recycle packaging
    • Bottles, pumps, sprayers, and caps made from PET(E), an inert, BPA-free plastic and the most widely recycled plastic worldwide (recycling logo #1)
    • Liquid dish soap refills packaged in eco-friendly pouches

Superb Customer Service

  • 100% money-back guarantee if you are dissatisfied with a Puracy product for any reason—no hassle, no return required, no questions asked
  • Superb, responsive, friendly customer service
    • Questions answered promptly, helpfully and courteously
    • One of the co-founders, Sean, often responds personally to customer questions on Amazon

I feel good that my purchases of Puracy's natural and safe cleaning products support a family-owned, American small business whose values are aligned with mine, and whose owners are proud and confident enough in the quality of their products to stand behind them with a no-hassle, 100% money-back guarantee if a customer isn’t a fan of one of their products, for whatever reason.

Puracy's Safe, Eco-Friendly Dish Soap Worked BETTER Than My Old Dishwashing Liquid - Without the Harsh, Toxic Chemicals! 

A Safer, Gentler, Greener Cleaner 

Puracy Natural Dish Soap’s formula is concentrated, so you need less of it compared to traditional dishwashing liquid. In my experience, it cuts through grease as well as, and maybe better than, the products with harsh, chemical-laden formulas I used years ago. And, while the lack of those harsh chemicals means it isn’t as effective at removing stubborn, burnt-on food from pots and pans, I find that adding a small squirt of Puracy liquid dish soap to the pans, filling them with very hot water and leaving them for 30-60 minutes usually is enough to loosen the food without needing to use a lot of elbow grease.

For decades, manufacturers of soaps and other cleaning products have been successfully brainwashing us that the more lather a soap produces, the more effectively it cleans. But the notion that more lather means more cleaning power simply isn’t true! If it were, how could dishwasher detergent and laundry detergent clean our dishes and clothes effectively, since both are specifically formulated not to produce lather or suds?

Yet, over many decades of misleading ad campaigns, manufacturers have psychologically manipulated consumers into believing that they can only get their dishes, pots, pans and even their hands and hair really clean by using soaps or shampoos that produce lots of lather. Of course, they fail to mention that the chemicals used to make these products lather abundantly are harsh, irritating and potentially harmful to people and animals, and potentially toxic to aquatic life.

It pains me when a reviewer occasionally complains about needing to use more Puracy Natural Dish Soap, compared to conventional brands, to produce the same amount of lather. My hope is that more consumers can become more knowledgeable about the effectiveness and safety of the ingredients in their cleaning products, as well as their effects on the environment and global ecosystem for current and future generations.

Save Money and Help Protect the Environment With Convenient 64-Ounce Refill Pouches

Puracy Natural Dish Soap Refill Pouch
Puracy Dish Soap Refills:
Easy on the wallet,
easy on the environment
Puracy Natural Dish Soap Refill
I bought the Puracy dishwashing liquid in a squirt bottle only once. Since then, I’ve been buying only the 64 oz. Puracy Natural Dish Soap Refills, which contain four times as much product as the 16 oz. bottles.

I really appreciate Puracy's decision to offer these large, money-saving, eco-friendly refill pouches for most of the products they make. By purchasing them and refilling my own, recycled bottle and the built-in soap dispenser at the back of the kitchen sink, my husband and I save more than 20% per ounce. Each refill pouch also saves 90% more plastic, water, and energy, compared to the equivalent amount of bottled soap (four 16-oz. bottles)!

And at a time when we're being urged to stay home as much as possible, avoid unnecessary trips to the store, and consolidate purchases as much as possible, being able to order these large refill pouches online, with free shipping for Amazon Prime members, is a great option. You can save even more with Amazon's Subscribe & Save option!

*Note: At the time of writing, the price of the 16-ounce bottles on Amazon was temporarily reduced, making the price per ounce the same for the individual bottles and the refills.

Refill Your Favorite Liquid Dish Soap Bottle or Dispenser

Like nearly all dishwashing liquids, Puracy Natural Dish Soap bottles have a squirt-type cap that must be pulled up before it will dispense the contents. Although the cap gets easier to pull up over time, both my husband and I prefer product containers that require less effort, like the pump bottles for liquid hand soap. So, after using up the squirt bottle of dish soap I bought initially, we now use the refill pouches for the built-in soap dispenser next to the kitchen sink faucet as well as a repurposed liquid soap pump bottle, since it's nice to be able to do dishes side-by-side without having to take turns accessing the dish soap.

If you're not a fan of squirt bottles, either, and don't happen to have kept an empty pump bottle you can reuse for this purpose, I suggest picking out an attractive glass soap dispenser bottle, preferably with a rust-proof or rust-resistant pump top, that you can fill with Puracy Natural Dish Soap from the 64-ounce refill pouches. I like this reasonably priced, textured glass liquid soap dispenser with a brushed nickel pump and a generous 16-ounce capacity, whose elegant but unpretentious design could complement nearly any style of kitchen decor, from contemporary to traditional, casual to formal.

Another option is a hands-free, automatic liquid soap dispenser. Most brands and models get mixed reviews and need to be used regularly and unclogged periodically, but if you're looking to take extra precautions to avoid spreading germs to other family members, you may want to consider something like the simplehuman 9 oz Liquid Soap Pump, Brushed Stainless Steel Touch-Free Sensor Dispenser, one of the better rated and more reasonably priced models from this well known, innovative product brand.

It's important to use Puracy Natural Dish Soap only in a dispenser designed for regular liquid soap, rather than in one made for foaming liquid soap formulas, which contain more water and are more dilute.

Puracy Natural Dish Soap: A Safe, Effective and Green Dishwashing Liquid Made in the USA reviewed by Margaret Schindel

Looking for more product reviews? You'll find many more on a wide range of topics from our Review This Reviews contributors at ReviewThisProducts.com.


Note: The author may receive a commission from purchases made using links found in this article. “As an Amazon Associate, Ebay (EPN) and/or Esty (Awin) Affiliate, I (we) earn from qualifying purchases.”


Wednesday, December 18, 2019

How to Prep and Store Organic Raspberries to Keep Them Fresh Longer

For the past year or more, I've been on a quest to find a way to prolong the time I can refrigerate fresh raspberries before they go bad. A few weeks ago, after extensive research and numerous failed experiments, I finally succeeded! In this review, I’ll share the preparation and storage method I developed that allows me to store fresh berries in the refrigerator successfully for days longer than any other method I tried.
The Secrets to Keeping Organic Raspberries Fresh Up to 2X Longer
The method I developed for prolonging the storage of ultra-perishable organic raspberries
was a labor of love that took more than a year of research and experimenting!

Organic Raspberries Are Extremely Perishable

Fresh berries are one of nature’s most delicious treats. Unfortunately, they don’t keep long in the refrigerator, especially the ones that you buy in a store rather than from a local farm stand. I try to buy mostly organic produce these days, and organic berries have even shorter lifespans than their conventionally grown counterparts. In fact, during the winter, many of the organic raspberries we get here in Boston are imported from Mexico, and after such a long journey, they rarely last more than a day, if that! That’s a waste of both food and money.

I adore organic raspberries and started eating them every week when I switched to a very low carb / keto lifestyle. That's when my search to find a way to prolong their edible life became a much higher priority.

My extensive online research produced lots of information and advice from reliable sources. Unfortunately, much of it was conflicting. Most sources advised not rinsing fresh raspberries until just before eating them. Some suggested soaking the berries in a vinegar and water solution immediately after buying them, then rinsing, drying and storing them. I remembered and looked up a 2015 article by my friend Grace who, after doing her own online research, developed a similar method for prepping and storing most types of produce that includes a 10-minute soak in a saltwater solution, followed by a 10-minute soak in a vinegar-water bath.

I tried them all. Many, many berries were sacrificed on the alter of my research! Unfortunately, none of the methods I tried succeeded in extending the storage life of my beloved organic raspberries. Nonetheless, I was determined to find a solution that would keep them going bad within a day or two of bringing them home.

Through Trial and Error, I Eventually Worked Out My Own Method for Storing Organic Raspberries Successfully for Several Extra Days

Undaunted (well, sort of), I started combining various aspects of some of the prior experiments. After each new experiment, I analyzed the results and tweaked the process for the next attempt. After a few more months, my stubbornness persistence finally paid off!

The prep work needs to start the minute the raspberries are brought home. After discarding any mushy ones, any remaining berries that have softened a bit are set aside to be eaten the same day. The rest get a brief saltwater bath, followed by a brief vinegar and water bath. The berries stay in each solutions for only 2-3 minutes, a much briefer soak than in any of the other methods I tested.

Next, they are rinsed, drained, and sorted further based on their firmness. Then they are set on a paper towel-covered cooling rack(s) for several hours to dry out thoroughly. As far as I know, mine is the first method to use this multi-hour drying time - an idea that turned out to be a game-changer in my experiments!

The storage method turned out to be as important as the prep process. Lining my storage container with two to three layers of paper towel was a step in the right direction, but not enough to slow down the berries' deterioration significantly.

The last piece of the puzzle fell into place when I stopped layering the berries between paper towels in a sealed storage container before refrigerating them. After another series of experiments and tweaks, eventually I was able to prolong the storage time by another 1-2 days by switching to a large, shallow storage container and storing the berries face down in a single layer, spaced apart so they didn't touch, and letting the lid rest on top of the container instead of sealing it.

Now My Organic Raspberries Remain Good for 5 or 6 Days!

Since I don't drive and I need to ask my husband to replenish my supply each week, my goal was to be able to have him buy me two 6-ounce containers of organic raspberries and keep them fresh for three to four days in the refrigerator. But once I started to make significant progress with my experiments, I raised my sights on a more ambitious goal.

Once I started experimenting with significantly longer drying times, my results improved dramatically! Obviously, how long fresh berries will keep depends on their condition when they are purchased. (Don't you hate not being able to see the berries at the bottom of the container, which are the most likely to be damaged or moldy, because they're hidden by the absorbent pad?)

After another month or two of trial-and-error, I finally achieved my new "stretch" goal: figuring out a way to prep and store three 6-oz. containers (18 ounces) of organic fresh raspberries so they stay fresh for 5 days. In fact, when I've been able to get a container of berries that are very fresh, firm, and unbruised, I've been able to prep them, store them in the refrigerator, and enjoy them for as long as 6 days!

A discovery like this is too good not to share. So, if you want to try my method for yourself, read on.

How to Prep and Store Organic Raspberries So They Stay Fresh Longer: Step-by-Step Instructions

Step 1: Gather your tools and supplies.

Supplies for prepping fresh raspberries for storage
Some of the supplies for prepping organic raspberries
to help them last up to 5 days (or even longer) in the refrigerator

Here's what you'll need:
  • Fresh organic raspberries (or any other type of berry, organic or conventionally grown)
  • A small bowl
  • A medium-to-large mixing bowl
  • A large slotted spoon
  • Water
  • Table salt or sea salt
  • A timer (after trying out many different brands and models, this accurate, easy-to-use, dual kitchen timer is definitely my favorite, thanks to the intuitive buttons, a large, easy-to-read display, and a ring loud enough to be heard from another room!)
  • Easy access to the kitchen sink (preferably with a sprayer-type faucet)
  • A roll of paper towels, preferably with closer perforation lines (like these Bounty Quick-Size Paper Towels) that let you tear off only the length you need
  • Shallow food storage containers with lids - one large and one medium sized
  • Optional: Paper clips
  • Optional: FreshPaper Food Saver Sheets
*Heinz All-Natural Distilled White Vinegar is one of the few white vinegars that aren't made with petroleum (yuck!). It's made from grain, which could be GMO, of course, but since it's a choice of that or a petroleum-based product, I'll stick with the former. Since I use a significant amount of it for prepping my raspberries, making my sugar-free pickling brine for my refrigerator pickles, and diluting it 50/50 with water to make a non-toxic kitchen surface cleaner/degreaser spray, I sometimes buy it in the large, 1.32-gallon economy size jug.

Step 2: Pick through the berries.

Carefully transfer them from their containers and spread them out in a single layer.

Pick through the berries, throwing out any that were damaged and setting aside any that need to be eaten that day rather than stored.

Then gently place the remaining berries in the small bowl.

Step 3: Soak them briefly in heavily salted water and rinse.

Fill the mixing bowl partway with enough water to just cover the berries. (You'll quickly learn eyeball the amount of water based on the volume of berries you're prepping.) Add about 3 tablespoons of table salt or sea salt and stir to dissolve.
Mixing the saltwater bath for the berries
Preparing the saltwater bath for the berries

Set the timer for 2 minutes, but don't start it yet. Adjust the "arms" of the colander so it rests on the edges of the sink. (Alternatively, place a traditional, small-holed colander over another mixing bowl, resting it on the lip of the bowl to elevate it for better drainage.)

Hold the bowl of raspberries just above the surface of the liquid in the mixing bowl, then tip them into the salty water. Start the timer.

Give them a brief, gentle stir so all sides of every berry come into contact with the saltwater solution, then stir them gently again after a minute.

As soon as the timer alarm goes off, use the large slotted spoon to lift the berries out of the water and place them into the over-the-sink colander so they are spread out over the entire surface of the colander. (Try to avoid piling the berries on top of each other, which can bruise the ones underneath.)

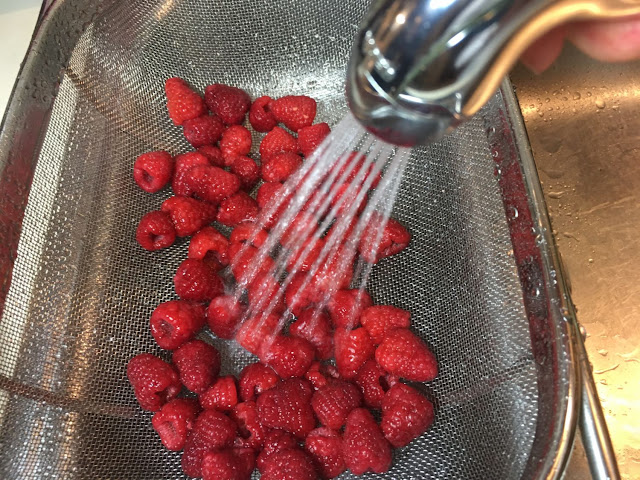
Run the cold water faucet and use the sprayer to quickly and gently rinse the berries in the colander. Leave them to drain while you empty and rinse the mixing bowl.

Gently rinsing the berries after the saltwater bath
Keep the water pressure gentle to avoid bruising the berries!

Tip: The less you handle the berries and the more gently you treat them, the longer they'll keep!

Step 4: Repeat, using a vinegar and water solution this time.

Refill the mixing bowl to the same level as before, this time substituting a mixture of roughly 3 parts cold water to 1 part all-natural white vinegar. (As an example, to make 2 cups of the vinegar solution, you would mix 1-1/2 cups of water with 1/2 cup of all-natural white vinegar.)

Gently tip the rinsed and drained raspberries from the colander into the vinegar solution in the bowl, then give them a gentle swish, soak, rinse and drain as you did in Step 3.

Gently spread them out on a double thickness of paper towels to absorb more of the water, turning them so the holes face down so any remaining water inside the berries can drain.

Step 5: Sort the raspberries according to firmness and let them dry for at least 3-4 hours (even overnight, if necessary).

Line the gridded baking rack(s) with three layers of paper toweling. Transfer the berries to the racks, one at a time, keeping them face-down and spacing them slightly apart so they don't touch their neighbors. Sort the berries into two groups as you do this, placing the firmest berries to one side of the rack (or on a different rack) and the softer berries to the other side.

Spreading out the berries in a single layer without touching on several sheets of paper towel
Leave the raspberries on the rack until they are firm and the surface is very dry

Set the racks on the counter and set the timer for 1 hour. When it rings, use the lightest touch and the least amount of pressure possible to slowly and gently roll each berry onto its side and separate it from the paper towel, then return it to the rack. (If you don't do this, or if you wait too long, the berries can stick to the paper towel as they dry, making it difficult to remove them without rupturing the surface at the sticking point. Voice of experience here, lol!) After you roll and lift off each berry, check for any leaked juice stains and, if necessary, move it to another spot where the paper towel is clean and dry.

Leave the racks out on the counter for at least 3 to 4 hours, preferably longer, until the surface of the berries has dried out a bit and they feel firmer than they were prior to their brief saltwater and vinegar solution baths.

Letting the surface of the berries dry out enough before refrigerating them is key to extending their storage time. I've even left them out overnight a couple of times, when they hadn't firmed up sufficiently after 4 hours on the paper towel-topped racks.

Step 6: Prep the storage containers and refrigerate the berries.

Rasbperries in paper towel lined storage containers, in a single layer without touching each other
The raspberries in the measuring cup were set aside to eat that night.
The ones in the containers are prepped and ready to be stored in the fridge.

Line both food storage containers with a double or triple thickness of paper towel, folding it neatly at the corners so the bottom to create a paper "tray" that fits perfectly flush against the sides and bottom of the container's interior. Holding four corner folds in place with paperclips helps keep the bottom of this liner flat and the sides at a 90-degree angle, which prevents that berries placed along the edges from tipping over and rolling toward the center.

When the berries have dried out sufficiently on the surface and are firmer to the touch than when you brought them home, place the less firm berries into the medium-size container, face down and spaced slightly apart. Then repeat with the remaining berries and the larger container.

Place the filled containers in the refrigerator, then lay the lids lightly on top of them and slightly askew, keeping the berries exposed to a small amount of air during their cold storage to help maintain their firmness. For the same reason, don't place anything on top of the lids.

Raspberries in storage containers with lids askew
Prepped raspberries in food storage containers with their lids askew
so the air can continue to circulate throughout the cold storage period 

Note: Moisture is raspberries' sworn enemy. So, before I made my multi-hour surface drying and unsealed lid breakthrough discoveries, I used to place a FreshPaper Food Saver Sheet inside each storage container before sealing the lids. Although the packaging says they can be reused for up to 2 weeks before tossing them, I found that the FreshPaper sheets absorbed so much moisture inside the sealed containers that I had to take them out and let them dry every other day. Now, I use them only when I get a container of out-of-season berries that are too soft to firm up even after leaving them out to dry overnight (although in that situation, being able to store them successfully for more than a day or two is unlikely). If you'd like too try a package, I got mine as part of a Whole Foods Market grocery delivery via Prime Now, a local shopping service that's free for Amazon Prime members.

Step 7: Enjoy the Raspberries

When you're ready for some fresh berries, simply remove as many as you want from the container and dig in. No need to rinse them again - they're ready-to-eat!

Bowl of fresh organic raspberries after 6 days of refrigerator storage
Store-bought, organic raspberries - still tasty (and not mushy)
even after they were stored in the refrigerator for 6 days!

Before you return the uneaten berries to the fridge, check that they are still standing up and spaced apart inside the storage container, then place the lid lightly on top.

Remember to eat the berries in the medium-sized storage container first, before starting in on the large container last.

Future Experiments

Over time, I've been swapping more and more single-use, disposable paper and plastic products for more eco-friendly, reusable alternatives. So, while this method works remarkably well for me, I'm troubled by how many paper towels it requires.

I could (and eventually might) substitute a dedicated set of cloth dish towels for draining and drying out the berries and cutting some to size for lining the storage containers. But since our bathroom towel racks are filled with towels and we have nowhere else to hang hand-laundered items to dry, hand-washing a bunch of berry-stained towels once or twice a week isn't in the cards. I'd be concerned about throwing the berry-stained towels into the washing machine with a regular laundry load because the dried berry juice might tint the water pink and ruin everything else in the washer. Running the machine with just the towels would be a waste of water and electricity.

I tried drying the berries directly on cooling racks with a grid design, but the openings were too large and many of the berries fell through.

I'm still hoping to come up with a way to reduce or eliminate paper towels from my process. At some point, I want to buy a couple of largish sheets of food-grade, stainless steel mesh and fold the edges down to make a drying tray. If I can figure out the right mesh to let the raspberries dry out over a period of hours without sticking to the metal, that might be a good solution.


How to Prep and Store Organic Raspberries to Keep Them Fresh Longer reviewed by
Margaret Schindel


Note: The author may receive a commission from purchases made using links found in this article. “As an Amazon Associate, Ebay (EPN) and/or Esty (Awin) Affiliate, I (we) earn from qualifying purchases.”


Saturday, August 10, 2019

Silicone Kitchen Tools & Accessories for Cooking & Baking Enthusiasts

Silicone sponges, potholders, spatulas, baking pan liners, muffin pan liners, food storage bags, cooking utensil rests, chocolate chip molds, ice pop molds and other silicone molds have become some of my favorite and most-often-used items in my kitchen.

Although I love cooking and baking, I don’t enjoy washing dishes, so I appreciate being able to toss my silicone kitchen tools into the dishwasher. It’s often just as easy to hand wash them with just a soapy sponge, since even sticky foods wash off easily.

The Best Silicone Cooking & Baking Tools
Read on for my reviews of the best silicone kitchen tools and accessories!

Silicone Potholders

My hands are very sensitive to hot and cold temperatures, so I've gone through a lot of potholders over the years. The first silicone potholders I tried were the OrkaPlus cotton-lined silicone mitts by Mastrad. These long mitts were like barbecue mitts, providing great coverage that protected my fingers, hands, wrists and the lower half of my forearms. This appealed to me a lot, since I'm prone to burning myself in the kitchen! They also came highly recommended by a respected cooking magazine and had great reviews. Unfortunately, I found them very clumsy and had a hard time getting a good grip on the edges of cookie sheets without smooshing the big silicone thumb part into the cookies (or whatever else was in the pan I was trying to remove from the oven). Next, I tried a pair of small, ribbed silicone pinch mitts, also called mini oven mitts, that just covered my fingers, thumbs and palms. But I found them very awkward to use.

Pair of red oval ribbed silicone potholders
These ribbed silicone potholders protect your hands without getting in the way

Finally, I bought two Architec Silicone HotGrip ribbed silicone potholders that turned out to be the perfect solution. I use them every day, throw them into the dishwasher every evening and they still look like new. They're thick, large enough to protect my hands and grip well, thanks to the ribbed texture. Mine are red, since at the time the pretty teal blue color wasn't available. I can't imagine them wearing out, but if they ever do, I'll definitely be buying the blue ones!

Silicone Spatulas

I frequently use nonstick cookware and bakeware and silicone spatulas help protect the nonstick coating. I’ve added to my silicone spatula collection over time because I use them for so many things.

The first ones I bought (many years ago) had silicone heads attached to handles of a different material (wood, metal or plastic). I soon realized I’d be better off with a seamless, one-piece design. This eliminates the possibility of the business end of the spatula becoming detached from the handle (something that happened to me several times with two-piece designs) and eliminates seams and crevices that can trap food and breed bacteria.

Two years ago, I purchased 4-piece silicone spatula set made by UpGood. I was unfamiliar with the brand but bought it because I liked the shapes and sizes in the set, the reviews were great and the price made them an excellent value. The set includes a long, slim spatula for scraping out jars, a curved spoon spatula and both long and short traditional scraper spatulas with one curved edge and one straight edge, These are very nice quality and they're still going strong in my kitchen a couple of years later, And the charcoal gray color is a neutral that won't clash with your kitchen's color scheme. Here's a photo of the spoon/spatula (AKA "spoonula") from the set.

Black silicone spoonula spoon-spatula
One of the spoonulas in my growing collection!

I find myself using the spoon/spatula shape the most for cooking and baking. Since I rarely have only one pot or pan going on the stove when I cook, I decided to get a couple more in that shape. I was delighted to find one in a pretty aqua/teal, my favorite color, so I ordered the GIR (Get It Right) 11-inch Premium Silicone Ultimate Spoonula in Teal. This high quality, seamless spoon spatula is made of pharmaceutical grade platinum-cured silicone that's heat resistant up to 550 °F. It also has a sturdy fiberglass core that doesn't heat up like the more common iron or stainless steel spatula cores. It's still one of my favorite cooking utensils - I just love the color and using it makes me happy. (It's the little things, right?) It also comes in Red, Orange or Gray.

I use an iSi Slim Silicone Spatula to scrape out my very tall Vitamix blender. It works extremely well for this purpose and I am very pleased with it.

Red iSi slim silicone spatula
This iSi slim silicone spatula is perfect for scraping the bottom of my Vitamix blender

Note: Any silicone spatula that is used to scrape out the contents of a blender will eventually get cuts or nicks from the sharp blades, at which point it should be replaced for sanitary reasons.

Silicone Baking Pan Liners

I've been baking for decades and, as any experienced baker will likely tell you, silicone baking mats are a baking staple. When I was younger, I used baking parchment much more often than I do now. But the older I get, the more concerned I become about the pervasiveness of wasteful habits that wreak havoc on the environment. So, increasingly, I've been trying to switch from disposable to reusable items.

For many years, I've used Silpat baking mats to line my cookie sheets. This French brand is so closely associated with this type of silicone bakeware liner that it's most often used as a generic term for them. But when I lost the use of my full-size double oven, I needed to get some smaller ones that would fit the smaller rimmed baking sheets for my tabletop oven.

I had been planning to buy the iconic Silpat brand again, but the name commands a premium and my income is not what it was when I worked in the corporate world. So, when I looked at a pair of silicone baking mats from an unfamiliar brand that had both great reviews and a great price, I took a chance.

Both my husband and I have been using these Quarter Sheet Silicone Baking Mats by WildCow several times a week. They're great for baking, of course, but we also use them to line our tabletop toaster oven rimmed baking sheets before inserting a rack to oven-bake regular or turkey bacon. We much prefer this method to pan frying, since there's no splatter, no turning and no watchful eye needed. These 11 3/4” x 8 1/4" nonstick cooking and baking mats fit inside the 12" x 10" rimmed baking sheets we use in our tabletop toaster oven (although I may trim the tips of the corners on a diagonal at some point). Despite the excellent price, they're thick and sturdy and have held up great. I can hand wash them quickly in hot, soapy water or just toss them into the dishwasher. (I can't figure out why the mat looks stained in this photo, since it isn't in real life!)

Wild Cow quarter sheet silicone baking mat
This inexpensive silicone baking mat works as well as my expensive Silpat mats

Be aware that these are heat resistant up to 400 °F, so don't use them for something that requires higher heat, such as browning the top of something under the broiler.

If you're using regular 18" x 13" pans — known in  professional kitchens as half size pans — I recommend getting the AmazonBasics Silicone Baking Mat Sheet, Set of 2 in the Standard size. AmazonBasics is one of Amazon's popular private-label "house brands".These silicone baking mats measure 11.6" x 16.5" and can also be used with 11" x 17" baking sheets (although they'll overhang two of the sides slightly). These mats currently have an average customer rating of 4.7 stars based on more than 4,300 customer ratings, are heat-resistant up to 480 °F and are also very well priced.

Silicone Mini Prep Bowls / Pinch Bowls

I've had a set of medium-sized stainless steel prep bowls for years that I still use. But when I set out and prepare all the ingredients before starting to cook or bake (an activity known in the chef / foodie / Food Network world as mise-en-place), it's also nice to be able to prep and measure out small amounts of ingredients, such as seasonings or garnishes.

My Norpro set of 4 silicone mini pinch bowls are perfect for that purpose. The four colorful bowls in the set are bright red, blue, yellow and green, respectively. These cuties are just 2.5" in diameter and 1.5" tall, so they take up practically no counter space, which is a big advantage if you're prepping a lot of ingredients. In the photo, you can see how tiny they are next to a 1-cup measuring cup.

Norpro set of 4 silicone mini pinch bowls next to 1-cup measuring cup
These tiny, colorful silicone pinch bowls are perfect for small amounts of ingredients

The nonstick silicone means I can measure and set out even sticky ingredients, like a couple of tablespoons of molasses or honey, and easily scrape them into a pot, pan or mixing bowl. These bowls are also microwave safe and heat resistant to 500 °F, so I can melt small amounts of butter or coconut oil in them. And because they're flexible, it's easy to pinch the sides of these flexible prep bowls (hence the name "pinch bowls") to control and direct the ingredients as I'm pouring them into my pot or bowl or drizzling melted butter or chocolate or a sauce over a dish.

When I'm through with whatever ingredients I used them for, I just toss these brightly colored mini pinch bowls into the dishwasher.

Reusable Silicone Baking Liners / Baking Cups

I often bake in cupcake or muffin tins, and even more so now that I’ve switched to eating low carb. I love baking batches of low carb, high-protein, sugar-free chocolate muffins made with almond flour or low carb mini cheesecakes that I can keep in the freezer. Baking a recipe in muffin tins rather than full size cake pans helps me with portion control, since I can just grab one serving and defrost it.

While I could just grease the wells of my muffin tins for my protein muffins, that won’t work for recipes like the mini cheesecakes, since they're too soft to turn out onto a rack after they come out of the oven (and since if I chilled them first to firm them up, they wouldn't release easily from the greased muffin tin).

I stopped buying disposable, single-use paper cupcake liners a few years ago, so I decided to look for some reusable silicone baking cups. Also, since our wall oven died a year or two ago*, we’re using a tabletop oven that isn’t wide enough to fit a full-size, 12-cup cupcake or muffin pan. So, I wanted silicone baking cups that were sturdy enough to be used on a baking sheet, without the support of a muffin pan so I could bake a dozen muffins (or mini cheesecakes) at a time in my small tabletop oven. And, of course, they could also be used as cupcake liners for my 6-cup muffin pans, which do fit my tabletop oven.

After considerable research, I chose Pantry Elements Silicone Cupcake Baking Cups & Liners. They’re made from high-quality, 100% food-grade silicone with no fillers, as demonstrated by the fact that they pass the “pinch test” perfectly. (According to numerous sources, if you pinch or bend and twist a flat area on a colored silicone food preparation product and the color appears white in that stretched area, it can indicate the presence of fillers vs. 100% silicone.)

Pantry Elements silicone cupcake baking cups & liners in a rainbow of colors
These reusable baking cups work so much better than paper cupcake liners!

They are also thick and sturdy enough to hold their shape after being filled with thick muffin batter. However, if you use them as stand-alone baking cups rather than as cupcake liners inside a muffin tin, place them on the baking sheet before you fill them with batter. Because they are flexible, moving them to the baking sheet after filling them with batter can be messy. (Ask me how I know, lol!)

Cleanup is easy. Sometimes I let them soak in warm, soapy water for a bit and wash them by hand with my silicone sponge, but they’re also dishwasher-safe. And they come in a rainbow of bright, pretty colors, which adds a nice, cheery pop of color to my kitchen.

Best of all, unlike paper cupcake liners, they release cleanly, so I don't end up losing the outer layer of crumbs to the trash. Just look at those sharp, crisp ridges on that muffin!

Silicone cupcake liner with very few crumbs after unmolding a baked muffin
See how few crumbs stick to these cupcake liners?

I bake with these silicone cups every week and they still look and act brand new. You get 24 liners for around 50 cents each in a convenient, see-through, lidded storage tube. I can’t imagine ever having to replace them.

*In case you're wondering, our defunct double wall oven, which is original to this 1950s house, is too old to be repaired, according to several appliance technicians who have looked at it. Unfortunately, we also can't replace it because it’s surrounded by built-in cabinetry that runs the entire length of the wall and contemporary ovens don’t fit the opening. Believe me, we've tried!

Reusable Silicone Food Storage Bags

Since I switched to a low-carb diet, I’ve been baking grain-free, sugar-free rolls, bread, muffins and brownies to make it easier for this former carbohydrate lover to stay on track. To make this process less time-consuming, I’ve started measuring the dry ingredients for multiple batches and storing them in freezer bags. Now, I can just pull out a bag of my “baking mix” for that recipe, let it come to room temperature, add the wet ingredients and put the batter in the oven. Easy peasy!

Since I am trying to reduce my use of plastic wrap and food storage bags that end up in landfills. So, rather than using disposable plastic freezer bags for this purpose, I decided to get some reusable food grade silicone food storage bags. The ones I chose originally had bottoms that let them stand up on the counter, which makes them easier to fill. The sliding closure is a bit stiff at first, by design, but loosens up just enough after the first few uses so they’re easier to slide but still airtight. They can also be used in the microwave and for sous-vide cooking and they’re dishwasher-safe for easy clean-up. The one in the photo holds the remaining 1/4 of a psyllium bun from my last batch — time to get baking!

Reusable food grade silicone food storage bag with slider closure
These reusable silicone food storage bags keep disposable plastic bags out of landfills

I have since upgraded to Stasher reusable silicone food storage bags. They're more costly, but they're definitely a worthwhile investment. The seal is airtight so you can even use these for sous-vide cooking, and the best part is that they seal and unseal so easily, they practically do it by themselves. I love them!

Silicone Cooking Utensil Rest

For many years, we’ve kept a marble spoon rest next to the stove. I bought it because I thought it was pretty. However, pretty is as pretty does, and this kitchen gadget has been a thorn in my side for a long time! Marble is absorbent, so the surface frequently stained when I was cooking a tomato-based sauce or dish. Also, I rarely use just one utensil when cooking. So, even though the marble spoon rest was fairly wide, it wasn’t big enough to accommodate multiple cooking utensils.

Silicone utensil rest
This easy-to-clean utensil rest holds up to 4 cooking utensils

I finally got rid of it and replaced it with a multi-slot silicone utensil rest. It’s certainly not the prettiest thing in our kitchen and the only color choices are a medium grey or a bright yellow-green, but both my husband and I love it. The four slots are wide enough to accommodate the handles of any of our cooking utensils, but also narrow enough so that the business ends of the utensils are held at an angle, so four utensils can fit without resting on top of each other. That also allows the base to be narrower than it would need to be if the “heads” of the cooking utensils were lying flat. In addition, there’s a small lip or rim around the edge of the base, so if there’s a bit of liquid that drips off a utensil, it doesn’t spill over onto the stove or countertop. The only cooking utensil we have that it isn’t large enough for is our enormous slotted spatula, which is nearly 5” wide!

Best of all, because it’s made of silicone, it’s stain-resistant, non-stick, heat-resistant up to 450 °F and dishwasher safe.

Silicone Chocolate Chip Molds

Most commercially available chocolate chips aren’t as high quality as those same brands offer in bars or chunks. In fact, many of the best quality chocolate manufacturers don’t make chocolate chips at all. So, if you’re a true chocolate lover like I am, whenever you use chocolate chips in a recipe, you’re usually settling for second (or third) best.

In addition, as I’ve matured, my taste buds have evolved. Now I prefer really dark chocolate, which has the added benefit of being heart-healthy in modest amounts. Unfortunately, it’s hard to find high-quality, very dark chocolate chips. The so-called dark chocolate chips in the grocery store are 60% cacao; but for heart health benefits, dark chocolate should be labeled 70% cacao or higher according to the world-renowned Cleveland Clinic.

If you want sugar-free chocolate chips, it’s even more of a challenge. The darkest I’ve found are Lily’s stevia sweetened chocolate chips which, while delicious, contain only 55% cacao – much too low to improve heart health.

Whether you prefer traditional or sugar-free chocolate, the lower the percentage of cacao, the higher percentage of other ingredients, which increases the number of net carbs per serving.

Sure, you can chop up a sugar-free dark chocolate bar instead, if you’re using them in a recipe. But sometimes you really want real chocolate chips!

So, I was delighted to find these silicone chocolate chip molds, which allow me to make my own healthy, sugar-free, dark chocolate chips that look as though they came right out of a bag from the store.

Silicone chocolate chip molds
These adorable chocolate chip molds let you make better quality chips for less!

If I’m feeling lazy, I can just melt a sugar-free dark chocolate bar, smooth it into the molds, let the chocolate harden (or chill the molds for a bit during the hot summer months), then invert and twist the molds to release the chips. I store them in one of my silicone food storage bags until I’m ready to use them in recipes (or eat them just the way they are). The molds come in a set of three. I've shown two facing up and one facing down so you can see the shape of the chocolate chips it makes.

If I have a bit more time, however, I make my own sugar-free, melted dark chocolate from scratch and use that in the molds. Homemade chocolate chips are also less expensive for the quality you get. Either way, I can get sugar-free dark chocolate chips with a much higher percentage of cacao than I can buy commercially.

Silicone Ice Pop Molds

Who doesn't love to cool off with a sweet, refreshing ice pop during the dog days of summer? Many years ago I stopped buying them and started making my own at home. My homemade ice pops are healthier, more nutritious and much cheaper than what I can buy at the store. More importantly (to me), I have complete control over the choice and quality of the ingredients. I use organic produce, dairy, coconut milk and other ingredients as much as possible. No food coloring in my food, thank you! Now that I'm eating low carb, I've also cut out not only processed sugars but also organic honey, maple syrup, date syrup and other natural sweeteners. So, pretty much the only way to ensure that the ice pops I eat meet my strict criteria for food quality and nutrition is to make them myself.

One of the low carb ice pop recipes I've really been enjoying is called Creamy Keto Fudgesicles. Personally, I think they taste much richer and creamier than their namesake, more like a chocolate pudding pop. They're made by blending ripe avocado, unsweetened cocoa powder, full fat coconut milk, erythritol, vanilla and a little sea salt, pouring them into frozen treat molds and freezing them. The first time I made the recipe, I discovered that the pudding-like mixture was too thick to go through the silicone funnel that came with my Lebice Popsicle Molds (which are very nice unless you're trying to make a frozen treat such as pudding pops or cheesecake pops that involve a very thick mixture). When I tried spooning the mixture into the molds with a teaspoon, even though I was extremely slow and careful I was unable to prevent some of the mixture from getting on the lip and exterior of the ice pop molds.

Since I knew I'd be making this recipe often, especially during the summer, I decided to look for a set of molds with wider openings. I wanted these new molds to have not only wider openings but also reusable lids and sticks. Ideally, they would be dishwasher safe. They would need to be made of BPA-free, FDA-approved food-grade materials and release the frozen ice pops without a struggle.

Silicone ice pop molds / Popsicle molds for frozen treats on a stick
These brightly colored ice pop molds make nice, big popsicles

The pudding pop recipe makes 6-8 pops, depending on the size of the molds, so I decided to buy a Silicone Popsicle Molds Set with two molds that can make up to 8 ice pops. One of the molds is a deep, bright pink (which the manufacturer calls "rose red" for some reason) and the other is a bright lime green. The set comes with integrated one-piece lids/sticks, two each in pink, lime green, orange and aqua-turquoise. (Kids probably would love getting to choose their favorite color.) And each well holds a generous 3.38 ounces.

Believe it or not, I've got even more silicone kitchen tools, and I'm sure there will be more in my future! If you have some favorites, I'd love to hear about them.

Silicone Kitchen Tools and Accessories for Cooking and Baking Enthusiasts reviewed by 
Margaret Schindel

For more product reviews, visit ReviewThisProducts.com.


Note: The author may receive a commission from purchases made using links found in this article. “As an Amazon Associate, Ebay (EPN) and/or Esty (Awin) Affiliate, I (we) earn from qualifying purchases.”


Most Recent Reviews on Review This Reviews


Search for Reviews by Subject, Author or Title

The Review This Reviews Contributors


SylvestermouseSylvestermouseDawn Rae BDawn Rae BMbgPhotoMbgPhotoBrite-IdeasBrite-IdeasWednesday ElfWednesday ElfOlivia MorrisOlivia MorrisTreasures by BrendaTreasures by BrendaThe Savvy AgeThe Savvy AgeMargaret SchindelMargaret SchindelRaintree AnnieRaintree AnnieLou16Lou16Sam MonacoSam MonacoTracey BoyerTracey BoyerRenaissance WomanRenaissance WomanBarbRadBarbRadBev OwensBev OwensBuckHawkBuckHawkDecorating for EventsDecorating for EventsHeather426Heather426Coletta TeskeColetta TeskeMissMerFaeryMissMerFaeryMickie_GMickie_G


Review This Reviews is Dedicated to the Memory of Our Beloved Friend and Fellow Contributor

Susan DeppnerSusan Deppner

We may be apart, but
You Are Not Forgotten


“As an Amazon Associate, Ebay (EPN) and or Etsy (Awin) Affiliate, I (we) earn from purchases.” Disclosure Statement

X