Friday, March 8, 2024

How to Bake a Delicious Turkey Breast Reviewed

Baked Turkey Breast
I've been baking whole turkeys for many years, but I don't remember ever baking just a turkey breast until recently. 

My husband loves turkey.  I bake them a few times each year during the holidays, but even with our large family gathered for the holidays, there is still turkey meat left over.  This thrills my husband because he makes turkey sandwiches with the leftovers for a few days after I bake a whole turkey for a family dinner. 

The problem has always been that once New Year's has passed, it would normally be 11 months before a turkey would grace our dinner table again.  When our local grocery store had frozen turkey breasts on sale, I decided to bake just the breast for my husband to make our beloved sandwiches.  

What a great decision!


How to Bake a Turkey Breast

Baking a delicious turkey breast is easy!  I decided to bake the turkey breast exactly the same way I bake a whole turkey.  My mother taught me decades ago how to bake a tender turkey in a Reynold's oven bag.  

Year after year, diners praise my turkey for being tender, moist and delicious.  I have never minded sharing my secret for baking a delicious turkey and now I will share how I used the same method to bake a fabulous turkey breast.

Be sure to thaw the turkey breast in the refrigerator for 2 or 3 days before you want to cook it. Because turkey packaging tends to leak, you will want to put a tray under it and/or put it in a disposable grocery bag to keep from making a mess in the refrigerator.


supplies to bake a turkey breast

Supplies 

  • Thawed Turkey Breast 
  • Reynolds Oven Bag (Turkey Size) 
  • 1 Tbsp Flour 
  • 1/4 Cup of Butter (softened) 
  • Pepper 
  • Deep Roasting Pan

  Instructions 

Step 1:  Preheat the Oven to 350° 

Step 2:  Toss 1 Tbsp flour inside the Reynolds Oven Bag

Step 3:  Hold the mouth of the bag closed and shake the bag to cover sides & top with flour

Step 4:  Put the floured bag in a 2″ deep, heavy duty roasting pan with it opened wide to make it easy to insert the turkey breast later

Step 5:  Wash the turkey completely, inside and out and remove any ice packets inside the turkey

Step 6:  Pat dry the outside of the turkey with paper towels 

Step 7:  Carefully place the turkey inside the floured bag, leaving the bag open wide

Step 8:  Rub the entire outside of the turkey with *softened butter

Step 9:  Cut the remaining butter into pieces and place the pats on top and inside of the turkey breast.

Step 10:  Pepper the outside of the turkey

Step 11:  Close and secure the bag with a nylon tie that is included with the Reynolds Oven Bags

Step 12:  Cut six 1/2″ slits in the top of the bag to allow steam to escape while cooking

Step 13:  Tuck the ends of the bag inside the roasting pan

Step 14:  Place the pan in the oven. Be sure to allow plenty of room for the bag to expand during cooking without touching the sides, racks, heating elements, etc. of the oven. 

Step 15:  Bake according to chart in the Reynolds Oven bag. An 8 lb. turkey breast will take 2 1/2 - 3 hrs 


*Softened butter - You can leave the butter on the counter for an hour before you need it or you can microwave it on defrost for 15 - 20 seconds to soften it  


Process in Pictures

turkey breast preparationWashed, Dried, Buttered, Peppered, Prepared & Ready to Close Bag

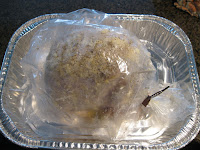
turkey breast in the bagIn the Bag, Bag Tie Secure,  & All Bag Sides Tucked Inside Pan

turkey breast in the ovenIn the Oven - Back, Sides & Top Clear


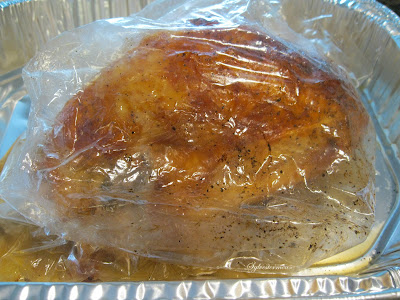
Baked Turkey Breast
Baked & Out of the Oven

At this point, you will need to let the turkey breast cool for 15 - 30 minutes.  Then, remove it from the bag, carve & serve.

According to my husband, there has never been a more delicious baked turkey breast!


My Preferred Supplies Are Available on Amazon


Check Out More Recipe Reviews at
ReviewThisRecipes.com


How to Bake a Delicious Turkey Breast Reviewed Written by:
House of Sylvestermouse


© 2024 Cynthia Sylvestermouse


Note: The author may receive a commission from purchases made using links found in this article. “As an Amazon Associate, Ebay (EPN) and/or Esty (Awin) Affiliate, I (we) earn from qualifying purchases.”


Thursday, March 7, 2024

Savory Spinach Ball Appetizers

 If you looking for an easy and healthy appetizer to serve at your next gathering, look no further than these easy spinach ball appetizers. These bite-sized delights are packed with nutrients and bursting with flavor. Whether hosting a party or craving a tasty snack, these spinach balls are the perfect choice.

Savory Spinach Ball Appetizers
Spinach Ball Appetizers - Reviewed

This is one of those recipes we had packed away and had not made for some time. This past Holiday season, Fran was going through some old recipes and found our spinach ball recipe.

We both thought wow we haven't made these in a long time. So, we decided to make them and we're so glad we did. 

Spinach Ball Ingredients:

  • 2 cups( 2-10 boxes) frozen chopped spinach
  • 3 large eggs
  • 2 cups seasoned bread crumbs
  • 1/2 cup grated Parmesan Cheese
  • 1/2 teaspoon garlic powder
  • 1/2 cup melted butter
  • 1/2 teaspoon thyme
  • 1/2 teaspoon salt
  • 1/4 teaspoon black pepper
Instructions:

  1. Thaw and pat dry the spinach.
  2. In a large mixing bowl, combine all ingredients and mix well.
  3. Scoop out portions of the mixture and roll into bite-sized balls.
  4. Place them on a greased cookie sheet or lined with parchment paper.
  5. Bake at 375 degrees for 15 to 20 minutes until they are golden brown and firm to the touch.
  6. Cool for a few minutes before serving.
These spinach balls are a great way to incorporate healthy greens into your diet without sacrificing flavor. Spinach balls are a perfect appetizer for any party or just as a snack. 

If we have any leftovers we freeze them. You can take them out of the freezer and pop them in the oven to warm them up for a snack. I like them plain, but you can experiment with different dipping sauces if you like.

For more recipes on Review This click here:

ReviewThisRecipes.com


Note: The author may receive a commission from purchases made using links found in this article. “As an Amazon Associate, Ebay (EPN) and/or Esty (Awin) Affiliate, I (we) earn from qualifying purchases.”


Wednesday, March 6, 2024

No Bed Sores or Discomfort for Us! ~ A Product Review

Caring for the Elderly brings you to all kinds of new ideas to make life comfortable and cozy, especially when most of the time is spent in bed!

If you have been following my blog posts you know all about how we (my other half and I ) are caring for my mother!  She is in her mid-90's and not in the best of health.  After a fall and a hospital stay, she is pretty much bed-ridden at this point in her life.

elder care

That is  not particularly  great for anyone but when you are elderly, it can be even more problematic.  Bed sores from constant pressure on certain body parts are a reality that must be dealt with.  

A while ago Margaret Schindel did a whole series on her new bed and the amazing mattress, you can read some of her review here..  She highly recommends it and what stuck with me was the memory foam layer in the mattress construction. 

We have a hospital bed for our Omi (that's her nickname), that helps us to position her so that she can watch TV, read, or just relax.  It also helps us to take care of her other needs as it raises and lowers so that our backs aren't quite so stressed.  But while those are great features, the mattress left a lot to be desired.

Within a month she was feeling pain in certain areas of her back, so we knew we had to do something to mitigate that pain.  Enter the Memory Foam Mattress Topper!

We decided to go with a 3 inch Gel Memory Foam Topper with a removeable cover.  With elderly people you have to be able to wash the cover often, but we also have mattress protectors for double insurance against leaks and other problems.

We love that this Mattress Topper is affordable and has some really great features as well.  It is made of high density foam that gives great back and general body support while still being breathable. 

Having the body supported fully lets the spine relax in a neutral position and the muscles also relax.  Sleep is enhanced and there is no morning soreness.

The Bamboo Fiber Cover is skin friendly and breathable.  It has adjustable elastic straps and an anti-slip surface so that once placed on the mattress, it will not move easily.

We like that it comes with a 10 year warranty.  The only downside was that when we first got it, we needed to let the topper air out!  It did have that new foam smell to it, but with it being placed out on the balcony for a day, that completely disappeared and we have not smelled it since.

All in all, this topper has been a life saver and Omi is no longer complaining about  soreness anywhere.  So we know that it is doing what it's supposed to do.


In our later years, we all want to be as comfortable as possible and this is a great, affordable and easy fix.  Bed Sores are not something that anyone would want to have and if they are left untreated, they can become infected.  So let's stop them from happening!  We have enough problems without adding ones that don't have to be there.

I hope this helps anyone else in our position, or anyone who has difficulty sleeping.  Try a Memory Foam Topper for your bed and see what kind of a difference it can make for you!


Note: The author may receive a commission from purchases made using links found in this article. “As an Amazon Associate, Ebay (EPN) and/or Esty (Awin) Affiliate, I (we) earn from qualifying purchases.”


Monday, March 4, 2024

Reviewing Etsy as a Source for Succulent Shopping

Did you know that Etsy is a great place to buy plants?  I did not know that until recently. I was shopping for succulents and saw so many good reviews on many Etsy plant shops that I decided to give it a try. I received my order from QueenofSucculents this week and was thrilled.

Text and photos about succulent plants


I was having a long-distance chat with my grandson recently. I was telling him what I was going to try to winter-sow outside. And vegetables that I wanted to try to grow this year. I listed onions, spinach, lettuce, and so on. He asked if he could make a suggestion. Of course I said yes. I thought he'd tell me about his favorite vegetable. Instead, he listed several interesting and rare succulents.

FUN!  Many years ago, I lived where hens and chicks (plants) grew outside. And believe it or not, some sort of cactus grew outside in Indiana. I've also enjoyed growing Aloe Vera and Christmas Cactus indoors off and on over the years. But I haven't had any of those plants for quite awhile.

One of the "rare" or "interesting" plants he listed was a Haworthia Obtusa. I'd never heard of that particular plant so I looked it up. Wow! It was interesting. 

With our conversation, I had an urge to have some succulent plants again. And how much better if I could find some Haworthia Obtusa's to grow. I did buy some succulents at a semi-local garden center and nursery. 

Succulent Shopping on Etsy

There are so many varieties of Succulents on Etsy. Many types, colors, and prices. There are many shops with great customer ratings and customer photos of the plants they purchased. The difficult thing about choosing a succulent shop was narrowing it down to just one shop for my first order.

I narrowed it down to QueenofSucculents.  I was still hesitant. I expected that it was unlikely that my plants received would be the plants in the shop photos. But they were!  I received exactly what I was looking at when I ordered. 

My plants were packed in a way that kept them safe; a combination of peanuts, paper, and what looked like the stuffing used for stuffed animals. 

I also received a teeny-tiny free gift - the cutest little succulent plant ever. Along with a Smart Plant Care card and a thank you/general care card.

I am very pleased with my order and my plants and look forward to adding to  my collection of succulents - as soon as I prove to myself that I can keep these plants alive for awhile! 

Two Highly Recommended Etsy Succulent Shops:

QueenofSucculents  - Based in Santa Cruz, California. All succulents have been "grown by us, hand-picked from nurseries, or imported from Korea". 

RareSucculents  - A succulent farm in Massachusetts


Note: The author may receive a commission from purchases made using links found in this article. “As an Amazon Associate, Ebay (EPN) and/or Esty (Awin) Affiliate, I (we) earn from qualifying purchases.”


Sunday, March 3, 2024

A 5-Star Rollercoaster of Intense Hilarity and Heart Based on True Financial Folly

A 5-Star Rollercoaster of Intense Hilarity and Heart Based on True Financial Folly

Dumb Money unfolds the true tale of the GameStop short squeeze led by Keith Gill, aka Roaring Kitty. Gill, an everyday investor with a YouTube channel and Reddit presence, takes center stage. 

The film demystifies short selling, where investors bet against a company's success, offering a gripping glimpse into the volatile world of stock market maneuvers.

With a brilliant ensemble cast and a razor-sharp script inspired by actual events, this is a gripping film, so I'm giving it a personal five-star rating.

A Hilarious (and Intense) Exploration of Real-Life Financial Folly:

"Dumb Money" draws inspiration from the true story of a motley crew of amateur investors who stumbled upon a golden opportunity in the volatile world of stocks. 

Led by the charismatic cast, the group dives headfirst into the chaos of Wall Street, armed with little more than dreams and misguided ambition.

An intense comedy of errors ensues as the characters navigate the complexities of the stock market, making decisions that range from absurd to downright ludicrous. 

The film cleverly satirizes the unpredictable nature of financial markets while delivering punchline after punchline with impeccable comedic timing.

Heartfelt Moments Amidst the Laughter, Rooted in Reality:

While "Dumb Money" is undoubtedly a riotous comedy, it also surprises audiences with moments of unexpected depth and sincerity rooted in the reality of actual events. The film explores themes of friendship, resilience, and the pursuit of dreams against all odds. Beneath the laughter, viewers find a relatable story of individuals navigating the ups and downs of life, both in and out of the stock market.

Visually Appealing and Energetic, Inspired by Actual Events:

The film's vibrant cinematography and energetic pacing contribute to its overall appeal. The director's keen eye for visual storytelling complements the script, creating a lively and immersive experience.

From the frenetic chaos of trading to the quieter, introspective moments, "Dumb Money" captivates audiences with its dynamic presentation inspired by the true events that unfolded.

Conclusion:

In the realm of comedy, "Dumb Money" stands tall as a testament to the brilliance that arises when a stellar cast, a witty script, and skilled direction converge, all rooted in the reality of true financial folly.

 This 5-star gem delivers shocking humor and surprises with its heartwarming moments and resonant themes. "Dumb Money" is a must-watch for anyone seeking a rollercoaster that effortlessly balances humor and heart, offering a true-to-life glimpse into the unpredictable world of financial endeavors. 

Strap in for a wild ride that leaves you both in stitches and on the edge of your seat, proving that sometimes the best investments are the ones that make you shockingly laugh, especially when they're based on true stories.

I couldn't believe this was a true story! But yep, sure was. I personally loved this one!

★★★★★ Five Stars

You can find this movie on Amazon Prime.


Note: The author may receive a commission from purchases made using links found in this article. “As an Amazon Associate, Ebay (EPN) and/or Esty (Awin) Affiliate, I (we) earn from qualifying purchases.”


Saturday, March 2, 2024

No Reserve by Felix Francis – Book Review


A Dick Francis Novel


Race Horses in stalls

Author Felix Francis continues following in his father's footsteps with the series of books which are always placed in the horse racing world in Great Britain.  Each main character in these books written first by Dick Francis, and then continued on by his son, Felix Francis, is related in some way to horse racing.  The character may be a jockey, a horse trainer or owner, or in some way work in a related field. 


In this latest book, No Reserve, the reader gets to follow the actions and adventures of an auctioneer in Newmarket at the bloodstock yearling sales.


Synopsis of No Reserve


The higher the stakes, the greater the risk.... 


Theo Jennings has been working for a bloodstock sales company these past three years, hoping to continue climbing the ladder in his chosen field. On Day 1 of the Newmarket October sales he makes his first-ever multimillion-dollar sale of a yearling colt. A few days after the sale, Theo finds out that the colt has died. After having accidentally overhearing a conversation about that colt and insurance, he becomes suspicious that foul play was involved. 


Theo begins to investigate the death of the colt, with the help of a young woman friend who works in the accounting department of the sales company. But no one really wants to talk to him or answer any questions. Then a person's body is found in the same stable where the colt was found dead. 


Suddenly, Theo finds fingers pointed at him and his world turns upside down with the accusations. The only way to clear his name is to find the real murderer. 


Summary


Another exciting adventure in the English world of race horses by mystery writer, Felix Francis. A thoroughbred thriller for sure! 


Related Links:


*Book Review of No Reserve written by Wednesday Elf


Note: The author may receive a commission from purchases made using links found in this article. “As an Amazon Associate, Ebay (EPN) and/or Esty (Awin) Affiliate, I (we) earn from qualifying purchases.”


Friday, March 1, 2024

Harlan Coben's Fool Me Once - Netflix Series Reviewed

Fool Me Once
My husband and I recently watched the Netflix series, "Fool Me Once".  We both would recommend it, even though there were times when I thought the title should have been "fools rush in".  

The main character, Maya Stern, seems to have the attitude that she is invincible, superior and the authority in any room or situation.  Frankly, she was not always very admirable.  Her rash decisions to constantly confront everyone made her seem more out of control than considered or intelligent, especially when her actions could influence her teenage niece and her teammates.  

At one point, we almost turned it off, but there was just enough suspense and mystery to the plot to keep us watching.  

I wasn't sure what I thought of the investigator, Sami Kierce, at first, but in the end he turned out to be one of my favorite actors in the series, simply because of his acting skill.  We also really liked 'Corey the Whistle' who was truly committed to revealing the truth and he seemed to genuinely care.


Fool Me Once Synopsis

Fool Me Once


Video Currently on Netflix

There is a lot happening in Maya Stern's life all at the same time.

She is a helicopter pilot that has recently been expelled from the military because she fired on an unverified civilian truck while trying to protect troops on the ground. 

Her beloved sister has been murdered and Maya feels there is more behind her death than just a home invasion.  Of course, Maya must investigate her sister's death. 

Then, her husband is shot in front of her while they are walking in the park and she has to endure police questioning.  Plus, her sanity is in question when she sees her husband visit their daughter on a recently acquired nanny cam.  Instead of calling the police, Maya confronts the nanny who responds by pepper-spraying her in the face and stealing the video card.  Now, the evidence that her husband may still be alive is gone.

Maya is not liked by her husband's wealthy family and her mother-in-law is equally confrontational and derogatory.  Sparks fly every time the two of them are together, or even talk on the phone.  


I'll close by telling you the same thing I told my parents, watch it to the end! The end makes all the rest worth it.


Check Out More Movie Reviews at
ReviewThisMovies.com


Harlan Coben's Fool Me Once (2024) - Netflix Series Reviewed by:
House of Sylvestermouse


Note: The author may receive a commission from purchases made using links found in this article. “As an Amazon Associate, Ebay (EPN) and/or Esty (Awin) Affiliate, I (we) earn from qualifying purchases.”


Thursday, February 29, 2024

Make Homemade Easter Candy

 As Easter approaches, the joy of celebrating with family and friends is complemented by the sweet treats for this spring Holiday. 

Why not add a personal touch to your Easter celebrations by making homemade Easter candy to add a special touch to your Holiday festivities.

Make Homemade Easter Candy
Make Homemade Easter Candy-Reviewed

We make a day of it yearly by making Easter candy with our grandchildren. Making your own chocolate candy for any Holiday is fun, and the kids have a great time being creative with decorating the candy.

The photo above shows some of our daughter's and the kids' creative work last year. I take no credit for the decorating, as none of it was done by me. My only job is to melt the chocolate and take some pictures.

Homemade Easter Candy

We use a double boiler to melt the chocolate on the stove. You can also melt the chocolate in the microwave using a microwave-safe bowl. 

I never have any luck melting the chocolate in the microwave. I like using the double boiler because I can add chocolate discs to the melted chocolate and keep stirring it.

There are many brands of chocolates to buy. We have been buying Wilton Candy Melts. We use milk chocolate, dark chocolate, and various colors for decorating. You will find instructions on the Wilton Candy Melt bags for melting the chocolate in the microwave or using a double boiler.

Homemade Easter Candy Ideas

After the chocolate is melted we just spoon it into the various plastic molds and then set the mold in the freezer for 10 to 15 minutes. After the chocolate is solid you are ready to decorate with the different colors of melted chocolate. 

The bunnies shown above are just out of the freezer and will be decorated with different colored chocolates using small brushes and toothpicks.

Decorating Easter Candy

In the photo above, Bobby is filling a mold with chocolate and adding sticks. Tyler is preparing to decorate with different colors of chocolate using toothpicks and brushes.

This Easter, take the opportunity to create lasting memories by making your own homemade candies. Whether you're a seasoned baker or just starting out, this delightful activity is sure to bring joy to your celebration. Share the sweetness with family and friends, and embrace the satisfaction of crafting your own Easter treats. Happy Easter!


Note: The author may receive a commission from purchases made using links found in this article. “As an Amazon Associate, Ebay (EPN) and/or Esty (Awin) Affiliate, I (we) earn from qualifying purchases.”


Wednesday, February 28, 2024

The Best Way to Clean Makeup Brushes Without Ruining Them

Good makeup brushes are an excellent investment for anyone who wears makeup. Whether you apply a full face of makeup or just a bit of foundation and blush, the right tools can make all the difference in achieving beautiful results with your makeup application. But whether you choose to invest in high-quality makeup brushes or inexpensive ones, proper care is important for many reasons including the effectiveness and longevity of these beauty tools as well as good hygiene.

Today I'm reviewing my tried-and-true method for cleaning makeup brushes quickly, easily, gently, and thoroughly using either a solid makeup brush cleanser bar (my preferred method) or a liquid brush shampoo.

The Best Way to Clean Your Makeup Brushes

A Step-by-Step Guide to Cleaning Makeup Brushes Using a Solid Brush Cleanser

In this step-by-step guide, I'll walk you through the easy process of using a solid makeup brush cleanser to clean your beloved brushes.

Step 1: Gather Your Supplies

Collect your dirty makeup brushes, a solid brush cleaner of your choice, a clean towel, and (optional) either mesh brush sleeves or a makeup brush drying rack. (I have linked my favorite recommended makeup brush cleaning supplies further down in this article.) Place these next to your bathroom sink.

Step 2: Wet the Lower Two-Thirds of the Brush Bristles

Run a moderate (not strong) stream of lukewarm water in your sink. Take one of the dirty makeup brushes and wet just the tips of the bristles under the running water. Take care to keep the upper part of the bristles where they meet the handle dry, since getting this area wet can loosen the glue that holds the bristles in place and cause the brush to shed.

Step 3: Swirl the Wet Bristles on the Solid Cleanser

Rub the wet brush gently over the surface of the solid makeup brush cleaner in circular motions. Don't push down, just swirl across the surface with the lower part of the bristles to create a rich lather, making sure to avoid the top where the bristles meet the handle. Lathering the cleanser and working it into the bristles will help break down and lift away impurities such as makeup residue, oils, and bacteria.

Place the tips of the wet, soapy bristles in the lid of the solid brush cleanser jar, then tap them against the inside of the lid repeatedly, rotating the brush to work the cleanser into the bristles on all sides. Don't press hard or push—you want to avoid getting the cleanser lather on the topmost part of the bristles, where the water can wick up inside the ferrule (the metal band inside which the tops of the bristles are glued into the handle), which can weaken the glue and cause premature shedding. 

Step 4: Rinse Thoroughly

Rinse the inside of the lid, then fill it partway with clean lukewarm water. Again, tap and swirl the tips of the brush inside the lid to rinse out the lather. Pour out the dirty water, rinse and refill the lid with clean water, and repeat. (Depending on how much makeup is on the brush, you may need to repeat steps 3 and 4 a few times.) Repeat this rinse step until the water runs clear, indicating that the brush is clean.

I made this video to demonstrate how to properly wet the bristles, lather them on the solid brush cleanser, and rinse them in the brush cleanser lid to avoid wetting the tops of the bristles.


Step 5: Shape and Dry

Gently reshape the brush bristles to their original form with your fingers and allow them to air dry. You have three air-drying options:

  • Slide a mesh brush guard sleeve over each brush, starting from the handle tip and sliding the guard down to the bristles. Note: These mesh sleeves are also great for protecting your brush bristles when you are traveling. 
  • Use a brush drying rack. Insert the handle of each brush from the underside of the rack through the flanged silicone inserts in an appropriately-sized hole, taking care to center the handle so the bristles point straight down.
  • Lay the brushes flat on their sides on a clean towel. Avoid leaving them upright, as water can seep into the handle and damage the brush over time.

Once your brushes are completely dry, store them in a brush case to keep them clean and dust-free until you're ready to use them.

Makeup brush cleaning supplies
Makeup brush cleaning supplies: Solid cleanser, liquid brush shampoo, mesh brush guards, collapsible acrylic brush drying rack

How to Wash Your Makeup Brushes Using Liquid Brush Shampoo

Follow the same steps as for using a solid brush cleanser, except:

  • Use any shallow, clean, medium-sized jar lid in place of the solid cleanser lid.
  • Squirt a drop of liquid brush shampoo into the lid, swirl the damp bristles in the lid to work in the soap and create a lather, then rinse the lid thoroughly before filling it partway with lukewarm water and rinsing the soapy bristles as in Step 4 of the solid brush cleanser instructions.

How Often Should You Clean Your Makeup Brushes?

If you are an actress who applies a full face of heavy stage makeup several times a week, you should wash your brushes after each makeup application. For someone who wears subtle daytime makeup, cleansing your brushes weekly with either solid brush cleaner or liquid brush shampoo should be fine. If you wear makeup only occasionally, you may be able to get away with sanitizing your brushes after each use with an alcohol-based makeup brush sanitizing spray and washing them with a brush cleaner and water every two or three weeks.

Maintaining clean makeup brushes is an essential part of any beauty routine. With the use of a solid makeup brush cleaner, this process becomes quick and effective. Incorporate this simple routine into your beauty regimen to ensure your brushes remain in top-notch condition, providing you with flawless makeup application every time.

Recommended Supplies for Cleaning Makeup Brushes

These are the cleaners and related tools and supplies I recommend to keep your makeup brushes clean, sanitary, and performing well for a long time.


Why It's Important to Wash Your Makeup Brushes Frequently

Cleaning makeup brushes on a frequent, regular schedule is essential for maintaining skin health, preventing bacterial buildup, preserving makeup quality, and promoting good hygiene habits. It's a simple yet crucial step in your beauty routine that contributes to both the longevity of your brushes and the health of your skin.

Preventing Bacterial Buildup

Makeup brushes come into contact with the skin, which naturally harbors bacteria. Over time, these bacteria accumulate on the bristles of the brushes. Regular cleaning helps prevent the growth of harmful bacteria that can lead to skin irritations, breakouts, or infections.

Maintaining Skin Health

Dirty brushes can transfer oils, old makeup, and bacteria to your skin, potentially causing clogged pores and breakouts. By keeping your brushes clean, you reduce the risk of introducing these unwanted elements to your skin, promoting a healthier and clearer complexion.

Preserving Makeup Quality

The residue left on makeup brushes can contaminate fresh makeup products, altering their color, texture, and performance. Regularly cleaning your brushes ensures that your makeup applies smoothly and accurately, maintaining the quality and longevity of your cosmetic products.

Preventing Cross-Contamination

Using the same brush with different makeup products, such as foundations, blushes, and powders, without cleaning it in between applications can lead to cross-contamination. This can affect the color accuracy of your makeup and may cause unintended combinations that don't complement each other. You don't necessarily need to wash the brush before using it with a second or third type of makeup in a single sitting; spraying it with an alcohol-based makeup brush cleaning spray and wiping it on a clean microfiber cloth or paper towel in between using it for different makeup products is fine. 

Enhancing Makeup Application

Clean brushes perform better for makeup application. Dirty brushes can carry remnants of previous products, causing colors to mix or appear muddy. Clean brushes help you achieve more precise and beautiful makeup looks and give you better control.

Prolonging Brush Lifespan

Regular cleaning helps maintain the integrity of the brush bristles. Accumulated makeup, oils, and bacteria can damage the bristles over time, leading to shedding and a shorter lifespan for your brushes. Cleansing them properly on a regular basis ensures that they will remain in good condition longer.

Reducing Allergic Reactions

For individuals with sensitive skin or allergies, using dirty brushes can trigger adverse reactions. Cleansing your brushes properly and frequently minimizes the risk of irritation and allergic responses by removing potential allergens and irritants from the bristles.

Promoting Good Hygiene Habits

Regularly cleaning your makeup brushes is part of maintaining good personal hygiene. Just as you wash your face and remove your makeup before bedtime, cleaning your brushes should be a routine practice to ensure your overall skincare and makeup regimen is as healthy as possible.


The Best Way to Clean Makeup Brushes Without Ruining Them by Margaret Schindel

Read More Beauty Reviews by Our Review This Reviews Contributors

Read More Product Reviews by Our Review This Reviews Contributors


Note: The author may receive a commission from purchases made using links found in this article. “As an Amazon Associate, Ebay (EPN) and/or Esty (Awin) Affiliate, I (we) earn from qualifying purchases.”


Most Recent Reviews on Review This Reviews


Search for Reviews by Subject, Author or Title

The Review This Reviews Contributors


SylvestermouseSylvestermouseDawn Rae BDawn Rae BMbgPhotoMbgPhotoBrite-IdeasBrite-IdeasWednesday ElfWednesday ElfOlivia MorrisOlivia MorrisTreasures by BrendaTreasures by BrendaThe Savvy AgeThe Savvy AgeMargaret SchindelMargaret SchindelRaintree AnnieRaintree AnnieLou16Lou16Sam MonacoSam MonacoTracey BoyerTracey BoyerRenaissance WomanRenaissance WomanBarbRadBarbRadBev OwensBev OwensBuckHawkBuckHawkDecorating for EventsDecorating for EventsHeather426Heather426Coletta TeskeColetta TeskeMissMerFaeryMissMerFaeryMickie_GMickie_G


Review This Reviews is Dedicated to the Memory of Our Beloved Friend and Fellow Contributor

Susan DeppnerSusan Deppner

We may be apart, but
You Are Not Forgotten


“As an Amazon Associate, Ebay (EPN) and or Etsy (Awin) Affiliate, I (we) earn from purchases.” Disclosure Statement

X