A cluttered linen closet can be a source of frustration, especially when
you're searching for that elusive missing pillowcase from a set of sheets or
the washcloth from a particular set of towels. Fear not! In this guide, I’ll
review an easy and efficient way to organize your linen closet using pop-up fabric storage bins labeled with index cards inside clear plastic pockets. Say
goodbye to the linen closet chaos and hello to a well-organized and visually
pleasing storage space for your sheets, towels, tablecloths, napkins, spare
blankets and pillows, out-of-season comforters, and holiday table runners.
It's time for spring cleaning!
I am not neat and well-organized by nature. However, I dislike living in a
cluttered environment, as does my husband. So, periodically, we tackle an area
of particular irritation to de-clutter and organize. Our most recent project
was our overstuffed and extremely messy linen closet.
Our easy linen closet makeover was a smashing success, so I put together a
step-by-step guide to decluttering and organizing a messy linen closet. (My
fellow Review This Reviews contributor Barbara also wrote a
linen closet organization guide
several years ago that you might want to check out.)
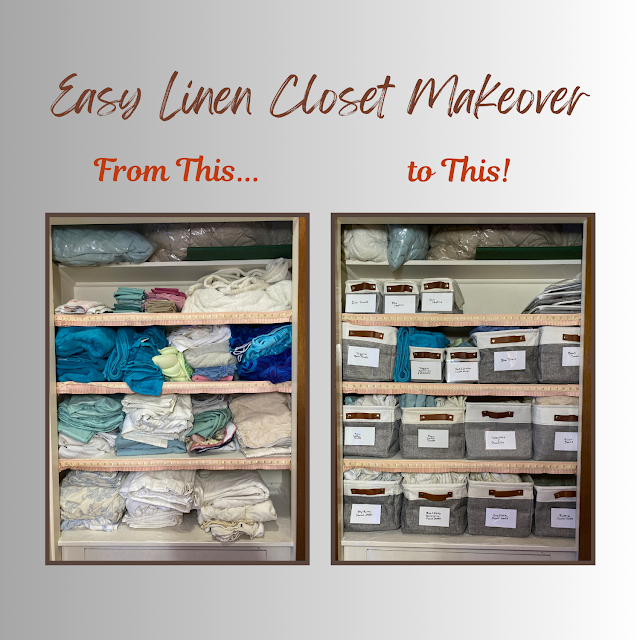
Photograph Your Messy Linen Closet Before You Begin Organizing
I encourage you to take before-and-after photos to document the
transformation. Our “before” closet was so bad that I didn’t photograph it and now I wish I had! The "before" photo you see above was taken in the middle of the process, after we had pulled everything out, sorted it into piles, discarded items we no longer need or use, and organized the linens we're keeping. It would have been far more impactful to show our real "before" linen closet next to our finished, organized "after" result, as well as a feel-good reminder of all we accomplished during this DIY home organization project.
Step 1: Assess, Sort, and Weed
Decluttering is the first step towards achieving an organized and functional
space. Before diving into the organization process, take a moment to assess
your linen closet's contents.
We pulled everything out of our closet, dumped them on our king-size bed, and
then sorted all our sheets, pillowcases, towels, blankets, tablecloths,
napkins, and other miscellaneous items into piles by category. Then came the
hard part: deciding what to let go of or store elsewhere (such as the rarely
used sheets for our sofa bed).
Set aside any worn-out, torn, stained, or mismatched linens, towels, or items
you no longer need. Be as ruthless as you can. Decide what to discard or
recycle and what to donate, then put those items into the trash, bags, or
boxes, as appropriate, labeling the containers for recycling or donation.
Step 2: Group, Arrange, and Label Your Remaining Linens
Next, put everything else back in the closet, grouping related items and
arranging them in whatever way you prefer to maximize shelf space and optimize
organization. Be sure to leave some shelf space open to accommodate future
purchases or gifts.
Tip: I suggest putting the linens you use most frequently on the most easily
accessible shelves and reserving the highest and lowest shelves for the items
you need to remove or put back less often ( such as comforters, extra
blankets, guest linens, and holiday tablecloths).
Using scrap paper, make a temporary label for each pile on the shelves (e.g.,
blue towels, pink towels, striped flannel sheets). Personalize these labels in
any way that makes sense to you (e.g., Mom’s Quaker lace tablecloth and
napkins). Then place these temporary labels on top of each pile until you have
your storage bins and labeling materials.

|
Our linen closet after we weeded out what we didn't need to keep.
It's
organized, but still messy and the linens don't fit the space well.
|
Step 3: Measure, Then Select Fabric Storage Bins or Baskets
Pop-up fabric storage bins or baskets are a game-changer for maximizing space and
bringing order to your closet both functionally and visually. These collapsible fabric bins make it easy to
group similar items and access them effortlessly. Choose appropriate size bins
to accommodate different types of linens, from large king-size sheet sets to
small dish towels.
Measure your piles of linens, the width of your linen closet shelves, and the
space between each shelf, then select a variety of coordinated bins in
different sizes to fit. This allows you to customize your storage solution
without investing in a custom closet makeover solution. The pop-up storage
bins we selected are inexpensive and the workmanship is not perfect, but the
price was right and they come in a wide range of sizes and shapes. It was also
important to us to have bins that fold down when not in use because we wanted
to keep some extras to allow for future expansion of our linen closet's
contents. However, if you don't mind spending more, you can find a wide array
of attractive storage bins to suit a variety of tastes and home decor styles.
If you have large, bulky items like comforters that won't fit inside even the
largest pop-up storage bins, you may want to put them in airtight vacuum
compression storage bags designed for this purpose, which will not only keep
these items clean but also compress them to fit more easily on your closet
shelves and save space.
Step 4: Unfold and Label the Bins
To make it easy to find what you need at a glance, you will want to label your
pop-up storage bins. We decided to use self-adhesive clear plastic 3” x 5”
pockets and index cards for labeling the fronts of our bins and ordered them
from Amazon along with our bins. We chose the 3”x5” size because they matched
the width of our smallest bins but were still large enough to accommodate
labels with several lines of text when needed.
When your bins, plastic pockets, and index cards arrive, unfold the bins and
press against the sides to prop them open. (The sides won’t stay completely
straight until you fill the bins.)
Attach a clear plastic pocket to the front of each bin. We ordered self-stick
plastic pockets but discovered that they didn’t adhere well to the fabric bins
over time, so you will want to stitch, glue, or rivet the pockets to the bins.
We've ordered a rivet tool and some rivets for attaching ours more securely.
We will use the rest of the self-adhesive pockets and index cards to label
storage cartons, where the adhesive will work perfectly.
Using a permanent marker and index cards, write a new, permanent label for
each pile of linens on your closet shelf to replace the temporary label.
This simple and effective labeling system allows for quick identification
without having to rummage through each bin, and the clear plastic pockets
protect the index card labels from becoming worn or dog-eared.
Step 5: Arrange Your Linens in the Labeled Bins
Take one pile of related linens and place it into the appropriately sized bin.
Insert the index card label into the clear plastic pocket and return it to the
closet shelf. Repeat with the remaining piles, bins, and labels.
This systematic approach not only keeps everything organized but also makes it
easier to find what you need when you need it.
Then take a photo of your newly neat and organized linen closet and savor the contrast vs. your "before" picture.

|
Our formerly crammed, messy linen closet is organized and
labeled,
so everything is easy to find and accessible. Now
we just need to
remove the old, frilly, decorative pink shelf edging we inherited!
|
Step 6: Maintain Regularly
To keep your linen closet organized and efficient, commit to regular
maintenance. Fortunately, this system makes it easy to maintain because, as my
grandmother used to say, there’s “a place for everything and everything in its
place.”
Periodically review the contents of each bin, refreshing, replacing, or
rearranging items as needed. This ongoing effort will prevent the return of
clutter and keep your linen closet in top-notch shape.
Messy Linen Closet Makeover Supplies
My husband chose a tailored storage bin style for this project, but the pretty baskets with the quatrefoil pattern would be a lovely, more feminine choice.
Enjoy Using Your Neat, Organized Linen Closet!
Transforming your linen closet into an organized storage space is a satisfying
and easily achievable DIY project. With the help of pop-up storage bins
labeled with index cards inside clear plastic pockets, you can create a system
that not only streamlines your storage but also adds visual appeal. Enjoy the
benefits of a tidy, accessible linen closet, where finding the perfect set of
sheets or towels or your favorite tablecloth and napkins is a breeze.
Happy organizing!
How to Organize Your Messy Linen Closet With Pop-up Storage Bins by Margaret Schindel
Read More
Decor Reviews by Our Review This Reviews Contributors
Read More
Home Decor Reviews by Our Review This Reviews Contributors
Read More
Product Reviews by Our Review This Reviews Contributors
Note: The author may receive a commission from purchases made using links found in this article. “As an Amazon Associate, Ebay (EPN), Esty (Awin), and/or Zazzle Affiliate, I (we) earn from qualifying purchases.”


.jpg)

