Everybody loves desserts and specialty treats for the 4th of July
celebrations. Fireworks & outdoor fun are a huge part of the
holiday, especially when we can stretch the activities across several days
or an extended weekend.
Unfortunately, July is a really hot month for many of us. We need
cool water and refreshing treats to keep us going throughout the day.
The specialty treats are especially awesome when they are easy to grab and
carry out to the picnic table, pool side, lake or even on a
boat.
Below are some excellent cool treats that we can make ahead and have ready
to serve at a moments notice. Glass is beautiful, but I do recommend
making the 4th of July treats in clear disposable plastic cups or small
bowls and serve with plastic spoons when needed. Making everything
disposable allows us to focus on fun and not washing dishes.
Jello Treats for the 4th of July
Jello is one of the easiest desserts or specialty treats that can be made
in 4th of July colors
Note: The author may receive a commission from purchases made using links found in this article. “As an Amazon Associate, Ebay (EPN), Esty (Awin), and/or Zazzle Affiliate, I (we) earn from qualifying purchases.”
Our granddaughters are visiting for the week, and we made this easy strawberry cheesecake dessert for the 4th of July. We used strawberry pie filling, but you can use any pie filling you like. Following is our review of how to make this easy and delicious dessert.
Ingredients:
1 SaraLee Pound Cake (cut into small pieces)
2 cans of strawberry pie filling
1 24.3oz Philadelphia No-Bake cheesecake filling (You can find this at Wal-Mart)
1 container of Cool Whip
We thought pictures would be best for our step-by-step instructions.
Here, Giada is cutting the cake into about 1-inch pieces.
Now they are spreading the no-bake cream cheese filling evenly over the top.
Spread the cool whip over the cream cheese filling. Now it was time to decorate our patriotic dessert with fresh blueberries and strawberries. Set it in the refrigerator for about two hours before serving.
This was easy and fun to do. The girls finished and decorated this in about 20 minutes. So there is plenty of time to make this for your 4th of July celebration.
Have a Happy and Safe 4th of July
Note: The author may receive a commission from purchases made using links found in this article. “As an Amazon Associate, Ebay (EPN), Esty (Awin), and/or Zazzle Affiliate, I (we) earn from qualifying purchases.”
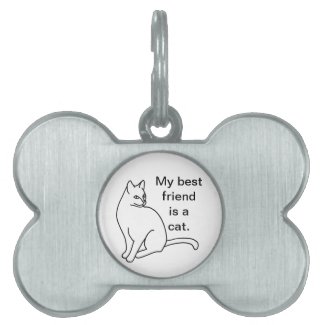
Welcome to my blog that showcases some of my fun cat sayings, that are printed on a variety of products. They can be a gift for yourself, and or for other cat lovers that you know.
This first item is a basic and cute notebook. A simple outline of a cat is drawn and printed on a gray background. The saying is, My cat inspires me. Have you ever had a cat that inspires you? My cat has inspired me to be more active and to also take more naps! Balance is key, she says.
The paper inside notebooks from Zazzle, can be whatever you choose, from ten options. They include college and wide ruled, storybook style, checklist, and more. You can visit the product page to view the different examples.
I had bought a planter and had it sitting in my living room. My cat jumped right in. It was as good as any box! The text says, "Planter cat. No soil required." This fun design is printed on the mug style and color of your choice.
My favorite one is Trampoline Cats. I might have been inspired by my cats to be more active, but my cats were not inspired to be active on my mini trampoline. They only saw it as a new bed that was just cozy enough for the both of them. This fun design is printed on the tshirt style, size, and color of your choice, for any gender and or age.
All of the above designs were designed by me and can be purchased in my CherylsArt store on Zazzle. Zazzle does the printing and shipping, and offers a 100% satisfaction guarantee that is good for 30 days from the date of your receiving the product(s). I have purchased both mugs and tshirts from Zazzle, and everything turned out great.
Thank you for visiting. May you have a purr-fect rest of your day.
Note: The author may receive a commission from purchases made using links found in this article. “As an Amazon Associate, Ebay (EPN), Esty (Awin), and/or Zazzle Affiliate, I (we) earn from qualifying purchases.”
Rediscovering the Sunday Slow-Down: The Inspiration Behind "Magic on Sunday"
There is a specific kind of quiet that arrives on a Sunday afternoon, isn't there?
It is a fleeting, golden window of time where the weight of the week finally begins to lift, and the looming responsibilities of Monday morning feel just far enough away to be ignored.
For many of us, especially in this fast-paced digital era, we have forgotten how to simply exist within that window. We treat rest as another item on our to-do list, something to be optimized and checked off.
"Magic on Sunday" was born out of a desire to reclaim that lost art of stillness!
As a story lyricist, my work often leans into the complexities of human emotion, the heavy, the reflective, and the deeply personal stories that shape our lives.
But this time, I wanted to shift the focus. I wanted to capture the lightness of a day that belongs to no one but yourself and the people you love.
A Soundtrack for the Simple Moments
When I set out to write "Magic on Sunday," my goal was to create something unabashedly joyful.
I wanted a track that felt like a breeze through an open window, bouncy, bright, and impossible to resist. While I am primarily a writer, I find immense fulfillment in the production process, using modern tools to bring the narratives behind my lyrics to life.
For this piece, I leaned heavily into a nostalgic sound palette. There is something about the warmth of vintage-inspired arrangements that makes a Sunday afternoon feel more like a memory you are living in real time.
The song is designed to be a companion for your weekend. Whether you are strolling through a local park, nursing a cup of tea on the porch, or finally stepping away from the screen to catch your breath, this track is my invitation to you: put your responsibilities on hold, just for a few hours.
The Story in the Frame
Music is always a vessel for storytelling, but I wanted to make sure the visual companion for "Magic on Sunday" captured the pure, uncomplicated essence of a day set aside for rest. The video follows a couple who have made the conscious decision to unplug completely, leaving the digital world and its constant demands behind.
In the video, you see them truly embracing the rhythm of a slow Sunday. It's our reminder that we don't need grand gestures to make a memory. Sometimes, the most meaningful thing you can do is give someone your undivided attention and enjoy the simple, quiet beauty of the world around you.
A Duet for Everyone
I deliberately chose to arrange "Magic on Sunday" as a duet. I wanted the narrative to feel balanced and inclusive. By bringing two voices into the conversation, the song becomes a shared experience, reflecting the collaborative nature of a relationship. It is not just about one person taking a break; it is about the power of two people deciding, in unison, that their peace matters more than their productivity.
As we move through the heat of summer, I hope this track finds its way into your playlists. I hope it serves as a gentle nudge to close your laptop, turn off your notifications, and find your own bit of magic in the afternoon sun.
Writing lyrics about life is always an evolution, and this project has been a refreshing detour into the brighter side of life.
Thank you for listening, for reading, and for allowing my words to become part of your personal soundtrack.
*********
"Drageda Lyrics" on all Platforms, including Streaming Platforms**
Note: The author may receive a commission from purchases made using links found in this article. “As an Amazon Associate, Ebay (EPN), Esty (Awin), and/or Zazzle Affiliate, I (we) earn from qualifying purchases.”
June 27 is the day selected to celebrate oodles of onions. The date was chosen by the National Onion Association(NOA) to document the creation of their organization in 1913. It’s definitely nothing to ‘cry’ over. LOL.
Culinary Versatility
Onions have countless culinary uses. You can take a raw onion and slice it, dice it or chop it to add to recipes. This can be either a condiment (such as a slice of onion on a burger) or diced or chopped as an ingredient to almost any recipe.
Onions can be the featured star of a meal or appetizer, such as homemade onion rings or the delicious ‘blooming onion’. Onion Soup is a popular beginning to the main course in many restaurants.
The Onion is Good for You
In addition to the flavor it adds to foods, onions are beneficial. They have very few calories, no added cholesterol, rich in vitamin C and antioxidants, plus vitamin B5. It also gives you an increase to your dietary fiber.
Funny Personal Onion Story
Years ago our daughter & son-in-law were in town visiting us. We had just acquired our very first gas grill and planned on burgers-on-the-grill for dinner. Instead of offering sliced onions as condiments, we decided to add chopped onions to the burger patties before cooking.
Our son-in-law, Paul, does not like onions (can’t imagine life without onions, myself). So we made two burger patties plain for him.
Well, somehow in the confusion of learning the new grill and turning the hamburgers, some of them must have gotten switched. When dinner was served, Bob took a bite of his burger and declared “I can’t even taste the onion in this”. Paul said “I can!” LOL. Seems Paul got Bob’s onion burgers and Bob got Paul’s Plain burgers! So, naturally, they simply switched.
The moral of the story (other than the impossible task of teaching Paul to like onions) is ‘never try a new recipe out on company’ (or, perhaps while learning a new appliance). :)
A Related Holiday:
Close to Onion Day, we find National Onion Ring Day on June 22. So, while you are enjoying your onion dishes, add in a serving of fried onion rings made from scratch. My favorite is my friend’s tempura batter used to deep fry the onion rings. Paired with a burger or a steak, it would be a delicious meal to end both National Onion Day and Onion Ring Day.
So, enjoy the versatile onion in all its many forms!
Note: The author may receive a commission from purchases made using links found in this article. “As an Amazon Associate, Ebay (EPN), Esty (Awin), and/or Zazzle Affiliate, I (we) earn from qualifying purchases.”
I have been cooking in T-Fal cookware most of my life. I have always
had a T-Fal 10.5" skillet in my kitchen for frying eggs, bacon, toasting
sandwiches, sauteing vegetables, frying smaller amounts of meat, etc.
There really are too many uses to list them all.
I also have used the T-Fal 5 quart Dutch Oven for many years. I cook
in it several days a week.
A little over a year ago, I discovered the larger 5 quart T-Fal
skillet while shopping at our local Target store. I bought it
immediately. This skillet has changed the way I cook.
Previously, I made my spaghetti sauce in my taller T-Fal Dutch Oven, but I
have found that I actually prefer making it in the shorter sided 5 quart
skillet. The skillet comes with a glass lid so I can see the sauce
simmering and gauge when to stir it. I also started using this skillet
for making the sauce for Manicotti or Lasagna. I can fry the pound of meat
needed and adding the sauce & seasonings without having to transfer it to the dutch
oven.
T-Fal cookware has a non-stick coating which really does reduce burning and
makes everything much easier to clean. It pretty much wipes clean
before I even start washing it.
The non-stick coating reduces the amount of oil needed when cooking.
Non-Stick Coating
2.9 inch Depth
Stay-Cool Handle on each side for easy lifting/moving
Tempered Glass Lid
Even Heat Base reduces hot spots
Dishwasher Safe
Oven Safe - up to 350°
Even though I prefer the T-Fal non-stick coating, there are a few
considerations when cooking in it. You can not cook on higher heat (500° or
above) when using T-Fal cookware. Also, I do not stir with metal
utensils or use knives in my T-Fal pans because they will scratch or cut the
non-stick coating. Once the coating gets damaged, the pan must be
replaced.
Note: The author may receive a commission from purchases made using links found in this article. “As an Amazon Associate, Ebay (EPN), Esty (Awin), and/or Zazzle Affiliate, I (we) earn from qualifying purchases.”
If you are looking for some light summer reading while at the beach or perhaps just in a chair on your back deck take a look at these short stories. They were written by seven different authors and celebrate all that there is about living on the coast. As an added bonus all of the proceeds for this book will support women in need in Brunswick County North Carolina and Horry County in South Carolina.
About the Book
I really enjoyed reading the short stories in Carolina Tides. Each story was just the right length to sit down and read all in one sitting. The sub-title of the book is A Story a Day for a Week Long Stay. That was a very fitting title, and although I was at home when I read them, I can very well see this as a great book to take on vacation, when you want a bit of reading time, but not too much.
The book covers many topics of coastal living from the wonderful creatures that live on the coast, to romantic walks on the beach, porch-lit evenings in sleepy little fishing villages, the history of North and South Carolina and even some unexpected encounters. Each of the short stories were written by a local author from the Carolina coastline.
Here is a link to the book on Amazon. It can be purchased as a paperback or a Kindle version. Carolina Tides
Stories and Authors
Here is a list of the stories and authors that are included in Carolina Tides
The Names Beneath the Tide by Teri M Brown
Winds of Change by Jan Comfort
Ark of Hope: A Pelican Story by Karen Prescot
Brighter Days Ahead by Lisa M Pritchard
Walk Back in Time on the Grand Strand by Lynda Stoy Stear
Azeleas by Carol Stigger
The Beach Ball by Jennifer Tirrell
My Visits to the Carolinas in Photos
I love visiting the beach and particularly love photographing lighthouses. We have made several trips to both North and South Carolina. The photos below were ones I took while photographing lighthouses in the Outer Banks of North Carolina.
More Reviews by Coastal Carolina Authors
Here are several reviews of have written on books by one of the authors in Carolina Tides, Teri M Brown.
Note: The author may receive a commission from purchases made using links found in this article. “As an Amazon Associate, Ebay (EPN), Esty (Awin), and/or Zazzle Affiliate, I (we) earn from qualifying purchases.”
Okay I will admit it, I have a few authors that I will gravitate to each and every time I see one of their books. TOYS, by James Patterson and Neil McMahon was one that I had not yet read. So when a friend offered the book to me, I grabbed it with both hands.
The genre of this book is a little to the left of where I normally go. It's dystopian and futuristic in some of the most disturbing ways. Especially when all we seem to read about is "AI" and how robots will make our lives so much easier.
Patterson and McMahon take this to the next level. Bringing about a "super" humanoid race that is trying to eradicate the last remaining humans on the face of the world. Quite a scary concept in my humble opinion.
But, even though the humans that remain on the earth are not nearly as physically and mentally enhanced as the Elite (as they like to be known), they do have the gift of seeing things outside of the box. Will that be their (the humans) salvation?
This novel will take you to places you may or may not have dreamt as our future is unfolding. Hays and Lisbeth are the #1 "Super Couple" of the Elites. They possess all the attributes that make them super human (ish) and they are intellectually and physically the most perfect couple ever made.
Hays has just completed a mission for the World Government that has him in the spotlight and winning adulations from all the other Elites in his company.
During his return home, he is blindsided by the enemy, fighting the ultimate battle of his life. While he wins this one, he is badly injured, taken to the Elite's version of a hospital and there his life takes an even more drastic turn.
Have I whetted your appetite to find out what happens next? I hope so.
This is a book that I found hard to put down because there are so many things happening in the pages that sound like some of the things that are happening right now or could be happening in the future. When or where will all this take place? Maybe in the next 50 years or so.
We already have the self driving cars and bionic limbs............. what will come next?
Note: The author may receive a commission from purchases made using links found in this article. “As an Amazon Associate, Ebay (EPN), Esty (Awin), and/or Zazzle Affiliate, I (we) earn from qualifying purchases.”