Showing posts with label Decor. Show all posts

Thursday, August 13, 2026

Review of Fall Home Decorations for 2026

Beautiful Fall Decor

 I enjoy changing the decor in my home to fit the seasons and autumn is my favorite season.  I prefer decorations that are simple and classic.  For fall bringing the colors of the season into the home with colorful pillows and throws, leaves, pumpkins and candles give you a warm and cozy feeling.  I have an entrance table that I like to decorate with a fall runner and some simple decorations.  In early fall I have a sunflower runner and add a colorful pot and some fresh flowers in the colors of the season.  Later in the fall I will change to a pumpkin designed runner and some pumpkins and candles.  Below is a photo of my early fall runner and flowers.

Fall decorations

Amazon has a lot of interesting fall decorations.  Here are some that I really like and thought they would be a great addition to my fall decor.

Leaves


Leaves make great decorations for a staircase or a fireplace mantle. This colorful leaves with berries and small pumpkins is 6 feet long.  it will be perfect for my mantle.  Here is a link to Amazon for the leaf's pictures above. Fall Leaves

Another great way to bring fall leaf color into your home is with this pair of colorful "Fall Maple Trees".  They are each 22 inches tall and are battery operated.

Here is a link to the trees on Amazon. Fall Maple Trees

Table Runners

Table runners are a great way to add a touch of autumn to your home.  I like to use them several different way.  They are great for my dining room table, my entrance table and sometimes I hang them over the banister leading to our downstairs.  Here are two that I found on Amazon.

Fall Pumpkin and Leaf runner                                                                           

Pumpkin Runner                                                                                               

Pillows

Colorful fall pillows can add a touch of fall to your sofa or chairs.  Here is one I really liked on Amazon.  They are covers for pillows and come in a set of two that are 18x 18 inches each.  What a great way to convert pillows you have into a fall theme.

Pumpkin Pillow Covers                                                                               

Fall Bathroom

I also like to bring a touch of fall into my guest bathroom.  Here are some items I found on Amazon the help give your bathroom a touch of the season.

Fall Hand Towels                                                                                              
Pumpkin Soap Dispenser                                                                                   

Fall Bath Mat                                                                                                 
I also like to add a touch of fall decor to my kitchen.  Here are some ideas for you from Amazon.

Pumpkin Trivets                                                                                               
Fall Kitchen Towels                                                                                   


Note: The author may receive a commission from purchases made using links found in this article. “As an Amazon Associate, Ebay (EPN), Esty (Awin), and/or Zazzle Affiliate, I (we) earn from qualifying purchases.”


Friday, May 29, 2026

Porch Goose and Porch Goose Outfits Reviewed

porch goose
My daughter called me a few weeks ago and said she was going to paint a concrete porch goose in a craft class.  I asked her if she remembered having a plastic porch goose that she dressed for special occasions and seasons when she was a very little girl.  Unfortunately, she didn't have an actual memory of it, but I couldn't help but wonder if she was drawn to that class because of her old beloved porch goose.  Her grandmother and I both remember well how she liked dressing her first porch goose.

She has now finished painting her concrete porch goose and is ready for porch goose outfits.  With her birthday only a few week away, she added porch goose outfits to her gift wish list.  

You probably know what I am about to say!  Between her grandmother, brother, father and I, we purchased 14 new goose outfits for her upcoming birthday.  I can hardly wait to see the pictures as she changes her goose's clothes each month, occasion or season.  

It is hard to choose a favorite porch goose outfit, but I am personally fond of the yellow raincoat and umbrella.  It reminds me of the outfit her plastic porch goose had when she was a little girl.  I only remember her dressing her original porch goose in her own baby clothes or baby doll clothes, but I think it is totally awesome that there are so many outfits made specifically for a porch goose now.


Awesome Seasonal Outfits for a Porch Goose

My daughter plans to change her porch goose outfits each month, according to the weather or season.  Of course, there are costume outfits for Halloween, but there are also special outfits for all of the holidays.  You can even select a bundle package of costumes to get started.  Buying a bundle is less expensive than purchasing them individually.


 12 Set Porch Goose Outfits for 23" Porch GooseCheck Price


How to Get Your Own Porch Goose

My daughter painted a concrete porch goose, but most of us don't have a concrete figure store close to us.  Plus, the 23" concrete porch goose weights over 40 lbs.  If you plan to set your porch goose on your recessed or enclosed porch, you may well prefer one made of resin that is easier to move.  These options also have a place to fill the base with sand or gravel to keep it from toppling in bad weather.  Then, you can simply enjoy changing your porch goose outfits seasonally too.

 LarpGears Premium Adjustable Large Porch Goose Statue – 23” Realistic Hollow Plastic Garden Goose with Removable Cowboy Hat & Bandana, Stone Base with Sand-Fillable Design for Outdoor StabilityCheck Price Porch Goose Statue Large White Porch Goose Big Resin Garden Lawn Yard 20 inches High Check Price


There are lots of different styles and designs in the Porch Goose Outfits.  Click Here to see more!

 Celltestria 4th of July Goose Outfits for 2323Check Price 2 Set Porch Goose Outfits with Wings Ladybug & BeeCheck Price Fishing Porch Goose Outfits for 23 Inch Lawn Statue, Fisherman CostumeCheck Price Gaggleville Football Goose Outfit, Fits Large 23Check Price


Read More Product Reviews On
ReviewThisProducts.com


Note: The author may receive a commission from purchases made using links found in this article. “As an Amazon Associate, Ebay (EPN), Esty (Awin), and/or Zazzle Affiliate, I (we) earn from qualifying purchases.”


Tuesday, August 12, 2025

What is Summerween?


Curious about Summerween? Wonder where it came from? Looking for ideas for celebrating the holiday?

I have long known that Halloween is the biggest selling holiday in America. With all the costumes, candy and decorations that people buy, that comes as no surprise. But I have just discovered a trend known as Summerween that I will review here.

The stores have long put their Halloween merchandise out during the late summer. However, Good Morning America says that stores launched their Halloween items extra early this year at least in part hoping to catch a piece of this trend. People are not just buying their Halloween supplies early but they are actually celebrating the holiday twice. That is, in October and in June or July and hence the term Summerween.

According to the magazine Real Simple, the holiday may have originated from the Season 1, Episode 12, Disney Channel episode of Gravity Falls, in which the residents celebrated Halloween with jack-o-melons and trick-or-treating in the summer on June 22nd or the second to last Friday of the month. The Pioneer Woman points out that if this is the origin, it took more than a decade for the trend to translate from the screen to reality, which it has done in 2025.

Summerween is enjoying succes at least in part because of the nostalgia surrounding Halloween though  Summerween-themed merchandise tends to include our favorite themes with some brighter, summery colors like those shown in the photo at the top of this page. You will find an endless variety of items like these for your Summerween celebration here on eBay.

The new ‘holiday’ is I suppose whatever you make it but it tends to be a blend of summer and Halloween with both non-traditional Halloween items like the aforementioned melon jack-o-lantern, icy drinks and flamingoes to traditional items like Frankenstein, skeletons and ghosts. You can have a pool party and a BBQ. You can read fireside stories at the campfire. You can watch spooky movies outdoors!

What a great way to get double the value out of your Halloween collection. If once a year is not enough for you and you want to do Halloween twice, you’ll find lots of ideas for celebrating a traditionally non-traditional Summerween in your social media feed but let me take this opportunity to share a few great ideas here:

MORE SUMMERWEEN CELEBRATION IDEAS


Harley Quinn Costume 

A Harley Quinn costume might even be better in the summer than in the winter because you don't have to worry about being warm!

A Barbie-Themed Apron

How about a Barbie-themed apron? I think it would make a perfect part of your costume in the summertime especially if you are serving up some pink cocktails.


A Summerween party with recipes from Delish that seem appropriate to the original holiday hosted in summer. Mummy hot dogs, pumpkin s'mores cookies and a black widow cocktail are just a few.


Perfect for your Halloween-themed storytelling, fall or summer, creepypasta is definitely not edible.


Audrey Hepburn's Wait Until Dark is a perfect psychological thriller considered "one of the most intensely frightening movies in movie history."


Puzzles aren't just for wintertime. If you find you have more time on your hands in the summer or you just enjoy puzzling all year long, you will enjoy this Halloween Treats puzzle.

SOUND UNNATURAL?


"Summerween?" says the Gravity Falls character played by Kristen Schall. "Sounds unnatural." What do you say?

Happy Summerween!
Brenda
Treasures By Brenda

SUMMERWEEN MERCHANDISE


Note: The author may receive a commission from purchases made using links found in this article. “As an Amazon Associate, Ebay (EPN), Esty (Awin), and/or Zazzle Affiliate, I (we) earn from qualifying purchases.”


Thursday, January 23, 2025

Reviewing Solar Garden Lantern

hummingbird solar light

 For Christmas this year, I received a beautiful solar garden light from a special friend.  This lamp is decorated with hummingbirds and flowers and at night will light up your garden with a lovely pattern.

Features of the Solar Lantern

In the photo below you can see the lamp in the dark after it has been charged by the sun for 6 hours.

Isn't it beautiful?  I charged it outdoors today, but since it is winter time I brought it inside to take the photo on my dining room table.


Solar Garden Decor

Here are some of the features of this beautiful solar lantern.
  • Lantern can be used by hanging up or sitting on a table or stand
  • It features auto on and off.
  • It is solar powered and will automatically light up at night.
  • When charged in sunlight for 8-10 hours it will then work at night for 8-10 hours.
  • It is waterproof and is suitable for all outdoor environments.
  • It comes in four designs:  the hummingbird (shown in photos), butterflies, mushrooms, or frogs.

You too can own one of these beautiful lamps.  Just go to Amazon at the following link. Solar Garden Decor

About my Special Friend

I'd like to share with you a little about my special friend.  Her name is Anna and over 60 years ago, when I was in girl scouts, I was working toward my pen pal badge. I was matched up with several pen pals from various countries and most I wrote to for a few months or maybe even a year and then the letters stopped.  One of my pen pals was Anna who lived in the London area in England.  I live in the midwestern United States.  Anna and I seemed to really connect with each other, and we now have been pen pals for 63 years.  Our lives took similar routes, we each married and had two children and we both have granddaughters.

We wrote letters to each other in snail mail for years and when we were each in our 40's we finally met each other in person.  Anna and her family traveled to the US to visit us. Since then, we have visited several times and now with technology we message each other regularly.  Our husbands have also become friends and will sometimes email each other.  We have vacationed together in Cyprus and Memphis Tennessee.  My husband and I have also visited Anna and Peter at their home in England near the border of Wales.  We attended their son's wedding and have met up with them when we were on cruises, and they would travel to one of our stops (Plymouth in England and Bruges in Belgium.)  We have developed a wonderful friendship over the years.  

Now that we are older my husband and I no longer are able to travel but we enjoy the wonderful memories.  We still message each other regularly sharing news of our children and granddaughters.
We also exchange Christmas gifts each year as we have for the last 60+ years.  This year we received the beautiful Solar Garden Lantern from Anna and Peter.


Note: The author may receive a commission from purchases made using links found in this article. “As an Amazon Associate, Ebay (EPN), Esty (Awin), and/or Zazzle Affiliate, I (we) earn from qualifying purchases.”


Thursday, January 2, 2025

Decorative Window Film Review

I purchased a DIY decorative window film for my sliding glass door. This is my review and experience with it.

Years ago, I had installed a tinted window film to reduce the affect of the sun's rays. It served it's purpose and did a pretty decent job. Although on very bright sunny days, I still had to close the curtain to make the space more comfortable.

Spring forward to me getting a new computer desk and deciding to have it face the window instead of the wall. I wanted to see something more decorative, other than a tinted view of my neighbor's shed. I wanted something that was colorful.

I decided on the one with the grapevine design. (This is the view from below my desk.)

Decorative window film


I love that I now have colors to look at. I can glance to the other glass panel to see what the weather and the birds are doing. So far, when the sun is bright, it gets scattered a bit and works as long as I don't look directly at the brightest spots.

I am happy with my purchase.

Installation Supplies:

The brand that I purchased is by Gila, and they recommend buying a separate installation kit. It comes with a liquid solution that gets applied to both sides of the film, and the glass that you are applying the film to. It also includes a spreader, cutter for spreading out the bubbles, and to do a final cut of the film around the edges.

I didn't go with an installation kit and instead did some searches on YouTube. I found out I could use distilled water with a couple of drops of dish detergent mixed in. (I didn't have distilled water on hand, and instead used some of my purchased drinking water.) As for the spreader, I used a 12 inch plastic ruler that has smooth edges and is see through. Here is a link for one if you need a ruler. https://amzn.to/3BGdr4d

I also used a utility knife and scissors.

Trim first:

I purchased the 3' by 6.5' size for the window film. The sliding door was two to three inches smaller than the film. Gila recommends cutting off excess film, leaving only around an inch of extra film before applying it to the window, glass. It is quite awkward to apply the film, so I do recommend trimming the film as well. I laid it down on my lightly carpeted floor to do the trimming.

Apply tape and separate top corners from backing:

The window film comes with an attached adhesive layer to keep the film from sticking to itself. This layer will need to be removed before applying the film to the glass. Gila recommends applying tape to the two upper corners on both outer sides of these corners. This is a big help to separate the film from its' backing. See diagram.

diagram


The upper ends of the tape are to be kept separated. The holder will then pull the two pieces of tape apart and watch for the film to separate from the backing. Separate a small section, then repeat on the other corner.

Spray on solution:

Spray on solution; either from kit or homemade mix of distilled water and a couple drops of dish detergent. I sprayed the top side of the film, the part that was facing up once I removed the backing. I kept spraying it in sections as I continued pulling the backing from the film.

While that was sitting, I sprayed the glass window that it was to get applied to. Then as best I could, I sprayed that back of the film that had been laying on the carpet, and then carried it to the sprayed window. You need to keep the film away from sticking to itself.

Apply the prepared film to the window:

I placed the smooth side of the film to the prepared window. It is quite slippery, which it is meant to be, so that you can slide it into position. I sprayed on more solution as needed. Since my desk was already in place, I had to work around and under it to get things in place. Oh well.

Once I got the film straightened out on the glass, I used the plastic ruler to squeegee the film to the glass, working from center areas out toward the edges. The goal is to work the bubbles out from under the film. Don't worry if the film starts to come down when you first doing this. I just pulled the film out and sprayed more solution on wherever it was needed.

Final trim:

After I got the bubbles all worked out, I did a final trim with the utility knife and scissors. The utility knife didn't always cut through the film, so I pulled it away from the glass, and used the scissors. I then applied more solution when needed and squeegeed again with the ruler.

Voila! I got it done. It took me longer than I thought, but would have went better had I decided to decorate my window before building my desk!

Anyway, I got it done and I am pleased with how it turned out.

Smaller windows should be a lot easier and also when nothing is as close as five inches in front of it; i.e. my desk. {grin}

Amazon did not show the grapevine scene that I purchased. If you want the grapevine scene, you can check with Menards. You can also peruse other designs on Amazon by visiting the link below.

If you're looking for an inspiring way to add more color to your life, and you're okay with DIY, I recommend a decorative window film.

Decorative window film


Gila Glass Scenes Spiral Mosaic Decorative Window Film on Amazon.


Hope you enjoyed this project and that you learned some helpful tips.

Cheryl Paton

As an Amazon affiliate, Cheryl Paton earns income from qualifying purchases made through links on this page, at no additional cost to the purchasers.


Note: The author may receive a commission from purchases made using links found in this article. “As an Amazon Associate, Ebay (EPN), Esty (Awin), and/or Zazzle Affiliate, I (we) earn from qualifying purchases.”


Sunday, December 29, 2024

Top Tips for Choosing the Perfect Rug for Your Home Office

Top Tips for Choosing the Perfect Rug for Your Home Office

When it comes to designing a home office, one element that often gets overlooked but plays a huge role in functionality and aesthetics is the area rug. 

Having spent countless hours experimenting with layouts and designs, I've discovered a few strategies to help you select a practical and visually appealing rug. Let's dive into my personal tips for making the right choice.

Positioning Your Home Office Rug: Setting the Stage for Productivity

The placement of your rug can make or break the flow of your workspace. Here are a few considerations to help you position your rug effectively:

  • Anchor Your Desk and Chair: I recommend placing the rug directly under your desk and chair to define your workspace. Make sure the rug is large enough so that when you pull your chair back, it stays on the rug. This creates a comfortable zone that enhances both form and function.

  • Balance the Room: If you have additional furniture like bookshelves or a filing cabinet, consider how the rug interacts with these pieces. Centering the rug in the room or aligning it with your furniture can create a cohesive and balanced look.

  • Keep It Clear: Avoid placing the rug where it might obstruct doorways or high-traffic areas. A well-placed rug should enhance the room's flow, not hinder it.

Size Matters: Choosing the Right Dimensions

Picking the right size rug is essential for maintaining harmony in your home office. Here's how I approach this:

  • For Small Setups: If your office space is compact, opt for a smaller rug that fits neatly under your desk and chair. A 5x7 or 6x9 rug is typically ideal for tighter spaces.

  • For larger spaces, I Recommend a rug large enough to accommodate multiple furniture pieces in a bigger office. Rugs measuring 8x10 or 9x12 can anchor the entire room, making it feel more unified.

  • Think Beyond the Desk: Sometimes, a larger rug that extends beyond your desk can create a warmer, more inviting atmosphere. This works exceptionally well in open-concept spaces.

Color and Pattern: Setting the Mood

Your rug's color pattern significantly impacts the vibe of your home office. Here are a few ideas based on my experience:

  • Neutral Tones for Focus: Rugs in neutral shades like beige, gray, or soft blues create a calm and professional environment. They're versatile and pair well with most décor styles.

  • Bold Hues for Creativity: Try a vibrant red or emerald green rug to energize your space. These colors can inspire creativity and make your office feel more dynamic.

  • Patterns for Personality: Don't be afraid to choose a patterned rug to add character. Whether geometric, floral, or abstract, a well-chosen pattern can bring texture and depth to your workspace. Just keep the rest of the room's déroom's mind to avoid clashes.

My Wool-Patterned Office Area Rug is 30 Years Old! It was purchased in 1994. Here's a Photo. Yep, I Prefer Patterns.

My 30 year old area rug in top condition

For You: 


Note: The author may receive a commission from purchases made using links found in this article. “As an Amazon Associate, Ebay (EPN), Esty (Awin), and/or Zazzle Affiliate, I (we) earn from qualifying purchases.”


Wednesday, December 11, 2024

Advent Wreaths ~ A Special Way to Countdown to Christmas~ From the Heart


For many people Christmas is a time of gift giving and holiday cheer, but for Christians, this time before Christmas marks a very special time to get ourselves ready for the Birth of the Christ Child.

A great way for family's to do this preparation is with a Christmas Wreath.   


What exactly is this Christmas Wreath?  

It's not just a door decoration but rather a decoration that sits on the Family's Dining Room or Living Room table.

It is a wreath made usually from evergreens and possibly decorated with some poinsettias or berries in between.  There is place on this wreath for 4 candles.

Christmas advent wreath


What is the meaning of all this?  Well from a Christian perspective, there is lots of  traditional symbolism involved with the Advent Wreath.

So let's break it down!  

  • A wreath is round, a circle symbolizing no beginning and no end.
  • It is usually covered with evergreens, either cedar or pine, again symbolizing everlasting life.
  • All Advent Wreaths should have 4 Candles around the perimeter of the circle.  
  • 4 Candles, 3 purple and one pink.  Sometimes Christians will add a 5th candle in the middle of White.
  • 3 Purple candles symbolize, Faith, Hope and Love with the pink candle symbolizing Joy!
  • The White Candle if added is a symbol of Christ and the Light of the World.

How do you use the Advent wreath?  Well for most Christians, each Sunday before Christmas is a countdown to the Big Event!  Not the coming of Santa Claus, but rather the coming of the Christ child.
Each Sunday for the 4 weeks before Christmas,  a candle is lit and the family sometimes will read the Bible story of the coming of Christ.

Week 1 will see one purple candle lit, week 2 two purple candles are lit, week 3 the pink candle is lit, and week 4 the last purple candle is lit.  Why the Pink candle?  Well as it gets closer and closer to the actual Christmas day, you can feel the Joy of the family waiting in anticipation.  By Christmas all 4 Candles are burning brightly.  Some family's will add that 5th candle, a White One, on Christmas Day symbolising the birth of the Christ Child.

Many times some of the symbolism will be scrapped and white or gold or red candles will replace the purple and pink, or a color of your choice to match your decor.  It is entirely up to you and your beliefs if you have an  traditional Advent Wreath in your home. 
Christmas will come one way or another, but sometimes it's nice to have the reminders of the reason for the season and help your family understand the story! 
Christmas advent wreath

Amazon has a lovely Advent Wreath that can be purchased here: https://amzn.to/4gx2alv 
Candles must be purchased separately here: https://amzn.to/4fsLY3T


Note: The author may receive a commission from purchases made using links found in this article. “As an Amazon Associate, Ebay (EPN), Esty (Awin), and/or Zazzle Affiliate, I (we) earn from qualifying purchases.”


Sunday, November 24, 2024

5 Textured Wall Ideas to Help You Add Interest to Your Space

5 Textured Wall Ideas to Help You Add Interest to Your Space

Transform Your Space with These 5 Stunning Textured Wall Ideas

Did you know that textured walls are one of the 2025 home decor trends?

When decorating your home, textured walls are the secret ingredient to adding depth, warmth, and personality to any room.

Whether creating a bold statement or a subtle layer of interest, these ideas will inspire you to reimagine your walls in ways that evoke emotion and style. 

Let’s explore five fabulous textured wall ideas, complete with tips on color, balance, and how to maximize each option.


1. Faux Brick Walls: The Charm of Urban Sophistication

Faux brick walls bring the rugged charm of a city loft into your home without the structural overhaul. These panels or wallpapers mimic the texture and appeal of exposed brick, creating a cozy yet industrial vibe.

What It Adds:
Brick walls add a sense of authenticity and character to your space, perfect for creating a warm, inviting atmosphere. Use them in a living room or home office to make the space feel grounded and stylish.

Color Tip:
Go with classic red bricks for a rustic charm or whitewashed bricks for a lighter, more modern feel. To avoid overwhelming a room, balance the texture with smooth surfaces, like sleek furniture or polished floors.

Designs to Preview Here.


2. Textured Paint Techniques: Subtle Sophistication

Textured paint was a hot trend in the 1990s, and I added it to my home as well. Fortunately, this textured look is making a comeback! Because I still have it featured in my hallways. I find it very durable, especially when you seal the sponge work with a sealer. 

Textured paint techniques, like sponging or rag rolling, bring soft, layered textures to your walls, evoking a sense of movement and depth. These techniques work wonderfully in bedrooms, hallways, or bathrooms for a soothing yet elegant touch.

What It Adds:
This option adds a luxurious, artistic flair to any room, drawing the eye while remaining understated. It’s perfect for creating an intimate, serene space.

Color Tip:
Choose soft hues like lavender, sage green, or pale blue for a calming effect. Avoid overly bold colors, as they can make the texture feel chaotic. Stick to a monochromatic palette to keep things cohesive.


3. Wood Paneling: Rustic Warmth with Modern Appeal

Wood paneling should have a modern flare—not those found in 1960s basements. Unless you love that, then go for it.

Whether reclaimed or new, wood paneling or shiplap makes a space feel cozy and organic. Vertical or horizontal slats can create illusions, like making a ceiling appear higher, or a room appear longer.

What It Adds:
The natural texture of wood infuses warmth and a tactile quality into a room, making it feel grounded and serene. It’s especially effective in dining areas or bedrooms.

Color Tip:
Light oak or ash wood brings brightness, while darker shades like walnut create a dramatic, moody vibe. Pair dark wood with light-colored walls or ceilings to avoid making the room feel heavy.


4. 3D Wall Panels: Drama and Depth

3D wall panels create a dynamic visual experience for a bold, modern look. These panels, available in geometric, floral, or abstract designs, turn any wall into a statement piece.

What It Adds:
These panels add drama, sophistication, and a futuristic vibe. They’re perfect for accent walls in living rooms or behind a bed as a headboard feature.

Color Tip:
White or neutral panels keep the design crisp and modern, while bold colors like navy or emerald green make a room pop. Use sparingly, as too much texture and color can overwhelm a space.

3D Wall Designs to Preview Here


5. Grasscloth Wallpaper: Organic Elegance

Here comes the 1980s. We created a featured grasscloth wall in our first apartment in 1982! Oh, and I loved it, and I still love grasscloth.

Grasscloth wallpaper is made from natural fibers like jute, sisal, or bamboo. It gives walls a soft, woven texture, perfect for creating a tranquil, spa-like ambiance.

What It Adds:
Grasscloth brings an organic, earthy feel to a room, creating a sense of calm and balance. It’s ideal for home offices, libraries, or even entryways.

Color Tip:
Earthy tones like beige, olive, or sand enhance the natural vibe. Because grasscloth has subtle patterns, pairing it with solid-colored furniture is best to maintain balance.

Grasscloth Wallcovering on Amazon.


How to Avoid Overwhelming a Space with Textured Walls

  • Start Small: Use texture on a single accent wall rather than an entire room to keep the look balanced.
  • Coordinate Colors: Choose complementary colors across textured and non-textured surfaces for harmony.
  • Balance with Simplicity: Pair textured walls with minimalist decor to let the walls shine without creating visual clutter.
  • Play with Lighting: Proper lighting can beautifully highlight textures, so use spotlights or wall sconces to add depth and drama.


Note: The author may receive a commission from purchases made using links found in this article. “As an Amazon Associate, Ebay (EPN), Esty (Awin), and/or Zazzle Affiliate, I (we) earn from qualifying purchases.”


Tuesday, October 22, 2024

Gobble Up the Fun with Thanksgiving Inflatables

 When the leaves start falling and the weather begins to cool we all know it's time for Halloween. The decorations come out inside and out. Every year we decorate outside for Halloween. After all the kids have had fun and the candy is all gone the decorations are stored away until next year.

Gobble up the fun with Thanksgiving inflatables
Reviewing our Thanksgiving Turkey

Every year when Halloween is over and the decorations are put away Fran would always say we don't have any Thanksgiving decorations for the yard. She solved that problem last year and bought this 6-foot inflatable for the yard. We now have a giant gobble of joy in our front yard to celebrate Thanksgiving.

From the moment we took it out of the box, the inflatable turkey's sheer size was inspiring and comical. He is an undeniable presence in our yard at 6 feet tall and with a goofy smile. All you have to do is secure him with the included strings and stakes.

Setting him up is as easy as pumpkin pie. Plug him in, and in a matter of seconds, you have a full-blown turkey with holiday cheer. The colors are bright and festive, with rich reds, oranges, and yellows that scream "fall". The material is thick and durable, and it is designed to handle some gusty fall winds and unpredictable autumn weather.

One more feature is he has a built-in LED light making it perfect to light up your yard at night. The soft internal glow makes it impossible to miss and ensures your holiday spirit shines even after dark.

So, should you get this inflatable turkey? Absolutely. If you want your home to be the talk of the neighborhood, if you want to make people smile as they walk by, and if you want to tell the world you're 100% ready for Thanksgiving, this is for you. We had so many people stop to admire him after we put him in the yard.

Find more Product reviews on Review This here:

ReviewThisProductReviews.com

VIVOHOME 6ft Height Happy Thanksgiving Inflatable LED Lighted Turkey Family Blow up Outdoor Lawn Yard DecorationVIVOHOME 6ft Height Happy Thanksgiving Inflatable LED Lighted Turkey Family Blow up Outdoor Lawn Yard DecorationVIVOHOME 6ft Height Happy Thanksgiving Inflatable LED Lighted Turkey Family Blow up Outdoor Lawn Yard Decoration


Note: The author may receive a commission from purchases made using links found in this article. “As an Amazon Associate, Ebay (EPN), Esty (Awin), and/or Zazzle Affiliate, I (we) earn from qualifying purchases.”


Tuesday, May 21, 2024

The Classic Record Player Stand - Reviewed

 In this age of digital streaming, there is something undeniably charming about spinning vinyl records on a classic turntable. Our daughter bought Fran a classic turntable for her birthday this year. Since we didn't have a place for it we had to find a record player stand. 

The classic record player stand - reviewed

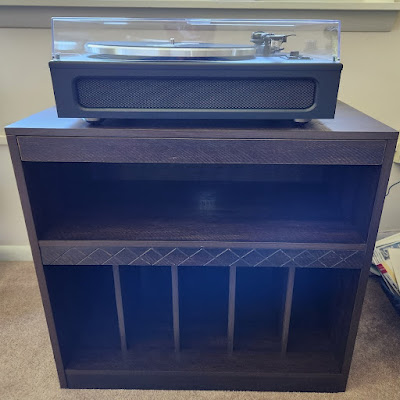
Fran began a search for what she wanted to buy for our new turntable. Yes, now we have another piece of furniture in the house. She found this Amil Series stand from Mazefur with more of a contemporary style. It's perfect for the new turntable and fits nicely in our living room.

The stand was very easy to assemble with excellent easy-to-follow instructions. The top surface offers a stable platform for our turntable, with enough space to accommodate even a larger model. 

The stand has a sleek pull-out drawer at the top, a shelf right below the drawer, and plenty of storage space for our extensive collection of vinyl records to be stored safely.

Many turntables on the market today have built-in CD players, ours does not. The shelf below the drawer will be perfect for a CD player, as we also have an extensive collection of CDs. The shelf has wire management access on the back panel for easy installation of the wires.

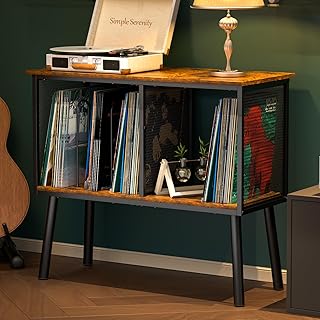
There are many styles of record player stands to choose from. We like the style of the one we purchased, but you can find many stands that offer a retro look to bring you back in time.

Find more Product Reviews on ReviewThis here:

ReviewThisProductReviews.com

Below are just a couple of styles you will find on Amazon.

AMHANCIBLE Record Player Stand with Charging Station, Turntable Stand with Storage Cabinet, 3 Tier End Table Hold Up to 100 Albums, Record Table for Vinyl, Living Room, Rustic Brown, HETCD01BR-1AMHANCIBLE Record Player Stand with Charging Station, Turntable Stand with Storage Cabinet, 3 Tier End Table Hold Up to 100 Albums, Record Table for Vinyl, Living Room, Rustic Brown, HETCD01BR-1AMHANCIBLE Record Player Stand with Charging Station, Turntable Stand with Storage Cabinet, 3 Tier End Table Hold Up to 100 Albums, Record Table for Vinyl, Living Room, Rustic Brown, HETCD01BR-1Record Player Stand with Adjustable Divider Vinyl Storage Holder Up to 200 Albums Mid-Century Large Record Player Table Vinyl Holder Turntable Stand End Table for Bedroom & Living Room, Patent PendingRecord Player Stand with Adjustable Divider Vinyl Storage Holder Up to 200 Albums Mid-Century Large Record Player Table Vinyl Holder Turntable Stand End Table for Bedroom & Living Room, Patent PendingRecord Player Stand with Adjustable Divider Vinyl Storage Holder Up to 200 Albums Mid-Century Large Record Player Table Vinyl Holder Turntable Stand End Table for Bedroom & Living Room, Patent Pending


Note: The author may receive a commission from purchases made using links found in this article. “As an Amazon Associate, Ebay (EPN), Esty (Awin), and/or Zazzle Affiliate, I (we) earn from qualifying purchases.”


Tuesday, April 30, 2024

Reviewing Renovating Old Pine Furniture Project


Two Pine chairs one sanded, one painted grey

This review covers an easy DIY project to renovate old unremarkable furniture into something to grace our homes and fit with existing decor. 

In our case we wanted a new dining table and chairs but the only ones we could find to fit our space and circular were very expensive. We did however find a lovely circular table and four chairs that were perfect for our needs and very comfortable at a very good price, but the issue was that they were a quite horrible orange pine colour.

I am not usually an advocate of painting wood. If it is beautiful oak, mahogony, rosewood or reclaimed wood I will not paint it. 

However orange pine with a shiny finish is just not to us all that beautiful and did not fit in with the rest of our decor ideas for the dining room. 

I am not deterred by a minor issue like this and we really liked the style and comfort of this dining set. So we bought the dining set and went about cleaning, sanding and painting. 

Here I will tell you what we did with the chairs. 


Step One Sanding Down Pine Chair

First it was important to sand down the wood. It had a shiny surface to it and I did not think even the best paint would go on well over such a shiny surface. 

With some furniture paints they declare that you do not need to sand down first so it is always best to  check the instructions and perhaps do a patch test to make sure if you need to sand or not. 

So we sanded it with a fine sandpaper until all the shiny orange paint was no more! 

It is important to do this step carefully and take your time as skimping on this preparation will affect the whole project.

I don't have a workshop or anywhere to do this kind of work so for me it was a case of clearing a room and laying down dust sheets and working on the floor. Of course a work table or ideally a workshop would be wonderful but this project is perfectly possible with none of this.  


Pine chair sanded and masked ready to paint


Step Two Cleaning The Chair

Next I cleaned the whole chair including the seat cushion and back.

The wood was cleaned with sugar soap and the chair with an upholstery cleaner. There is no real skill to this, all this took was time and following the cleaning instructions.

Then we left it all to dry.

Close up of design on chair sanded


Step Three Masking Tape 

With a project like this it is important to use masking tape to mask off all the areas that you do not want to paint. I do find this step rather boring but it is necessary. 

It is worth spending a little time over this as it is a lot more difficult to remove paint from where you do not want it than to simply mask it off beforehand and does make the painting process easier. 


Step Four Painting The Wood

After laying down sheets I set about painting the whole chair. 

It needed to be done in two steps so that I could reach the whole wooden parts of the chair. So involved the chair standing up and laying down to reach it all. 

As I had two chairs on the go at the same time this was possible to do without wasting time. 

We chose a light grey colour. It did take two coats to cover the wood. I would always recommend two coats. A darker colour may have covered the wood more thoroughly with one coat but I always think two coats gives better coverage and longevity.


Two pine chairs one sanded and one painted grey


Furniture Paint. 

We used Rust Oleum Satin Finish Furniture Paint. It says on the tin it is a superior satin silky finish in slate grey.

I found that this paint went on very well and smoothly. I found it a really good paint to use.  It did not have an overpowering smell and did not give me a headache as many paints do. It went on well although was a little drippy, so it was essential to have sheets down. It is necessary to stir it well before starting to paint. 

The clean up is so easy as it is water based so it is just a case of wiping off most of the excess paint then washing in water. 

If I had a workspace I might have used a Rustoleum furniture spray paint which may have speeded things up. However I was doing this project in winter in our dining room so a spray paint would not have been a good idea in these circumstances. 

Any good furniture paint can be used, just choose the finish, application method and colour you like. I tend to go for water based and low odour for ease of use in the home and clean up afterwards. 


Tin of furniture paint


Due to the space and how intricate some of the work was I used a small paintbrush and I think this was a good idea so that there was more precision.

After the first coat the finish did not look all that good but I always expect this. 

I left it to dry thoroughly then applied a second coat and this is where the magic happens as the pine disappeared and the beautiful slate grey colour saturated the wood. I an no expert but I think the finish, even in the more difficult intricate parts is pretty good. 


Close up of painted chair


Finished Pine chair painted grey project


The four chairs took me two days to do at a fairly relaxed pace with lots of coffee breaks! It is a straightforward project that anyone could do really. All it takes is time and patience and a few basic painting skills. 


The Supplies You Need For This Furniture Project

Furniture Paint or Rustoleum paint 

Sandpaper 

A small paintbrush

Masking Tape

Old sheets, dust sheets or anything you have to protect the floor


We think it was a worthwhile project and we now have a lovely dining set at a fraction of the price. 

If we ever get fed up of the colour  or go for a different scheme, it will be very easy to change with a light sanding and a coat of new paint.


More Reviews


Reviewing Restoring A Metal Garden Swing Seat


More Reviews By Raintree Annie


Crafts & DIY Reviews By Contributors On Review This Reviews


Product Reviews By Contributors On Review This Reviews


Note: The author may receive a commission from purchases made using links found in this article. “As an Amazon Associate, Ebay (EPN), Esty (Awin), and/or Zazzle Affiliate, I (we) earn from qualifying purchases.”


The Review This Reviews Contributors


SylvestermouseSylvestermouseDawn Rae BDawn Rae BMbgPhotoMbgPhotoBrite-IdeasBrite-IdeasWednesday ElfWednesday ElfOlivia MorrisOlivia MorrisTreasures by BrendaTreasures by BrendaThe Savvy AgeThe Savvy AgeMargaret SchindelMargaret SchindelRaintree AnnieRaintree AnnieLou16Lou16Sam MonacoSam MonacoTracey BoyerTracey BoyerCheryl Paton Cheryl PatonRenaissance WomanRenaissance WomanBarbRadBarbRadBev OwensBev OwensBuckHawkBuckHawkDecorating for EventsDecorating for EventsHeather426Heather426Coletta TeskeColetta TeskeMissMerFaeryMissMerFaeryMickie_GMickie_G


Review This Reviews is Dedicated to the Memory of Our Beloved Friend and Fellow Contributor

Susan DeppnerSusan Deppner

We may be apart, but
You Are Not Forgotten


“As an Amazon Associate, Ebay (EPN) and or Etsy (Awin) Affiliate, I (we) earn from purchases.” Disclosure Statement

X