Showing posts with label fall decor. Show all posts

Friday, October 30, 2020

Fall Leaves Placemats & Tablerunners Reviewed

Fall Placemats
Like many of our Contributors, I love the fall and the beautiful colors of nature.  The yellow, gold, orange, and red leaves falling all around are simply stunning.

With the fall, we welcome cooler weather which tends to keep us indoors more and looking out the windows at the beautiful landscape.  That makes me want to bring some of the beautiful leaves inside, which I have certainly done in the past.

Several years ago, I was doing a bit of early Christmas shopping when I spotted the gorgeous fall leaves cutwork placemats.  There were only two left, but that was fine for my kitchen table, which only seats two.  

We removed our large kitchen table decades ago and replaced it with a couch & chair.  Not only does that provide comfortable seating in the kitchen, but it forces us to use the dining room, which was previously only used for holidays.

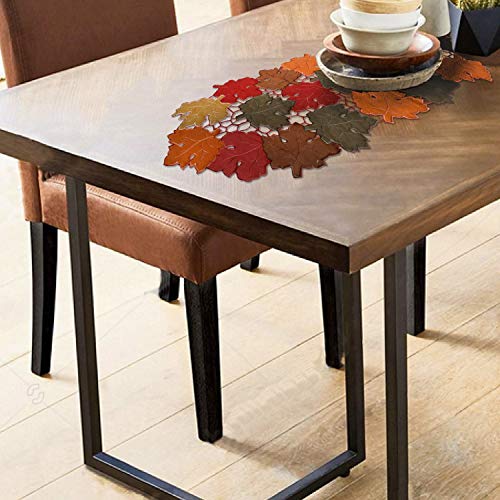
The fall leaves cutwork placemats are perfect for my husband and myself at our smaller kitchen table.  Plus, they provide really beautiful fall decor in the center of our kitchen.

fall placemats


Fall Leaves Placemats

Forest Blanket with Poly-Suede Cutwork Round Doily - 16 inch placmats (Set of 4)Forest Blanket with Poly-Suede Cutwork - 16 inch placmats (Set of 4)Check PriceMy fall leaves placemats are made of a faux suede material.  The cutwork design gives them a nostalgic look that appeals to us.  Our table is wood, a gift from my grandmother's home.  The wood table provides the perfect background for the fall leaves placemats.

When our daughter visited last fall, she commented on how pretty these placemats are on the table.  Normally, we all have very different decor preferences.  Apparently, these fall leaves placemats appeal to a variety of decor tastes. 

The current fall leaves placemats that are available are slightly different from mine in colors.  That is common with fabric due to different runs or fabric selection.  It could also be due to a different manufacturer.  Photography lighting can also affect an image.  Regardless, they are still stunning!

If you stop by my article about my grandmother, you will see the table in it's original place in her home.  That photo was taken on Christmas over 30 years ago.


Fall Leaves Tablerunner

Owenie Fall Leaves Table Runners,Thanksgiving Centerpieces for Tables, 13Inch x 34Inch Embroidered Maple Leaf table decor for Harvest, Autumn Farmhouse Decorations for Home Settings, Machine Washable.Owenie Fall Leaves Table Runners,Thanksgiving Centerpieces for Tables, 13Inch x 34Inch Embroidered Maple Leaf table decor for Harvest, Autumn Farmhouse Decorations for Home Settings, Machine Washable.Check PriceOur kitchen opens up to our dining room where we have the large dining room table that seats 8-12 easily.  Recently, I came across a fall leaves tablerunner that compliments my placemats.  That ties the decor in the two rooms together nicely.  

The tablerunner is not an exact match, but that is not really noticeable unless you place them side by side.  That doesn't matter to us since they are used on different tables.  Plus, there is something naturally eclectic about them not matching, just as hundreds of leaves don't match when blanketing the yard.

If you were going to use the table runners and the placemats on the same table, I would recommend buying the exact same pattern all at the same time.  


More Articles on Fall Decor


Check Out More Home Decor Reviews at
ReviewThisDecor.com

House of Sylvestermouse


Note: The author may receive a commission from purchases made using links found in this article. “As an Amazon Associate, Ebay (EPN) and/or Esty (Awin) Affiliate, I (we) earn from qualifying purchases.”


Thursday, November 7, 2019

DIY Pumpkin Succulent Centerpiece


diy Pumpkin Succulent Centerpiece

It's pumpkin season!  Now is the perfect time to round up some pumpkins and create unique centerpieces as a festive touch for your holiday celebrations.  A DIY pumpkin succulent mini garden will be the perfect addition to your Thanksgiving decor.  Not only will it be a real attention-getter when you host guests for the holidays, but you will have the benefit of enjoying your new container garden long after you finish all those turkey left-overs.

Here's What You Need:
  1. One large flat pumpkin 
  2. A variety of succulents
  3. Clear gel glue
  4. Spray adhesive
  5. Moss
real pumpkin
It's best to use a flat pumpkin with a slightly indented center .
While I prefer to use a pumpkin in its natural state, I chose to paint mine for this demo project.  I used a lovely Solstice Blue paint color (a subtle blue-gray) that will blend in with the woodland theme I am using for my holiday decorations.  It reminds me of the beautiful shadows you see on fresh snow.  A neutral colored pumpkin better accents the succulents.

removing a pumpkin stem for diy project
Removing the Stem

Once the paint was dry, I used my Dremel with a cut-off wheel to remove the pumpkin stem. 

spraying on craft bond
Spraying on Elmer's Craft Bond 
I then sprayed adhesive on the center top of the pumpkin where the moss will be placed. 

pressing and gluing  moss on pumpkin
Press Moss Into the Adhesive
While the adhesive was still fairly wet and tacky, I pressed a nest of moss onto the sticky surface.  It seems I got a little moss happy.  Could have used a bit less moss, but it would have made a big mess to attempt to remove it.  I let the adhesive set for several minutes before moving to the next step.

cactus with roots showing
Preparing the Roots for Planting

While the adhesive was setting up, I gently removed the soil from the cacti roots in preparation for planting them on the surface of the moss.  I also separated the succulent clusters so I would have more options for spreading out individual plants.

Pumpkin Succulent Centerpiece
Vary Succulent Colors, Textures, and Heights
Start your succulent placement with your largest plant.  Visually, it is most pleasing to the eye to position the first cactus off-center and toward the edge of the pumpkin.  It is also a good idea to group your taller cacti near that first featured plant.  You will use clear gel glue to fasten your succulents to the moss.  Don't worry!  The glue won't hurt your succulents.

mist the moss on a pumpkin centerpiece
Time to Lightly Mist the Moss
Once your pumpkin succulent centerpiece is complete, carefully give the moss a light misting of water.  You will provide moisture to the moss about once a week.  It's important not to let water pool under your plantings.  It will lead to premature rot.  Simply tip your pumpkin slightly to the side to drain any excess water after each misting.  

To extend the life of your pumpkin, and to give your succulents what they need, carefully choose a location away from heaters.  Try to situate your succulent container garden such that your cacti get the sunlight they need without getting too much heat on the pumpkin.  Likewise, take care to protect your succulents from freezing if you will be displaying your centerpiece on a porch or outdoors.

One last tip:  Place your pumpkin on a piece of cork or thick cardboard to keep the bottom from early decay (especially if placed in a location where surface dampness occurs).  Take care to protect your indoor furniture with the use of a waterproof planter mat.

With proper care, your pumpkin succulent centerpiece should last several weeks.  Once the pumpkin has reached the end of its season of life, you can either cut off the top of the pumpkin and plant it on top of appropriate cacti soil, or transplant the newly rooted succulent cuttings to another container.  Of course, you may also choose to use a faux pumpkin to eliminate this step.

It's easy to see why these pumpkin centerpieces are so popular.  Besides being unusual and visually stunning, they let you take your creativity to a whole new place.  This DIY centerpiece is sure to be a fun conversation-starter at your next gathering.  Why not make one to share for a hostess gift?  Who wouldn't love such a thoughtful gesture? 

Enjoy this project and my best wishes to you for a blessed holiday season.


Note: The author may receive a commission from purchases made using links found in this article. “As an Amazon Associate, Ebay (EPN) and/or Esty (Awin) Affiliate, I (we) earn from qualifying purchases.”


Most Recent Reviews on Review This Reviews


Search for Reviews by Subject, Author or Title

The Review This Reviews Contributors


SylvestermouseSylvestermouseDawn Rae BDawn Rae BMbgPhotoMbgPhotoBrite-IdeasBrite-IdeasWednesday ElfWednesday ElfOlivia MorrisOlivia MorrisTreasures by BrendaTreasures by BrendaThe Savvy AgeThe Savvy AgeMargaret SchindelMargaret SchindelRaintree AnnieRaintree AnnieLou16Lou16Sam MonacoSam MonacoTracey BoyerTracey BoyerRenaissance WomanRenaissance WomanBarbRadBarbRadBev OwensBev OwensBuckHawkBuckHawkDecorating for EventsDecorating for EventsHeather426Heather426Coletta TeskeColetta TeskeMissMerFaeryMissMerFaeryMickie_GMickie_G


Review This Reviews is Dedicated to the Memory of Our Beloved Friend and Fellow Contributor

Susan DeppnerSusan Deppner

We may be apart, but
You Are Not Forgotten


“As an Amazon Associate, Ebay (EPN) and or Etsy (Awin) Affiliate, I (we) earn from purchases.” Disclosure Statement

X