Showing posts with label DIY. Show all posts

Monday, May 19, 2014

A Craft Project that eases my fear of Spray On Glue!

I have always been afraid to try aerosol adhesives! Yes, I am a chicken when it comes to paying good money for something that I have no idea how to use -- also, I have heard "glue everywhere!" horror stories from my friends who have tried using such products and I was definitely scared off. Even my own daughter tried using a  good name brand  spray adhesive for a design project when she was in college and told me in precise detail why she would never use a spray glue again. 


spray glue demonstation

(*Always follow manufactures's suggestions on the safe usage of their products! Click 3M: Tips and Techniques to read about how to use a spray on glue.)


Today, however, I am inspired to give spray on glue a try. "Why?" you are asking. Well, I recently read an article that gave me inspiration for a project that would put this sticky product to a good use.

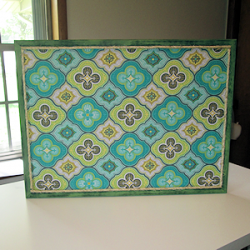
retro style bulletin board made with spray glue


How I Made My Retro-Style Bulletin Board for My Craft Room  written by a Review This! contributor, decoratingforevents, showed me in excellent photographic detail how to create a bulletin board for my own home office. One tip I found especially helpful was to use "re-positionable" spray-on glue. That tip totally made good sense for someone like me who is very often a crafting klutz.


Lensmaster Decoratingforevents also found some very attractive retro-fabrics that took me back to the 50's and 60's. (Who would have ever predicted that the futuristic designs of that bygone era would EVER come back in fashion?) Another reason I like this bulletin board project: the author used a Glue Gun! As as a Glue Gun Slinger  that made me very happy, indeed.

Now, I am off to drool over the fabrics that decoratingforevents found on Amazon to see which one I can use to pull my "office" together with my own retro-style bulletin board. I just might purchase some spray adhesive, too.


Note: The author may receive a commission from purchases made using links found in this article. “As an Amazon Associate, Ebay (EPN) and/or Esty (Awin) Affiliate, I (we) earn from qualifying purchases.”


Tuesday, May 13, 2014

Mod Podge can make miracles happen!

craft idea modpodge
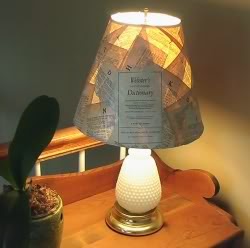
A Dictionary Lamp--just needs some trim!
A few years ago I got the "make over" bug and decided to re-do an old lampshade (that is a link to my DIY page, btw).  I used what I had on hand and you can see the result in the photo to the left. Yes, I did rip up an old dictionary! Do not hate me, because the book was already headed to the recycle bin. Those of you who know me will confirm that I never destroy a book that is still in good shape. I then decoupaged the pages from that torn up book onto the lamp using watered down craft glue. This recycled lampshade project turned out pretty good. 


While I was the The Glue Gun Slinger Contributor on the now defunct website, Squidoo, I  discovered that I could have used ModPodge (by Plaid) for the project instead of that diluted glue! Using a glue + water mixture was successful for me at the time, however. As it turns out, lots of people use a homemade version of ModPodge just as I did on my lampshade project. Tracy Boyer wrote and article and shared a recipe for this economical adhesive mixture for those of us who don't want to guess at proportions.  The Tracy suggests 2 parts glue to 1 part water.

Sometimes using a name brand commercial product will produce consistently good looking results. I have to admit that my own decoupage medium did not look as good after it dried as some other projects that I have seen at craft fairs and such. 


Now, I need to haul out the glue gun and put some trim on that dictionary themed lampshade. Who knows, I just might give it a fresh coat of ModPodge! Stay tuned for the results!


Note: The author may receive a commission from purchases made using links found in this article. “As an Amazon Associate, Ebay (EPN) and/or Esty (Awin) Affiliate, I (we) earn from qualifying purchases.”

Tuesday, April 22, 2014

Mailboxology


decorative painted mailbox
Photo Credit: ©Renaissance Woman (aka Bird Legs)
What gives a home instant curb appeal?  For me, it’s always the little touches: a willow garden arbor; watching hummingbirds blissing out on red geraniums in window boxes; that classic rocker calling my name on the porch.

When I think first impressions, I always recall a teacher of mine who had the kind of front yard that made you want to stop and linger.  Her brand of curb appeal started less than six inches from the street.  It was always about the mailbox.  People went out of their way to see her latest creation.  I know because I was one of them... her mailbox groupies. 

Today, as I finished revitalizing a seriously sorry looking mailbox at the end of my country lane, I realized I was paying homage to that most extraordinary individual who taught me the true meaning of painting on a whole different kind of canvas.  I only wish it hadn’t taken me so many years to do something about the forlorn sight that greeted every visitor to my home. 

When does a mailbox become more than a mailbox?  It ceases to be a standard 6-inch x 18-inch receptacle when it becomes a means of celebrating life, personal expression, and the essence of home.  Thank you, my friend, for teaching me to see the potential in everything.  If there were such a thing as human curb appeal, its name and definition would be Carolyn.

Though my first mailbox renovation isn’t on a par with her works of art, I think she would be pleased that I went all out to create something whimsical.  Carolyn, more than anyone, understood that whimsy is good for the soul.  I hope my new mailbox makes someone, maybe you, smile on the inside. 

What kind of whimsy might you express today? 


Note: The author may receive a commission from purchases made using links found in this article. “As an Amazon Associate, Ebay (EPN) and/or Esty (Awin) Affiliate, I (we) earn from qualifying purchases.”

Tuesday, April 8, 2014

Tile in a Snap


tiled home entry
SnapStone Floating Tile
Seven years ago I bought a new home that was about 70 percent complete.  Part of the 30 percent that remained to be finished included flooring in two bedrooms, the upstairs loft, a half bath, pantry, laundry room, and stairwell.  To make the house immediately livable, I put in some flooring that was trendy at the time.  I figured if a product passed the Divine Design test of my HGTV guru, Candice Olson, it was certainly more than worthy of installation in my home.

I’m still happy with most of the flooring I installed, but I have since rescued a dog.  Anyone who has cared for larger dogs knows they can be hard on flooring.  The area that has taken a beating is the stairwell landing where Toby likes to hang out by a picture window that gives him a place to keep an eye on what’s happening in our world.  I need to install a tougher material that can take heavy traffic.

Having decided on tile, since my animals love to soak up the sun in front of that window, I have been researching DIY options.  How I love to come across web pages that show an innovative home improvement product in action.  There are many websites pushing products, but few that are exceptional when it comes to demonstrating an actual installation.  I appreciate a how-to presentation that is honest in sharing what went right as well as lessons learned.

Here’s one of the best Squidoo lenses I found.  KateHon demos a fabulous floating tile flooring option while sharing before and after photos of a bathroom renovation.  I can see myself installing this tile floor in my home.  How about you?

Have you published a home improvement product review?  If so, stop by and let me know.  I hope to feature your work.  You can find me at Home Renovation Central and "Do or Di DIY."


Note: The author may receive a commission from purchases made using links found in this article. “As an Amazon Associate, Ebay (EPN) and/or Esty (Awin) Affiliate, I (we) earn from qualifying purchases.”


Tuesday, April 1, 2014

Operation Sunbeam


solar oven
Solar Oven (Photo Credit)
When I was growing up, I wanted to be a spy.  How I loved all those top-secret codes and 007 spy gadgets.  Of course, one of my favorite TV shows was Mission Impossible.

Today, my mission, which I have chosen to accept, is far different from those Jim was offered over the course of the series.  Though the overall operation has changed, there are still zeros in my aspirations.  These days I am working on zero waste and zero emissions—perhaps the Ground Zero of those seeking the ultimate green lifestyle.  Just imagine how our world would be different if everyone accepted that mission.

I recently wrote a review of a book, Cooking Green, about how we might each reduce our cookprints (our kitchen’s carbon footprint).  In that book, author Kate Heyhoe compared our ovens to Humvees because of their horrible waste of energy.  She really got me thinking about how I might create greater efficiencies with my cooking.

Kate mentioned that the closest we can get to zero emissions when baking is to use a solar oven.  That thought has been bouncing around in my brain for several days now.  Intrigued with the thought of building and using my own solar oven, I have been a woman on a mission. 

First, I gathered up resources for learning more about solar cooking.  A topic search of web pages led me to many excellent resources.  I’ve since checked out solar cookery guides and cookbooks from my library and have conducted a number of Internet searches.  These combined resources have only increased my enthusiasm for making my cooking as green as possible. 

Curious?  Your mission, which I hope you will accept, is to take a minute or two to explore the potential for tapping into the greatest underutilized power source on the planet (sunshine).  I encourage you to think about the possibilities by visiting How to Make and Use a Solar Oven.  Don't delay.  This link may self-destruct in 30 seconds.


Note: The author may receive a commission from purchases made using links found in this article. “As an Amazon Associate, Ebay (EPN) and/or Esty (Awin) Affiliate, I (we) earn from qualifying purchases.”


Tuesday, March 25, 2014

Beetle Mania

tree stumps or log ends
Permission via Creative Commons -
Photo by Tuchodi
There's something you should know about me.  I'm a locabore (not to be confused with loco or boring).  Are you wondering why you've never heard this term before?  It's because I just made it up.  I do that a lot.

Perhaps you have heard of a locavore—a person dedicated to eating local foods whenever possible.  So what in the world is a locabore?  It’s a person who makes a commitment to using local beetle kill wood for a wide variety of construction projects.  The “loca” is for local and the “bore” is for the beetle activity that leads to a tree’s untimely death.  It’s a growing problem in my state (Colorado) and beyond.

I have been reading about green remodeling practices.  One of the important things we can do when building or remodeling is to use reclaimed wood.  When lumber is harvested nearby, the ecological impact is reduced significantly.  There is no need to transport the wood cross-country (which eliminates a much larger carbon footprint). 

Because dead trees are already dry and seasoned, there is no need to burn fossil fuels for the kilns that would normally be required to lower the moisture content of freshly cut living trees.  And, by using dead trees, we can lower the dependence on harvesting trees that are better left in the forest doing their best to keep our environment healthy.

This weekend, as I was purchasing supplies for a couple of ongoing home renovation projects, I found beetle kill pine boards on sale.  That made my choice very easy.  When I build with local woods, the advantages go well beyond financial and ecological gain.  Things that grow here look good in my home.  They are a natural fit.  You would expect to see native woods like aspen, pine, and fir inside a house that is surrounded by those kinds of forests.  There is a harmony that is both seen and felt.

Even if you live in an urban area, there are always sources of reclaimed timber and other architectural elements.  A source to consider is your local Habitat for Humanity Restore.  They stock recycled construction materials.  Always think “re” first as you aim for greener living and building (reclaimed, recycled, repurposed).

Let's learn how to be good to the place we call home.  We only get one chance at this.  Unless we want to be dead standing, it's "Do or Di" time.  


Note: The author may receive a commission from purchases made using links found in this article. “As an Amazon Associate, Ebay (EPN) and/or Esty (Awin) Affiliate, I (we) earn from qualifying purchases.”


Tuesday, March 11, 2014

Uniquely Brilliant

ostrich egg carvings
Photo Credit: Ostrich Egg Carvings
This morning I have several things on the brain that might seem unrelated at first glance:  Seth Godin, orchids, Dremel tools, dentures, "peticures," and egg carvings.  You just never know what you’re going to find here when I start writing at 2:30 a.m.  I enjoy being surprised by the things percolating in my brain at this hour.

So what is the connection?  The interwoven thread is that of being indispensable and uniquely brilliant.  I am, of course, thinking about Seth Godin’s book about linchpins.  One of the things Seth asks us is if we are indispensable.  I had always hoped to be seen in that way but in reality, when I first read his book, I had not yet experienced an organization that didn’t constantly remind my colleagues and I that we could be easily dispensed of and replaced. 

What makes you or I indispensable, or, in the definition of a human linchpin, essential?  We learn by reading Seth’s book that it is our unique brilliance.  And, our unique brilliance has to do with the artistry of our hearts and souls.  We become indispensable when we turn each day into a work of art. 

That explains where the title of this post and Seth Godin come into play.  You may still be wondering how I’m going to work in the orchid, false teeth, peticure, carving, and Dremel angles.  This has to do with the artistry, unique brilliance, and essence of those who make Squidoo such an incredibly creative unworkplace.

Unworkplace?  That’s right.  Squidoo is not typical in any way.  In this creative community, each writer is constantly encouraged to pour his or her indispensability into each interaction (with others and with stories).  So what is the work in an unworkplace?  It’s emotion, and passion, and delight.  It is being the work of art that we already are in essence.

That brings us to the rest of the story, as Paul Harvey would say.  A while back, I issued a challenge for creative souls to share reviews of their favorite Dremel tools.  In my “Do or Di” DIY world, the Dremel is indispensable.  It is uniquely brilliant.  It’s the one tool I would never want to be without.  I haven’t found anything that my Dremel cannot do.  It is a linchpin.

While visiting Dremel reviews on Squidoo, I have been continually amazed and delighted by the ingenious ways in which my fellow writers use their Dremel tools and accessories.  Please take a few moments to celebrate with me the unique brilliance of those who have demonstrated there are no limits to what two linchpins (human and Dremel) can accomplish in concert with one another.  

Denise McGill saves the day with her Dremel dentistry brilliance.  While Nathanville upcycles a plastic tumbler into an orchid pot using his Dremel.  Then there are the amazing egg carvings presented by Craft-E-Mom.

After checking out their artistry, might you join us as the newest member of our Squidoo Linchpin Collective?  We’d love to have the opportunity to appreciate the indispensable artistry and unique brilliance of you.


Note: The author may receive a commission from purchases made using links found in this article. “As an Amazon Associate, Ebay (EPN) and/or Esty (Awin) Affiliate, I (we) earn from qualifying purchases.”


Most Recent Reviews on Review This Reviews


Search for Reviews by Subject, Author or Title

The Review This Reviews Contributors


SylvestermouseSylvestermouseDawn Rae BDawn Rae BMbgPhotoMbgPhotoBrite-IdeasBrite-IdeasWednesday ElfWednesday ElfOlivia MorrisOlivia MorrisTreasures by BrendaTreasures by BrendaThe Savvy AgeThe Savvy AgeMargaret SchindelMargaret SchindelRaintree AnnieRaintree AnnieLou16Lou16Sam MonacoSam MonacoTracey BoyerTracey BoyerRenaissance WomanRenaissance WomanBarbRadBarbRadBev OwensBev OwensBuckHawkBuckHawkDecorating for EventsDecorating for EventsHeather426Heather426Coletta TeskeColetta TeskeMissMerFaeryMissMerFaeryMickie_GMickie_G


Review This Reviews is Dedicated to the Memory of Our Beloved Friend and Fellow Contributor

Susan DeppnerSusan Deppner

We may be apart, but
You Are Not Forgotten


“As an Amazon Associate, Ebay (EPN) and or Etsy (Awin) Affiliate, I (we) earn from purchases.” Disclosure Statement

X