Showing posts sorted by date for query fall. Sort by relevance Show all posts

Sunday, April 21, 2024

The Popularity of Pickleball: A Sport on the Rise


The Popularity of Pickleball: A Sport on the Rise

The growing popularity of Pickleball fascinates me! My mom loved playing this! Mom and Dad were Snowbirds; they spent winters in the southern USA. The community they stayed in played Pickleball, and Mom was really into it. Whenever I hear the word Pickleball I think of mom talking about it.


When I read that Pickleball is now going mainstream, I sort of giggled, thinking it was more of a senior sport. But guess what? It's growing amongst young people.


Being a lover of statistics, I had to research this! Below are some of the fascinating growth stats.


Why Is Pickleball So Popular?


It's easy to learn and inexpensive. Pickleball's accessibility is a key factor in its popularity. Unlike some sports that require years of practice, Pickleball is easy to pick up. 


The rules are straightforward, and beginners can quickly get into the swing of things. Plus, it doesn't break the bank – you only need a paddle, a ball, and a court.


Celebrity Endorsements


Pickleball has indeed caught the attention of celebrities from various walks of life. From actors and musicians to athletes and influencers, the pickleball craze has spread like wildfire and become the latest trend in the celebrity world. 


Some notable celebrity Pickleball team owners include Selena Gomez, Ellen DeGeneres, and Jim Berkus. It's popular! Here's an article that features some additional notable celebrities connected to the sport.


Pickleball by the Numbers Explosive Growth:


(A) 36.5 Million Players: From August 2021 to August 2022, over 36.5 million Americans played Pickleball.


(B) 158.6% Growth: The number of players increased by a staggering 85.7% in 2022 alone, with a three-year growth rate of 158.6% (2020-22).


Fastest-Growing Sport: 


For three consecutive years (2020-2022), Pickleball has held the title of America's fastest-growing sport.


Average Age: Between 2020 and 2021, the average age of pickleball players dropped from 41 to 38.1, indicating a surge of interest among younger players.


Core Players: Those who play Pickleball more than eight times a year fall into the "core player" category. Their average age is 47.5 years.


Casual Players: Casual players who play at least once a year have an average age of 33.6 years.


Youth Appeal: The 18-34 age group constitutes 27.8% of players, with the highest participation rate. However, they also have the most casual players.


The Popularity of Pickleball: A Sport on the Rise


Senior Players: Remarkably, 33% of core players are over 65, emphasizing Pickleball's appeal across generations.


How to Play Pickleball


Court and Equipment: Pickleball is played on a badminton-sized court with a net. Players use a solid paddle and a perforated plastic ball.


Serving: The serving team starts the game by serving diagonally. The ball must bounce once before being returned.


Volley Zone: The non-volley zone (or "kitchen") near the net is crucial. Players cannot volley (hit the ball in the air) while standing inside this zone.


Scoring: Points are scored only by the serving team. Games are typically played to 11 or 15 points, with a two-point lead.


Dinking and Smashing: Dinking involves soft shots close to the net while smashing is a powerful overhead shot.


Pickleball's rise from retirement communities to mainstream courts is a testament to its universal appeal. Whether you're a seasoned player or a curious beginner, grab a paddle and join the pickleball revolution! 🏓🥒


Note: The author may receive a commission from purchases made using links found in this article. “As an Amazon Associate, Ebay (EPN) and/or Esty (Awin) Affiliate, I (we) earn from qualifying purchases.”


Monday, April 15, 2024

Reviewing Jeans Yarn by Lion Brand 5 Years Later

In 2019, I reviewed Jeans yarn by Lion Brand. I loved it then and I love it now. During that time, I was focused on crocheting chemo hats and baby/child hats. Jeans is a beautiful yarn that creates soft and comfortable wearables and afghans. 

Photo of blue Jeans yarn


Over the Fall/Winter holidays, I impulsively picked up a skein of yarn and began crocheting again. Life had been busy and I just hadn't made time for one of my favorite hobbies. I started with a huge skein of Mandala yarn and a new stitch to me called the Brick Stitch.  I then learned a beautiful Cross Back Stitch (tutorial by JaydaInStitches) and started a baby afghan using Caron Simply Soft yarn.

That baby afghan project put me in the mood for something soft and comforting, beautiful but not frilly. I had such a craving to use Jeans yarn by Lion Brand. I remembered how wonderful it was to work with, even all of these years later. 

Jeans Yarn by Lion Brand

  • 3.5 oz/100g skein weight
  • 246 yd/225m length
  • 100% acrylic
  • machine washable and dryable
  • medium weight #4 yarn
While this is a worsted weight (#4) it feels much lighter to me. Afghans are far more supple with this yarn than with regular #4 weight yarn. Of course, both thick and light afghans have their uses but I am in the mood to make something lighter.

It comes in 5 shades of blue, very similar to the color of jeans, one black, and one shade of light brown. 

Here is a brief video (56 seconds) from Lion Brand that shows the yarn and shows it being worn. I think you can see how soft and perfect it is for garments.


In my current project, I'm using the Jeans yarn and the Cross Back stitch for 10 rows (however, it looks like 5 rows since every-other-row is a single stitch) and two rows of Double Stitch in the darker blue. This stitch looks like it requires more advanced crochet skills but it is very easy (if you know the Double Stitch and the Single Stitch). And it works up quickly. 

cross back stitch

I learned the Cross Back stitch on the tutorial by JaydaInStitches. You can find the tutorial for this beautiful and easy stitch here. 

Related Yarn Review Links:

Wednesday Elf, a prolific creator of plushy friends, wrote about I Love This Yarn by Hobby Lobby. At the time of her review, that yarn came in acrylic, metallic, and cotton versions. 

Sylvestermouse reviews the Bernat Loop Yarn, a yarn that is created so that blankets can be made with your fingers alone. No crochet hook skills required. 

My recent review of the Mandala Bonus Bundle and the brick stitch pattern.


Note: The author may receive a commission from purchases made using links found in this article. “As an Amazon Associate, Ebay (EPN) and/or Esty (Awin) Affiliate, I (we) earn from qualifying purchases.”


Sunday, April 14, 2024

10 Essential Steps to Prepare Your Yard for Spring: A Guide to Yard Cleanup and Flower Preparation

10 Essential Steps to Prepare Your Yard for Spring

Spring is just around the corner, and it's time to prepare your yard for the vibrant blooms of the season. 

As the snow melts away and the days get longer, your garden awaits a rejuvenation after the winter slumber. 

To ensure your yard is ready to burst with color and life, here are 10 essential steps to focus on yard cleanup and prepare for spring and summer flowers, including perennials and annuals.

10 Steps to Prepare Your Yard for Spring

  1. Clear Away Debris: Start by giving your yard a thorough cleanup. Remove fallen branches, dead leaves, and other debris accumulated over the winter months. This step not only enhances the aesthetics of your yard but also helps prevent pests and diseases.

  2. Inspect and Prune: Look closely at your trees, shrubs, and perennial plants. Trim back any dead or damaged branches to encourage healthy growth. Pruning also stimulates flowering in many plants, so don't be afraid to trim where necessary.

  3. Prepare the Soil: Good soil is the foundation of a healthy garden. Turn over the soil in your flower beds to loosen it up and remove any weeds or old plant debris. Consider adding organic matter such as compost or aged manure to enrich the soil and provide essential nutrients for your plants.

  4. Divide Perennials: Periodic division rejuvenates perennial flowers and promotes better growth and flowering. Spring is an ideal time to divide overcrowded clumps of perennials such as irises, hostas, and daylilies. Replant the divided sections in your garden or share them with friends and neighbors.

  5. Inspect Bulbs: If you planted bulbs such as tulips, daffodils, or hyacinths in the fall, now is the time to check on them. Look for signs of growth and remove any debris covering the emerging shoots. Consider adding a layer of mulch to help retain moisture and suppress weeds around the bulb beds.

  6. Plan and Plant Annuals: Annual flowers add instant color and variety to your garden. Research which annuals thrive in your climate and soil conditions, and plan your flower beds accordingly. Consider factors such as sunlight exposure, water requirements, and bloom times to create a harmonious display throughout the season.

  7. Prep Flower Beds: Before planting annuals or transplanting seedlings, prepare your flower beds by amending the soil and adding any necessary fertilizers or soil amendments. Remove weeds and cultivate the soil to create a loose, well-draining planting environment.

  8. Start Seeds Indoors: For certain annuals and vegetables, starting seeds indoors can give you a head start on the growing season. Invest in some seed trays, potting soil, and grow lights, and begin sowing seeds for flowers such as marigolds, zinnias, and cosmos. Transplant the seedlings outdoors once the danger of frost has passed.

  9. Plan for Pollinators: Remember the pollinators as you design your flower beds! Choose various flowers that attract bees, butterflies, and other beneficial insects. Incorporate native plants and flowers with different shapes and colors to provide pollinators a diverse and inviting habitat.

  10. Mulch and Water: Finally, after all your hard work, mulch your flower beds to help conserve moisture, suppress weeds, and regulate soil temperature. Water newly planted flowers thoroughly, especially during dry spells, to help them establish strong root systems.

By following these 10 steps, you'll be well on your way to a vibrant and flourishing garden that will delight you throughout the spring and summer months. With proper yard cleanup, soil preparation, and thoughtful plant selection, your outdoor space will become a haven for colorful blooms and buzzing pollinators. So roll up your sleeves, grab your gardening tools, and let the beauty of spring unfold in your yard!

ReviewThisReviews Gardening Guru:

Check out Raintree Annie's informative articles for more tips and advice on yards and gardens. She's always very helpful - You can scroll through many of them here.


Note: The author may receive a commission from purchases made using links found in this article. “As an Amazon Associate, Ebay (EPN) and/or Esty (Awin) Affiliate, I (we) earn from qualifying purchases.”


Friday, April 12, 2024

The Dating List (2019) Movie Review

The Dating List Movie Review
The Dating List is a movie I would recommend if you are seeking an easy to watch romantic comedy.  

Romantic comedies are not movies that will make you fall out of your chair laughing as the word "comedy" might suggest.  Rather they include witty conversations or awkward interactions between a really likable couple.   

The Dating List characters, Abby Morel (Natalie Dreyfuss) and Dan Thrubrig (Andrew Dunbar), are the perfect example of a very likable couple that engage in witty rapport and both just seem naturally playful.  Their facial expressions exude happiness.  

The romantic part, well that is more literal and obvious.  In The Dating List, we watch Abby and Dan meet, fall for each other, and then go through that awkward phase of wondering if he or she likes the other one.  In this movie, it doesn't help that Abby is trying to set her boss up to date Dan. 


The Dating List Movie Synopsis

In a hurry to get to a job interview, Abby runs into a deli to grab some treats.  As she and another customer jockey for attention to place their orders, they end up getting mixed up orders and stop outside to trade.  During the trade, they accidentally trade binders too and neither realizes the mistake until later.

Abby had been a secondary managing editor for Lansing Publishing in Toledo and she hopes to get hired as a junior editor at Belle & Howe Publishing Co.  Since she arrives 2 minutes late for her interview with Susan Danvers and does not have the recommendation of a senior editor, she is immediately rejected.

Back home that night, Abby finds she has a book manuscript instead the waste water treatment manual she is supposed to be proofreading. Instead of "correcting" the manual, she edits the book manuscript.  In the morning, her deli-order-friend calls her in hopes of getting the manuscript back.  They agree to meet to trade binders.  Upon discovering that she is holding the only copy of the book, she insists they immediately make copies so the book is never lost.

During her meeting  with Dan to exchange binders and then make copies of the book, she gets a call from Ms. Danver's office with a temporary job offer, followed by an unusual request.  If Abby can screen profiles and find a suitable man for Ms. Danvers to date, she will give her an opportunity to get the junior editor job.  Abby jumps at the offer to work as a "temp" for Ms. Danvers and immediately starts sorting through potential men from a dating website.

Then she is sent to meet the men in person.  Finding the assignment harder than she expected, Abby starts thinking outside the box and remembers Dan.  She will introduce Susan Danvers to Dan and all will be perfect!

Well, not exactly .........


You may think you have the story all figured out by reading this brief synopsis and you may be right on some points.  However, this movie has an unexpected and quite satisfying ending.

If you enjoy a fun romantic comedy, this movie is for you!

________________

I watched The Dating List on Frndly TV, a subscription streaming service, but it is currently available on several other subscription services as well.


Check Out More Movie Reviews at
ReviewThisMovies.com


The Dating List (2019) Movie Review by:
House of Sylvestermouse
-


Note: The author may receive a commission from purchases made using links found in this article. “As an Amazon Associate, Ebay (EPN) and/or Esty (Awin) Affiliate, I (we) earn from qualifying purchases.”


Sunday, April 7, 2024

The Mystical Connections to a Solar Eclipse - History Meets the Unseen

The Mystical Connections to a Solar Eclipse - History Meets the Unseen

Solar eclipses have long captivated human imagination, evoking a sense of wonder and mystery. 

Across various cultures and civilizations, these celestial events have been interpreted in diverse and intriguing ways, often imbued with spiritual significance and mystical beliefs.

This blog post will explore the mystical connections to solar eclipses, delving into the fascinating beliefs and interpretations from different cultures worldwide.

Ancient Mesopotamia and Babylonian Beliefs: 

In ancient Mesopotamia and Babylon, solar eclipses were viewed as omens, often associated with the anger or displeasure of the gods. Priests and astrologers meticulously recorded these celestial phenomena, believing them to foretell significant events such as wars, the rise or fall of empires, and natural disasters. Eclipses were seen as powerful messages from the divine, prompting rituals and offerings to appease the gods and restore balance.

Ancient Chinese Traditions: 

In ancient Chinese culture, solar eclipses were interpreted as the result of a celestial dragon devouring the sun. To ward off the dragon and ensure the return of sunlight, people engaged in various rituals, including banging drums, making loud noises, and shooting arrows into the sky. The belief was that these actions would frighten the dragon away, allowing the sun to emerge again. Solar eclipses were also seen as harbingers of doom and were associated with the downfall of rulers or dynasties.

Indigenous Peoples' Spiritual Connections: 

Indigenous cultures worldwide have unique interpretations of solar eclipses, often rooted in spiritual traditions and connections to nature. For many indigenous peoples, eclipses are seen as moments of spiritual renewal and introspection, symbolizing the cyclical nature of existence and the interconnectedness of all living beings. Rituals and ceremonies honor the celestial event and harness its energy for healing, growth, and transformation.

Hindu Mythology and Symbolism: 

In Hindu mythology, the solar eclipse is depicted as the result of the demon Rahu swallowing the sun and later releasing it. This mythological narrative symbolizes the eternal struggle between light and darkness, good and evil. Solar eclipses are viewed as auspicious times for spiritual practices such as meditation, prayer, and charity, offering inner purification and enlightenment opportunities. Temples may also conduct special ceremonies to invoke divine blessings and protection during this celestial event.

Contemporary Perspectives and Approaches:

While ancient cultures viewed solar eclipses through a lens of mysticism and mythology, contemporary society approaches these phenomena with a blend of scientific understanding and awe-inspiring wonder. 

Advancements in astronomy and technology allow us to predict and observe eclipses with remarkable precision, unraveling the mechanics of these cosmic events. Yet, even in our modern age, solar eclipses continue to evoke a sense of awe and reverence, reminding us of the enduring mysteries of the universe and our place within it.

Solar eclipses bridge the tangible world we inhabit and the vast mysteries of the cosmos. Across cultures and civilizations, these celestial phenomena have inspired awe, wonder, and spiritual contemplation. 

Whether interpreted as omens, symbols of renewal, or manifestations of cosmic forces, solar eclipses remind us of the profound interconnectedness of all things and the enduring quest to comprehend the mysteries of existence. 

As we safely gaze up at the darkened sun during an eclipse, we are reminded of our place in the vast tapestry of the universe, where science and spirituality converge in a dance of exploration and wonder.

Safety Glasses For Viewing the Eclipse:

ISO 12312-2 Certification: Look for glasses that meet the ISO 12312-2 international safety standard for filters for direct observation of the sun. This certification ensures the glasses have been tested and meet the required safety standards for viewing the sun.

Eclipse Glasses Available on Amazon


Note: The author may receive a commission from purchases made using links found in this article. “As an Amazon Associate, Ebay (EPN) and/or Esty (Awin) Affiliate, I (we) earn from qualifying purchases.”


Tuesday, March 19, 2024

Reviewing the Beautiful and Cheerful Daffodil.

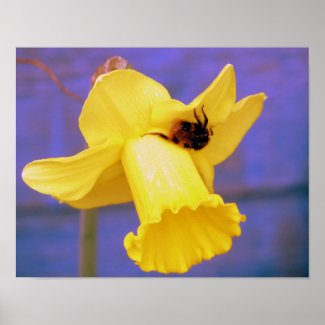
Yellow Daffodils In The Garden

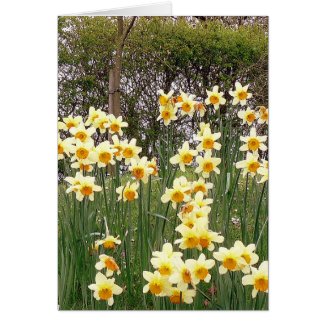
Daffodils are abundant in my garden right now and I love to see their beautiful vibrant colours  and gently swaying trumpet shaped heads bringing sunshine to a cold day.

Daffodils are native in Europe and North Africa and although the name Daffodil is most commonly used, the botanical  name is Narcissus and they are part of the Amaryllidaceae family. 

Regarding the name there is also a link with the Greek myth of Narcissus. The story goes that he was renowned to be very beautiful  and he fell in love with his own reflection, so much so that he pined away until he died and turned into the flower narcissi or daffodil. 

Tall Yellow Daffodils
 

Daffodils In The Garden 

Even though it has been very cold here ever since they flowered, their appearance symbolising  rebirth and new beginnings gives me hope and joy. Although it has not been a particularly harsh winter this year, it has been very cold, damp, grey and very rainy so it is lovely to see some colour and brightness in the garden which certainly lifts the spirits for warmer weather and Spring. 

Most of mine are golden yellow colours but some are white and some are fragrant which is lovely. There are also orange flowers and combinations of yellow and white or orange and yellow. 

 Daffodils are very versatile in planting schemes for the garden. I like to plant little Tete a Tete daffodil in pots and troughs where their delicate looking blooms can be easily seen. The bigger daffodils are planted in the borders of the garden. Daffodils can also be naturalised in grass. 

 As we have a lot of daffodils, some can be spared to be used as cut flowers and brought inside to place in a vase. This is lovely to bring Spring into the house. They look lovely in a vase by themselves or mix very well with other flowers perhaps white, purple or blues being my preferences. 

 Daffodils come in a wide variety of shapes and sizes from the tiny to the large and different colours from yellow gold, white and orange.  Many have the classic strong trumpet shaped flower head and others have multi petaled varieties.


Looking After And Planting Daffodils 

Daffodils are bulbs and hardy perennials. This is lovely as they come back every year once planted. 

While planting bulbs in borders can be a little tedious, once it is done you will have daffodils every year with little effort involved.


Planting Daffodils

We can plant daffodil bulbs in the autumn/fall around September to November time. This gives them time to establish roots before winter cold sets in. Before planting check to make sure that the bulbs are  clean and firm, discard any that are mouldy or very soft as these may be too old or diseased. It is best to buy and plant bulbs in the same season so that they do not get hence to get any mould or go soft. 

Daffodils prefer full sun or partial shade and they do appreciate a well-drained soil so it is ideal to plant in an area that will get a decent amount of sunshine. We have an area of heavy shade and I never plant daffodils there as they will not do well. Other flowers fair better there. All my daffodils planted in the soil are in sunny spots and I move the ones in pots into sunny places as soon as I see shoots coming up.

I put a grit and compost mix in my containers for the bulbs. For planting in the garden we do have heavy clay soil which although I have improved over years is still less than ideal but the bigger ones have managed to thrive in it. So if you have a sunny spot but perhaps less than ideal soil give it a try with a small number of the bigger bulbs to see if they can be successful.  

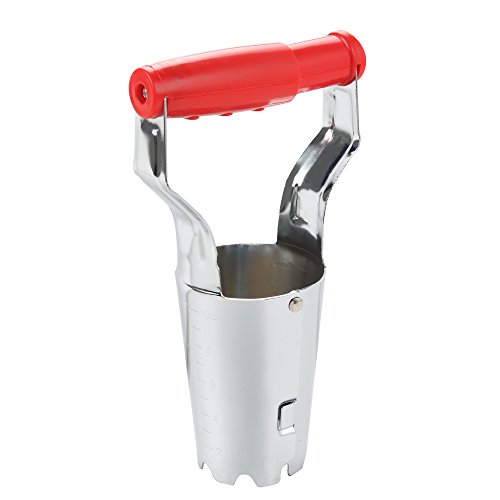
Bulbs should be planted  approximately 6 inches or 15 centimetres deep below the soil surface. For this you can simple dig a hole with a trowel or use a bulb planter. Having done a lot of this I would advise if you are planting a lot, to invest in a bulb planter to make the job easier and quicker.  


When planting in the soil space bulbs about four to six inches apart, it will not be too long before  you will have daffodil clumps.

If planting in a container you can space them much closer together, just ensure that none of the bulbs are touching each other.

It might be a good idea to protect the bulbs from squirrels and rodents who may try to steal them! A wire mesh over the top of containers usually deters most of them.

Water them immediately after planting. Do also water them in dry spells,  but they do not usually require any special feed or much other attention.


Care Of Daffodils

All that you need to do is enjoy the blooms then allow them to die down naturally. The flowers will fade and at that point you can cut off the flower and its stem down to the base and then allow the leaves to die down naturally. Some people just cut off the heads of the daffodils and that is fine too, I just prefer to take the whole stem down as I think it looks better. 

 Some people tie up the leaves, I believe so they look neater as the plant fades, but there is no need to do that and I prefer to allow them to die down naturally which is also a lot less work.

If you have naturalised in grass, you must wait to cut the grass until the leaves have completely died down as they are feeding the bulb for flowers next year. Do it too early and you will have no or limited flowering next year. 

I always like to have daffodils in pots and troughs so that when they are blooming I can display them where we can see them and even up on tables. Then as they fade we move the pots to an unnoticed area of the garden. Then I can plant annual seeds in the pots and bring them out again when those flowers bloom, thus not wasting the space in the containers. 


A Word Of Warning About Daffodils.

 While daffodils are beautiful flowers and so cheerful, they do contain toxins and are not edible in any of its parts. I do tend to wear gloves when planting them and handling the bulbs a lot.

 It is important to teach children not to eat them. If you are concerned then it is easy to plant bulbs in a pot and put them high up out of reach of small children. 

My parents always had daffodils in the garden and I was trained to respect the plants in the garden and only to eat what my parents said was safe and never came to any harm.


Daffodils Inspiring Artists

Daffodils have long inspired poets and artists and you can see why.  The most famous example of poetry  is probably the ode to daffodils is William Wordsworth’s poem “I Wandered Lonely as a Cloud,” where he describes the wonder of happening across a field of stunning golden daffodils dancing in the breeze.


In terms of art, the one that springs to mind immediately is Van Gough's  "Daffodils". The painting is in oils with vibrant colours and thick brush strokes and is hanging in the Norton Simons Museum in Pasadena California.


Read More Gardening Articles


Essential Wildlife Gardening Gifts


Note: The author may receive a commission from purchases made using links found in this article. “As an Amazon Associate, Ebay (EPN) and/or Esty (Awin) Affiliate, I (we) earn from qualifying purchases.”


Friday, March 15, 2024

Peonies are Lovely Spring & Summer Flowers that are Easy to Grow

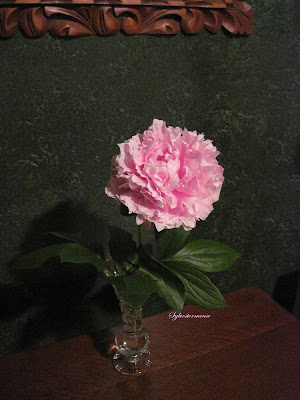
peony flower
I planted my peony 25 years ago.  It continues to give me the gift of gorgeous blooms year after year.

Peonies are perennials, which is why they continue to produce lovely flowers each year.  They do well in a variety of soils.  I happen to have a clay soil and as you can see, my peony is perfectly content with her environment.  

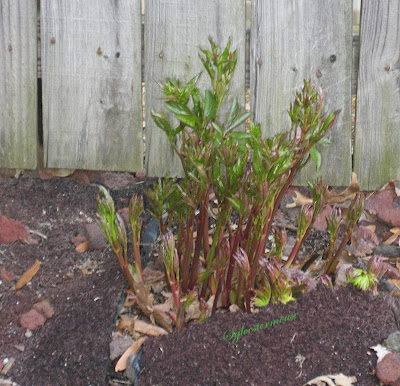
It may surprise you to know that the large peony bush is actually a tuber that is planted in the fall.  I've never had to move my peony for extreme cold or ice.  She retreats underground before winter, but pops right back up in spring.  It is mid-march here now and I am already seeing her shoots as she prepares to fully awaken.  I don't expect to see actual blooms until late April, but my peony takes center stage when she is ready.

If you are interested in planting a peony like mine (shown on the right), she is a Sarah Barnhardt peony.  I ordered her from Breck's Nursery, which is still in business.  I prefer them because they ship at the right time for planting in your zone.  That is something I always appreciate about that nursery!  I can make an order in spring or summer (when I see a flower blooming) and then the nursery sends me the bulb or tuber at the correct planting time.  That makes gardening so much easier!  They keep up with the calendar for me.  Because bulbs & tubers require very little time to plant, it has never been inconvenient for me to plant them within a day or two of arrival.

peony shoots
First Peony Shoots in Spring - 3/12/24


First Full Bloom in 2024 - (4/16/24)
Peony Bush
Peony Bush on 4/16/24


Planting Peonies

Because the peony is a tuber, it is extremely easy to plant.  The hardest part for me is determining which side is up.  Don't laugh!  I have actually spent more time inspecting a tuber, looking for the eyes, then it takes to actually plant it.


We get a moderate to high amount of wind in our area, so I elected to plant our peony in front of our south-facing fence and on the east side of the house.  The fence and house provide protection from winds which blow from west to east during a storm.

  • peony
    Late spring, early summer blooming 
  • Fall planting 
  • Plant in an area that stays well drained 
  • Full sun to partial shade
  • Dig a wider hole than necessary to loosen the dirt around it to allow the roots to grow 
  • Mix *bulb food into the soil (purchased along with the peony)
  • 1 1/2 - 2 inches deep (the pink bud eyes should be at that depth)
  • When winter arrives and the plant dies back, cut to just above ground level
  • It usually takes 2 or 3 years before a peony blooms, but they are worth the wait
*Bulb food:  I use Breck's Food for Bulbs & Perennials OR Osmocote when planting


Peony Blooms
peony bloom

The peony blooms are impressively large.  That is my husbands hand holding the flower up for me to photograph.  You can see how big the flower is compared to a mans hand.
 
I often cut them and bring them inside so I can enjoy seeing the lovely bloom throughout my day.  
 
When our children were in grade school, they loved taking a few peony blooms to their teachers.  A single peony flower is as lovely as a dozen roses, in my opinion, and I do love roses.
 
peony photo by Sylvestermouse


Read More Gardening Reviews On
ReviewThisGardening.com


House of Sylvestermouse


Note: The author may receive a commission from purchases made using links found in this article. “As an Amazon Associate, Ebay (EPN) and/or Esty (Awin) Affiliate, I (we) earn from qualifying purchases.”


Tuesday, March 12, 2024

A Review of Color Oops - Fix Hair Coloring Disasters


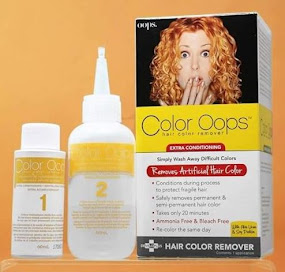
color oops


Got A Hair Coloring Disaster? Too Dark? Green? Poor Color Choice ?

Don't Panic! What you've done, can be undone.....use Color Oops! 

Most hair coloring mistakes can be fixed. Many times you can return your hair to its natural color, as long as you haven't used bleach. If you have used bleach, your hair's natural color has been stripped away, leaving you with hair that is varying shades of light blonde or white. Your original color is gone, and it cannot be brought back. In that circumstance, the best you can do is to follow advice on how to lose the offending color you ended up with, and then dye your hair a color that is close to what your natural color was.

However, if you just made a mistake with hair dye, no bleach involved, there is a good chance that your hair can be restored with Color Oops.


color oops


Hair Coloring Disasters Come In Many Forms Like:

Honest Mistake - the color on the bottle is NOT what you ended up with, for whatever reason.

Going Goth - You decided that you wanted to go goth with jet black hair. Now you look like Morticia Addams.

Your Green is Nothing to Envy - You have over processed your hair and now Kermit the Frog wants your number.

Better Dead than Red - You thought your blonde hair would look cute if it was red. Now you look like Carrot Top.

Being Blue has New Meaning - You decided it would be cool to have blue hair....or pink, or teal or even multicolor. Now you look like a unicorn vomited on your head.

Most are repairable as long as you didn't use bleach.


How Does Color Oops Remove Color Without Bleach?

Color Oops has no bleach or ammonia, but it does have aloe vera and soy protein that will help condition and restructure  your hair while removing the color.  The question is HOW does it remove the color without the damaging your hair?  I found the answer to be kind of like magic.....but of course, it isn't.  

Hair has several layers and the peroxide in hair dye opens these layers up so the color molecules can penetrate.  Your hair may look dark on the outside but the peroxide has lightened the inside layers of your hair, permanently, so Color Oops will not take you back to your natural color. You will end up with lighter hair than your natural shade. Color Oops gets rid of color by reopening the layers of your hair and shrinking the color molecules, so they simply fall off when you wash and rinse.  

Honey, I shrunk the molecules!

Regardless of how strange it sounds, it works!

I have been coloring my hair auburn for years.  Frankly I was just sick and tired of dealing with it.  Any shade of red hair dye fades really quickly.  To keep it vibrant you need to reapply every 4 to 6 weeks, but then as your hair grows, the bottom where it is colored over and over gets darker and darker and the new growth at the top is much lighter.  After a while it can look quite ombre.

So I decided I needed a change, but how to get rid of the red?  And what then?  I was in a real quandary, so I decided to check out hair styles and colors on You Tube.  I saw some really lovely videos on people with naturally gray hair and I considered it.  You Tube is where I saw a video on a product called Color Oops.  I was impressed with what I saw in the vid, so I went to the store and bought some.  I decided on Extra Conditioning because my hair can use all the conditioning it can get.  I still had not decided on the final color, but I decided to go for it anyway.

After I applied Color Oops, my hair looked rather unusual.  It was kind of multicolored......some light red, light brown, dark brown and of course, gray.  It was not a look that I was thrilled with which I understand is not uncommon.  There is a good chance that anyone that uses this product will not like the hair color they end up with.

The answer is simple, just recolor your hair.  Color Oops does not do any damage to your hair, so you are safe to recolor it quickly.  I waited two days, but that was more for my scalp, which was kind of tender.  I decided to go blonde because it is easy to maintain when you have a lot of gray, but I was wondering how blonde it would actually come out without bleach.  I loved the way it came out!  I was surprised that it did come out such a light blonde considering it really was more auburn than any color, pre-Oops.  I always wanted to be a blonde, but I never wanted to have to bleach my hair and maintain it.  Now I have pretty blonde hair and I only have to reapply the color about every 3 months, when it starts looking more gray than blonde!

Below is a video showing how to use Color Oops (she chose to use Extra Strength) and the results.


I was delighted with the results I got from Color Oops.  It was quick and easy to use, did not damage my hair and left me free to dye it the color I wanted.  I could not ask for a better or easier way of fixing my color problem, unless of course I could use magic!

color oops

Color Oops Extra Conditioning


Note: The author may receive a commission from purchases made using links found in this article. “As an Amazon Associate, Ebay (EPN) and/or Esty (Awin) Affiliate, I (we) earn from qualifying purchases.”


Most Recent Reviews on Review This Reviews


Search for Reviews by Subject, Author or Title

The Review This Reviews Contributors


SylvestermouseSylvestermouseDawn Rae BDawn Rae BMbgPhotoMbgPhotoBrite-IdeasBrite-IdeasWednesday ElfWednesday ElfOlivia MorrisOlivia MorrisTreasures by BrendaTreasures by BrendaThe Savvy AgeThe Savvy AgeMargaret SchindelMargaret SchindelRaintree AnnieRaintree AnnieLou16Lou16Sam MonacoSam MonacoTracey BoyerTracey BoyerRenaissance WomanRenaissance WomanBarbRadBarbRadBev OwensBev OwensBuckHawkBuckHawkDecorating for EventsDecorating for EventsHeather426Heather426Coletta TeskeColetta TeskeMissMerFaeryMissMerFaeryMickie_GMickie_G


Review This Reviews is Dedicated to the Memory of Our Beloved Friend and Fellow Contributor

Susan DeppnerSusan Deppner

We may be apart, but
You Are Not Forgotten


“As an Amazon Associate, Ebay (EPN) and or Etsy (Awin) Affiliate, I (we) earn from purchases.” Disclosure Statement

X