It's pumpkin season! Now is the perfect time to round up some pumpkins and create unique centerpieces as a festive touch for your holiday celebrations. A DIY pumpkin succulent mini garden will be the perfect addition to your Thanksgiving decor. Not only will it be a real attention-getter when you host guests for the holidays, but you will have the benefit of enjoying your new container garden long after you finish all those turkey left-overs.
Here's What You Need:
- One large flat pumpkin
- A variety of succulents
- Clear gel glue
- Spray adhesive
- Moss
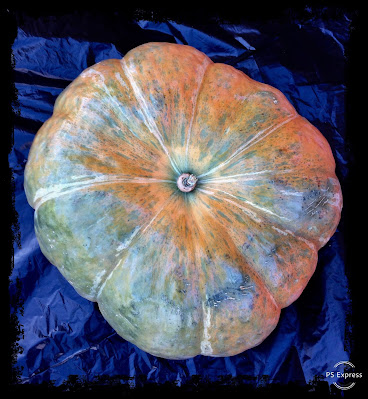 |
| It's best to use a flat pumpkin with a slightly indented center . |
While I prefer to use a pumpkin in its natural state, I chose to paint mine for this demo project. I used a lovely Solstice Blue paint color (a subtle blue-gray) that will blend in with the woodland theme I am using for my holiday decorations. It reminds me of the beautiful shadows you see on fresh snow. A neutral colored pumpkin better accents the succulents.
Removing the Stem
Once the paint was dry, I used my Dremel with a cut-off wheel to remove the pumpkin stem.
 |
| Spraying on Elmer's Craft Bond |
I then sprayed adhesive on the center top of the pumpkin where the moss will be placed.
 |
| Press Moss Into the Adhesive |
While the adhesive was still fairly wet and tacky, I pressed a nest of moss onto the sticky surface. It seems I got a little moss happy. Could have used a bit less moss, but it would have made a big mess to attempt to remove it. I let the adhesive set for several minutes before moving to the next step.
Preparing the Roots for Planting
While the adhesive was setting up, I gently removed the soil from the cacti roots in preparation for planting them on the surface of the moss. I also separated the succulent clusters so I would have more options for spreading out individual plants.
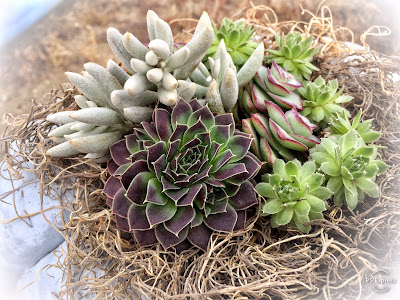 |
| Vary Succulent Colors, Textures, and Heights |
Start your succulent placement with your largest plant. Visually, it is most pleasing to the eye to position the first cactus off-center and toward the edge of the pumpkin. It is also a good idea to group your taller cacti near that first featured plant. You will use clear gel glue to fasten your succulents to the moss. Don't worry! The glue won't hurt your succulents.
 |
| Time to Lightly Mist the Moss |
Once your pumpkin succulent centerpiece is complete, carefully give the moss a light misting of water. You will provide moisture to the moss about once a week. It's important not to let water pool under your plantings. It will lead to premature rot. Simply tip your pumpkin slightly to the side to drain any excess water after each misting.
To extend the life of your pumpkin, and to give your succulents what they need, carefully choose a location away from heaters. Try to situate your succulent container garden such that your cacti get the sunlight they need without getting too much heat on the pumpkin. Likewise, take care to protect your succulents from freezing if you will be displaying your centerpiece on a porch or outdoors.
One last tip: Place your pumpkin on a piece of cork or thick cardboard to keep the bottom from early decay (especially if placed in a location where surface dampness occurs). Take care to protect your indoor furniture with the use of a waterproof planter mat.
With proper care, your pumpkin succulent centerpiece should last several weeks. Once the pumpkin has reached the end of its season of life, you can either cut off the top of the pumpkin and plant it on top of appropriate cacti soil, or transplant the newly rooted succulent cuttings to another container. Of course, you may also choose to use a faux pumpkin to eliminate this step.
It's easy to see why these pumpkin centerpieces are so popular. Besides being unusual and visually stunning, they let you take your creativity to a whole new place. This DIY centerpiece is sure to be a fun conversation-starter at your next gathering. Why not make one to share for a hostess gift? Who wouldn't love such a thoughtful gesture?
Enjoy this project and my best wishes to you for a blessed holiday season.
Note: The author may receive a commission from purchases made using links found in this article. “As an Amazon Associate, Ebay (EPN) and/or Esty (Awin) Affiliate, I (we) earn from qualifying purchases.”


