Showing posts with label Recipes. Show all posts

Saturday, December 24, 2016

Buttery Pasta and Shrimp Recipe Review


Our Favorite Seafood Meal


Image of my buttery pasta & shrimp dish
Having lived in coastal communities a number of times over the years, from the California Central Coast to the Gulf Coast of Florida to (today) Coastal Georgia, seafood dishes are popular favorites in our household. 


While living on the California Central Coast in 1980, I came across a shrimp recipe put out in a little cookbook leaflet by Land O Lakes, using real butter (yum) in the recipes. This shrimp/pasta buttery combination has become a standard for company dinners and has also become a family favorite for Christmas Eve dinner every year.


cooking time on Buttery Pasta and Shrimp Recipe


Ingredients


Ingredients for Buttery Pasta and Shrimp Recipe
Ingredients, prepped and ready

  • 3 cups cooked spaghetti, (7 oz. Uncooked)
  • 1/4 cup Sweet Cream Butter
  •  1 cup chopped green pepper, (1 medium)
  • 1/2 cup chopped onion
  • 2 (12 oz.) packages frozen cocktail shrimp (or fresh shrimp as noted below)
  • 1-1/2 tsp. Garlic powder
  • 1/2 tsp. Salt
  • 1/2 tsp. Oregano leaves
  • 1/4 tsp. Pepper
  • 2 cups cubed fresh tomatoes
  • Grated Parmesan or Romano Cheese 

*Cooks' Note

The recipe calls for frozen cocktail size shrimp, which is fine, but living near the coast where fresh seafood is available I naturally substitute fresh shrimp for the cocktail shrimp.

I take about one pound of medium shrimp, peeled & deveined, cut them in half most times, and sauté them separately in a bit of butter & garlic before adding them to the pot of vegetables simmering in the butter & seasonings. I've also added fresh sliced mushrooms to the original vegetables of chopped onions and green pepper in the recipe. As you can see, your own preferences are easy to substitute in this dish.


Instructions


Image of the cooked Angel Hair Pasta for recipe
Angel Hair Pasta - Cooked
  • Cook spaghetti; set aside.  I used angel hair pasta in this recipe, but you can use any pasta that you desire.

Pan holding vegetables sautéed in butter
Sautéing the vegetables in real butter
  • In a 3 qt. Saucepan melt butter over medium heat (5-7 minutes).
  • Add remaining ingredients, except tomatoes and spaghetti. Stir to blend.
  • Cook over medium heat (5-7 minutes).
  • Add cooked spaghetti; stir to blend.
  • Continue cooking over medium heat, stirring occasionally until spaghetti is heated through (3-5 minutes).
  • Remove from heat; add chopped tomatoes. Cover; let stand 1 minute or until tomatoes are heated through.
  • To serve, sprinkle with Parmesan cheese.


Dinner photo: Pasta dish with garlic toast & coleslaw
Pasta dish with garlic toast & coleslaw

Serve this buttery pasta and shrimp dish with slices of garlic bread or Texas Toast, and either a salad or coleslaw, and you have a very delicious and satisfying meal anytime you crave shrimp & pasta.


Land O' Lakes Chicken and Seafood Cookbook


Land of Lakes Cookbook
Land O Lakes Chicken & Seafood Cookbook

The buttery pasta with shrimp recipe featured in this review can also be found in this cookbook of recipes for chicken and seafood made using real butter. I've used my copy for years!


This 44-page booklet from 1980 has recipes for both chicken and a variety of seafood, all using delicious butter.

Shrimp Lovers Recipes


Forrest Gump knows ways to eat shrimp - shrimp kabobs, shrimp creole, shrimp gumbo, shrimp cocktail...

Looking for more shrimp recipes, you'll find them here! 

Bubba Gump Shrimp Cookbook book cover
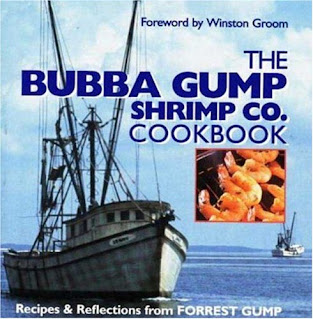
Over 75 Shrimp Recipes from Forrest Gump


For other delicious recipes, shrimp and otherwise, check out ReviewThisReviews Recipes for a variety of yummy dishes from our contributors.


+Images are personal photographs by (c) Wednesday Elf

(c) Wednesday Elf. Article originally written in October 2013 on another site.


Note: The author may receive a commission from purchases made using links found in this article. “As an Amazon Associate, Ebay (EPN) and/or Esty (Awin) Affiliate, I (we) earn from qualifying purchases.”


Saturday, December 17, 2016

Sweet Ginger Cheese Muffins - Recipe Review

plate of sweet ginger muffins
Sweet Ginger Muffins copyright BuckHawk 


Looking for easy, vegan and gluten-free muffin recipes, I came across a delicious looking sweet ginger one. But, it wasn't completely perfect to go with the soup I was planning for dinner. Therefore, I did the conversions needed to end up with Sweet Ginger Cheese Muffins.

Here I'll tell you about the original recipe along with the changes I made to create my new muffin recipe. Although my recipe is both vegan and gluten-free, I've included the easy changes you can make to convert it to standard diet fare.


The Original Muffin Recipe


gluten free cookbook
Great Gluten-Free Vegan Eats
One of my favorite vegan and gluten-free cookbooks is Allyson Kramer's Great Gluten-Free Vegan Eats from Around the World. In her section titled Tasty Treats from Central and South America, she includes a recipe for Chilean-Style Sweet Ginger Cake. This was the recipe that enticed me into creating my own version.

Sweet Ginger Cake is meant to be a dessert. But, to go with the potato leek soup I was serving, I wanted something a bit less desserty. Ergo, less sugar and sweet ingredients and the addition of vegan cheese shreds and nutritional yeast. The result was a delicious cheesy muffin similar to sponge cake in texture.

Sweet Ginger Cheese Muffins Recipe


Ingredients and directions:
  • 2/3 cup vegan margarine 
  • 1/3 cup raw sugar
  • 1 teaspoon vanilla extract
Cream these ingredients together until they form a smooth paste. I used my stand mixer for this. It just goes so much faster.

Then add in:
  • 2 teaspoons dried, ground ginger
  • 1/3 cup tapioca flour
  • 1/2 teaspoon sea salt
  • 1 teaspoon xanthan gum
  • 3 teaspoons baking powder
  • 2 tablespoons nutritional yeast
  • 2 cups gram flour
  • 1/4 cup honey, agave or other sweetner
  • 1 1/2 cups almond milk
Mix all of this together until you have a smooth batter. Finally fold in 1/2 cup of shredded cheese. I used a combination of Daiya brand mozzarella and cheddar style vegan shreds.

Grease and flour 12 standard muffin cups and divide the mixture among the tins. Bake at 350 degrees for 25 minutes or until golden brown on top.

Recipe Notes


For those of you who are not familiar with vegan and gluten free cooking, many of these ingredients will sound foreign. But every single one is available in health food stores and online.

If you want to make these muffins in a more conventional way, you can easily replace the vegan margarine for butter, replace both the tapioca and gram flour with all-purpose flour, skip the xanthan gum and replace the vegan versions of milk and cheese with dairy versions.

Nutritional yeast is not like standard bread yeast. It's deactivated and more similar to brewer's yeast. It adds a cheesy flavor and vitamin B12 to anything it's added to. Nutritional yeast is found in a dried version, either flakes or powder. If you don't have nutritional yeast, you may want to add more cheese shreds.

Either way you want to make this recipe, you will enjoy a combination of flavors. Unexpected combination, I agree, but the result will complement soups and stews wonderfully.


Posted by: BuckHawk
Buckhawk

About This Contributor

BuckHawk decribes herself as "Basically a lazy person who prefers the easy things in life." So that's what she writes about. Easy home decorating, easy recipes, easy entertaining. But, she is also a lover of animals, gardening and crafting. You'll find her writing all over the Web, but with Review This Reviews! she has the opportunity to write about all of her loves.


Note: The author may receive a commission from purchases made using links found in this article. “As an Amazon Associate, Ebay (EPN) and/or Esty (Awin) Affiliate, I (we) earn from qualifying purchases.”


Monday, December 5, 2016

Easy Snickerdoodle Cookie Pie Recipe Review

I have always loved Snickerdoodle cookies. I remember eating them as a child, growing up in Amish country. I love eating fresh baked goods - cookies, breads, and pies. Unfortunately, I have very little time to spend in the kitchen so I am always looking for tasty shortcuts. This is a super fast, easy, and delicious way to bake something we call Snickerdoodle Cookie Pie.


Why and How I Make Snickerdoodle Cookie Pie


I regularly bake brownies (from a box mix, of course). Brownies from a box are quick, easy, and fairly fool-proof. Even for me. I love eating cookies, but because I'm fairly lazy in the kitchen I rarely bake cookies. After all, dropping cookies onto sheet after sheet and having to be attentive to the oven every few minutes seems like a lot of work to me. I end up burning more cookies than I bake successfully. Because of these tendencies, I thought I'd try to make bar cookies using Betty Crocker Snickerdoodle cookie mix. 

I have used the different Betty Crocker cookie mixes and have found every single one tasty and dependable. I know what I am getting when I buy this brand of cookie mix. I recommend this cookie mix for folks like me who aren't very talented in the kitchen. Or for people who have minimal time for baking.

After experimenting with a 8" square baking dish and just one pack of cookie mix, I then experimented with a 10 1/2" round baking dish and two packs of cookie mix. I do like the 8" baking dish with one package of peanut butter cookie mix (just follow the directions) but for the Snickerdoodles, I prefer the round dish.

Ingredients:

  • 2 packages of Betty Crocker Snickerdoodle cookie mix
  • 2 eggs
  • 2 sticks of butter
  • 2 T water
  • only 1 of the packs of cinnamon (included with each cookie mix package)
  • optional - crystal sugar sprinkles

also:
  • Baking dish 10 1/2" round and at least 1" deep baking dish
  • non-stick cooking spray

Step-by-Step directions:

pre-heat oven to 375 
set butter in dish and warm to room temperature


set the cinnamon packs aside

add cookie mix (both packages) to the bowl
add eggs and water

mix together


lightly grease the bottom of the baking dish

sprinkle approximately 1/4 of one of the cinnamon packs in the bottom of the baking dish


drop the cookie dough by large spoonfuls into the dish flatten/spread slightly

(the dough is very thick. Trying to pour then spread is only successful in pulling the cinnamon up from the bottom of the dish)


sprinkle the cinnamon remaining in one packet on the top

(you can choose to use both cinnamon packets, but I prefer less cinnamon. I simply save the extra packet for use on toast or oatmeal)


optional - during the holidays I use red and green crystal sugar in addition to the cinnamon


bake at 375 for approximately 30 minutes

test for doneness with a toothpick or small wooden skewer
when the skewer pulls out clean, bake for an additional few minutes

(I bake for an additional 5 minutes. If you end baking as soon as the skewer comes out clean, your cookie pie will be doughy in the center.)


cool, slice and serve

can be served with a scoop of vanilla ice cream


Notes:

You will need to adjust the length of baking time for your oven, elevation, and preference. I prefer my cookie pie to be a bit on the doughy or under-cooked side. You may prefer yours cooked through a bit more. 

As I was preparing this article I noticed that the Betty Crocker Peanut Butter cookie mix is less expensive in Amazon's Prime Fresh category than it is at my local stores. Be sure to check out the lower prices if you are an Amazon Prime and Prime Fresh member.


Note: The author may receive a commission from purchases made using links found in this article. “As an Amazon Associate, Ebay (EPN) and/or Esty (Awin) Affiliate, I (we) earn from qualifying purchases.”


Saturday, December 3, 2016

Aroma Digital Rice Steamer Review

rice steamer of cooked rice
Rice Steamers Review
It's been 3 years since I got my Aroma Digital Rice Steamer. So I decided it was time to share my review of how it's worked in my kitchen. Along with sharing some of my favorite recipes for delicious rice and grains, you can learn a few of the tricks I've discovered to make perfect grains every time. You can never go wrong with a great rice side dish. Or maybe a base for a yummy stir-fry. Or any number of other ways to enjoy rice and grains.


Review of Aroma Digital Rice Steamer


rice steamer
Aroma Digital Rice Steamer
After reviewing many different choices, I picked the Aroma brand for my rice steamer for several reasons. First, the capacity. This can make 8 cups of rice. At a half cup per portion, you could feed 16 with one batch. Granted I've never tried to feed 16 people at once, but it's nice to know I can. Second, it has both a white rice setting and a brown rice one. That's important when you use healthy grains like quinoa and millet. Use the brown rice setting for these, which cooks a bit longer giving you fluffier grains.

The third and final reason I chose the Aroma brand was the price. It's not the cheapest one on the market, but it's certainly affordable and fit nicely into my tight budget.

A feature of the Aroma Digital Rice Steamer that I didn't think I would need is a delayed timer setting. WOW - that has turned out to be the feature I most enjoy. If I want to serve dinner at 6, I just start the rice steamer at 3, set it for 3 hours delayed and the perfect rice is ready when the rest of dinner is finished. The delay cycle is long enough that you can set it before leaving for work if you want.

Cooking Different Grains in the Aroma Rice Steamer


Since I've cooked different grains and a variety of rices, I can offer you a few tips to make them perfectly every time. For grains like quinoa and millet, I've found that a little bit less liquid makes a perfectly cooked grain. The Aroma rice steamer comes with a measuring cup for the grains. Per each cup of grain, I use 1 1/2 cups of liquid. For wild rice, I use 2 1/4 cups of liquid. For stickier rice, I use about 2 cups of water and for long grain rices, I use about 1 3/4 cups of liquid.

This may seem a little picky, but it matters. You want the rice or grains to turn out to be perfect for the recipe you're making so a little pickiness works wonders. All the water is absorbed into the rice so the amount does matter.

Onion Wild Rice Recipe


One of my family's favorite recipes is Onion Wild Rice. And it's so easy to do. This recipe makes 4 servings.
    onion wild rice
  • Finely chop about half of a yellow or white onion.
  • Add the onions and the dry wild rice to your rice cooker.
  • Add 2 1/4 cups of broth, vegetable, chicken or beef broth works.
  • Add in a dash of salt and pepper to your own taste.
  • Stir the mixture up and turn on the rice cooker to the brown rice setting. 
See, I told you it was easy. I've tried it with ground dried Shitake mushrooms as well and that works great, too. With a rice steamer, you can let your imagination help you create interesting dishes.

Coconut Almond Grains


This is another easy recipe using quinoa and millet together. They are similar grains, but have slightly different flavors. To your rice cooker add:
  • 1/4 cup shredded unsweetened dry coconut flakes
  • 1/4 cup almond slivers or chopped almonds
  • 1 cup of mixed quinoa and millet - can be equal portions or not
  • 1 1/2 cup of liquid - water works just great, as does broth
  • Salt and pepper to taste
Stir this up and turn on your rice cooker, setting for brown rice. Another simple way to add healthy grains to you meals.


Choosing a Rice Steamer


The market has many different rice steamers. Nearly every small kitchen appliance maker makes one. So you will need to make a choice. The Aroma brand is not as well known as others, which is why I felt it needed a review after all my years of using it. 

Companies like Oster and Cuisinart also make rice steamers. You may be more comfortable with a brand you recognize. Besides the brand name, you also want to consider capacity. Make sure you can make enough cooked rice to feed your family. For many price is a major consideration. You need to balance how often you will use the rice steamer, the features, the capacity, and the price.

See more great product reviews at Review This! Products


Posted by: BuckHawk
Buckhawk

About This Contributor

BuckHawk decribes herself as "Basically a lazy person who prefers the easy things in life." So that's what she writes about. Easy home decorating, easy recipes, easy entertaining. But, she is also a lover of animals, gardening and crafting. You'll find her writing all over the Web, but with Review This Reviews! she has the opportunity to write about all of her loves.


Note: The author may receive a commission from purchases made using links found in this article. “As an Amazon Associate, Ebay (EPN) and/or Esty (Awin) Affiliate, I (we) earn from qualifying purchases.”


Friday, October 28, 2016

Instructions for Easy Stenciled Cupcakes for Halloween

Decorate Halloween Cupcakes with Stencils Reviewed

Stenciling cupcakes is a fun and easy way to decorate a cupcake. I am sharing simple step by step in instructions for stenciling Halloween Cupcakes along with lots of photos and tips.
Stenciling cupcakes is a fun way to decorate cupcakes. Using stencils is a pretty easy way to decorate beautiful Halloween cupcakes that are certain to be a frightening fantastic addition to your party table.

By simply using stencils, confectioners sugar or sanding sugar, you too will be able to create tasty treats that double as great Halloween decorations.

If you can't find the cupcake stencil you want, why not use a small cookie cutter?

Let me show you exactly what I am talking about and what your guests will be talking about at your Halloween party when you make these creepy cupcakes!


Choose the Right Cupcake Recipe


Stenciling cupcakes is a fun and easy way to decorate a cupcake. I am sharing simple step by step in instructions for stenciling Halloween Cupcakes along with lots of photos and tips.
For convenience, I used boxed cake mixes to make my cupcakes. I baked 12 large Triple Chocolate Fudge with a Betty Crocker Super Moist cake mix and 12 large Lemon Supreme cupcakes with Duncan Hines Moist Deluxe cake mix. 

I selected these flavors because I knew I would not be icing all of them and I wanted cupcakes that would taste good without icing.

Delicious filled cupcakes would be ideal for these stenciled cupcakes for Halloween since they will not be frosted.

Here are a few recipes you might like for your frost-less cupcakes.

Recipes for Cupcakes that are Delicious Without Icing


Supplies You Will Need to Get Started Stenciling

Supplies for Stenciled Halloween Cupcakes
  • Baked Cupcakes ~ I baked Triple Chocolate Fudge and Lemon cupcakes
  • Stencils or Cookie Cutters
  • Confectioners Sugar
  • Sanding Sugar ~ your choice of colors
Decorators note:  An essential tool for decorating with Confectioner's sugar is a cup with a mesh top.


Recommended Powdered Sugar Shaker


With Stainless Steel Mesh Dome Lid 


This cup will allow you to literally sprinkle confectioners sugar onto your cupcake once the stencil is in place. It will cut down on the mess often associated with decorating with confectioner's sugar.


Directions for Stenciling Cupcakes


  1. Using Cupcake Stencils - Place the stencil on the cupcake
  2. Sprinkle Cupcake with Confectioners Sugar then Slowly
  3. Gently Lift Stencil Off of Cupcake

Easy Stenciled Cupcakes for Halloween


Use A Cookie Cutter to Stencil

If you don't have stencils on hand, you could also use a small cookie cutter.  Owls and ghosts were not included in my stencil pack, but I wanted cupcakes decorated with them.  Since I love owls and ghosts at Halloween, I used my cookie cutters.  It is the same process, you simply have to make sure you have a good hold on the cookie cutter and have it firmly pressed against the cupcake top so the powdered sugar doesn't escape the sides. 

Stenciling Iced Cupcakes


Stenciling cupcakes that have icing is a little messier and a bit more tricky, but can certainly be done!  

To stencil an image on icing or frosting, you would want to use sanding sugar instead of powdered sugar.  The sanding sugar does have an added "sparkle" benefit.

You do need to be extremely careful when you lift the stencil or cookie cutter off the icing to keep from dropping excess sugar outside of the image lines.  The icing tends to try to hold on to your stencil.  I recommend lifting it straight up and off the cupcake  without tilting the stencil.

Directions for Stenciling Cupcakes with Sanding Sugar


  1. Using Cupcake Stencils - Place the stencil or cookie cutter on the frosted cupcake
  2. Sprinkle Sanding Sugar on the Cupcake,  then Slowly
  3. Gently Lift the Stencil Straight Up & Off of Cupcake 


Cupcakes for Halloween Stenciled with Sanding Sugar

 These Cupcakes were Decorated with
Lemon Frosting and Brown Sanding Sugar


Using Cookie Cutters & Stencils to Decorate Cupcakes


Stenciling cupcakes is a fun and easy way to decorate a cupcake. I am sharing simple step by step in instructions for stenciling Halloween Cupcakes along with lots of photos and tips.
Black Cat Cupcake
Lemon Cupcake & Black Sanding Sugar
When you decorate your Halloween cupcakes with stencils or cookie cutters, your variety is limited only by your cookie cutters, stencils and supplies.   I have dozens of cookie cutters and several packs of Halloween stencils.  I enjoy playing around with them and seeing what unique cupcakes I can create.  Now, everybody knows you can't celebrate Halloween without the black cat.  Isn't he spectacular on his golden moon cupcake!

They are also great for cakes! 


You can see my directions on how to stencil a Halloween cake by clicking this link to Cooking for the Holidays


Supplies Used in This Article


Confectioners Sugar is available in most grocery stores.  A variety of sanding sugar colors is not as easily obtained.  I purchase mine online.  

I also purchase my cookie cutters and stencils online. 


The Stencils


The stencils used in this article are an older pack of Martha Stewart Halloween stencils - M230600 (UPC #015586743364). The pack includes the bat, 2 jack o' lantern faces, the witch, the spider, the web, the skull & crossbones and the raven. (Neither the raven nor the web are shown on the front of the package.)  The only place I could find them at the time of writing this article was on eBay.


Since eBay inventory changes constantly, I recommend checking here again soon if you don't see exactly what you want right now.


See More Recipes On ReviewThisRecipes.com


More Recipes by Sylvestermouse
Peach Cobbler RecipeQuick and Easy Peach Cobbler Recipe
My mother's peach cobbler is one of my favorite desserts.  Actually, it is my favorite breakfast too. I have even been known to eat it for lunch.


Peanut Butter Fudge RecipePeanut Butter Fudge Recipe
This is my mother's recipe for Peanut Butter Fudge.  I have never seen it published anywhere else, but it is the best I have ever tasted.


"This Tutorial for Easy Stenciled Cupcakes for Halloween" Written by:
House of Sylvestermouse


Note: The author may receive a commission from purchases made using links found in this article. “As an Amazon Associate, Ebay (EPN) and/or Esty (Awin) Affiliate, I (we) earn from qualifying purchases.”


Thursday, October 6, 2016

October is Pizza Month: Reviewing Our Favorite Pizza Recipes

Making homemade pizza actually is pretty easy, especially if you follow one of the favorite pizza recipes you'll find here.

These days, ordering a pizza is as easy as pulling out your phone and opening an app. But, let's face it, it's hard to beat homemade. Besides, preparing a pizza at home doesn't require waiting for (and paying for) delivery or going out again if you're already at home.

Making homemade pizza actually is pretty easy, especially if you follow one of the favorite pizza recipes that we're going to tell you about, all tried and true. It's a fun activity, too, one that's perfect for involving the kiddos.

Kid-Friendly Pizza Recipes


Quick and Easy Pizza Bun Recipe from Ladymermaid
Photo from Ladymermaid
With just the tiniest bit of planning you'll always have the ingredients on hand to make this Quick and Easy Pizza Bun Recipe from my friend Lorelei aka Ladymermaid.

Pizza sauce from a bottle or jar should be a staple in your house, along with plenty of mozzarella cheese.  A toaster oven is perfect for making these individual pizzas using bread or hamburger or hot dog buns. Kids, especially, love adding the cheese and toppings to the buns and popping them into the toaster oven for a few minutes. Adults enjoy these, too, perhaps with more sophisticated toppings. For a family or a crowd, use a baking sheet and the regular oven to turn out enough pizzas for everyone.


Spider Web Pizza Recipe perfect for October and Pizza Month
Photo from Cooking for the Holidays

Since it's October, I absolutely had to include the recipe for this fun Spider Web pizza from Review This Reviews' own Sylvestermouse. She's absolutely right about families' needing a quick but filling meal before trick-or-treating on Halloween evening. And, as her family has done, making this Spider Web Pizza a tradition for October 31st is a great idea.

Only a few simple ingredients are required to assemble a delicious pizza that your family will love. Adding a creepy spider to the top is optional, but where's the fun in that? Read all about decorating a pizza for Halloween at the link.


Healthy Pizza Recipes


Artichoke Zucchini White Pizza Recipe from RecipesForRealPeople
Photo from Recipes For Real People
If you love pizza but want something a little different from the traditional red sauce topped with pepperoni, try this Artichoke Zucchini white pizza recipe. I call it "A to Z Pizza" for short.

I use packaged crust and jarred Alfredo sauce, along with sliced fresh zucchini, a jar of marinated artichoke hearts, some onion, garlic, and black olives, and top it all off with a combination of mozzarella and Parmesan cheese. Yes, it tastes as good as it sounds! It's good for you, too, if you go easy on the sauce.


Basic Dough Recipe, Perfect for Homemade Pizza Crust, from Sam's Places
Photo from Sam's Place

To turn any of these pizza recipes into true homemade pizza, you'll need a good pizza crust recipe. Get it at Sam's Place! Here's his easy homemade all purpose dough recipe, and he also includes links to his own homemade pizza and pepperoni bread recipes. Prepare to be impressed as Sam is a wonderful cook. (Update: Hot out of the pizza oven is Sam's latest, Fresh Tomato Spinach Pizza. Don't miss this delicious recipe!)


Pizza When It's Too Hot to Cook

Presto Pizzazz Plus Rotating Pizza Oven: Read the Review
Author Photo
Pizza is perfect food around the calendar, but when it's hot outside I don't like to heat up the house by turning on the oven. That's why I'm thrilled with the Presto Pizzazz Plus Rotating Pizza Oven that joined our family several months ago.

Whether I'm in the mood for a quick pizza from the freezer, if I pick up a fresh pizza from the deli, or even if I make my own pizza from scratch, the Pizzazz allows me to prepare it without heating up the house. This awesome appliance also saves time since there's no preheating required. It works for other foods, too, as you'll learn when you read my full Pizzazz Plus review.


So, are you hungry yet? 


These recipes should get you through October's Pizza Month celebration or any month, year, or day of the week that you find yourself in the mood for a slice of one of America's favorite foods. I'd love if you leave a comment to let me know which of these is your favorite pizza recipe.

~Susan 


~Susan Deppner
Read more of my reviews.


Posted by Susan Deppner

Susan Deppner

About the Author

Susan Deppner is a baby boomer, a cancer survivor, and a Southerner who believes in the Golden Rule. She enjoys writing about food, faith, and fitness; health, home, and holidays; people, places, pets, and patriotism, and more. Follow Susan on Twitter, Facebook, and Pinterest.


Note: The author may receive a commission from purchases made using links found in this article. “As an Amazon Associate, Ebay (EPN) and/or Esty (Awin) Affiliate, I (we) earn from qualifying purchases.”


Tuesday, September 6, 2016

Soft Foods: Potatoes Reviewed

Potatoes Are A Perfect Soft Food For Dentures Or Tender Gums From Oral Surgery

potatoes
I'll be reviewing ideas for serving potatoes to yourself or the family member who has tender gums from prepping for dentures or oral surgery of any kind, today.

There is the obvious idea of mashed potatoes but they do not have to be the traditional serving. Trust me, you begin to want some kind of variety with your soft foods as it takes months for your gums to heal after having your teeth pulled and while you are adjusting to your new dentures.

So, for some variety in those mashed potatoes add different items to the dish. Personally, I love to add some minced garlic from time to time. They are also good with some shredded cheese. Sour cream and chives is another way to spice up those good old mashed potatoes. One evening I cooked some baby spinach leaves until tender and added those with a touch of sour cream and it was absolutely delicious!

One of my favorite potato dishes is creamed peas with red potatoes. This dish is a great source when soft foods are called for.

Creamed Peas With Red Potatoes

Ingredients:
1 1/2 pounds of red potatoes 
1 1/2 cups of frozen baby peas
3 tbsp sliced green onions
4 tsp butter
4 tsp all purpose flour
1 cup milk

Directions:
Scrub potatoes and cut into fourths (smaller if you like). Cook potatoes in boiled salted water for about 15 to 20 minutes or until soft. Drain and set aside.

Cook peas and onions in a small amount of boiling salted water for about 8 to 10 minutes. Drain and set aside. 

Make a thin white sauce by melting the butter, slowly adding the flour while stirring. Add a dash of salt and pepper. Slowly add milk while stirring the sauce. 

Combine the peas and potatoes, add the white sauce and mix together well. 

This is a wonderful addition to any meal whether you need soft foods or not! 

Another choice for potatoes is the traditional baked potato. Just make sure that it is cooked soft enough that you can mash it with your fork and you will be able to eat it without hurting those tender gums. Your choice of toppings are up to you, making sure that the toppings are not going to take too much chewing.

Cheesy Potatoes With Olives

Another potato dish that I fix often and even more while my gums have been tender is a cheesy twist on hash browns. 

Ingredients:
1 pkg frozen hash browns
1 cup sour cream
1 1/2 cups shredded cheddar cheese (sharp is really good in this recipe)
10 to 12 Green Olives stuffed with pimento diced
Salt
Black Pepper

Directions: 
Allow hash browns to partially thaw enough that you can break them apart easily.

Pre-heat oven to 350 degrees.

Combine the sour cream, cheese and diced olives in a bowl. Add a dash of salt and black pepper.

Lightly oil a casserole dish. (I actually use butter to coat the sides and bottom). Mix the hash browns with the sour cream and cheese mixture and place into the casserole dish. Bake for 25 to 30 minutes.

I am not sure that I would have ever made this recipe if I had not been served it one evening at a friend's house many years ago. Those olives really add a nice variation to cheesy potatoes! Kind of salty and tangy, it is really scrumptious!

These are just a few ideas for preparing potatoes as a soft food option for tender gums. The wonderful thing is that every single one of these potato ideas are delicious at any time! What is your favorite way to eat potatoes?


Note: The author may receive a commission from purchases made using links found in this article. “As an Amazon Associate, Ebay (EPN) and/or Esty (Awin) Affiliate, I (we) earn from qualifying purchases.”


Saturday, September 3, 2016

A Bacon Review

Bacon sizzling in a pan
Source: Pixabay
December 30 is designated as Bacon Day and the Saturday before Labor Day is known as  "International Bacon Day!"  There are various sources for who decided that bacon needed to be recognized with its own special day. 

Residents in Bradford, MA claim to have created this day in 2000. A group of Boulder, Colorado graduate students also claim to have created this special day, in 2004. 

Whatever the true source, it's definitely a day to enjoy this tasty treat in your favorite way (breakfast bacon & eggs, a BLT for lunch, or dinner of a bacon cheeseburger or a bacon wrapped steak or scallops).

Today's Motto: Everything tastes better with bacon.


What is Bacon and Why is it so Popular?


Bacon is a pork product that over the years has become one of our most favorite of foods. I'm not sure why this is, but 'Bacon Mania' has certainly taken over in recent years and has spread to more than just a tasty breakfast item eaten plain. 


Bacon dishes have evolved into some crazy creations, such as 'chicken-fried bacon' and chocolate-covered bacon. In a recent survey, 65% of Americans would support bacon as their "national food"!


Bacon Themes


Bacon is the Duct Tape of the  Kitchen Tee Shirt
Funny Gift for Men who love BaconUnicorn Tees on Etsy


Bacon themes can now be found on games and clothing, bandaids and duct tape and more. There is even a 'Bacon-opoly' Monopoly Game!


Bacon Terms in Other Countries


While we in America call it a bacon slice, several other countries have their own terms.

  • Canada: Strip
  • Germany: Speck
  • United Kingdom and Ireland: Rasher


Related Bacon Articles:


Review This contributor Brenda Little has a fun article about Bacon Playing Cards, a unique stocking stuffer for the man or teenager in your life.

And Sam Monoco tells us a funny story about how not paying attention while cooking can 'burn the bacon' in his 'Bacon Epic Failure' blog post. 


Cooking with Bacon

 
Image of bacon cooking
Image Source: Pixabay

  • My daughter cooks her bacon in the oven. She lays the bacon slices on a cookie sheet and bakes at 400 degrees for 15 to 20 minutes.  This gives her the really crispy bacon she loves, without having to 'watch & turn' the bacon as when it is cooked in a frying pan on the stove.
  • In our family, we have a 'family joke' about my hubby Bob cooking the bacon. He preferred to cook it in a frying pan, BUT each bacon strip had to lay perfectly FLAT to turn out cooked the way he preferred - nice and evenly cooked all over.  Of course bacon likes to 'curl' as it cooks, so this involved lots of turning and flattening each piece using two forks to 'hold' the ends down so they would end up cooking flat. His method also involved a LOT of 'swearing', so the family joke, which my (grown-up) kids like to say today, is that you cannot cook bacon without swearing at it! 
  • It's recommended by cooking shows and website articles to always start cooking your bacon in a cold pan. Lay the bacon strips out in the pan, then turn on the burner to a low to medium temperature. Cook slowly to desired crispness, cook in batches, and drain each batch on a paper towel or brown paper bag. You can also cook bacon in the oven, as my daughter does, or in the microwave (good if only a few slices are needed for a single sandwich or to crumble for bacon bits for a salad).  Line a microwave-safe dish with 4 layers of paper towels, arrange the bacon in a single layer, and cover with 2 more layers of paper towels. Microwave on HIGH for 1 minute per slice of bacon and check for doneness. If not done to your preference, microwave in additional 30 second bursts. 


Bacon Cookbook


101 Things To Do With Bacon cookbook cover
And, finally, every bacon lover needs a Bacon Cookbook for times when just a few strips of bacon with eggs isn't enough for our bacon cravings.

From old favorites to inventive new recipes, the 101 Things To Do With Bacon cookbook will give you plenty of tasty bacon dishes to try.

Bring home the bacon with these delicious recipes from appetizers to salads to dinners.... and even desserts!


Happy Bacon Day and "International Bacon Day"!


Note: The author may receive a commission from purchases made using links found in this article. “As an Amazon Associate, Ebay (EPN) and/or Esty (Awin) Affiliate, I (we) earn from qualifying purchases.”


Most Recent Reviews on Review This Reviews


Search for Reviews by Subject, Author or Title

The Review This Reviews Contributors


SylvestermouseSylvestermouseDawn Rae BDawn Rae BMbgPhotoMbgPhotoBrite-IdeasBrite-IdeasWednesday ElfWednesday ElfOlivia MorrisOlivia MorrisTreasures by BrendaTreasures by BrendaThe Savvy AgeThe Savvy AgeMargaret SchindelMargaret SchindelRaintree AnnieRaintree AnnieLou16Lou16Sam MonacoSam MonacoTracey BoyerTracey BoyerRenaissance WomanRenaissance WomanBarbRadBarbRadBev OwensBev OwensBuckHawkBuckHawkDecorating for EventsDecorating for EventsHeather426Heather426Coletta TeskeColetta TeskeMissMerFaeryMissMerFaeryMickie_GMickie_G


Review This Reviews is Dedicated to the Memory of Our Beloved Friend and Fellow Contributor

Susan DeppnerSusan Deppner

We may be apart, but
You Are Not Forgotten


“As an Amazon Associate, Ebay (EPN) and or Etsy (Awin) Affiliate, I (we) earn from purchases.” Disclosure Statement

X