

The Group Photo
It is great to get a photo of the entire group. We had 29 people in our group and I wanted to get them in to a group photo. Here are some of the tips that I used.
- Use a tripod and set your timer on your camera..that way you can be in the photo too.
- Before you gather everyone together first try out a few shots with a smaller group to make sure where you want to place your camera.
- Take the time to arrange everyone in an eye pleasing arrangement. I first had everyone standing with the tallest in the back. But as you can see here that was not as appealing as when I had some sitting and some kneeling.


Take some Smaller Group Shots
I took photos of several groups: the siblings, the cousins, the grandchildren and individual family groups. Be sure to include both serious and fun shots. The cousins had a fun pose they had done 10 years ago at a wedding so I had them do that again.

Candid Shots
You will want to include photos of people participating in activities and also of people just sitting around and visiting. Some tips to remember.

- Watch your lighting....you want to be able to see the faces
- Be careful not to snap shots of the backs of people
- Try to make sure everyone is included in a couple of shots
- Capture the activities that everyone is enjoying
- Have someone snap a photo of you...after all you were there too


Be sure to Include Photos of Your Location
You will want to include some photos of the location where you held the event. I walked around the property and took photos of the cabins we stayed at, the boat docks, the swimming area, the meeting area, and the playground. I also went down to the lake at sunset to capture some images of the sun setting and the beautiful clouds over the lake.


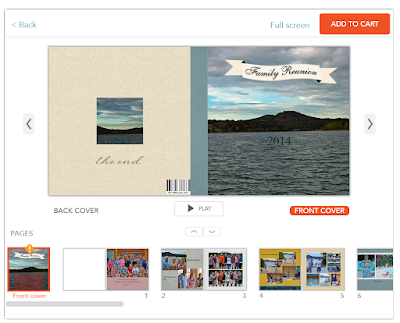
Consider Making an Online Photo Book
When you get home from your outing consider making an online photo book. You can share the book with all of the people from your event and they can choose whether or not to order it in paper form. I like to use the service of Shutterfly . They have an easy to follow program to help you put all of your memories into a book. They also have various sizes that you can order. Here are some tips to use in getting ready to make your photo book.
- First you will want to download all of your photos into your computer
- Next you will want to determine which ones would work best for your book and do whatever editing is needed for those photos. I started out with 287 photos and narrowed that down to about 80 that I used in the book.
- The next step I do is to make a folder on my desktop of the photos I want to use in the book
- I then download these photos into the Shutterfly program and follow their instructions to make my photo book.
Here is a copy of the book that I made.
I hope these tips have helped you and that you will capture some wonderful memories from your next reunion or event.
Click here to create your own Shutterfly photo book.
I hope these tips have helped you and that you will capture some wonderful memories from your next reunion or event.
Note: The author may receive a commission from purchases made using links found in this article. “As an Amazon Associate, Ebay (EPN), Esty (Awin), and/or Zazzle Affiliate, I (we) earn from qualifying purchases.”
FOLLOW US ON:


