Showing posts with label Home Appliances. Show all posts

Monday, July 1, 2019

Reviewing the NuWave Brio 10 Qt Air Fryer

Reviewing the NuWave Brio on Review This! 
Just this week I purchased the NuWave Brio 10 qt air fryer. And I am immediately in love with this way of cooking. I had to immediately review my new kitchen appliance.  If I find that over time I become disenchanted with this air fryer, I'll update this review. But right now I cannot imagine changing my mind about this machine.


NuWave Brio 


I bought an air fryer due to a recommendation from a co-worker. My co-worker had a cardiac event at a very young age. Thankfully, he recovered fully and returned to work. Not only did he return to work he clearly was losing weight and living a healthier lifestyle.  I asked him what his secret was. He said that he was using an air fryer. And if I was interested in losing weight and/or becoming healthier, I should definitely get one.

After looking at video reviews and comparison shopping in the stores, I chose the NuWave Brio 10 Qt machine. I made this choice for three main reasons.

  • similar pricing to the other machines
  • 1500w (double the power of some of the other machines)
  • a larger cooking space than some of the other machines

The NuWave advertising lists the highlights of this appliance as:

  • digital controls
  • evenly distributed heat
  • dishwasher safe parts (the parts - not the machine)
  • program functions - program your favorite recipes
  • stage functions - create up to 10 stages of time/temp adjustments
  • rotisserie - adjustable forks and rotates 360 degrees
  • sear function 
  • reversible wire rack (to adjust the height of your food and/or make room for up to an 8 lb chicken)
  • built-in "safe start" sensor
  • precise temperature control from 100F - 400F degrees. 

My Skepticism and Hesitation


That initial air fryer recommendation came to me close to two years ago. When my co-worker suggested an air fryer, one of the reasons I was very skeptical is that I didn't believe that I'd use one regularly. After all, I never deep-fry foods and I already often bake my meats/french fries rather than fry. 

Since then, a second co-worker has had a cardiac event (she is fully recovered also - thank God!). With my friends having major health scares, my own increasingly health problems, and after watching a movie of a young man who controls his Multiple Sclerosis (MS) symptoms via diet and exercise, I decided to take the plunge and purchase an air fryer. 

(No, I do not have MS, but his story about healthy diet was so motivating I decided to focus on cutting out even more carbs, sugars, and junk foods. If you would like to see my review of Living Proof by Matt Embry, click here).


The Past Week with the Brio Air Fryer


Since I have bought this machine, I have had a wide variety of cooked vegetables (broccoli, asparagus, green beans) that I normally would not have unless I was eating out. For some reason, I have never been able to stir-fry or saute vegetables and have them turn out appealing in any way. The one vegetable I cook well is summer squash, but I was frying them in a small amount of oil. Now I'm air frying them with only a dusting of cooking spray.

I've made chicken livers in this machine and they turned out GREAT.  I did not expect them too. The light flour coating browned and crisped. I was amazed. Another perk was that cooking the chicken livers in the machine greatly decreased that cooking liver smell that permeates the apartment when I cook them in the frying pan!  

I've also made a beef and broccoli Chinese food recipe that turned out GREAT. This is something I've never been able to cook successfully previously. 

I have made both lightly floured chicken nuggets and BBQ chicken chunks that looked and tasted as though they were grilled.

But the best thing about this appliance has been cooking great foods, foods that I often would pop into the oven for 30 - 45 minutes. But this apartment is hot and we've been having a heatwave. Without the Brio, I would either be on the verge of heatstroke while making dinner or I would forgo a real meal. With the NuWave Brio, I have been making great meals during this heatwave and adding very little, if any, extra heat in the kitchen. 

I am really pleased with this purchase and I'm very glad I finally acted on my co-worker's recommendation.


Note: The author may receive a commission from purchases made using links found in this article. “As an Amazon Associate, Ebay (EPN) and/or Esty (Awin) Affiliate, I (we) earn from qualifying purchases.”


Friday, June 14, 2019

Hamilton Beach Rice Cooker Reviewed

An inexpensive rice cooker that everyone should have in their kitchen!

Hamilton Beach Rice Cooker Reviewed
I love rice, but I always hated the mess on my stove-top created by the sputtering pan.  I have several friends who have commented over the years, that their rice would burn on the stove if they cooked it according to the package instructions.

On the stovetop, Riceland Rice, the brand I prefer, should be cooked on a low boil, covered for 15 minutes.  You are not supposed to lift the lid or stir the rice for 20 minutes.  I have always believed my rice did not burn simply because of my brand of cookware, and not because my friends were doing anything wrong.

Regardless of the cleanup required, I cook rice frequently.  After all, cleanup is just a part of cooking and I do enjoy cooking.  

When my children were in school, there were mothers who found their solution by buying a rice cooker.  However, it wasn't until this last Mother's Day that I discovered the real beauty of a rice cooker in my own kitchen when my son gifted me with a Hamilton Beach Rice Cooker.


Hamilton Beach Rice Cooker Review


 Hamilton Beach (37518) Rice Cooker,
4 Cups uncooked resulting in 8 Cups Cooked
Comes with Steam & Rinse Basket
Check Availablity & Price
See Below for Newer Model
I want to start by saying, I really love this rice cooker and I wish I had it decades ago.  It is so easy to cook and clean with this fabulous little cooker.  Plus, it doesn't take up very much storage room.  Because I use it often, I leave mine out on the counter, but it would be small enough to store in a standard kitchen cabinet.

I have yet to experiment with all that this beauty can do for me, but cooking the rice without a mess is enough for me to recommend this cooker to anyone.  It came with a small steamer basket, which I look forward to testing soon by steaming fresh vegetables.  The basket can also be used as a colander for rinsing.

You can cook white or brown rice, beans, hot cereal, hot soup and grains in the cooker, in addition to steaming vegetables.

The cooking pot has a nonstick coating and is dishwasher safe.

Hamilton Beach Rice Cooker Review


To Cook White Rice in the Hamilton Beach Rice Cooker

Hamilton Beach Rice Cooker Reviewed
  • Simply add 1 cup white rice, 1 teaspoon of butter, dash of salt and 2 cups boiling water into the cooker pot.  
  • Set the pot into the cooker and close the lid.  
  • Plug in the Rice Cooker
  • Select Warm, then Select White Rice
The cooker will auto set the timer to the default timing and auto-adjusts the time as it cooks.  (usually takes about 35 minutes to cook the rice according to my recipe, but let the cooker auto-adjust itself) 

When it has finished cooking, the cooker automatically switches over to a warming cycle to keep the rice warm until you are ready to serve.


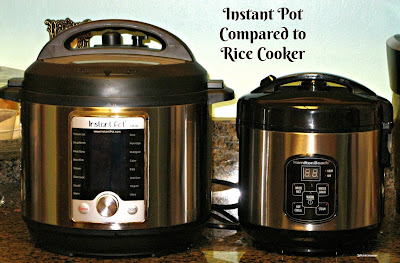
Rice Cooker Vs. Instant Pot


Rice Cooker Vs. Instant Pot
I want to note that I do have an Instant Pot, which I also love.  The 8 cup rice cooker is perfect for rice or sides.  It is smaller and lighter-weight than my Instant Pot, which makes it much easier to store.  However, I could never cook my Minestrone Soup in it.  I need my Instant Pot for complete dinner size meals.  

If you have space for both, I highly recommend having both the 8 cup Hamilton Beach Rice Cooker and the 6 Qt. Instant Pot Pressure Cooker.


Note: A few days ago, I needed a housewarming gift and thought this would be the perfect gift. However, I noted that my model (37518) was no longer available "new". Therefore, I purchased (37519 - shown on the far right below). Other than a slightly different color control panel, it is exactly the same in size and function.  

 Instant Pot Ultra, 10-in-1 Pressure Cooker, Slow Rice Cooker, Yogurt /Cake Maker, Egg Cooker, Sauté, and moreCheck Price Hamilton Beach Digital Programmable Rice Cooker & Food Steamer, 8 Cups Cooked (4 Uncooked), With Steam & Rinse Basket, Stainless SteelCheck Price Hamilton Beach 8-Cup Rice Cooker and Steamer | Model# 37519Check Price


Read More Product Reviews On
ReviewThisProducts.com


House of Sylvestermouse


Note: The author may receive a commission from purchases made using links found in this article. “As an Amazon Associate, Ebay (EPN) and/or Esty (Awin) Affiliate, I (we) earn from qualifying purchases.”


Tuesday, February 5, 2019

Heart Waffle Maker Reviewed

Another Way To Say I Love You

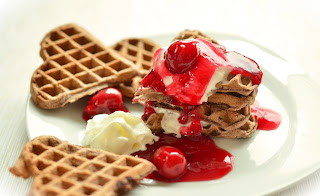
heart shaped waffles
Heart Waffles image courtesy of pixabay.com
With Valentine's Day rapidly approaching, I have had hearts on my mind. I found an adorable little kitchen gadget that will allow me to make little heart shaped waffles anytime of the year that I want to. 

The fun part is that with this mini waffle maker you and I are not constrained with just making waffles. Any wet batter will work. So, we can make heart shaped hash browns, paninis or even biscuit dough for a little heart shaped pizza. Now isn't that a fun idea? 

This little waffle maker is very light weight (about a pound) and does not take up much room for storage. It is a perfect size for a small apartment and can even travel with you on vacation. It heats up fairly quickly, too. The one drawback is that it only makes one waffle at a time but it shouldn't take too much time to whip up several due to the miniature size. 

I couldn't help but think of one of my family members who traveled around the country in an RV. This little heart waffle maker would have been great for them to have on their trips because it would pack away nicely in that very limited kitchen area. You are not limited to a heart design, either. There is an option for traditional round waffles if you would rather have them instead of hearts. 

What a fun idea for a house warming gift or a gift for the new bride and groom. Kids can make heart shaped waffles for Mom or Dad on Mother's and Father's day. There are just so many fun ways that this little gadget can be used! I think that it would be such a fun little addition to any kitchen. What about you? Do you think that you would have some fun with it? 

Mini Heart Waffle Maker


Note: The author may receive a commission from purchases made using links found in this article. “As an Amazon Associate, Ebay (EPN) and/or Esty (Awin) Affiliate, I (we) earn from qualifying purchases.”


Sunday, September 30, 2018

An Alternative to a Double Oven when Cooking for a Crowd

Counter-Top Roaster Ovens - "Very handy to have on hand"
Counter-Top Oven Roasters are a Practical and Affordable Solution

If you don't own a double oven it can be tricky to cook for a large crowd. 

For most of our life our homes have had one oven. Our family is quite large and cooking for family events, particularly Thanksgiving and Christmas, takes creative planning.

It's certainly possible to plan a large dinner with one oven, but having an extra oven makes the job so much easier. 

For 20 years or more we've owned a counter-top roaster oven. It's stored away for most of the year, but come the Fall the oven gets hauled out and used.

I Didn't Want One!

Not being one for a lot of kitchen appliance clutter, I was against getting another kitchen gadget. Clutter is not my thing.

However, I was absolutely wrong.

Our counter-top oven roaster has been one of the best choices in kitchenware we've ever made. Big family meals would be impossible for me without it now! Don't take my oven-roaster away.

The Brand We Use is 'Nesco'

I've featured a few 18 quart Nesco oven roasters below.

An 18 quart oven roaster typically fits a turkey up to 22 pounds. The non-stick cookwell is also removable which makes it easy to clean. If you use it to cook a large chilli for a party, put the entire oven on the table and keep the temperature on low. You can also remove the cookwell and bring it to the table.

In terms of the temperature gage, it operates like a standard oven. As an example, for our Turkeys, I start cooking the Turkey at 400 and then after about an hour turn it down to 350 to 375.

I'll also put oil and butter on the top of the Turkey and it does brown enough for our taste. However, if the top isn't brown enough for you, just lift the cookwell out and place it in the oven to broil the top to the color you like. The roaster also comes with a rack with handles allowing you to safely remove your Turkey.


It's over 20 years later, and I'm still using our Nesco Oven Roaster. Come to think of it, we've never had one single problem with it. That's rare. Hopefully the newer models last as long as my older model has. As far as my own experience, 'reviewed and recommended'.


Note: The author may receive a commission from purchases made using links found in this article. “As an Amazon Associate, Ebay (EPN) and/or Esty (Awin) Affiliate, I (we) earn from qualifying purchases.”


Friday, May 11, 2018

Hamilton Beach Stand Mixer Reviewed (Model 63325)

Hamilton Beach Stand Mixer Reviewed
I love my Hamilton Beach 63325 6-Speed Stand Mixer! 

For many years, I was tempted to buy a stand mixer, but I simply couldn't justify the multi-hundred dollar cost of the one I thought I wanted.  Every time I entered a department store, I would mosey over to the kitchen appliances and allow myself to be mesmerized by the beauty of a shiny new stand mixer.   

Several times my husband offered to buy one for me, but I refused to let him spend that much money on a mixer.  He even ordered one online as a surprise for me once and I cancelled the order myself citing the ridiculously high price was just too much.  I told him if it ever went on a 70% off sale, we could talk.  Of course, that never happened.   

However, my daughter and son-in-law did the unthinkable without my permission a few years ago.   They gave me a stand mixer for Mother's Day.


The Gift of the Hamilton Beach 6-Speed Stand Mixer


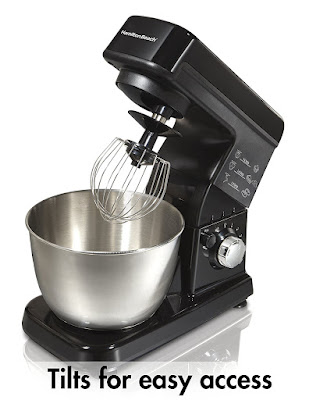
Hamilton Beach 63325 6-Speed Stand Mixer
I should note that the children were smarter than me.  They knew I needed a stand mixer, but they didn't choose the shiny and pretty model I was entranced by in department stores.  They looked at a durable, dependable, yet lightweight beast.  

I confess, I hadn't even considered the weight of the "beauty" I thought I wanted.   It's a good thing they thought of the weight though because I do have to move my stand mixer (11 lbs) each time I use it.  I would never have been comfortable lifting and moving the "beauty" (26 lbs).  Lifting my "beast" and carrying it from counter to counter is almost effortless for me.

The first time I used my Hamilton Beach stand mixer, I stood back and watched, amazed at how it did that work for me.  I definitely appreciated everything about it.  

You might think that being lighter weight would cause the mixer to hop around on the counter while mixing.  It does not.  It has nonslip feet and they definitely work!  

I also thought I wanted a glass bowl, but the Hamilton Beach stand mixer has a stainless steel bowl.  As it turns out, the stainless steel bowl is fabulous!  It is also much lighter than a glass mixing bowl, plus it won't break if I drop it.  Now, I have to tell you, I am thrilled that it came with stainless steel instead of glass.

Features of the Hamilton Beach Stand Mixer, Model 63325


Hamilton Beach Stand Mixer Reviewed (Model 63325)
  • 6 Speeds
  • 3 Attachments:  Flat Beater, Whisk, & Dough Hook
  • Head tilts up and locks into place to easily add ingredients 
  • Beater has excellent bowl coverage - very little need for scrapping sides
  • Nonslip Feet
  • Lightweight (11 lbs)
  • Mixer Unit Wipes Clean
  • Attachments and Bowl are Dishwasher Safe
  • Inexpensive by Comparison 

I want to take a moment to address how well this stand mixer mixes.  When I make a German chocolate cake, I do stop and scrape the sides of the bowl to make sure it is getting completely mixed.  That truly may be more habit on my part than necessity.  However, heavier batters, like my carrot cake, do not require scraping the sides of the bowl at all.  The flat beater does an excellent job of scraping, stirring and mixing.

The only advantage I now see to the beauty over the beast is that you can purchase separate attachments like a food grinder, pasta maker, ice cream maker, etc. that work by using the motor of the stand mixer for power.  If I ponder that for long, I realize I'm not likely to ever buy or use either of those separately purchased attachments.  If I want either of those things, I can buy the individual machine that is made for that specific purpose with it own motor.  

In case I forgot to mention, the Hamilton Beach Stand Mixer (the beast) costs almost 1/4 of the price of the one I thought I wanted (the beauty).  Ironically, that even beats that 70% off sale I was waiting for before I would make a purchase.

Thank you again to my daughter and her sweet husband for giving me what I really needed, the Hamilton Beach Stand Mixer. 

Read More Product Reviews On
ReviewThisProducts.com


House of Sylvestermouse


Note: The author may receive a commission from purchases made using links found in this article. “As an Amazon Associate, Ebay (EPN) and/or Esty (Awin) Affiliate, I (we) earn from qualifying purchases.”


Saturday, February 25, 2017

Easy in the Kitchen: Slow Cooker to Make Homemade Beans

programmable slow cooker
Programmable Slow Cooker
Yes, I admit it. I have 2 slow cookers and I use them both regularly. Easy in the kitchen is my preference and I'm going to review with you how I make things easier with my slow cookers. They aren't just for making dinners anymore. There's plenty to enjoy about slow cookers.

My two are different sizes. I have a smaller one that is a 4-quart cooker, and I have a larger programmable 6-quart size (www.kitchen-basics-small-appliances.com/programmable-slow-cookers-easy-cooking). I have made plenty of chilis, stews and soups in my slow cookers and I will continue to do so. The joy of tossing in all the ingredients, turn the thing on and come back to dinner ready to serve can't be beat. Plus, why not make enough for 2 or more dinners? That's easy in the kitchen in my book.

Homemade Beans


One of my favorite uses for my slow cookers is making my own homemade "cans" of beans. I was one of those people who would buy cans and try to force myself to use them. Sure beans are good for you, but I could never stomach the boring taste and slimy liquid canned beans were packed in. Discovering how to make my own beans made a world of difference.

  • Black beans
  • Chickpeas
  • Black-eyed peas
  • Pinto beans
  • Navy beans or any white bean
I start with dried beans - so much cheaper! About 1/2 cup of dried beans will equal a standard can size of cooked beans (about 1 1/2 cups). My smaller slow cooker easily handles a cup and half of dried beans, so I make 3 "cans" of beans at a time. 

Dried beans need to be soaked first, so I do this in my slow cooker. Usually overnight. Then drain and rinse the beans, put them back in the slower cooker, add enough water to cover the beans with about 2 inches of water on top, and cook. I set my slow cooker on high for 4 hours and the beans are cooked to perfection. If you have a programmable slow cooker, you can set it to cook the beans when it's most convenient for you. 

Packaging Homemade Beans
black beans


Freezing your cans of homemade beans is the easiest option.  I use half-pint mason jars which hold about 1 1/2 cups of cooked beans - the equivalent of a standard can. Remember to label them with the date as well. Frozen beans should last about 6 months. Of course, I can't ever test that out, I use my frozen beans too fast! 

Here's an easy in the kitchen trick for you. With any frozen foods, top the food with a piece of parchment paper. That will prevent ice crystals from forming and will keep freezer burn out of your food. 

Choosing a Slow Cooker


If you're in the market for a slow cooker, whether your first, second or ninth, there are things to consider before you buy. The options are numerous. You'll want to think about what size you need, what features will be helpful and what your budget allows. When you have the right appliance for the right cooking needs, you will have an easier time in the kitchen. 

So stop depending on store-bought cans of beans. Make your own. Flavor them to your own tastes and enjoy healthy and delicious homemade beans in your slow cooker. 


Posted by: BuckHawk
Buckhawk

About This Contributor

BuckHawk decribes herself as "Basically a lazy person who prefers the easy things in life." So that's what she writes about. Easy home decorating, easy recipes, easy entertaining. But, she is also a lover of animals, gardening and crafting. You'll find her writing all over the Web, but with Review This Reviews! she has the opportunity to write about all of her loves.


Note: The author may receive a commission from purchases made using links found in this article. “As an Amazon Associate, Ebay (EPN) and/or Esty (Awin) Affiliate, I (we) earn from qualifying purchases.”


Monday, January 23, 2017

Reviewing the Savings of a KitchenAid Artisan Mixer

Pink is only one of the MANY KitchenAid colors available
I have recently decided that I need to purchase a KitchenAid Artisan Mixer as soon as possible.  This is a complete change of mind about investing in a what I had previously considered "just another kitchen gadget". And to be more specific, another gadget that has a hefty price tag when you are budgeting every penny. But I have reviewed the many reasons of why the cost would be justified and have observed others using this important kitchen tool. Below, I will share the primary reasons that I have decided a KitchenAid Artisan Mixer is an important purchase to make, and worth budgeting for. 

Customizing Bread Recipes for Health and Savings


I am discovering the joys of homemade bread.  My first successful recipe was an easy Peasant Bread that consisted of letting it rising and punching it down more than kneading.  As I became proficient with that bread, I attempted another bread recipe - the Ultimate Bread recipe. This second bread recipe requires kneading. 

So far, I've done this kneading by hand and have had no problems. However, it is a bit time consuming and tiring. The older I become the more quickly my hands tire. I have decided to bake my own bread weekly and have done so recently but I'm learning that I need a bit of help.

Energy Savings - I am referring to my energy. I feel like there are not enough hours in the day and that I need to be twins in order to get everything finished that I want to finish on the weekends.  Making bread is a priority.  But as I am kneading, and my hands are growing tired, I think that "there must be an easier way". Well, there is.  It is a KitchenAid Artisan Mixer with a bread hook attachment. If the machine does the kneading I can save my energy for other tasks.

Money Savings - Have you noticed the prices of bread in the stores? I am a one-person household but I go through a good share of bread. I like toast and peanut butter sandwiches. I like to make grilled cheese sandwiches to go with my soup. With bread recipes that have only 6 ingredients, two loaves of store-bought bread can easily cover the costs of the ingredients to make many loaves of bread at home.

Possible Health Benefits - With 6 ingredients going into my homemade bread, I know what I am eating. The bread that I typically purchased from the store lists ingredients that I am able to pronounce. So there were no mystery ingredients. However, it also lists gluten. 

For folks who need gluten-free breads, or have preferences about the types of flours they consume, they can easily adjust recipes to suit their needs.

KitchenAid Artisan Mixer Reviews


There are many, many reviews online and much information about KitchenAid Artisan Mixers.  I will not reinvent the wheel and rewrite that information. Especially since I am not yet a proud owner of this important kitchen tool. 

Heather does own one and has reviewed her KitchenAid as well as shared important information such as the best time of year to make your purchases due to sales. If you are ready to learn more about these mixers from current owners, I would start with her review.


After reviewing the financial, physical energy, and health related savings, it becomes easy to see that a KitchenAid Artisan Mixer will be an investment that pays for itself fairly quickly. The most difficult part of the purchase will be choosing just one of the many beautiful colors. 


Note: The author may receive a commission from purchases made using links found in this article. “As an Amazon Associate, Ebay (EPN) and/or Esty (Awin) Affiliate, I (we) earn from qualifying purchases.”


Sunday, May 15, 2016

The Oster Griddle and Why I Love It - A Review

Oster Griddle via Amazon
The biggest reason we have a Griddle in the house is to make pancakes.

For decades home-made pancakes have been a staple in our home and when we're in-between grills, pancake breakfasts usually hit the skids.

Well, we've been in the 'in-between' stage for about a year or more, so just recently I decided a new Griddle was in order.

What's nice about a Griddle is the convenience for breakfast! My fourth son is now 16, still in high-school, and I make it a habit to prepare him a decent breakfast before school. That breakfast usually ranges between:
  • Free-Range Eggs, Spinach & Kale fried in Coconut Oil and Sliced Oranges, or
  • A Grilled Cheese Sandwich with Sliced Oranges or Bananas
What Do I Love about The Oster Griddle?

We've had a Griddle in our home for decades, and I do have a good amount of experience determing whether a grill passes the 'pancake' making test.

When I tried the Oster Griddle for the first time, I knew instantly, by how the pancakes browned, whether I had a winner ... and yes, according to my pancake making judgement, this grill is a winner.

Here are the points about the Oster Griddle that I appreciate:
  • It's ceramic non-stick coating is fantastic for non-stick performance. For the first batch of pancakes, I always put a bit of butter on the grill (even with a non-stick griddle) just to be safe. But with this grill, although I haven't tried it, I believe the butter was unnecessary. However, for the other three batches of pancakes, I did not add any butter whatsoever and the pancakes didn't stick at all!
  • The size of the grill is nice - I was able to make six good sized pancakes at a time.
  • The surface is scratch resistant and less likely to peel or flake. I haven't had ours long enough to give it the scratch test, but based on the durability of the surface, I can believe it.
  • The ceramic coating is free of PTFE & PFOA chemicals.
  • Food cooks evenly
  • It does cook faster and thus I imagine that will save energy over time
  • It looks nice on my counter and it's a snap to clean
I plan to use it frequently for breakfasts and it's situated conveniently beside the Vitamax and Coffee Machine (the two other appliances that get the most use).

Using our Oster Griddle for Grilled Cheese
Photo by Funkthishouse.com
Enjoy My Pancake Recipe:

Well, it's not really mine, it was my Mom's and before Mom, Grandmothers :)
  • 1 Cup of Flour
  • 3 Teaspoons of Baking Powder
  • 2 Tablespoons of Sugar (Optional)
  • 3/4 Teaspoon of Salt (Optional)
  • 1 Egg
  • 1 Cup of Milk
  • 2 Tablespoons of Melted Butter or Oil
  • 1 Teaspoon of Vanilla Extract
Mix all of the ingredients together (manually). Don't over mix it of course. Let the Mixed Batter sit for five or ten minutes or even longer if needed. Then, using a ladle, scoop onto your grill ... greased with a little bit of butter if you like.

On the Oster Grill, the temperature between 265 and 300 degrees seemed to work fine for me.

The secret to good, fluffy pancakes is to only flip them once.

You'll know the first side is cooked when there are 'bubble-holes' peeking through the uncooked side. However, you can usually tell by the smell, or just take a little peek to be sure they're the color of golden brown that you like.

Flip them over, let the other side cook for a few minutes or less, and they're done.

Because we are so many in our family, and everyone has there own preference for the fixings they like inside their pancakes, I'll add the items to each pancake on the uncooked side one at a time, while the one side is cooking. Tip: When you add the food item to the uncooked side, gently spread some of the batter from that uncooked side over the food item - that way when you flip it over, you'll have batter cooking on the grill instead of the chocolate chips, blueberries or whatever you added hitting the grill directly (which could burn).

Popular flavor additions in our home are chocolate chips, fresh raspberries, strawberries or blueberries. This morning it was chocolate chip pancakes and blueberry pancakes.

So yes, I recommend this grill, we love it!


Note: The author may receive a commission from purchases made using links found in this article. “As an Amazon Associate, Ebay (EPN) and/or Esty (Awin) Affiliate, I (we) earn from qualifying purchases.”


Thursday, February 18, 2016

Presto Pizzazz Plus Rotating Oven Review

Presto Pizzazz Plus Rotating Pizza Oven Review

A Multi-Use Rotating Pizza Oven (and more) 


I first had my eye on the Presto Pizzazz a couple of years ago, thinking that it might be a fun kitchen gadget, something I'd use now and then to bake or re-heat pizza. I didn't buy it then because I decided that a one-purpose gadget wasn't a good investment of money or space in my kitchen.

But wait, there's more.

Recently, I came across this clever pizza cooker again, with a new, updated name. Now it's called the Presto Pizzazz Plus Rotating Pizza Oven. This time I read the outstanding reviews and realized that there was much more to the Presto Pizzazz than pizza. People love this thing and use it for lots of different convenience foods, and prepare food that you wouldn't even think of as being able to bake outside a conventional oven. Indeed, it's not just a one-purpose kitchen gadget, not at all!

So I bought the Pizzazz Plus and determined to test it out for myself.

First We Baked Pizza


First, we tried pizza (makes sense). I bought our favorite freshly-prepared pizza from the deli (actually they're previously frozen, thawed when you buy them, but they look fresh, taste amazing, and we like them a lot). I ended up adding a little bit of time to the recommended cooking time in the Presto Pizzaz Plus instruction booklet and we really loved the result. The crust was perfectly done on the bottom, the toppings hot, and the cheese bubbly. The frozen pizza that I tried later turned out very well, too.

I should mention that there are two heating elements on the oven, one above and one underneath the tray. It's up to you to choose upper, dual, or lower. So if the crust is done the way you like it but your piled-on pizza toppings need a bit more heat, simply choose "upper," add some time, and watch the pizza until it looks exactly as hot and bubbly as you want it to be.
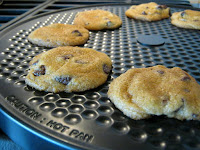
Chocolate Chip Cookies Baked on the Presto Pizzazz Plus
Chocolate chip cookies
baking on the Presto Pizzazz Plus.
Then we moved on to cookies for dessert. Brilliant! I love being able to bake up just four to six cookies from a refrigerated package for the two of us as a quick dessert. Delicious result!

Tater tots make for a quick lunch or snack when baked on the Presto Pizzazz Plus Rotating Oven
Tater tots make for a quick lunch
or snack when baked on the
Presto Pizzazz Plus Rotating Oven.
The next day I chose tater tots to fix for a quick lunch. Again, the pizza oven, now a tater tots oven, performed as advertised using the settings and cooking time for "potato patties" in the convenience food cooking chart included with the instructions.

The breaded, cheese-stuffed jalapeno peppers that we tried next turned out great, too.

That night we tried frozen egg rolls to go with our stir-fry vegetables (honestly, we do eat "fresh" most of the time, but everybody's entitled to a little convenience food now and then). Again, score! And no preheating the conventional oven, which sped up dinner prep time considerably.

All the frozen convenience foods that we tried, even the cookies, turned out great. Saturday morning came the big test: cinnamon rolls, the "pop and fresh" kind. I almost didn't try them on the Pizzazz Plus because it seemed so unlikely that they'd turn out, but my husband encouraged me to be brave, to try and see what happens. Once again I was not only surprised but impressed. Eight cinnamon rolls with the recommended settings from the instruction book were a perfect fit and turned out beautifully, as you can see from the pictures below. And yes, they tasted great, too.

Presto Pizzazz Plus Cinnamon Rolls - before.
Presto Pizzazz Plus Cinnamon Rolls - after.

Presto Pizzazz Plus Tips


Here are seven things about the Pizzazz that are important to remember:

Presto Pizzazz Plus Rotating Oven with Instruction Book. Utensils not included.
Presto Pizzazz Plus Rotating Oven with Instruction Book.
Utensils are not included.
1. Place the Pizzazz Plus away from the edge of the counter. It's attractive to both kids and dogs, neither of which should be allowed to operate or even touch it without the permission (and supervision) of a responsible adult. Safety first!

2. Don't walk away from the Pizzazz Plus when it's in use. First reason, you might not hear the "ding" when it's done and, even though the heating coils turn off at the end of the timed cycle, the residual heat may will burn the food (I should have taken a picture). Second reason, see number one above.

3. Using potholders, lift and remove the tray from the Pizzazz when you're satisfied that the food is done and set it on a cooling rack or cutting board to let the food, and the tray, cool.

4. To avoid damaging the surface of the tray, don't use a pizza wheel or knife until you've moved the pizza to a cutting board. See number 5.

5. Treat the tray carefully to make it last. Store it in a safe place where it won't get scratched. Use only utensils that are designed to be used on non-stick surfaces to keep from damaging the surface. Consider investing in a silicone or plastic spatula and tongs (useful for turning tater-tots, egg rolls, etc.) to use with the Presto Pizzazz.

6. Read the instruction booklet that comes with the appliance. Test it using the times and methods on the cooking charts then adjust accordingly based on your own preferences.

7. Don't overload the cooking tray with food; leave space between individual tater tots, chicken nuggets, etc. For instance, six cookies, spaced evenly, bake much better than nine or 10 cookies that are too close together.

But Wait, There's More!


(Did I say that already?) There are many other foods you can bake on the Pizzazz Plus, I just haven't gotten to them all. Besides typical frozen snack foods, cookies, and cinnamon rolls, the instruction booklet suggests grilled sandwiches and quesadillas, and even includes instructions for making s'mores. What's not to like about that?!

When I first looked, I was amazed at how many 5-star reviews this convenient countertop pizza oven had received. Now I know why. The very handy Presto Pizzazz Plus Rotating Pizza Oven gets 5 stars from me and has earned my "Sassy Susan" Seal of Approval.

Did you enjoy the review? Does this appliance appeal to you? How would you use it? Please share your thoughts in the comment section below.

QUICK LINKS:
Buy the Presto Pizzazz Plus at Home Depot (Best price as I type this - subject to change)
Buy it at Walmart
Buy it at Amazon.com

~Susan
Meet the Reviewer

P.S. If you enjoyed this review, please pin it:

The Presto Pizzazz Pizza Oven does more than bake pizza. Use it to prepare convenience foods and snacks, even cookies and cinnamon rolls!


~Susan Deppner
Read more of my reviews.


Posted by Susan Deppner

Susan Deppner

About the Author

Susan Deppner is a baby boomer, a cancer survivor, and a Southerner who believes in the Golden Rule. She enjoys writing about food, faith, and fitness; health, home, and holidays; people, places, pets, and patriotism, and more. Follow Susan on Twitter, Facebook, and Pinterest.


Note: The author may receive a commission from purchases made using links found in this article. “As an Amazon Associate, Ebay (EPN) and/or Esty (Awin) Affiliate, I (we) earn from qualifying purchases.”


Sunday, August 23, 2015

Frigidaire Gallery Series Fridge Review

Frigidaire Gallery Series
Our New Frigidaire Fridge & What We Love About It
We recently had to purchase a brand new fridge. I say "had to", because it wasn't optional; our old one had officially done it's time and was put out to pasture.
So, like most people, I decided to do some homework before we made a large purchase. The photo to the left is the fridge we decided to go with: The Frigidaire Gallery Series - Model #FGHC2355PF
Why We Didn't Choose a Fridge with a Bottom Freezer
Although we really wanted the 'french door model with the freezer on the bottom', there were a number of reasons why it wouldn't work for our kitchen:
  1. Crazy as it sounds, because I'm on the taller side, bending with these less than perfect knees every time I would need something from the freezer was an issue
  2. I find the bottom freezers have more potential for disorganization (I have a lot of people in the house, and supervising how they remove and put things back isn't possible)
  3. I prefer the freezer items to be at eye level (or most of it at eye level)
  4. The location of our fridge in our kitchen wasn't really conducive to having a large freezer drawer pulled out - it would block the flow of traffic
What Almost Made Us Choose a Fridge with a Bottom
The Inside of Our New Fridge
Freezer:
  1. The Fridge sections are wonderful! They have double french doors (although some come with one door if you would prefer that)
  2. The wider upper fridge area easily enables you to store food width-wise - very convenient for cakes, trays and other large serving dishes.
  3. They look amazing!
  4. If money wasn't really an object and I were to choose a bottom freezer fridge, 
So that brings us to Why We Chose the Side by Side (22.7 cu.ft):
Our previous fridge was a side-by-side, and we're used to it - However, after we compared the bottom freezer to the side-by-side, these are the main reasons we went for it:
  1. The stainless steel finish had to be the 'finger print proof' kind - We did like another manufacturer's product, however the fridge was not treated with a finish to prevent the ugliness of constant finger prints and thus constant wiping of the doors.
  2. The side by side french door model was important to us - Our kitchen size works best with this kind of fridge
  3. We wanted an Ice and Water Dispenser and really liked how easy this one was to use and understand
  4. We love the lighting in the fridge - It's a daylight lighting with a very light blue hue to it - looks modern, and looks great at night when you open the fridge (futuristic)
A Closer Look Inside of our Fridge at the Lighting
Ok, so it can't be all sunshine and roses right? 
There must be something I don't like about it?
Well, yes there is: The ice maker dispenses the ice very very quickly, so if you get this model, remember to put a larger cup underneath to catch the fast-spewing ice, otherwise some of it will end up on your floor. Other than that, there aren't any other negatives for us.
We would probably choose a slightly larger style than this one, but other than that, we really liked it.


Note: The author may receive a commission from purchases made using links found in this article. “As an Amazon Associate, Ebay (EPN) and/or Esty (Awin) Affiliate, I (we) earn from qualifying purchases.”


Most Recent Reviews on Review This Reviews


Search for Reviews by Subject, Author or Title

The Review This Reviews Contributors


SylvestermouseSylvestermouseDawn Rae BDawn Rae BMbgPhotoMbgPhotoBrite-IdeasBrite-IdeasWednesday ElfWednesday ElfOlivia MorrisOlivia MorrisTreasures by BrendaTreasures by BrendaThe Savvy AgeThe Savvy AgeMargaret SchindelMargaret SchindelRaintree AnnieRaintree AnnieLou16Lou16Sam MonacoSam MonacoTracey BoyerTracey BoyerRenaissance WomanRenaissance WomanBarbRadBarbRadBev OwensBev OwensBuckHawkBuckHawkDecorating for EventsDecorating for EventsHeather426Heather426Coletta TeskeColetta TeskeMissMerFaeryMissMerFaeryMickie_GMickie_G


Review This Reviews is Dedicated to the Memory of Our Beloved Friend and Fellow Contributor

Susan DeppnerSusan Deppner

We may be apart, but
You Are Not Forgotten


“As an Amazon Associate, Ebay (EPN) and or Etsy (Awin) Affiliate, I (we) earn from purchases.” Disclosure Statement

X