Showing posts with label healthy eating. Show all posts

Thursday, June 1, 2023

Do You Eat Enough Fruit & Veg Every Day?

Do you eat enough fruit and veg everyday?

Let's review whether or not you eat enough fruit and veg every day. The latest research seems to have discarded the 5 + 2 that we were told we needed to eat - five vegetables and two fruit every day.  It suggests that we should be eating 9 fruits and vegetables every single day.  Now a lot of people would struggle to get that amount of fruit and vegetables in their day so what can we do?

The number one thing I would suggest is to make sure that you are adding fruit and vegetables to your breakfast.  I know that years ago I would have a breakfast that didn't contain any fruit or veg and then I basically had to fit my fruit and vegetable intake into the rest of the day, back then I rarely had an afternoon snack and my morning snack would be something like a sausage roll or a chocolate muffin.  Lunch would sometimes contain fruit and/or vegetables, but not always.  A favorite was a cheese, tomato and cucumber sandwich, but I would also sometimes have a ham and cheese or a tuna and mayo sandwich - aka no fruit or veg.  This meant that I had to try and get my (at the time) 7 serves of fruit and veg with my dinner which really didn't happen.  Now we have to make that 9 servings - "Houston we have a problem".

If you add some fruit and vegetables to your breakfast you start your day off making it a lot easier to hit your fruit and vegetables target.

I usually have three servings of fruit and vegetables before I even go to work these days so how do I do this?

I drink a Green Gut Glow drink first thing in the morning on an empty stomach and this counts as one serve of fruit and vegetables as it contains a scoop of Be Well Superfood Greens.

Next, I add fruit and vegetables to my breakfast whether I'm having an egg-based breakfast, oats-based breakfast, pancake or waffle-based breakfast, smoothie-based breakfast or salad-based breakfast.

Yes, I put salad-based breakfast in there, not something that is traditional my husband and I had a breakfast salad on holiday a few years ago and we absolutely loved it.

Let's go into more detail on these breakfast ideas:

By the way, it's also important to get plenty of protein in your breakfast as well.  So what do you eat for breakfast?

By the way, if you want more tips for healthy living be sure to check out my Facebook Group - Healthy Tips to Feel & Look Your Best.

how to get enough fruit and veg everyday


Note: The author may receive a commission from purchases made using links found in this article. “As an Amazon Associate, Ebay (EPN) and/or Esty (Awin) Affiliate, I (we) earn from qualifying purchases.”


Tuesday, November 17, 2020

Keto Cheddar Cheese Biscuits Recipe With Chives

Today, I'm pleased to share my review of my quick and easy low carb cheddar cheese and chive biscuits recipe, whose not-so-secret ingredient is HighKey Keto Buttermilk Biscuit Mix.

I've enjoyed putting my own spin on my baked goods ever since I was a kid, whether I'm making them from scratch or using a high quality packaged mix as a shortcut. So, when HighKey Snacks, one of my favorite keto food brands, came out with a delicious keto-friendly buttermilk biscuit baking mix, I couldn’t wait to start playing around with my own ingredient add-ins. One of my favorite variations so far is this quick and easy, 5-ingredient recipe for keto cheddar cheese buttermilk biscuits with chives. They're so buttery and delicious, everyone in your family will ask for more, and they'll never guess these treats are keto-friendly. This is now one of my go-to low carb recipes, and I usually bake a dozen every two or three weeks, depending on whether my omnivorous husband is in the mood for some.

Keto & Low Carb Cheddar-Chive Buttermilk Biscuits
Tender, flavorful, cheddar cheese keto biscuits with chives, ready in 30 minutes or less

Enjoy Big, Buttery Drop Biscuits, Even on a Keto or Low Carb Diet

I have tried—and loved—every baking mix in HighKey’s keto-friendly, low carb product line. So, I was really excited when the company announced it was coming out with a new keto buttermilk biscuit mix. I was confident that it, too, would be a winner, and I wasn’t disappointed! 

Since making a traditional flaky biscuit requires using wheat flour or other another grain, the texture of those made with HighKey’s buttermilk biscuit baking mix makes them more similar to traditional drop biscuits. Just add eggs, They’re extremely versatile and taste great, whether you eat them plain, toasted and buttered, or in sweet or savory dishes, from keto strawberry shortcake (with fresh berries and whipped cream) to sweet or savory low carb sandwiches.

Even though this biscuit mix has great buttermilk flavor, I was surprised to learn that it contains no buttermilk. In fact, it’s dairy free and soy free, and has no added sugar or artificial ingredients, so it’s a great option for people with those dietary restrictions, regardless of whether they’re following a ketogenic or low carb diet.

Two baking pans of freshly baked keto cheddar-chive biscuits
Tender, low carb, keto-friendly cheddar cheese biscuits with chives, just out of the oven

My Quick and Easy Keto Cheddar Cheese and Chive Biscuits Variation

Using HighKey Buttermilk Biscuit Baking Mix

Variety is the spice of life, especially when your food choices aren’t free of limitations. Both my husband and I are huge fans of cheddar cheese bread. These days, however, the yummy, carbohydrate-laden cheese bread we used to buy from our local bakery is now off-limits (for me, at least). My husband also loves chives. So, one of the first ideas I had for varying the original HighKey buttermilk biscuit mix recipe was to add sharp cheddar cheese and chives. 

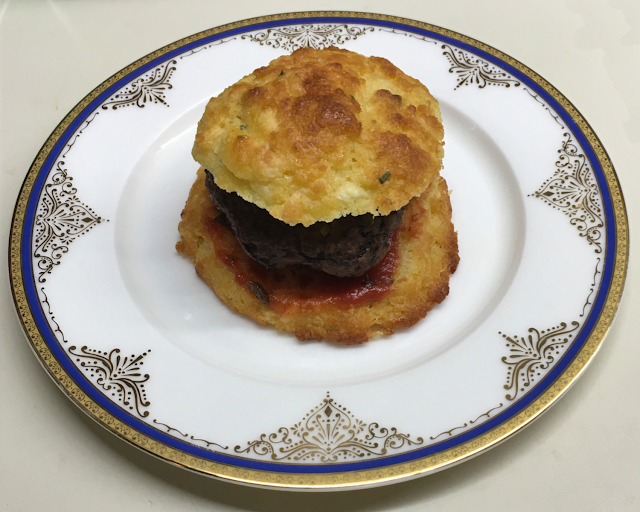
I had to experiment with the proportions bit to get the prominent cheddar flavor I was looking for. Increasing the amount of cheese also made the biscuits somewhat less crumbly, which means I can also use them as hamburger buns. And, while I love having a slice of hot, gooey, melted cheese on my burgers, using these cheddar-chive keto biscuits as a bun gives me that great cheeseburger flavor even if I don’t add any additional cheese. 

I usually prefer to use fresh chives in my dishes. For this recipe, however, I decided to go with freeze-dried chives, since I would need only a small quantity, and I no longer eat mashed potatoes (which I always make with plenty of fresh chives) now that I follow a ketogenic diet. Fortunately, freeze-dried chives work fine for these cheddar cheese biscuits.

One of My Favorite Keto Bread Options

With or without chives, these cheddar cheese biscuits are not only delicious but also versatile. Even though they are moist, rich, and yummy just as is, I also I love using them to add extra flavor to a sandwich or burger, as a filling side dish to turn a soup or salad into a satisfying, high-protein, low carb meal, or just sliced, toasted, and buttered for breakfast (or a hearty snack).  

Just be aware that you may want your burger with a knife and fork if you serve it in one of these tender biscuits.

Hamburger on a keto cheddar cheese biscuit
Last night's dinner: this juicy burger on a keto cheddar-chive biscuit,
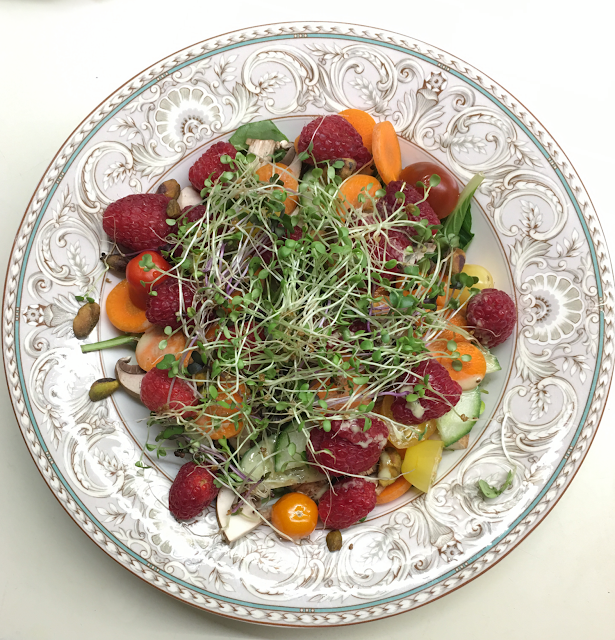
served with a big, colorful, pretty and nutritious salad

Low Carb Keto Cheddar Cheese and Chive Buttermilk Biscuits Recipe 

These quick and easy keto biscuits are sure to become one of your favorite low carb recipes.

Keto cheddar-chive biscuit
Prep Time:

15 minutes

Cook Time:

15 minutes

Total Time:

30 minutes

Recipe Yield:

12 large biscuits

Calories:

257 kcal


Ingredients

  • 1 10-ounce package HighKey Buttermilk Biscuit Mix
  • 1 ounce sharp or extra-sharp cheddar cheese, shredded 
  • 1 to 2 tablespoons freeze-dried chives, or to taste
  • ½ cup butter, very well chilled and cut into ¼-inch cubes
  • 4 large eggs, lightly beaten

Instructions

  1. Preheat the oven to 375 ℉. Line one or two baking sheets with parchment paper. 
  2. In a large mixing bowl, stir together the baking mix, shredded cheese, and chives.
  3. Stir in the chilled butter cubes, then cut in the butter with a pastry blender until it resembles coarse crumbs. 
  4. Stir in the eggs to form a soft, sticky dough.
  5. Scoop the dough onto the parchment-lined baking sheet(s) in 12 equal mounds, spacing them well apart to allow for spreading.
  6. Bake for 14–15 minutes, until the tops and edges of the biscuits are a light golden brown.
  7. Let them cool for a minute or two, then remove them to a cooling rack to cool completely.

Screenshot of recipe nutrition information in Carb Manager app on iPhone screen
Nutrition Facts

If you're on a keto diet and counting your macros, here's what the Carb Manager app calculated. Although it's based on the specific brand of extra-sharp aged cheddar cheese (and eggs and butter) I used, the calories and macros should be very similar, regardless of the brands of ingredients you use.

These big, delicious cheese biscuits are extremely filling. Each contains 2.6 net carbs, 257 calories, and just over 23 grams of fat, 9 grams of protein, and 6 grams of dietary fiber. 


Helpful Baking Tips for Making Keto Cheddar and Chive Buttermilk Biscuits


Make the Entire Package of HighKey Buttermilk Biscuit Mix at a Time (and Freeze Any Extra Biscuits)

The first time I prepared a bag of HighKey Buttermilk Biscuit Mix, I measured out 1-1/3 cups of the dry mix and combined it with 1/4 cup of butter and two eggs to make 6 biscuits as directed on the package. Unfortunately, when I started making my next batch, I discovered that there was only about a cup of leftover dry mix in the package! Subsequently, I have seen comments on Facebook and Amazon from people who had the same experience after following the package directions. Now, I always make a dozen buttermilk biscuits at a time, using the entire bag of mix. Fortunately, like most baked goods, these biscuits freeze beautifully, and thaw quickly at room temperature.

Use a Pastry Blender to Cut in the Butter

When I was a girl, my grandmother taught me to cut fat into dry ingredients by scissoring it into the flour mixture with two sharp knives. That experience definitely has made me appreciate the ease and efficiency of using a pastry blender instead. In addition, this handy tool, also called a pastry cutter or dough blender, creates more uniform bits of butter for more even distribution throughout the dough. It's also possible to use a fork, but that tends to mash the butter into the flour, rather than chopping it into nice little individual flour-coated bits. So, although the HighKey Buttermilk Biscuit Mix package directions give you the choice of using a pastry cutter or a fork, I strongly recommend using the former.
Spring Chef Dough Blender
Spring Chef Dough Blender on Amazon

I recently replaced my dull, 40-year-old pastry blender with a Spring Chef Dough Blender, and it turned out to be a major upgrade! It has sturdier and much sharper stainless steel blades, as well as a wide, comfortable, soft-grip handle. Both these features make it a pleasure to use, especially since this high quality, heavy-duty cutter doesn't feel heavy in my hand. In addition to cutting butter or other fat into dry ingredients, I also love using it for other cooking and baking tasks that my previous pastry blender would not have been up to, such as chopping nuts and making salsa and guacamole.

Use a #14 Scoop to Portion the Dough Evenly

Dividing any dough or batter evenly into equal-size portions is always desirable, since it enables all the biscuits, cookies, etc., to finish baking at the same time with the same degree of doneness. If you are baking for yourself or others who are monitoring their food intake, whether tracking macros on a low carb or keto diet or counting calories, protein, fat, carbohydrates, fiber, cholesterol, sodium, potassium, or other nutrients for a medical, health, or weight loss reason, portioning equal servings of a recipe becomes even more important. Over time, I have assembled a collection of high quality Norpro stainless steel scoops in several different sizes, the largest of which is the 4-tablespoon (#16) Norpro scoop with a comfortable, soft-grip handle, none had the right capacity to measure out 1/12 portions of this keto buttermilk biscuit dough, with or without added cheese. Guesstimating how much to overfill  the #16 size always left me with too much or two little dough for the last few portions, and I was spending more time weighing each mound and shuffling around bits of dough to equalize the portion sizes than I did preparing it in the first place.

Eventually, I managed to find a #14 stainless steel scoop with a capacity of 4-3/4 tablespoons, which turned out to be the perfect size for portioning this keto biscuit dough into twelfths. It's a huge time-saver, makes nice, rounded mounds, and has a sturdy spring-action mechanism for the scraper blade.

Don't Skip the Baking Parchment Paper

These drop biscuits will likely stick, and stick badly, to the baking pan if you try to grease it instead of using baking parchment. I prefer using unbleached, precut sheets of parchment paper, which are less toxic than bleached baking parchment and don't curl like paper sold in rolls. If you are trying to cut down on single-use disposable products, a reusable silicone nonstick baking mat is a great alternative.

Consider Making Them With Extra-Sharp Cheddar 

The first time I made these, I used regular sharp cheddar, and only half an ounce. (I also left out the chives.) They tasted good, but weren't as cheesy or tangy as I had hoped. So, for the next batch, I not only doubled the amount of cheese, and used aged, extra-sharp cheddar. It made a huge difference! So, if you enjoy the taste of extra-sharp cheddar, I encourage you to try using it in these biscuits.

My Favorite Brands of High Quality, Low Carb and Keto Baking Mix Products

One of the keys to my successful keto diet journey, which helped me lose nearly 60 pounds and, more importantly, has enabled me to maintain that weight loss, has been finding keto-friendly versions of my favorite baked goods. 

Although I’ve always loved to bake (and still do), I also wanted to spend less time thinking about food, which meant spending less time cooking and baking, especially during the first six months of my new, healthy eating lifestyle after switching to a ketogenic diet. So, while I absolutely love using the recipes in Carolyn Ketchum’s The Ultimate Guide to Keto Baking (my keto baking bible) and my go-to low carb and keto blogs and websites, more often than not I’ve been using the excellent baking mixes from HighKey Snacks, Good Dee’s, and Keto and Co, which not only taste great but are also made with wholesome (and, for the most part, minimally processed) ingredients. You can learn more about these brands’ high-quality baking mixes in my review of homemade low carb keto cupcakes and muffins.


Keto Cheddar Cheese Buttermilk Biscuits Recipe With Chives by Margaret Schindel

Posts About My Keto Diet Journey

My First Year on The Keto Diet

Preparing to Succeed on the Keto Diet, Part One

Preparing to Succeed on the Keto Diet, Part Two

Low Carb Muffins & Cupcakes: Treats to Enjoy on a Keto Diet

Low Carb Keto Chocolate Yogurt Granola Chip Pudding Recipe

Good Dee’s Keto Cookie Low Carb Baking Mix Review

Hamama Microgreens Growing Kit Review & Success Tips

My Favorite Hamama Microgreens Seed Quilt Accessories

Keto Cheddar Cheese Biscuits With Chives Recipe

The Ultimate Keto Hot Chocolate Recipe

The Best Low Carb Keto Gift Ideas: Keto Gift Guide

The Best Low Carb Keto Cinnamon Muffins

Wholesome Yum Keto Bread Mix and Yeast Bread Recipe

The Good Chocolate 100% Organic No Sugar Dark Chocolate Review

The Best Advice to Maintain Your Keto Diet Weight Loss

My New Irresistibly Delicious Keto Cheese Crackers Recipe

Luscious Low Carb Keto Triple Peppermint Cheesecake Brownies Recipe

Quick & Easy Livlo Blueberry Scones Keto Baking Mix Review

Snack Better With The Best Healthy Keto Cookie Dough Bites

The Best Quick and Easy Low Carb Keto Pizza Recipe

The Best Quick and Easy Low Carb Keto Shortcake Cupcakes Recipe

Comparing the Best Keto-Friendly Chocolate Hazelnut Spreads - No Added Sugars

The Best Low Carb Keto Sandwich and Burger Buns Mix

Blueberry Biscuit Scones — New, Easy, Low Carb Keto Recipe

The Best Keto Pizza Crust Mix With 0 Net Carbs

An Unusual, Delicious Strawberry Chocolate Tea With 0 Calories

Delicious Sugar-Free Keto Cookies That OREO Fans Will Love

Healthy Pistachio Cherry Chocolate Chip Marshmallow Cereal Treats Recipe

Easy, Decadent, High Protein, Sugar-Free Rocky Road Cottage Cheese Ice Cream

The Best Quick & Easy Low Carb Sausage and Ricotta Calzones

How to Make Refreshing Vanilla Italian Soda (With or Without Cream)


Reviews of the Keto Diet by Barbara C. (aka Brite-Ideas)

My Personal Keto Testimonial

How I Stayed Committed to the Ketogenic Way of Eating

Read More Recipe Reviews by Our Review This Reviews Contributors

Read More Product Reviews by Our Review This Reviews Contributors

Read More Reviews About Health and Wellness by Our Review This Reviews Contributors


Note: The author may receive a commission from purchases made using links found in this article. “As an Amazon Associate, Ebay (EPN) and/or Esty (Awin) Affiliate, I (we) earn from qualifying purchases.”


Wednesday, October 21, 2020

My Favorite Hamama Microgreens Seed Quilt Accessories

Recently, I wrote about my successful experience with growing microgreens, using Hamama Seed Quilts. I thought it would be helpful to also review both the decorative accessories and most helpful extras I use and love for growing these delicious and extremely nutritious microgreens indoors, in the comfort of my living room.

Although the Hamama's bamboo grow tray frame, seed quilt label holder, and other decorative accessories are designed specifically for the company's innovative, patent-pending growing system, the other recommended products I'm reviewing here would be both useful and beneficial to anyone who enjoys gardening, cooking, or both!
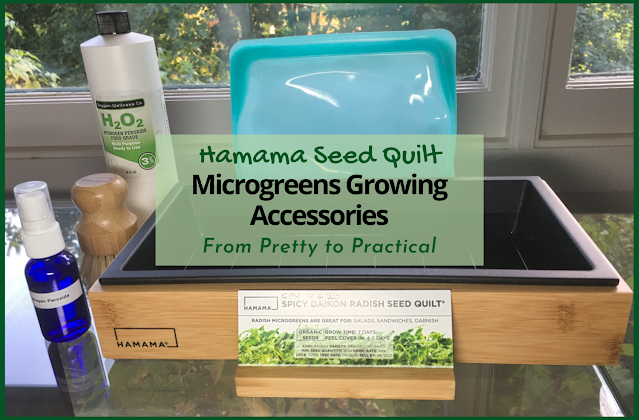
Hamama Seed Quilt Microgreens Growing Accessories
My favorite accessories and useful supplies for growing microgreens with Hamama's seed quilt growing system

Microgreens are a delicious, nutritious way to add essential vitamins, minerals and antioxidants to salads, sandwiches, and other dishes for those of us who try to live a healthy lifestyle. Since health was my primary motivation for losing nearly 60 pounds on a keto diet, my new healthier lifestyle focuses quite a bit on healthy eating, and especially on getting more nutrition from food and relying less on supplements, something that is especially important when following a ketogenic approach to eating.

My Favorite Hamama Microgreens Growing System Accessories and Helpful Supplies

As I shared in my previous post, the Hamama microgreens seed quilt growing system is so easy, even this “brown thumb” gardening amateur is successfully growing delicious, healthy, nutrient-dense microgreens throughout the year, even here in New England. Now that my husband and I are no longer are at the mercy of the unpredictable and often scant selection of packaged microgreens at our local stores, we use our fresh, home-grown microgreens for more than just garnishes. In fact, they make up half the dark, leafy greens in our large, nightly dinner salads!

Along with Hamama's seed quilts and grow trays, the core of their unique container gardening system, I've also purchased a few accessories and supplies that have made the process of growing my own fresh, nutritious kale, broccoli, clover, daikon radish, zesty salad mix, and other varieties of microgreens more enjoyable and convenient.

Hamama's Custom Growing System Accessories

Bamboo Grow Tray Frames and Seed Quilt Label Holders

Two side-by-side Hamama seed quilts with decorative bamboo grow tray frames and seed quilt label holders
I love the way the bamboo grow tray frames and seed quilt label holders dress up my microgreens growing setup by our living room windows

Since counter space in our small kitchen is at a premium, I grow my microgreens in our living room, which has a wall of floor-to-ceiling windows (although Hamama microgreens seed quilts don’t require a lot of light). So, I successfully harvested a few different varieties of microgreens using this unique growing system, I decided to spring for Hamama’s proprietary bamboo frames and seed quilt label holders. The bamboo frames fit either style of the company's grow tray. I started with Hamama's white ceramic tray. See how nice the bamboo frame looks with it?

Microgreens growing in white ceramic Hamama grow tray with bamboo frame
The white ceramic grow tray is thicker (and heavier) than the black plastic tray.

Not long after, I decided to switch to the black plastic grow trays, which weigh very little and are much easier to carry back and forth to the kitchen (on the other end of our house) for cleaning. Although I try to avoid buying plastic for disposable items, these trays are reusable, and I plan to be using them for the foreseeable future. The walls are much thinner, allowing a narrow margin around the seed quilt, so it's much easier to check the water level in relation to the coconut coir mat (and to add a bit more water, if it's evaporating faster than expected). The marked fill line is also thinner than on the white ceramic tray, so it's easier to gauge how much water to add for soaking the seed quilt.

Whether you prefer the black plastic or white ceramic grow tray, the simple, sleek and stylish bamboo frames make them much more attractive and blend well with any style of home décor. There is a Hamama logo in the lower left corner of one side of the frame. Usually, I'm not a fan of displaying brand names, especially on decorative items. But in this case, I think the logo has been done quite tastefully and doesn't detract from the look. However, it can easily be hidden by facing that side of the frame toward the window, if you prefer.
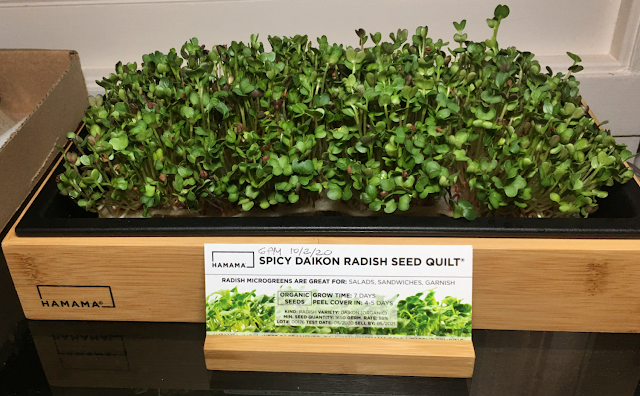
Hamama microgreens germinated seed quilt in tray with decorative bamboo grow tray frame and seed quilt label holder
The Hamama bamboo grow tray frames and matching seed quilt label holders give my microgreens growing setup a more attractive, "finished" look.

The matching bamboo label holders are great for displaying the coated cardstock labels that come with each seed quilt at an easy-to-read angle. These labels provide a useful reminder of which type of microgreens I’m currently growing, as well as the approximate number of days until the paper cover should be peeled, and the total number of days until harvest. Before I got these label holders, I used to tape the cardstock labels to the grow trays. The tape left a sticky residue and wasn’t very attractive. Now, my bamboo seed quilt label holders coordinate perfectly with my grow tray frames.

Each holder is a nicely finished, rectangular block of bamboo the exact length of a Hamama seed quilt label, with a thin slot for the label. Whenever you start a new seed quilt, simply slide the label that comes with it into the slot, which holds it upright and angled slightly back for easy reading. When you finish harvesting your microgreens crop, just remove and discard the label from the holder, so it’s ready for the label from your next seed quilt.

More Matching Bamboo Accessories

Hamama makes a matching seed quilt holder for storing your extra seed quilts, but since I don’t store mine out where people can see them, I didn’t need one. The company has just announced its brand new bamboo "grow shelf," a gorgeous self-standing, five-shelf, open shelving unit to current customers, who can preorder one now. I expect it to be added to the Shop section of the website soon, so everyone who wants will be able to order one.

Extra Hamama Grow Trays

Once I knew I was going to be using this unique microgreens growing system regularly, I ordered two additional grow trays. As of this writing, the price of two black grow trays is only four dollars more than the price of just one. And, since it’s essential to clean each grow tray thoroughly after harvesting one seed quilt and before starting another, it’s nice to have an extra tray so there’s a clean one standing by to start my next microgreens seed quilt as soon as I harvest the previous one. I can soak, scrub, and disinfect the used tray at my leisure (it’s also safe to clean in the top rack of the dishwasher).

Hamama Microgreens Harvesting Kit

The company offers a convenient set of three tools for harvesting the microgreens grown with their proprietary seed quilts and grow trays. The kit contains:

  • 1 reusable Stasher silicone bag (sandwich size)
  • 1 pair of scissors (with the Hamama logo)
  • 1 bamboo scrub brush with natural fiber bristles (for thoroughly scrubbing your grow tray)

It's a very useful kit, particularly if you prefer to harvest your microgreens by trimming them just above the top of the seed quilt, rather than pulling them out, roots and all. Alternatively, you can purchase a Stasher silicone food storage bag, a pair of sharp, stainless steel scissors, and a bamboo scrub brush with natural fiber bristles (or use equivalent items you may already own) to create your own customized microgreens harvesting kit.

Save Money on Your First Hamama Grow Kit, Seed Quilt, or Accessories Order!

Don't miss my Hamama shopping link and discount code at the end of this article to save 10%!

My Favorite, Practical Products for Growing, Harvesting and Storing Fresh Microgreens

Stasher Silicone Food Storage Bags

You don't have to grow microgreens to fall in love with these fabulous food storage and cooking bags

In August 2019, I wrote a review of my favorite silicone kitchen tools and accessories, including silicone food storage bag. But, after trying the Stasher silicone bag in my Hamama Harvesting Kit, I fell in love with it. I purchased three more in larger sizes, and I definitely plan to add more over time. Although they cost more than other silicone bags, they're totally worth the price!

These Stasher silicone bags are a cinch to open and close, unlike any other brand of silicone food storage bags I've tried. Yet, they're also airtight and watertight. Many people use them for sous-vide cooking, placing the sealed bag of raw food in a pot of boiling water. And since these bags are leakproof, They're also perfect for marinating meats, poultry, seafood, fish, or vegetables to infuse them with extra flavor.

Four Stasher silicone food storage bags
The Stasher silicone food storage bags I have purchased to date
Stasher Silicone Stand-Up Food Storage Bag

The Stasher bag that came with the Hamama Harvesting Kit is the sandwich size (7.5" x 7.5" x 1"), which has a 15 oz. capacity. (It's the smallest one in the photo of my current Stasher bag collection.) However, since I wrap my harvested microgreens loosely in a paper towel before placing them in the bag to store in my refrigerator, I find that I need a larger size if I want to harvest all (or most) of a seed quilt at one time.

The sizes I use to comfortably contain an entire crop of paper towel-wrapped microgreens from a Hamama seed quilt are the tall Stasher Silicone Reusable 1/2 Gallon Food Storage Bag (10.25” x 8.25” x 1.5” with a 64.2 oz. capacity), and the Stasher Silicone Reusable Stand-Up Food Storage Bag (7.75" x 7" x 3" with a 56 oz. capacity) that, true to its name, stands up on its own for easy filling and removal of the contents.

Dedicated Scissors

If you prefer to harvest your microgreens with scissors, it's a bad idea to use your general-use utility scissors that are also used to cut paper, crafting materials, etc. I highly recommend dedicating a pair of scissors exclusively to harvesting microgreens and herbs, and cleaning the blades scrupulously before each use. They don't need to be fancy kitchen shears, but they should be sharp and comfortable and have stainless steel blades. (Who wants specks of rust in their microgreens or herbs?)

If I were putting together my own harvesting kit, it would include the Fiskars 01-004761J Softgrip Scissors with 8-inch stainless steel blades (or something similar), which are backed by a lifetime warranty.

Bamboo and Natural Fiber Bristle Scrub Brush

It's important to clean Hamama grow trays very thoroughly before starting each seed quilt. Although the trays are top-rack dishwasher safe, the top rack or our modestly sized dishwasher is usually filled to capacity with glasses, cups, bowls, long-handled spatulas, cooking tongs, etc. So, I prefer to scrub my grow trays by hand.

It can be challenging to clean between the ridges inside the black grow trays, particularly at the corners and around the perimeter. That's why the Hamama Harvesting Kit includes the small, round, bamboo handled scrub brush with natural fiber bristles, which I find invaluable for this purpose.

When I looked for a similar brush, most of them had either synthetic bristles or components made of plastic or other non-biodegradable components. After considerable searching, I finally found a palm-sized, mildew-resistant round bamboo scrub brush with organic, natural fiber bristles, very similar to the one in the Hamama Harvesting Kit. As a bonus, it comes with soap dish that can also be used to store the scrub brush out on the counter, if desired (just make sure both the brush and the dish are completely dry first).

This versatile brush has medium-hard bristles that can also be used to clean even non-stick pots and pans, dishes, vegetables, and more.

3% Food Grade Hydrogen Peroxide and Fine Mist Spray Bottle

Only one of my Hamama seed quilts has ever developed mold, back when I was still a seed quilt "newbie." It was hot and humid in our living room, since we don't have central air conditioning and only turn on each room's A/C unit when we are actively using the room. I made the common rookie mistake of over-watering that one seed quilt, so that the paper covering was wet. When, unsurprisingly, about a third of the sections failed to germinate. I then compounded the problem by covering those water-logged sections with strips of newspaper for two days, after reading a troubleshooting tip for a different problem. (I did say I had a brown thumb!) Of course, when I pulled off the newspaper strips at the end of two days, there were signs of mold, and unfortunately, the seed quilt was unsalvageable at that point.

Before throwing away the moldy seed quilt, I took a couple of photos and shared them in the Hamama Friends group on Facebook and asked how I could prevent a recurrence. The answers were very instructive. One of the best recommendations I got was from a woman who recommended that spraying the surface of the water in the grow tray with food-grade 3% hydrogen peroxide before soaking future seed quilts. She also said she mists the leaves with it after peeling off the paper cover, and hasn't had any mold issues since she started doing that.

I immediately ordered a bottle of food grade 3% hydrogen peroxide. A while ago, I had purchased a dozen small, cobalt blue glass mister bottles. I filled one of them with the 3% hydrogen peroxide and labeled it (since the rest of my cobalt glass misters are also filled with clear liquids), and it now lives next to my Hamama grow trays to remind me to spritz the water before soaking each new seed quilt. And, like the helpful person who suggested I use the 3% hydrogen peroxide for this purpose, I haven't seen a speck of mold since I started following her excellent advice!

I find these pretty and practical cobalt blue glass spritzer bottles useful for many different purposes. They spray a very fine mist, which makes them ideal for evenly and lightly moistening metal clay with distilled water, since this material dries out very quickly when exposed to air while working with it. I keep another filled with isopropyl alcohol for sanitizing makeup brushes, tweezers, manicure implements, etc. in between full soap-and-water cleanings. I also find that they don't leak, so I'm considering keeping another bottle filled with a CDC-approved alcohol-based disinfectant in my purse for when I leave the house. The cobalt glass isn't just pretty; it also helps protect the contents against UV rays.

Save 10% on Your First Hamama Order!

If you haven't ordered directly from the Hamama website before, you can use my Hamama shopping link (or click on the image below), add the products you want to the shopping cart, then use the discount code SUPERGREENS during checkout to get 10% off your product total. And if you're lucky enough to have receive a Hamama grow kit as a gift, you can use this link and discount code to save 10% on the beautiful bamboo accessories made exclusively for the Hamama seed quilt and grow tray system.


hamama microgreens


My Favorite Hamama Microgreens Seed Quilt Accessories by Margaret Schindel

Posts About My Keto Diet Journey

My First Year on The Keto Diet

Preparing to Succeed on the Keto Diet, Part One

Preparing to Succeed on the Keto Diet, Part Two

Low Carb Muffins & Cupcakes: Treats to Enjoy on a Keto Diet

Low Carb Keto Chocolate Yogurt Granola Chip Pudding Recipe

Good Dee’s Keto Cookie Low Carb Baking Mix Review

Hamama Microgreens Growing Kit Review & Success Tips

My Favorite Hamama Microgreens Seed Quilt Accessories

Keto Cheddar Cheese Biscuits With Chives Recipe

The Ultimate Keto Hot Chocolate Recipe

The Best Low Carb Keto Gift Ideas: Keto Gift Guide

The Best Low Carb Keto Cinnamon Muffins

Wholesome Yum Keto Bread Mix and Yeast Bread Recipe

The Good Chocolate 100% Organic No Sugar Dark Chocolate Review

The Best Advice to Maintain Your Keto Diet Weight Loss

My New Irresistibly Delicious Keto Cheese Crackers Recipe

Luscious Low Carb Keto Triple Peppermint Cheesecake Brownies Recipe

Quick & Easy Livlo Blueberry Scones Keto Baking Mix Review

Snack Better With The Best Healthy Keto Cookie Dough Bites

The Best Quick and Easy Low Carb Keto Pizza Recipe

The Best Quick and Easy Low Carb Keto Shortcake Cupcakes Recipe

Comparing the Best Keto-Friendly Chocolate Hazelnut Spreads - No Added Sugars

The Best Low Carb Keto Sandwich and Burger Buns Mix

Blueberry Biscuit Scones — New, Easy, Low Carb Keto Recipe

The Best Keto Pizza Crust Mix With 0 Net Carbs

An Unusual, Delicious Strawberry Chocolate Tea With 0 Calories

Delicious Sugar-Free Keto Cookies That OREO Fans Will Love

Healthy Pistachio Cherry Chocolate Chip Marshmallow Cereal Treats Recipe

Easy, Decadent, High Protein, Sugar-Free Rocky Road Cottage Cheese Ice Cream

The Best Quick & Easy Low Carb Sausage and Ricotta Calzones

How to Make Refreshing Vanilla Italian Soda (With or Without Cream)


Reviews of the Keto Diet by Barbara C. (aka Brite-Ideas)

My Personal Keto Testimonial

How I Stayed Committed to the Ketogenic Way of Eating

Read More Reviews About Gifts by Our Review This Reviews Contributors

Read More Product Reviews by Our Review This Reviews Contributors

Read More Reviews About Health and Wellness by Our Review This Reviews Contributors


Note: The author may receive a commission from purchases made using links found in this article. “As an Amazon Associate, Ebay (EPN) and/or Esty (Awin) Affiliate, I (we) earn from qualifying purchases.”


Wednesday, October 7, 2020

Hamama Microgreens Starter Kit and Seed Quilts Review

The Easiest Way to Grow Your Own Microgreens - Hamama Seed Quilts
With a Hamama Microgreens Starter Kit and the company's proprietary seed quilts, growing and harvesting fresh, delicious, and nutritious microgreens is nearly effortless!

Fresh, crisp microgreens are colorful, refreshing, and extremely nutritious. Since last year, when I committed to making healthy lifestyle changes, including a special focus on healthy food choices, I have been adding microgreens to salads, sandwiches, soups, eggs, and other dishes as often as possible.

Although buying packaged microgreens at our local Whole Foods is an expensive and frustrating proposition, growing my own hadn't seemed like a viable option, given my poor track record with keeping even healthy plants alive, much less growing them from seed.

Then, four months ago, I found out about an innovative microgreens growing system from a company called Hamama, which was designed to be as as simple, effortless, and low-maintenance as possible, so that even container gardening newbies like me could grow these healthy, tasty, nutrient-dense greens year-round.  

The proprietary, patent pending Hamama Seed Quilt Growing System is the brainchild of co-founders Camille Richman and Daniel Goodman, who met when they were mechanical engineering students at the world-renowned Massachusetts Institute of Technology. Following their graduation from MIT, they worked together full-time at the MIT Media Lab, researching high tech indoor agriculture. After growing food both in the lab and at home for several years, they wanted to make it possible for more people to experience the benefits of growing healthy food at home.

In May, I decided to order a Hamama Microgreens Starter Kit, including three seed quilts and a reusable grow tray. I was surprised and delighted by the results, and a few weeks later,  I ordered two more growing trays and 18 more seed quilts. Although I've skipped a week here and there, I've successfully grown and harvested around more than a dozen seed quilts at this point. Now, I'm anxious to share my experience, and perhaps inspire others to try growing their own healthy, delicious, superfood microgreens, even if they have never had any experience, or luck, growing vegetables in the past.

P.S. Make sure to read all the way to the end of this review to find out how to get a 10% discount off the purchase price of your first order of a Hamama Microgreens Starter Kits, Seed Quilts, or other microgreens growing accessories!

Microgreens Are Superfoods That Pack a Powerful Nutritional Punch

Increasing our consumption of nutritious, dark leafy greens is an important part of healthy eating. The USDA Dietary Guidelines for Americans recommend eating more fruits and vegetables, including dark leafy greens. For those of us who have chosen a low carb, ketogenic approach to eating, dietary restrictions make it even harder to get enough nutrients from the foods we eat, rather than from supplements.

Adding more microgreens to our diets, in particular, provides even greater health benefits. A 2012 research study found that microgreens contain between four and 40 times higher concentrations of essential nutrients than their mature counterparts!

These nutrient-dense, immature plants can be excellent sources of key vitamins such as C, E, K, and also carotenoids including lutein and beta-carotene (a precursor to Vitamin A aka retinol), two important antioxidants provide a wide range of health benefits, including helping to protect our eyes against macular degeneration. 

Large, colorful, salad topped with Hamama microgreens
We enjoy a large, colorful, salad with a generous helping of freshly harvested microgreens every day!

Why Not Just Buy Packaged Microgreens Instead of Growing Them?

Unfortunately, many supermarkets and grocery stores either don't sell them, or run out of them quickly. Even when I've been lucky enough to find one or two containers, those commercially grown microgreens have cost a pretty penny. Far too often, the expensive organic microgreens we've bought at our local Whole Foods Market have become not just limp but slimy and inedible after just one or two days in the vegetable drawer of our fridge. Most are also sold in single-use, plastic clamshell packaging, which is bad for the environment. 

Finding organic microgreens or ones that have been grown from non-GMO seeds can also be a challenge. 

Unfortunately, since March, these problems have been further exacerbated by the widespread negative impact of the current, unprecedented health crisis.

The Pros and Cons of Using Hamama Seed Quilts vs. Growing Microgreens From Seed

Buying packets of loose seeds and growing them on a bed of moistened potting mix, soil, or coconut coir is, without question, the cheapest way to grow microgreens at home. However, it also requires watering the seeds once or twice a day, and monitoring their progress daily, from the the time they are planted until they are ready to be harvested, usually takes somewhere between 9 days and a few weeks. And they do best with 4–6 hours of direct sunlight, or natural light supplemented by a grow light(s).

While this may be a good option for experienced container gardening enthusiasts, not everyone was blessed with a "green thumb," or enjoys growing things from seed. Some of us just want to have convenient and consistent access to a variety of microgreens and enjoy them when they are at their freshest, tastiest, and most nutritious, and are happy to pay more for an approach that requires significantly less time and effort than growing these immature greens from seed.  

That's why Hamama developed its proprietary seed quilt system, which makes growing fresh, delicious, nutrient-rich microgreens indoors as easy, effortless, and care-free as possible. 

Anatomy of a Hamama Microgreens Seed Quilt

Each seed quilt consists of three layers (excluding the seeds):

  1. The bottom layer is a loosely woven coconut coir mat (aka coconut fiber mat or coconut husk pad).
  2. The middle layer is a thin sheet of white felt
  3. The top layer is some type of unbleached paper.

The seeds are sandwiched between the white felt layer and the light brown paper cover, divided into 20 long, narrow, rectangular, "quilted" sections that hold the seeds in place in a fairly even distribution.

Key Benefits of the Hamama Seed Quilt Grow System for Microgreens

  • By combining the seeds, the growing substrates, and the papery cover into a single, compact unit and pairing it with a perfectly-sized growing tray, Hamama has removed as many variables as possible.
  • The Hamama Starter Kit contains everything you need to grow microgreens, except the 24–26 ounces of water for the initial soak. (Depending on the quality of your tap water, I recommend using filtered water.)
  • Starting a new seed quilt takes as little as 1–2 minutes! After that, you can basically ignore it for the next 4–6 days, until the seeds have germinated.
  • This bottom-watering and self-watering growing system is the closest thing to "set-it-and-forget it." Once you pour water inside the grow tray up to the fill line and briefly submerge the seed quilt to get all 20 sections evenly moistened, you shouldn't have to mist the seeds quilt or seedling, or top up the water. (Toward the end of the growing period, I try to check the water level every couple of days, if I remember. just in case it drops below the midpoint of the coconut coir mat.) 
  • The brown paper cover helps to filter the ambient light during the initial 4–6 day germination period, then it peels off easily to provide the seedlings with full exposure to the ambient light.

Hamama Microgreens Seed Quilts Are So Effortless, They Practically Grow Themselves!

Growing a Hamama microgreens seed quilt is as easy as 1-2-3:

  1. Do the brief initial "soak." Add water to the growing tray's marked fill line (no higher) and submerge the seed quilt for 10–30 seconds, just until all 20 sections have uniformly changed to a darker shade of brown.
  2. After 3–5 days, when the seeds have germinated, pushing against the paper cover and causing the sections to puff up or balloon, peel the paper cover.
  3. Approximately 7–10 days after the initial soak, harvest your microgreens!

You can harvest the entire seed quilt at once and store whatever microgreens you won't use immediately in the refrigerator, if you wish, or harvest a few sections at a time over the next few days. 

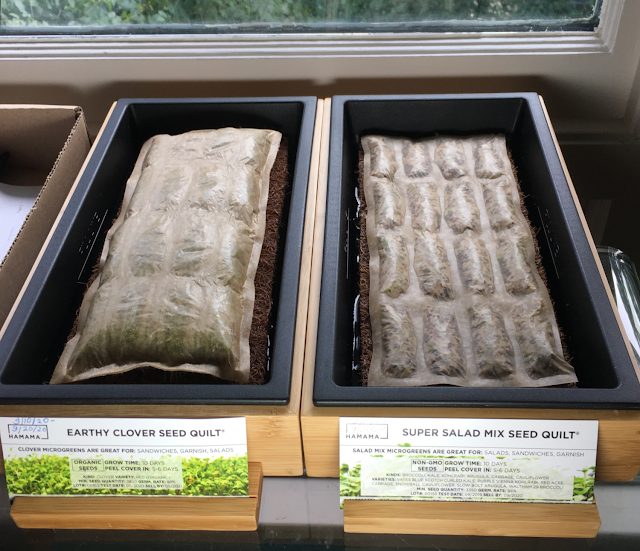
Hamama Earthy Clover and Super Salad Mix seed quilts and are puffed up and ready to peel
I often grow more than one Hamama seed quilt at a time

What's Included In the Hamama Microgreens Starter Kit?

  • One reusable Grow Tray.
    • Black plastic or white ceramic
  • Your choice of three Hamama Seed Quilts (choose all one variety, or mix and match up to three different types) 
  • Easy growing instructions.

Choose From 10 Different Types of Microgreens Seed Quilts

Hearty Broccoli, Refreshing Cabbage, Spicy Daikon Radish, Super Salad Mix, Sweet Wheatgrass, Zesty Mix, Energizing Kale, Earthy Clover, Hot Wasabi Mustard, and Fragrant Fenugreek. All the seeds in Hamama's microgreens seed quilts are non-GMO Six are also organic (Energizing Kale, Fragrant Fenugreek, Hearty Broccoli, Spicy Daikon Radish, Earthy Clover, and Sweet Wheatgrass). The company is working on making the switch to an all certified organic line.

Save 10% on Your First Hamama Order!

Use my Hamama shopping link, add the products you want to the shopping cart, then use the discount code SUPERGREENS during checkout to get 10% off your product total.


hamama microgreens

Hamama Microgreens Starter Kit and Seed Quilts Review by Margaret Schindel

Posts About My Keto Diet Journey

My First Year on The Keto Diet

Preparing to Succeed on the Keto Diet, Part One

Preparing to Succeed on the Keto Diet, Part Two

Low Carb Muffins & Cupcakes: Treats to Enjoy on a Keto Diet

Low Carb Keto Chocolate Yogurt Granola Chip Pudding Recipe

Good Dee’s Keto Cookie Low Carb Baking Mix Review

Hamama Microgreens Growing Kit Review & Success Tips

My Favorite Hamama Microgreens Seed Quilt Accessories

Keto Cheddar Cheese Biscuits With Chives Recipe

The Ultimate Keto Hot Chocolate Recipe

The Best Low Carb Keto Gift Ideas: Keto Gift Guide

The Best Low Carb Keto Cinnamon Muffins

Wholesome Yum Keto Bread Mix and Yeast Bread Recipe

The Good Chocolate 100% Organic No Sugar Dark Chocolate Review

The Best Advice to Maintain Your Keto Diet Weight Loss

My New Irresistibly Delicious Keto Cheese Crackers Recipe

Luscious Low Carb Keto Triple Peppermint Cheesecake Brownies Recipe

Quick & Easy Livlo Blueberry Scones Keto Baking Mix Review

Snack Better With The Best Healthy Keto Cookie Dough Bites

The Best Quick and Easy Low Carb Keto Pizza Recipe

The Best Quick and Easy Low Carb Keto Shortcake Cupcakes Recipe

Comparing the Best Keto-Friendly Chocolate Hazelnut Spreads - No Added Sugars

The Best Low Carb Keto Sandwich and Burger Buns Mix

Blueberry Biscuit Scones — New, Easy, Low Carb Keto Recipe

The Best Keto Pizza Crust Mix With 0 Net Carbs

An Unusual, Delicious Strawberry Chocolate Tea With 0 Calories

Delicious Sugar-Free Keto Cookies That OREO Fans Will Love

Healthy Pistachio Cherry Chocolate Chip Marshmallow Cereal Treats Recipe

Easy, Decadent, High Protein, Sugar-Free Rocky Road Cottage Cheese Ice Cream

The Best Quick & Easy Low Carb Sausage and Ricotta Calzones

How to Make Refreshing Vanilla Italian Soda (With or Without Cream)


Reviews of the Keto Diet by Barbara C. (aka Brite-Ideas)

My Personal Keto Testimonial

How I Stayed Committed to the Ketogenic Way of Eating

Read More Reviews About Gifts by Our Review This Reviews Contributors

Read More Product Reviews by Our Review This Reviews Contributors

Read More Reviews About Health and Wellness by Our Review This Reviews Contributors


Note: The author may receive a commission from purchases made using links found in this article. “As an Amazon Associate, Ebay (EPN) and/or Esty (Awin) Affiliate, I (we) earn from qualifying purchases.”


Most Recent Reviews on Review This Reviews


Search for Reviews by Subject, Author or Title

The Review This Reviews Contributors


SylvestermouseSylvestermouseDawn Rae BDawn Rae BMbgPhotoMbgPhotoBrite-IdeasBrite-IdeasWednesday ElfWednesday ElfOlivia MorrisOlivia MorrisTreasures by BrendaTreasures by BrendaThe Savvy AgeThe Savvy AgeMargaret SchindelMargaret SchindelRaintree AnnieRaintree AnnieLou16Lou16Sam MonacoSam MonacoTracey BoyerTracey BoyerCheryl Paton Cheryl PatonRenaissance WomanRenaissance WomanBarbRadBarbRadBev OwensBev OwensBuckHawkBuckHawkDecorating for EventsDecorating for EventsHeather426Heather426Coletta TeskeColetta TeskeMissMerFaeryMissMerFaeryMickie_GMickie_G


Review This Reviews is Dedicated to the Memory of Our Beloved Friend and Fellow Contributor

Susan DeppnerSusan Deppner

We may be apart, but
You Are Not Forgotten


“As an Amazon Associate, Ebay (EPN) and or Etsy (Awin) Affiliate, I (we) earn from purchases.” Disclosure Statement

X