Showing posts with label Sam Monaco. Show all posts

Thursday, November 16, 2023

Elevate Your Festive Decor with Holiday Table Runners

 The holiday season is upon us, it's time to revamp your dining area with the perfect table runner for festive charm and elegance. A well-chosen table runner can instantly transform your dining area into a cozy and inviting space, setting the tone for many memories with friends and family. 

Capture the spirit of the season with stunning holiday table runners to add a touch of magic to your holiday season.

Elevae your Festive Decor with Holiday Table Runners

Fran has a table runner in our house for every holiday and season. I especially love how she decorates our Thanksgiving and Christmas dining areas. She always finds the perfect centerpiece to add to our dining area table to highlight the festive table runner. Our dining area is right off of the kitchen and the first thing you see when you come in our kitchen door. 

Holiday Table Runner Ideas for your Dining Area:

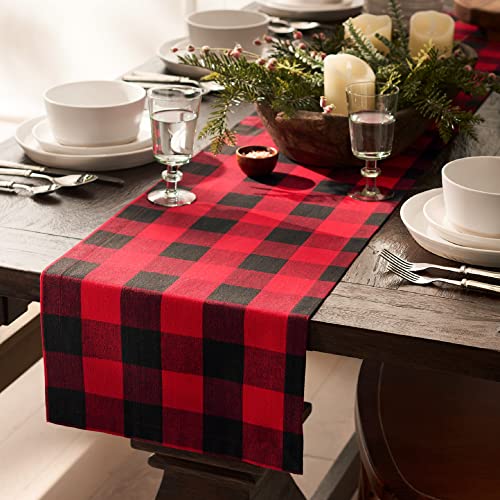
The Cassic Red and Green Plaid: Timeless and traditional, a red and green plaid table runner invites a rustic charm and warmth. For me, this traditional runner is a reminder of Christmas past.

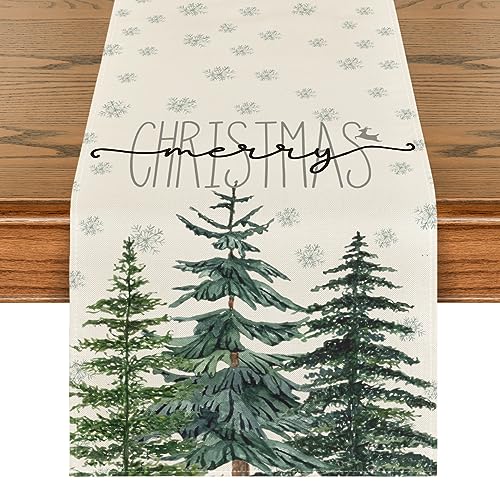
Snowflakes and Icy Blues: Add a touch of winter to your table with delicate snowflakes and cool icy blue hues. this choice will bring a touch of frosty glamour to your dining table. 

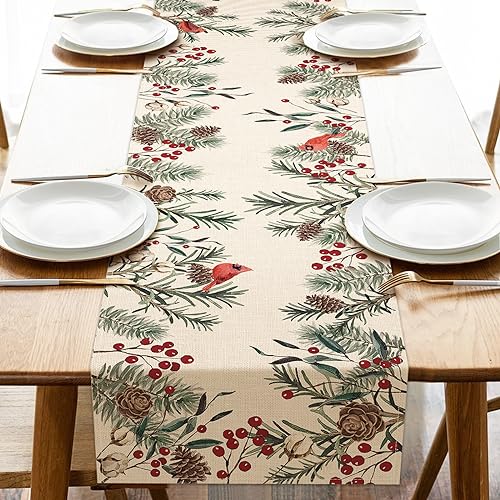
Festive Holley and Berries: Embrace the true spirit of the season with a festive Holley and Berries table runner. The vibrant colors and cheerful design will bring a dose of holiday cheer to your dining table.

Glittering Gold and Silver: Create a touch of sophistication and glamour in your dining area with the elegance of Gold and Silver.

Whimsical Reindeer and Sleighs: A delightful, whimsical table runner with playful reindeer and sleigh motifs. The playful and festive design will add a touch of a joyful and merry celebration to your dining table.

With the holiday season fast approaching, selecting the perfect table runner will set the stage for unforgettable celebrations. Whether you prefer classic Christmas themes or contemporary designs that capture the joy of the season, these holiday table runners offer a variety of options. I hope you can find one that fits your style.

Amazon has a fine selection of festive table runners for the holiday season:

Elrene Home Fashions Farmhouse Living Holiday Buffalo-Check, 13Elrene Home Fashions Farmhouse Living Holiday Buffalo-Check, 13Elrene Home Fashions Farmhouse Living Holiday Buffalo-Check, 13Artoid Mode Beige Pine Tree Snowflake Merry Christmas Table Runner, Seasonal Winter Xmas Holiday Kitchen Dining Table Decoration for Home Party Decor 13 x 60 InchArtoid Mode Beige Pine Tree Snowflake Merry Christmas Table Runner, Seasonal Winter Xmas Holiday Kitchen Dining Table Decoration for Home Party Decor 13 x 60 InchArtoid Mode Beige Pine Tree Snowflake Merry Christmas Table Runner, Seasonal Winter Xmas Holiday Kitchen Dining Table Decoration for Home Party Decor 13 x 60 InchSeliem Winter Pine Needle Branches Table Runner, Pine Cone Cardinal Red Birds Berry Farmhouse Kitchen Dining Table Decor, Christmas Holiday Home Decoration Indoor Outdoor Party Supply 13 x 72 InchesSeliem Winter Pine Needle Branches Table Runner, Pine Cone Cardinal Red Birds Berry Farmhouse Kitchen Dining Table Decor, Christmas Holiday Home Decoration Indoor Outdoor Party Supply 13 x 72 InchesSeliem Winter Pine Needle Branches Table Runner, Pine Cone Cardinal Red Birds Berry Farmhouse Kitchen Dining Table Decor, Christmas Holiday Home Decoration Indoor Outdoor Party Supply 13 x 72 Inches


Find more Decor ideas on Review This here:


Note: The author may receive a commission from purchases made using links found in this article. “As an Amazon Associate, Ebay (EPN) and/or Esty (Awin) Affiliate, I (we) earn from qualifying purchases.”


Tuesday, November 7, 2023

Thanksgiving - The Best from Review This Contributors

 Thanksgiving is a time for family and friends to gather, celebrate, and give blessings, and thanks.

Thanksgiving - The Best from Review This Contributors
Photo from Pixabay - Credit monicoe

Thanksgiving is also a time for a great feast with your family, and friends. Thanksgiving dates as far back as 1621, and became a National Holiday in 1863. Today, we will review some typical Thanksgiving menus.  Everyone has their traditions and favorites. 

Typical Thanksgiving Menu:

  • Turkey
  • Stuffing
  • Cranberry Sauce
  • Sweet potatoes
  • Mashed Potatoes
  • Green Beans
  • Pumpkin Pie

Thanksgiving Table

This was our table last year, with all of our Thanksgiving favorites. The homemade cranberry sauce is one of my favorites. 

Our daughter makes the best homemade cranberry sauce, get this delicious cranberry sauce recipe here. This cranberry sauce is much better than the cans I remember growing up.

Roasted Turkey

Everybody knows I love to cook, but when it comes to the Thanksgiving turkey it's all Fran. I do get to check the internal temperature and carve the turkey. Fran insists on buying a fresh turkey every year.

 Oh, there is one other thing I get to do, inject melted butter into the turkey breast. This really helps keep it juicy.

Pumpkin Pie

After all of that delicious food, you must save room for dessert. There is always a traditional pumpkin pie on our table. Last year these pies were crafted by our granddaughters and grandson.

The Thanksgiving food is wonderful, but for me, it's all about having our family together in one place. That is a blessing in itself and what makes me so thankful.

Take some time to click the link below for many wonderful Thanksgiving ideas from the ReviewThis Contributors. You will find Thanksgiving history, inspiration, main dishes, side dishes, and desserts to help plan your Thanksgiving Holiday.

Wishing you all a Safe and Healthy Thanksgiving


Note: The author may receive a commission from purchases made using links found in this article. “As an Amazon Associate, Ebay (EPN) and/or Esty (Awin) Affiliate, I (we) earn from qualifying purchases.”


Tuesday, October 10, 2023

How to Clean and Season a Cast Iron Skillet

 I love cooking with my cast iron skillets. Lodge cast iron skillets are the only brand I buy. I have three cast iron skillets, 8-inch, 10-inch, and 12-inch. When you buy a Lodge cast iron skillet, it is already seasoned and ready to use. But over time and use, you must re-season your cast iron skillet.

Last week I was making some hash brown potatoes in my 10-inch skillet, and they stuck to the bottom of the skillet. I knew it was time to re-season my skillet.

How to Clean and Season a Cast Iron Skillet
My 8, and 10-inch skillets are seasoned and ready to cook again

You can search YouTube, and you will find many videos on how to season a cast iron skillet. Today, I'm reviewing the method that I use and that has worked well for me over the years.

Cleaning a Cast Iron Skillet


The first thing that I do is clean my skillets. I use mild dish soap, warm water, and this copper scrub pad.

 I want to make sure that I get any food particles left behind. 

Next, I dry them with a soft towel. Then, I put them in the oven at 200 degrees for about 10 minutes. 

This ensures my skillets are completely dry.

Season cast iron skillet


Now that my pans are dried, I added a thin layer of olive oil. Then, I pre-heated my oven to 400 degrees. 

Olive oil has a smoke point of about 350 degrees, so you want to be at least 20 degrees higher than the smoke point.

When the oil hits the smoke point and above a chemical reaction occurs called polymerization. 

This chemical reaction bonds the oil to the pan, creating a layer of natural seasoning.

Cooking with cast iron frequently using oils also helps build up a layer of seasoning in your pan.


I set the pans in the 400-degree oven upside down and baked them for 1 hour. You can add a cookie sheet or tin foil under the pans to catch any oil that may drip. Then, I turned the oven off and let them cool while still in the oven. After 1 hour if you need to use your oven remove the pans with an oven mitt and set them on a cooling rack.

You can repeat this process as many times as needed to develop a layer of natural seasoning. With proper care, your cast iron skillets will give you years of cooking delicious food. 

These are three Lodge cast iron skillets I own and use:

Lodge Seasoned Cast Iron 3 Skillet Bundle. 12 inches and 10.25 inches with 8 inch Set of 3 Cast Iron Frying PansLodge Seasoned Cast Iron 3 Skillet Bundle. 12 inches and 10.25 inches with 8 inch Set of 3 Cast Iron Frying PansLodge Seasoned Cast Iron 3 Skillet Bundle. 12 inches and 10.25 inches with 8 inch Set of 3 Cast Iron Frying Pans


Note: The author may receive a commission from purchases made using links found in this article. “As an Amazon Associate, Ebay (EPN) and/or Esty (Awin) Affiliate, I (we) earn from qualifying purchases.”


Thursday, October 5, 2023

Extra Crispy Chicken Tenders

 These extra-crispy chicken tenders are so crispy on the outside and so tender and juicy on the inside. These are the perfect lunch, dinner or snack your family will love. What a great after-school snack for the kids.

Extra Crispy Chicken Tenders
Extra Crispy Chicken Tenders - Reviewed

With the busy schedules of everybody in the family, we have at least one meal together every week. A couple of weeks ago Fran made these delicious chicken tenders for dinner along with a salad. Everybody loved these chicken tenders, they were gone in no time at all. 

These are so easy to make in the oven, deep fryer, or in your air fryer. We used our air fryer, it's the healthier choice, and it's much faster. We used our Ninja Foodi Grill which is a combination grill and air fryer.

Extra Crispy Chicken Tenders - Ingredients

1 or 2 pounds of chicken strips

1 cup seasoned panko bread crumbs or 1 package extra crispy Shake N Bake

2 eggs beaten

Salt and Pepper to taste

Barbeque sauce or Ranch dressing for dipping

Beat the two eggs in a shallow bowl. Dip each chicken tender in the egg and then, coat the tenders with the bread crumbs. 

For the air fryer, spray the air fryer basket with cooking spray. Set the temperature to 400 degrees. Place the chicken tenders in the air fry basket at least 2 inches apart. If you overcrowd the basket, they won't be crispy. Cook the chicken tenders for 5 to 6 minutes per side until they are golden brown.

For the oven, Place the coated chicken tenders on a cookie sheet lined with tin foil. The tin foil will make it easy to clean up. Bake at 400 degrees for 30 minutes.

Make sure the internal temperature of the chicken reaches at least 165 degrees. I use my Thermo-Pro TP-18 instant-read thermometer. It's a good idea to have an instant-read thermometer handy for all of your cooking needs. 

Another thing that makes these so easy is that, you can buy the chicken tenders packaged and ready to cook at your local grocery store.

These chicken tenders are the perfect weeknight meal for the whole family. We enjoyed every single one of them.

By the way, the photo could have been better but everyone was sitting around the table waiting for me to take the picture.

Find more recipes on ReviewThis here:

ReviewThisRecipes.com


Note: The author may receive a commission from purchases made using links found in this article. “As an Amazon Associate, Ebay (EPN) and/or Esty (Awin) Affiliate, I (we) earn from qualifying purchases.”


Thursday, September 21, 2023

What is the best Wood for a Cigar Humidor

I enjoy relaxing with a good cigar, and since I don't smoke my cigars in the house, that only leaves me the time to enjoy my cigars in the warmer weather.

What is the best wood for a cigar humidor

Pictured here is my fine collection of cigars in my humidor. A good cigar can be quite expensive so, you need a humidor to keep your collection fresh.

What is a Humidor:

A cigar humidor is basically a wood box to store your cigars. Its main function is to maintain a constant temperature and humidity level to keep your cigars in top condition. Not storing your cigars properly can affect the flavor in the future.

Cigars will last a very long time if stored properly in your humidor. I have had some of the cigars you see in the photo for many years.

I always wondered what types of wood were used for the inside of a humidor and why. So, I did a little research to find out, and here is what I found.

Basically, there are three types of wood used to line the inside of a humidor.
  • Spanish Cedar (By far the most popular)
  • American or Canadian red cedar
  • Honduran mahogany
Spanish cedar is by far the most popular, and is used as the wood lining in most humidors, and here is why.

Spanish cedar offers high humidity absorption, which helps maintain a stable climate and prevents mold. This also helps the flavor of the cigars as they age, and the odor quality of the wood offers protection from tobacco worms. 

Tobacco worms can destroy every cigar in your humidor. Over the years I have never had the problem of tobacco worms in my humidor.

Actually, Spanish Cedar is really not cedar, it just smells like cedar. It is grown in the Northern regions of South America.

When you buy a humidor it will generally be equipped with a humidifying system and a hygrometer to gauge the humidity.

Cigars are best stored at a temperature between 64 and 70 degrees and 70 to 72 percent humidity.

I learned a lot of useful information by doing this research. It has certainly helped me maintain my precious collection of cigars.

Humidors are a wonderful gift idea for anyone who loves a good cigar.

Mantello Cigars Humidor, Glass-Top Cigar Humidors, Humidor Box for 25-50 Cigars, with Hygrometer & Divider, HumidorsMantello Cigars Humidor, Glass-Top Cigar Humidors, Humidor Box for 25-50 Cigars, with Hygrometer & Divider, HumidorsMantello Cigars Humidor, Glass-Top Cigar Humidors, Humidor Box for 25-50 Cigars, with Hygrometer & Divider, HumidorsMarvero Handcrafted Cigar Humidors Box, Cedar Wood Cigar Humidor for 150 Cigars with Digital Hygrometer, 3 Large Drawers, 3 Humidifiers and 10 Cedar Wood Spills. Gift for Men and AficionadosMarvero Handcrafted Cigar Humidors Box, Cedar Wood Cigar Humidor for 150 Cigars with Digital Hygrometer, 3 Large Drawers, 3 Humidifiers and 10 Cedar Wood Spills. Gift for Men and AficionadosMarvero Handcrafted Cigar Humidors Box, Cedar Wood Cigar Humidor for 150 Cigars with Digital Hygrometer, 3 Large Drawers, 3 Humidifiers and 10 Cedar Wood Spills. Gift for Men and Aficionados


For more Product Reviews on ReviewThis click here:


Note: The author may receive a commission from purchases made using links found in this article. “As an Amazon Associate, Ebay (EPN) and/or Esty (Awin) Affiliate, I (we) earn from qualifying purchases.”


Thursday, September 7, 2023

Oven Baked Zucchini Sticks

 These oven-baked zucchini sticks are a great way to use the abundance of your zucchini crop. They make a perfect appetizer for any meal, or just have them as a snack.

Oven Baked Zucchini Sticks

These zucchini sticks or fries are so crispy on the outside and tender on the inside. Bobby and his girlfriend Abby made dinner the other night. They made these delicious zucchini sticks as an appetizer.

If you don't have a garden, just pick up a couple of medium-sized zucchini at the grocery store or your local farmers market. With a few more ingredients that most of us already have in the pantry, you'll be on your way to making this easy and tasty appetizer. 

Baked zucchini fries

First, peel and cut the zucchini in half. Then, slice them like french fries, about 3 to 4 inches long. This part was my job, Bobby and Abby did the rest.

Prepare zucchini fries

They set up a dredging station with flour, a beaten egg, and seasoned bread crumbs. First, the flour, then dip them into the egg, and then the bread crumbs. 

Baked Zucchini Sticks Ingredients:

2 medium size zucchini peeled and cut

1 teaspoon olive oil

1/2 cup all-purpose flour

1 large egg beaten

1 cup Panko Breadcrumbs

1 teaspoon paprika

1 tablespoon parmesan cheese

Salt and Pepper to your taste

Directions:

  1. Preheat oven to 425 degrees
  2. Peel and cut the zucchini into 3 to 4-inch pieces.
  3. In a flat dish add the flour, salt, and pepper.
  4. Beat the egg in a small bowl and mix with olive oil.
  5. In a flat dish mix the breadcrumbs, paprika, and parmesan cheese.
  6. Prepare a cookie sheet lined with parchment paper.
  7. Dip the cut zucchini into the flour, egg, and breadcrumbs and place on the prepared cookie sheet. Place them at least 2 inches apart.
  8. Bake for 20 to 25 minutes until they are golden brown.
Serve right out of the oven with your favorite pizza sauce or ranch dressing for a tasty appetizer or snack.

For more recipes on Review This Click Here:


Note: The author may receive a commission from purchases made using links found in this article. “As an Amazon Associate, Ebay (EPN) and/or Esty (Awin) Affiliate, I (we) earn from qualifying purchases.”


Monday, August 14, 2023

Setting up a Backyard Birdhouse

 Our grandson Bobby made this birdhouse in his school woodshop. This birdhouse was a Christmas gift for his mother. We finally set the birdhouse up in their backyard. Here is a review of how we did it.

Setting up a Backyard Birdhouse
Photo Credit Sam Monaco

Bobby had a good idea of how he wanted to set the birdhouse up. His thought was to cement a threaded pipe in the ground then, attach a flange to the bottom of the birdhouse and screw it together.

We looked up how high the birdhouse should be, and found the recommended height to be five feet off the ground. The problem was the hardware store did not have a pipe long enough to be able to cement at least 2 feet in the ground and give us five feet above the ground. Thus we would have needed a seven-foot pipe.

We finally decided on using a 4x4 treated lumber post and a 4x4 post anchor. So, we bought a six-foot 4x4 post and the post anchor along with four L-Brackets to attach the birdhouse to the post.

4x4 post anchor

This is the post anchor, the one we purchased goes into the ground two feet. These post anchors are also great for setting up mailboxes

How we set up our Birdhouse:

First, we cut 12 inches off of the six-foot 4x4 post making it five feet the recommended height we needed.

Next, we used the 12 inches we cutoff to drive the post anchor into the ground with a sledgehammer. Bobby did the sledgehammering.

We inserted the post into the post anchor, and Bobby tightened the bolts at the bottom to secure the post.

We centered the birdhouse on top of the post. Tyler, our other grandson was in charge of the L-Brackets.

Tyler handed the brackets and screws to Bobby, while I held the birdhouse in place. Bobby screwed in all four brackets, and we were finished.

Backyard birdhouse

Here is the happy crew with a job well done. We set the birdhouse up in less than an hour. Now, we just need to wait for some birds to make their happy homes. 

COLEBA Bird Houses for Outside,Outdoor 5 Hole Bird House Room for 5 Bird Families Bluebird Finch Cardinals Hanging Birdhouse for Garden (Brown - Set of 1)COLEBA Bird Houses for Outside, Outdoor 5 Hole Bird House Room for 5 Bird Families Bluebird Finch Cardinals Hanging Birdhouse for Garden (Brown - Set of 1)COLEBA Bird Houses for Outside,Outdoor 5 Hole Bird House Room for 5 Bird Families Bluebird Finch Cardinals Hanging Birdhouse for Garden (Brown - Set of 1)Ashman Fence Post Anchor 30 Inches Tall, 3.25 x 3.25 Inches Wide, Ideal for securing Mailbox Posts, Deck Posts, Gazebo Posts, Street Lamps and More, 1 PackAshman Fence Post Anchor 30 Inches Tall, 3.25 x 3.25 Inches Wide, Ideal for securing Mailbox Posts, Deck Posts, Gazebo Posts, Street Lamps, and More, 1 PackAshman Fence Post Anchor 30 Inches Tall, 3.25 x 3.25 Inches Wide, Ideal for securing Mailbox Posts, Deck Posts, Gazebo Posts, Street Lamps and More, 1 Pack


Find more DIY projects on Review This here:


Note: The author may receive a commission from purchases made using links found in this article. “As an Amazon Associate, Ebay (EPN) and/or Esty (Awin) Affiliate, I (we) earn from qualifying purchases.”


Thursday, August 3, 2023

Easy Air Fryer Corn on the Cob

 Air fryers are a wonderful tool to have in your kitchen. If you don't have an air fryer consider making room on your kitchen counter for one. From main dishes, and side dishes to desserts, there isn't anything you can't do with an air fryer.

Easy Air Fryer Corn on the Cob
Air Fryer Corn on the Cob - Reviewed
Photo credit Sam Monaco

Our daughter got us a Ninja Foodi Grill for Christmas a few years ago. It is a combination grill and air fryer, and we use it all of the time to make so many easy meals.

Summertime is corn season and grilled corn is a favorite of ours. If you don't feel like firing up the grill just for corn or boiling water to heat up the kitchen try the air fryer.

It's so easy to make in the air fryer, in just 15 minutes you will enjoy that delicious toasted corn flavor with your favorite garnish for added flavor.

How to Make Air Fryer Corn on the Cob:

Air fryer corn on the cob
Air Fryer Corn on the Cob
Photo Credit Sam Monaco

I started with five fresh ears of corn and brushed them with olive oil on all sides, or you could use melted butter. 

Then, I coated them all around with Hidden Valley Ranch Seasoning. I preheated the air fryer to 375 degrees and set the time for 15 minutes. We added melted butter and salt for a delicious side dish. My air fryer basket easily fits five ears of corn.

This works well for fresh or frozen corn, but I prefer fresh corn on the cob. If you have an air fryer give this a try, your family is going to love it.

Other Topping Ideas for Corn on the Cob:
  • Sour cream
  • Parmesan cheese
  • Cheddar cheese
  • Crumbled bacon
  • Chili powder
  • Paprika 
  • Old Bay seasoning
  • Cajun seasoning
These are just a few more ideas for garnishing corn on the cob. I'm sure everybody has their favorite.

You may also like some of my other Air Fryer Recipes:


Ninja Foodi 5-in-1 Indoor Grill with Integrated Smart Probe, 3.9 L (4 qt.) Air FryerNinja Foodi 5-in-1 Indoor Grill with Integrated Smart Probe, 3.9 L (4 qt.) Air FryerNinja Foodi 5-in-1 Indoor Grill with Integrated Smart Probe, 3.9 L (4 qt.) Air Fryer


Find more recipes on Review This Here:


Note: The author may receive a commission from purchases made using links found in this article. “As an Amazon Associate, Ebay (EPN) and/or Esty (Awin) Affiliate, I (we) earn from qualifying purchases.”


Thursday, July 20, 2023

Charcoal Chimney Starter Reviewed

 Over the years I have been back and forth between charcoal and gas grills. Five years ago my daughter gave me a Char-Griller Smokin Champ combination offset smoker and grill. Ever since I've been all about the charcoal grilling and smoking.

Charcoal Chimney Starter Reviewed

If you're cooking with a charcoal grill or a smoker, then a chimney starter is a must-have. The chimney starter is the easiest and fastest method of lighting any kind of charcoal. Getting your charcoal started and ready to cook is really easy. To me, the chimney starter is the safest option. You could use charcoal lighter fluid but the chemicals found in lighter fluid could leave your food tasting like the fluid.

The chimney starter in the photo is my Weber Rapidfire Charcoal Chimney Starter. I have had this one for five years now.

Features of my Chimney Starter:

It measures 13-inches High

7.5-inches in diameter

Cone shaped grate on the bottom

Ergonomic handle with heat shield

Lightweight

Durable Construction

How to use a Charcoal Chimney Starter:

Charcoal Chimney

The first thing that I do is flip it over and wad up 3 sheets of newspaper placed in the bottom of the cone-shaped grate. You can buy charcoal starters specifically made to light a chimney, but I find the newspaper works just as well.
Charcoal Chimney Starter

Turn the chimney over on the grill grates and light the newspaper. I use a small grill and set it up on a picnic table. When you light the newspaper you'll see a lot of white smoke as seen in the photo. Don't worry this stops once the charcoal gets going.

Weber Rapidfire chimney starter

In this photo, you can see the red glow of the charcoal moving up to the top. Looking at the top the coals are starting to turn white on the corners. This chimney is ready to dump into my grill. The process will be about 15 minutes and you'll be ready to cook with hot charcoal.

A word of caution: For dumping the hot charcoal into your grill you should have a grill glove made for high heat. I use heavy leather gloves when I'm dumping the charcoal. The hot charcoal can be 500 degrees or more. The charcoal chimney is a fast and easy way to start your charcoal.

Rapidfire Chimney StarterRapidfire Chimney StarterRapidfire Chimney StarterBBQ Fireproof Gloves, Grill Cut-Resistant Gloves 1472°F Heat Resistant Gloves, Non-Slip Silicone Oven Gloves, Kitchen Safe Cooking Gloves for Oven Mitts,Barbecue,Cooking, Frying,13.5 Inch-RedBBQ Fireproof Gloves, Grill Cut-Resistant Gloves 1472°F Heat Resistant Gloves, Non-Slip Silicone Oven Gloves, Kitchen Safe Cooking Gloves for Oven Mitts,Barbecue,Cooking, Frying,13.5 Inch-RedBBQ Fireproof Gloves, Grill Cut-Resistant Gloves 1472°F Heat Resistant Gloves, Non-Slip Silicone Oven Gloves, Kitchen Safe Cooking Gloves for Oven Mitts,Barbecue,Cooking, Frying,13.5 Inch-Red


Find more Product Reviews Here:


Note: The author may receive a commission from purchases made using links found in this article. “As an Amazon Associate, Ebay (EPN) and/or Esty (Awin) Affiliate, I (we) earn from qualifying purchases.”


Tuesday, July 4, 2023

Decorate a Room with Royal Blue

 Blue is my favorite color. My mother always had some part of our home decorated with royal blue. It could be the pillows for the couch, the curtains, or throw rugs, somewhere in the house was the color royal blue. My mother was a master at color coordinating. I'm sure this is why blue is my favorite color.

Royal Blue
Decorating with Royal Blue Reviewed

Some Royal Blue History:

This deep and vivid shade of blue is said to have come from Rode Somerset a small village in England, well known for its millwork. In the 18th century, one of the mills created a robe for Queen Charlotte using a deep blue dye named Royal Blue.

So, the next time you have a bedroom to makeover consider decorating with the color Royal Blue. Then you could have a room fit for a King and Queen.

Decorating a Room with Royal Blue:

Decorating a bedroom or any room in your house with royal blue can be challenging but satisfying. The rich majestic color is associated with power and luxury, making it an ideal choice for a bedroom. 

Consider the mood and style that you want to create in the room. Royal blue will represent the sky and sea and is associated with open spaces to create a calming mood.

It is best to use royal blue as an accent color in contrast with neutral shades such as white, beige, or gray. This will create a sense of balance in the room and allow the royal blue to stand out. 

As an example, our living room curtains are royal blue, the walls are painted antique white, and the furniture and carpet are beige, the television stand and table are dark mahogany. This creates a sense of balance and harmony in the room allowing the royal blue to stand out and make a statement.

I'm certainly not an expert at interior decorating, my mother was very good at matching colors and I have my wife Fran to thank for decorating our living room.

With these tips in mind, you can create a beautiful and sophisticated room with the color royal blue as its centerpiece.

Deconovo Solid Blackout Curtains - (42x84 Inch, Royal Blue, 2 Panels) Back Tab and Rod Pocket Light Blocking Curtains for Living RoomDeconovo Solid Blackout Curtains - (42x84 Inch, Royal Blue, 2 Panels) Back Tab and Rod Pocket Light Blocking Curtains for Living RoomCheck the PriceHOMEIDEAS 6 Piece Bed Sheets Set (King, Royal Blue), 1800 Bedding Soft Brushed Microfiber Luxury Sheets, Deep Pockets, Easy Care, Wrinkle & Fade FreeHOMEIDEAS 6 Piece Bed Sheets Set (King, Royal Blue), 1800 Bedding Soft Brushed Microfiber Luxury Sheets, Deep Pockets, Easy Care, Wrinkle & Fade FreeCheck the Price


For More Decorating Ideas from Review This click here:


Note: The author may receive a commission from purchases made using links found in this article. “As an Amazon Associate, Ebay (EPN) and/or Esty (Awin) Affiliate, I (we) earn from qualifying purchases.”


Friday, June 23, 2023

Air Fryer Fried Dough

 Easy to make air fryer fried dough reviewed.

Air Fryer Fried Dough

You will find this sweet treat at your local County Fair or Church Bazaars. They go by many different names, fried dough, doughboys, or elephant ears. Whenever we visit a local fair the first thing I look for is the fried dough. Fried bread dough with sugar or sugar and cinnamon all over it.

These little sweet treats are just as easy to make at home with your air fryer. Over the weekend, I picked up some fresh dough at our local grocery store to make some pizza. I had some dough left over, but it wasn't enough to make another whole pizza so I decided to use my air fryer to make these little sweet treats.

How to make Air Fryer Fried Dough:

  1. Take a small portion of bread dough in your hand and begin to shape it into a 4 to 5 - inch disc. not too thick.
  2. Set them on a cookie sheet and lightly coat both sides with oil.
  3. Spray the air fryer basket with cooking spray or you can lightly brush it with oil.
  4. Preheat your air fryer to 350 degrees and set the timer to 9 minutes.
  5. Set them in the basket and turn them over after 5 minutes.
  6. While they are cooking melt about 1/2 stick of butter.
  7. Put 1/2 cup of white sugar in a flat dish. You can add cinnamon and mix it together if you like sugar and cinnamon.
  8. When they finish cooking brush with the butter and coat with the sugar mixture.
Make sure you flatten them before adding to the air fryer, as you can see from the picture I made mine a little too thick. They puffed up so much that I considered filling them with strawberry jam but didn't enough on hand. I had room for four at a time in my air fryer basket, I ate one one them before I took the picture. 

If you don't have an air fryer it's just as easy to make these on the stovetop. Check out my recipe here for County Fair Fried Dough.

We love our air fryer, we have a Ninja Foodi Grill and we use it all the time. It's a real time saver for quick indoor grilling or air frying. Check out my review here: Ninja Foodi Grill Review.

For my County Fair Fried Dough recipe on the stovetop, I use my cast iron skillet.


Ninja Foodi 5-in-1 Indoor Grill with Integrated Smart Probe, 3.9 L (4 qt.) Air FryerNinja Foodi 5-in-1 Indoor Grill with Integrated Smart Probe, 3.9 L (4 qt.) Air FryerCheck the PriceLodge LCC3 Cast Iron Combo Cooker, Pre-Seasoned, 10.25Lodge LCC3 Cast Iron Combo Cooker, Pre-Seasoned, 10.25Check the Price


For more recipes on Review This click here:


Note: The author may receive a commission from purchases made using links found in this article. “As an Amazon Associate, Ebay (EPN) and/or Esty (Awin) Affiliate, I (we) earn from qualifying purchases.”


Most Recent Reviews on Review This Reviews


Search for Reviews by Subject, Author or Title

The Review This Reviews Contributors


SylvestermouseSylvestermouseDawn Rae BDawn Rae BMbgPhotoMbgPhotoBrite-IdeasBrite-IdeasWednesday ElfWednesday ElfOlivia MorrisOlivia MorrisTreasures by BrendaTreasures by BrendaThe Savvy AgeThe Savvy AgeMargaret SchindelMargaret SchindelRaintree AnnieRaintree AnnieLou16Lou16Sam MonacoSam MonacoTracey BoyerTracey BoyerRenaissance WomanRenaissance WomanBarbRadBarbRadBev OwensBev OwensBuckHawkBuckHawkDecorating for EventsDecorating for EventsHeather426Heather426Coletta TeskeColetta TeskeMissMerFaeryMissMerFaeryMickie_GMickie_G


Review This Reviews is Dedicated to the Memory of Our Beloved Friend and Fellow Contributor

Susan DeppnerSusan Deppner

We may be apart, but
You Are Not Forgotten


“As an Amazon Associate, Ebay (EPN) and or Etsy (Awin) Affiliate, I (we) earn from purchases.” Disclosure Statement

X