Showing posts with label Appetizers. Show all posts

Tuesday, August 20, 2024

Easy Zucchini Fritters

 These easy-to-make zucchini fritters are a fantastic way to use up an abundance of zucchini, especially during the summer, when our gardens are at their peak.

They are so crispy on the outside and tender on the inside, making them a great snack, appetizer, or even a nice light meal.

Zucchini Fritter Recipe
Easy Zucchini Fritters - Reviewed

Our daughter, Jamie came over last week with a huge zucchini. She set it on the counter, and I asked what we were making. She replied we are going to make zucchini fritters.

I've never had these before and am always ready to try a new recipe. I couldn't wait to get started.

Recipe for Zucchini Fritters:

Ingredients:

  • 1 large or 3 medium-sized zucchini (peeled and shredded) about 1 1/2 to 2 lbs.
  • 1 teaspoon salt
  • 1 to 1 1/2 cups all-purpose flour
  • 1 cup Panko seasoned bread crumbs
  • 1/2 cup grated parmesan cheese
  • 3 large eggs, beaten
  • 3 tablespoons Mrs Dash seasoning
  • 1 clove garlic, minced
  • 1/4 cup green onions minced
  • 1 tablespoon fresh chopped parsley
  • Olive Oil for frying
  • Salt and pepper to taste
Instructions:

  1. Peel and grate the zucchini with a hand grater or food processor.
  2. Place the grated zucchini in a colander over the sink to drain. Tip: we placed a dish on top and pressed it to help drain.
  3. After the zucchini is drained, mix all ingredients in a large bowl.
  4. Heat the olive oil in a large skillet over medium heat. We used Jamie's Hamilton Beech Electric fryer for this.
  5. Scoop out 3 to 4 tablespoons of the zucchini batter and flatten to form. Sort of the size of a thin burger.
  6. Fry until they are golden brown on both sides. 

Grated Zucchini

This photo is of our grated zucchini in a colander with a bowl under it, Fran placed a dish on top to help drain the water out of the zucchini.

The measurements in this recipe are approximate. I watched Jamie mix the ingredients but, she didn't measure anything. 

You'll want to make sure that the zucchini mixture is consistent and holds together when you're forming them. So, you may need to add more flour, bread crumbs, or parmesan cheese as needed.

We served the zucchini fritters with a Caprese Salad and a dill dip that Jamie made from plain yogurt, fresh dill, and lemon juice.

One of the best things about these zucchini fritters is how simple they are to make, and how absolutely delicious they are.

Find more Recipes on ReviewThis Here:

ReviewThisRecipes.com


Note: The author may receive a commission from purchases made using links found in this article. “As an Amazon Associate, Ebay (EPN) and/or Esty (Awin) Affiliate, I (we) earn from qualifying purchases.”


Thursday, March 7, 2024

Savory Spinach Ball Appetizers

 If you looking for an easy and healthy appetizer to serve at your next gathering, look no further than these easy spinach ball appetizers. These bite-sized delights are packed with nutrients and bursting with flavor. Whether hosting a party or craving a tasty snack, these spinach balls are the perfect choice.

Savory Spinach Ball Appetizers
Spinach Ball Appetizers - Reviewed

This is one of those recipes we had packed away and had not made for some time. This past Holiday season, Fran was going through some old recipes and found our spinach ball recipe.

We both thought wow we haven't made these in a long time. So, we decided to make them and we're so glad we did. 

Spinach Ball Ingredients:

  • 2 cups( 2-10 boxes) frozen chopped spinach
  • 3 large eggs
  • 2 cups seasoned bread crumbs
  • 1/2 cup grated Parmesan Cheese
  • 1/2 teaspoon garlic powder
  • 1/2 cup melted butter
  • 1/2 teaspoon thyme
  • 1/2 teaspoon salt
  • 1/4 teaspoon black pepper
Instructions:

  1. Thaw and pat dry the spinach.
  2. In a large mixing bowl, combine all ingredients and mix well.
  3. Scoop out portions of the mixture and roll into bite-sized balls.
  4. Place them on a greased cookie sheet or lined with parchment paper.
  5. Bake at 375 degrees for 15 to 20 minutes until they are golden brown and firm to the touch.
  6. Cool for a few minutes before serving.
These spinach balls are a great way to incorporate healthy greens into your diet without sacrificing flavor. Spinach balls are a perfect appetizer for any party or just as a snack. 

If we have any leftovers we freeze them. You can take them out of the freezer and pop them in the oven to warm them up for a snack. I like them plain, but you can experiment with different dipping sauces if you like.

For more recipes on Review This click here:

ReviewThisRecipes.com


Note: The author may receive a commission from purchases made using links found in this article. “As an Amazon Associate, Ebay (EPN) and/or Esty (Awin) Affiliate, I (we) earn from qualifying purchases.”


Thursday, September 7, 2023

Oven Baked Zucchini Sticks

 These oven-baked zucchini sticks are a great way to use the abundance of your zucchini crop. They make a perfect appetizer for any meal, or just have them as a snack.

Oven Baked Zucchini Sticks

These zucchini sticks or fries are so crispy on the outside and tender on the inside. Bobby and his girlfriend Abby made dinner the other night. They made these delicious zucchini sticks as an appetizer.

If you don't have a garden, just pick up a couple of medium-sized zucchini at the grocery store or your local farmers market. With a few more ingredients that most of us already have in the pantry, you'll be on your way to making this easy and tasty appetizer. 

Baked zucchini fries

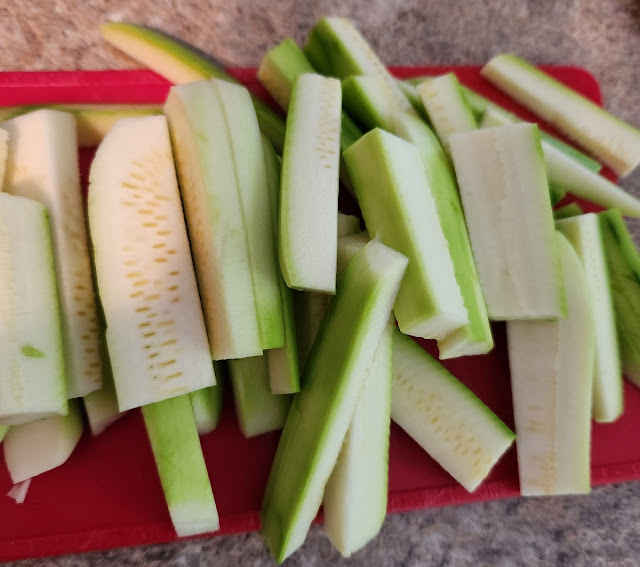
First, peel and cut the zucchini in half. Then, slice them like french fries, about 3 to 4 inches long. This part was my job, Bobby and Abby did the rest.

Prepare zucchini fries

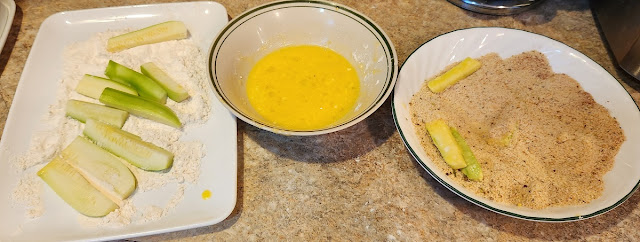
They set up a dredging station with flour, a beaten egg, and seasoned bread crumbs. First, the flour, then dip them into the egg, and then the bread crumbs. 

Baked Zucchini Sticks Ingredients:

2 medium size zucchini peeled and cut

1 teaspoon olive oil

1/2 cup all-purpose flour

1 large egg beaten

1 cup Panko Breadcrumbs

1 teaspoon paprika

1 tablespoon parmesan cheese

Salt and Pepper to your taste

Directions:

  1. Preheat oven to 425 degrees
  2. Peel and cut the zucchini into 3 to 4-inch pieces.
  3. In a flat dish add the flour, salt, and pepper.
  4. Beat the egg in a small bowl and mix with olive oil.
  5. In a flat dish mix the breadcrumbs, paprika, and parmesan cheese.
  6. Prepare a cookie sheet lined with parchment paper.
  7. Dip the cut zucchini into the flour, egg, and breadcrumbs and place on the prepared cookie sheet. Place them at least 2 inches apart.
  8. Bake for 20 to 25 minutes until they are golden brown.
Serve right out of the oven with your favorite pizza sauce or ranch dressing for a tasty appetizer or snack.

For more recipes on Review This Click Here:


Note: The author may receive a commission from purchases made using links found in this article. “As an Amazon Associate, Ebay (EPN) and/or Esty (Awin) Affiliate, I (we) earn from qualifying purchases.”


Wednesday, August 9, 2023

Chocolate Covered Grapes Recipe Review

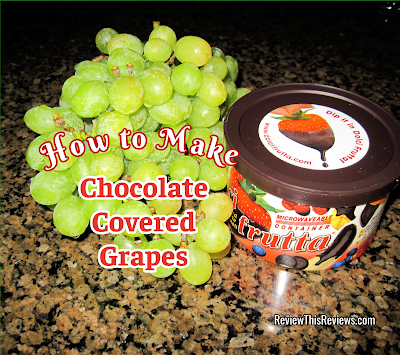
grapes and chocolate to make chocolate dipped and covered grapes
Chocolate Covered Grapes are Fun to Make and Delicious to Eat

Preparing Chocolate Covered or Dipped Grapes is fast and easy. They make a delicious appetizer, dessert or snack. Of course, when you enjoy them as much as I do, they might just make a meal.

Seedless Grapes are one of my favorite fruits and I love chocolate, so it only makes sense that I would combine the two and create Chocolate Covered Grapes.

I discovered Saco Dolci Frutta at the grocery store when I was making fruit selections to create a fruit platter for a party.  The Saco Dolci Frutta was stocked below the fresh fruits.  When I spotted the chocolate, I thought it would be fun to add covered or dipped chocolate to the tray.  It ended up being a big hit!  After the first trial, I started making chocolate fruit for every party.

In this article, I give instructions with photos so you can create this tasty treat for yourself and your family.


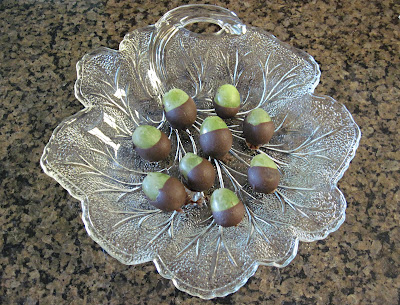
Chocolate Dipped Grapes

Supplies and Ingredients for Chocolate Dipped Grapes

  • Fresh Seedless Grapes
  • Chocolate for Melting ~ I prefer Saco Dolci Frutta featured below.
  • Wax Paper

Easy Directions for Chocolate Covered Grapes

Dolci Frutta Hard Chocolate ShellCheck Price

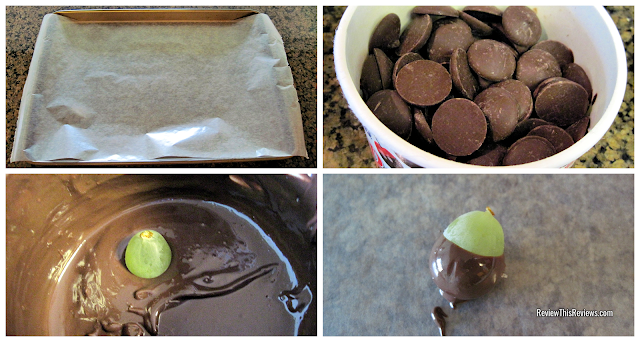
Step 1: Cover a cookie sheet with wax paper ~ The cookie sheet will make it easier to move your Chocolate Covered Grapes.

Step 2: Wash and Dry Your Grapes

Step 3: Melt Your Chocolate ~ If you use Saco Dolci Frutta, you can melt the chocolate in the microwave in their package container. Melt the chocolate in the microwave for 2 minutes on medium and stir the chocolate until it is completely melted. Other chocolates will need to be melted in a double boiler or a microwavable dish.

Step 4: Dip the Grapes in the chocolate

Step 5: Set on wax paper to cool

Step 6: When you have dipped all of your grapes in chocolate, serve or eat.


Best if not refrigerated


Step by Step photos for making chocolate dipped grapes


More Chocolate or Dipped Fruit for Your Platter


Check Out More Recipe Reviews at
ReviewThisRecipes.com


This recipe article was originally published by me in 2009 on a different site that no longer exists. Unless otherwise noted with the individual photo, all Photos are mine and should not be used without written permission.  © 2009 Cynthia Sylvestermouse

Chocolate Covered Grapes Recipe Review Written by:
House of Sylvestermouse


© 2023 Cynthia Sylvestermouse


Note: The author may receive a commission from purchases made using links found in this article. “As an Amazon Associate, Ebay (EPN) and/or Esty (Awin) Affiliate, I (we) earn from qualifying purchases.”


Tuesday, April 19, 2022

Air Fryer Crispy Chicken Wing Recipe

 My air fryer crispy chicken wing recipe and method reviewed

Air Fryer Crispy Chicken Wing Recipe

Everybody in our family likes crispy chicken wings. I have never quite mastered crispy wings until I made them in our Ninja Foodi Grill and Air Fryer. So, if you like your chicken wings crispy this is the way to do it.

We had a crowd the day we made these so I used a 5-pound bag of chicken wings. Normally I would do about 2-pounds.

How I prepared the chicken wings:

one gallon zip lock bags
2 tablespoons olive oil per bag
3 to 4 tablespoons baking powder per bag


Seasoning:

1 teaspoon smoked paprika
1 teaspoon garlic powder
1/2 teaspoon cayenne pepper
1 teaspoon onion powder
1 teaspoon brown sugar

All of the above ingredients are per one bag of 15 or 20 wings. The first thing I did was, rinse the wings with cold water and pat them dry with a paper towel.

You can really use any already made chicken seasoning, just add a generous amount to each bag. Place the wings in a zip lock bag, add all the ingredients and mix well. Set the bags in the refrigerator for about 30 minutes.

I sprayed the air fry pan with non-stick cooking spray. Then, I set the air fry temperature to 390 degrees and the timer for 22 minutes. When the air fryer was preheated I added the wings, fitting about 12 to 15 wings in the pan. After 11 minutes I turned the wings over for the remaining 11 minutes.

Preparing the hot sauce:

1 stick of butter (melted)

Mix this together well in a large bowl. If you really like your wings hot add a dash of cayenne pepper. For me, the hot wing sauce is hot enough. Toss the crispy wings in the sauce and enjoy.

Air Fryer Crispy Chicken Wings

These crispy wings are perfect anytime for a snack or party. Your family and friends will love these air fryer wings.


Find more recipes on Review This here:


Note: The author may receive a commission from purchases made using links found in this article. “As an Amazon Associate, Ebay (EPN) and/or Esty (Awin) Affiliate, I (we) earn from qualifying purchases.”


Friday, November 8, 2019

Chocolate Covered Fruit DIY Recipes Reviewed

Fruit Trays Are Fabulous!

Chocolate Covered Fruit DIY Recipes Reviewed - Chocolate Fruit Tray
Fruit trays have been gracing event tables for many years. Whenever friends or family are planning a wedding shower, baby shower, tea, reception or party, I always volunteer to bring the fruit tray.

For decades, I have prepared Chocolate Covered Strawberries for my family. Purchasing chocolate covered strawberries from a candy store, can be very expensive. Making my own, is inexpensive and easy.

One day I was preparing a fruit tray for a gathering and I decided to take a side dish of chocolate covered strawberries as a special treat. I looked at the prepared fruit tray sitting next to the chocolate covered strawberries and I thought, "why not dip all of the fruit in chocolate?" That is how my chocolate covered fruit tray began. 

Over the next few days, I tested different fruits dipped in chocolate and allowed my family to be the judges. We have found that there are a lot of fruits that we love dipped or covered in chocolate.

This will probably be the first time you have seen some of these fruits covered or dipped in chocolate. After all, the day I prepared them, it was the first time I had seen most of them. 


Chocolate Dipped or Chocolate Covered Fruit Recipe


Preparation to cover any fruit in chocolate begins basically the same way.
  1. Wash and dry the fruit.
  2. Peel, if necessary.
  3. Melt the Chocolate

Some of these fruits have special instructions.

You may wish to visit the individual article for each one. Some articles have examples of large chunks fully covered in chocolate, as well as slices with dipped tips.


Virtually any fruit can be dipped or covered in chocolate. Let me know if you find one I haven't made or featured. I would love to try it!

Chocolate Fruit Tray Recipes

Make a Special Treat


Chocolate covered fruits are wonderful treats anytime.

Either one makes a great afternoon snack, a simple dessert or even a special treat for the lunch box.

Just select your favorite fruit, melt your chocolate and start dipping!


Dolci Microwavable Chocolate & Beautiful Serving Trays


 Dolci Frutta Chocolate Melting Wafers, 8 ounceCheck Price Dolci Frutta Party Kit with Chocolate and White ChocolateCheck Price Dolci Chocolate Wafer Melting, 8 ozCheck Price James Scott Crystal 3 Tier Rectangle ServerCheck Price


Check Out More Recipe Reviews at
ReviewThisRecipes.com


Chocolate Covered Fruit DIY Recipes Reviewed Written by:
House of Sylvestermouse


© 2009 Cynthia Sylvestermouse - This Article was originally published on a website that has closed.


Note: The author may receive a commission from purchases made using links found in this article. “As an Amazon Associate, Ebay (EPN) and/or Esty (Awin) Affiliate, I (we) earn from qualifying purchases.”


Most Recent Reviews on Review This Reviews


Search for Reviews by Subject, Author or Title

The Review This Reviews Contributors


SylvestermouseSylvestermouseDawn Rae BDawn Rae BMbgPhotoMbgPhotoBrite-IdeasBrite-IdeasWednesday ElfWednesday ElfOlivia MorrisOlivia MorrisTreasures by BrendaTreasures by BrendaThe Savvy AgeThe Savvy AgeMargaret SchindelMargaret SchindelRaintree AnnieRaintree AnnieLou16Lou16Sam MonacoSam MonacoTracey BoyerTracey BoyerCheryl Paton Cheryl PatonRenaissance WomanRenaissance WomanBarbRadBarbRadBev OwensBev OwensBuckHawkBuckHawkDecorating for EventsDecorating for EventsHeather426Heather426Coletta TeskeColetta TeskeMissMerFaeryMissMerFaeryMickie_GMickie_G


Review This Reviews is Dedicated to the Memory of Our Beloved Friend and Fellow Contributor

Susan DeppnerSusan Deppner

We may be apart, but
You Are Not Forgotten


“As an Amazon Associate, Ebay (EPN) and or Etsy (Awin) Affiliate, I (we) earn from purchases.” Disclosure Statement

X