Whether you enjoy jewelry making, building, painting or refurbishing models,
other hobby, crafts & DIY projects or doing small electronics repairs,
investing in good quality tools for doing delicate precision work can help
achieve better results faster and with less effort by giving you more precise
control and leverage while reducing the strain on your hands (your most
valuable tools by far!).
Choosing the right tool storage and organization system can not only help
protect that investment but also enhance your efficiency and enjoyment of the
creative process while you are working on your projects. However, I have
learned the hard way how challenging it can be to evaluate, compare and,
ultimately, determine the best solution for your individual tool storage
and organization needs,
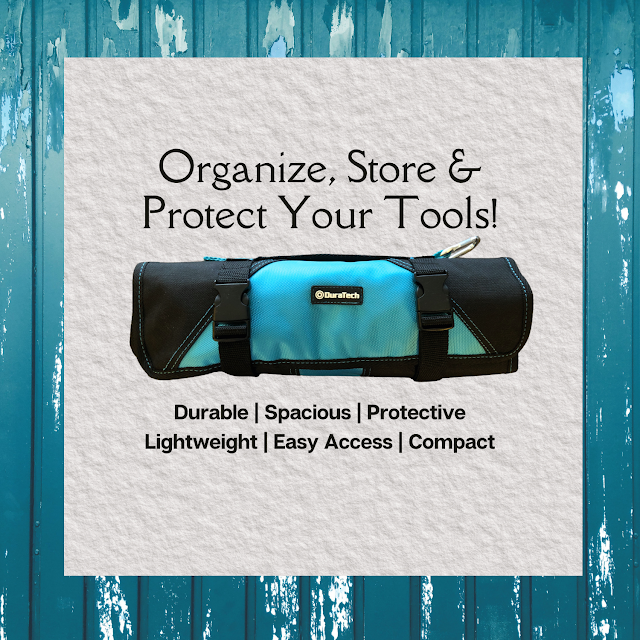
Today, I am sharing my personal product review of the DuraTech Tool Roll Organizer, 21 Pockets Tool Bag Roll that I bought a few months ago as a Christmas gift for my husband, who
has an extensive collection of precision hand tools for his hobbies, crafts nd
DIY projects.
|
|
This awesome waterproof DuraTech 21-pocket tool roll organizer can
securely hold many tools of different sizes and shapes. You can view
them at all a glance, find and remove what you want, and return it to
its spot quickly and easily when you have finished using it.
|
My husband John works long hours at a rewarding but stressful and
high-pressure job. One of his favorite ways to relax and recharge his
batteries is working on a variety of hobby, crafts & DIY projects. He
especially enjoys collecting and restoring rare and hard-to-find, vintage 1:43
scale die-cast model cars and trucks, as well as collecting and refining
hard-to-find plaster buildings for our Christmas village display and then
painting them in stunning, elaborate detail and adding interior lights.
Sometimes, he even adds strategically placed, tiny color-changing LEDs to
create special effects (for example, randomly flashing multicolored lights
inside a Harry Potter-esque magic shop, as though the wizards inside are
trying out different magic wands to find the one that will choose him or her,
or simulating the glow of a blacksmith's forge by carving out a large, wide
opening in a wall, lining it with iridescent, colored foil through which you
can see tiny LEDs, each cycling through red, orange and yellow and out of sync
with each other). We actually display two different Christmas villages, one
made up of lighted Dept. 56 Christmas in the City buildings and another with
John's amazing carved, exquisitely painted and lighted plaster buildings.
During the holidays, our display can take up half of our living room, with two
villages arranged around that year's train tracks layout and connected by
John's wonderful, vintage, O-scale model train collection, some of which he
inherited from his beloved uncle.
Since John isn't easy to buy gifts for, I usually ask him for a Christmas wish
list to give me some guidance. (I also choose one or two gifts for him that
will be complete surprises, but in case they miss the mark, I know that he'll
at least get some of the gifts he really wants!) Two of the items on his most
recent wish list were a set of good quality, upgraded pliers and cutters and a
better storage and organization solution for them and the rest of his
precision hobby tools.
Since I used many of the same items as jewelry making tools, I knew exactly
which pliers and cutters I wanted to buy for him. Xuron makes very high
quality tools for small-scale, delicate, precision work at a very reasonable
price. They are also more durable than similar tools I have purchased from
much more expensive brands. So I chose several pairs of my favorite
Xuron pliers and cutters
as part of John's Christmas gift.
However, while there are lots of great toolboxes and other tool storage and
organization options for larger tools, like hammers, wrenches and sockets, I
knew that finding a better tool storage and organization solution for my
husband that would meet his specific requirements would be a lot more
challenging, since he had already experimented with several different
types of tool organizers and storage that weren't working for him.
|
|
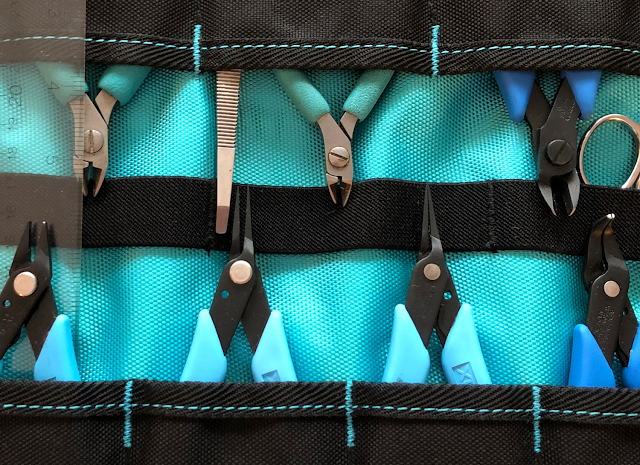
The five Xuron jewelry making and electronics pliers and cutters I
gifted to my husband for Christmas, nestled in the four lower and far
right upper pockets of the DuraTech 21-pocket tool roll organizer I
also gave him to store them and the other precision tools in his collection.
|
Great Tool Storage and Organization Solutions for Precision Pliers, Model
Building Tools, Jewelry Making Tools, Etc. Are Surprisingly Hard to
Find!
Last year, John purchased a secondhand, wheeled O.P.I. nail polish
salesperson's sample case that he has been converting into a super cool,
customized, mobile crafting workstation with a spacious, attached, removable
work surface that he calls his hobby tray. Since he doesn't have a dedicated
workspace for his hobbies and crafts, this clever solution now enables him to
work on crafts and DIY projects whenever he has a bit of time, wherever he
happens to be. Even better, it also doubles as a compact, consolidated storage
organizer for all his painted plaster Christmas village, electronics repair
and vintage die-cast car refurbishing and model building tools, supplies and
current projects.
He has been having a blast "imagineering" (to use a Disney term) and tweaking
his one-of-a-kind mobile craft storage and workstation over time. In fact,
redesigning and refining has turned out to be one of his favorite projects to
date!
He had come up with workable solutions for customizing the interior in terms
of organizing and storing his paintbrushes, paints, glues, sandpaper, markers
and other supplies and for safely storing delicate project works-in-progress.
Unfortunately, he wanted (and needed) a better way to store and organize a
variety of other tools, including pliers and cutters, needle files, riffler
files, X-ACTO knives and blades, hemostats, dental picks, micro carving tools,
tweezers, specialty pens, scissors, miniature screwdrivers, a ruler, a pin
vise, micro drill bits, etc.
These precision tools needed to be easily visible and acccessible while in use
and protected during storage and transport, and the tool organizer not only
would need to fit neatly inside the top compartment of the new mobile hobby
storage/workstation but also work as a standalone, portable tool storage
organizer that he could easily bring to another location, for example, to help
a friend or family member with an electronics or jewelry repair project.
In addition, John's ideal tool organizer and storage solution would need to
hold a lot of tools, in a wide range of shapes and sizes, and store them
compactly, as well as be both lightweight, sturdy and wear-resistant.
Traditional and Nontraditional Tool Organizers Didn't Meet Our Needs
Like John, I have been a "maker" since I was a child. and have spent many
years trying to find better storage and organizing solutions for my jewelry
making, beading, metal clay, polymer clay and painting tools and supplies.
While I discovered some wonderful
bead storage and organization solutions
years ago for my enormous collection of rare and vintage beads and jewelry
making supplies, I continue to search for better jewelry making tool storage
and organization solutions.
Between the two of us, we have tried or considered a variety of traditional
hobby, DIY and craft tool holders and organizers, such as brush holders, tool
caddies, plier stands and tackle boxes. (Plano tackle box systems are
wonderful for storing jewelry findings, beads, and other jewelry making
supplies, but not the best solution for storing, organizing and protecting
delicate precision tools.)
We both have also tried a number of non-traditional tool storage and
organization solutions, such as cosmetics organizers, including the
acrylic eye pencil and lip pencil organizers and
lipstick/lip gloss organizer that I keep on my vanity for makeup. (They work great for their
intended use!)
Unfortunately, every commercial or DIY tool organizer solution either of us
has tried over the years has had significant limitations that failed to meet
our respective precision tool storage and organization needs. As a result,
each of us ended up having to cobble together several different tool storage
and organization products to accommodate our collections.
Some of the Tool Storage and Organizer Products We Tried That Missed the
Mark (and Why)
-
Storing delicate, precision tools in a
Plano tackle box rack system
would give them no protection. They would rub against each other,
potentially nicking or dulling cutter blades or scratching or dinging smooth
pliers jaws, creating uneven surfaces that would transfer to the wire or
metal on which they were used.
-
For example, John's coarse bastard file or diamond-coated riffler files
could wreak havoc on his pair of fine nippers if they were to come
into contact.
-
Another important downside of that type of storage is that it would not be
easy to see each individual tool at a glance and find and remove the
desired one quickly and easily.
-
Tool storage organizers with uniform-size compartments, like brush holders
or marker storage units, would not work for pliers, cutters or similarly
shaped tools. Even straight tools of varying widths, lengths/heights and
diameters could not be stored and organized in these storage solutions
efficiently (and some tools were too wide or thick to fit at all.
-
None of the three common types of pliers storage solutions I have used have
been particularly convenient for me, and none would work for John's mobile
hobby and crafts cart.
A
pliers rack
is fine if you have a permanent spot for it to live in a dedicated
workspace. However, they don't protect the tips of the pliers, cutters or
nippers from each other and would be unsuitable to lay on their sides in
John's rolling hobby station cart.
Wood pliers blocks
keep the pliers and cutters separated and, therefore, somewhat protected.
However, they don't fit every pair of pliers or cutters (especially those
with wider/ergonomic handles or grips), and removing and replacing the tools
into the holes in the block requires a bit more fiddling than we want to do,
especially for the pairs in the middle of the block.
I have a lot of jewelry making pliers and cutters, most of which I have been
storing in zippered tool pouches (similar to this Eurotool tool pouch with zipper), for lack of a better lightweight, easily portable solution. They have
elastic loops or straps inside to hold the tools in place and prevent them
from knocking into each other when not in use. Unfortunately, since the
manufacturer doesn't know the sizes, shapes, handle widths and other
characteristics of the pliers and cutters you own or how many you have, I
have found that unless the zipppered tool case was designed by the
manufacturer for a specific brand and set of these tools, it is very
difficult to use the interior storage space efficiently.
More importantly, in my experience, it is impossible to remove a pair of
pliers or cutters from the elasticized loops without using two hands,
even if the tool pouch was custom designed by (or for) the tool manufacturer
to work with a specific set of pliers and cutters from a single product
line, and especially if the tips have protective caps. So, whenever
you are working on a project and need one of those tools, you have to stop
working, put down the project so you have both hands free, and then wiggle
and coax the required pair of pliers or cutters out from under their elastic
strap restraints (without banging into or dislodging any adjacent pairs)
before you can pick up the project again with your nondomiant hand and try
to pick up where you left off before this unnecessary and distracting
interruption.
The need for a simpler, more compact, more portable tool storage solution
became a much higher priority when John began customizing his new mobile hobby
workstation. (Since we have also been rethinking and trying to redesign my
too-small crafts room/ "studio" space, if I could figure out a great tool
storage and organization solution for John, I had my fingers crossed that
maybe it could work for my jewelry making and crafting tools, too!)
The DuraTech 21-Pocket Tool Roll Organizer to the Rescue
One Tool Organizer and Storage Solution to Rule (and Hold and Protect) Them
All!
|
|
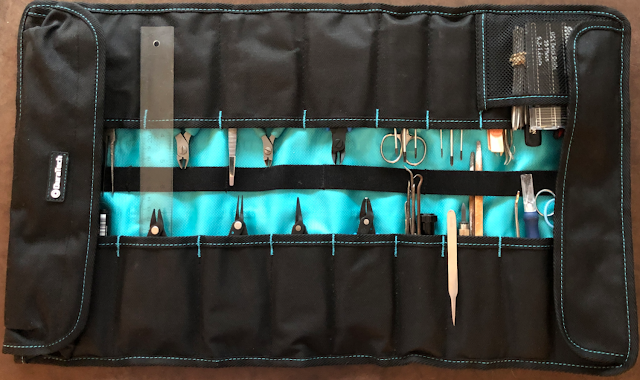
The main pockets are in wider and narrower widths to accommodate a
wide range of tool types, shapes and sizes and provide flexibility in
how your organize them. The bright turquoise blue lining also makes it
much easier to see and distinguish between the "business ends" of
different pliers, cutters and other precision tools.
|
As usual for me when shopping for an important product purchase, I did my due
diligence.
I began with an in-depth needs analysis, asking John to describe in detail his
storage and organization requirements for his model building tools and to take
me through all the types of craft storage he had already tried and explain why
they didn't do what he wanted and needed.
Then, armed with that information (and a spinning head!), I dove into my
product research. Since I had already been looking for solutions to similar
storage and organization challenges for my jewelry making tools for my compact
crafts studio redesign, I was already familiar with a lot of what was out
there and knew that none of what I had found so far would meet my husband's
very specific needs.
Fortunately, my persistence paid off! I wanted to make sure that whatever tool
storage and organization solution I picked for John would be one he would be
happy with, so I had decided to run my choice by him before ordering it,
rather than keeping it a surprise until he opened it with his other Christmas
gifts.
When I showed him the DuraTech Tool Roll Organizer, 21 Pockets Tool Bag Roll I had picked out for him on Amazon, I could telll immediately from his
interest that I was on the right track. The more he read, looked at the
product photos and read the product reviews, the more his eyes lit up.
I placed the order that same day, fingers crossed that he would love his new
DuraTech tool roll organizer as much when he put his gift to use after
Christmas as he did when looking at the product page. Fortunately, he did!
Key Features and Benefits
After filling his new tool organizer with his scale model making tools and
using his DuraTech 21-pocket tool roll organizer for more than a month, here
are the things he loves about his gift.
|
|
Areas of stress are reinforced with bartack stitching between the
pockets and heavy-duty, stitched twill tape bias binding enclosing the
edges of the pockets and flaps. .
|
Durable Premium Fabric, High Quality Construction
-
The double-layer, high-quality, waterproof 1680-denier turquoise blue and
900-denier black oxford cloth fabrics are extremely durable, making this
Dura-Tech tool roll organizer both sturdy and water-resistant. (Oxford cloth
is a tight basketweave fabric. The ones used in this tool roll appear to be
ballistic coated nylon or polyester oxford cloth, similar to Cordura
fabric.)
-
Even if you aren't storing your tools in a car or shed or traveling with
them, so they are exposed to the elements, it's still nice to know that
they will be protected against spills and water damage in the event of an
accident.
-
The comfortable haul handle, adjustable straps, buckles and hook-and-loop
flap closure are also made of sturdy, high-quality materials with durable
construction, e.g.:
-
bartack stitching reinforcement between the pockets and on the top haul
handle, areas most likely to be subject to stress during use.
-
edges of the pockets and flaps are bound with heavy-duty twill tape bias
binding tape and stitched securely with sturdy contrasting thread.
-
After two months of nearly nonstop use, my husband’s DuraTech 21-pocket tool
roll organizer still looks brand new.
Thoughtful and Attractive Design
Pockets Galore
-
The 17 main pockets that span the length of the tool roll's interior along
both sides are tall and come in different widths. The wider pockets can
accommodate and hold most pliers and cutters securely to prevent them from
moving around and potentially causing damage to the working surfaces. The
narrower pockets are great for storing thinner tools and can even
accommodate a 12-inch ruler, as you can see in the photos of my husband's
DuraTech 21-pocket tool roll organizer.
-
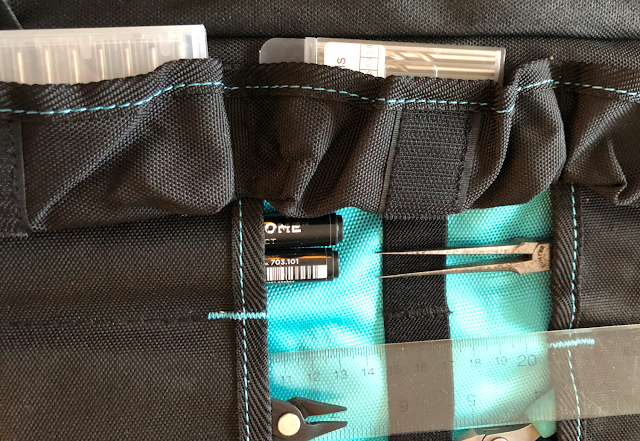
The three shorter, deeper, gusseted pockets at one end can hold a surprising
amount, and there is a flap with a hook-and-loop tape closure to help keep
the contents from escaping accidentally. These are great for storing
smaller items (e.g., a set of micro drill bits housed in a hard storage
case, a set of sockets, small packages of nails, screws or washers, a tape
measure).
-
At the opposite end, there is also a sturdy mesh pocket attached to the
outside of one of the 17 main pockets. Since this mesh pocket is shorter and
also see-through, it's perfect for shorter tools, such as needle files, that
could slide down inside one of the taller, opaque, main pockets, where they
would be hidden and hard to reach.
-
The DuraTech tool roll organizer lays flat when unrolled and filled with
tools, and there’s plenty of room in each pocket. This means you not only
can store all your crafting, model building or jewelry making tools in one
place and see them all at a glance, you can also easily remove and replace
each tool with just one hand while you are working, so you don't have to put
down your project every time you need to reach for a new tool.
 |
| The open mesh
pocket at one end of my husband's DuraTech Tool Roll Organizer holds micro drill bits (in a fitted case), needle files and a small diamond nail file for rounding and smoothing wire ends |
Striking Use of Contrasting Colors Goes Beyond Just Good Looks
-
The two-tone black and bright turquoise color-blocked design looks very
sharp and distinctive. Bonus—the bright blue color makes it easy to spot
your tool storage organizer quickly if you happen to misplace it (or if your
work space, craft room or studio is messy and overcrowded, like mine).
-
The "business end" of the tool(s) in each stitched pocket are much more
visible against the backdrop of the bright turquoise fabric lining in the
center. So, you can quickly and easily distinguish a pair of round-nose
pliers from a matching pair of needle-nose pliers or a Phillips-head from a
flathead mini screwdriver, or pick out an individual diamond-coated riffler
file from others in an assorted set.
Versatile Touches
-
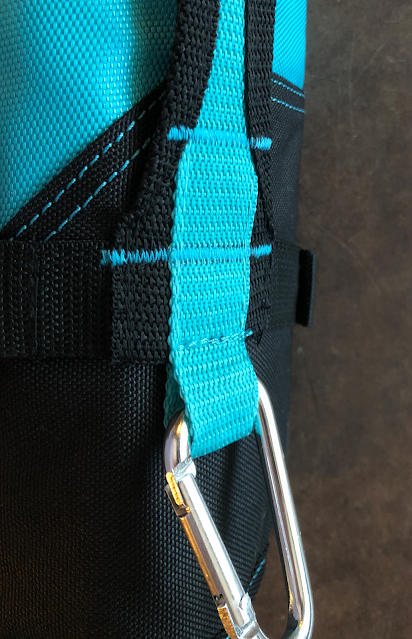
The large, sturdy, aluminum D-ring next to the haul handle can be used to
hang your DuraTech tool roll organizer from a hook or to use as a keyring,
attach a water bottle, etc.
|
|
This close-up photo of the bartack-stitched, reinforced haul handle,
durable, high-denier, heavy-duty oxford cloth fabric and large, sturdy
D-ring help you visualize a few examples of the high quality
materials, workmanship and construction that went into this
superior tool roll orgaizer.
|
Capacious When in Use, Lightweight and Compact When Rolled up for Storage
-
The DuraTech 21-pocket tool roll organizer can hold a lot of pliers,
cutters and other hand tools.
-
The adjustable straps allow this tool roll organizer to accommodate a
large number of tools of varying shapes and sizes and store them securely.
In fact, if you shake the closed and buckled tool roll, you won't
hear any of the tools rattling against each other.
-
As you can see, even after my husband put all his favorite model making,
crafts and DIY and other hobby tools into his new DuraTech tool roll
organizer, there is still plenty of storage room for future specialty
pliers or other precision tool acquisitions. (As any hobby or crafting
enthusiast will tell you, you can never have too many tools, lol!)
-
Given its generous capacity, this tool roll is surprisingly lightweight
and compact. It's takes up relatively little real estate on a work surface
or in a cabinet, drawer or rolling cart and doesn't add much weight to
that of its contents, making it extremely portable.
A Remarkable Value
-
After researching so many tool organizers and storage solutions, I was very
surprised (and delighted) to discover how affordable this DuraTech tool roll
organizer is, given its obviously superior quality materials,
construction, design and durability compared to most of the other types of
storage and organization products I've found during my extensive
searches.
-
Currently this DuraTech 21-pocket tool roll organizer is priced at less than
$18 on Amazon, which I consider an absolute steal in terms of value for
money.
A Inexpensive and Thoughtful Gift for Any Jewelry Making, Scale Model
Making, Electronics or DIY Enthusiast
My husband couldn't be more thrilled with his DuraTech 21-pocket tool roll
organizer. I'm seriously considering buying another for my jewelry making
pliers, cutters, awls and other hand tools.
It's hard to imagine anyone whose hobbies and interests include model
railroading, remote-control cars and planes, building scale models or
dioramas, jewelry making, watch repair, electronics and similar creative
pursuits who wouldn't appreciate receiving such an attractive, thoughtfully
designed, well made and durable storage organizer for their precision tools
as a gift.
Of course, if that description also fits you, I encourage you to consider
treating yourself to one of these terrific DuraTech tool roll
organizers.
The Best Tool Roll Organizer To Store and Protect Your Tools by Margaret Schindel
Read More Product Reviews by Our Review This Reviews Contributors
Read More DIY Reviews by Our Review This Reviews Contributors
Read More Gifts Reviews by Our Review This Reviews Contributors
Note: The author may receive a commission from purchases made using links found in this article. “As an Amazon Associate, Ebay (EPN) and/or Esty (Awin) Affiliate, I (we) earn from qualifying purchases.”


 Scott's 71133 HandyGreen Hand-Held Spreader