As we age, we're more prone to developing dry, cracked heels that can be
painful as well as unsightly. There are many contributing factors, some within
our control and others not. However, if you suffer from cracked heels, you
know they can be challenging to treat effectively.
I've tried many different treatments for this annoying condition. In today's
review, I recommend some simple tips that have helped me the most. Here's to
healing our dry, cracked heels!
What Causes Cracked Heels?
The helpful WebMD article
"What to Know About Cracked Heels" explains that cracked heels can develop "When the skin around your
heels becomes dry and thick...Extra pressure on the fat pad of your heels can
cause dry, thick skin to form cracks, or heel fissures."
According to the article, contributing factors may include:
- Wearing sandals, clogs, or other open-heeled footwear
- Taking hot baths or hot showers
- Using soaps with harsh ingredients
- Standing for long stretches of time
- Cold, dry weather
-
Medical conditions such as hypothyroidism, athlete's foot, heel spurs,
Sjögren's syndrome, or juvenile plantar dermatosis
How to Treat and Repair Dry, Callused, Cracked Heels at Home
After consulting multiple reliable sources, here are the at-home foot care
steps I have followed to heal my dry, cracked heels successfully. I repeat
these steps periodically, as needed, to prevent and heal my heel cracks.
The best time to do these steps is just before bed to allow the
healing foot cream or ointment to soak into the skin and do its work while
you're sleeping.
Caveat: The WebMD article explains that "Occasionally, severely
cracked heels can get infected and lead to a skin infection called
cellulitis" and advises talking to your doctor "if your heels are severely
cracked or don’t improve after you’ve treated them for a week."
Step 1: Use a diamond foot rasp to remove the top layer of thick calluses.
If your calluses aren't too thick and your heel cracks aren't deep, you can
use a pumice stone after soaking your feet in warm, soapy water (see step 2).
However, if your heels are extremely dry and have thick calluses, use either
a Diamancel Diamond Foot Buffer #11 Medium Rasp or, for even thicker calluses, a Diamancel Diamond Foot Buffer #22 Coarse Rasp
followed by the #11 Medium Rasp.
These files are an investment, but they will last for many years and can be
easily washed in hot, soapy water and then dried and disinfected with
isopropyl alcohol after each use.
Note: I have tried but do not recommend the "cheese grater" style metal foot
file. It removes a lot of skin quickly and has sharp "teeth" that make it easy
to accidentally remove too much callus and possibly cut into your skin, which
could lead to infection. This type of foot file also leaves the surface very
rough and requires a lot of effort to smooth with a pumice stone or fine
diamond foot buffer.
Step 2: Soak your feet in warm, soapy water for 20 minutes.
Use gentle soap and warm, not hot water, in a tub or, if you prefer, a
dedicated foot bath. Consider the affordable
HoMedics Bubble Mate Foot Spa, a splash-proof, heated foot bath with water jets and raised massage nodes
to pamper your tired feet. This is on my holiday wish list and would make a
great gift, especially as part of a spa gift basket!
(My mom had a heated foot bath many years ago that she used to bring with her
to the nail salon when she got a pedicure since she was extremely conscious
about good hygiene at the salon. She also loved using it at home to soothe her
aching feet after a long day.)
After soaking your feet for 20 minutes, use a pumice stone to smooth away any calluses or, if you used a diamond foot rasp in step 1, to smooth any roughness left by the rasp(a).
Step 3: Towel-dry your feet well.
Use a clean, absorbent towel to dry your feet very thoroughly, especially in
between your toes to help prevent athlete's foot.
Step 4: Apply a healing ointment or moisturizing cream.
I have tried numerous foot creams to heal dry, cracked heels. Based on my
experience, if you have very dry, callused heels with fairly deep cracks, I
highly recommend starting with the
Kerasal Nighttime Intensive Foot Repair, Skin Healing Ointment for Cracked
Heels and Dry Feet. I discovered this fantastic ointment thanks to the recommendation of a
well-known and highly respected board-certified dermatologist on social media.
I'm very grateful to her for introducing me to this miracle cracked heels
treatment!
It contains 5% salicylic acid, 10% urea and soft white petrolatum to
exfoliate, soften, and moisturize hard, dry, cracked, and callused heels, and
is approved by the American Podiatric Medical Association. It comes in a small
tube, but a little goes a long way.
Another good option is Ebanel Urea Cream 40% plus Salicylic Acid 2%. It has a consistency that one Amazon reviewer likened to Elmer's glue,
which helps it adhere to the skin while it does its work. It may not be the
most cosmetically elegant formulation, but it's extremely effective!
Once your feet are in better shape and your cracks have healed, you can switch
to something less heavy-duty and more economical for daily or nightly
maintenance. Good choices include Dr. Scholl's Dry, Cracked Foot Repair Ultra
Hydrating Foot Cream, Miracle of Aloe Miracle Foot Repair Cream for Dry,
Cracked Feet & Heels, or Palmer's Cocoa Butter Formula with Vitamin E
Foot Magic Moisturizing Foot Cream. All of these are available on Amazon, and
most can be found at a well-stocked drugstore.
Whichever cream or ointment you use, make sure to massage it in very well
before putting on your heel socks or sleep socks.
Step 5: Put on heel socks or thin, breathable bed socks and wear them
overnight.
I prefer wearing thin cotton or bamboo socks to bed if I'm applying my foot
cream or ointment to the balls of my feet as well as my heels. Bamboo or
cotton bed socks allow the skin to "breathe," and thin socks are less
absorbent so your foot cream or ointment stays on the skin of your heels vs.
on your socks.
My favorite socks for this purpose (and also my favorite summer or warm
weather socks) are the SERISIMPLE Women's Bamboo Ankle Socks. They come in a pack of five pairs for less than $17 (at the time of this
post's publication), so $3.40 a pair, and they are excellent quality! They are
thin, soft, and lightweight and slip on easily over foot cream or ointment.
They also come in a very large selection of pretty pastel, mid-tone, and dark
color assortments.
But if my feet are in really rough shape and I'm applying the ointment just to
my cracked heels, I'll put on toeless, silicone-lined heel socks before going
to bed.
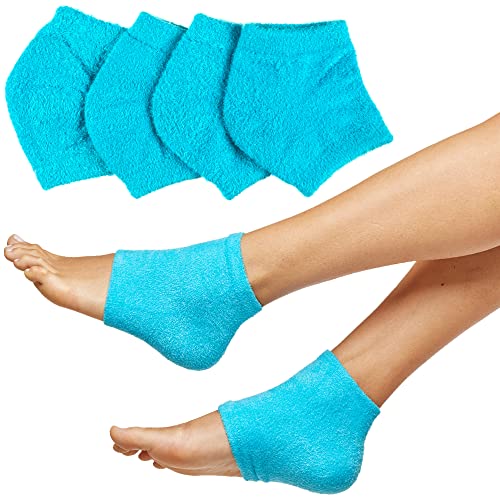
For the latter, I really like the
ZenToes Moisturizing Fuzzy Sleep Socks. The outer shell is a soft,
fleece material, while the heel is lined with a silicone gel infused
with jojoba seed oil, olive oil, and vitamin E to add an extra layer of
softening and moisturizing ingredients where they are needed most.
The silicone gel creates a warm, hydrating environment that helps your foot
cream or ointment penetrate while you sleep. These open-toed sleep socks are
also washable and reusable, and one size fits most. Even after the infused
oils are used up, they still work perfectly with your preferred foot cream.
I also love that these are made by a small, woman-owned business based in
Wisconsin. Although the socks are not manufactured in the USA, the company
prides itself on doing three product quality checks before they are shipped
out to customers: before they leave the factory, when they are received at the
USA warehouse, and when they are packaged in that USA warehouse.
In addition, ZenToes uses individuals with diverse abilities who work for
Opportunities, Inc. in Wisconsin, a Community Rehabilitation Program, to
package their products "with dignity and purpose."
For a short-term quick fix, replace steps 4 and 5 with an intensive repair foot mask.
There are Kerasal Nighttime Intensive Repair Foot Masks that can be used instead of steps 4 and 5, although as single-use products they are less economical (and less environmentally responsible). But they're great if you want to try out the Kerasal Nighttime Intensive Foot Repair ointment to see how you like it before investing in heel socks or thin cotton bed socks.
Also, if you want to wear sandals, go to the beach, etc., and notice at the last minute that your heels are cracked, you can use the Kerasal Daytime Intensive Repair Foot Mask (pack of 2 pairs). These won't deliver the same results as steps 1–5, but they can definitely
improve the way your feet and heels look and feel in less than half an hour.
To use them, start by washing and drying your feet thoroughly. Then, remove
one pair of the foot masks and put them on. Put your feet up and relax
(they're too slippery to walk around in) for 20 minutes, then remove the
covers and massage any residue of the healing cream into your feet.
Helpful Tips to Prevent Heel Cracks
An ounce of prevention is worth a pound of cure. To keep your feet and heels soft, smooth and healthy, here are some habits to adopt that can help prevent or reduce calluses and heel cracks:
- Avoid walking barefoot on hard surfaces
- Wear closed-heel footwear
- Take warm, not hot, baths or showers
- Use mild soaps
-
Dry your feet and in between your toes thoroughly to avoid athlete's foot
-
Keep your skin at a comfortable temperature and moisturize your feet daily
and/or nightly with a foot cream after showering or bathing and drying the
skin well
Disclaimer
I am not a medical professional and this article should not be construed in
any way as medical advice. When in doubt, consult your doctor before
attempting to treat your cracked heels at home.
How to Soften Dry, Callused, Cracked Heels the Easy Way by Margaret Schindel
Read More
Beauty Reviews
From Our Contributors
Read More
Health Reviews
From Our Contributors
Read More
Product Reviews
From Our Contributors
Read More
Gift Reviews
From Our Contributors
Note: The author may receive a commission from purchases made using links found in this article. “As an Amazon Associate, Ebay (EPN), Esty (Awin), and/or Zazzle Affiliate, I (we) earn from qualifying purchases.”


.jpg)


