Showing posts with label photoshop. Show all posts

Thursday, January 13, 2022

Reviewing Photos from 2021


red flower photo by mbgphoto
Beauty from Behind

Whether you are taking photos for fun or professionally it is a great exercise each year to review the photos you took the year before.  By doing this you will help yourself to become a better photographer. Looking through the previous year's photos and picking your favorites will tell you a lot about yourself as a photographer.  It will give you a better idea of what type of photos you tend to gravitate to and also what types of photos you need the most improvement.  I challenge you to take some time to look at last years photos and pick out few that you feel are your best. 

My Review of 2021 Photos

I took this challenge in a couple of photography groups in which I participate.  I found it to be a fun and rewarding experience. 

I have three different cameras that I use on a regular basis.  A Sony DSLR A57, a Sony mirrorless 6300, and my iPhone 11 Pro.  When I went through the photos, I did not look for ones from each camera, but rather just looked for the photos I liked.  I was surprised to find that all three cameras were represented in the 13 photos I ended up choosing as my favorites.

I had played around a lot in Lightroom and Photoshop during 2021 and I found a few photos in my favorites that reflected some of the new features I learned.  But I also noted that some of my favorites just went back to basic good photography without any enhancements added.

My Favorites for 2021

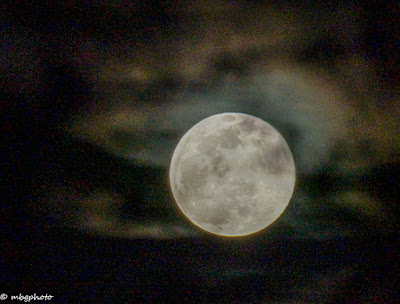
One of the photos I really liked was a photo of the Wolf Moon taken on January 28, 2021.  This photo was taken with my Sony DSLR and a 600mm lens.  I used an f stop of 6.3 and a speed of 1/400.  

wolf moon photo by mbgphoto

I always like to photograph birds and birds in the snow are particular favorite shots.  Here is one I captured in February with my DSLR with the zoom at 250mm.  It was taken through my sliding glass doors of some Cardinals at a feeder on our deck.

birds on a bird feeder photo by mbgphoto


Since we were homebound much of 2021, I found that I had a lot of backyard bird photos.  Here is another favorite.  A bluebird I took in April.  Again, with my DSLR camera this time with the lens zoomed in to 600mm.

Eastern Bluebird photo by mbgphoto


In April we got a new dog, Dixie, and she became a favorite model.  Here is a photo I took of her in May.  This one was taken with my mirrorless camera and a 25mm lens.  I edited it in Lightroom to select the subject and then black out the background with the exposure slide.  I like the effect.
jack russell terrier dog photo by mbgphoto


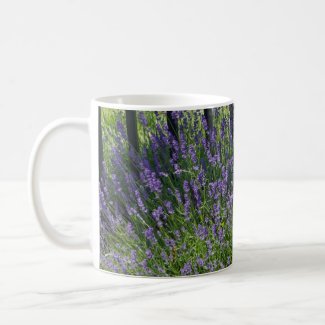
In June I went to a lavender farm to find some new subjects for my photography.  I took several shots with my mirrorless camera.  This one caught my eye with the bee on the plants.  It was taken with a 210mm lens and enhance in Photoshop with a Neural filter.  I like the look the filter gave to the photo.
lavendar farm photo by mbgphoto
Lavendar Farm


In July I captured these coneflowers with my iPhone.  It really does take great photos and the colors are brilliant.  

coneflowers photo by mbgphoto


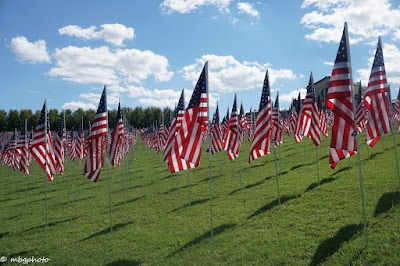
A photo outing in September was to Art Hill in St. Louis where there was a display to honor those who were killed from 9/11.  It was called Flags of Valor and this photo was taken with my mirrorless camera with a 24mm lens.

Flags of Valor photo by mbgphoto


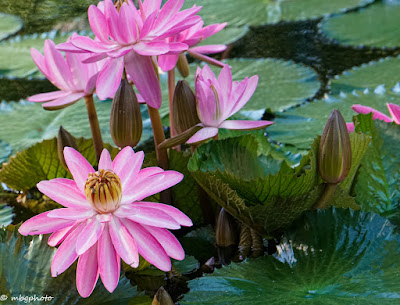
In late September we took a trip to the Missouri Botanical Garden.  I had my Sony mirrorless camera with me.  It is really my go to camera now whenever I am out and about.  It is lightweight and I think takes a quality photo.  Here is a photo taken of some water lilies at the garden.

water lilies photo by mbgphoto

The next photo, also from the botanical garden is of the Japanese bridge.  Fall colors were just started to come out so I took this photo into Photoshop and enhanced it with a Neural filter.

Japanese bridge photo by mbgphoto


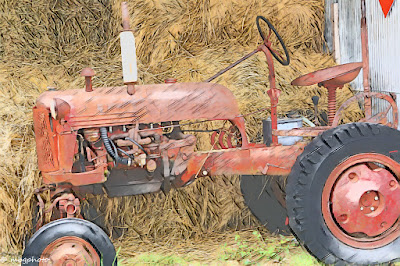
In October I went to a farm with a group that I am the mentor for their photography club.  We took photos of pumpkins and animals and some farm machinery.  Here is a photo of a tractor.  I was using my mirrorless camera and this one I took into Photoshop and used one of the Neural filters.

tractor photo by mbgphoto


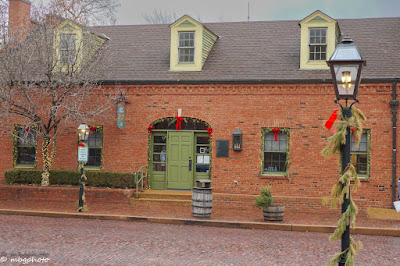
In December I went with the group to downtown historic St. Charles.  Here is a photo I took of the visitor center.  Again, I was using my mirrorless camera.
 
St Charles visitor center photo by mbgphoto

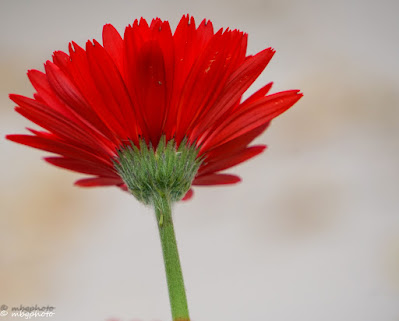
The photo at the beginning of this article is one I took in October of a final flower on the pot on our deck.  I was using my Sony mirrorless camera.
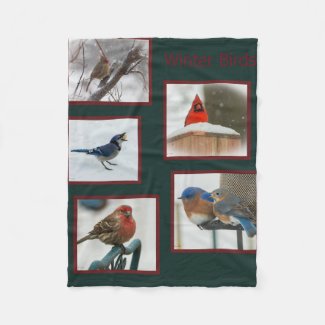
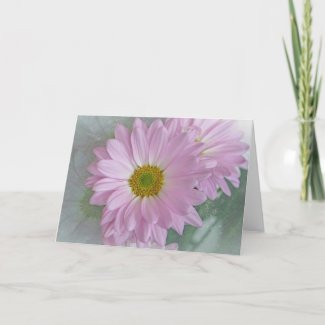
My Photos on Zazzle

I enjoy making Zazzle products from my photos.  Here are a couple I made from my favorite photos from 2021.


Note: The author may receive a commission from purchases made using links found in this article. “As an Amazon Associate, Ebay (EPN) and/or Esty (Awin) Affiliate, I (we) earn from qualifying purchases.”


Thursday, November 12, 2020

Review of Adobe Photoshop and Lightroom Updates


Jupiter Lighthouse with cloudy skies
Jupiter Lighthouse with Cloudy Sky

I really love the  new features of Lightroom and Photoshop that came with the updates in October of 2020.  Most of the time I have found that I have to practice several times and try to remember all of the steps for a new feature.  However, with these new features I read a summary of the changes once and right away I was able to use the new features.  They were that easy to  use.  In this post I will give you some examples of my three favorite new features.


Sky Replacement


One of the really fun new features in Photoshop is the sky replacement.  You could always replace skies on photos, but in the past it required you to remember several different steps in Photoshop and it was hard to select just the right amount of sky.  With the new sky replacement all you do is pull up "Sky Replacement" from the drop down menu and the sky is automatically selected.  You then have a wide variety of choices on sky replacements or you can create your own skies.  In the photo of the lighthouse above and the three shown below I replaced the skies with the selections already built into the system.  Each replacement only took seconds.  Which of these skies do you like best?

Jupiter Lighthouse with pretty blue sky background
Jupiter Lighthouse with Blue Sky

Jupiter Lighthouse with a rainbow


Jupiter Lighthouse with Rainbow
Jupiter Lighthouse with sunset sky background


Jupiter Lighthouse at Sunset


Color Adjustments in Lightroom

With the new updates in Lightroom, color adjustments have never been easier.  First there is a color grading panel that gives you opportunities to separately adjust colors for the midtones, shadows and highlights.  They are very easy to use, I suggest opening the color grading panel in the develop module and experiment with what each of the color wheels will do for your photograph.

In the  photos below I replaced the color of the flowers.  This was accomplished in just minutes using the adjustment brush.  I clicked on the brush, set the size of the brush I wanted and then adjusted the color in the hue slider.  Next I brushed over the parts of the photo that I wanted to change the color and just that easy I turned the pink flowers into a orange colored flower.


pink flowers
orange flowers
The photo above shows the original pink flower.  In the photo to the right, I easily changed the color of the flower with just a few simple brush strokes.


Neural Filters

I find it fun to try out different filters on some of my photos.  With the latest update, Photoshop added a new section of filters.  They are found under the filter tab and then under Neural Filters.  They are very easy to try.  Just click on the filter you want to try and you will see a preview of what your photo will look like with that filter. There is also a button to select if you want to preserve the color and another if want to focus on the subject.  Along with those two choices there are several sliders that let you determine the amount of filter that you want to apply. In the photos below, I applied four different filters to the same fall scene.


fall scene with wheelbarrow and fall flowers

wheelbarrow of pumpkins and gourds with fall flowers

decorative fall wheelbarrow and flowers

fall scene with fall flowers, pumpkins & gourds

Zazzle Products from my Photos

If you would like to see my photos on a wide variety of products, please stop by my Zazzle store at www.zazzle.com/mbgphoto


Note: The author may receive a commission from purchases made using links found in this article. “As an Amazon Associate, Ebay (EPN) and/or Esty (Awin) Affiliate, I (we) earn from qualifying purchases.”


Thursday, February 27, 2020

Review of Designing Collages and Composites in Photography

bird collage photos by mbgphoto

Putting photographs into collages is a fun way to display a grouping of photos.  In the grouping above I show a simple collage with a group of my bird photos.

Create a Simple Collage in Lightroom


The above collage is one that I created in Adobe Lightroom.  To make this collage I moved several of my bird photos to the Print option at the top left of the Lightroom screen and then followed the directions to add the framing and sizing.  You also have options to change the color on the frames and the background and to add some text.

Here is another collage that I made in the same way.

bird collage photos by mbgphoto


Composites


I belong to a Facebook group called "Create 52" where each week we have a theme to create a photograph and post it on the page.  One of our recent themes was called Collages/Composites.  I posted one of the collages that I made on Lightroom.  I then decided to try to stretch my knowledge and try some of the composites.  Many of the other members were posting some very interesting composites.  Composites are a very creative way of using your photographs.  For my first try I went to Photoshop and opened the collage of the Cardinals and then opened a texture that I had of snow.  I combined the two into one photograph and then changed the opacity to get the desired effect.  Here is the resulting photo.

bird photo collage by mbgphoto


More Advanced Composites


After seeing some of the other posts in our "Create 52" group, I decided to try some composites using multiple photographs.  I had been on a field trip with a group I help mentor in photography and we went to a local college and several students displayed their musical instruments for us to photograph.  I took several of the photographs and combined them into one design and then used a photo of some sheets of music for a texture.  Here are two of my designs.  Remember, I'm just learning but I think you can get the idea.

saxophone photo by mbgphoto

instrument with music score overlay photo by mbgphoto


Creating your own Collages and Composites


If you are interested in trying one of these procedures there are a lot of tutorials that will help you online.  If you have Photoshop just search for tutorials for creating composites in Photoshop.  If you use other editing software just search online and I'm sure you will also find tutorials for them.  Many of the tutorials are on YouTube and are free.  You can watch them and pause whenever you need to review a step.  I have learned a lot on YouTube.


Zazzle Design from my Collage


Note: The author may receive a commission from purchases made using links found in this article. “As an Amazon Associate, Ebay (EPN) and/or Esty (Awin) Affiliate, I (we) earn from qualifying purchases.”


Thursday, May 23, 2019

Creative Photography- Combining Techniques

pansies through lensball photo by mbgphoto
In this post I will review two techniques I have talked about in previous posts and give tips on how to combine them to create some fun and creative photographs.

Lensball

A lensball is a fun way to break away from the normal photos and get a bit creative. Here is a photo I took of a friend photographing the St. Louis Arch,  I took his photo through a lens ball that was sitting on a tripod next to him.
photographer through lensball photo by mbgphoto
On this post Crystal Photography Ball , I show you basic techniques on using a lensball.  These basic techniques are the first steps in creating the combined technique you see in the introductory photo.


Textured Backgrounds

Whenever you want the background to be different from your photo it is quite simple to change backgrounds in Photoshop.  Some backgrounds I make myself and others I get online.  Whichever method you choose, the tips in this post will help you to change your background. Photoshop Texturing Techniques
African daisy photo by mbgphoto
The photo above is a shot of an African daisy put on a textured background.

Combining Techniques

Now for the fun and creative part. When you take photos with a lensball first of all the photo is upside down and second the background just never seems to look right. At least mine usually doesn't.  I was contemplating this problem when I thought about my textured background technique I love to use and decided I could apply it to my lensball photos.  Here is a photo I created using these combined techniques and then the steps I followed to create the photo.
dipladenia flower through lensball photo by mbgphoto


  • First I took a photo of my new Dipladenia plant and edited it in Lightroom.  I saved the photo on my desktop.
  • Next I took a photo of the same plant using my crystal photo ball.  I put the photo ball stand on a table right next to the plant and focused my camera on the plant image inside the ball.  I brought the photo into Lightroom and inverted the photo so the image in the ball is right side up.
  • Next I opened the first photo in Photoshop.
  • With the first photo open I clicked on File and Place Embedded in Photoshop.
  • This brought the ball photo into photoshop covering the original photo.  I then used the Lasso tool to outline the ball and I clicked on Create and Mask in the top bar.
  • Now I used the slider to get the effect that I wanted.  I used the transparency and the feather sliders.  I next clicked done.
  • Now I click on the little square mask symbol at the bottom of the layers column and again moved the sliders to get the desired effect.
  • Finally I used Save As and named my file and saved it as a JPeg file.
I do this procedure as second nature now, but it took me a lot of practice before I got any results that I was happy with.  I wish you much fun and success in your quest for Creative Photography.


Note: The author may receive a commission from purchases made using links found in this article. “As an Amazon Associate, Ebay (EPN) and/or Esty (Awin) Affiliate, I (we) earn from qualifying purchases.”


Thursday, April 25, 2019

Review of Texturing Technique in Photoshop

Pink Daisy with texturing technique applied on photo by mbgphoto

A favorite technique of mine in Adobe Photoshop is texturing.  The photo above shows a photo of a flower with a textured background.  This photo is actually a combination of two different photographs that I shot.  The foreground is the daisy flower and the textured background is a photograph of my windshield with ice on it.  On this post I will review some of the steps needed to create this photo and then show some other photographs I created using this procedure.


Creating a Textured Background

There are many places online that you can buy textured backgrounds, but I like to create my own using parts of photographs that I have taken.  Here are a few from my library.  They include a couple of sky images, a brick wall, fire (from my fireplace) and the icy windshield that I used in the introductory photo.


photo background created by mbgphotophoto background created by mbgphotophoto background created by mbgphoto

photo background created by mbgphoto


Steps to Create Textured Photo Composite

The steps below are the ones I used to create my textured background images.  There are several different ways to do different procedures in PS(Photoshop) but these are the ones I find easiest for me.  I have never taken a class on PS, but rather have taught myself through the use of the tutorials on PS (great for the basics) and YouTube tutorials you can find online for many different specialty techniques.  Here then are the steps used to create the photo like the one at the top of this post.
  •   I first Open a background photo in PS. I used my icy windshield background for the photo at the top of this post. I also always make a duplicate copy of the background photo.
  • Next I click on file and then Place Embedded to select the photo that I want in the forefront.  In this case my daisy photo. The new photo will come in on top of the background photo and I will then stretch or reduce it to make it the same size as the background photo.
  • The next step is to pick out the area of the photo that you want to highlight.  In the case of the daisy photo I use the Quick Selection tool to outline the main daisy.  I then click the  button at the top that says Select and Mask.
  • This will open a new window that will give you the opportunity to use sliders to bring in as much of the background texture as you want.  Play with the sliders till you get the desired effect and click done.
  •   This will bring you back to the main screen where you will now click the little square at the bottom of the layers column that adds the layer mask.(when I first started I always got hung up because I forgot this important step.)
  • Next you will tweak the sliders for the layer mask to get exactly the effect you desire.
  • Now you just save your work and you have created a beautiful photo with a textured background.
  • This took a lot of practice for me to get all the steps right so don't get discouraged if at first you don't succeed.

    Samples of my Textured Background Photos

    pink daisies with brick background photo by mbgphoto
    Daisy  with Brick Wall Texture

    Eastern Bluebirds photo by mbgphoto
    Bluebirds with Sky Texture Background

    candle through lensball with textured background by mbgphoto
    Candle in Crystal Ball with Fire textured background

    Photoshop Texture Book on Amazon


 Zazzle Card with Textured Photo


Note: The author may receive a commission from purchases made using links found in this article. “As an Amazon Associate, Ebay (EPN) and/or Esty (Awin) Affiliate, I (we) earn from qualifying purchases.”


Saturday, October 21, 2017

How to Create Pinterest Images with Photoshop


How to Create Pinterest Images with Photoshop - A Step by Step Guide
Today I'm going to review how to create Pinterest images with my favorite photo editing software - Photoshop!  I create most of my Pinterest images with Photoshop, I have tried a few other places, but I always come back to Photoshop.

I've been asked quite a few times how I create my images for Pinterest which is why I thought I'd just show you.  Now I can't promise you that your images will take off in popularity on this social media platform, but I can promise you that the steps will be easy to understand.

I have been using Photoshop for a few years now, but the way I create the majority of my images are easy for beginners and experts alike to follow.

The first thing you have to do is open up your Photoshop and select a new file, I simply press Ctrl N to do this, but you could use the file menu and open it that way.

You will be greeted with a pop up box where you have to select your image details, it looks like this -

set image measurements on photoshop

I only change two things on the default and that is the width and height as you can see on the image.  I have changed the image height a few times, but the majority of the time I just use the standard 738 x 1105.

The next step means finding the image you want to use for your pin so I've decided that I want to do a pin for my welcome to Lou16.com post (I can't believe I was missing a Pinterest image on that post until I wrote this!)

I'm going to use the image I have in my introduction as the main image for my Pinterest image as well so let's have a look at what we're going to do....

add image to draft for Pinterest with Photoshop,

So the first thing I do is create a new file, then I open up the photo I want to use and drag it onto the new file.

1.  Here you can see that this image has a border that I created previously.  I'm going to use this color for the background so to do this I need to use the eyedropper tool to select the exact color.
2.  This is the eyedropper tool.  To use this you click on the tool and then click on the color that you want to select.
3.  After selecting the color I make sure to select the correct layer (in this case the blank one as I'm using this for background.
4.  The paint bucket tool will cover the layer with the selected color.

After doing all of these steps you'll be left with the next image.

add background color to Pinterest images with Photoshop,

3.  I'm going to do things backwards here and get you to look at number 3!  When I did the background color the teal was on top and the white was underneath, as I'm thinking of doing the text in white I switched them around.  Sometimes when you're using two colors you can just change between these two to save having to use the eyedropper tool again.

Back to our image..

Now I want to add some text to the image so I have to select the text box.

1.  This is the Text box and you have to click on this before adding any text.
2.  This is the text tool bar, you can change the color from here (it will default to the top square at number 3 unless you change it), you can also alter the font, the font size and whether you want to use a bold or italic or both.

add text on Pinterest images with Photoshop,

As you can see I dragged the image down a little so that I could add text above and below it.  Above I just used regular and underneath I selected italics.  You can also highlight just one or two words and change their color or size in order to make an impact.

1.  There are different things you can select on the side including a border which I always use for my Pinterest images.  You select the border (or arrow as I have done on these images for you) and click apply - the color on top of the color box is what color the object will appear as.

I didn't want to use white as a border because the website background is white so I used the eyedropper tool to select another color from the photograph.

I always try to pull either the border, background or text (sometimes all of them) from the actual photo as you know it's going to go.

Create Pinterest images with Photoshop,

I always keep Photoshop open until I see the final image uploaded to the website.  In this case I uploaded the border from a light green in the foliage that really made it pop on Photoshop, but looked strange on the white background of the website.

I then changed the border to the blue of my t-shirt, but again on the white background of this site it just didn't look quite right.  The third and final one is what is pictured above and I've use the brown of my hair!

Now you don't always have to use a photo, sometimes I'll use a graphic from a site like Pixabay and use that.

This is a very basic way to create a Pinterest image using Photoshop, as you get used to using it you can get more and more creative with using several images merged together like this one from another post I created -

Get Traffic to Your Website

In this image I used an image of traffic which I reduced and played with to get it to fit onto the laptop screen.  The background is taken from the laptop color and you can see I changed the color and font size of the 21 in the image.

Start off simple and as you get used to using these tools you'll find yourself creating all kinds of images, try not to become too addicted to Photoshop as once you start down this rabbit hole you can lose all sense of time!

You might be interested in my other Photoshop tutorial (and there will probably be more to come!) -


Peach Cobbler RecipeHow to Remove Blemishes From Photos Using Photoshop
Let's review how easy it is to use Photoshop to remove blemishes from photos, trust me it's really simple and well worth the time spent to restore old family photos.


Our contributors here on Review This also use other platforms to create their images for Pinterest so be sure to check out our tips for writers including -


... and let's not forget our Pinterest tips -


Before leaving I'd like to tell you one of the things that really helped me with getting traffic from Pinterest (obviously the images help!) and that was using Tailwind, I highly recommend this scheduling tool for anyone who wants to harness the power of this visual social media platform.

If you've found this article helpful please share on your favorite social media platform.

A Step by Step Guide to Creating PInterest Images with Photoshop
Image by Lou of Lou's Designs


Note: The author may receive a commission from purchases made using links found in this article. “As an Amazon Associate, Ebay (EPN) and/or Esty (Awin) Affiliate, I (we) earn from qualifying purchases.”


Most Recent Reviews on Review This Reviews


Search for Reviews by Subject, Author or Title

The Review This Reviews Contributors


SylvestermouseSylvestermouseDawn Rae BDawn Rae BMbgPhotoMbgPhotoBrite-IdeasBrite-IdeasWednesday ElfWednesday ElfOlivia MorrisOlivia MorrisTreasures by BrendaTreasures by BrendaThe Savvy AgeThe Savvy AgeMargaret SchindelMargaret SchindelRaintree AnnieRaintree AnnieLou16Lou16Sam MonacoSam MonacoTracey BoyerTracey BoyerRenaissance WomanRenaissance WomanBarbRadBarbRadBev OwensBev OwensBuckHawkBuckHawkDecorating for EventsDecorating for EventsHeather426Heather426Coletta TeskeColetta TeskeMissMerFaeryMissMerFaeryMickie_GMickie_G


Review This Reviews is Dedicated to the Memory of Our Beloved Friend and Fellow Contributor

Susan DeppnerSusan Deppner

We may be apart, but
You Are Not Forgotten


“As an Amazon Associate, Ebay (EPN) and or Etsy (Awin) Affiliate, I (we) earn from purchases.” Disclosure Statement

X