 |
| Pallet Wood Feature Wall and Window Seat |
When I purchased my current country home, many of the features that most appealed to me were the quirky, whimsical touches that made it so unlike all of the other cookie-cutter properties. After moving in, though, I discovered a few things that were just a little too
different for my taste. Still, in renovating those oddities, I wanted to remain true to what had drawn me to this house in the first place: the use of character wood (weathered wood that captures your imagination).
In today's post, I am sharing part one of a two-part series focused on creating a DIY pallet book nook from a previously unused space in my upstairs bedroom. We will start with the woodworking elements of the project and then finish with handcrafted decorating touches (a homemade cushion, pillows, rug, and other decor to cozy up the space).
Because I have poured so much of myself into my master bedroom renovations, it has become my favorite room in the entire house. One last improvement remained to make this space visually and functionally cohesive. There was a funky "hallway" in the room that housed my exercise bike (because it didn't lend itself to much else). The thing that really bugged me about that long, narrow space was a weird, uneven application of drywall. I couldn't knock that wall down because it housed my closet and was most likely structural (helping support the roof). And, hanging, mudding, texturizing, and painting new sheetrock just wasn't on my bucket list. Been there, done that. Not my idea of a good time. So, what to do?
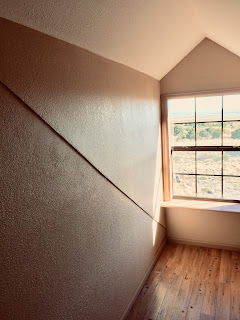 |
| Funky Drywall Before Renovation |
Recycled pallets are the answer to most of the truly pressing needs in my world. Seriously. Pallet wood can right most wrongs. It just requires a little—well, okay, a lot—of elbow grease. I'm good with that. The finished product has always proven worth it. We'll just skip over the less than scintillating details of finding, hauling, deconstructing (pulling a massive number of ornery nails), and refinishing (cutting, sizing, planing, and sanding) a tall pile of pallets. On to step eight.
 |
| Tape Marks Studs Where Planks Will Be Nailed |
With the feature wall pallet planks ready for installation, I prepped the wall by finding and marking the studs.
 |
| Leveling Wall Sections With Lath |
Next, I applied thin strips of wood lath to level the two sections of drywall, which will provide a more solid backing when nailing in the pallet planks. The wainscoting pictured above consists of three framed pieces of corrugated metal topped by a chair rail. It provides a nice contrasting texture, as well as adding a reflective surface to lighten up the space.
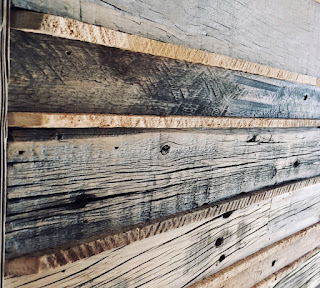 |
| Oh the Tales This Wall Could Tell |
When I nailed in the rows of pallet wood, I decided to alternate different widths and colors. I left all of the wood in its natural state, as the original saw blade marks, nail holes, knots, and checking is what adds personality. As I started working on this step, I got the inspiration to separate rows of planks with horizontally placed strips of recycled lath removed from inside the plaster walls of an old ranch house. The definition of the chiseled edges of lath created an effect similar to the chinking seen between bricks. Really, though, it is the history of that lath, and the story it tells, that adds so much value and interest to the feature wall.
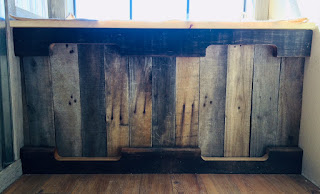 |
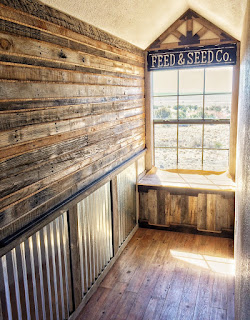
| Rustic Pallet Window Seat |
No book nook would be complete without a window seat. Again, I used rustic pallet parts, purposely choosing planks with nail streaks, and then trimming the bench with pallet skids. Where there was fresh wood from making the cuts, I applied chalkboard spray paint, and then sanded off most of it to blend the color with that of the naturally weathered surfaces.
 |
| Books Feed and Seed the Mind |
Above the window, I created a decorative king post truss trim that matches the actual support truss on the front of my house. I like the way it ties everything together. While working on this truss, I happened to find the metal Feed & Seed sign at Tractor Supply Co. It seemed like the perfect message for my new space, as books certainly do feed and seed our minds. When I got home with the sign, I was amazed that it fit exactly in place between the truss and the window. That never happens. I knew then that it was meant to be.
 |
| My Nook is Ready for Accessorizing |
With the construction work done, I am now in the process of accessorizing my new nook. I have selected fabrics and will soon start sewing the window seat cushion and pillows. Stay tuned for part two of this DIY series when I post the final reveal. So, what do you think? Could you see yourself curled up with a book in this sunny space?
Note: The author may receive a commission from purchases made using links found in this article. “As an Amazon Associate, Ebay (EPN), Esty (Awin), and/or Zazzle Affiliate, I (we) earn from qualifying purchases.”


