


It's time for a DIY project for the true romantics out there. Is there anything lovelier than fresh cut flowers in an antiqued mercury glass vase? Perhaps the reason mercury glass is such a popular centerpiece at weddings is the nostalgic effect it has on us. I absolutely love the understated beauty and elegance of silvered glass. The look, and the effect, is way too wonderful to save only for special occasions.
I invite you to follow along with me and transform your own gorgeous flower vessels. It takes very little time and money to create the beautiful mercury glass effect presented here. In less than an hour, you can be enjoying your own timeless centerpiece. If you're like me, you'll get hooked and create any number of these mercury glass vases for yourself and for gifting to friends and family. This is a gift you can be sure will be used and appreciated.

* White vinegar
* Water
* Misting pump bottle
* Paper towels
Optional
* Tarp or plastic drop cloth
* Wooden dowel rod
* Gloves
- Mix one cup of white vinegar with one cup of water. Pour into misting bottle.
- Use a paper towel or soft cloth to wipe your glass clean.
- Protect work surfaces with a tarp, newspapers, or a drop cloth.
- Test mister to ensure you will get a very fine spray.
- Shake up your spray paint for two minutes.

Step 6
Depending on the type of glass container you are painting, you may find it very helpful to use a dowel rod. Supporting your vase with a dowel makes it easy to mist and spray all of the surfaces at the same time (without getting paint on your hands or fingerprints on your vase). It also enables you to spray the bottom of the vase without waiting for the paint to dry on the sides of the container.
When I was painting the test tube vases, I used short dowel rods that I stood on end in an old piece of wood. All I did was drill some holes in a two-by-four. Then, I stacked each test tube on a dowel, leaving enough space in between to give me room to maneuver with the mister and spray paint.

When I was painting the test tube vases, I used short dowel rods that I stood on end in an old piece of wood. All I did was drill some holes in a two-by-four. Then, I stacked each test tube on a dowel, leaving enough space in between to give me room to maneuver with the mister and spray paint.

Steps 7-8
Spray a very fine mist of the vinegar water on your vase. The key to success is to start with a very light coating of the mist. If you get large, running droplets, go ahead and wipe it down with a paper towel and start again.
Immediately spray over the mist with a light coat of the Looking Glass spray paint. You will repeat these steps two to three times, so it is important not to try to get all of the silvering done all at once. Light layering is essential to getting the desired vintage look of mercury glass.

Step 9
Very gently dab all over the misted and painted surface of the glass with a clean and dry paper towel. You want to blot up all spots of water and any larger droplets of paint. This step creates the aged look of the silvered glass.
Step 10
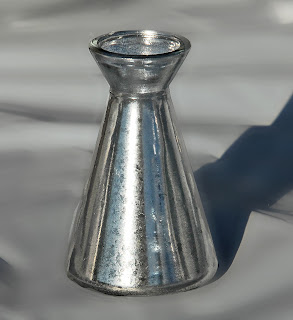
Repeat the misting, painting, and blotting process until you are happy with the final effect. I repeated the process three times on the vases pictured in this tutorial.
Step 11
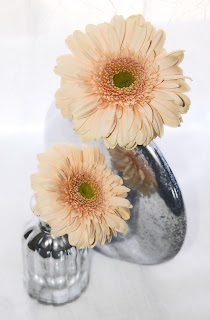
Once the paint is dry, experiment with arranging your favorite flowers in your gorgeous mercury glass vases. They look really nice in groupings of various sizes and shapes.
 In this example, I placed three mercury glass test tubes in an antique bed spring. The addition of a beveled mirror base created stability and an interesting reflective quality. Peonies seemed just right for this type of vintage floral arrangement.

Mercury glass centerpieces don't have to be expensive to look like you spent big bucks at a floral shop. Use the glass you already have at home. It is so easy to upcycle any ordinary jar or cheap vase into something extraordinary. There is something incredibly satisfying about giving a face-lift to a common, plain item.
We all hold the power of transformation in our hands. Let's go create and share some beauty today.
Immediately spray over the mist with a light coat of the Looking Glass spray paint. You will repeat these steps two to three times, so it is important not to try to get all of the silvering done all at once. Light layering is essential to getting the desired vintage look of mercury glass.

Step 9
Very gently dab all over the misted and painted surface of the glass with a clean and dry paper towel. You want to blot up all spots of water and any larger droplets of paint. This step creates the aged look of the silvered glass.

Step 10
Repeat the misting, painting, and blotting process until you are happy with the final effect. I repeated the process three times on the vases pictured in this tutorial.

Step 11
Once the paint is dry, experiment with arranging your favorite flowers in your gorgeous mercury glass vases. They look really nice in groupings of various sizes and shapes.


Mercury glass centerpieces don't have to be expensive to look like you spent big bucks at a floral shop. Use the glass you already have at home. It is so easy to upcycle any ordinary jar or cheap vase into something extraordinary. There is something incredibly satisfying about giving a face-lift to a common, plain item.
We all hold the power of transformation in our hands. Let's go create and share some beauty today.
Note: The author may receive a commission from purchases made using links found in this article. “As an Amazon Associate, Ebay (EPN), Esty (Awin), and/or Zazzle Affiliate, I (we) earn from qualifying purchases.”
FOLLOW US ON:


