 |
| Ramshorn Snail Shell - Olloclip Macro Lens |
Up until this year, I had not done any photography with my cell phone cameras. When my laptop died a while back, I had to rely on an older iPhone to take the photos for my online blogs, reviews, and social media posts. That necessitated the discovery and use of a few key photo apps and, just recently, the use of clip-on smartphone lenses. In the ongoing process of learning as much as possible about iPhone photography, I came across several references to the Olloclip macro, wide angle, and fisheye lens kit. Today, I am reviewing my initial impression of these lenses (which are available for many different brands and models of phones).
When I purchased my
Olloclip lens kit, I was mainly interested in the two macro lenses (magnification times 10 and 15). I wanted to take some really up close and personal photographs (think flowers, butterflies, bees, dew drops, etc.). Macro is also great when I need photos of the jewelry I sell online. The wide angle lens will be used primarily for landscape photography (can't wait to try it out at the
Great Sand Dunes). It is also perfect for group shots, selfies, and videos. The fisheye lens will be fun for the animal photography—like those cute nose shots—I do to help shelter dogs get adopted. It is also wonderful for lighthouse photography (spiral staircases especially).
 |
| Rescue Dog Finn - Olloclip Fisheye Lens |
As I have been getting into macro photography, I have found it helpful to start indoors, since it takes some patient practice to learn how close to be to the subject, how to get the focus right, how to stage the object for an interesting photo, and, perhaps most importantly of all, how to handle the lighting. I don't have to deal with the wind indoors, either. That is a huge plus.
 |
| Flexible Tripod, Olloclip 10X Lens, iPhone |
Yesterday, I was experimenting with some shells I had found on the beach. I used natural lighting by a window. With macro, a tripod is essential, as is a remote shutter release (or the use of your phone's shutter timer). I set up some black foam boards and a tiny easel covered in a sheet of black felt for my backgrounds. With the Olloclip 10X macro lens, I was able to get incredibly close to my subject (just a few millimeters away). Not much will be sharply in focus with ultra macro photography (but the right kind of blur is the appeal), so the trickiest part is moving the mini tripod around until you find the special effect, and point of focus, that expresses your unique point of view. It's all about the angle.
 |
| Ramshorn Snail Shell Without Macro Lens |
You can see just how small the snail shell actually is in the photo above using a regular camera lens without macro (about half an inch).
 |
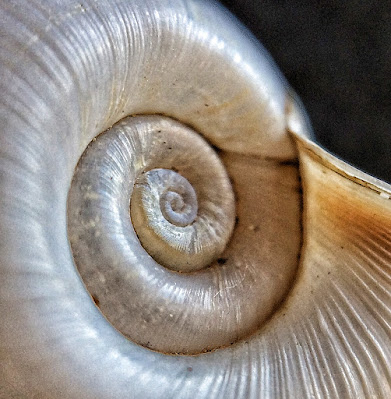
| Ramshorn Snail Shell - 10X Magnification |
This is the same shell photographed with the Olloclip 10X macro lens. I used the free
Snapseed photo app for cropping and minor adjustments.
 |
| Sundial Shell Without Macro Lens |
Next, I experimented with a Sundial shell I found on Padre Island. Two photos are provided for comparison. The photograph above was taken with my Nikon D200 with a zoom lens. The photo below was taken with an iPhone 5s (ancient compared to the latest iPhones) and an Olloclip 10X macro lens.
 |
| Sundial Shell - Olloclip 10X Macro Lens |
Today, it was time to get outdoors and test the wide angle lens. I'm sure most of you can relate to the frustration of not being able to get all of your subject into the photo frame. First, I snapped a regular shot of this historic truss bridge with my iPhone (the Lobato Bridge over the Rio Grande in southern Colorado). As you can see below, the right side of the bridge was cut off.
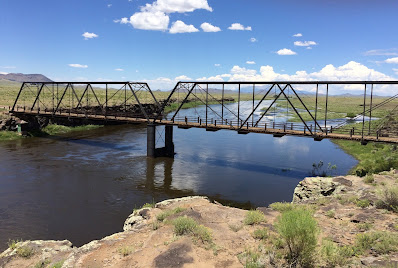 |
| The Lobato Bridge - Built in 1892 |
The photo below was taken with the Olloclip wide angle lens. I was able to get all of the double-span bridge in the photograph even when standing much closer to the bridge than in the first shot. There was plenty of extra margin for cropping.
 |
| Bridge Photographed Using Olloclip Wide Angle Lens |
One thing I did notice is that this wide angle shot is a bit fuzzy near the edges of the photograph. I'm told Olloclip has a free app for making image adjustments. I will check that out and update you.
 |
It's not what you look at that matters,
it's what you see. ~Thoreau |
I was lying on the forest floor while pointing the Olloclip fisheye lens directly skyward when I created this photo. This image reminds me of an eye, with the trees forming the iris. In a forest devastated by wildfire, I was looking at the emergent green undergrowth and seeing how to embody the Phoenix.
 |
| Phoenix Rising: Self-Portrait |
All of these photos are first attempts. Once I experiment, and perhaps invest in a newer smartphone with a more advanced camera, I'm sure my photographs will evolve. You have to start somewhere and learn by trial and error. In this case, I don't really care if the photos aren't perfect. For me, photography is a reflective practice. I photograph things that move me, and I practice photography to learn how to see more clearly, to learn how to pay deep attention, and to immerse myself in beauty and wonder.
If you enjoy pushing your creative boundaries, you really can't go wrong with Olloclip products. They offer good quality, affordable tools for the smartphone photography enthusiast. There are more expensive options, but for just getting started, I suspect most of us like to keep costs reasonable. This is a good budget choice. I feel I got my money's worth.
olloclip 4-IN-1 Lens for iPhone 6/6s and 6/6s Plus Silver Lens/Black Clip (Wide-Angle, Fisheye and Macro Lens)Check Price
Note: The author may receive a commission from purchases made using links found in this article. “As an Amazon Associate, Ebay (EPN), Esty (Awin), and/or Zazzle Affiliate, I (we) earn from qualifying purchases.”


