Showing posts with label how to. Show all posts

Thursday, May 31, 2018

Vintage Lamp Bird Bath - DIY Tutorial and Review

vintage lamp repurposed as a bird bath

I was visiting my muse the other day, Pinterest, when I came upon the most delightful inspiration.  Have you seen the creative bird baths that are being made from vintage lamps?  I'm pretty sure I would never have thought of this fun, and ingenious, idea on my own.  As one who loves to give cast off items new life, this was the perfect project for me.  In case you also enjoy whimsical garden features, I am sharing my DIY process to prime your pump.

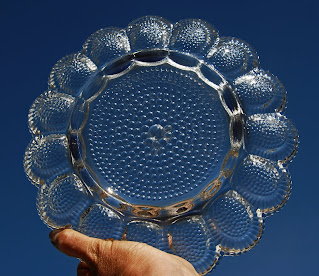
glass serving dish

First, I needed an old lamp and bird bath basin, so I took a little field trip to a couple of thrift stores.  Goodwill had exactly what I needed.  On my first shopping expedition, I found a glass serving dish that reminded me of a sunflower.  Amazingly, that is the exact vision I had for the theme of my creation.  Who knew an egg platter could be so lovely?

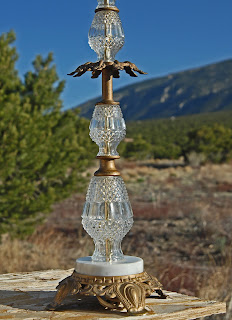
crystal or glass lamp

Next, I went on the hunt for the right lamp to complement my new bird bath dish, and to serve as its base.  Because thrift stores are always receiving new donations, I found the perfect lamp on my very next trip to the store.  The crystal, marble, and brass features, along with the size of the lamp, were just right in every way.  I couldn't wait to get home and put the finishing touches on my vintage bird bath.

lamp bulb holder

Step One: Unscrew the light socket and remove it from the top of the lamp.

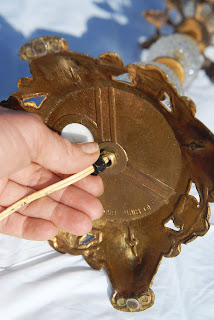
lamp electrical cord

Step Two:  Clip the electrical cord and pull it out through the lamp base.  

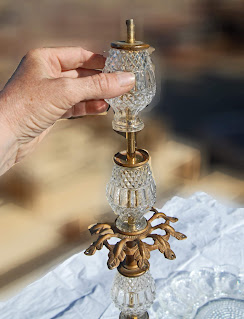
sections of crystal lamp

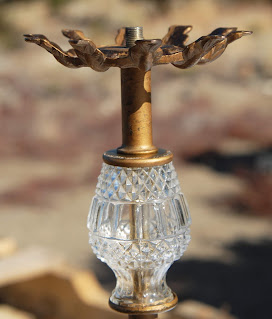
Step Three:  I removed each individual section of the lamp and reassembled the pieces to better support the basin section of my bird bath.  I moved the brass leaf section to the top of the column and reversed it (turned it upside down) to serve as the support arms for my glass dish.  

brass holder on lamp

Step Four:  Though I had intended to glue the platter directly to the brass arms, I found that they weren't totally level, so I riveted a circular metal candle holder to the brass piece.  I spray painted the metal silver since it would show through the bottom of the water basin.  I wanted a natural looking reflection.

serving dish on lamp holder


gluing a glass plate to a lamp candle holder

Step Five:  I used E6000 glue to affix the glass dish to the candle holder.  I ran a bead of glue all along the circular rim on the bottom of the egg platter and carefully applied pressure for a minute or two after centering the dish on the metal plate.  Then, I let the glue cure for a couple of days.

e6000 glue

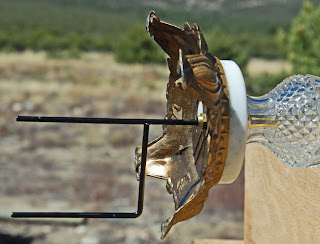
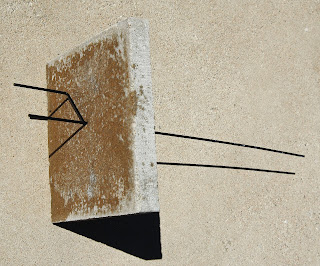
Step Six:  Since I don't want my glass bird bath to tip over and shatter, I ran a metal post up into the center column where the cord used to be housed.  I purchased an inexpensive plant hanger at the dollar store.  It has stakes to anchor the base of the lamp into the ground.  I measured the height of the lamp and then cut off the hook top of the planter stake.  For extra insurance, since the winds are often incredibly strong where I live, I drilled a hole through the center of a cement patio paver and inserted the metal rod through it before installing the rod inside the lamp.  Now my bird bath is very stable and far less likely to get knocked over by the wind or wild critters.  As a bonus, it now has a level platform on which to stand.  I'll be planting flowers around the paver to make it more attractive.

metal post


patio pavement square and metal post


metal post placed through patio pavement square


vintage lamp bird bath


Your steps may not be identical to mine, because every lamp is slightly different, but there are enough similarities to give you a sense of how to go about assembling your bird bath.  You may be able to find a lamp that already has a glass shade.  In that case, you won't need a separate glass dish.  I preferred knowing that my glass dish would not be toxic to birds and I didn't have to seal any holes that had been drilled through a lamp shade.  

I am very pleased with my unique bird bath.  It is so satisfying to take an unwanted item or two and turn them into a conversation piece.  More than that, I feel like I am showing a little love to the beautiful creatures who share my garden habitat.  It has been an especially dry season.  With the mountain creek dried up at the moment, it feels wonderful to provide a source of sustenance for the precious birds that fill my life with their sweet presence and songs.

Let me know if you decide to make your own bird bath or garden art with a vintage lamp.  I would love to see how you use your creative gifts.


Note: The author may receive a commission from purchases made using links found in this article. “As an Amazon Associate, Ebay (EPN) and/or Esty (Awin) Affiliate, I (we) earn from qualifying purchases.”


Tuesday, December 26, 2017

Social Media For Writers Reviewed

Authors Need To Market Their Work

writers market
Writer Image courtesy of Pixabay.com
One of the gifts that I just received for Christmas was the book Social Media For Writers. My daughter thought it might be helpful for me to brush up on the skills needed to be successful with the use of Social Media in regards to my marketing strategy in order to sell my books. 

If you are a regular reader of Review This, you are probably aware that I published my first Cozy Mystery novel in October of 2017. Then in November I published my second book in the series. It isn't like in the past when if you were lucky enough to find a publisher for your books who offered you a contract. Back then if you were a writer with a large publishing firm, they did a lot of the marketing for you. A lot of us have gone the self-publishing route which means that all of the marketing is up to us, the author. Even if we had a big name publisher we would need to market our own work. Most publishing companies of today only spend their advertising money on well known authors (who kind of don't need it but that is another topic all together!). 

Those of you who know me probably think that I probably already understand how to use social media because this isn't my first rodeo with a writing gig. I might have published my first fictional work but I've been around the block several times when it comes to promoting my online writing ventures. I do understand the basics of social media and use it regularly but I will admit not to its fullest potential. The game is different for authors in particular and let's face it...the way to use these social networks changes on a regular basis. How many times have you reached a point where you feel that you have figured it all out, to have one or two of the popular sites change the playing field? I'm guessing a lot!

So, I really appreciate my daughter gifting me this book! I'm reminding myself of the basics while being able to come up with a strategy for my writing and promotions.

What I like about this book by Tee Morris and Pip Ballantine is that it is written in an easy to understand format. As I said, I'm not new to social media but even if I were the content would be easy to understand. They do a really good job of explaining how each option works and best practices for a writer to use on each platform. They cover blogging, podcasting, Twitter, Facebook, Tumblr, Google+, YouTube, Pinterest and Instagram. Do they recommend that you try to use all of them? Actually, no. They understand that if one were to try to have a solid presence on all of them; there would be no time for the actual writing of the books. They suggest that you pick the three that you are most comfortable with and go from there.

As I am studying this book, I feel confident with their advice. They are both authors in their own right and I can tell by the content that they actually use social media to promote not just this book but a series of books that they have co-authored together. I don't know about you but for me that is huge. I'm sure that you have experienced the same as I have over the years with getting advice from a so called expert who has less experience than you do when the dust all settles.

I really like that the authors break down the formats and give realistic time frames for using them. Having experience with most of these social media networks, I can tell that they are giving good information on the time that can be invested in working with the different options. They are even honest about having invested a lot of time on a few of them and figuring out that for their needs and their time constraints, it wasn't worth it. That doesn't mean that you will come to the same conclusion because we all have different styles and comfort levels. I do appreciate their honesty in the results for themselves!

Now, I realize that not all of you are planning to write a novel or a work of non-fiction; that being said I do know that many of you have a strong online presence either contributing here on Review This or your own sites. Perhaps you contribute on another multi-user site. My point is that much of the information will be beneficial for your online work as well.

I know in the past, I have tried to have a presence on all of the social media sites. It doesn't take long to get burnt out trying to keep up. Reading a book like Social Media For Writers is helpful in reminding us of what it is we want to accomplish and the audience we are trying to reach. This book gives some realistic advice on coming up with a strategy that is not overwhelming and that with the proper effort put forth should offer a successful result. It is not going to happen overnight but with dedication and a good plan, it can happen.

I am finding this book very helpful and I think that many of you will, also. I know I am changing my strategy after having read it. I am going to concentrate on three platforms and not worry about all of the others. How about you? If you were going to limit your marketing to three platforms, which would you be willing to invest your time in?


Note: The author may receive a commission from purchases made using links found in this article. “As an Amazon Associate, Ebay (EPN) and/or Esty (Awin) Affiliate, I (we) earn from qualifying purchases.”


Friday, June 17, 2016

How to Change a Blogger URL to a Custom Domain URL

Custom Domain URL on Blogger - Easy Instructions

Easy Instructions for Changing a Blogger URL with Photos

There are several reasons why you might want to redirect a blogger url to a custom domain url.  In my case, I didn't want to transfer all of the articles on blogger to a new site just to have the custom domain url.  Custom domains are easier to remember since they most often match the site name.  They also don't require readers to remember the "blogspot" part of the url.  It is so much easier to tell friends, family, and readers to visit ReviewThisReviews.com than it is to tell them ReviewThisPersonalReviews.blogspot.com.  Now that our site has been redirected, either the old url or the new custom domain url will land you here.

Even though we have owned the custom domain name for years, I was hesitant to make the redirect.  I feared all kinds of evils would befall us.  I worried that we might even be offline for hours or days.  All of those concerns were unfounded.  Nothing bad happened and within 30 minutes, our custom domain was completely set and our site was redirected.

Now, let me share our extremely easy directions for redirecting a blogger site to a custom domain.  These instructions are written with bloggers in mind, not computer web designers.  The instructions are written in plain, easy to understand English and I have included lots of screenshots so you can see exactly what I am talking about in each step. 

Instructions for Redirecting a Site URL


If you follow these instructions, they will work.  Some steps may require waiting time for the DNS settings to activate, but that does not mean you have made a mistake.  Simply be patient and allow the internet to process your commands. 

1) Purchase Custom Domain - I use Namecheap, so these instructions will show their dashboard 

2) On the Blogger Dashboard, click Settings > Basic 

3) Click the link "+ Setup a 3rd party URL for your blog" 

Easy Instructions with Photos for Changing a Blogger URL to Custom Domain


4)  Go to the Namecheap Dashboard and click "Manage" by the url you wish to use, then select "Advanced DNS" from the top tabs.
 
Easy Instructions for How to Change a Blogger URL to a Custom Domain URL

Easy Instructions for How to Change a Blogger URL to a Custom Domain URL


5)  Copy the domain url, go back to the blogger dashboard, and paste the domain url in the box.   
BE SURE TO START THE DOMAIN URL WITH www.      
example:  www.thetoymousestore.com      
(If there is a / at the end, remove it)
 
Easy Instructions for How to Change a Blogger URL to a Custom Domain URL

6)  Click Save - This will auto-populate the information you need for the next step.
 
Easy Instructions for How to Change a Blogger URL to a Custom Domain URL

7)  Copy the destination (ghs.google.com) and Go Back to the Namecheap Dashboard.  Paste ghs.google.com in the CNAME record value box replacing "free.park-your-domain.com."  Make sure the www is in the Host section  

8)  Click "add a new record" and select to add another CNAME Record (See Screenshot Below)  

9)  Paste the second line of letters and numbers in the appropriate CNAME boxes  

Easy Instructions for How to Change a Blogger URL to a Custom Domain URL

10)  Click all of the check marks - they will disappear and little trash cans will appear 

11)  Go back to the Blogspot dashboard and click Save.   (If it doesn't save right away, wait 15 - 20 min and try again.   One of my blogs took about  15 min for the DNS settings to activate so I could save it.) 

12)  Once saved, confirm the new domain url is working by viewing your actual blogLook at the address to confirm url change.
 
Easy Instructions for How to Change a Blogger URL to a Custom Domain URL


13)  One last VERY IMPORTANT STEP!   

On the Blogger dashboard, under Settings > Basic, click the "edit" link beside the new url and check the box beside "Redirect 'YourSiteName'.com to www.'YourSiteName'.com.    This ensures that the www.  is not required in the url to find your site.   (This may also take a few minutes before it will allow you to save it)  

Easy Instructions with photos for changing a blogger url to a custom domain url


Congratulations!   
You are done, so go Celebrate!!!


You may also enjoy seeing our new Quick View Home Page here on Review This!  This page features articles you may have previously missed, while also providing excellent examples of the types of reviews published on our site.  

I will be sharing instructions on how to create your own Quick View Home Page for your blog soon.


Quick View Home Page on Blogger


How to Change a Blogger URL to a Custom Domain URL written by:
House of Sylvestermouse


Note: The author may receive a commission from purchases made using links found in this article. “As an Amazon Associate, Ebay (EPN) and/or Esty (Awin) Affiliate, I (we) earn from qualifying purchases.”


Sunday, November 30, 2014

How to Put Fun into Your Holidays

family christmas card
Wouldn't we all love to put some fun back into our holiday preparations? Here are tips to help you do just that. Remember those days as a kid when the holidays were all about excitement, anticipation and just plain fun. It's time us grown-ups got to enjoy that as well.

Shop Online for Some Fun


Skip the crowds, the traffic, the lines and the surly salespeople. Shop online for just about everything you need from holiday decorations to gifts. The contributing writers for Review This put together a great holiday gift guide just to help you do that very thing. 

You can get in the mood for some fun Christmas time while still
front door decorated for Christmas
curled up in your pj's and fuzzy bunny slippers. Just do it online. Christmas Time Treasures has lots of those great pages to help you with holiday decorations for your home, like pre-lit Christmas trees, festive kitchen towels, even holiday cats on decorative pillows (www.web-surfing-with-susan.com/christmas-cat-throw-pillows). 

Get your Christmas tree decorated with personalized ornaments or something even more fun like Eiffel Tower ornaments (www.web-surfing-with-susan.com/eiffel-tower-christmas-ornaments). Holidays are definitely easier and much more fun when you shop online from the comfort of your own home. 

Take Some Time to Relax


bubble bath
Since you won't need to spend many extra hours fighting the malls and the traffic, use that time to relax and do something you love. For me, it's a long hot bubble bath with festive scented soaps (www.the-bubble-bath.com/get-in-the-holiday-spirit-with-a-festive-bubble-bath) and reading a great Christmas mystery book (www.mysterybookworldlive.com/holiday-mysteries/christmas-mysteries).  Now, we're talking relaxing. 

Whatever you like to do to relax, do it. Your own holidays will be more fun. More like those days when you were a kid and the whole month of December was all about the excitement, anticipation and fun.


Posted by: BuckHawk
Buckhawk

About This Contributor

BuckHawk decribes herself as "Basically a lazy person who prefers the easy things in life." So that's what she writes about. Easy home decorating, easy recipes, easy entertaining. But, she is also a lover of animals, gardening and crafting. You'll find her writing all over the Web, but with Review This Reviews! she has the opportunity to write about all of her loves.


Note: The author may receive a commission from purchases made using links found in this article. “As an Amazon Associate, Ebay (EPN) and/or Esty (Awin) Affiliate, I (we) earn from qualifying purchases.”


Tuesday, April 8, 2014

Tile in a Snap


tiled home entry
SnapStone Floating Tile
Seven years ago I bought a new home that was about 70 percent complete.  Part of the 30 percent that remained to be finished included flooring in two bedrooms, the upstairs loft, a half bath, pantry, laundry room, and stairwell.  To make the house immediately livable, I put in some flooring that was trendy at the time.  I figured if a product passed the Divine Design test of my HGTV guru, Candice Olson, it was certainly more than worthy of installation in my home.

I’m still happy with most of the flooring I installed, but I have since rescued a dog.  Anyone who has cared for larger dogs knows they can be hard on flooring.  The area that has taken a beating is the stairwell landing where Toby likes to hang out by a picture window that gives him a place to keep an eye on what’s happening in our world.  I need to install a tougher material that can take heavy traffic.

Having decided on tile, since my animals love to soak up the sun in front of that window, I have been researching DIY options.  How I love to come across web pages that show an innovative home improvement product in action.  There are many websites pushing products, but few that are exceptional when it comes to demonstrating an actual installation.  I appreciate a how-to presentation that is honest in sharing what went right as well as lessons learned.

Here’s one of the best Squidoo lenses I found.  KateHon demos a fabulous floating tile flooring option while sharing before and after photos of a bathroom renovation.  I can see myself installing this tile floor in my home.  How about you?

Have you published a home improvement product review?  If so, stop by and let me know.  I hope to feature your work.  You can find me at Home Renovation Central and "Do or Di DIY."


Note: The author may receive a commission from purchases made using links found in this article. “As an Amazon Associate, Ebay (EPN) and/or Esty (Awin) Affiliate, I (we) earn from qualifying purchases.”


Most Recent Reviews on Review This Reviews


Search for Reviews by Subject, Author or Title

The Review This Reviews Contributors


SylvestermouseSylvestermouseDawn Rae BDawn Rae BMbgPhotoMbgPhotoBrite-IdeasBrite-IdeasWednesday ElfWednesday ElfOlivia MorrisOlivia MorrisTreasures by BrendaTreasures by BrendaThe Savvy AgeThe Savvy AgeMargaret SchindelMargaret SchindelRaintree AnnieRaintree AnnieLou16Lou16Sam MonacoSam MonacoTracey BoyerTracey BoyerRenaissance WomanRenaissance WomanBarbRadBarbRadBev OwensBev OwensBuckHawkBuckHawkDecorating for EventsDecorating for EventsHeather426Heather426Coletta TeskeColetta TeskeMissMerFaeryMissMerFaeryMickie_GMickie_G


Review This Reviews is Dedicated to the Memory of Our Beloved Friend and Fellow Contributor

Susan DeppnerSusan Deppner

We may be apart, but
You Are Not Forgotten


“As an Amazon Associate, Ebay (EPN) and or Etsy (Awin) Affiliate, I (we) earn from purchases.” Disclosure Statement

X