

|
|
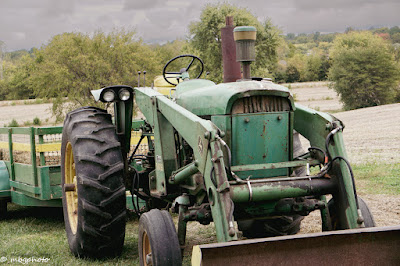
Tractor Edited with Vintage Preset |
In October of 2021 Adobe Creative Cloud introduced a series of
updates to their photo editing programs. My favorite program in the
Creative Cloud is Lightroom Classic and I am very excited about all of the
updates that were included in the latest version.
Presets
One of the updates in Lightroom Classic is a number of new presets that are
available to the user. Presets are a series of editing features that
are put together to give a certain look or feel to a photograph. With
these presets the photographer can give a slight change to the photograph in
just one click. Some of the presets included in the new update were
ones for portraits, landscapes, vintage looks, retro looks, black and white
and many more. In the photo at the top of this page I took a photo of
an old tractor and used one of the vintage presets on it. In deciding which
preset to use I merely ran my mouse over each choice and a preview of the
photo with that preset was displayed. I then chose the one that I felt
best fit the mood I was looking to create.
Masking
The biggest and I believe the best new feature is the Masking
feature. In this feature all of the local adjustment tabs were merged
into a single masking icon. The existing adjustment tools were
all moved to this icon and in addition two new options were added.
These are the options I am really excited about and feel I will use
often. They are Select Sky and Select Subject. These options use
artificial intelligence to select the sky, people, animals and other object
in the photo. You then have the ability to easily adjust just the
selected objects. Let me show you with a few examples.
Select Subject
Often, I have a great photo of a subject, but the background is
too cluttered. In this photo my husband is seated in front of a busy
looking bookshelf. I was able to use the Select Subject and with just
a couple of clicks I selected his photo and then was able to pull the
exposure all the way down on the background to turn in black.

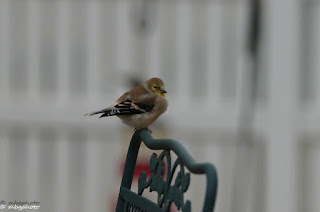
I will give you another example. In this photo you see a bird but it
is really not standing out in the photo. Here is the original.
Here is the same photo with the bird really standing out.
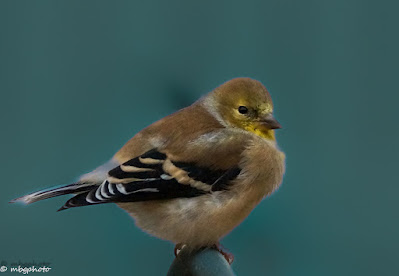
Here are the editing steps I took to create this look. First of all I cropped the photo to pull the bird in close. Next I used the mask feature and did a Select Subject to isolate the bird. After that I inverted the mask to have the background selected and I played with the various sliders to get the background I wanted. In this case I used the exposure, temp, tint, clarity and dehaze sliders. All of this took just a couple of minutes and I believe I went from a mediocre photo to one I really like.
Select Sky
I have often gotten a great photo of a subject but was very disappointed
with the sky. I knew I could fix the sky, but this was often very
time consuming. With the new Select Sky feature I can now change
the sky in seconds. Here is an example of one photo I took on a day
when it was very cloudy but the direction the photo was taken from made the
sky appear very plain. First the original photo.

I took this photo and went into the Masking feature and did a Select Sky. I then used the dehaze and texture sliders to give more depth to the sky. Here is the resulting photo, which I like much better.

Note: The author may receive a commission from purchases made using links found in this article. “As an Amazon Associate, Ebay (EPN), Esty (Awin), and/or Zazzle Affiliate, I (we) earn from qualifying purchases.”
FOLLOW US ON:


