Who doesn't like to be pampered with a special gift they wouldn't normally buy for themselves, especially during the holidays or for another special occasion?
Whether you have nearly finished your holiday shopping or are just getting started, you can order these these beauty gifts and have them delivered quickly. I've included gifts at a variety of price ranges in this review, from stocking stuffers to splurges.
Happy gift-giving!
Note: I am an Amazon Associates and a ShopMy affiliate partner. If you purchase anything through the product links in this review, I may earn a small commission.
Beauty Gifts Under $25
These inexpensive gifts pack a big punch for their low price tags. They're perfect stocking stuffers for the beauty lovers on your list or anyone who could use a bit of pampering.
 NISHEL Large Hanging Travel Toiletry Bag for Women
The Nishel Travel Toiletry Bag is far and away the best bag of its kind I have ever owned, and I have tried a lot of different brands and models over the years. It holds a LOT of products, from shampoo, soap, conditioner, deodorant, body lotion, razor, etc., to sunscreen, skincare and makeup — enough for quite a long trip, if desired — while keeping everything neatly organized and easily accessible throughout your stay.
Despite how much it holds, it folds and zips up into a compact size with convenient carrying handles.
I wrote an in-depth product review of the Nishel Travel Toiletry Bag last year that includes photos of how I pack mine so you can see just how much it holds and how you might want to organize yours. Also, although it is marketed as a women's travel toiletry bag, it would also be great for men who like to travel with more toiletries than can comfortably fit in a traditional Dopp Kit style bag.
 NISHEL Large Double Layer Travel Makeup Bag
The NISHEL Large Double Layer Travel Makeup Bag is for women who travel with a lot of makeup and prefer a train case style bag.
This large-capacity makeup bag measures 10.5 x 7.5 x 7 inches and has both top and bottom makeup storage compartments with a capacious center section with elastic straps that can accommodate even large fluffy makeup brushes easily.
The large main section can hold bottles, tubes, compacts, palettes, etc., and includes a removable divider that you can position as desired (or omit). The top section, inside the lid, is a shallow zippered compartment that's perfect for a larger makeup palette.
Like the travel toiletry bag, the outer shell is a soft, smooth, quilted microfiber material that is both attractive and easy to clean.
 Maybelline The Blushed Nudes Eyeshadow Palette Makeup, 12 Pigmented Matte & Shimmer Shades
This Maybelline The Blushed Nudes Eyeshadow Palette is absolutely stunning and is an incredible bargain. It contains 12 extremely wearable, neutral eyeshadow shades in both matte and shimmer finishes that would be flattering on any eye color or skin tone.
The matte shadows could be used alone for an extremely subtle, conservative look, or can be paired with the metallic shimmer shades for a fancier evening or special occasion makeup look.
Maybelline is known for high-quality, highly pigmented makeup at very affordable prices. This would be great for anyone from a teen to a senior who enjoys "putting on a face."
Note: Although this eyeshadow palette comes with two double-ended sponge applicators, I would highly recommend giving your gift recipient a set of good makeup brushes if they don't already own some.
 NYX PROFESSIONAL MAKEUP Ultimate Warm Neutrals Eyeshadow Palette
This NYX PROFESSIONAL MAKEUP Ultimate Warm Neutrals Eyeshadow Palette is another terrific choice with 16 high-quality eyeshadow shades to suit any eye color or complexion. The highly pigmented shadows include a mix of safari-inspired neutral browns in a range of finishes, from matte and satin to shimmery and metallic shades.
The colors in this palette were curated by makeup professionals in Los Angeles. It is recommended to apply these shadows over an eyeshadow primer for the best color payoff.
NYX eyeshadows are now vegan, cruelty-free, and packaged with 30% recycled materials.
 Shower Steamers Aromatherapy Box of 6 Premium Shower Bombs with Essential Oils
These Shower Steamers Aromatherapy Shower Bombs with Essential Oils are the perfect, affordable way to pamper someone who doesn't love makeup or skincare but loves a warm, relaxing shower. They will make the lucky recipient feel like they have escaped to a relaxing spa for a while, in the comfort of their own home.
This set of six shower steamers comes beautifully gift boxed for easy gift giving. The six scents in the green box, which come from fragrant essential oils, are eucalyptus, green tea, jasmine, rose, lemongrass, and lavender in the green box. If you choose the blue box, your giftee will receive eucalyptus, peppermint, green tea, lemongrass, salvia, and tea tree. The pink box contains rose, gardenia, lavender, chamomile, rosemary, and jasmine to make your recipient feel relaxed, restored, and well rested.
These shower steamers are a cinch to use. Let your gift recipient know to unwrap one, place it in the corner of their shower away from the water stream, and allow the steam activate the fragrance from the essential oils.
 Burt's Bees Tips and Toes Kit, 6 Travel Size Products
This Burt's Bees Tips & Toes Kit makes a wonderful, unisex stocking stuffer. It's a nicely boxed set of five travel-size products and a sixth, full-size product that would also be great for a purse, gym bag or briefcase:
- A tube of Honey & Grapeseed Nourishing Hand Cream
- A tin of Almond & Milk Hand Cream
- A tin of Hand Salve
- A tin of Burt's Bee's Lemon Butter Cuticle Cream
- A tube of Coconut Oil & Soap Bark Softening Food Cream
- A tube of Pomegranate Moisturizing Lip Balm
This would make a great gift for anyone of any age, especially during the cold winter months.
Beauty Gifts Under $50
These affordable gifts are sure to please.
Jenny Patinkin makes my absolute favorite makeup brush cleaners.
As I have explained in previous reviews about washing makeup on brushes, keeping makeup brushes clean and sanitary is essential for many reasons, including optimal performance and avoiding cross-contamination of bacteria between your brushes, your makeup, and your skin.
I use the Jenny Patinkin Spray Away Instant Makeup Brush Cleaner with a microfiber cloth to clean my makeup brushes in just seconds after each use. Then, either once a week (if I'm wearing makeup most days) or every other week, I wash them properly with the Jenny Patinkin Luxury Vegan Makeup Brush Soap.
With these two products, I am able to care for even my most expensive makeup brushes effectively yet gently. The set of both products would make a fabulous gift for any makeup wearer!
 Body & Earth Ocean Gift Basket - 7-Piece Bath and Body Gift Set
This Body & Earth 7-Piece Ocean Gift Basket Set consists of a reusable bathtub-shaped "basket" filled with 6 luxurious ocean-scented bath and body products:
- Bath Salts
- Shower Gel
- Bubble Bath
- Body Lotion
- Bar Soap
- Scented Glass Votive Candle
Your gift recipients will think of you fondly as they luxuriate in a bubble bath or fragrant shower, and their skin will be silky soft thanks to the body lotion.
The contents are beautifully packaged in an aqua blue and white pattern reminiscent of ocean waves. This gift looks much more expensive than its affordable price tag would suggest!
 9-Piece Vanilla Coconut Home Spa Gift Basket Set
An even more luxurious set is the 9-Piece Vanilla Coconut Home Spa Gift Basket Set from LOVERY.
This set features vanilla and coconut-scented bath and body products enriched with moisturizing vitamin E oil and shea butter packed inside a ribbon-tied 9.5-inch tall, 4.5-inch square gift basket.
Because the scent isn't particularly masculine or feminine, this would make a great gift for men as well as women.
This set includes:
- Bath Oil
- Shower Gel
- Bubble Bath
- Body Scrub
- Bath Salts
- 2 Bath Bombs
- Bath Towel
- Reusable Decorative Basket
 Real Techniques 9 -Piece Au Naturale Makeup Brush Set
For the woman (or girl) who doesn't have a good set of makeup brushes, the Real Techniques Au Naturale Makeup Brush 9 Piece Set would be a great starter set or a nice but inexpensive upgrade (if she's just using whatever cheap brushes or applicators come with her makeup). It would also make a great second set to keep in a gym bag.
This set of cruelty-free, vegan makeup brushes for face, cheeks and eyes includes:
- Ultimate Powder Brush
- Light Layers Complexion Brush
- Perfecting Prime Brush
- Blurring Concealer Brush
- Precision Fan Brush
- Full Coverage Brush
- Shading Brush
- Defining Crease Brush
- Flat Liner Brush
The brushes have sturdy aluminum ferrules and custom-cut UltraPlush synthetic bristles that apply and blend makeup beautifully.
 DRMTLGY Pumpkin Enzyme Face Mask with Jojoba Beads
The DRMTLGY Pumpkin Enzyme Mask with Jojoba Beads is one of my favorite face masks. It's a great way to get a spa-like facial-treatment affordably, in the comfort of your own home.
This mask uses a combination of enzymatic and physical exfoliants to brighten dull skin and leave it feeling soft and silky. It reduces the appearance of large pores, deeply hydrates the skin, cleanses impurities, and gently exfoliates the dead surface layer of the skin for a smoother, more radiant complexion.
Key skin-loving ingredients include pumpkin, jojoba oil beads, kaolin clay, vitamin E, peptides, ceramides, enzymes, and colloidal silver.
You can read more about this outstanding rejuvenating face mask in my detailed product review that explains why it's The Best Exfoliating Enzyme Mask for Brighter, Softer, Smoother Skin.
Beauty Gifts Over $50
I have a large collection of high-quality makeup brushes, but I still had to buy this adorable Jenny Patinkin Brush Babies Mini Makeup Brush Set.
This tiny pink zippered pouch holds 6 mini makeup brushes that feature full-size vegan, synthetic bristle brush heads on palm-size weighted handles that give them the same balance as full-length brushes without the size.
The brushes in this set are:
- Complexion
- Powder/Blush
- Concealer
- Eyeshadow
- Crease
- Smudge
Jenny Patinkin claims that her brushes have 2.5x the number of bristles as other brushes. I'm not sure which brushes she's comparing them to, but her brushes definitely have ultra-fine bristles and a luxurious feel and deliver an extremely smooth makeup application.
This mini but mighty set is perfect for an avid makeup lover who appreciates good quality makeup brushes. Even if your gift recipient already has a good set of brushes, she will love this mini makeup brush set for her purse, car, desk, gym bag, or carry-on bag.
By now you know that I feel strongly about the importance of good quality makeup brushes for a beautiful, seamless, professional-looking makeup application.
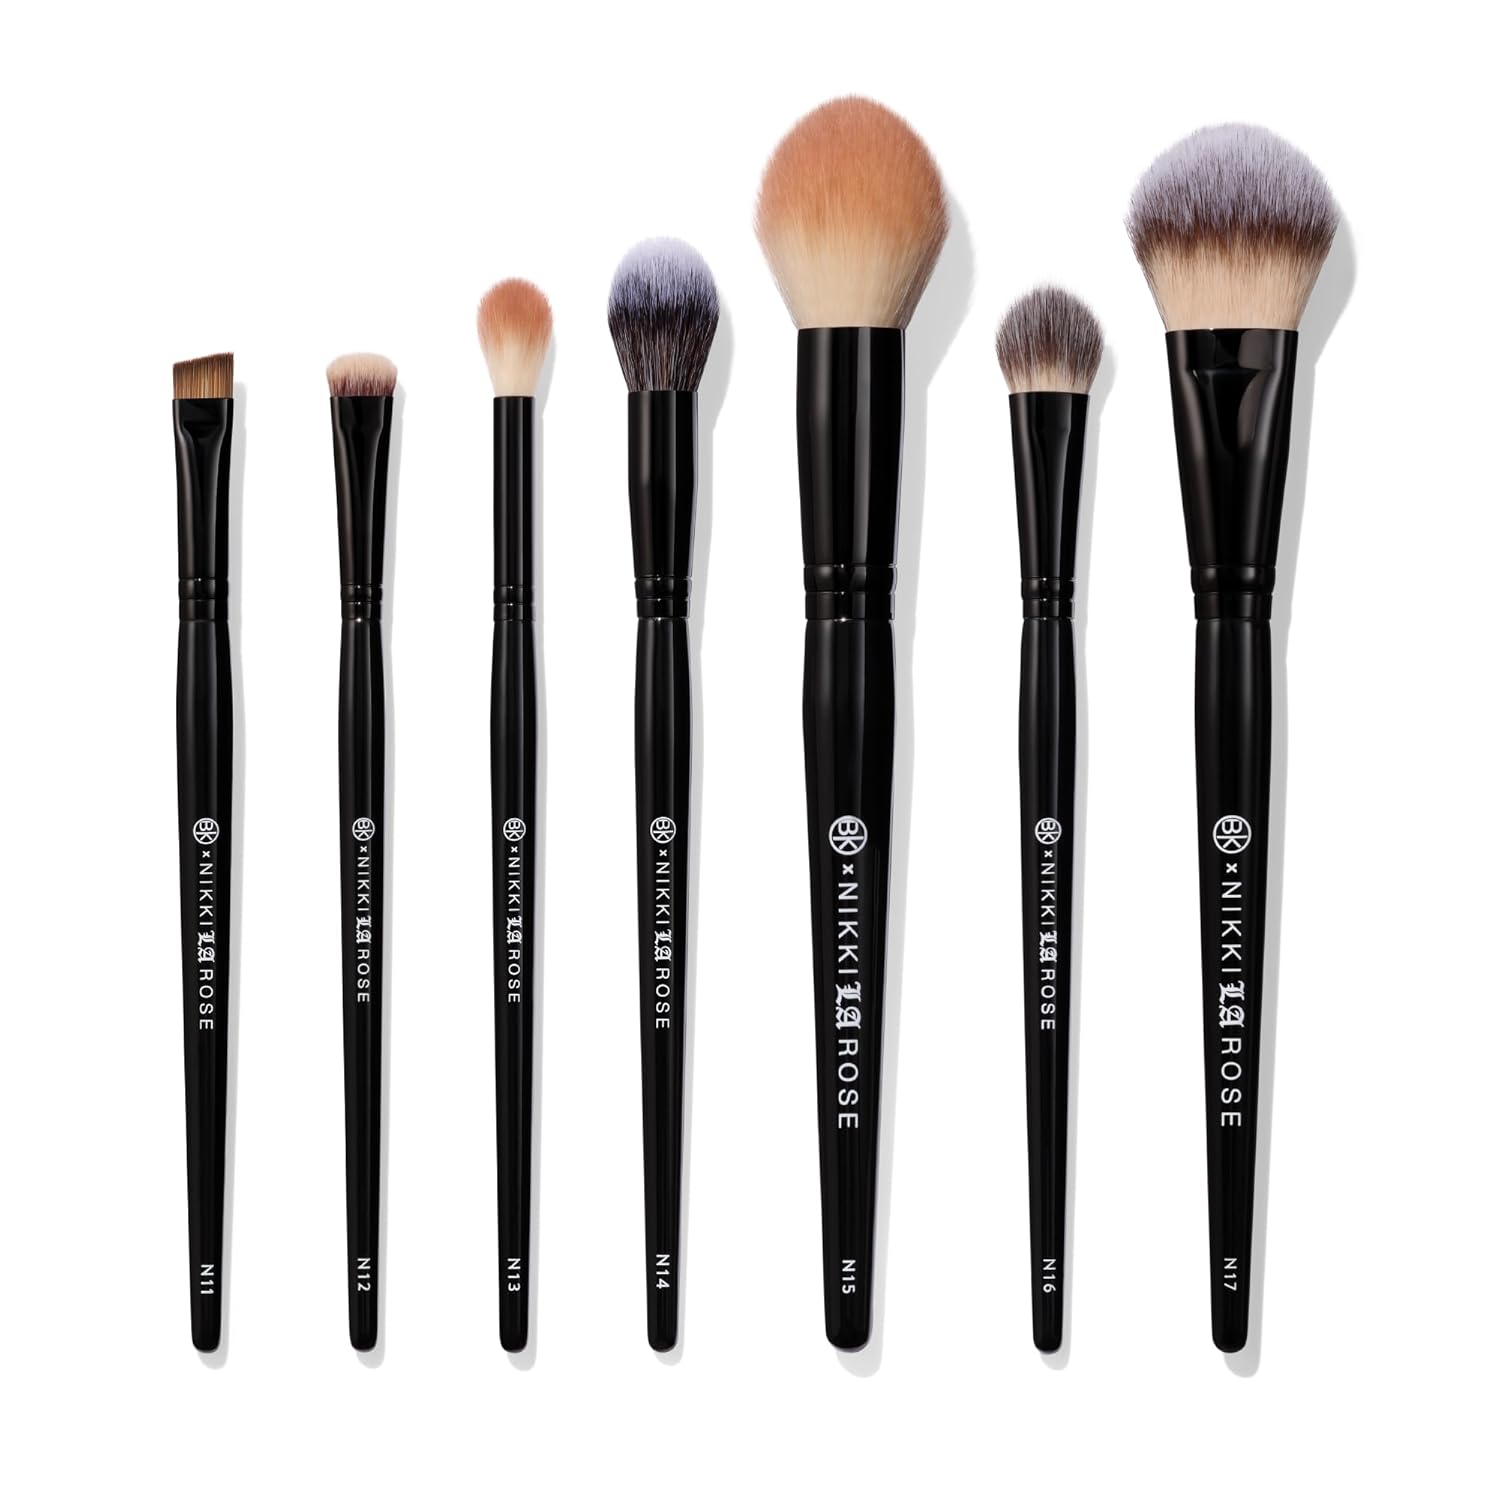 BK BEAUTY x Nikki La Rose Pro Artist Makeup Brush Set - Vol. 1 (7-Pc Set)
Although it took me many years to bite the bullet and invest in a really good set, I finally did. In fact, I have become a bit of a high-end makeup brush collector by now. I wish I had made the investment sooner, as the positive difference in my makeup application when using good brushes is really noticeable. Of course, it's also important to learn good application techniques, but with the right tools, it's so much easier.
My very favorite makeup brushes of all time are this set of BK Beauty x Nikki La Rose Pro Artist Makeup Brushes Vol. 1. Nikki is an incredibly talented makeup artist with a long list of celebrity clients and her work is amazing. The collab she did with one of my favorite brush companies, BK Beauty, to create this 7-piece set of professional makeup brushes is simply superb.
The set includes:
- The N14 Petite Precision Multitasker — ideal for small areas
- The tapered N15 Precision Medium Powder brush — perfect for blending, bronzer, and contouring
- The N16 Pro Concealer brush — its triangular tip allows for precise concealer application
- The N17 Multi-Pro Face brush — an ingenious, dual-sided brush with lighter bristles on one side for creams and liquids and darker bristles on the other side for powders
- The N11 Ultimate Angle brush — lets you create a winged liner look effortlessly with a single stroke
- The N12 Ultimate Smudger — designed for blending pencil liner, smudging, and defining eyes and lips
- The N13 Precision Pro Blender — ideal for deep-set, mature, and small eyes (which I really appreciate).
All seven brushes are multitaskers that make them worth their weight in gold for anyone who loves a beautiful, professional-looking makeup application. In fact, pro makeup artists love this set!
Although it's definitely a splurge, any serious beauty lover would adore getting this fabulous set and its complementary companion, the BK Beauty x Nikki La Rose Pro Artist Brush Set Vol. 2, which has eight of the most unusual and ingenious multi-tasking makeup brushes on the market.
I hope this review of the best beauty gifts for last-minute gift giving helps you find the perfect gifts for people on your list!
The Best Beauty Gifts for Last Minute Gift Giving by Margaret Schindel
Read More
Beauty Reviews by Our Review This Reviews Contributors
Read More
Product Reviews by Our Review This Reviews Contributors
Read More
Gift Reviews by Our Review This Reviews Contributors
Read More
Holiday Reviews by Our Review This Reviews Contributors


.jpg "Top Tips for Choosing the Perfect Rug for Your Home Office")