Monday, January 11, 2021

Guard Your ID Stamp Reviewed

 I received this very practical and very useful gadget for Christmas and the Guard Your ID stamp has quickly climbed to the top of my favorite gadget list!

Guard Your ID Stamp


How The Guard Your ID Works

I believe this gadget falls under the "Why Didn't I Think Of That!" category for paper management. While I make every effort to go paperless I still receive unsolicited and undesired direct mail advertisements printed with my personal information.

Many times the direct mail advertisements are heavy on paper and envelopes, but have your personal information just one spot. The Guard Your ID stamp is perfect to quickly eliminate the personal information to then dispose of the mailer in the trash or in the paper to be shredded pile. 

Easy as 1-2-3 simply open the stamp, blot out your personal information on the mailer and you are done!

Quick, Easy & Convenient

I love the ease of this gadget. All you have to remember is to replace the cap, give a twist to the cap and the ink and stamp is stored safely for the next use.

Paper Shredders Plus Guard Your ID

The Guard Your ID stamp is the perfect companion to the traditional paper shredder to protect personal information. If you have ever tangled with a home paper shredder I have found that our home shredder is not fond of the mailers and envelopes. Nothing like having a few unwanted envelopes stuck in the shredder to try and untangle.

Fun Practical Gift

I liked this gadget so much I purchased the three pack to have one at the office and two in the gift bag stash. A great little add on for practical gift giving. Savings Hint: Coupons on the single stamp and three pack are available frequently on amazon for a nice savings!


Note: The author may receive a commission from purchases made using links found in this article. “As an Amazon Associate, Ebay (EPN) and/or Esty (Awin) Affiliate, I (we) earn from qualifying purchases.”


Sunday, January 10, 2021

Review of LED Rechargeable Strip Lights for Closets, Kitchens and More

LED Rechargeable Strip Lighting - No Batteries Required

I purchased LED rechargeable strip lights for my son's closet as a small Christmas gift, and wow, great product.

LED Strip Lighting for Closets and More

My son loves ambient lighting and has positioned stip-lighting behind his desk, his piano, and bed headboard, and they look amazing. However, those particular strip lights require electricity, and that's fine for furniture pieces near an outlet, but not for a closet.

In my search for a creative gift, I came across strip lights that are rechargeable. My first thought was, what-the-heck is rechargeable strip lights? First of all, I despise lights that require batteries. Batteries are simply an added cost. So the word "rechargeable" piqued my interest.

My son's closet is big enough to step into, and I wanted to get lighting for it without resorting to something that requires batteries.

In my search, I came across these Medulla Strip Lights and decided to give them a try. Good decision. They're fantastic. 

Here's how they look in his closet:


One set was enough to reach across the back of the closet. The closet is about 5.5 feet wide. He positioned the lights along the back wall of the closet. You can put them under the top shelf; however, he felt they would be better across the back. 

Here's Another Look at His Closet:


Settings on the Led Strip Lights

On his model, there are three settings; On, Off, and Auto. Also, the brightness can be adjusted up or down. Auto activates the motion sensor - which is fantastic. The lights stay off until it senses motion when you open your closet. That helps to preserve battery life.

Easy to Install With Built-In Adhesive

Simply peel the protective backing off of the strip lights and install them where you want. They secured perfectly for my son. His were placed on wood. The rechargeable unit also has adhesive on it and can easily be positioned where you want to put it.

How Long Does the Battery Last?

The instructions indicate that when you have the strip lighting set at Auto (Motion Sensor), assuming you open and close your closet 5 times a day, the charge should last approximately 30 days. My son hasn't had it that long yet and hasn't had to do a recharge.

How Do You Recharge LED Strip Lighting?

This unit has a USB port and a short USB cord. Simply plug it into a USB outlet. I imagine you could use your computer to recharge; however, we have a power cord with built-in USB slots, so we intend on using that.

Other Places You Can Put this Convenient Strip Lighting:

  • Staircases
  • Under bedframes for kids for added lighting when they step out of bed.
  • Sheds and Garages
  • Under kitchen cupboards
  • Dark corners that need lighting from time to time
  • The back of headboards for ambient lighting
  • Home entertainment systems
More Info On Recharging the Battery

Below Margaret asked some good questions that I thought would better be mentioned up here:

Does the Recharging Unit Detach for Charging?

Yes, it does. Simply pull it out from the end where the connection is made to the lights.

More Info on Recharging

My son plans on using a recharging brick (you know, the ones from cell phones). He'll simply plug the charging unit into the brick, and then plug the brick into the wall. The unit comes with a short cord to attach the closet charging unit to the brick. Of course, you can plug it into a laptop or PowerBar with USB connections as well. I think the brick connection is the easiest. 

How the Charging Unit Attaches to the Wall

The unit comes with a magnetic strip with an adhesive backing. Simply place the magnetic strip on the wall (stick it), then the rechargeable unit attaches to the magnetic strip for easy removal when it's time to recharge.


Note: The author may receive a commission from purchases made using links found in this article. “As an Amazon Associate, Ebay (EPN) and/or Esty (Awin) Affiliate, I (we) earn from qualifying purchases.”


Saturday, January 9, 2021

How Did I Become a Bookworm?

 I haven't written many book reviews when you consider how many books I've read in my life.  The reason why is because I don't want to inadvertently ruin the book for someone by mentioning a twist or alluding to something I saw in the book that they interpreted differently until much later.

A stack of books on a table at the beach is a true sign you're in the presence of a bookworm!
Image from Pixabay

Hi, my names Louanne and I'm a bookworm, I've been a bookworm for as long as I can remember certainly before I started school.   My parents always read to us before going to bed (until we wanted to read by ourselves) and my mum told me a few years ago about dad trying to skip a few pages and make up the story in order to get me asleep quicker and I would get quite pretentious in telling him - that's not what it says and making him start again!

My daughter went into daycare from about 14 months old and I was told by the staff what a large vocabulary she had.   Like my parents before me, I had always read to her because, in my opinion, teaching a child to read a book is like ensuring they will always be able to choose their own adventures.

There are books on every topic and if your child loves space they only have to find a quiet space and the right book and they can transport themselves onto a new planet or a spaceship and have an absolute ball.   If they want to become dragon slayers, fairies, or pirates - there are books available for all of them.

I have always read a wide variety of books, both fiction and non-fiction and I credit this habit of reading for allowing me the ability to think outside of the box and also for doing well at trivia quizzes!

When I was younger I used to read at least one book a day and I collected Bookworm Certificates at school so often the teacher couldn't believe how much I read, she actually told my parents, "Louanne doesn't read books, she inhales them."   I've always remembered that because I was going to put it on my author bio when I published all of my literary works.   Well writing a book hasn't happened (I'd much rather read!), but a couple of my friends (and reviewers on this site) have done so.

Beverley Owens has written some great cozy mysteries, check out her Amazon page here

Barbara Tremblay Cipak - has written riddle books which are so much fun (although sometimes frustrating!), check out her Amazon page here.

What Kind of Bookworm Are You?

Throughout my life people have always asked me one of two questions - who's your favorite author? or what genre of books do you like to read?

I really can't pick a favorite author, there are just so many.   When I was younger I remember loving

Malory Towers & St Claires books by Enid Blyton that inspired a generation of girls to beg their parents to be allowed to go to boarding school
Enid Blyton books
Enid Blyton and I would alternate between preferring the Famous Five or the Secret Seven (the Secret Seven won out the most!).   I can remember getting a few of her books as sets for Christmas - Malory Towers & St Claires and I loved that as it wasn't just one book, but a whole set.   After inhaling both these sets I really, really wanted to go to boarding school!

I also found a fondness for Agatha Christie as a teen as she was one of my nan's favourite authors, my nan also introduced me to these cheap little paperback mystery books (the name of the series escapes me now) that were written to be consumed quickly and by a range of different authors.   They were written in much the same style as cozy mysteries which I think is probably why I love settling down with them.

I also discovered Ruth Rendall as a teen and after reading A Murder of Crows was thoroughly hooked.   At the same time as I was reading these, my best friend was delving into the books of Jean Plaidy.  Of course, I had to see what she was reading and so I started 'inhaling' historical fiction as well.

What' genre of books do I like to read is also too hard to answer as I'm sure you can tell from the above paragraph!

When I had finished all the Ruth Rendall & Jean Plaidy books in our local library I decided to pivot and started to read biographies.   I just grabbed the biographies without worrying who they were about - some people I had never heard of before!  I read every biography in the library, some were boring but the majority were so interesting and now and then they'll be a trivia question and I'll say the answer without thinking and I have no idea how I knew it.   Reading - it's great for building knowledge!

When I was 18 &19 I lived with my Gran for nine months and her favorite author was Catherine Cookson so I found myself devouring all of those.  She also enjoyed Danielle Steele.

After that, I tended to alternate between whodunnits and family sagas.   I had moved to a smaller town when I was 19 so I would start reading an author and then read every book the library had by that author before trying a new one.   It was a great way of getting to know new authors, it was where I first came across Penny Vincenzi and I would put her new book title on my Christmas list for several years afterward.

The Kindle - Perfect for the bookworm on the go
I have the Kindle Paperwhite
Gradually I started adding 'Chick Lit', psychological thrillers & John Grisham to my book lists.  It seems like the only type of book genre I haven't really been able to immerse myself in is science fiction.   I prefer my Sci-fi on the screen.

I am now in my 50s and finally have a kindle which doesn't stop me from reading actual books, by the
way, it just seems to mean I read even more!   I have started to add personal development books into the mix.

Let's have a look at a few of the books I have reviewed here on Review This, let me know which one's you've read as I wouldn't dream of asking you for a favorite author or genre!


Note: The author may receive a commission from purchases made using links found in this article. “As an Amazon Associate, Ebay (EPN) and/or Esty (Awin) Affiliate, I (we) earn from qualifying purchases.”


Friday, January 8, 2021

Chocolate Hot Cocoa Bombs Recipe & Review

Hot Cocoa Bombs Recipe


When Wednesday Elf introduced me to Hot Cocoa Bombs in her Cocoa Day review, I knew I would be making them soon! 

I enjoy trying new recipes, especially when they are decorative and fun to make.  I have always referred to that as Fun Food created while crafting in the kitchen.  It combines my two favorite things to do:  cooking & crafting.

I decided to make the Hot Cocoa Bombs as a special treat for my family on Christmas Eve. They were fantasic! Truly the best hot cocoa or hot chocolate I have ever tasted and we all enjoyed watching them "explode" inside the mug.

This delicious hot drink would be a wonderful treat for any holiday party, gathering, or just for fun!

hot cocoa bombs in snowman mugs


Hot Cocoa Bomb Recipe

I looked at several existing recipes before I decided to combine ideas instead of using just one. 

To start, I liked the idea to create a round ball by "gluing" two pieces together.  I promptly ordered 2 sets of large sphere shaped silicone molds which would make 12 round hot cocoa bombs.  I have worked with silicone molds many times and love them!   

An alternative to gluing two pieces together would be to simply cover each filled 1/2 sphere with a layer of melted chocolate chips. I will try this at some point in the future.  Decorating a flat surface would be fun and would still provide the same tasty treat. 


Preparation Time Using 1 Set of Sphere Silicone Molds

Set your silicone molds on a cookie sheet for easy moving!  Use a microwavable glass bowl

   
Prep Time Microwave Time Ready In Yields
30 minutes 45 seconds,
then 15 sec intervals to melt
1 hour 30 min. 6 servings


Ingredients for My Hot Cocoa Bombs

 
  • 12 ounce bag Chocolate Chips
  • Hot Cocoa Mix  (I used 2 packets of Hershey,s
  • Mini Marshmallows, chopped peppermint, chopped toffee (for filling)
  • Sprinkles or Chocolate shaving for decorating


Directions for Making Hot Cocoa Bombs

  1. Melt 1 1/2 cups chocolate chips in the microwave in 15 second intervals, stirring in between cook times until fully melted
  2. Chocolate Hot Cocoa Bombs
  3. Using a spoon, smooth 2 teaspoons of melted chocolate (for each cavity) up the sides and around the bottom  (save any leftovers and don't wash your bowl yet)
  4. Set in the refrigerator for 30 minutes
  5. Lay the silicone mold face down on a cookie tray and carefully "roll" the silicone cups from the chocolate bomb pieces one at at time.  (take your time!  You don't want to break the chocolate bomb pieces)
  6. Fill 6 cavities with 1 Tablespoon hot cocoa mix, 6 or 7 mini marshmallows and/or other selected fillings
  7. Melt about a teaspoon chocolate chips and use this as the "glue" to attach the top sphere to the lower filled sphere
  8. Set in the refrigerator for 30 minutes
  9. Decorate your cocoa bombs with sprinkles, chocolate shavings, chocolate drizzle, etc.
 

To serve, pour hot milk over the chocolate bomb and watch for melting drama to unfold! Of course, you will need a spoon to stir the ingredients the bomb has "exploded".


I found that melted chocolate chips were not a great consistancy for drizzle and did not make beautiful thin drizzles, but since the hot cocoa bombs are so big, it didn't really matter. If you want a pretty thin drizzle, I recommend buying melting chocolate and using a drizzle spoon.


 6-Cavity Large Semi Sphere Silicone Mold 2pcCheck Price Hershey's Milk Chocolate, Hot Cocoa MixCheck Price Kraft Jet Puffed Mini Marshmallows, 10 oz (Pack of 3)Check Price Mercer Culinary Small Precision Drawing Decorating Spoon, 7 Inch, Stainless SteelCheck Price


Check Out More Recipe Reviews at
ReviewThisRecipes.com


Chocolate Hot Cocoa Bombs Recipe & Review Written by:
House of Sylvestermouse


© 2021 Cynthia Sylvestermouse


Note: The author may receive a commission from purchases made using links found in this article. “As an Amazon Associate, Ebay (EPN) and/or Esty (Awin) Affiliate, I (we) earn from qualifying purchases.”


Wednesday, January 6, 2021

The Carry-All Wagon That Will Make Life Easier For Everyone in 2021! A Product Review

We have always been on the look out for something that will make our chores easier!  After all we are seniors! 

The wonderful thing is that when searching for things that will make senior life easier, we sometimes stumble on things that are useful to everyone!  

We are in an apartment and so when doing our grocery shopping, we often take a bundle buggy with us, so that bringing up our purchases can be done in one trip.  Hauling groceries to the elevators 2 or 3 bags at a time just doesn't appeal to me or my other half.

grocery shopping, carts, shopping carts


Sometimes though, that bundle buggy just doesn't cut the mustard, so to speak, and we are left tripping up and down the elevators ad nauseum.

There has to be a better way!

Well, I think I have found it.  Bundle buggies take up a lot of space in the trunk of the car.  When shopping is the order of the day though, you need to find that space.  No questions asked, you will need a way to get those groceries to your doorstep as easily as possible.

Now I have found that there are these really great collapsible wagons that can do the job as well or better than a bundle buggy.  They are compact, take up little room in the car, and open up to reveal a substantial amount of space to place all your groceries and any extras you might have picked up.

What I really like about this wagon is that it is not just for groceries or for older folks.  This wagon is useful for everyone. 

Families when they are going on a picnic, or to a sporting event with their children, can load this wagon with chairs, extra toys for the children that aren't on the field, snacks, drinks, blankets and any other possible need to keep the kids out at the park for the duration.  No need to be running back and forth to the car for extra things.  It's all in the wagon, ready for you!

Going to the cottage would be a fantastic time to use this wagon as well.  Just think of unloading the car, with blankets, food for the week, drinks, water toys, bathing suits and the like.  Pile it all into the wagon and I'm sure you will have fewer trips back and forth.  Even the children can pull the full wagon without too much difficulty.  Help is on the way in more ways than one.

Gardeners and garden lovers, can use this cart to move around new plants, soil, compost, tools and so much more.  All of it just goes into the wagon and it goes where you need it.  How wonderful is that?


Collapsible wagons come in a variety of sizes and styles.

There are a few things that you should discern before you purchase one of these wagons!  What is the ultimate use for the wagon going to be?  If you are using it for transport from one location to the next, you might want to check out the specific size and weight of load  the wagon can handle.  

Are you going to use it just for carting things from the car to an apartment, or are you going to walk to the store and use it to carry your purchases on the way home?  You might think this is a silly idea, but let me tell you, some of the "attributes" of the wagon you choose could make the difference between a good hike home or not.  Do you need brakes on your wagon?  How about an adjustable handle?  For our purposes, the adjustable handle is a must have.  I'm 5'7" and my other half is 6'5",  My arms and his are not the same and our ability to grab that handle and go with it would need adjustment.  There are a few different options on these wagons as you might expect and it's good to think about that before you buy one.

If you are going to use this wagon year round, you might want to go with wheels that are a little larger to get you through snow easier.  Some have rotating wheels that makes it easier to move it about!  You can either pull it or push it.  

These wagon/carts can be opened up with one hand and it can collapse with one hand too!  Their footprint is small so that your trunk isn't all taken up with the wagon in it's storage position.  But it is there when you need it.  You can also purchase a tarp to carry things that might overflow the body of the wagon.  

Just imagine a coach of a soccer team with 24 or more soccer balls.  They would all fit into the wagon with the tarp overlay keeping everything secure!  How's that for a time saver and trip saver too!  


As I get used to having this new tool at my disposal, I will keep you up to date on more uses for this handy wagon.  I know I will make good use of it especially on the days that I walk to the grocery store or those days when recycling needs to be disposed of.  No more trotting back and forth, it will get done in one trip!

grocery store shopping collage


Note: The author may receive a commission from purchases made using links found in this article. “As an Amazon Associate, Ebay (EPN) and/or Esty (Awin) Affiliate, I (we) earn from qualifying purchases.”


Tuesday, January 5, 2021

The Benefits Of Rebounder For Health And Fitness Reviewed

What is Rebounding?

rebounder (small indoor tramboline) for exercise
The Benefits Of Using A Rebounder For Health And Fitness Reviewed.


Rebounding is effectively bouncing or jumping up and down on a mini trampoline. This exercise can be done very gently or it can be a serious aerobic workout.

As it is a low impact cardiovascular form of exercise, people from older children to older adults can use a rebounder, as long as their healthcare team approves it. 

I started using my rebounder 2 months ago. I was looking for something where I could exercise safely indoors during our cold winter months and something that would help me to get fitter and lose some weight. 

As I have had an ankle injury and severe back pain with two herniated discs in the past, to the point I could barely walk without pain and numbness, I am always wary of any new exercise. 

Exercises like jogging and running put too much pressure on my joints and back to be healthy for me. I love swimming but cannot always have access to a pool.  

After checking with my doctor that it was OK to use this piece of equipment I started very slowly and with very short sessions.


demonstration of using a rebounder for exercise
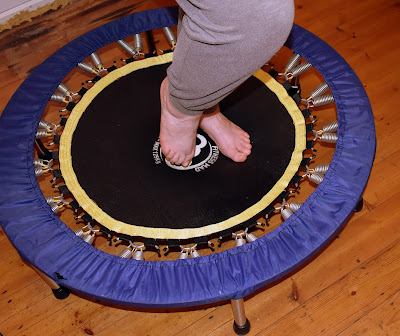
Stepping slowly and gently on Rebounder


Safety And Rebounding 

It is important that wherever you use your rebounder that you make sure you have enough clearance above your head to use it safely. You do not want to be hitting your head on the ceiling!

It needs to be placed on a strong stable floor that is even. You do not want the rebounder to be on an uneven surface. 

Also, ensure there is enough room around the rebounder to get on and off safely without bumping into or having to step over anything. Please take care that children and pets are not too close to you when using it. 

Also as it is a form of cardio exercise make sure the room is well ventilated and open one or more windows to let fresh air in.

From my personal experience, I would say to get a rebounder with as large an area of use as possible to make it easier for you. Some have very small areas to bounce onto and I think I would personally find that difficult and annoying.  

Then it is just a matter of making sure it is all fixed securely and you are good to go!


woman standing on rebounder to show size of exercise equipment
Bouncing On Rebounder. 


Who Should Not Use A Rebounder.

Rebounding is a pretty safe form of exercise for most people especially as if you need to, you can take it at a very gentle pace. 

However, If you have not exercised for a long time and are over 50 years of age please do check with your Doctor first.

If you are very overweight or have heart or lung conditions or any illness or previous accident or injuries, especially to your back or legs or have joint issues or circulatory problems or just feel generally unhealthy or very unfit you must check with your doctor before using a rebounder. 


What Are The Benefits Of Using A Rebounder? 

I wanted a rebounder to help me to increase my fitness and to lose weight. So far both are improving slowly. 

I wanted to be able to exercise effectively and easily indoors in the colder, rainy weather without having to go to a gym or pay gym membership prices. It certainly fulfills these criteria. 

I am also looking forward to taking it out onto our Patio in the summer and using it there. 

It certainly works the leg muscles and I have noticed my muscles, especially in my legs, are much firmer.

Rebounding apparently helps to strengthen the bones in terms of strength and density. This is especially important as we get older and at any age is healthy. 

It is said to help improve coordination and balance. My balance was Ok before I started but I do think it has helped me become more stable and hopefully less likely to have balance issues in the future as I age. 

As my husband had a major operation on his right leg several years ago, we have noticed some minor balance issues and they are gradually improving as he uses the rebounder more often.  

I understand it may help pelvic floor strength and help to prevent urinary incontinence. I cannot vouch for that but if it does that is a good thing as well. 

It certainly works the core abdominal muscles which I really need to be strong to offer support to my back. As I am unable, due to my back condition, to do many core exercises like sit-ups this is great to work my core muscles while standing up. 

It also works the large back muscles and I know having been told by my health care team that if I can keep the back muscles strong and flexible that will help my back long term. I am supposed to swim at least twice a week but have been unable to do that at all these last 10 months and so rebounding is useful for me. 

There are lots of videos on the internet that will show you exercises to do from the very gentle to the most advanced strenuous workout. Many exercises incorporate using your arms as well so you do get a great full body workout. 

Like any other piece of exercise equipment, it is of course only as good as how often you use it.


What I Found Difficult About The Rebounder. 

It is quite a large piece of equipment and takes up a good amount of space in a room.  At first I would carefully fold all its legs in and store it under the table. However, as I was using it every day for a short period of time it got to be a pain getting it out then putting it away all the time, so I just left it out. Now we are both using it, it's not worth putting it away, so we leave it propped up on its side in a corner and we do not notice it too much. For us seeing the results from the exercise it is worth it.

The one we bought does not have a stabilizing handle. Now we are used to it that does not matter so much, but at first, it would have been helpful to have that security there. If you know you may have some balance issues or would like to feel more secure on a rebounder I would strongly recommend a handle. 

You can buy rebounders that fold away easier and do have handles so both these can be overcome. 

Ours was not too bad to put together as it just meant putting each of the six legs on which once we got the hang of was doable. Some rebounders are more complex to put together so depending on your level of skill and patience do watch out for that. 


What I Like About The Rebounder

It is a sturdy piece of equipment that so far is still looking and operating as well as it was the first day of use. 

While it is an investment it is not overly expensive for exercise equipment and as most in the family can use it, does work out very cost-effective. 

It is fun to use! This is key for me as I would otherwise get bored and then not use it. 

I miss it when I do not use it! 

I am starting to see results! I especially like to see my tummy core muscles improving!  Bear in mind when I started I was literally using it only for 5 minutes a day for weeks so I could ascertain how it was affecting my back. It is only in the last 3 weeks that I have built up to 15 minutes a day. If you don't have health issues you would build up to 15 minutes or more much more quickly. 

People of any age can use a rebounder as long as approved by a doctor. I would advise that if used by children they are supervised. If used by an older person it may be a good idea to buy one with a stabilising handle and if possible have someone around if assistance is needed.     


What To Wear When Rebounding.

You can exercise in specific exercise clothes and that is advisable if you are doing a long serious workout. Usually, I just wear joggers or leggings, bare feet and a loose T-shirt or top.

I have often just hopped onto the rebounder for 5-10 minutes in my leggings and top in between working sessions on the computer. I would advise wearing a stretchy, forgiving material though just so you can move freely. 

I exercise in my bare feet. I think it would be Ok to wear trainers if that was more comfortable for you. However, footwear would need to be very stable and have a good grip. If you are not sure perhaps try to out both ways and see what you feel is best for you. Clearly do not use a rebounder wearing slippers or normal shoes as that is not safe.


Summary Of What To Bear In Mind When Buying A Rebounder

I have shown a few rebounder choices throughout this article. No one rebounder will suit all people. You will need to carefully consider all factors and what is important to you personally. 

What is a key factor for one person or family may not be important to another. It really does depend on what you are wanting from this piece of exercise equipment including your fitness, your skill level and experience of exercise equipment, the room you have and why you want a rebounder. However, there are a few things to bear in mind that I wish someone would have mentioned to me.


rebounder exercise equipment with foot on it to show size comparison
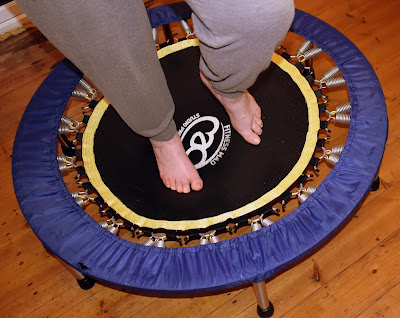
You can see the size of the surface area to bounce on in relation to my foot. 


1. Size.

I would suggest buying the largest surface area you can. I personally would not feel comfortable on ones with a very small area though these are often easier to transport and fold away. It depends on what is most important to you and is a choice to weigh up.  

2. Safely handle or not.

 I do not have a safety handle and now I would not feel the need to buy one. However, in the early days, I would have felt happier with one. As I get older I might buy another rebounder with a handle just for safety.  I think there are also some exercises you can do easier with a handle so a detachable handle would perhaps be useful. This is a very personal choice. 

3.Price. 

Rebounders vary quite a bit in price and often depends on durability and what comes in the kit with them. Usually, the wisest advice is to buy the best you can afford. You need to think how you will use the rebounder and the demands you will place upon it. I would always look for safety, reliability and sturdiness in a rebounder. You do not want parts of it breaking within months. However, do not feel you have to buy the most expensive when actually a less expensive model may fulfill all your needs.   

4. Noise level.

 Some rebounders are noisier than others. You will see some are sold on the fact that they are quieter. You may decide to choose on this basis alone if noise levels are important to you. For me, it was not an issue as I play music anyway when rebounding and I use it on the ground floor of our house and do not disturb anyone, but for others, this may be a key issue.  

5. Storage.

If you are going to leave your rebounder out then storage issues are not such a consideration. However, If you feel you will need to put away your rebounder every time you use it check carefully the packing away and storage requirements. Does it fold up easily and quickly, do the legs fold up or do they need to be taken off, can it slide under a bed without much effort or do you need to disassemble it before storing. In my experience the more difficult it is to get out and set up a piece of equipment the less you will use it. 

 
rebounder exercise equipment in use
Gentle jumping on Rebounder

Using A Rebounder

With any piece of exercise equipment that is new to us it is best to start off slow and steady and gradually build up so you can monitor the effect it has on your body. You do not have to bounce high in the air even gentle bouncing with your feet hardly leaving the mat will give benefits. 

If you feel unsure do have someone with you when you first start using your rebounder for security. Children should be supervised and older people may wish to have someone with them especially at first. 

It is important to maintain the correct posture keeping a nice line from your ankle to hip to shoulder and your head held straight and tall. Do follow the instructions for the exercises so you are rebounding safely and effectively. 

In terms of how I built up time on my rebounder as I have known back issues, I first checked with my doctor that it was Ok for me to use this form of exercise for my specific condition. 

Once I had the medical go-ahead I literally tried bouncing for 2 minutes very gently then got off. When that was Ok for me 2 days later I tried it again for 2 minutes. All that first week I did a couple of minutes every other day. 

The following week I increased to 5 minutes every other day.  The week after as I had not had any pains I increased to 10 minutes every other day.

I dropped back to 7 minutes when I got a bit of backache and gave myself a few days off, then started gradually increasing again. I have now built up slowly to 15-20 minutes 4 days a week. Sometimes I do the 20 minutes in one session. Other times I split it into two 10 minutes sessions. 

I think as I want to lose weight I may need to increase to 30-minute sessions 5 days a week next.

At first, I needed to concentrate a lot on what I was doing to get the form and balance right but now I put on some great music, which for me is often a Queen track and rebound away !! I find, 20 minutes flies by so quickly! 


exercising on a rebounder
Higher stepping on Rebounder


Most of all I just love using my rebounder and enjoy the exercise! 

In the end that really is the key factor to improving fitness and losing weight through exercise. Choose something you feel you will enjoy and just go have fun!


Note: The author may receive a commission from purchases made using links found in this article. “As an Amazon Associate, Ebay (EPN) and/or Esty (Awin) Affiliate, I (we) earn from qualifying purchases.”


Monday, January 4, 2021

Reviewing Grypmat: the Ultimate Tool Mat

 When I give gifts, I try to give something that connects with that person's passion. Or something that is very practical. It is a happy moment when I give a gift that hits both marks. I gave the Grypmat to my best friend and he immediately let me know how wonderful this product is.


What is a Grypmat?

A Grypmat is a trademarked, silicone tool organizer that sticks to surfaces and so much more.

Grypmats:

  • come in a variety of sizes
  • are made of silicone polymer and "special ingredients" to make it "extra grypy".
  • are anti-static and clings through a combination of suction and friction
  • protect surfaces from marring and scratching
  • prevent the loss of tools, bolts, and other small items
  • are not magnetic (does not pick up bits of metal fragments that scratch)
  • are rated for very hot and very cold temperatures (climate, engine, workspace, etc)
  • are washable; oils and chemicals (used in mechanic work) wash off easily and do not harm that mats
  • can be used in a variety of activities; mechanical work, jewelry-making, gunsmithing, and almost any activity that requires keeping track of items. 
I chose this size of Grypmat because it was in my gift-giving price range. The bright orange color is a bonus and will help him find the mat if (when) he misplaces it. Also, it is the size that fits on a ladder step. I cannot count the number of times I've watched my friend at the top of a ladder trying to hold on to multiple items while working. 

Comments, Photos, and a Brief Review from My Friend

I knew I'd review the medium Grypmat as soon as my friend started text-bombing me with photos and comments about the gift I gave to him. As a side note, my friend works in building maintenance and car repair. I know that he HATES when people are careless and scratch things by laying their tools on surfaces. I've been with him when the socket drops out of his hand, falls through the engine, and a hide-n-seek game ensues. As soon as I saw these Grypmats, I knew that he would put it to good use. But I had no clue how much he'd love it. In fact, I had apologized that this gift was probably a really boring/practical/work-related gift.

The following is a selection of photos and comments from my friend (used with permission):


"I'd say I've had numerous times I'd like to have it on the window....

a place to sit stuff"

"Even the mirror job... I had tools on the wiper cowl and if you miss one... crunch... hoodcrumple"


"Now watch this.. bridge over an area !!!!!!!"

"And it's an electrical insulator... won't arc battery..."


Of course, there are Grypmat knock-offs available. I decided to purchase the original Grypmat out of the expectation (an expectation that was met) that the materials would be high quality and the product would perform as advertised. I'd imagine that the knock-offs would provide a non-marring tool mat but I imagine that the "gripping" ability would be absent. For example, my silicone soap molds are heat-resistant in an oven and would prevent tools from making scratches in surfaces if used as a mat. But the grip factor is missing as is the industrial level quality. I am also not confident that my silicone items would stand up to the chemicals used in auto repairs and similar activities. 

Who Invented Grypmat?

"Grypmat is a Veteran-founded company founded by former Air Force F-16 Mechanic, Tom Burden" from the Grypmat official website.

Another reason I chose Grypmat was related to who the inventor is. While I am not someone who does a great deal of shopping, I do try to support Veteran-owned businesses when I spend money. I also support entrepreneurs and small business as often as I am able. Finally, who better to design a tool mat than an F-16 mechanic? 

I felt that my decision was validated when I realized that Tom Burden had also appeared on The Shark Tank. If The Sharks have faith in this product, I thought it would be a good choice as a gift for my friend.

And clearly, it was an excellent and much appreciated choice. 

Related Links:

If you are interested in a Grypmat, or want more information, you can check the official website. You can also find Grypmats on Amazon via the Grypshon store or using the link below. 


Photo credit: truck and Grypmat photos courtesy of Dawn Rae's BFF.


Note: The author may receive a commission from purchases made using links found in this article. “As an Amazon Associate, Ebay (EPN) and/or Esty (Awin) Affiliate, I (we) earn from qualifying purchases.”


Sunday, January 3, 2021

What to Put Above a Bench Seat


Ideas on What to Place Above a Bench Seat - Complete the Look

If you've added a bench seat to a foyer or against a wall in a bedroom, it can be difficult to figure out what to put above it.

If the bench seat is against the wall in a bedroom, it can look rather lost when you consider the distance between the seat of the bench and the ceiling. 

Obviously, you'll have to position items higher than where a person's back and head would be when they're seated.

Below Is a List of Items to Consider When Decorating Above a Bench Seat

  • Wall racks with metal hooks are ideal above a bench seat. Whether in a bedroom or a foyer, a wall rack with hooks provides a place to hang coats, sweaters, hats, or just use it to feature a gorgeous array of decorative wreaths. If you're not a fan of clothing hanging out in the open (some prefer clothes hidden in closets), then use the hooks to feature decorative hanging pieces, such as dream catchers, tin signs on wire hooks, a collection of colorful cloth bags, decorative umbrellas, or narrow baskets filled with colorful dried flowers. Just remember to gauge the distance between where to place the hooks and how far down items should hang to not land where someone's head would be when seated.

  • Place a floor-to-ceiling strip of decorative vinyl or paste wallpaper behind the bench. The bench then becomes its own decorative area. If you're a fan of brick, there are many brick-look wallpaper designs to choose from. Add photos on the paper above it or hooks, or just let the wallpaper speak for itself.

  • A large decorative wall clock makes an excellent decorative piece when the bench seat is in a hallway. Again, place it high enough not to collide with people, but make it large enough to make an impression as a substantial decor item. The nice thing about a clock is it's fairly flush, and won't protrude very much from the wall.

  • Use metal art to add dimension and texture as a backdrop. You can check out some of the metal art featured on the product display below. Metal art comes in multiple designs, ranging from butterflies to birds, to sayings, to abstract collections. If the area you're decorating needs something other than simple photos, consider textured art.

  • A Collage of Photos and Various Textured Items. Don't be afraid to mix photos with wreaths, dream catchers, and word art. Mixed textures such as wood, cloth, greenery, and even lights can create a lovely rustic decoration piece, especially for an entryway. Consider a shelf positioned quite high up, then place the items that are flush to the wall below it.

Check out some of the above-suggested product ideas below:


Note: The author may receive a commission from purchases made using links found in this article. “As an Amazon Associate, Ebay (EPN) and/or Esty (Awin) Affiliate, I (we) earn from qualifying purchases.”


Most Recent Reviews on Review This Reviews


Search for Reviews by Subject, Author or Title

The Review This Reviews Contributors


SylvestermouseSylvestermouseDawn Rae BDawn Rae BMbgPhotoMbgPhotoBrite-IdeasBrite-IdeasWednesday ElfWednesday ElfOlivia MorrisOlivia MorrisTreasures by BrendaTreasures by BrendaThe Savvy AgeThe Savvy AgeMargaret SchindelMargaret SchindelRaintree AnnieRaintree AnnieLou16Lou16Sam MonacoSam MonacoTracey BoyerTracey BoyerRenaissance WomanRenaissance WomanBarbRadBarbRadBev OwensBev OwensBuckHawkBuckHawkDecorating for EventsDecorating for EventsHeather426Heather426Coletta TeskeColetta TeskeMissMerFaeryMissMerFaeryMickie_GMickie_G


Review This Reviews is Dedicated to the Memory of Our Beloved Friend and Fellow Contributor

Susan DeppnerSusan Deppner

We may be apart, but
You Are Not Forgotten


“As an Amazon Associate, Ebay (EPN) and or Etsy (Awin) Affiliate, I (we) earn from purchases.” Disclosure Statement

X