Monday, November 11, 2019

Freegal Review: Free Music Downloads

The journey through cutting the cable cord continues! It has been a indeed a journey and  cutting the cord is easy. What is not as easy is finding affordable content that is easy to access and user friendly to replace cable content! I happened upon Freegal when researching the free digital content available from my local library.

freegal free music downloads banner


What Is Freegal?

Freegal is a music library offered through your local library. Music can be downloaded for free with a weekly limit of downloads. The music library includes Sony's music catalog and a reported catalog of over 15 million songs. 

How User Friendly Is Freegal?


As you can see below, I am limited to five downloads per week. The number of downloads per user per week is determined by the package purchased by your library.

freegal free music downloads search bar


It is easy to access Freegal. Simply navigate to the Freegal website and log in with your library membership information. Or enter Freegal through your library digital menu with your library membership number.

The Freegal menu for desktop is self explanatory. The songs can be previewed prior to downloading. I did not find the search feature overly helpful for browsing. However, if you are searching for a particular artist versus general browsing the search engine is adequate.

The library can also be accessed with Apps from Google Play and Apple App Store.

freegal free music downloads dashboards
As with any new service or app there is a small learning curve to use the service. Freegal is easy to use and the music can be downloaded easily with the click of the mouse. Check with your local library to see if Freegal is included with your library membership.

Cutting the cable has been an interesting experience. Freegal is the third service reviewed which offers free content. The search for additional user friendly and robust sources of free content continues!

Where To Find Free Content For Cord Cutters

hoopla dashboard


Hoopla - Hoopla offers free books, movies and television shows through your local library.


kanopy banner


Kanopy- Kanopy offers free movies with an emphasis on Indie films and documentaries.


Note: The author may receive a commission from purchases made using links found in this article. “As an Amazon Associate, Ebay (EPN) and/or Esty (Awin) Affiliate, I (we) earn from qualifying purchases.”


Sunday, November 10, 2019

10 Reasons to Consider a Combination TV Stand and Fireplace

Electric Fireplace TV Stands

Even though we have a gas fireplace in our family room, we've had a combination electric fireplace tv cabinet for several decades. The photo on this page is the actual unit we purchased. 

Ten Reasons to Consider a TV Electric Fireplace Cabinet:

1. A Secondary Heat Source

Currently, this unit is in my office. The room gets chilly in the winter, so this solves that problem. Of course, it houses a TV as well, which is ideal on those days I prefer to work while watching the tube. 

2. To Save Space

If you'd like both a fireplace and a TV in the room but don't have space for it, you'll want to consider a unit like this. They come in various shapes, sizes, and designs, so you're sure to find one that ties into your existing decor.

3. To Add a Fireplace Where None Exists

If your home or apartment doesn't have a fireplace, it's the ideal solution; you add to
Electric Fireplace TV Stand
in my office
the ambiance, decor, and practicality with one piece of furniture.

4. To Warm Up a Finished Basement/Recreation Room Area

Often times finished basements don't have or can't have a gas fireplace. An electric fireplace solves the problem. It brings additional heat in the room, provides extra storage and of course, is a place for the TV.

5. When You Move, Take it With You

Renters, in particular, benefit from moveable TV Fireplace Stands. Now you don't have to eliminate apartments without fireplaces; just add one of these units, and you'll achieve that cozy feel you're seeking.

6. It's Easily Relocatable

We've had our fireplace tv stand in multiple places in our home over the years. In fact, it was in our master bedroom for over five years before we moved it to my office. Previous to that, it was in the living room. 

7. Add a Gaming System to the Stand

Some tv fireplace stands come with enough room to hook-up a gaming station. In our particular unit, there's a Play Station attached to the TV for kids and grown-ups alike. On the side of the unit are glass doors where we place the controllers and games.

8. Extra Compact Storage Space

Some units come with cupboards and others with convenient storage areas. At the bottom of this article you'll see a link to a page that features various designs and styles; take a look at all the choices.

9. A Fireplace Remote

Ok, pretty much all electric fireplaces come with a remote control. However, it's especially convenient when you're in bed, on the couch or at your desk, and need the heat on! Reach for the remote and start-up your fireplace.

10. It's A Lot More Affordable than Installing a Fixed Fireplace

Although the prices of fireplace tv stands vary from lower to higher ranges, they're less expensive than hiring a contractor to install a gas or electric unit.

Various Designs and Styles

Unfortunately, I can't give you a link to the fireplace unit in our home as it's been there for decades. We've never had a problem with it either. It certainly was worth the money. It cost us approximately $1200.

However, I did put together a collection of various designs and styles from multiple stores. You'll notice there's a broad range in prices, colors, and styles to fit just about any decor theme.


Just a reminder, if you have little kids or pets, don't let them touch the fireplace! Like any fireplace unit, gas, or electric, it gets hot!

Stay Warm


Note: The author may receive a commission from purchases made using links found in this article. “As an Amazon Associate, Ebay (EPN) and/or Esty (Awin) Affiliate, I (we) earn from qualifying purchases.”


Saturday, November 9, 2019

Plano Storage Unit Review


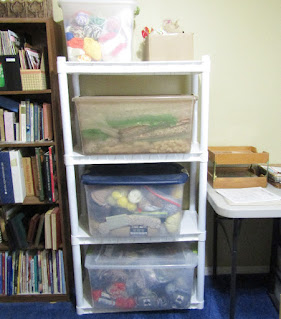
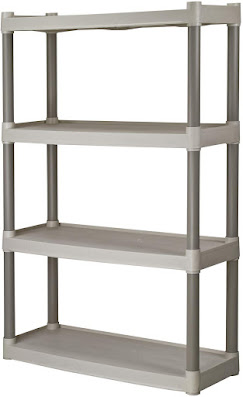
Plano 4-Shelf Storage Unit
I am a crochet and needlework crafter who creates for family & friends and for my Etsy Shop. Over the years I have acquired a fairly large inventory of completed crafts and an even larger inventory of yarn and related materials.  

I keep all this 'stuff' in plastic bins to keep them clean and organized. I have stored them in 'stacks'  (bins on top of bins) to conserve space, but this is inconvenient most of the time as I have to move bins to reach the ones underneath and then re-stack. And, of course the exact needed item at any given time always seems to be on the 'bottom' of the stack! 

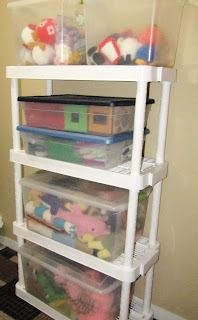
I finally found the perfect solution ~ a way to keep each bin quickly available, and also save space.  It was as easy as purchasing the Plano 4-shelf storage unit. In fact, once I bought and set up one, I realized that TWO would be even more helpful.


Plano 4-Shelf Storage Unit


Plano 4-Shelf Storage Unit

This shelf storage unit by Plano has four shelves that are 30 inches wide and 14 inches deep and stands about 55 inches high.  There are 16 inches between shelves, which gives me plenty of storage space. The unit is made of durable heavy-duty plastic. It comes unassembled, but has easy snap-fit assembly which only takes minutes to put together. No tools are needed.

The shelf unit pictured here is in tan, I bought mine in white and I have seen others in black. It is also reasonably priced. 


The Perfect Solution for my Craft Room


My yarn storage on the Plano storage unit
Yarn Storage

My stuffed animal storage on a Plano storage unit
Stuffed Animal Storage

Plano is the perfect answer to my craft storage problem, as my plastic bins fit just right on the shelves. Most of the plastic storage bins I use measure approximately 25 x 14 x 12 inches, thus the dimensions of each shelf on the storage unit allow plenty of room for each bin. It is SO handy to be able to take out just one bin to obtain a needed item without having to move and reposition a stack of bins. Since my storage bins are see-through, I can also quickly spot the exact bin I need. 


More Storage Units


Riving Origami rack - folding storage unit
Many other sizes and styles of storage units are available. Our Review This Review Contributor, Dawn Rae, has reviewed the Riving Origami Rack, which is a handy folding storage rack. 

This storage rack meets her needs in her small apartment and has proved to be  HER perfect solution. 


Summary


Image of Plano storage units as craft storage


So, for wherever you need extra storage space, from household products to crafts/hobbies to kids toys, a space-saving storage unit is definitely handy.


(c) Wednesday Elf Review of the Plano Storage Unit - Review written on 11/9/2019 and updated on 1/26/2023.


Note: The author may receive a commission from purchases made using links found in this article. “As an Amazon Associate, Ebay (EPN) and/or Esty (Awin) Affiliate, I (we) earn from qualifying purchases.”


Friday, November 8, 2019

Chocolate Covered Fruit DIY Recipes Reviewed

Fruit Trays Are Fabulous!

Chocolate Covered Fruit DIY Recipes Reviewed - Chocolate Fruit Tray
Fruit trays have been gracing event tables for many years. Whenever friends or family are planning a wedding shower, baby shower, tea, reception or party, I always volunteer to bring the fruit tray.

For decades, I have prepared Chocolate Covered Strawberries for my family. Purchasing chocolate covered strawberries from a candy store, can be very expensive. Making my own, is inexpensive and easy.

One day I was preparing a fruit tray for a gathering and I decided to take a side dish of chocolate covered strawberries as a special treat. I looked at the prepared fruit tray sitting next to the chocolate covered strawberries and I thought, "why not dip all of the fruit in chocolate?" That is how my chocolate covered fruit tray began. 

Over the next few days, I tested different fruits dipped in chocolate and allowed my family to be the judges. We have found that there are a lot of fruits that we love dipped or covered in chocolate.

This will probably be the first time you have seen some of these fruits covered or dipped in chocolate. After all, the day I prepared them, it was the first time I had seen most of them. 


Chocolate Dipped or Chocolate Covered Fruit Recipe


Preparation to cover any fruit in chocolate begins basically the same way.
  1. Wash and dry the fruit.
  2. Peel, if necessary.
  3. Melt the Chocolate

Some of these fruits have special instructions.

You may wish to visit the individual article for each one. Some articles have examples of large chunks fully covered in chocolate, as well as slices with dipped tips.


Virtually any fruit can be dipped or covered in chocolate. Let me know if you find one I haven't made or featured. I would love to try it!

Chocolate Fruit Tray Recipes

Make a Special Treat


Chocolate covered fruits are wonderful treats anytime.

Either one makes a great afternoon snack, a simple dessert or even a special treat for the lunch box.

Just select your favorite fruit, melt your chocolate and start dipping!


Dolci Microwavable Chocolate & Beautiful Serving Trays


 Dolci Frutta Chocolate Melting Wafers, 8 ounceCheck Price Dolci Frutta Party Kit with Chocolate and White ChocolateCheck Price Dolci Chocolate Wafer Melting, 8 ozCheck Price James Scott Crystal 3 Tier Rectangle ServerCheck Price


Check Out More Recipe Reviews at
ReviewThisRecipes.com


Chocolate Covered Fruit DIY Recipes Reviewed Written by:
House of Sylvestermouse


© 2009 Cynthia Sylvestermouse - This Article was originally published on a website that has closed.


Note: The author may receive a commission from purchases made using links found in this article. “As an Amazon Associate, Ebay (EPN) and/or Esty (Awin) Affiliate, I (we) earn from qualifying purchases.”


Thursday, November 7, 2019

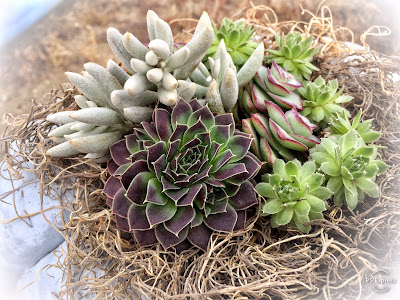
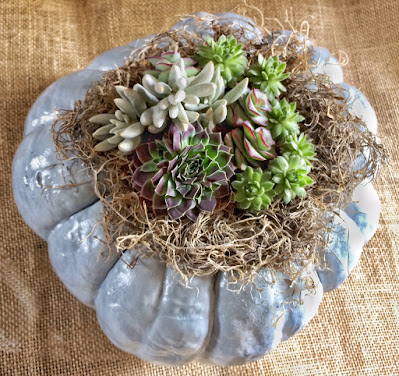
DIY Pumpkin Succulent Centerpiece


diy Pumpkin Succulent Centerpiece

It's pumpkin season!  Now is the perfect time to round up some pumpkins and create unique centerpieces as a festive touch for your holiday celebrations.  A DIY pumpkin succulent mini garden will be the perfect addition to your Thanksgiving decor.  Not only will it be a real attention-getter when you host guests for the holidays, but you will have the benefit of enjoying your new container garden long after you finish all those turkey left-overs.

Here's What You Need:
  1. One large flat pumpkin 
  2. A variety of succulents
  3. Clear gel glue
  4. Spray adhesive
  5. Moss
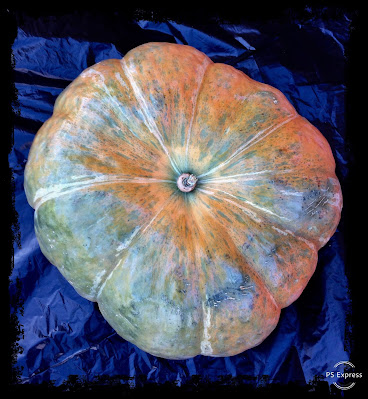
real pumpkin
It's best to use a flat pumpkin with a slightly indented center .
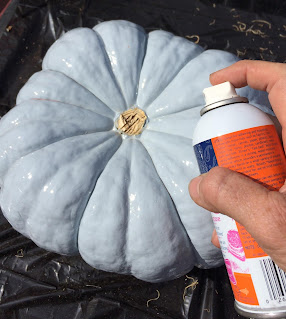
While I prefer to use a pumpkin in its natural state, I chose to paint mine for this demo project.  I used a lovely Solstice Blue paint color (a subtle blue-gray) that will blend in with the woodland theme I am using for my holiday decorations.  It reminds me of the beautiful shadows you see on fresh snow.  A neutral colored pumpkin better accents the succulents.

removing a pumpkin stem for diy project
Removing the Stem

Once the paint was dry, I used my Dremel with a cut-off wheel to remove the pumpkin stem. 

spraying on craft bond
Spraying on Elmer's Craft Bond 
I then sprayed adhesive on the center top of the pumpkin where the moss will be placed. 

pressing and gluing  moss on pumpkin
Press Moss Into the Adhesive
While the adhesive was still fairly wet and tacky, I pressed a nest of moss onto the sticky surface.  It seems I got a little moss happy.  Could have used a bit less moss, but it would have made a big mess to attempt to remove it.  I let the adhesive set for several minutes before moving to the next step.

cactus with roots showing
Preparing the Roots for Planting

While the adhesive was setting up, I gently removed the soil from the cacti roots in preparation for planting them on the surface of the moss.  I also separated the succulent clusters so I would have more options for spreading out individual plants.

Pumpkin Succulent Centerpiece
Vary Succulent Colors, Textures, and Heights
Start your succulent placement with your largest plant.  Visually, it is most pleasing to the eye to position the first cactus off-center and toward the edge of the pumpkin.  It is also a good idea to group your taller cacti near that first featured plant.  You will use clear gel glue to fasten your succulents to the moss.  Don't worry!  The glue won't hurt your succulents.

mist the moss on a pumpkin centerpiece
Time to Lightly Mist the Moss
Once your pumpkin succulent centerpiece is complete, carefully give the moss a light misting of water.  You will provide moisture to the moss about once a week.  It's important not to let water pool under your plantings.  It will lead to premature rot.  Simply tip your pumpkin slightly to the side to drain any excess water after each misting.  

To extend the life of your pumpkin, and to give your succulents what they need, carefully choose a location away from heaters.  Try to situate your succulent container garden such that your cacti get the sunlight they need without getting too much heat on the pumpkin.  Likewise, take care to protect your succulents from freezing if you will be displaying your centerpiece on a porch or outdoors.

One last tip:  Place your pumpkin on a piece of cork or thick cardboard to keep the bottom from early decay (especially if placed in a location where surface dampness occurs).  Take care to protect your indoor furniture with the use of a waterproof planter mat.

With proper care, your pumpkin succulent centerpiece should last several weeks.  Once the pumpkin has reached the end of its season of life, you can either cut off the top of the pumpkin and plant it on top of appropriate cacti soil, or transplant the newly rooted succulent cuttings to another container.  Of course, you may also choose to use a faux pumpkin to eliminate this step.

It's easy to see why these pumpkin centerpieces are so popular.  Besides being unusual and visually stunning, they let you take your creativity to a whole new place.  This DIY centerpiece is sure to be a fun conversation-starter at your next gathering.  Why not make one to share for a hostess gift?  Who wouldn't love such a thoughtful gesture? 

Enjoy this project and my best wishes to you for a blessed holiday season.


Note: The author may receive a commission from purchases made using links found in this article. “As an Amazon Associate, Ebay (EPN) and/or Esty (Awin) Affiliate, I (we) earn from qualifying purchases.”


Wednesday, November 6, 2019

The Dogs of Riga by Henning Mankell Book Review

The Dogs of Riga Henning Mankell Book Review
Henning Mankell’s The Dogs of Riga is not a book about dogs but rather one that refers to another meaning of the word. That is, “to follow someone or their movements closely and persistently.” To dog them.  I believe that it is the perfect title for this book given the Cold War setting and the actual trailing that takes place in the story.

It is a crime detective novel, the second that we are reading for Carleton University’s Learning in Retirement program class called Classics of Detective Fiction: From the 1960s to Today.

The book was translated into English in 2001 and is set in Sweden and the troubled Baltic state Latvia. In our class notes, the instructor says that the book falls in the genre of “Scandinavian noir” and that it offers “criticism of the social welfare ideal.” The later being something that the author was well known for.

Though my book came with the tagline about Mankell being, "Sweden's greatest living mystery writer," we did lose him in 2015 to cancer.

THE STORY


Detective Kurt Wallander is the somewhat rumpled, seemingly depressed lead character. He is newly single, a bit burnt out with police work and given to periods of self-doubt. His personal life is not so great.

In his professional life, Wallander is a Swedish homicide detective and in this novel, he is assigned a case that starts with the washing ashore of two well-dressed dead men. The case turns out to be much more complex than it first appears and eventually sees Wallander in over his head in Latvia.

REVIEWS


This book is “a near-flawless performance in a distinguished series” says Kirkus Reviews.

Publisher’s Weekly says this book is “a unique combination of police procedural and spy thriller that also happens to be a devastating critique of Soviet-style Communism.”  Agreed.

The Crime Review says, “Mankell’s gritty, ultra-realist noir writing style keeps a somewhat tired plot line fresh and interesting, and makes this a piece not to be missed in the ongoing development of Wallander’s character.” I am so glad to have met Wallander!

Finally, The Crime Review also says that Mankell is masterful at “capturing sentiment about complex social and political issues in a very real, day-to-day way.”  I  agree, it seemed like a a very good representation of the place and the times.

Readers on Goodreads rate this book a 3.72 out of 5 and Amazon readers give it an average score of 4 out of five stars.

MY REVIEW


I thoroughly enjoyed my time with Mankell’s Wallander and as I said above, I am glad to have met him and I do look forward to more of his adventures. The Dogs of Riga was a captivating book; a page turner at 326 pages. It definitely had my attention and made me want to know what would happen next. It is therefore HIGHLY RECOMMENDED by me if you enjoy well-crafted, somewhat gritty crime detective fiction and novels set in the Cold War.

As in my review of Ian Rankin’s Black and Blue, I have to tell you that this is not the first book in the Detective Kurt Wallander series. Since it is part of the course I am taking and therefore assigned reading, I started with it. I will definitely have to go back to the start of the series, which is where, I imagine, you will start if you also want to meet Kurt Wallander.

WHICH DETECTIVE KURT WALLANDER BOOK IS FIRST?


Since I want to back track and read the books that came before The Dogs of Riga, I searched for a complete list of the Kurt Wallander books in the order that they should be read. I struggled at least in part because apparently the books were not translated to English in chronological order.   I eventually found this Detective Kurt Wallander website and timeline, which should be helpful if you want to start at the beginning, too.

The Pyramid (1999) - This is a prequel, an anthology.
Faceless Killers (1991)
The Dogs of Riga (1992)
The White Lioness (1993)
The Man Who Smiled (1994)
Sidetracked (1995)
The Fifth Woman (1996)
One Step Behind (1997)
Firewall (1998)
The Return of the Dancing Master (2000) – Written by Stefan Lindman
Before the Frost (2002) – Written by Linda Wallander
The Grave (2004)
The Troubled Man (2009)

IN CLOSING


More than 40 million copies of the Detective Kurt Wallander books were sold worldwide so I am not the only one who enjoys them.  However, the author also wrote many plays, children’s books and screenplays.

I think The Dogs of Riga would be a brilliant movie and apparently my idea is not a bad one because the BBC made Henning Mankell’s novels into a Swedish crime TV series that now comprises 26 episodes.

You can check out all of Henning Mankell’s Wallander books on Amazon by clicking here and you can learn more about or order your copy of The Dogs of Riga here.

If you do read the book, please come back and let us know if you enjoyed it and, if you have seen the movies, we would love to hear about them, too.

See you
At the bookstore!
Brenda
Treasures By Brenda

Quick Links:

Buy your copy of Henning Mankell’s The Dogs of Riga on Amazon.


The Dogs of Riga Kurt Wallander Mystery Book


Note: The author may receive a commission from purchases made using links found in this article. “As an Amazon Associate, Ebay (EPN) and/or Esty (Awin) Affiliate, I (we) earn from qualifying purchases.”


Tuesday, November 5, 2019

Reviewing Author Plans For 2020

Planning for the Future

I'm going to put myself out on a limb today by publicly reviewing my plans as an author for 2020. I have been weighing my options quietly in my mind for about a month now. So, today I'll put my ideas out there because one of the best motivators is to have people holding you accountable for the goals you have set for yourself. It seems to work for people who are dieting, trying to quit smoking, and a variety of other things that we wish to accomplish. Let's see if it works for a budding writer.

author plans
Can this author reach her goal?
books image courtesy of pixabay.com

Not too long ago, I did a review on Kathi Daley She is another Cozy Mystery author, like myself. I really enjoy her books but the thing that kept niggling at my brain is that she published a book a month in one year. Actually, I think she did it two years in a row. So, 24 books in two years. At first I thought, wow that is impressive. Then I began to think on the lines of could I do that? Could I write and publish 12 books in 12 months. You probably see where I'm going with this.


2020 Goals For This Author


When the year 2019 began, I had only written and published two books. I had been stuck on book three for over a year. In February of this year, the block I was experiencing finally broke away and I was able to finish the third book in the Roni Rainer Mysteries series; publishing it in March. At that point, I didn't really have any set goals for writing other than I wanted to try to write everyday. 

To make a rather long story short, last month I published my seventh book. Without a thought of how many books I wanted to write this year, I was able to add five books to my list of published works. If you had asked me a year ago, if I could do anything even close, I would have probably said that I didn't think so. The words started flowing and the ideas kept coming and so I wrote. Some days I wrote more than others but I did try to write something everyday.

So, my goal for next year is to try really hard to write and publish a book a month for the entire year. I'm going to ask you to hold me accountable to this declaration. I really think that I can do it. I have already figured out that in order to accomplish this I'll need to write (or at least average) about 2300 words a day. I honestly think that is very doable for me. 

I have already roughly planned out how and what I will publish next year. The first thing will be a new series that I am already working on. (I'll have to have at least one book ready to publish in January.) This new series will be called the Babbs Bennett Mysteries. Babbs is older than my other main characters. She is over 65 and has temporarily moved back to her hometown to help her cousin run a book store while he recuperates from a bad fall off of an icy path. The name of the book store is Holiday Books. Holiday is the family surname and her cousin has always played on that family name by decorating the shop each month for that month's holidays. That is going to be a fun part of the creative process, coming up with titles that have to do with different holidays.


Working List of Books to Write

  • January Book One of Babbs Bennett Mysteries (working title Valentine Vengeance)
  • February Book Two of Babbs Bennett Mysteries 
  • March Book Three of Babbs Bennett Mysteries
  • April Book One of Cottonwood Grove Mysteries (new series involves a yarn shop business)
  • May Book Two of Cottonwood Grove Mysteries
  • June Book Three of Cottonwood Grove Mysteries
  • July Book Five of Roni Rainer Mysteries
  • August Book Four of Cabin 9 Mysteries
  • September Book One of Second Chances Mysteries (new series involves a second hand shop)
  • October Book Two of Second Chances Mysteries
  • November Book Three of Second Chances Mysteries
  • December Book Four of Babbs Bennett Mysteries
Well, there you have it; my goals as an author for 2020. What do you think? Am I being too ambitious? 


Already Published Books by Beverly Owens


  • Roni Rainer Mysteries
    1. Death Takes a Spin
    2. Illegal Harvest
    3. The Puzzle of Talking Rock
    4. Missing in Beaver Falls
  • Cabin 9 Mysteries
    1. Campground Corpse
    2. Untimely Checkout
    3. Grifter's Gamble


Note: The author may receive a commission from purchases made using links found in this article. “As an Amazon Associate, Ebay (EPN) and/or Esty (Awin) Affiliate, I (we) earn from qualifying purchases.”


Monday, November 4, 2019

How to Have Warm Feet at Night

I hate cold feet when I go to bed almost as much as I hate sending a large amount of money to the local utilities company. This creates a dilemma in cold climates. I will review my cost saving solution to going to to bed with warm feet. 


Reviewing how to have warm feet in bed.

The nights have turned cold and I dread turning on the furnace. I don't mind living in a cooler environment but I can't stand crawling into a cold bed. It takes forever for my feet to warm up on cold sheets. The solution is an electric blanket. If you have cold feet in bed, or have a partner that puts their cold feet on your warm feet in bed, this may be a helpful solution for you too.

In my drafty old apartment, it is far less expensive to use an electric blanket than it is to try to heat the entire apartment.  So every evening as I'm preparing for bed, I click on the electric blanket and turn the thermostat way down. By the time I crawl into bed, there is a warm, toasty spot for my feet.

I've tried electric blankets before but I got too hot when I was completely covered with a heating blanket. Perhaps you would prefer that kind of all-over warmth. If so, buy an electric blanket to match your bed size.

I tend to just have a problem with really cold feet at night. The rest of my body remains at a comfortable temperature at night. A throw-sized electric blanket just at my feet worked better for me than a full-sized blanket.

But since I'm a restless sleeper, the problem became a waded up blanket tangled around my feet.

When I began placing the throw-sized, sherpa-lined blanket under the fitted bed sheet, at my feet, all of my problems were solved. The electric throw remained exactly where I placed it. The cord with the control is long enough to reach the outlet and be easily accessed. My feet stayed toasty warm but not too hot (I'm starting to feel like I'm Goldilocks, looking for the bed temperature that's not too cold, not too hot, but just right!)
plush faux fur throw

And best of all, I pay a much lower bill to the utilities company when I'm not trying to heat my drafty apartment and half of the great outdoors. It is a small way to help my finances and to decrease my impact on the environment. And every little bit helps in both of those areas.

Winter is coming in the US. If you don't like to be cold but don't want to give your entire paycheck to the utilities company, consider using an electric blanket and turning that thermostat down.


Note: The author may receive a commission from purchases made using links found in this article. “As an Amazon Associate, Ebay (EPN) and/or Esty (Awin) Affiliate, I (we) earn from qualifying purchases.”


Sunday, November 3, 2019

3 More Tips from a Newbie Self-Publisher

3 More Tips From a Newbie Self Publisher
3 Additional Newbie Self-Publisher Tips
From a Fellow Newbie's Experience

In the previous few articles, I reviewed my newbie experiences with self-publishing. Since I've published my third book and still have some hair left, there's more to share.

Again, I'm not a publishing guru; I'm just sharing tips as I go through the process.

If you've published paperbacks, you understand that your book can be uploaded in digital format as an eBook.

I started in reverse. My first book was an eBook. After publishing an eBook, I learned to publish paperbacks.

However, once I mastered (yeah, right) the ability to publish a paperback, I changed the order in which I publish books:

  •  My books are written for Paperback publishing first
  •  Then, that same book is uploaded as an eBook

I prefer doing paperback books first. The physical copy is more detailed and takes more care in its design.

When doing an eBook, you upload your completed book document to KindleCreate. Again, read this article for a little bit about KindleCreate and eBook preparation.

Three Tips to Pass Along: 

1. Kindle Create - What I Learned the Hard Way with the Third Book

If your manuscript/book document has anything in List Format, for example, 1, 2, 3, etc., when you upload it to KindleCreate, KindleCreate doesn't let you modify Lists. You have to have it exactly as you want before uploading or not using a list format. 

My book had 160 items in List Format. To get around the lists for the eBook version, I typed the numbers in brackets and put them above the typed item. I didn't use the auto-format of 1.2.3. in the toolbar. However, beware; even if you type 1. versus using the word processing numbering format in the toolbar, you still won't be able to modify that list in KindleCreate.

Oh, and the same goes for Tables in KindleCreate: They can't be modified once uploaded to KindleCreate.

Maybe KindleCreate will change these restrictions down the road?

2. Get Your Amazon Author Page Completed

Read the general instructions on the Amazon help page here to get started. It's easy to understand.

I decided to wait until I completed three books before doing my Author page. However, there's no need to wait. If you only have one book, go for it.

The Author page has five key elements:

  •  Upload your photo or any photo(s) you prefer for the page
  •  Add your books to the page (easy, automatic process)|
  •  Write a Bio on yourself - Take some time to do this (see the tip below)
  •  Upload any videos you have that relate to you or your books
  •  Add an RSS feed from your blog, Pinterest, or another place that connects to your Business


Regarding the Amazon Bio, take advantage of this article; it's filled with excellent tips. It provides guidance on how your Bio should sound and what you should say. You can follow me on my newly created author pageIf you prefer a video tutorial on how to complete an Author Page, this one is helpful:


3. The Size of Your Book as it Relates to the Book's Spine

I have yet to use a professional graphic artist to create covers. For now, Amazon's Cover Creator is still my go-to tool. What I learned from this third book is that size matters. If you want your book to have written details on the Spine, you must ensure it's approximately 100 pages. This last book was less, about 65 pages, and thus couldn't have the title on the Spine. 

I'll keep most of my books to at least 100 pages to avoid this. You don't have to if you don't want to; it's up to you.

Here are my article tips to date:


Here's my completed third book, and yep, I'm working on the fourth.


Note: The author may receive a commission from purchases made using links found in this article. “As an Amazon Associate, Ebay (EPN) and/or Esty (Awin) Affiliate, I (we) earn from qualifying purchases.”


Saturday, November 2, 2019

Lego City Fire Station - Reviewing Lego Set #7208

"Lego Set 7208" "Lego City Fire Station" "Lego Fire Station"
Buy Lego City Fire Station here!


For new readers, I used to review Lego sets years ago and my favorite range was definitely the Lego City range.   I even had an alter ego called Leo who has made a surprise appearance on Review This Reviews while reviewing the Lego Creator Holiday Bakery set.

Now I know that all things fireman related are always popular with children and I can relate as when I was younger my dad was a fireman so I got to ride in a fire engine for real and even go down the fire pole (yes it is as fun as it looks!).   It's no surprise then that the Lego City Fire Station would be a popular set.   Why don't we review it now?

Lego City would not be complete without a fire station and they have a great one with Lego City Fire Station (7208)!

This Lego City set contains 662 pieces and once completed provides hours and hours of fun (much like the rest of the Lego City range).   The fire station is fully manned with a whole shift on duty at any given time - this means that you get not 1, but 5 firemen minifigures which is just fantastic in my opinion.

The set also includes a fire truck that has a ladder which actually rotates - just what you need to rescue people from the top of a burning building.   There is even a cat and a tree that it can fit in so that the fireman can 'rescue' it.

No expense has been spared by Lego City in making sure their fire fighters have everything they need including a second vehicle which is a much smaller one that's ideal for their rescue work.

There are lots of little inclusions in this set which are fun like a coffee machine, a television and a table with a computer.  I always think that it's often these little extras which are important when it comes to playing with the set after it's been built.


Lego Fire Station Set
Lego City Fire Station with a Fire Engine & Fire Rescue Truck


Now once you've got the Lego City Fire Station you can rest assure that the citizens of Lego City will all be safe, but I'm a great believer in that you can never be too careful so if you wanted to you could get more fire sets such as a fire fighting helicopter to keep any bush fires on the outskirts of the city under control!   If you want to check out all of the Lego City fire sets then you can find the best selecion at - Lego City Fire Sets.


A Couple of Warnings for This Lego City Fire Set

The first one is that once they have this fire set many children will then request one of the Police Station sets (unless they already have them that is)!  I mean do you know of any cities that have a fire station, but no police station?

The other thing to be aware of with this set is that once it's built it shouldn't be moved.   The downside is that it's not built on one of the larger base plates so when you try and move it you'll find it breaks and has to be rebuilt.   What this means is if you have room build it in situ so that your child can play with it where it is, if you don't have room then build it on a tray or something that it can be carried on.

Lego Sets Stimulate Children's Minds & Imaginations

Lego sets are great for children as the process of building the set stimulates their mind into figuring out how to build it whether your child chooses to follow the instructions or try and figure it out on their own.   Actually putting the set together is good for their fine motor skills which is invaluable.

Lego also helps a child to learn patience and perseverance as they have to take their time to build the set before they can play with it.

Once a set is built Lego keeps giving as now it's time to play and there's nothing like a Lego City set to stimulate a child's imagination and they can spend hours playing with them.

What Do You Think Of Lego?


Do you think Lego sets make great gifts for children?   Or do you enjoy them yourself?   If you love Lego yourself or have a Lego fan to buy for then why not check out all of our Lego Reviews.


Note: The author may receive a commission from purchases made using links found in this article. “As an Amazon Associate, Ebay (EPN) and/or Esty (Awin) Affiliate, I (we) earn from qualifying purchases.”

Most Recent Reviews on Review This Reviews


Search for Reviews by Subject, Author or Title

The Review This Reviews Contributors


SylvestermouseSylvestermouseDawn Rae BDawn Rae BMbgPhotoMbgPhotoBrite-IdeasBrite-IdeasWednesday ElfWednesday ElfOlivia MorrisOlivia MorrisTreasures by BrendaTreasures by BrendaThe Savvy AgeThe Savvy AgeMargaret SchindelMargaret SchindelRaintree AnnieRaintree AnnieLou16Lou16Sam MonacoSam MonacoTracey BoyerTracey BoyerRenaissance WomanRenaissance WomanBarbRadBarbRadBev OwensBev OwensBuckHawkBuckHawkDecorating for EventsDecorating for EventsHeather426Heather426Coletta TeskeColetta TeskeMissMerFaeryMissMerFaeryMickie_GMickie_G


Review This Reviews is Dedicated to the Memory of Our Beloved Friend and Fellow Contributor

Susan DeppnerSusan Deppner

We may be apart, but
You Are Not Forgotten


“As an Amazon Associate, Ebay (EPN) and or Etsy (Awin) Affiliate, I (we) earn from purchases.” Disclosure Statement

X