Showing posts with label nature photography. Show all posts

Thursday, February 11, 2016

Review of Winter Snow Scene Photography

Winter Snow Scenes

Winter is a Great time for a Photographer 

Ice on Wild Geraniums photo by mbgphoto
Photographing winter scenes is a wonderful way to pass your time on a snowy winter day. The snow covers all the dullness of the winter scenery and gives a beautiful field of white to everything you photograph.
 
I have found that I don't have to go any further than my own backyard to find some great photographic subjects. The birds outside my window always lend to some nice photos and if I want to wander a bit further away, a walk around the neighborhood will produce lots of trees covered with snow.
This page was created to showcase my winter photos and to present them on some of the Zazzle products I have designed. I hope you enjoy your tour through my winter wonderland!
Intro photo is "Ice on wild Geraniums" taken in my front yard


Winter Snow Scene

Snow Laden Evergreen

I photographed this tree while taking a walk in my neighborhood just after a big snowfall. The tree had a lot of houses and other things in the background so I put it in Photoshop Elements and use the impressionist brush to smudge out the background. I like the effect it gives showing just the tree as the center of the scene.
snow laden evergreen photo by mbgphoto
You can purchase my photos on cards at zazzle.com/mbgphoto

Winter Scene Note Cards

Winter snow scenes make wonderful note cards. Keep in touch with friends and family and write your own message inside. This photograph was taken from my front porch on Christmas evening. I used a flash to illuminate the small Japanese maple tree that was laden with snow. This effect highlighted the tree and kept the black background.
Japanese maple tree photo by mbgphoto

Christmas Snow Scene Cards

Winter Snow Scene

Snow scenes make beautiful Christmas cards. You can create your own from your photographs. I recommend sights like Zazzle and CafePress to use your own photos to make quality looking greeting cards.

Christmas Wreath

Christmas wreath photo by mbgphoto
Stop by my Zazzle store at zazzle.com/mbgphoto to purchase copies of my photos on a variety of products

Birds in the Snow

Birds make great subjects in a snowy background . I have a bird-feeder in my backyard and in snowy weather I will sit by our patio doors with a telephoto lens on my camera and photograph the birds in the snow.

Birds in my Backyard

birds in the snow photo by mbgphoto

I think the male Cardinals are particularly pretty in the snow. Their bright red feathers look stunning against the white snow. We have been having several male and female cardinals visiting our bird-feeder in the snow.

Male Cardinal

male cardinal photo by mbgphoto

Majestic Cardinal

cardinal photo by mbgphoto

Female Cardinal

female cardinal photo by mbgphoto

Pansy peaking through the Snow

pansy in the snow photo by mbgphoto


Note: The author may receive a commission from purchases made using links found in this article. “As an Amazon Associate, Ebay (EPN) and/or Esty (Awin) Affiliate, I (we) earn from qualifying purchases.”


Thursday, October 8, 2015

Review of Tips on Photographing Waterfalls

Photographing Michigan Waterfalls

Melting Snow Equals Beautiful Waterfalls

Michigan waterfalls photo by mbgphoto
The Upper Peninsula (UP) of Michigan is known for large snowfalls. It is not unusual to have over 200 inches of snow in a season and the record snowfall stands at 390.4 inches according to a sign we saw in the Keweenaw Peninsula. When all of this snow melts in the spring the waterfalls in the area are full of rushing water. In the UP you will find over 324 different waterfalls.

When we visited, in mid June, we found waterfalls everywhere we went. Many times we would pull off the road and hear the rushing water. Other times we would follow signs that led us to paths to the nearby waterfalls.

Earlier in the spring, I had attended a class where the instructor gave us tips on photographing waterfalls, so I was anxious to try out these tips and photograph some waterfalls.

On this page, I will pass on the tips that worked for me as I show you photographs from 5 of the waterfalls I photographed in Michigan. We returned to Michigan in September and was able to photograph the beautiful Tahquamenon Falls. I am adding that photo near the end of this page.

all photos by myself-mbgphoto

Alger Falls - forgetting the tips

Alger Falls photo by mbgphoto


The first waterfall that I photographed was on the side of a busy road. My husband pulled off the road and I jumped out with my camera. The ground in front of the waterfall was rocky and hilly and I thought I could shoot it without a tripod. 

I use aperture priority when I shoot. This allows me to pick the aperture and the camera sets the speed. In order to get a slower speed to get the smooth waters that I like to take you have to use a larger number on your aperture. Ideally I would like to use an F22 or higher but without a tripod the largest number I could use successfully for this photo was a F11. This gave me a speed at 1/20 a second. It was not really good enough for what I wanted, but then I was in a rush. 

The resulting photo is, in my opinion, mediocre. In the photos that follow you will see the results when I use the following tips.
  1. Always use a tripod 
  2. Slow down and take your time 
  3. Use a polarizing filter to reduce the glare and slow the speed 
  4. Use a remote shutter release

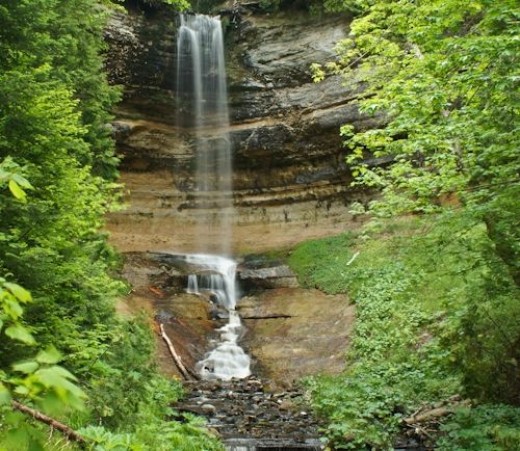
Munising Falls - 50 foot drop

Munising Falls photo by mbgphoto

 
This beautiful waterfall was located near where we were staying in Munising. We parked in a lot and then I walked a well maintained path into the woods for about 1/2 mile to reach two of the viewing platforms for the waterfall. This waterfall has a breathtaking 50 foot drop into a canyon. 

The platform for viewing made it easy for me to set up my tripod to get a good shot. A tripod is essential to get the smooth looking water in this photo. I shot this photo using the aperture setting of F22 this gave a shutter speed of .6 seconds. I had my ISO set at 200 and used a shutter release to keep the camera steady.


Photography Equipment - three items to capture perfect waterfall photos


  • If you are looking to get the look of the smooth flowing water in your waterfall photos, a tripod is an essential piece of equipment. The tripod listed below is the one I use. It is not a high priced piece of equipment and it works with all of my cameras (yes even my point and shoot). To get the steady shot you need for waterfalls I highly recommend using a tripod.
  • Using a polarizing lens will help you to slow down your shutter speed to get the smooth look of the water. It also helps to reduce any glare. This is especially important if you are trying to shoot on a sunny day. On a cloudy day it wouldn't be necessary.
  • A shutter release is also helpful in keeping your camera steady. I have one that attaches to my camera, but I think a remote one would be really nice.

tripod
Tripod on Amazon.com
tripod


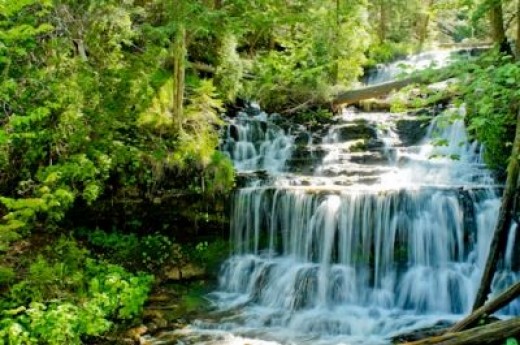
Smooth Flowing Water - Wagner Falls

Wagner Falls photo by mbgphoto


The Wagner falls was also near Munising, Michigan. It starts with Wagner Creek which flows over a number of rocky ledges to create this beautiful waterfall. There was also a tree limb that had fallen across the area, which added to the falls of the water.

I got to this waterfall by walking a short gravel path to a viewing platform. As was the case for the Munising Falls, the platform made a perfect place to set up my tripod. I was shooting from several angles, moving around the platform, when another photographer came and stood near me. He watched me for awhile and then inquired as to whether I had a polarizing filter in my camera bag. Now, I knew that was a way to slow down my shutter speed, but I had forgotten to add the filter. I thanked him for the tip and then went and put on the polarizing filter. This made a really nice difference.

It was a sunny day and the filter helped to reduce the glare and slow down the speed. I was able to shoot this photo using a F25 aperture and a speed of .5 seconds. I was pleased with the smoothness of the water in the resulting photo.

Wagner Falls with an Aperature of F8

Wagner Falls photo by mbgphoto


Jacobs Falls

Jacobs Falls photo by mbgphoto


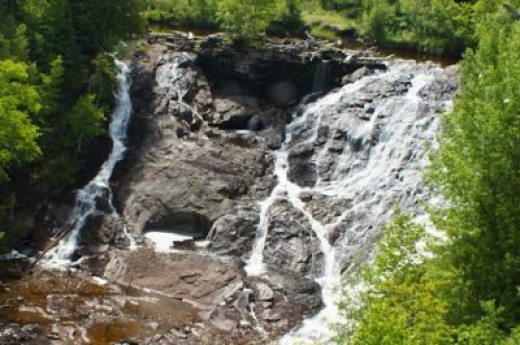
The next two waterfalls are ones that we encountered as we were visiting lighthouses in the Keweenaw Peninsula in upper Michigan. In both of these photos I remembered to use all of the waterfall photography tips I had learned. I took my time, used a tripod, used my polarizing filter and used an off camera shutter release. 

In this photo of Jacob Falls I used a setting of F22 which gave me a speed of 1/3 second. I also pushed my ISO down to 100 to further slow the speed. 

In the photo of Eagle River falls I used a F22 setting at 1/15 second. 


Eagle River Falls

Eagle River Falls by mbgphoto


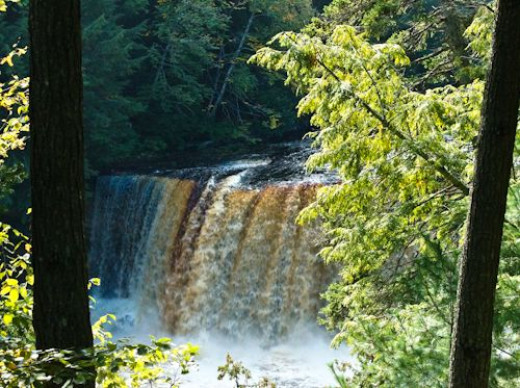
Tahquamenon Falls - beauty in the fall

Tahquamenon Falls - beauty in the fall


The Tahquamenon Falls are beautiful. They have a orangish brown color that comes from the tanic acid that leaches into the river from cedar and hemlock swamps. When we were there in September of 2013 I took many photos of the falls. Sometimes I tried to capture some of the fall colors of the trees to pick up on the orange color of the water. On other photos I looked for a way to frame the falls to show off the beauty of the falls.

In this photo I found a place where I could take the photo with a tree stem on each side of the picture. I think it works well to frame the photo.


My Waterfall Photos on Zazzle

Michigan Waterfalls Greeting Card
Michigan Waterfalls Greeting Card by mbgphoto
Shop for Michigan waterfalls Cards online at Zazzle.com


Note: The author may receive a commission from purchases made using links found in this article. “As an Amazon Associate, Ebay (EPN) and/or Esty (Awin) Affiliate, I (we) earn from qualifying purchases.”


Thursday, April 24, 2014

Nature Photography Class

jonquil flower photo by mbgphoto

Photography classes are a great way to enhance your skills as a photographer and to learn some new techniques.  I try to take a new class or seminar each year. I just started a new 6 week class on nature photography and over the next weeks I will share with you some of the tips that I have taken away from the class.

In our first class the instructor gave us an introduction to the class.  He first described his take on what comprises nature photography.  For him it is wildlife, panoramic scenes, and basically anything outdoors that does not involve the 'hand of man".  In the introduction we were given some guidelines on photo ethics.  A good photographer will respect the earth and leave the area in the same condition he found it.  Here are some of the points the instructor made.
  • Be concerned for the safety and welfare of the subject
  • Do not dig up plants
  • Don't trim or snap plants
  • Do not expose nests or handle babies
  • Do not lie!  Make your shot be authentic.
We were told that it is important to know your subject.  You can do this by taking the time to research your subject before you start photographing and to take the time to observe your subject.  For instance if you are trying to photograph butterflies take the time to learn a little bit about their habits and it will be much easier for you to find them and get a great photograph.  Many parks and wildlife areas will have pamphlets about their plants and wildlife that will give you hints on the best times to observe and photograph them.

The instructor also stressed the importance of knowing your camera.  He suggested sitting around at home and just taking photos of anything using all different settings just to get to know all the features on your camera.  In fact we have a homework assignment to photograph a ruler to learn how close our camera can focus.  We will  be doing this using each of our lenses.  We will then photograph the ruler outside with a zoom lens using both the shortest and the longest focal length at a F8 setting.  This will show us the difference in the backgrounds with each focal length.  Taking the time to learn the camera in this manner will help us to use the right settings when we are out in the field.

I am really looking forward to our next class next week and next Thursday I will again give you some tips from the class.


Note: The author may receive a commission from purchases made using links found in this article. “As an Amazon Associate, Ebay (EPN) and/or Esty (Awin) Affiliate, I (we) earn from qualifying purchases.”


Most Recent Reviews on Review This Reviews


Search for Reviews by Subject, Author or Title

The Review This Reviews Contributors


SylvestermouseSylvestermouseDawn Rae BDawn Rae BMbgPhotoMbgPhotoBrite-IdeasBrite-IdeasWednesday ElfWednesday ElfOlivia MorrisOlivia MorrisTreasures by BrendaTreasures by BrendaThe Savvy AgeThe Savvy AgeMargaret SchindelMargaret SchindelRaintree AnnieRaintree AnnieLou16Lou16Sam MonacoSam MonacoTracey BoyerTracey BoyerRenaissance WomanRenaissance WomanBarbRadBarbRadBev OwensBev OwensBuckHawkBuckHawkDecorating for EventsDecorating for EventsHeather426Heather426Coletta TeskeColetta TeskeMissMerFaeryMissMerFaeryMickie_GMickie_G


Review This Reviews is Dedicated to the Memory of Our Beloved Friend and Fellow Contributor

Susan DeppnerSusan Deppner

We may be apart, but
You Are Not Forgotten


“As an Amazon Associate, Ebay (EPN) and or Etsy (Awin) Affiliate, I (we) earn from purchases.” Disclosure Statement

X