Showing posts with label mbgphoto. Show all posts

Thursday, April 25, 2019

Review of Texturing Technique in Photoshop

Pink Daisy with texturing technique applied on photo by mbgphoto

A favorite technique of mine in Adobe Photoshop is texturing.  The photo above shows a photo of a flower with a textured background.  This photo is actually a combination of two different photographs that I shot.  The foreground is the daisy flower and the textured background is a photograph of my windshield with ice on it.  On this post I will review some of the steps needed to create this photo and then show some other photographs I created using this procedure.


Creating a Textured Background

There are many places online that you can buy textured backgrounds, but I like to create my own using parts of photographs that I have taken.  Here are a few from my library.  They include a couple of sky images, a brick wall, fire (from my fireplace) and the icy windshield that I used in the introductory photo.


photo background created by mbgphotophoto background created by mbgphotophoto background created by mbgphoto

photo background created by mbgphoto


Steps to Create Textured Photo Composite

The steps below are the ones I used to create my textured background images.  There are several different ways to do different procedures in PS(Photoshop) but these are the ones I find easiest for me.  I have never taken a class on PS, but rather have taught myself through the use of the tutorials on PS (great for the basics) and YouTube tutorials you can find online for many different specialty techniques.  Here then are the steps used to create the photo like the one at the top of this post.
  •   I first Open a background photo in PS. I used my icy windshield background for the photo at the top of this post. I also always make a duplicate copy of the background photo.
  • Next I click on file and then Place Embedded to select the photo that I want in the forefront.  In this case my daisy photo. The new photo will come in on top of the background photo and I will then stretch or reduce it to make it the same size as the background photo.
  • The next step is to pick out the area of the photo that you want to highlight.  In the case of the daisy photo I use the Quick Selection tool to outline the main daisy.  I then click the  button at the top that says Select and Mask.
  • This will open a new window that will give you the opportunity to use sliders to bring in as much of the background texture as you want.  Play with the sliders till you get the desired effect and click done.
  •   This will bring you back to the main screen where you will now click the little square at the bottom of the layers column that adds the layer mask.(when I first started I always got hung up because I forgot this important step.)
  • Next you will tweak the sliders for the layer mask to get exactly the effect you desire.
  • Now you just save your work and you have created a beautiful photo with a textured background.
  • This took a lot of practice for me to get all the steps right so don't get discouraged if at first you don't succeed.

    Samples of my Textured Background Photos

    pink daisies with brick background photo by mbgphoto
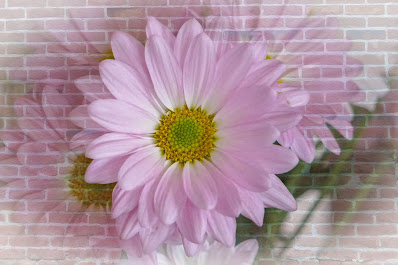
    Daisy  with Brick Wall Texture

    Eastern Bluebirds photo by mbgphoto
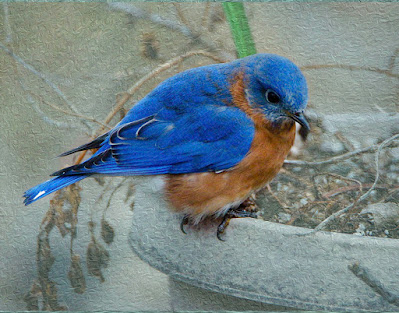
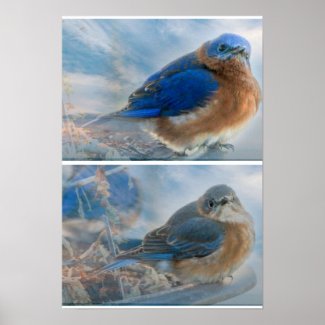
    Bluebirds with Sky Texture Background

    candle through lensball with textured background by mbgphoto
    Candle in Crystal Ball with Fire textured background

    Photoshop Texture Book on Amazon


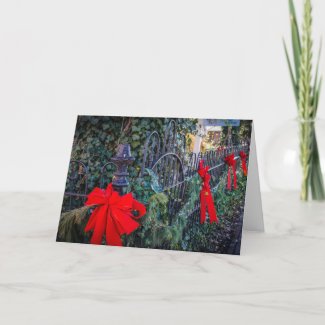
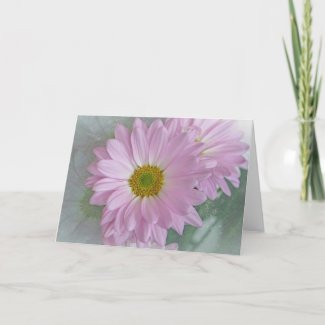
 Zazzle Card with Textured Photo


Note: The author may receive a commission from purchases made using links found in this article. “As an Amazon Associate, Ebay (EPN) and/or Esty (Awin) Affiliate, I (we) earn from qualifying purchases.”


Thursday, April 4, 2019

Reviewing Grill Mat

grill mat

I love to cook out on my deck using my gas grill.  For Christmas I received a pair of grill mats that have made grilling and cleanup so much easier.  These mats are sold in sets of two and can be cut to fit any size grill.  They are also good on any kind of grill.  So, whether you have a charcoal, propane, gas or electric grill you will  want to check out these handy mats.

As you can see in the photo above I put my entire meal on the grill mat.  In the photo above I have hamburgers and a variety of vegetables.  No extra pots or pans needed, just my easy to clean grill mat.

When we are finished eating and the grill has cooled down, I bring the grill mat inside and wash it off with sudsy water in the sink.  It cleans very easily and is quickly ready for use the next time I grill.


Why I Love My New Grill Mat


  • Cook entire meal at one time
  • Vegetables and fruit will not fall through grill slats
  • Easy to use, no preparation needed
  • Food will not stick to mat
  • Very easy cleanup 
  • I no longer need to clean the grill
  • Mat can also double as baking mat
Be sure to click on the link below to buy your own grill mat.  You will love how easy it is to use and maintain.


Note: The author may receive a commission from purchases made using links found in this article. “As an Amazon Associate, Ebay (EPN) and/or Esty (Awin) Affiliate, I (we) earn from qualifying purchases.”


Thursday, March 28, 2019

Reviewing Crystal Photography Ball

candle through lensball photo by mbgphoto

For Christmas, I received a Crystal Photography Ball.  These balls have become quite popular with photographers and  I was anxious to get one and try it out.  The great thing about these balls is that they are a fun way to try different techniques with your photography no matter what type of camera you use.  When I got mine for Christmas my  nephew tried it out with his iPhone with wonderful results.  So whether you use a DSLR, a mirrorless camera, a point and shoot or even a camera phone try out a photography ball to add some new interest to your photos.

Taking Photos with a Crystal Photography Ball

I have found that it takes a bit of practice to get used to shooting with the photography ball, but with a bit of practice you can get some interesting shots.
yellow daffodil through lensball photo by mbgphoto

Here are a few tips that may  help you.

  • Try using a wide angle lens and get close to the ball.
  • For landscapes you may want to try a zoom lens.
  • Be sure to focus on the image in the ball
  • Be careful not to use the ball too long in bright sunlight...you could get burned from the reflection.
  • Take care to keep your  ball free of fingerprints.  Bring a cleaning cloth with you.
  • There are lots of tutorials on You Tube.  Take a look at a few to get additional ideas.


Editing Photos

One of the first things you will notice when  you look at the photos you have taken is that the image in the ball is upside down.  There are several things you can do in editing to correct this.

  • The easiest solution is to simply flip the entire image as you can see I have done in this image.  This works particularly well when the background is blurry and you have lights in the background.  Here is one of my first photos with the photography ball.
Christmas tree through lensball photo by mbgphoto

  • Another solution would be to add a textured background to the photo.  I did that in the photo at the beginning of this post, where I added a fire background to the candle in the ball.
  • A third solution is to flip just the ball in Photoshop or a similar program.  I have not quite mastered that technique yet, but you can find lots of videos on YouTube to take you through that process.


Some of My Favorite Crystal Ball Images

Here are a few more images I have taken with my crystal ball. These are some that I took while on a trip to Jupiter, Florida.  I still have a lot to learn, but I love the challenge.
ocean through lensball photo by mbgphoto

beach grass through lensball photo by mbgphoto

lighthouse through lensball photo by mbgphoto


Purchasing a Photography Ball

A crystal photography ball can be rather inexpensive.  Here is one like the one I have with a clear stand and a pouch to keep it.


Note: The author may receive a commission from purchases made using links found in this article. “As an Amazon Associate, Ebay (EPN) and/or Esty (Awin) Affiliate, I (we) earn from qualifying purchases.”


Thursday, March 14, 2019

Review of Sony A6300 Mirrorless Camera

Red Rose Floral Arrangement photo by mbgphoto


For my birthday my husband bought me a new Sony Mirrorless camera.  I was looking for something lightweight to use when I traveled. But I wanted the same capabilities of my Sony SLR. I had been hearing about the mirrorless cameras from fellow photographers and at a meeting last fall we had a speaker at our photo club that introduced us to mirrorless cameras and I was sold.  A mirrorless camera combines the best of a DSLR(Digital Single Lens Reflex) camera and a lightweight compact body.  It has the features of the DSLR without the mirrors which makes it a lightweight camera without sacrificing the quality.


Features of A6300

There are many features that I enjoy on the Sony A6300.  Here are just a few of the ones that are important to me.
  • 100-25,600 ISO range allowing you to take great photos even in low light settings.
  • 4D focus systems which quickly locks in on your subject, helping to take crisp clear photos.
  • Continuous shooting at up to 11fps(frames per second)
  • WiFi, NFC, QR codes for easy file transfer
  • Tiltable 3inch LCD screen that tilts up or down for capturing high and low framing
  • An eyepiece cup that helps me to see clearly what I am photographing.
  • Settings that allow you to shoot in Auto, Scene, Full Manual and everything in between.
  • Movies in 4K movie recording


Learning to Use A6300

I am finding the A6300 very easy to use.  Most of the features are similar to my DSLR so the learning curve was very easy.  My husband bought me two lenses to go with my new camera a wide angle 16-55 and a telephoto in the 55-210 range.

The photo below was taken during a cloudy day in a room with no lights turned on.  I love the way the camera handles low light situations.  For this photo I just set the camera to aperture priority F7.0 and shot away.  The colors came out perfect with no adjustment needed.
festival mask photo by mbgphoto

On a recent trip to Florida, I was able to photograph birds at the pier with my new camera.  In order to get some nice closeup shots I put on my 55-210 zoom lens.  In this closeup of a brown colored pigeon I again used aperture priority and a F6.3 setting.  I love the sharp photo, great colors and blurred background.
pigeon photo by mbgphoto

For photographs using my photography ball, I switched to a wider angle lens 16-55 mm. I again used aperture priority and was able to capture Jupiter lighthouse in my ball.
lighthouse through a photography ball photo by mbgphoto


Note: The author may receive a commission from purchases made using links found in this article. “As an Amazon Associate, Ebay (EPN) and/or Esty (Awin) Affiliate, I (we) earn from qualifying purchases.”


Thursday, February 28, 2019

Review of Woodpecker Facts and Photography

Downy Woodpecker on a birdfeeder photo by mbgphoto
                                                                         Downy Woodpecker

I have been fascinated by woodpeckers for a long time, but I didn't realize there were so many different types of woodpeckers.  This year I purchased a peanut feeder for my backyard.  When I started to see different types of woodpeckers using the feeder I checked out information about woodpeckers  both online and in my Backyard Birds guide.  In this post I will show you photos and facts about the four types of woodpeckers that have visited my backyard.


Northern Flicker

Northern Flicker perching on a shepherds hook photo by mbgphoto
The Northern Flicker is a very handsome bird.  It has a brown back with black bars and a very distinct crescent of black on the chest. In flight the white rump is very conspicuous.  

These woodpeckers usually forage on the ground for food, but I have also seen them at my suet feeders.

Downy Woodpecker

Downy Woodpecker on a birdfeeder photo by mbgphoto
Downy Woodpeckers are the most common ones that I see in my backyard.  They visit year round and are fairly small birds.  These small tubular looking woodpeckers are very delicate looking.  They have crisp black and white plumage and the males have a red patch toward the back of the head.  They have a larger look-alike cousin the Hairy Woodpecker.

Red-Bellied Woodpecker

Red-Bellied Woodpecker on a birdfeeder photo by mbgphoto
The Red-Bellied Woodpecker is a large bird with zebra type stripes across the back.  The red belly is really just a pink tinge across the white chest.  The really red part is on the head.  The male has a bright red cap that extends from the bill all the way down the nape.  The female is similar to the male except that the red cap is only in the  nape area.

Yellow-bellied Sapsucker

Yellow-bellied Sapsucker on a birdbath photo by mbgphoto
I have only seen this bird one day in my yard.  I was able to capture photos from several angles and posted it on birding sites.  The consensus was that it is a Yellow-bellied Sapsucker.  My bird book says that I probably caught it on its' migration south.

These birds are rather large woodpeckers with a striped face pattern and a long white slash on the wing.  The male has a red throat and forecrown.  The female has white throat and red fore crown, so I would say the photo above is a male Yellow-bellied woodpecker.


Feeders for  Woodpeckers

I have two types of feeders that I use to attract woodpeckers.  The first is a cage like feeder that I fill with suet cakes.  You can see a Northern Flicker enjoying a suet cake in the photo below.
This type of feeder is also visited by several other types of birds.

Northern Flicker on a suet cake birdfeeder photo by mbgphoto

This year I purchased a peanut feeder and it has been very popular with both woodpeckers and nuthatches.  This feeder is filled with unshelled peanuts and it is fun to watch the birds peck away till they get the nut out of the shell.  This keeps them at the feeder longer and helps me to capture them with my camera.  Below is a Red Breasted Nuthatch that visited the peanut feeder.

Nuthatch on a birdfeeder photo by mbgphoto

I purchased my peanut feeder on Amazon.  You can get your own by following the link below.


Note: The author may receive a commission from purchases made using links found in this article. “As an Amazon Associate, Ebay (EPN) and/or Esty (Awin) Affiliate, I (we) earn from qualifying purchases.”


Thursday, February 14, 2019

Review of Bluebird Facts and Photography

Bluebirds resting in a planter photo by mbgphoto

I have long been a fan of Bluebirds but until this year I have not been able to  capture any photographs that I really liked.  During a very cold spell in January a group of Bluebirds visited our backyard and I was able to capture some nice photos.  I had a camera set up on a tripod in front of our glass doors and I snapped away as the Bluebirds checked out our feeding spots.  For those interested I am using a Sony A57 with a Tamron150-600 lens.  My camera is set to A (aperture mode) and I'm using a 6.5 aperture in most of these photos.


Eastern Bluebird Identification

These birds are small thrush type birds with a round head and big belly.

Male Bluebirds

The male Bluebirds are particularly bright in color as you can see in the photo above.  They have a bright blue colored head and back along with their tail feathers.  Their throat and chest are a bright rusty color.

Female Bluebirds

Female Eastern Bluebird photo by mbgphotoFemale Bluebird

The female bluebirds have the same color pattern as the males and they are a similar size, however their coloring is much more subdued.  Their head appears an almost grayish color as you can see in the photo above.

Juvenile Bluebirds

The juvenile Bluebirds have spotting on their backs and chests and some blue
beginning in their wings and chests.

Feeding Behavior and Diet

Eastern Bluebirds on a feeder photo by mbgphoto

From spring to early fall the Bluebirds diets consist of mainly insects.  In the winter they rely mainly on fruits.  As you can see in the photo above they will also resort to seeds in the winter.

I have found that if I do not clean out my flower containers after blooming season the Bluebirds and other birds like to rummage through the dead plants.
Eastern Bluebird photo by mbgphoto


Nesting

Although Bluebirds will use a nest box they also like holes in old trees, particularly old woodpecker nests.  They fill their nests with grass and other plant material.  A Bluebird usually lays 4-5 eggs and they are inculpated by the female for 11-19 days.  The fledgling birds leave the nest in about 19 days.

References

I gathered my information from several online sources as well as from my book Backyard Guide to the Birds.  Here are my references.
  • allaboutbirds.org/guide
  • Audubon.org
  • wild-bird-watching.com


Zazzle Products from my Photos


Note: The author may receive a commission from purchases made using links found in this article. “As an Amazon Associate, Ebay (EPN) and/or Esty (Awin) Affiliate, I (we) earn from qualifying purchases.”


Thursday, January 24, 2019

Reviewing Dryer Balls


bag of wool dryer balls photo by mbgphoto


During the Christmas holidays, I was washing a batch of sheets when one family left and another would be staying in the guest room.  I was frustrated because the sheets tangled in the dryer and didn't get dry in the middle.  My daughter was observing this and said "Mom, haven't you tried dryer balls.  They work great to keep things from tangling in the dryer and your clothes get dry faster."  

I had never heard of dryer balls before, but thanks to my thoughtful daughter a bag of the balls were delivered to my house 3 days later.

Features of Dryer Balls

  • Great for people with sensitive skin.  Non-toxic and Hypoallergenic
  • Reduce wrinkles and drying time
  • Eco-friendly way to soften laundry
  • No more tangled laundry
  • Good for 1000-2000 loads
  • Reduce need to iron clothes
  • Minimizes clothes damage and lengthens clothes life
I have been using the balls since I received them.  The bag came with 6 balls so the will last for years.  I put 2-3 balls in each small to medium load of wash and 3-4 balls in a large load.  I am very pleased with the results.


Buy Your Own Dryer Balls

Here is a link to the dryer balls like the ones I use.


Note: The author may receive a commission from purchases made using links found in this article. “As an Amazon Associate, Ebay (EPN) and/or Esty (Awin) Affiliate, I (we) earn from qualifying purchases.”


Thursday, January 10, 2019

Review of A Piece of the World by Christina Baker Kline


Scene from Port Clyde Area


For my book  club, we just read A Piece of the World by Christina Baker Kline.  I knew it was historical fiction and that it took place in Maine, but it wasn't until I started reading that I realized I had been to all of the small towns that were mentioned in the book.  I find it delightful to be able to picture the area that the story take place.  The photo above is one that I took on my visit.


The Book

I had read books by Christina Baker Kline before and really enjoy her writing style.  She wrote The Orphan Train and Sweetwater both books I would highly recommend.  So, I started A Piece of the World with high expectations and I was not disappointed.  Christina Baker Kline has a way of bringing you into her book and making you feel empathy with her characters.

Although this book is a work of fiction, the major characters are all real people and the author did a lot of  research into the characters and the area to give a realistic view.  The book is based on a painting by artist Andrew Wyeth  Christina's World , and in particular about the life of Christina.
The author alternates between describing Christina's early life in the early 1900's to describing her life when Andrew Wyeth is painting her in the mid 1900's.  Christina leads a simple and hard life on a farm in a remote area of Maine.  She grows up with her parents and three brothers on the family farm overlooking the bay.  Although it sounds like a beautiful setting the work is hard without any of the conveniences of modern day.  They have no electricity or indoor plumbing and Christina has a debilitating disease that makes it hard for her to move around.  Despite this she manages to do her chores and eventually take care of the household.

In her late teens and early twenties Christina meets some summer people who visit the coast each summer and we hear of her friends and love interest from Boston.

Later in life the painter Andrew Wyeth summers in the area and uses the upstairs rooms in Christina's home to paint.  Christina becomes friends with Andrew and his wife Becky and he is the one person that seems to understand things from Christina's point of view.

I found this to be a very intriguing book that really makes you consider life's choices.  I would recommend this book to anyone who enjoys historical fiction. 


Amazon Links to the Book and the Painting


Rockland and Port Clyde Area Today

I have written about the Rockland and Port Clyde area in two different posts.  This post is primarily about lighthouses in the area and was written on my lighthouse blog.
Mid-Coast Maine Lighthouses

I've also written a post on Review This about the area Review of Port Clyde Maine

Today Andrew Wyeth's son is a prominent local artist.  There is a gallery just above the General Store that displays his works along with some of his fathers.
Port Clyde Area photo by mbgphoto
Photos of the Area
Here are some photos I took of the area around Port Clyde.  I found it to be very picturesque.
Port Clyde lighthouse photo by mbgphoto

Port Clyde Area photo by mbgphoto

Port Clyde boats photo by mbgphoto


Note: The author may receive a commission from purchases made using links found in this article. “As an Amazon Associate, Ebay (EPN) and/or Esty (Awin) Affiliate, I (we) earn from qualifying purchases.”


Thursday, December 27, 2018

Photographing Christmas in Historic St. Charles

Historic St. Charles, Missouri main street sign photo by mbgphoto

One of my favorite Christmas outings is a walk down Main  Street in downtown St Charles, Missouri.  This charming town was built on the banks of the Missouri river.  I wrote about this town in a previous post World Wide Photo Walk
In that post you see the town decked out in their fall décor.

In this post I will give you a brief history of the town and then share my photos taken during early December.

A Brief History of St. Charles

Here is a few of the highlights of St. Charles history. If you'd like to know more, check out the link below.

  • Founded in 1769 by French-Canadian fur trader Louis Blanchette
  •  In 1804 on the banks of the Missouri river, Lewis and Clark met here to begin their westward expedition.
  • In 1818 Saint Philippine Duchesne established first free girls school west of the Mississippi.
  • Between 1821-1826 St. Charles served as Missouri's first capital.
  • Today it is a destination for over one million visitors each year.
https://www.discoverstcharles.com/about/history/

Mad Hatter shop in St. Charles, Missouri photo by mbgphoto

Conservatory for Weddings

Conservatory for Weddings in St. Charles, Missouri photo by mbgphoto

Before we started our walk  down Main Street we stopped by the Conservatory a greenhouse turned into a wedding venue.  It was my first visit and I found it a delightful setting for small weddings.  Below is a shot looking toward the front of the greenhouse.

greenhouse in St. Charles, Missouri photo by mbgphoto

Photos from our Walk down the Historic Streets

After visiting the Conservatory  we proceeded down Main Street to photograph the historic buildings in their Christmas décor.  I was especially drawn to the windows and doors as you can see in the photos below.

shop window in St. Charles, Missouri photo by mbgphoto

decorated window in St. Charles, Missouri photo by mbgphoto

Christmas decorations around door in St. Charles, Missouri photo by mbgphoto

Christmas decorations around window in St. Charles, Missouri photo by mbgphoto


Christmas door decorations on restaurant in St. Charles, Missouri photo by mbgphoto

Zazzle Products from Main Street Photos


Note: The author may receive a commission from purchases made using links found in this article. “As an Amazon Associate, Ebay (EPN) and/or Esty (Awin) Affiliate, I (we) earn from qualifying purchases.”


Most Recent Reviews on Review This Reviews


Search for Reviews by Subject, Author or Title

The Review This Reviews Contributors


SylvestermouseSylvestermouseDawn Rae BDawn Rae BMbgPhotoMbgPhotoBrite-IdeasBrite-IdeasWednesday ElfWednesday ElfOlivia MorrisOlivia MorrisTreasures by BrendaTreasures by BrendaThe Savvy AgeThe Savvy AgeMargaret SchindelMargaret SchindelRaintree AnnieRaintree AnnieLou16Lou16Sam MonacoSam MonacoTracey BoyerTracey BoyerRenaissance WomanRenaissance WomanBarbRadBarbRadBev OwensBev OwensBuckHawkBuckHawkDecorating for EventsDecorating for EventsHeather426Heather426Coletta TeskeColetta TeskeMissMerFaeryMissMerFaeryMickie_GMickie_G


Review This Reviews is Dedicated to the Memory of Our Beloved Friend and Fellow Contributor

Susan DeppnerSusan Deppner

We may be apart, but
You Are Not Forgotten


“As an Amazon Associate, Ebay (EPN) and or Etsy (Awin) Affiliate, I (we) earn from purchases.” Disclosure Statement

X