Showing posts with label Tips for Writers. Show all posts

Saturday, October 5, 2019

Reviewing FlexClip, a Free, Online Video Maker

How to make videos for social media sharing for FREE!
When it comes to social media it really seems as though video is king, but how can you create videos to promote yourself without buying expensive video equipment and having to learn new videography skills?   You use an online video maker!   I have tried a few different online video makers and have found they all have pros and cons, today I'm going to talk to you about FlexClip.

FlexClip are a completely free video maker which is awesome, but they also offer 2 other plans - basic and plus which offer better quality videos, longer videos and the ability to do more projects - they also allow you to add a custom watermark.

I love the fact that you can use it for free and see if you like it before committing to buying a plan.   The other thing I love is that when you make a video it doesn't include a watermark as many of the other free online video makers do.

Making a Video from Stills 


Now I am only reviewing using this to make videos from still images, but you can use it with video which I haven't had a chance to do yet.

So the actual making of the video is pretty simple and it tells you exactly how to do it BUT one of the biggest problems I felt with the program was that I could not find out what size images were best to be used.   They have lots of articles for you to read for help, but there doesn't appear to be a search function for you to simply ask the question you have which is a shame.

They list common FAQs for you to search, but when your question doesn't appear in there it is a little disheartening.

My first video was for my Arbonne business and you can see that I should've used different sized images.


What I really liked when I made this video was adding the music, there was a lot of Christmas music available for me to use.

The music that is available is definitely something that I think is good as other online video makers that I have used have not had as many different options as FlexClip.

As I enjoyed making that video I quickly turned around and made one for the offline business I work with, I still hadn't found what size images I should be using so used ones that I thought should be okay - I think they worked.

I used a different text style in this video and there are quite a few different options to use when adding text as well which I think is another positive.


I used both of these videos on Facebook and the quality seemed really good on there.

Adding Backgrounds to Images

I did have a play around and found that where I have images that aren't really the best size for this program I could add a colored background which really seemed to help.

Video Templates


FlexClip also offer a number of video templates which look great and depending on your business you may like to use them.   I have used video templates in the past, but I usually prefer to create my own initially when trying out a platform.

There are definitely a couple of the templates that I could see myself using in the future though.


My Thoughts on FlexClip


I really had my reservations when I first used it because I couldn't get an answer to my image size, but I did like all the other features and I think when I use it more I'll naturally get a feel for the size that works best anyway.

I am keen to try uploading videos and editing them (I only have my phone for taking videos so that could be interesting!) and when I do that I will review that aspect and link to it from here.

I would definitely recommend trying the free version and love, love, love that it doesn't have their logo on your videos as it looks so much better when sharing.   I am also seriously considering purchasing one of the plans as I think it's great for promoting for bloggers, zazzlers, affiliate marketers, social marketers as well as brick and mortar businesses.


Note: The author may receive a commission from purchases made using links found in this article. “As an Amazon Associate, Ebay (EPN) and/or Esty (Awin) Affiliate, I (we) earn from qualifying purchases.”


Wednesday, May 8, 2019

Review of Medium Partner Program: Should You Pay to Earn?

What is the Medium Partner Program?

Review of Medium Partner Program: Should You Pay to Earn?
Image by PixLoger from Pixabay, edited on PicMonkey


I joined the Medium blogging platform in 2016, before the beginning of the Medium Partner Program (MPP.) A blogging friend had said the platform was a good place to have a presence. I discovered it was a good place to keep some of my posts from sites that had died until I could post them elsewhere. So in 2016 old posts I'd republished were all I had on Medium, and only a few of them. I didn't post anything else because at the time there was no way for someone like me to earn money at Medium.

In February 2019, my HubPages friend Glenn Stok told me about the Medium Partner Program that now provides an opportunity for writers like me to earn money. But there's a catch.

It takes money to have that opportunity. One must pay $5.00 a month or $50 a year to join the Medium Partner Program. That link provides all the program details and everything else you need to know in order to join the MPP. Only you, though, can decide whether it's worth the money to get this opportunity.

Should You Join the Medium Partner Program?


I asked Glenn, "Is it worth the money to become a MPP member?" His answer convinced me to give it a try. No one gets any affiliate commission by recruiting members, so he had no reason to exaggerate his results and I don't think he would anyway. He wrote a comprehensive article on Medium and the Partner program so I see no reason to try to rehash it here. He did an excellent job. Here's the link to Glenn's article: How to Make Money Writing Articles Without Ads on Medium. I prefer to tell you my own opinions based on my results and the other opinions I found was I was surfing the web.

My Experience as a Medium Partner Program Member


February 2019


I joined the Medium Partner Program on February 5, 2019. At the time I had nine posts there left over from 2016. I put five of them behind the paywall. The other four did not meet the content guidelines for the program. The pay period ended on February 24, so my work was only behind the paywall for 19 days in February.

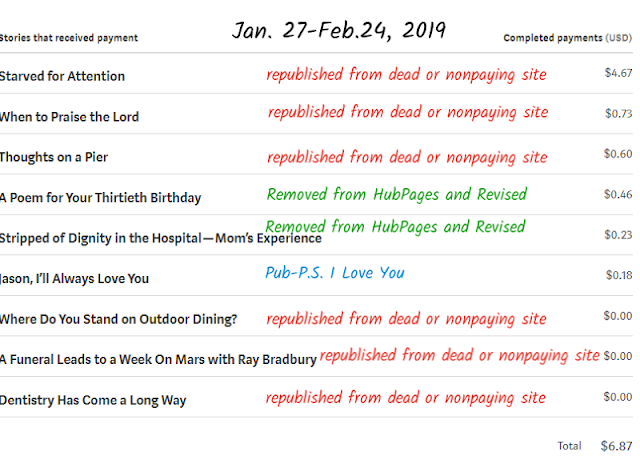
Here is a chart of my first payday on February 27, and the money did go into my account on time. Post titles are on left. Earnings for each post are on right. Red letters are for posts removed from dead or non-paying sites. Green letters show posts I removed from HubPages, revised, and reposted on Medium. Blue letters show the name of Medium publication where a post was accepted and now appears. You can see that not all my old posts made money, but some did. Articles published on Friday-Sunday of a week often don't start getting views counted until the next week. Pay weeks go from Monday - Sunday. Where there is no publication, it means I didn't submit to a publication or the publication didn't accept that article.

During this same period, with 44 featured hubs, I earned $5.10 on HubPages.


Review of Medium Partner Program: Should You Pay to Earn?

March, 2019

In March I revised and republished more of my old stories and added some new ones. Here are the results. Again, the blue script shows what publications accepted the articles. The red shows where the revised articles originally appeared if they weren't on the last February image. PP stands for Persona Paper. Bub stands for Bubblews. Some articles from either of those sites may have appeared on both and I can't always remember which only came from Bubblews. Green still represents hubs (HP) revised and moved here.

During this same period, with 44 featured hubs, I earned $9.27 on HubPages.

Review of Medium Partner Program: Should You Pay to Earn?

April 2019


I have not repeated the sources here, but I have included the publications that accepted my posts. I did not  repeat the publications for the articles that earned nothing this month. You can see that although I made more money this month, some of the articles that earned money last month earned nothing this month. Unlike sites like HubPages, an article may have a short earning life.

During this same period, with 44 featured hubs, I earned $12.45 on HubPages. (Note: I have not written anything new on HubPages for a long time and interact there rarely now, but I do publicize my Hubs on social media. )


Review of Medium Partner Program: Should You Pay to Earn?

Update January 29, 2020


I added many more posts in 2019. The list is so long now that it would not fit on one screen in an image. There were only three months when I did not make at least $5. Those three months occurred during and just after the time in July when I went back to listing and selling books online and had to transfer a lot of records and establish new selling venues.

Selling on Instagram took much more time than selling from my Biblio store. In spite of not having time to write more than about 2-4 posts a month during and after July, my total earnings for 2019 were $123.61. After taking out my membership fee, I still had $73.61 left. This month, I've earned $5.58 so far. I will renew my membership next month.

 Even if I'd not broken even, I still would have been happy with the value I received from all the posts I read by others daily. Many were on subjects like brain health, written by experts, that I might not have searched for, but were conveniently served on Medium.

Conclusions from My Results


Unpublished Posts Moved from Other Sites Can Earn On Medium


I currently have thirty posts on Medium. Twenty-six are behind the paywall. Four are not. Of those behind the paywall, only eleven were written just for Medium. "Starved for Attention," which made the most the first month, made nothing the next two months. It was previously on another site, revised, and moved to Medium. "Jason, I'll Always Love You" was picked up by a popular publication, P.S. I Love You, and earned only .18 in February. In March it was my highest earner. It still did well in April.

Articles Published by Publications Usually Get Seen by More People than Those Published Independently


In the second month, some of the articles were picked up by publications, some of which I didn't even submit. Articles that appear in popular publications with lots of subscribers are distributed more widely than those one self-publishes. However, inclusion in a publication does not guarantee more earnings.

Curated Articles Get Wide Distribution and Usually Earn the Most. 


My three curated articles have performed best for me so far. When you put your article behind the paywall you can also choose to have it sent to the curators for consideration. They pick which articles Medium itself will promote in its newsletters that go out to all Medium subscribers. Curation gives articles the best chance to be seen by lots of eyes. These are my curated articles so far.


Medium Earns More for Me Than HubPages on New Articles


On the other hand, older Hubs retain more earning power than older Medium posts. Working together Medium and HubPages give you the both of best worlds. Would I make more on HubPages if I kept submitting more hubs and interacting as much as I do on Medium? Possibly. The statistics I gave for HubPages above my earning charts are for my original account. My Squidoo transfer account makes almost nothing there, and it's those articles I plan to revise and transfer to Medium or somewhere else. 


Review of Medium Partner Program: Should You Pay to Earn?
Image by isuru prabath from Pixabay, edited in PicMonkey 


Medium Is a User Friendly Site for Readers and Writers

After a struggle with the quirks of the WordPress and even the Blogger editor, Medium's editor is simplicity itself. One can just concentrate on writing. It's the words and the images that are important. No quizzes, polls, videos, etc. are considered important post ingredients as they are on HubPages. The focus is on what you say. I  like not having to sell anything to make money. I would like to focus on stories and ideas as opposed to products. 

As a reader, I also like reading Medium posts because they're not full of affiliate links and ads. You can read all the way through a Medium article without encountering one pop-up asking you to subscribe to a newsletter. Readers can concentrate on content. I think many people subscribe for that reason. 

There is a wealth of interesting content on Medium. Many Medium members are not writers, but readers. They are not part of the Medium Partner Program, but they are the ones who read our work and help us earn for our writing. 


What I Like Best About the Medium Partner Program


Medium allows me as much freedom as I want. I can write in any genre. I can apply to a publication or not. I can write on any subject, though some subjects won't earn as much as others. As long as I follow the guidelines for the Medium Partner Program, I can put any article I want to behind the paywall. Of course, that doesn't mean it will earn anything. 

Medium treats me like an adult. It lets me take responsibility for my own work. I can publish it independently without submitting it to a publication editor and waiting for approval and publication. That means I am also free to publish inferior work that is less likely to earn than more polished work.

Proofreading is my responsibility alone. Publications want quality, so they do have editors to make sure what they publish is worth reading and is free of errors. But they don't correct it for you. They send it back to you or reject it outright. If a publication rejects your work, you are still free to publish it yourself. 

For an article to earn, other Medium subscribers need to see it, read it, and interact with it. Curated articles are most likely to get a kick start leading to more views on Medium. Articles in publications also get help from a newsletter the publication sends to its members listing new articles. In late 2019 this payment plan changed. Now payments depend on how much time paying members spend reading one's work. This suits me even better. A writer will be read more, not just clapped for by people wanting return claps. It's harder to game this system. 

Views from promotional links on social media don't usually bring in paid views. Traffic from Twitter automatically gets past the paywall for free. Most writers usually post a friend link when they post to social media so that readers can bypass the paywall if people click through. That means a well-promoted post with lots of traffic may not earn much if the readers aren't Medium members. 

Writers for publications often have their own Facebook groups for promotion. Koinonia is one of my favorite publications for Christian writers and it has an active Facebook Group. I know of three other active Facebook groups that are open to any Medium writers for discussion and threads for sharing posts. All these promotion opportunities and the support from other members is very helpful to new Medium writers. 

Most Medium publications encourage personal articles. They like authors to share what they've learned about  relationships, family life, work, mental health, business, and a number of other topics. Unlike HubPages, they prefer articles written in the first person rather than the third person, unless they deal with science or other very objective subject matter. Articles that speak directly to readers with a personal voice seem to do best.

Medium makes it easy to build your own following. You can even start your own publication on Medium if you don't find another that suits you or you want to keep your work in one place to make it more accessible to your followers.


The Downside of the Medium Partner Program


You are making an investment of five dollars a month or fifty dollars a year. There is no guarantee you will earn it back within those time frames. I'm on my eleventh week. If my earnings hold to their current pattern I will have covered my first year's membership by the end of the twelfth week and the rest will be profit. There is no guarantee that will happen. But I've never yet earned back with ads and affiliate links what it cost me to self-host a WordPress blog, and that was a far larger investment. My membership also allows me unlimited reading behind the paywall, and that's been worth the fee by itself.

You cannot include affiliate links or a call to action in a post that goes behind the paywall. You can, however link to another Medium post you have not put behind the paywall. In that post you may have an affiliate link or a call to action. You just need to make sure it's not interpreted as writing a post behind the paywall that only exists to point to another site.

If your posts aren't curated or promoted by a publication, they may not get much traffic. I have four posts that have received no fans or applause. Three were first published somewhere else between 2014 and 2016 and their original publishing dates followed them. If I publish older posts again, I will not use the importer which retains the original date. I will unpublish from the first site and revise for Medium.

The other unloved post was a rant published just for Medium. A few people read it, but no one liked it enough to applaud. That happens. I'm wondering if I should tweak the title and republish it.

If my current results on Medium hold up until the end of the year and my earnings keep growing, I will join again next year. A full year will help me see whether this is the direction I should go. But even if it's a wonderful year and I earn even more than I expect, there is that final downside. Medium can change the terms of the MPP any time they choose. They could stop paying. They could even close the site, though I think that's unlikely.

I have written the obituaries for many sites. One was What Can We Learn from the Fall of Bubblews? It was first published when Bubblews was still alive -- to answer questions about the living site. Some of the original predictions remain intact, but the post itself has been updated many times as things changed. I updated it once again and changed the title when when Bubblews finally died. Many of us who used to rely on Squidoo for income were crushed when it died.

We can never depend on any site we don't own for future income. It's always better to own your own site if you can make a profit. Meanwhile, as we build an audience, we can introduce ourselves to new readers on sites like Medium and  HubPages.

Possibly the biggest downside to writing for Medium is that you may be tempted to to neglect your own blogs. I have. I've also neglected other sites like HubPages. It's always a good plan to back up one's work on all sites, just in case, and not to put all one's eggs in one basket.

Basket of Eggs


Note: The author may receive a commission from purchases made using links found in this article. “As an Amazon Associate, Ebay (EPN) and/or Esty (Awin) Affiliate, I (we) earn from qualifying purchases.”


Friday, April 5, 2019

How to Create Your Own Videos Ads with Ripl Video Creator

How to Create Your Own Videos Ads with Ripl Video Creator

Reviewing Ripl Video Creator - Online Website - Basic Plan is Free


Here is a simple tutorial on how to create your own video ads that can be shared on Twitter, Facebook, Linkedin, and YouTube.  Plus, you can save a copy of your created video on your own computer.

The Ripl Video Creator website is fairly easy to use, especially if you have ever used a photo editing site.  It takes only a few minutes to create a basic video ad since Ripl provides free templates to get you started.  There is also a paid version available that offers more templates.  With the paid version, you can also replace the Ripl logo in the right bottom corner with your own logo.

I use Ripl Video Creator to create ads for several websites and my Ebay store items.  It could also be used for Etsy store items, Zazzle store items or even to promote a directory that shows the variety of places you can be found online.  Because you can add text to the video, you could even add the url location on the video.

Here is the complete video of the still image shown above.  Because I saved the video on my computer, I can easily upload it to Blogger.


Or, I can insert the copy of that video ad from YouTube to Blogger or my websites.


Basic Tutorial to Get Started on Ripl Video Creator 


You will need to create an account on Ripl to get started.   To do so, you can click the link here, or simply type Ripl.com in your browsers address bar.


1.  Choose a Ripl Template


Sign in to Ripl Video Creator and select the template you like.  You can change templates as you design your ad if you don't like the way your original template selection looks.   

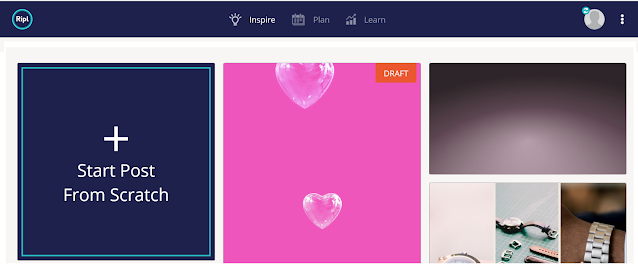
If you have previously started a video but not published it, you will see it labeled as "draft" and can select it from the template options. 

select the video template you want to use on Ripl Video Creator


If you start the "post from scratch", you will be redirected to the workshop area where you can choose to see "more designs" in the left sidebar. 

select the video template you want to use on Ripl Video Creator


When you are redirected to the templates, the free templates are shown at the top.  Simply click the one you wish to use.  The free templates change often.  There are always new options for upcoming holidays or seasons.

Ripl Video Creator templates


2.  Select Font and Add Text


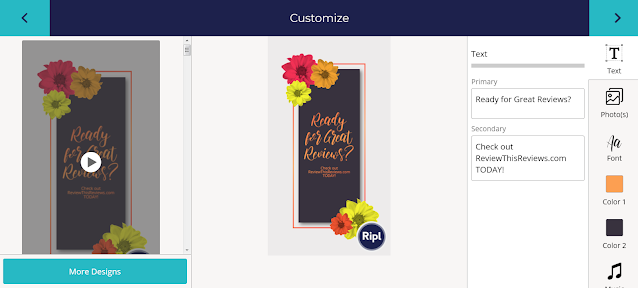
A font is pre-selected for each template, but you can change the font by choosing a different choice from the right sidebar.  As you can see in the screenshot below, you can also change font colors.

Add the text in the "primary" and "secondary" boxes.  

Adding music is also an option.  Simply click the music notes to select the background music.


Ripl Video Creator font selections


3.  Add Photos

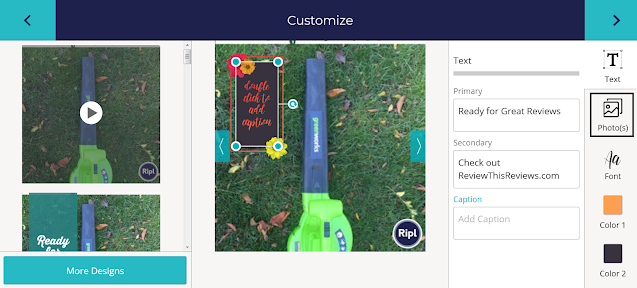
Click the "photos" box in the right sidebar to upload your own photos for slideshows.  You will see a "caption" box that allows you to add text to that photo only.  Double click the caption area on the photo to add the text, move the text box, or resize it.


adding photos for a video on select the video template you want to use on Ripl Video Creator


Note:  If you change the text color here, it will change the text color on all images in the entire slideshow.


review of Ripl Video Creator

In the case of the video slideshow ad I have used here for the example, it was at this point that I decided I preferred a different text and text background color.  The background colors are pre-selected based on the font color you choose.


3.  Publish and Share Your Created Ripl Video

After you have added all of your images, added your text, and selected font colors, your are ready to publish your video ad.

Click the right top arrow to move to the publishing page on Ripl.

Ripl Video Creator


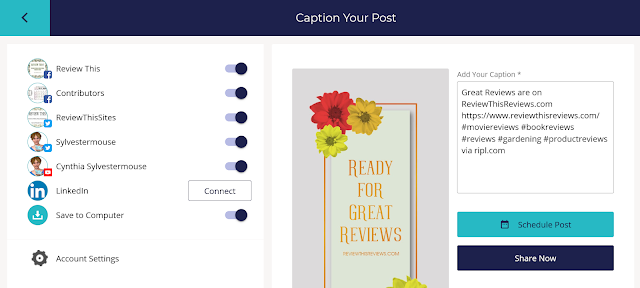
Add all of the facebook pages, Twitter accounts, Linkedin accounts in the account setting, on this page.  Be sure to slide the buttons on the right of each one to "on" if you want the current video added to that particular social media page. 

Remember to turn "on" the "save to computer" button too if you wish to download a copy of the video to your computer.

Then, click the "Share Now" button.


social media and save options on Ripl Video Creator


share options on Ripl Video Creator
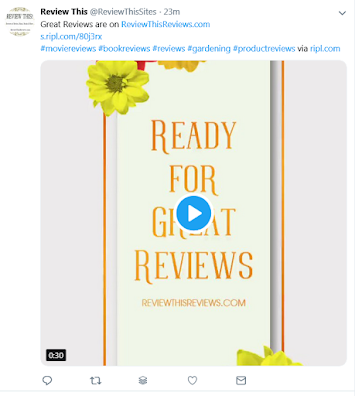
Shared On Twitter
share Ripl Video Creator
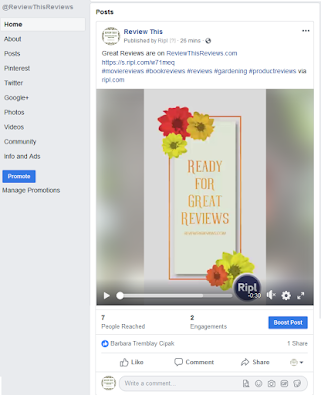
Shared On Facebook


Please Share Your Ideas


I have shared how I use the Ripl Video Creator, but I would love to hear from you! 

Tell us in our guestbook (comments section) below the ways and places you have used Ripl to promote your websites, stores or products.


Note: The author may receive a commission from purchases made using links found in this article. “As an Amazon Associate, Ebay (EPN) and/or Esty (Awin) Affiliate, I (we) earn from qualifying purchases.”

Friday, June 22, 2018

How to Create a Link to Jump to a Specific Part of a Page - Step by Step Instructions

How to Create a Link to Jump to a Specific Part of a Page - HTML Tutorial First, let me define "page jump link".  If you wish to have a link to a section or paragraph in an article, you can create a page jump link that can be inserted anywhere in an article.  You can even use jump links to "jump" to a section in another article on a website.  Or use one to jump to an article section on a totally different website that you manage by simply using the link to the jump link itself.  


Like this: 


I used page jump links at the top of our Review This Site Directory so visitors could quickly skip to the category of articles they wish to see. I've had several fellow bloggers ask me how I created those indexing page jumps and I happily shared my code.  However, it is easier for me to simply publish this article then to continue sharing the code individually each time it is requested.
 

FAST CLICK INDEX - Click the Category Title to Jump to Specific Section of Our Site Directory
BOOKS    CRAFTS    DECOR     ELECTRONICS     GARDENING    GIFTS    HOLIDAYS    MOVIES    MUSIC    PARTIES    PHOTOGRAPHY    PRODUCTS    RECIPES    SITE REVIEWS    SPORTS    TIPS FOR WRITERS    TOYS    TRAVEL    WEDDING    SPECIAL TRIBUTES        ABOUT THE CONTRIBUTORS    ARCHIVES    


ONE VERY IMPORTANT NOTE: THIS CODE MUST ALWAYS BE ADDED OR CORRECTED ON THE HTML, NOT COMPOSE, OPTION WHEN WRITING ON BLOGGER.

If you ever use Compose on an article on Blogger where you use the jump skips, your jump link code will be lost.
As an example, if I ever wish to add anything to this article, I will have to do so in the html tab. Should it open to compose, click the html tab and close the article immediately without making or saving any changes. Keep opening it until it opens in the html. Never update or save an article that has page jumps while working under the compose tab.


HTML Code to add Jump Links


I'm showing the actual html code that you would need to create a jump link.  This is the code I used in this article to skip to the end.

This code should go at the top, or section where you want to place the option to jump to another section.  Replace the title text with your own descriptive text.

<a href="#the_end_HERE">Skip to End</a> 


And this code should go at the beginning of the section you wish to skip to.

<a id="the_end_HERE">The End!</a>


The id link text must be exactly the same in both links.  As you can see, the visual title text can be different.


Easy Jump Links

Adding page jump links to an article is actually very easy if you are careful and remember to stay in the html tab area on Blogger. I do recommend keeping a copy of your original article html text on a file saved to your computer. Accidents happen, especially if we get in a hurry and need to make a quick change or update an article.

This html jump link code also works on Wordpress!


Happy Blogging & Jumping!


House of Sylvestermouse


Note: The author may receive a commission from purchases made using links found in this article. “As an Amazon Associate, Ebay (EPN) and/or Esty (Awin) Affiliate, I (we) earn from qualifying purchases.”


Saturday, October 21, 2017

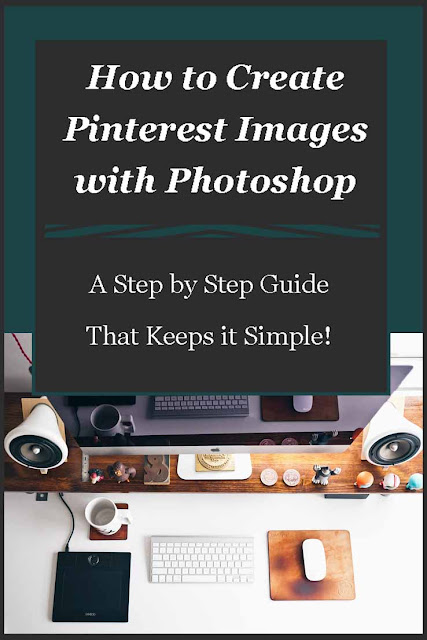
How to Create Pinterest Images with Photoshop


How to Create Pinterest Images with Photoshop - A Step by Step Guide
Today I'm going to review how to create Pinterest images with my favorite photo editing software - Photoshop!  I create most of my Pinterest images with Photoshop, I have tried a few other places, but I always come back to Photoshop.

I've been asked quite a few times how I create my images for Pinterest which is why I thought I'd just show you.  Now I can't promise you that your images will take off in popularity on this social media platform, but I can promise you that the steps will be easy to understand.

I have been using Photoshop for a few years now, but the way I create the majority of my images are easy for beginners and experts alike to follow.

The first thing you have to do is open up your Photoshop and select a new file, I simply press Ctrl N to do this, but you could use the file menu and open it that way.

You will be greeted with a pop up box where you have to select your image details, it looks like this -

set image measurements on photoshop

I only change two things on the default and that is the width and height as you can see on the image.  I have changed the image height a few times, but the majority of the time I just use the standard 738 x 1105.

The next step means finding the image you want to use for your pin so I've decided that I want to do a pin for my welcome to Lou16.com post (I can't believe I was missing a Pinterest image on that post until I wrote this!)

I'm going to use the image I have in my introduction as the main image for my Pinterest image as well so let's have a look at what we're going to do....

add image to draft for Pinterest with Photoshop,

So the first thing I do is create a new file, then I open up the photo I want to use and drag it onto the new file.

1.  Here you can see that this image has a border that I created previously.  I'm going to use this color for the background so to do this I need to use the eyedropper tool to select the exact color.
2.  This is the eyedropper tool.  To use this you click on the tool and then click on the color that you want to select.
3.  After selecting the color I make sure to select the correct layer (in this case the blank one as I'm using this for background.
4.  The paint bucket tool will cover the layer with the selected color.

After doing all of these steps you'll be left with the next image.

add background color to Pinterest images with Photoshop,

3.  I'm going to do things backwards here and get you to look at number 3!  When I did the background color the teal was on top and the white was underneath, as I'm thinking of doing the text in white I switched them around.  Sometimes when you're using two colors you can just change between these two to save having to use the eyedropper tool again.

Back to our image..

Now I want to add some text to the image so I have to select the text box.

1.  This is the Text box and you have to click on this before adding any text.
2.  This is the text tool bar, you can change the color from here (it will default to the top square at number 3 unless you change it), you can also alter the font, the font size and whether you want to use a bold or italic or both.

add text on Pinterest images with Photoshop,

As you can see I dragged the image down a little so that I could add text above and below it.  Above I just used regular and underneath I selected italics.  You can also highlight just one or two words and change their color or size in order to make an impact.

1.  There are different things you can select on the side including a border which I always use for my Pinterest images.  You select the border (or arrow as I have done on these images for you) and click apply - the color on top of the color box is what color the object will appear as.

I didn't want to use white as a border because the website background is white so I used the eyedropper tool to select another color from the photograph.

I always try to pull either the border, background or text (sometimes all of them) from the actual photo as you know it's going to go.

Create Pinterest images with Photoshop,

I always keep Photoshop open until I see the final image uploaded to the website.  In this case I uploaded the border from a light green in the foliage that really made it pop on Photoshop, but looked strange on the white background of the website.

I then changed the border to the blue of my t-shirt, but again on the white background of this site it just didn't look quite right.  The third and final one is what is pictured above and I've use the brown of my hair!

Now you don't always have to use a photo, sometimes I'll use a graphic from a site like Pixabay and use that.

This is a very basic way to create a Pinterest image using Photoshop, as you get used to using it you can get more and more creative with using several images merged together like this one from another post I created -

Get Traffic to Your Website

In this image I used an image of traffic which I reduced and played with to get it to fit onto the laptop screen.  The background is taken from the laptop color and you can see I changed the color and font size of the 21 in the image.

Start off simple and as you get used to using these tools you'll find yourself creating all kinds of images, try not to become too addicted to Photoshop as once you start down this rabbit hole you can lose all sense of time!

You might be interested in my other Photoshop tutorial (and there will probably be more to come!) -


Peach Cobbler RecipeHow to Remove Blemishes From Photos Using Photoshop
Let's review how easy it is to use Photoshop to remove blemishes from photos, trust me it's really simple and well worth the time spent to restore old family photos.


Our contributors here on Review This also use other platforms to create their images for Pinterest so be sure to check out our tips for writers including -


... and let's not forget our Pinterest tips -


Before leaving I'd like to tell you one of the things that really helped me with getting traffic from Pinterest (obviously the images help!) and that was using Tailwind, I highly recommend this scheduling tool for anyone who wants to harness the power of this visual social media platform.

If you've found this article helpful please share on your favorite social media platform.

A Step by Step Guide to Creating PInterest Images with Photoshop
Image by Lou of Lou's Designs


Note: The author may receive a commission from purchases made using links found in this article. “As an Amazon Associate, Ebay (EPN) and/or Esty (Awin) Affiliate, I (we) earn from qualifying purchases.”


Tuesday, September 19, 2017

Reviewing A Thesaurus

A Most Important Tool For Writing

writing desk
Writing Center image courtesy of Pixabay.com
My decision to review a thesaurus in today's post might seem a little lame at first glance. Stick with me for a bit and you will see why I think that every home and office should have at least one available.

I, along with the other reviewers here at Review This, do quite a lot of writing. Most of us write a post here each week while maintaining our own sites in other locations on the web. It would not be far-fetched for me to assume that each of us probably has at least one thesaurus that we refer to often. Mine is sitting right here next to me as I compose this post. I pick it up and use it several times every single day.

Now, I realize that not everyone considers themselves writers, as we do, but that isn't exactly the case. Adults frequently need to compose a letter or a report pertaining to their jobs. (You should know that I just picked up my thesaurus to find a better word for often and decided on frequently in that last sentence.) College students are required to write a term paper for some of their classes. A thesis might be required for many degrees. High school, middle school and even elementary school students will need to write reports about different subjects during the years that they attend school. In all of these instances the person is temporarily a writer. 

Certainly, we all have the option of looking up words (synonyms or antonyms) on an online thesaurus. Those have been available for quite a while. My preference is an actual book that I can pick up and search through quickly. I don't have to open a new window or switch screens. My writing is still in front of me and I can return to it swiftly. (I just used my thesaurus again choosing swiftly over quickly.) See how that works?

Personally, I think that if we encourage our young students to get into the habit of using this tool for their writing needs; we are also helping them practice searching for words in alphabetical order along with spelling skills. Adults will be better adept at this but even they learned at one time the order of the alphabet when looking a word up. Whether the writer is very young, middle-aged or even elderly their finished product will be a much better piece if they have taken a few minutes to find a variety of words to use in their text. Can anyone remember a paper returned from the teacher with several red marks and a note that says, "You used this word 15 times! Choose different words from time to time."

As a writer, it is my desire, to create a pleasant reading experience for anyone who might read what I have written. I don't want to sound repetitive or appear that I have a very small vocabulary. I think whether it is a conscious goal or not; most people who are writing something want it to be received well. A thesaurus can be invaluable for that very purpose.

It is probably no surprise that I think that giving a child a tool that will help them write better is a very good idea. They may not be looking to make a career out of writing but they will from time to time be required to write something. That "something" will be better if they know how to find synonyms to use to say the same thing in a different way. A by-product is that they will have a much better vocabulary.

As I stated before; I use my thesaurus regularly each day. I have found it extremely helpful as I work on my soon to be published mystery book. 


Note: The author may receive a commission from purchases made using links found in this article. “As an Amazon Associate, Ebay (EPN) and/or Esty (Awin) Affiliate, I (we) earn from qualifying purchases.”


Friday, September 8, 2017

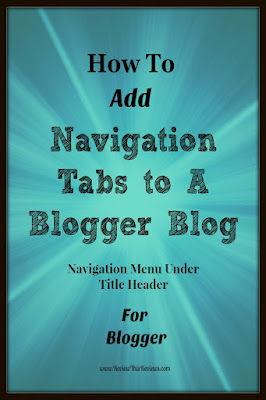
How to Add Tabs to the Top of a Blogger Blog - Step by Step

Instructions to Add a Navigation Menu to Your Blogger Blog


How to Add Tabs to the Top of A Blogger Blog Blogger offers a great way to start a free blog, but there are a few things you may want to do to improve the navigation of your blog. One of those things is adding category tabs to the top of your Blogger Blog to make it easier for guests to find subjects of interest by category. This horizontal line of tabs is often referred to as a Navigation Menu or Bar because quite simply, it helps visitors navigate your site and find exactly what they are seeking. 

As you add new posts to your blog, you will discover that it becomes really difficult for visitors to find your older articles. Therefore, labeling your posts by category and than creating tabs at the top of your blog becomes essential. 

Be sure to bookmark these easy to follow instructions for adding tabs to your blog. As your blog content grows, you may wish to revisit and change your tabs. This article will then serve as a great refresher on how they were initially set up, therefore you can easily see how to change or add to them.


Easy Instructions on How to Add Tabs to Blogger 


I am going to take you to the layout of Review This to show you step by step how to create your navigation menu.  This is the method used to create our top navigation menu that is a simple list  of our Contributors names.  If you click on either name, you will see that it redirects you to posts that have been published by that one author.  You decide what category labels best suit your blog.  For instance, a recipe blog might have labels for Appetizers, Main Course, Desserts, Snacks, and More.


How to Add Tabs to the Top of a Blogger Blog - Step by Step Instructions


The secondary navigation menu of our categories is a drop-down menu.  A separate tutorial on creating a drop-down menu will be published at a later date.


(See Tutorial Images in Slideshow Below Written Directions)


  1.   Add a Category Label to Each Post.  Labels are on the right side of each post draft under Post Settings.
  2.   Go to the Layout Tab on Your Blog Dashboard 
  3.   Click "Add a Gadget" in the Cross Column Section under the Header Section
  4.   Select either the Labels Gadget or the Page Gadget.  We used the Page Gadget on Review This because we had Page Links we also wanted to add to our Nav Bar in addition to the labels.  (Contributors & Quick View Home Page Links)
  5.   If you Use the Label Gadget, simple select the labels you wish to have as tabs, and save.
  6.   If you Use the Page Gadget, select the pages you want to use, plus add other labels as external links, save link, and save gadget.  
  7.   You can change the order of the tabs by simply dropping & dragging them within the gadget.
  8.   View Your Blog in "Preview" to See Your Arrangement  
  9.   Save Arrangement (button in upper right corner of layout page) 


CONTROLLING THE SLIDESHOW ABOVE
Use the Arrows at the Base of the Slideshow to Move Through the Images
and the stop button to pause the playing slideshow on a specific image
slidebar directions


More Tips & Tutorials for Blogger
(Including Instructions to Create an Image Slider Like I Used Above)


Note: The author may receive a commission from purchases made using links found in this article. “As an Amazon Associate, Ebay (EPN) and/or Esty (Awin) Affiliate, I (we) earn from qualifying purchases.”

Most Recent Reviews on Review This Reviews


Search for Reviews by Subject, Author or Title

The Review This Reviews Contributors


SylvestermouseSylvestermouseDawn Rae BDawn Rae BMbgPhotoMbgPhotoBrite-IdeasBrite-IdeasWednesday ElfWednesday ElfOlivia MorrisOlivia MorrisTreasures by BrendaTreasures by BrendaThe Savvy AgeThe Savvy AgeMargaret SchindelMargaret SchindelRaintree AnnieRaintree AnnieLou16Lou16Sam MonacoSam MonacoTracey BoyerTracey BoyerRenaissance WomanRenaissance WomanBarbRadBarbRadBev OwensBev OwensBuckHawkBuckHawkDecorating for EventsDecorating for EventsHeather426Heather426Coletta TeskeColetta TeskeMissMerFaeryMissMerFaeryMickie_GMickie_G


Review This Reviews is Dedicated to the Memory of Our Beloved Friend and Fellow Contributor

Susan DeppnerSusan Deppner

We may be apart, but
You Are Not Forgotten


“As an Amazon Associate, Ebay (EPN) and or Etsy (Awin) Affiliate, I (we) earn from purchases.” Disclosure Statement

X