Showing posts with label Tips for Writers. Show all posts

Friday, August 12, 2016

Using Easy Product Displays to Create Home Page Featured Articles

How to Create a Blogger Home Page Review and Tutorial

Create Home Page Featured Articles

Previously, I published How to Create a Static Home Page on Blogger.  In that article, I shared that I used "Easy Product Displays" to generate the code for our Quick View Home Page here on Review This!   With EPD, I can easily create a truly awesome code that features the article images, with captions, set side by side.  

This provides a viewer friendly page that our guests can view quickly and select an article on Review This that they wish to read.  Because each photo is linked to the review article of origin, a visitor need only click the photo to be redirected to that page.  

It truly is the perfect Home Page set up for Blogger.


How to Make Your Own Home Page Features Using EPD


I was asked by several people to share a step by step tutorial on how to use Easy Product Displays (EPD) to create the Home Page features.  Since I change our Quick View Home Page features each week, that is a very easy request to fulfill.  

I will show you step by step photos of the process, but you will need to join Easy Product Displays to use their service and generate the code.  You can join for your free trial and set up your first home page code, by simply clicking the box below.

Note:  Setting up a featured article page is not the intended purpose of EPD, it is just a fantastic alternate use of their service.  
What Easy Product Displays offers to affiliate marketers with their search tools, buttons and displays is much more valuable.


Step by Step Instructions for Creating Your Featured Article Page

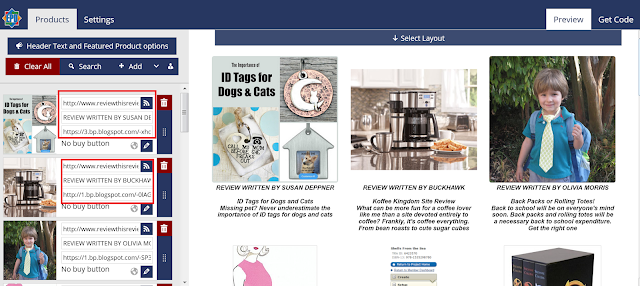
  1. Select Your Setting on the EPD Dashboard - Be sure you Select "None" for the Button Type.  I also select "No Border" for the Border Style
    dashboard for Easy Product Displays

  2. Add the Number of "Boxes" for Photos/Articles You Wish to Display
    dashboard for Easy Product Displays

  3. Fill in the Spaces with the Article URL, the Title, and the Photo URL
    dashboard for Easy Product Displays

  4. Select Your Layout - As you can see the the screenshot below, there are a variety of layout styles.  
    dashboard for Easy Product Displays

  5. Click the "Get Code" tab in the upper right corner, then select "Copy to Clipboard"
    dashboard for Easy Product Displays

  6. Move to your Blogger Page and paste the code copied to clipboard on the Blogger post using the "HTML" tab page.
    dashboard for Easy Product Displays

Additional Notes:

If you wish to add line spaces in the captions under the pictures, you would simply add <br /> <br /> where you want the break.  


A Screen Shot of Our Quick View Home Page 

This is a miniature screenshot taken at the time this article was written of our Quick View Home Page here on Review This!  I wanted you to easily be able to see the results, but you are always welcome to visit our current Quick View Home Page.
 
Review This Quick View Home Page

If you have any questions, or need additional information, please ask in the guestbook below.


More Tips & Tutorials for Blogger


Using Easy Product Displays to Create Home Page Featured Articles Tutorial Written by:
House of Sylvestermouse


Note: The author may receive a commission from purchases made using links found in this article. “As an Amazon Associate, Ebay (EPN) and/or Esty (Awin) Affiliate, I (we) earn from qualifying purchases.”


Friday, August 5, 2016

How to Create a Static Home Page on Blogger

how to create a static home page on blogger
Blogger is a great blogging platform that is perfect for beginners, as well as experienced bloggers.   However, as our blogs grow, we need to find ways to make them easier to navigate.  We want our older posts to be easier to find by our readers.

Those of us who write on blogs already know that the newest article will be featured at the top of the blogger site.  The older articles will be shoved down the blog landing page and eventually to the "next" page.  Depending on the frequency of publishing, that can actually happen pretty fast.  Articles that are still very relevant are no longer seen on the landing page and become harder to find.  One could almost even say they are "hidden" by the newer content.  So, what can we do?  

We take navigation very seriously on Review This!  In addition to having every article listed in our drop down tabs, we have a "Quick View Home Page".  Each week, our contributors select articles to feature on that page.  It looks & feels like a Home Page on a website.  

We opted to have our Quick View Home Page set up as a separate page that our readers can easily visit, as opposed to setting it as our static home page.  However, you can certainly set one up just like it to be the landing page for your blog. 


Step by Step Instructions for Creating a Blogger Static Home Page 


Blogger has a default "Home" that takes any guests to the "line up" of published articles.  It is necessary to do a redirect in order to have a static home page on Blogger. 

1)  Create a new page with an appropriate title and Publish it.

create a new page

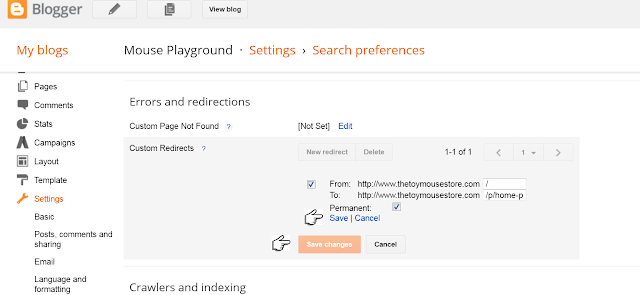
2)  Set the Redirect on your Blogger Dashboard.  Go to Setting > Search Preferences > Custom Redirects

Fill in the blank squares.  The site url is auto-filled:  
  They will look something like this.  Be sure to add the / at the end of your current home url

      From:  www.CurrentHomeURL.com/
      To:   http://www.YourSiteName.com/p/home-page.html 


Redirect on your Blogger Dashboard
 
 
3)  Check Each of the Boxes Click Save

4)  Click Save Changes

5)  Check the main url link to make sure it is properly redirecting to your new home page.

6)  Go Back to the Page you created at the beginning of this tutorial and add the content you want showing on your new Home Page.


You Now Have A Static Home Page on Blogger!


★ ★ ★ ★ ★

Click the button below to see the Review This Quick View Home Page.  Each week, I use EPD, Easy Product Displays, to generate the code for the page that allows the images with captions to be set side by side.  

I have published a step by step guide "Using EPD to Create Home Page Featured Articles" in a separate post.  Please click this link to see that companion tutorial.
 
quick view home page


Note: The author may receive a commission from purchases made using links found in this article. “As an Amazon Associate, Ebay (EPN) and/or Esty (Awin) Affiliate, I (we) earn from qualifying purchases.”


Monday, August 1, 2016

Review of CreateSpace Self Publishing Platform

Instructions for Publishing Books at CreateSpace.com


 State Flowers of the USA Coloring Book: For Students and Teachers

Ever since I published my 3 books on CreateSpace people have been asking me how to do that and if I recommend them. The short answer to that is yes, I do recommend them.

The other thing people want to know is if it is hard to do. That is not so easy to answer. There is a learning curve for sure, but I do have some free tools you can use to make it easier. All in all, I think CreateSpace is a fantastic tool for first time authors to get themselves published.

*All the books on this page are my own books I have published at CreateSpace.

Getting Started at CreateSpace 


So here I am going to take you step by step through the process to create your first book on CreateSpace and get it published and listed on Amazon and maybe picked up by booksellers who will also distribute it for you. My first book is on the right and got picked up by 12 other sellers besides Amazon including Barnes and Noble and several teacher websites. I am thrilled! 


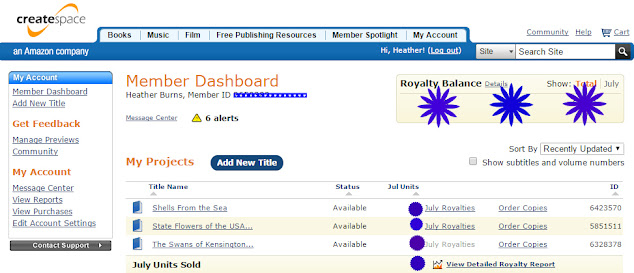
The first thing you will need to do is sign up for a free account. Just go to http://CreateSpace.com  and follow the easy registration instructions. Once you have an account you will be taken to your dashboard. It looks like the image below. The first thing you do to get started on a new book is to press that Blue button that is just about in the middle of the page which says "Add New Title." If you know the title of your new book just go ahead and add it. Don't worry you can change it before you publish, so  just put something and that way you will have access to the rest of the tools. This is the first part of the setup by the way.  After you have a title, you can just hit the button at the bottom that says "Save and Continue." 
screenshot of members dashboard on createspace


screenshot of createspace dashboard tool
Menu 

On the right is a photo of the Menu that is on the left side of the setup process once you add a title. You can see that the different parts of the process are listed and when you complete a section it gives you a Green check mark so you always know what else needs to be done. 

The set up process is a series of pages where it will ask you to put in information about your book, so just do each step and hit save. The next thing it will want to know after the title is the ISBN. Now I am a big fan of "free" so I just use their free ones. The only reason to buy your own ISBN would be if you wanted to have books printed by them and then distribute them yourself. I have no idea why anyone would want to do that work though! Later in the process you will see that CreateSpace gives you the option to have your book distributed by Amazon (they own CreateSpace) and also by other online sellers and even by bricks and mortar stores like Barnes and Noble.  I am a big fan of "easy" too! So just use their free one, and go on to the next step, which is the Interior.

In this step, you pick your size and type of printing. You will see a list of formats and there is a button you can click to see the approximate cost to print too. But to save you time here is a page with a list of the sizes and templates you can download to add your content. https://forums.createspace.com/en/community/docs/DOC-1323

Now the next step is the heart of the matter so to speak; adding all your content. The templates are set up for Microsoft Word, or for OpenOffice. I don't have Word, so I use OpenOffice. (because it's free, LOL, just go to OpenOffice.org and download it! ) I find this to be the hardest part of the process, because you have to make sure your content is exactly the way you want it printed. I have done 2 coloring books and I wanted them to be printed on one side only to make a nicer product for the colorists, so I had to really pay attention to insert a blank page after every image. If you don't know how to use OpenOffice or Word, that is beyond the scope of this article, but I used Google and YouTube and was able to do find tutorials to format everything properly. Just type your question into Google. 
 Shells From the Sea: Coloring Pages and Greeting Cardsbuy button


Once you are happy with your book, save a copy, and then also use the "export as PDF" function to save as a PDF too, because CreateSpace wants you to upload it in PDF form. But if you ever need to edit it later, you might need the original document, unless you have Adobe software and can edit PDF documents. So just to be sure, I always save the original Open Office document and also a PDF document.


If my instructions are not clear, you can also see lots of helpful tips on the page under the Interior button. Also there is a forum with a community of writers who have compiled a list of frequently asked questions. However, many of them are experienced authors and seem to be a little impatient with first time authors, so I just use Google to ask my questions. For example I might ask "how do I  __________ on a createspace template?" You would think CreateSpace would be easier to ask, but no, Google is. 


Designing the Cover of Your Book on CreateSpace


Next is the cover. They have templates for that too, so just scroll through them till you see one you like. Here's a hint. Under each cover there is a scroll bar to see different versions. The typeface and the colors can often be changed so there are a lot more variations than is apparent when you first look through the cover options. Just pick one you like and upload your image if it calls for one. They often have specific requirements for the images, so if your images are not the right size you will need to edit them. Lots of people have Photoshop but I don't, so I use http://Picmonkey.com. (yes, it's free) You can upload an image there, change the file size in a few clicks and then you are good to go!

 The Swans of Kensington Garden: A Photo Book of Swansbuy button

Speaking of images, they have to be at least 300 dpi for CreateSpace so what should you do if yours are not?  If you have Photoshop, this is fairly easy to fix but if you don't, here is a free software program you can use to change them to the correct dpi. Just go to http://www.Irfanview.com and download the free software.  

The program can be used for many other things too, but I only use it for changing the dpi and use Picmonkey for all the other things I do with images, like change the exposure and crop, add text, straighten, etc. Picmonkey is much easier to use for those things. But you can't control the dpi with it. A hint when  you use Picmonkey: save the file as the best quality jpg. They call it Sean. Yes it is a bigger file, but it will make your finished book far more beautiful! 

So once you have your interior and cover done, you are ready to complete your setup. This just involves setting the price, telling CreateSpace where you want it distributed and approving the proof. You will be able to check it page by page to be sure it meets your expectations. Once that is done, CreateSpace will also have to examine your proof to make sure it meets their specifications. They will either approve it, or send you a message that it needs to be changed. Don't worry, they will tell you exactly what needs to be changed. 

Here is a photo of the project page that shows all the steps in a graphic so you can see what is done and what needs to be finished. This is a completed book so all my steps are completed and marked with a Green check mark. (I can't publish a coloring book on Kindle so that one has a red button.)

screenshot of createspace dashboard


Eventually you will get it approved. I say that because it usually takes a few times before they do approve it. But then, wow, you will have published your first book! Good luck! 


Note: The author may receive a commission from purchases made using links found in this article. “As an Amazon Associate, Ebay (EPN) and/or Esty (Awin) Affiliate, I (we) earn from qualifying purchases.”


Friday, June 17, 2016

How to Change a Blogger URL to a Custom Domain URL

Custom Domain URL on Blogger - Easy Instructions

Easy Instructions for Changing a Blogger URL with Photos

There are several reasons why you might want to redirect a blogger url to a custom domain url.  In my case, I didn't want to transfer all of the articles on blogger to a new site just to have the custom domain url.  Custom domains are easier to remember since they most often match the site name.  They also don't require readers to remember the "blogspot" part of the url.  It is so much easier to tell friends, family, and readers to visit ReviewThisReviews.com than it is to tell them ReviewThisPersonalReviews.blogspot.com.  Now that our site has been redirected, either the old url or the new custom domain url will land you here.

Even though we have owned the custom domain name for years, I was hesitant to make the redirect.  I feared all kinds of evils would befall us.  I worried that we might even be offline for hours or days.  All of those concerns were unfounded.  Nothing bad happened and within 30 minutes, our custom domain was completely set and our site was redirected.

Now, let me share our extremely easy directions for redirecting a blogger site to a custom domain.  These instructions are written with bloggers in mind, not computer web designers.  The instructions are written in plain, easy to understand English and I have included lots of screenshots so you can see exactly what I am talking about in each step. 

Instructions for Redirecting a Site URL


If you follow these instructions, they will work.  Some steps may require waiting time for the DNS settings to activate, but that does not mean you have made a mistake.  Simply be patient and allow the internet to process your commands. 

1) Purchase Custom Domain - I use Namecheap, so these instructions will show their dashboard 

2) On the Blogger Dashboard, click Settings > Basic 

3) Click the link "+ Setup a 3rd party URL for your blog" 

Easy Instructions with Photos for Changing a Blogger URL to Custom Domain


4)  Go to the Namecheap Dashboard and click "Manage" by the url you wish to use, then select "Advanced DNS" from the top tabs.
 
Easy Instructions for How to Change a Blogger URL to a Custom Domain URL

Easy Instructions for How to Change a Blogger URL to a Custom Domain URL


5)  Copy the domain url, go back to the blogger dashboard, and paste the domain url in the box.   
BE SURE TO START THE DOMAIN URL WITH www.      
example:  www.thetoymousestore.com      
(If there is a / at the end, remove it)
 
Easy Instructions for How to Change a Blogger URL to a Custom Domain URL

6)  Click Save - This will auto-populate the information you need for the next step.
 
Easy Instructions for How to Change a Blogger URL to a Custom Domain URL

7)  Copy the destination (ghs.google.com) and Go Back to the Namecheap Dashboard.  Paste ghs.google.com in the CNAME record value box replacing "free.park-your-domain.com."  Make sure the www is in the Host section  

8)  Click "add a new record" and select to add another CNAME Record (See Screenshot Below)  

9)  Paste the second line of letters and numbers in the appropriate CNAME boxes  

Easy Instructions for How to Change a Blogger URL to a Custom Domain URL

10)  Click all of the check marks - they will disappear and little trash cans will appear 

11)  Go back to the Blogspot dashboard and click Save.   (If it doesn't save right away, wait 15 - 20 min and try again.   One of my blogs took about  15 min for the DNS settings to activate so I could save it.) 

12)  Once saved, confirm the new domain url is working by viewing your actual blogLook at the address to confirm url change.
 
Easy Instructions for How to Change a Blogger URL to a Custom Domain URL


13)  One last VERY IMPORTANT STEP!   

On the Blogger dashboard, under Settings > Basic, click the "edit" link beside the new url and check the box beside "Redirect 'YourSiteName'.com to www.'YourSiteName'.com.    This ensures that the www.  is not required in the url to find your site.   (This may also take a few minutes before it will allow you to save it)  

Easy Instructions with photos for changing a blogger url to a custom domain url


Congratulations!   
You are done, so go Celebrate!!!


You may also enjoy seeing our new Quick View Home Page here on Review This!  This page features articles you may have previously missed, while also providing excellent examples of the types of reviews published on our site.  

I will be sharing instructions on how to create your own Quick View Home Page for your blog soon.


Quick View Home Page on Blogger


How to Change a Blogger URL to a Custom Domain URL written by:
House of Sylvestermouse


Note: The author may receive a commission from purchases made using links found in this article. “As an Amazon Associate, Ebay (EPN) and/or Esty (Awin) Affiliate, I (we) earn from qualifying purchases.”


Tuesday, October 20, 2015

A Review of BlogJob.com: A Great Free Host for Your WordPress Blogs


Is BlogJob a Writing Community That Has Everything


Update, May 4, 2016

AS of May 4, 2016, BlogJob has "temporarily suspended" its rewards program as described below. You can still blog there, but you will not get points for any site activities or blog posts until the site straightens out certain issues. It is still a good place to socialize, and those who have monetized their blogs themselves can still earn from them. I would not advise anyone to join at this time, though. Although the site may solve its issues and begin making enough income to begin paying again, there is no guarantee that will happen.  I have posted an updated review of BlogJob in Transition

Have you been thinking of starting a blog? Perhaps you are already an experienced blogger who would like to start a new blog. Maybe you'd like to  use WordPress without the cost of buying domain names and paying expensive hosting fees. It would also be advantageous to be paid something for your efforts as soon as your posts are published while you are waiting for traffic to build. I believe you will find a happy blogging home in the BlogJob writing community.

Ravens Discuss BlogJob, created on Shareasimage.com

I want to emphasize the word community here. I've not been so happy at a site since Squidoo died.  Here's why. BlogJob is like Facebook, Tsu, and just about any content writing site that shares revenues all rolled into one. It functions well as a social network with forums, groups, and friends. The active friends interact with each other often and comment on each other's blogs as Squidoo lensmasters used to comment on each other's lenses and as Hubbers comment on each other's hubs. You can start or join groups. You have forums for discussing whatever is on your mind. You write your content on your own WordPress blogs which are hosted for free on the site as folders on the BlogJob domain. You earn for everything you do.

Blogging on BlogJob


Image courtesy of https://pixabay.com/en/cms-wordpress-265129/
On BlogJob, you  have almost total control over your WordPress blogs. It's not limited and difficult to use as it was on Seekyt, a site that finally closed to most writers. As long as you follow the usual Google content rules and keep everything G-rated and free of spam, you can decide what to post without any unreasonable restrictions. You can use affiliate and referral links to reputable sites. You can choose your own theme and customize it. You can add widgets. You can place Goggle ads or others. You can do almost anything you could if you  were hosting the blog on your own domain.  Your blogs must be at least 300 words long. Most of mine are about three times that.

There are some limitations,  however. Aren't there always? As this point in time, some of the tools that make affiliate selling easier don't function because of software conflicts. Amazon native ads don't work unless you use them in place of a regular ad, like one from Google. I haven't tried that yet. Easy Product Displays only show buttons and links, no images, when viewed. I'm hoping the EDP developers and the BlogJob website owner will figure out how to make it work. Meanwhile, Zazzle and Amazon regular codes work just fine.

 Another limitation is that you don't fully control the placement of all ads on your site. BlogJob administration places a couple of them where you might not want them to be, but I found when I complained they changed the placement and type of ad where it would not be so distracting.

Can't I Get Free Hosting Elsewhere?


Image courtesy of https://pixabay.com/en/blog-tweet-like-share-parts-710670/
BlogJob is a Community
Yes. You can use Blogger or WordPress.com to host free blogs for you. They also network you with other bloggers, but not in the same way. Those networks offer little incentive for bloggers to interact with each other. BlobJob bloggers are motivated to read and comment on other members' blogs because they are rewarded for it. They are also motivated to share the blogs of other members on social media. Blogging on your own can be a lonely business, especially at the beginning. Building traffic takes time, and income only arrives with traffic. BlobJob bloggers get help with both traffic and earning at this early stage.

How You Earn

As of may 4, 2016, what follows has been suspended until further notice. People may redeem points they have already earned, but cannot earn any more points. We don't know if the rewards system will be reinstated or not at this point in time.

Image Courtesy of https://pixabay.com/en/dollar-currency-money-us-dollar-499481/
Points add up to gift cards or PayPay cash at BlogJob
BlogJob has a reward system that works on points. You get points for almost anything you do -- commenting on blog posts and in forums, responding to comments of others, making friends, starting a group or interacting in a group, referring new members and site visitors and making blog posts. You get 50 points for each blog post. As the points add up, you will be able to redeem them for gift cards or PayPal payments. You can get a $25 payment to PayPal with 5,000 points or $100 for 10,000 points. Patience pays off.

I accumulated 5,818 points between November 5, 2015 and April 30, 2016. That's an average of 33 points a day, and that's because I did not have time to do at least one blog every day. You are limited to earning 100 points a day until you are able to complete a project. That means if you earn all 100 points a day, it will take you 100 days to cash out for $100 in your PayPal account.

A completed project raises your point ceiling. A project is something like a merit badge was in scouting. You have a step-by-step list of jobs to do and then you apply for the project. They involve blogging and attracting people to your blog or to the site. The first project most people complete is Social Networker. It includes instructions for getting your blogs set up.

Promoting Your Blogs


Sharing Buttons on BlogJob (Screen Shot from one of my BlobJob Dashboards
On every BlogJob blog you publish, there are special sharing buttons for social media. (See screen shot above from one of my blogs.) When you use them while logged in, they will include your referral in the links. If people use those links to visit your blog, they  are considered referred visitors and if they come as a referred visitor and sign up, they will become part of your network of referred new members. Only referred visitors give you points and count in completing  a project. As I update this on April 30, 2016, the site has been migrated to a new server and the sharing buttons have not been put back yet. Members have been advised to use a compatible plug-in for sharing, but referral codes must be manually added at the time being.

You will not work alone in getting more visitors to your blogs. Other logged in BlogJob members who use the buttons will also send visitors, but those who come to your blogs on their links won't be credited to your account. They will, however, see your ads and affiliate links. You don't get points for visitors who haven't come via your referral links, but you don't really get anything for visitors to your self-hosted blogs either unless they buy something or their view increases your Google earnings. You can profit the same way from un-referred visitors to BlobJob blogs.

One thing I like about the built-in share buttons is that there is a Hootsuite interface for posting to Facebook and Twitter. That means I can schedule tweets to all three accounts at once and then go back to Hootsuite and refine the scheduling.  Facebook links can be posted to your personal profile, a page you manage, or a group. Unfortunately, it can't post to a specific group thread in the way some groups require. (This is no longer the case unless you use the recommended Super Socialize plugin with both Hootsuite and Buffer interfaces.)

I Highly Recommend BlogJob


Would you rather not start your own self-hosted blog or website for your unhosted articles or posts you still plan to write? Please consider BlogJob as an alternative. It has a built-in community where you can connect with friends so you can work together to make each other successful. It has integrated promotion tools. It helps you begin to earn before your blog is established. Please join me at BlogJob by clicking this referral link. It may  be just the solution you've been looking for.

Keep in mind though that when writing on any site you don't own, you don't have full control. If you'd rather self-host and you want to start a blog you can monetize properly from the beginning, I recommend you enroll in the Pajama Affiliates blogging course described below that meets your particular need. There is usually at least one course on sale at any given time.

A Review of BlogJob.com: A Great Free Host for Your WordPress Blogs


To be up and running quickly you may want to start with "WordPress Site in a Day". If you're serious about making an income blogging as your business, you may want to go all in for the Affiliate Marketing Business Bundle that has the works. You will find a full description of each course when you click through. I have purchased these courses and can tell you they are worth every penny I've spent on them. The teachers are making thousands of dollars a month from affiliate marketing in their blogs, so you know you won't be getting useless information.

 If you aren't sure about making even this small investment, there is even a trial course for a dollar that not only gives you access to some of the most useful videos in the course, but also admittance to the private Facebook group for those taking the course. You will probably discover that you already know some of the others if you've been writing for third-party sites.

This has just been a whistlestop tour of all the features BlogJob offers. BlogJob also provides business opportunities for network marketers if you are inclined that way. There are job and resume boards, as well, where you can look for blogging jobs or submit your resume if you would find that useful. Most members will probably never even click on the tabs that lead to those extra earning possibilities, but they are still available if you need them.

Hope to see you at BlogJob soon.

Update, After being temporarily closed to new members, BlogJob is now open again. Those now wanting to join need to fill out an application that demonstrates they can write in English.


Note: The author may receive a commission from purchases made using links found in this article. “As an Amazon Associate, Ebay (EPN) and/or Esty (Awin) Affiliate, I (we) earn from qualifying purchases.”


Friday, May 15, 2015

How to Create Collections on Zazzle and Add Them to Your Sites

Creating a Collection on Zazzle is really easy!   Plus, adding your curated Zazzle collection is even easier, but you may wonder why you would want to feature the collection link instead of featuring the items themselves in a post.  There are actually several reasons why the collection would be a better option than individual links, but first let's cover how to create the Zazzle collection.


create a zazzle collectionHow to Create a Zazzle Collection

  1. Select Your Subject ~ Example:  Postcards from Rome
  2. Hover you mouse over the item you will be adding to the board.  You will see the "add to collection" button in the upper right hand corner.
  3. Click the down arrow to see the list of your collections.  
  4. Since we are adding a new collection, type the title of your new collection in the bottom square and click create.  
  5. Add a description of your new collection by editing the board.
  6. Add 5 tags
  7. Check the "visible in stores" square if you wish the collection to show on your store's home page.   It must also be marked "public" do show to anyone other than you.
add a title, tags and description to a zazzle collection
How to Edit, Title, Add Tags and Add a Description to Your Zazzle Collection


Alternate Way to Create a Collection on Zazzle


You can also start a new collection by simply clicking the "+ New Collection" on your Collections page and continue with steps 4-7 above.

create a collection on zazzle
How to Create a Collection on Zazzle


How to Find Your Collections on Zazzle


In order to edit, change the cover photo, or rearrange the items in the collection, you can simply go to your collections page and select the collection you wish to edit.  You will find that option in the drop down tabs under your profile image at the top.

find your collections on zazzle
How to Find Your Collections on Zazzle


How to Add a Photo to the Top of Your Zazzle Collection Page


At the top of each collection page, you have the option to add a photo or banner image.  This gives the collection page a really nice overall finished look, while also giving an instant example of what can be found in that collection.

Add a photo to the top of your Zazzle collection by simply clicking the "camera" in the big, blue square and selecting the image from your own uploaded photos or images. 

add a top photo to your collection
How to Add a Top Photo to a Zazzle Collection


How to Reorganize Your Items in a Zazzle Collection


Reorganizing the items in your collection is very easy.  Simply click the "organize" button at the top of the collection, then drag and drop your items where you wish.

organize a zazzle collection
How to Reorganize Your Items in a Zazzle Collection


How to Add a Zazzle Collection to Your Wordpress or Blogger Site


Adding a Zazzle collection to Wordpress or Blogger is very easy.

  1. Simply click the "share" button at the top of the collection page on Zazzle. 
  2. Select the "link" option
  3. Select Your Display Preference
  4. Copy the html code
  5. Paste the html code in your article under the html (blogger) or text (wordpress) option ~  not under compose or visual

 
share your zazzle collection on social media


How the Collection Appears


Note:  To get a larger display on your site like I have above, go to the "html" of your article and change the 325.jpg standard size to 525.jpg.  That size should not distort your image and will give you a larger display of your collection photo.


Why Use a Zazzle Collection in Your Website Article 


There are actually a couple of very important reasons to us the Collection link provided by Zazzle in your site article.


  1. It is only one affiliate link on your article.  
  2. Links to the entire Collection page which could easily feature dozens of additional related items.
  3. From your Collection page, the reader may well be tempted to explore more of your Zazzle store items.
  4. The Collection image makes a great sidebar ad or a fast addition to a related article for an easy update of the article.

What do you think?  Can you add to that list of why we should use a Zazzle collection in our website articles?

Please leave your thoughts, suggestions and comments below.


Zazzle Collections Can Include Items from Other Zazzle Stores


You are not limited to featuring only your store items in one of your collections.  You can add items for other Zazzle stores to your collections.  This is especially helpful if you don't have enough of a particular item to make a nice size collection presentation.  You will earn 15% in affiliate income when a buyer clicks through your created collection link in your published article!

However, if they access your collection via Zazzle instead of your published article, your referral code is not included in each individual link in the collection.  Therefore, I would not recommend checking the "visible in stores" option when creating collections that include a lot of items from other stores, unless you don't mind not receiving the commission for items sold.   Hopefully, that will be corrected in the future.


Note: I changed the size of these collection displays from 425.jpg to 625.jpg. I also added the words "Collection Curated" to the blanket collection since all of the throw blankets featured in this collection are not items in my store.


See the Collection Images in Action on a Wordpress Article


Here is an example of an article I recently published that uses the collection image links instead of individual product links.  I have featured 3 different Zazzle Collections in this article.

Mugs by Sylvestermouse

I would love to add your articles here too.  If you have used a Zazzle Collection in one of your published articles, please leave the link in the comments section below.


From Our Readers


This Mug Collection was created by Jasmine who, within an hour of reading this article, had used the instructions here to create her first collection and I wanted to share it with everyone. Review This is, and always has been, dedicated to promoting others as well as our own work. Thank you for being one of our loyal followers Jasmine!

Our own Contributor, Bev, also created a collection by using the instructions in this article. Likewise, we are featuring her new Zazzle collection.

mugs by raintree annie on zazzleFlower Mugs by Annie (Raintree Designs)

throw blankets on zazzleThrow Blankets Curated Collection by Sylvestermouse

mugs by bevClematis Mugs by GramsBe


If you use these instructions to create your first Zazzle collection, simply leave me a note in the comments section below. I would love to feature your collection too. (The throws would be happy to move out of the way for your collection to be included here.)


Note: The author may receive a commission from purchases made using links found in this article. “As an Amazon Associate, Ebay (EPN) and/or Esty (Awin) Affiliate, I (we) earn from qualifying purchases.”


Most Recent Reviews on Review This Reviews


Search for Reviews by Subject, Author or Title

The Review This Reviews Contributors


SylvestermouseSylvestermouseDawn Rae BDawn Rae BMbgPhotoMbgPhotoBrite-IdeasBrite-IdeasWednesday ElfWednesday ElfOlivia MorrisOlivia MorrisTreasures by BrendaTreasures by BrendaThe Savvy AgeThe Savvy AgeMargaret SchindelMargaret SchindelRaintree AnnieRaintree AnnieLou16Lou16Sam MonacoSam MonacoTracey BoyerTracey BoyerRenaissance WomanRenaissance WomanBarbRadBarbRadBev OwensBev OwensBuckHawkBuckHawkDecorating for EventsDecorating for EventsHeather426Heather426Coletta TeskeColetta TeskeMissMerFaeryMissMerFaeryMickie_GMickie_G


Review This Reviews is Dedicated to the Memory of Our Beloved Friend and Fellow Contributor

Susan DeppnerSusan Deppner

We may be apart, but
You Are Not Forgotten


“As an Amazon Associate, Ebay (EPN) and or Etsy (Awin) Affiliate, I (we) earn from purchases.” Disclosure Statement

X