Showing posts with label Sam Monaco. Show all posts

Tuesday, May 24, 2022

How to Replace a Window Screen

 Five easy steps to replace a window screen reviewed.

How to Replace a Window Screen

Replacing window screens is not as difficult as some people may think it is. Our screen door into our kitchen has a screen at the bottom of the door. So, with traffic in and out all year long I replace this screen almost every year.

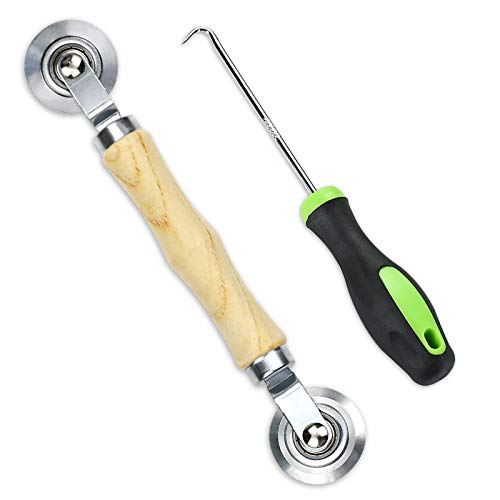
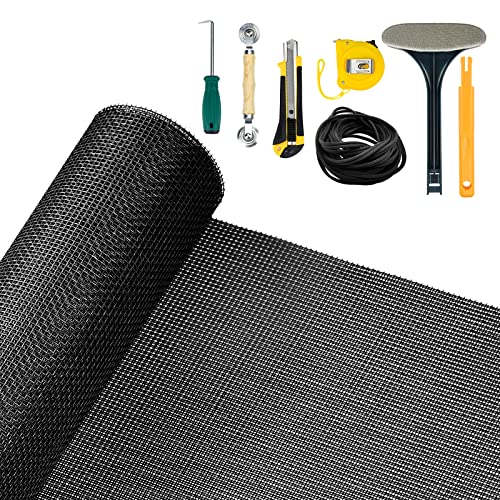
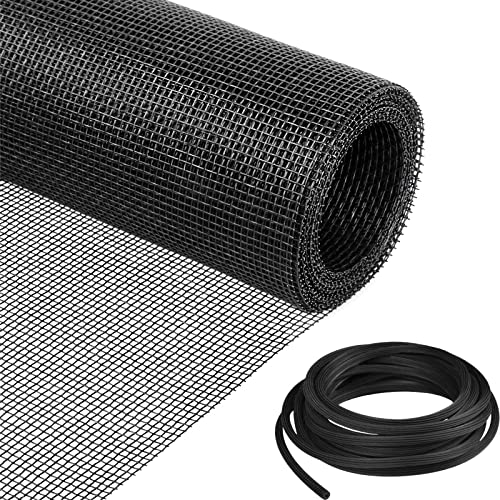
Replacing a screen requires a few simple tools. First, you need a fiberglass or aluminum screen. I always use fiberglass, then you will need a screwdriver, spline, utility knife, and 
roller tool all seen in the photo above.

Replacing a Window Screen Step 1:


Step one Remove the old screen

With a screwdriver locate the end of the spline in the old screen and pry it up. Continue to pull the spline out all around the window. You can save and reuse the old spline, but I never do, I always use a new spline it really doesn't cost that much.

Step 2:

Step 2

Now, roll out the new screen over the window frame. Before you cut it make sure you're 2 to 3 inches over on all sides. Don't worry you will trim the excess off later.

Step 3:

Step 3

There are two wheels on the roller tool, one wheel is smooth, and the other wheel is grooved. Using the smooth wheel, begin pressing the screen into the groove on the window frame one side at a time.

Step 4:

Step 4


Set the spline at one end of the window frame and stretch it to the other end. Now, use the grooved end of the roller toll and press the spline into the groove. Repeat steps 3 and 4 for the other 3 sides of the window frame.

Step 5:

Step 5

Now it's time to trim off the excess screen. Using the utility knife, carefully run it along the outside edge of the window frame groove. Take your time with this because you don't want to slip and cut your new screen. If the spline is not completely pressed down in the corners you can use a screwdriver to push it in.

Replacement Complete

My screen replacement is complete and ready to be placed back on my door until next year. Although, this year I have placed this screen on the top of the door so hopefully I won't have to replace it next year.

 Five easy steps and you can easily replace your window or door screens. You can find all the tools needed to replace window screens at any hardware store.

Find more DIY Projects here: ReviewThisCrafts.com

DIYSELF 2Pack Utility Knife Box Cutter Retractable Blade Heavy Duty(Red)DIYSELF 2Pack Utility Knife Box Cutter Retractable Blade Heavy Duty(Red)DIYSELF 2Pack Utility Knife Box Cutter Retractable Blade Heavy Duty(Red)Yoochee Screen Tools - Screen Rolling Tool and Screen Spline Remover Hook - Screen Roller Tool with Wooden Handle and Steel Wheel for Screen Repair - Durable Tools for Installing Door Screens WindowYoochee Screen Tools - Screen Rolling Tool and Screen Spline Remover Hook - Screen Roller Tool with Wooden Handle and Steel Wheel for Screen Repair - Durable Tools for Installing Door Screens WindowYoochee Screen Tools - Screen Rolling Tool and Screen Spline Remover Hook - Screen Roller Tool with Wooden Handle and Steel Wheel for Screen Repair - Durable Tools for Installing Door Screens WindowSenneny 7 PCS Screen Repair Kit - 39Senneny 7 PCS Screen Repair Kit - 39Senneny 7 PCS Screen Repair Kit - 39HOMWMPA Window Screen Replacement Kit, 36HOMWMPA Window Screen Replacement Kit, 36HOMWMPA Window Screen Replacement Kit, 36


Note: The author may receive a commission from purchases made using links found in this article. “As an Amazon Associate, Ebay (EPN) and/or Esty (Awin) Affiliate, I (we) earn from qualifying purchases.”


Tuesday, May 17, 2022

Scotts Hand-Held Lawn Spreader

 My Scotts handheld lawn spreader reviewed

Scotts hand held lawn spreader

Most homeowners love a lush green lawn and achieving that beautiful lawn can be a lot of work. Luckily for me, I have a small yard so taking care of it is not so bad. 

If you have a large yard you probably have a lawn spreader on wheels. I honestly don't have room in my garage for one more thing, so I found this handy little handheld lawn spreader. It is perfect for my small yard.

Features of Scotts Hand-Held Lawn Spreader:

Great for small yards
All sturdy plastic 
Fully assembled  and ready to go
Five spreader settings
Holds up to 1,000 sq. ft. of lawn products
5-Feet of broadcast 
Easy hand crank

Scotts recommends feeding your lawn with weed and feed or lawn food four times a year. I would only feed twice a year, once in early spring and then again in the fall.

Because we live only two blocks from a lake I quit using weed and feed because of chemical runoff into the lake. I still use my lawn spreader in early spring. I spread granulated lime and a couple weeks after that I spread grass seed.

The lime increases the PH balance and calcium in the soil for thicker greener lawns and improves the soil structure and root development. The grass seed is for new growth and helps choke out weeds. The spreader is perfect for small yards, gardens, and flower beds.

In the winter this little lawn spreader is a handy tool to spread ice melt on my driveway and sidewalks. Although I prefer spreading the lime and grass seed much better. Scotts even makes a battery-powered spreader. For this one, you will need two AA batteries.

Find more Product Reviews here: ReviewThisProductReviews.com

Scotts Wizz Battery Powered Fertilizer, Seed, and Ice SpreaderScotts Wizz Battery Powered Fertilizer, Seed, and Ice SpreaderScotts Wizz Battery Powered Fertilizer, Seed, and Ice SpreaderScott's 71133 HandyGreen Hand Held SpreaderScott's 71133 HandyGreen Hand-Held SpreaderScott's 71133 HandyGreen Hand Held Spreader


Note: The author may receive a commission from purchases made using links found in this article. “As an Amazon Associate, Ebay (EPN) and/or Esty (Awin) Affiliate, I (we) earn from qualifying purchases.”


Wednesday, April 27, 2022

The Original Lysol Concentrate - Reviewed

 This 12oz. little brown bottle of the original Lysol concentrate will make 9 gallons of cleaning solution.

Lysol Concentrate

With all of the convenience today of easy-to-use cleaners in spray bottles, and wipes, it makes me wonder does anyone still use this little brown bottle of Lysol concentrate? Well, we always have a bottle under our kitchen sink.

Lysol concentrate cleans, disinfects, deodorizes, and eliminates germs on non-porous surfaces. It will eliminate bacteria and viruses that I can't even pronounce. 

Some of the many uses for Lysol Concentrate:

  • Floors
  • Washable Walls
  • Appliance exteriors
  • Counter Tops
  • Bathtubs
  • Showers
  • Doorknobs
  • Toilet Bowl exteriors
To clean and deodorize just mix 2 to 3 tablespoons with one gallon of warm water. To disinfect and remove heavy dirt, grease and grime use 5 tablespoons to one quart of warm water.

True Story about this little brown bottle:

Many years ago in high school my buddy and I needed some extra money to take our dates to the prom. We had to buy flowers and take our dates to dinner. Since it was early in the spring we knew that people would be spring cleaning their homes. So we advertised for washing walls.  

Well, the ad worked and we had several customers lined up. So we gathered up our buckets, ladders, and rags. My mother handed me the little brown bottle of Lysol concentrate and told us to add a couple of cap fulls to every bucket, it will leave a fresh scent in their home. I still use the little brown bottle today.

Oh, and by the way, I married my prom date. Fran and I will soon be celebrating our 50th wedding anniversary.


Find more Product Reviews Here:

LYSOL Concentrate Disinfectant, Original Scent 12 oz (Pack of 6)LYSOL Concentrate Disinfectant, Original Scent 12 oz (Pack of 6)LYSOL Concentrate Disinfectant, Original Scent 12 oz (Pack of 6)LEAKTITE 500 5-Quart Plastic PailLEAKTITE 500 5-Quart Plastic PailLEAKTITE 500 5-Quart Plastic Pail


Note: The author may receive a commission from purchases made using links found in this article. “As an Amazon Associate, Ebay (EPN) and/or Esty (Awin) Affiliate, I (we) earn from qualifying purchases.”


Tuesday, April 19, 2022

Air Fryer Crispy Chicken Wing Recipe

 My air fryer crispy chicken wing recipe and method reviewed

Air Fryer Crispy Chicken Wing Recipe

Everybody in our family likes crispy chicken wings. I have never quite mastered crispy wings until I made them in our Ninja Foodi Grill and Air Fryer. So, if you like your chicken wings crispy this is the way to do it.

We had a crowd the day we made these so I used a 5-pound bag of chicken wings. Normally I would do about 2-pounds.

How I prepared the chicken wings:

one gallon zip lock bags
2 tablespoons olive oil per bag
3 to 4 tablespoons baking powder per bag


Seasoning:

1 teaspoon smoked paprika
1 teaspoon garlic powder
1/2 teaspoon cayenne pepper
1 teaspoon onion powder
1 teaspoon brown sugar

All of the above ingredients are per one bag of 15 or 20 wings. The first thing I did was, rinse the wings with cold water and pat them dry with a paper towel.

You can really use any already made chicken seasoning, just add a generous amount to each bag. Place the wings in a zip lock bag, add all the ingredients and mix well. Set the bags in the refrigerator for about 30 minutes.

I sprayed the air fry pan with non-stick cooking spray. Then, I set the air fry temperature to 390 degrees and the timer for 22 minutes. When the air fryer was preheated I added the wings, fitting about 12 to 15 wings in the pan. After 11 minutes I turned the wings over for the remaining 11 minutes.

Preparing the hot sauce:

1 stick of butter (melted)

Mix this together well in a large bowl. If you really like your wings hot add a dash of cayenne pepper. For me, the hot wing sauce is hot enough. Toss the crispy wings in the sauce and enjoy.

Air Fryer Crispy Chicken Wings

These crispy wings are perfect anytime for a snack or party. Your family and friends will love these air fryer wings.


Find more recipes on Review This here:


Note: The author may receive a commission from purchases made using links found in this article. “As an Amazon Associate, Ebay (EPN) and/or Esty (Awin) Affiliate, I (we) earn from qualifying purchases.”


Saturday, March 19, 2022

Chautauqua Lake New York Fishing


rainbow over Chautauqua Lake in New York
Chautauqua Lake - Reviewed
If you are an avid fisherman and looking for a new lake to cast your line. Chautauqua Lake just might be the place for you. Come and fish in Chautauqua Lake and you might even see a rainbow or two.

Chautauqua Lake is located in western New York, just east of Erie Pennsylvania, and south of Buffalo New York. The lake is the largest inland lake in western New York. Stretching 17 miles long and 2 miles wide at its widest point, with 42.5 miles of shoreline.

We have lived here since 1989 and consider this our home. We live just two blocks away from the lake and can never get enough of it.

Many fishermen come here to fish for Muskie a North American fresh-water fish, it is the largest fish in the pike family. In the lake, they range from 40 to 50 inches. I've done my share of fishing in Chautauqua Lake, but have never landed a muskie.


Popular Species of Fish in Chautauqua Lake:

  • Muskie
  • Walleye
  • Largemouth Bass
  • Smallmouth Bass
  • Crappie
  • Perch
  • Bluegill 
The north basin of the lake is 75 ft. at its deepest with an average depth of 25 Ft. The south basin is much shallower at 19 Ft. at its deepest with an average depth of 11 Ft. The south basin with its shallow waters and weedy areas make this the perfect environment for bass fishing.

If ice fishing is for you, here in the winter months you will find many colorful fishing huts over the frozen surface of the lake. As for me, you will find me in the house with a warm blanket during the winter. 

There are many fishing tournaments throughout the year at Chautauqua Lake. Click here for a list of the tournaments and much more do here in Chautauqua Lake Region. Then, make your plans,  pack your gear and bring your boat. Maybe I'll see you on the lake.


 Following are some of my recipes for the fresh fish of Chautauqua Lake:


Find more Travel on Review This: ReviewThisTravel.com

Find more Recipes on Review This: ReviewThisRecipes.com

Greater Than a Tourist- Chautauqua Lake Region New York USA: 50 Travel Tips from a Local (Greater Than a Tourist New York Series)Greater Than a Tourist- Chautauqua Lake Region New York USA: 50 Travel Tips from a Local (Greater Than a Tourist New York Series)Greater Than a Tourist- Chautauqua Lake Region New York USA: 50 Travel Tips from a Local (Greater Than a Tourist New York Series)


Note: The author may receive a commission from purchases made using links found in this article. “As an Amazon Associate, Ebay (EPN) and/or Esty (Awin) Affiliate, I (we) earn from qualifying purchases.”


Saturday, March 5, 2022

Air Fryer Sugar Cinnamon Biscuit Bites


Air Fryer Sugar Cinnamon Biscuit Bites
Air Fryer Sugar Cinnamon Biscuit Bites - Reviewed

These air fry sugar-cinnamon biscuits are so easy to make, and what a wonderful little sweet treat and snack. Your family will think that you spent all day making these.

These little beauties are perfect for breakfast or an after-school snack for the kids. I made these last week and they did not last very long at all in our house.

Sweet Biscuit Bites Ingredients:

1 package Pillsbury Grand Biscuits (8 counts)

1 stick (1/2 cup) melted butter

3/4 cup white sugar

2 tablespoons cinnamon

Instructions:

  1. Cut each biscuit into fours
  2. In a bowl add the sugar and cinnamon and mix together
  3. Melt the butter, I used a measuring cup for the melted butter
  4. Spray your air fry pan with non-stick cooking spray
  5. Place them in the air fryer, and space them so they don't touch each other.
  6. Set to air fry at 360 degrees
  7. Set the timer for 3 or 4 minutes. Times could vary with different air fryers. I used our Ninja Foodi Grill and Air Fryer
  8. Remove them with tounges to a plate and let them rest for a couple of minutes.
  9. Dip each one in butter then roll them in the sugar and cinnamon.
Cutting the Biscuits

Cutting the biscuits into fours. You can roll these into little balls if you like to be like donut holes. The yield is 32 little sugar-cinnamon biscuit bites.

Air Fry donut bites

The first batch is done, in the air fryer for 3 minutes at 360 degrees or until they are golden brown. On the 2nd batch, they were done after 2 minutes because the air fryer was already heated. That is something you will have to keep an eye on.

sugar cinnamon biscuit bites

After about 2 minutes I dipped each one in the butter and then rolled in the sugar-cinnamon mixture.

I must say that these are so easy to make, and what a perfect little treat to have on hand for the kids or friends.

Times may vary with different air fryers. I used our Ninja Foodi Grill and Air Fryer. Click here to read my review of the Ninja Foodi.

My friend, Mary Beth also reviewed her new Power XL Air Fryer. Click here to see her review.

Find more recipes on Review This Here: ReviewThisRecipes.com


Note: The author may receive a commission from purchases made using links found in this article. “As an Amazon Associate, Ebay (EPN) and/or Esty (Awin) Affiliate, I (we) earn from qualifying purchases.”


Wednesday, January 26, 2022

Electric Fireplace Television Stand


Electric Fireplace Television Stand
Electric Fireplace TV Stand Reviewed

Many homeowners dream of having a comfortable living space with the beauty of a fireplace. Although many homes do not have a wood-burning or gas insert fireplace.

 Some homeowners are turning to electric fireplaces to give them that cozy ambiance in their homes. 

The technology of electric fireplaces has come a long way over the years giving you the look and feel of a real fireplace. Along with the added benefit of generating real heat for your living space.

 We recently purchased a Walker Edison Electric fireplace television stand for our living room.


 Our television is located in a corner of our living room so we purchased a corner unit. There are so many options to choose from for electric fireplaces so, I'm sure there is one to fit your home's decor.

The Features of our Electric Fireplace:

  • First, it fits perfectly in the corner of our living room
  • Two tempered glass doors
  • Storage on both sides
  • Each side has two adjustable shelves
  • Fireplace insert with blower for heat
  • Will heat a 400 square foot area
  • The top is large enough for a 55-inch Television
  • The fireplace display can be operated without the heat on
  • Available in 10 different colors
  • Plug-in fireplace; no electrician required (Caution here: see below)
The unit was well packaged with easy-to-follow instructions and was not difficult to assemble. Although I do recommend having a second person to help with the assembly. My grandson Bobby helped me with the assembly and we had the unit assembled in about 3 hours.

Over time an electric fireplace may help you save on your heating bill. By heating the room you are in you could lower your home's thermostat. On the other hand, the average cost of using the heater on an electric fireplace is about .15 cents per hour.

The outlets in our living room are all wired to a 15 amp breaker. The heater unit draws 1400 watts so, with the other draw of the television and lights the heater tripped the breaker. I did have to call an electrician to wire one outlet in our living room to be on its own 20 amp breaker just for the heater unit.  This was not a huge problem and it's much safer to be on its own breaker.

Although, our daughter and son have the same 1400 watt fireplace insert and did not need an electrician.

We are very pleased with our electric fireplace television stand. On a cold winter night, it adds the perfect ambiance to our living room along with some additional heat to keep us warm.

This is the Walker Edison unit that we purchased. You can shop for many options and styles.

Walker Edison Alcott Classic Glass Door Fireplace Corner TV Stand for TVs up to 55 Inches, 48 Inch, EspressoWalker Edison Alcott Classic Glass Door Fireplace Corner TV Stand for TVs up to 55 Inches, 48 Inch, EspressoCheck the Price


Find more product reviews on ReviewThis here: ReviewThisProductReviews.com


Note: The author may receive a commission from purchases made using links found in this article. “As an Amazon Associate, Ebay (EPN) and/or Esty (Awin) Affiliate, I (we) earn from qualifying purchases.”


Sunday, December 12, 2021

Heidi Bowl Football Game

Heidi Bowl Football Game
The Heidi Bowl Football Game Reviewed
Photo Credit Getty Images

Some of you may remember The Heidi Bowl very well, and many others may have never heard of it or are just too young to know. If you are one of the others and don’t know what I’m talking about, let me explain.


November 17th, 1968, at 4:00 pm Eastern Standard Time the Oakland Raiders vs. the New York Jets football game aired on NBC. The game was played in Oakland California; these two teams were fierce rivals, quarterback Joe Namath vs. Oakland’s Daryl Lamonica.


We followed Joe Namath as he played high school football only 15 miles from where I grew up. I remember this game very well, as I was watching this game with my father and uncles.


The NBC executives had originally ordered the television movie Heidi to air at 7:00 PM.

Because of the high-scoring game and excessive injuries and penalties, the game ran late and ended at 7:07 pm. When the fourth quarter started at 6:20 pm the NBC executives knew it was not going to end on time.


They decided to keep the game on until the end. They began to call the network technicians to communicate their decision but could not get through.


As the time got closer to 7:00 pm. sports fans began calling the network to see if the game was going to remain on.


This overloaded the network's lines causing the lines to go down, thus the NBC executives could not communicate their decision. So, at 7:00 pm the game was cut off on the East Coast for the movie Heidi.


This caused viewers and sports fans on the East Coast to miss one of the most dramatic endings in football history. The Oakland Raiders scored two touchdowns in the final minute of the game to win 43 to 32. I can still remember when they flashed the final score at the bottom of the screen during Heidi. My dad and uncles were furious.


The game will forever be known as the Heidi Bowl and prompted the NFL and the networks to agree upon airing all games in their entirety. Now you know why your regular programs are delayed on Sunday if a game runs over.


The Jets and Raiders met again in December with the Jets winning 27-23 to win the American Football League Championship. Two weeks later the New York Jets defeated the highly favored Baltimore Colts of the Nation Football League in Super Bowl III.


I hope you enjoyed this bit of sports history. 


This was the year that the New York Jets made football history


Beyond Broadway Joe: The Super Bowl TEAM That Changed FootballBeyond Broadway Joe: The Super Bowl TEAM That Changed FootballBeyond Broadway Joe: The Super Bowl TEAM That Changed Football


Note: The author may receive a commission from purchases made using links found in this article. “As an Amazon Associate, Ebay (EPN) and/or Esty (Awin) Affiliate, I (we) earn from qualifying purchases.”


Monday, November 29, 2021

Battleship Classic Board Game Reviewed


Battleship Classic Board Game Reviewed

Battleship is a classic naval combat board game of strategy and excitement. In this board game, you will search the ocean floor to destroy your opponent’s fleet of ships.

The board game was first introduced by Milton-Bradley in 1967 as a plastic board and peg game. The game battleship comes from earlier versions of a pencil and paper game from the 1930s.

Battleship has also evolved into many electronic versions of the game today. The game I had growing up was the original plastic board and peg game. I have spent many hours playing this game with my brothers and friends.

The game we have today is the same, but it was made by Hasbro. I have never tried one of the electronic versions but thought about it many times. Today I play the same battleship game with my grandchildren that I played growing up.

How to Play Battleship:

Each player has a fleet of five ships consisting of the following:

Class of Ship                       #of Hits to Sink the Ship

Aircraft Carrier                                  5

Battleship                                          4

Destroyer                                          3

Submarine                                        3

Patrol Boat                                        2

Battleship classic board game

Each player has a plastic case with two grids, white pegs, and red pegs. One grid is the ocean floor, this is where you place your fleet of ships either horizontal or vertical. The upper grid is to record your misses with white pegs and your hits with red pegs.

 You can also use your ocean floor to track your opponent's misses with white pegs. This is an option and I never use it.

A player calls out a location on the grid and the opposing player says either hit or miss. If it is a miss the first player marks the location with a white peg, so he doesn’t call that location again. If it is a hit, then he places a red peg in that location and the opposing player places a red peg in the ship that was hit.

Now, the first player must figure out if the ship is placed horizontal or vertical on the opposing player’s grid. Once a player has sunk the other player's entire fleet, he wins the game.

Battleship is just another classic game that has been around for many years and will provide hours of fun.

For more classic toys and games visit me at

 Cherished Toy Finds


Find more toys on Review This Here

ReviewThisToyReviews.com

 Battleship Board Game for ages 7 and up makes a perfect gift for hours of fun.

Hasbro Gaming Battleship GameHasbro Gaming Battleship GameCheck the Price


Note: The author may receive a commission from purchases made using links found in this article. “As an Amazon Associate, Ebay (EPN) and/or Esty (Awin) Affiliate, I (we) earn from qualifying purchases.”


Monday, November 1, 2021

Air Fry Homemade French Fries


Air Fry Homemade French Fries

There is nothing like French Fries made from real potatoes. Oh, sure you can buy frozen French Fries, but I like fresh homemade the best. These real fries are so easy to make in your air fryer. They are crispy on the outside and so tender on the inside. My review will show you just how easy they are to make.

The way these French Fries turn out brings back some fond childhood memories for me. Growing up in New Castle a small town in Western Pennsylvania we lived near a small amusement park called Cascade Park.

The Park officially opened in May of 1897 and was a huge attraction. People would come from all over Pennsylvania and Ohio to visit Cascade Park. The park is still in existence today as a nature park.

As you walked through the midway of the park there were several food vendors. I had two favorites, one was the pizza vendor, and the other was the French Fries.

We would get a cup full of fresh real potato French Fries with vinegar and salt, oh my goodness, this was heaven when I was a kid. Now I enjoy that same goodness with my Air Fry homemade French Fries.

How to make the best Air Fryer French Fries:

3 to 4 medium potatoes (washed and peeled)

2 tablespoons of cooking oil

One-gallon plastic storage or freezer bag

Apple Cider Vinegar

Salt

Directions:

  1. Wash and peel the potatoes
  2. Cut to size (I have a French fry cutter for this you’ll see it below)
  3. Place the cut potatoes in the plastic bag, add the oil and shake
  4. Set your air fryer to 390 degrees
  5. Air Fry for 18 to 19 minutes
  6. When they are finished transfer to a dish or bowl, splash on the vinegar and add the salt while the fries are hot.
French Fry Cutter

This is a photo of our French fry cutter that we have had for years. I must tell you the story about this cutter.

When Fran and I were dating back in high school, yes, that was a long time ago. Fran's father knew how much I loved French fries. So, he went out and bought this French fry cutter just for me. We still use it today.

Just peel your potato, cut a flat spot on the bottom of the potato so the potato stands up. Set the cutter on top and push, Ha!! it's that easy.

We use our Ninja Foodi Grill and Air Fryer to make our French Fries. You can read my review of our Ninja here.

More recipes on Review This Here: ReviewThisRecipes.com

Get your very own French Fry Cutter, and may it last you as long as ours has.

Home Basics Stainless Steel French Fry Cutter, One Size, SilverHome Basics Stainless Steel French Fry Cutter, One Size, SilverHome Basics Stainless Steel French Fry Cutter, One Size, Silver


Note: The author may receive a commission from purchases made using links found in this article. “As an Amazon Associate, Ebay (EPN) and/or Esty (Awin) Affiliate, I (we) earn from qualifying purchases.”


Tuesday, October 19, 2021

Make Fresh Basil Pesto


Make Fresh Basil Pesto
Fresh homemade basil pesto reviewed

It’s easy to grow your own herbs. Every year in the spring, Fran buys fresh basil plants, we re-pot these plants and set them out on our deck.

We enjoy fresh basil all season long and into the fall. The plants just keep reproducing. This basil pesto is so easy to make and can be enjoyed in many ways.

Basil pesto is perfect tossed over pasta, spread on crackers or toast, try adding some to your favorite salad. Try it on Garlic bread or a baked potato. 

I’ve even made pesto pizza you can find my recipe here for Fresh Tomato and Pesto Pizza.

Our grandson Bobby loves to cook, and especially with fresh ingredients. This fresh basil pesto is one of his favorites to make. Bobby makes this basil pesto in about 10 minutes. So, it’s easy to have a meal on the table in less than 30 minutes.

Basil Pesto Ingredients:

2 cups fresh basil leaves

1/4 cup pine nuts

1/2 cup fresh grated Romano or Parmesan Cheese

1/2 cup extra virgin olive oil

4 cloves fresh garlic (We love our garlic so, you can cut this in half if you like)

1/8 teaspoon red pepper flakes (can be omitted)

1/4 teaspoon salt

1/4 teaspoon ground pepper

1 tablespoon lemon juice

Directions:

Add the basil leaves and pine nuts into the bowl of a food processor. Pulse the food processor several times to chop and mix.

Add the garlic, cheese, and lemon juice and pulse several more times

Place the lid on the food processor turn it on and pour the olive oil in a steady stream.

Stop and scrape the sides with a spatula and turn it on again for about 10 seconds.

Add salt and pepper to taste. If you use the red pepper flakes add them now and pulse a few more times to mix it all in.

We served our basil pesto over fresh Fettuccine that we made with our Emeril Lagasse Pasta and Beyond machine.

Read my review here: Emeril Lagasse Pasta and BeyondReviewed.

Basil Pesto

Our basil pesto with homemade fettuccine was on the table in 30 minutes or less for a delightful family meal.

We used our Ninja Food Processor to make this pesto. Any food processor or blender will work. If you don’t have a basil plant, you can buy fresh basil at your local grocery store and have this basil pesto at any time. 

It's easy to freeze the pesto to enjoy anytime on crackers or toast. Pour the pesto into ice cube trays and place them in the freezer. After the pesto freezes place the cubes in a freezer bag.


Note: The author may receive a commission from purchases made using links found in this article. “As an Amazon Associate, Ebay (EPN) and/or Esty (Awin) Affiliate, I (we) earn from qualifying purchases.”


Most Recent Reviews on Review This Reviews


Search for Reviews by Subject, Author or Title

The Review This Reviews Contributors


SylvestermouseSylvestermouseDawn Rae BDawn Rae BMbgPhotoMbgPhotoBrite-IdeasBrite-IdeasWednesday ElfWednesday ElfOlivia MorrisOlivia MorrisTreasures by BrendaTreasures by BrendaThe Savvy AgeThe Savvy AgeMargaret SchindelMargaret SchindelRaintree AnnieRaintree AnnieLou16Lou16Sam MonacoSam MonacoTracey BoyerTracey BoyerRenaissance WomanRenaissance WomanBarbRadBarbRadBev OwensBev OwensBuckHawkBuckHawkDecorating for EventsDecorating for EventsHeather426Heather426Coletta TeskeColetta TeskeMissMerFaeryMissMerFaeryMickie_GMickie_G


Review This Reviews is Dedicated to the Memory of Our Beloved Friend and Fellow Contributor

Susan DeppnerSusan Deppner

We may be apart, but
You Are Not Forgotten


“As an Amazon Associate, Ebay (EPN) and or Etsy (Awin) Affiliate, I (we) earn from purchases.” Disclosure Statement

X