Showing posts with label RenaissanceWoman2010. Show all posts

Thursday, July 19, 2018

The Language of Flowers - Book Review

the language of flowers book cover
Read More Reviews
To read The Language of Flowers by Vanessa Diffenbaugh, is to reflect on how the bouquet of each of our lives is crafted flower by flower.  As we enter Victoria's story, none of us would want the bouquet she sees as the definition of who she has become: thistle, peony, and basil (flowers that represent a deep mistrust of people, anger, and hate).  Well before the end of this book, I suspect, like me, that you will be urging Victoria, in your heart of hearts, to pick a few white violets and daffodils.

Who is Victoria, this self-described thistle?  She is a child who has spent her entire life in the foster care system.  Victoria's self-image has been shaped by the one constant she has known throughout her childhood: rejection.  After being bounced from 32 different placements, Victoria is finally aging out of the system.  Having turned 18, she is eligible for emancipation.  While that freedom is welcomed, it comes with a whole new set of challenges.  Victoria has no money, no family, and no place to call home.  What she has, though, is an extraordinary gift for changing lives.  It will be the discovery of this gift that offers up new hope for a girl who has always been too afraid to hope, or trust, or love.

We learn early on that Victoria had one significant relationship at the age of nine.  Her foster parent, Elizabeth, taught Victoria how the meanings of flowers were an important form of communication during the Victorian Era.  This language of flowers is something intuitive for Victoria.  Plants, flowers, and growing things become her solace, her sanctuary, and the very life of life.

As Victoria seeks to find her way in a world that frightens her, individuals from her past reappear.  One offers the chance for true love.  The other offers the chance for redemption.  Both can give Victoria something she has always wanted more than anything: a family and a sense of belonging.  Will Victoria be able to move past the shame and feelings of unworthiness that stand in the way of making her way home?  You will want to read The Language of Flowers to discover the answer to that question.

Before we go, were you curious, in the introduction to this review, about why we might want Victoria to pick some white violets and daffodils to replace the thistles, peonies, and basil in her bouquet?  Those white violets represent the sentiment "let's take a chance on happiness" and daffodils are symbolic of new beginnings.  When it comes right down to it, isn't that what we wish for everyone who has waited a lifetime to grow into something beautiful?


Note: The author may receive a commission from purchases made using links found in this article. “As an Amazon Associate, Ebay (EPN) and/or Esty (Awin) Affiliate, I (we) earn from qualifying purchases.”


Thursday, July 5, 2018

I'll Push You - Book Review

i'll push you book cover
Every once in a while, if we are fortunate, we are given a glimpse into a relationship of such incredible beauty that we are instantly inspired to be more, to do more, and to love more than we ever have before.  To read I'll Push You, is to witness the ultimate expression of brotherly love and devotion.  It is the opportunity to enter into a pilgrimage of the heart.

There are volumes of travelogues written by those who have embarked on such ancient walks as the Camino de Santiago.  The thing that sets this story apart, along with Justin Skeesuck and Patrick Gray's extremely rare lifelong friendship, is the fact that this trek was supposed to be impossible for them to accomplish.  Few believed they could actually pull it off.  Of course, those naysayers did not comprehend the enormous overcoming power of Justin and Patrick's friendship, of their faith, and of their spirits.

Born just 36 hours apart, Skeez and Paddy, as they affectionately called one another, never really knew life apart from one another.  They were classmates throughout their schooling, were best man in each other's wedding, and only became closer when Justin was diagnosed with a debilitating neuromuscular condition similar to ALS.  When Justin lost his capacity to walk, and to use his arms and legs, Patrick did not hesitate to step in to help Justin's wife care for his every need.

Not one to wave a white flag and give up in defeat, though he would have been justified in feeling more than a little bit of hopelessness, Justin sought to find ways to continue to live life with gusto.  When he learned about the Camino in Spain (The Way), Skeez asked Paddy if they might attempt it. Without losing a beat, Patrick replied: I'll push you.  At the time, neither Justin nor Patrick knew just exactly what it was they had agreed to do.  All too soon, they would begin the most arduous journey of their lives.

How do you cross the Pyrenees, and other mountain ranges, make it through the Mesita desert, and ford through raging rivers in a wheelchair?  What do you do when the pathway becomes a steep, boulder-strewn bowling alley, or an impassable quagmire of deep mud?  These became the daily challenges that had stopped even the most robust pilgrims along the way.  With the help and kindness of strangers, Justin and Patrick are drawn into the pilgrimage within the pilgrimage.  What began as a travel adventure, becomes a deeply transformational journey of self-reflection.

Over the course of 500 miles, Skeez and Paddy explore what it means to love, to serve, to trust, and to grow in grace.  To take the journey with them is a blessing, a privilege, and the chance to ponder how we might be the love that turns the impossible into the possible.


Note: The author may receive a commission from purchases made using links found in this article. “As an Amazon Associate, Ebay (EPN) and/or Esty (Awin) Affiliate, I (we) earn from qualifying purchases.”


Thursday, June 21, 2018

DIY Mercury Glass


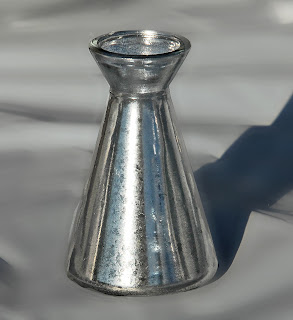
diy mercury glass vase
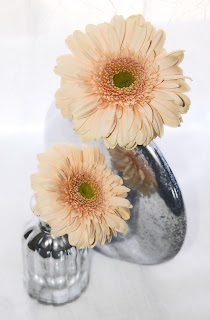
It's time for a DIY project for the true romantics out there.  Is there anything lovelier than fresh cut flowers in an antiqued mercury glass vase?  Perhaps the reason mercury glass is such a popular centerpiece at weddings is the nostalgic effect it has on us.  I absolutely love the understated beauty and elegance of silvered glass.  The look, and the effect, is way too wonderful to save only for special occasions.  

I invite you to follow along with me and transform your own gorgeous flower vessels.  It takes very little time and money to create the beautiful mercury glass effect presented here.  In less than an hour, you can be enjoying your own timeless centerpiece.  If you're like me, you'll get hooked and create any number of these mercury glass vases for yourself and for gifting to friends and family.  This is a gift you can be sure will be used and appreciated.


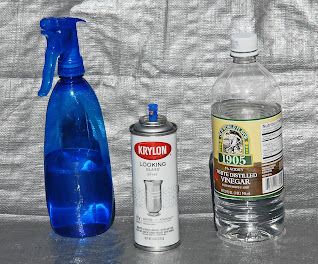
products needed for diy mercury glass
What You Will Need
* Glass vase
* White vinegar
* Water
* Misting pump bottle
* Paper towels

Optional
* Tarp or plastic drop cloth
* Wooden dowel rod
* Gloves

Steps 1-5
  1. Mix one cup of white vinegar with one cup of water.  Pour into misting bottle.
  2. Use a paper towel or soft cloth to wipe your glass clean.
  3. Protect work surfaces with a tarp, newspapers, or a drop cloth.  
  4. Test mister to ensure you will get a very fine spray.
  5. Shake up your spray paint for two minutes.
glass container vase

Step 6
Depending on the type of glass container you are painting, you may find it very helpful to use a dowel rod.  Supporting your vase with a dowel makes it easy to mist and spray all of the surfaces at the same time (without getting paint on your hands or fingerprints on your vase).  It also enables you to spray the bottom of the vase without waiting for the paint to dry on the sides of the container.

When I was painting the test tube vases, I used short dowel rods that I stood on end in an old piece of wood.  All I did was drill some holes in a two-by-four.  Then, I stacked each test tube on a dowel, leaving enough space in between to give me room to maneuver with the mister and spray paint.


spray painted

Steps 7-8
Spray a very fine mist of the vinegar water on your vase.  The key to success is to start with a very light coating of the mist.  If you get large, running droplets, go ahead and wipe it down with a paper towel and start again.

Immediately spray over the mist with a light coat of the Looking Glass spray paint.  You will repeat these steps two to three times, so it is important not to try to get all of the silvering done all at once.  Light layering is essential to getting the desired vintage look of mercury glass.


painting progress diy mercury glass

Step 9
Very gently dab all over the misted and painted surface of the glass with a clean and dry paper towel. You want to blot up all spots of water and any larger droplets of paint.  This step creates the aged look of the silvered glass.


diy mercury glass vase

Step 10
Repeat the misting, painting, and blotting process until you are happy with the final effect.  I repeated the process three times on the vases pictured in this tutorial.

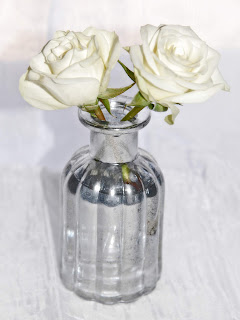
diy mercury glass vase with flowers

Step 11
Once the paint is dry, experiment with arranging your favorite flowers in your gorgeous mercury glass vases.  They look really nice in groupings of various sizes and shapes.

diy mercury glass holders with flowers
In this example, I placed three mercury glass test tubes in an antique bed spring.  The addition of a beveled mirror base created stability and an interesting reflective quality.  Peonies seemed just right for this type of vintage floral arrangement.


diy mercury glass vase with flowers

Mercury glass centerpieces don't have to be expensive to look like you spent big bucks at a floral shop.  Use the glass you already have at home.  It is so easy to upcycle any ordinary jar or cheap vase into something extraordinary.  There is something incredibly satisfying about giving a face-lift to a common, plain item.

We all hold the power of transformation in our hands.  Let's go create and share some beauty today.


Note: The author may receive a commission from purchases made using links found in this article. “As an Amazon Associate, Ebay (EPN) and/or Esty (Awin) Affiliate, I (we) earn from qualifying purchases.”


Thursday, June 7, 2018

Modern Masters Metal Effects Paint Review

copper weather vane
If you were to offer me something bright, shiny, and new, or, on the other hand, something with the rich patina of age, I would choose the luster of an item that shows signs of life every time.  The best example I can give is that of a copper weather vane.  I have always loved the verdigris patina of weathered copper.  So, when I discovered Modern Masters Metal Effects paints, I just knew I had to explore the possibilities of being able to speed up a process that normally takes place over many years.

I was given a custom-made folk art weather vane many years ago.  Because of the loveliness of the wood grain, and because I didn't want to risk ruining what was a very meaningful gift, I'd been reluctant to paint or stain the weather vane with ordinary finishes.  Until I found the right product, I decided to leave my special art piece unfinished.

When I recently came across some online videos of how Modern Masters paints and patina activators had completely transformed normal household items (like vases, frames, furniture, garden statues, and planters), I knew the day had come to give my weather vane the finish it deserved and had waited for all this time.  I stopped by Hobby Lobby to pick up the Modern Masters copper paint and green patina kit and got started right away.
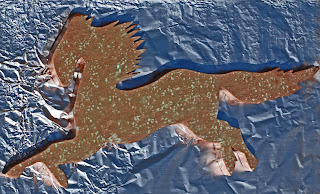
painting a weather vane
My first experiment with patina application.
You can finish a small project in a couple of days.  First, you apply two coats of their uniquely formulated primer.  Once those coats have dried, you then apply the first coat of your metal effects paint.  For the second application of copper paint, you work quickly to spray on the patina activator while the paint is still wet.  Then the really fascinating process begins.  Over the course of a few minutes, you will begin to see evidence of oxidation taking place.  The green patina begins to appear and will become more visible over the next several hours.  Your painted item will become more and more lovely with time.  The patina continues to evolve just as it would if you left copper outside to weather naturally.

patina brushed copper weather vane
Patina brushed in the direction of the grain.
Though I followed the directions, and spritzed on the patina activator as instructed, my first results were not what I wanted.  The verdigris patina was too speckled for my taste.  I decided to brush on a new coat of copper paint and begin again.  That is the beauty of this process:  you can redo until you are satisfied.  It doesn't take long to figure out what works best given the vision you have for a piece.  I found that lightly brushing the wet patina solution in the direction of the wood grain produced the best results.  It created a sense of movement and freedom that honors the true spirit of this horse.

I have been asked about whether or not the metal effects paint must be sealed.  The copper and bronze finishes are self-protective (no topcoat needed).  You are encouraged to seal the iron paint with rust patina.  There is a Modern Masters product specifically made for that purpose.  It is called Permacoat X-Treme Sealer.

The wonder of this product is that it works on so many different materials (wood, metal, plastic, stone, paper, etc.).  You have the choice of copper, bronze, and iron metal effects, along with green, blue, or rust patina activators.  I have purchased all three kits and have more projects currently in progress.  At the moment, I am restoring two vintage portholes recovered from ships.  They are getting the bronze treatment just as soon as I finish removing all of the salt, rust, paint, and caulk from their surfaces.  I will post photos throughout that process.

My other ongoing project involves the iron paint with rust activator.  I am refinishing some reclaimed doors I purchased from the Habitat for Humanity ReStore.  Those doors are going in the She Shed I built a while back.  I'll keep you posted with the results of that experiment as I determine which direction I'm heading with that design.  I'm thinking I might try a mixed media approach or play with some stencils when activating the patina.  And, of course, it won't stop at that.  I've been going through my jewelry box with the thought of giving some items a new look.  Check out my Pinterest Modern Masters Metal Effects board for inspiration.

As you can probably tell, I am totally sold on Modern Masters Metal Effects paints.  I highly recommend this creative medium.  You can purchase the product in kits or individually.  The paints and patina solutions come in a number of different quantities, making it easy and affordable to customize based on the size of your project.  Go have some fun with your own metal effects adventure in patina painting!  You will be amazed.


Note: The author may receive a commission from purchases made using links found in this article. “As an Amazon Associate, Ebay (EPN) and/or Esty (Awin) Affiliate, I (we) earn from qualifying purchases.”


Thursday, May 31, 2018

Vintage Lamp Bird Bath - DIY Tutorial and Review

vintage lamp repurposed as a bird bath

I was visiting my muse the other day, Pinterest, when I came upon the most delightful inspiration.  Have you seen the creative bird baths that are being made from vintage lamps?  I'm pretty sure I would never have thought of this fun, and ingenious, idea on my own.  As one who loves to give cast off items new life, this was the perfect project for me.  In case you also enjoy whimsical garden features, I am sharing my DIY process to prime your pump.

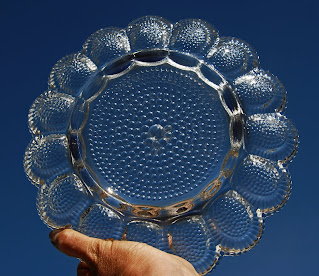
glass serving dish

First, I needed an old lamp and bird bath basin, so I took a little field trip to a couple of thrift stores.  Goodwill had exactly what I needed.  On my first shopping expedition, I found a glass serving dish that reminded me of a sunflower.  Amazingly, that is the exact vision I had for the theme of my creation.  Who knew an egg platter could be so lovely?

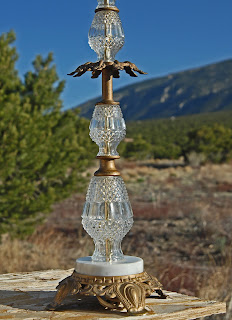
crystal or glass lamp

Next, I went on the hunt for the right lamp to complement my new bird bath dish, and to serve as its base.  Because thrift stores are always receiving new donations, I found the perfect lamp on my very next trip to the store.  The crystal, marble, and brass features, along with the size of the lamp, were just right in every way.  I couldn't wait to get home and put the finishing touches on my vintage bird bath.

lamp bulb holder

Step One: Unscrew the light socket and remove it from the top of the lamp.

lamp electrical cord

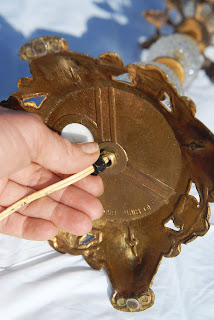
Step Two:  Clip the electrical cord and pull it out through the lamp base.  

sections of crystal lamp

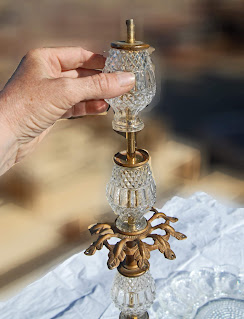
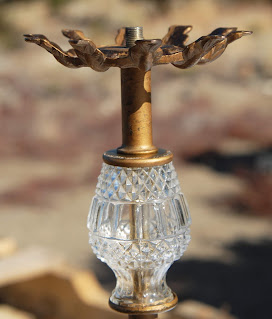
Step Three:  I removed each individual section of the lamp and reassembled the pieces to better support the basin section of my bird bath.  I moved the brass leaf section to the top of the column and reversed it (turned it upside down) to serve as the support arms for my glass dish.  

brass holder on lamp

Step Four:  Though I had intended to glue the platter directly to the brass arms, I found that they weren't totally level, so I riveted a circular metal candle holder to the brass piece.  I spray painted the metal silver since it would show through the bottom of the water basin.  I wanted a natural looking reflection.

serving dish on lamp holder


gluing a glass plate to a lamp candle holder

Step Five:  I used E6000 glue to affix the glass dish to the candle holder.  I ran a bead of glue all along the circular rim on the bottom of the egg platter and carefully applied pressure for a minute or two after centering the dish on the metal plate.  Then, I let the glue cure for a couple of days.

e6000 glue

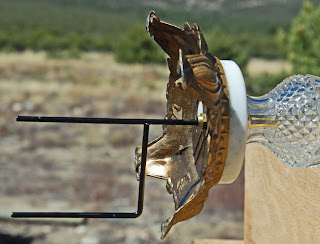
Step Six:  Since I don't want my glass bird bath to tip over and shatter, I ran a metal post up into the center column where the cord used to be housed.  I purchased an inexpensive plant hanger at the dollar store.  It has stakes to anchor the base of the lamp into the ground.  I measured the height of the lamp and then cut off the hook top of the planter stake.  For extra insurance, since the winds are often incredibly strong where I live, I drilled a hole through the center of a cement patio paver and inserted the metal rod through it before installing the rod inside the lamp.  Now my bird bath is very stable and far less likely to get knocked over by the wind or wild critters.  As a bonus, it now has a level platform on which to stand.  I'll be planting flowers around the paver to make it more attractive.

metal post


patio pavement square and metal post


metal post placed through patio pavement square


vintage lamp bird bath


Your steps may not be identical to mine, because every lamp is slightly different, but there are enough similarities to give you a sense of how to go about assembling your bird bath.  You may be able to find a lamp that already has a glass shade.  In that case, you won't need a separate glass dish.  I preferred knowing that my glass dish would not be toxic to birds and I didn't have to seal any holes that had been drilled through a lamp shade.  

I am very pleased with my unique bird bath.  It is so satisfying to take an unwanted item or two and turn them into a conversation piece.  More than that, I feel like I am showing a little love to the beautiful creatures who share my garden habitat.  It has been an especially dry season.  With the mountain creek dried up at the moment, it feels wonderful to provide a source of sustenance for the precious birds that fill my life with their sweet presence and songs.

Let me know if you decide to make your own bird bath or garden art with a vintage lamp.  I would love to see how you use your creative gifts.


Note: The author may receive a commission from purchases made using links found in this article. “As an Amazon Associate, Ebay (EPN) and/or Esty (Awin) Affiliate, I (we) earn from qualifying purchases.”


Thursday, May 17, 2018

DIY Mason Jar Bird Feeder - Tutorial and Product Review

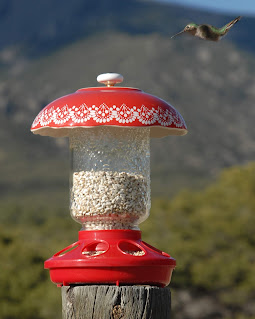
diy mason jar bird feeder and hummingbird
One of my favorite things in all the world is to spend time observing and photographing wild birds.  Most avid bird-watchers and photographers know that providing food is one way to ensure a steady stream of visitors and photo moments.  For some time now, I have wanted to make a new feeder for the birds that bring me such great pleasure.

Right away I knew that a mason jar bird feeder would be perfect for my country home.  Who doesn't love the charm of the ever-popular mason jar?  I thought I would share this project and a few tips for those out there who might also enjoy treating their feathered friends.  It is likely you already have most of what is needed for this easy do-it-yourself craft.  Let's get started.


Supplies Needed

  1. A regular mouth canning jar.
  2. A chick feeder base.
  3. A bowl or plate for the canopy over the jar.
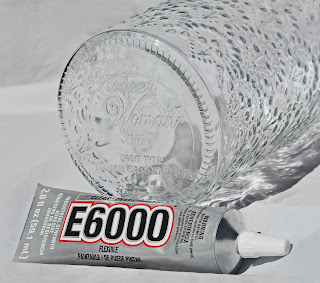
  4. E6000 glue (or another super strength clear adhesive).
  5. Birdseed.
  6. Chain or picture wire (plant or basket hanger).
  7. Optional: Decorative knob.
dish for diy mason jar bird feeder
Step One:  Acquire a regular mouth canning jar and proportionately sized dish for its canopy.  You can find inexpensive mason jars at thrift stores, any of the dollar stores, craft stores, etc.  Though I already had some canning jars at home, I fell in love with The Pioneer Woman's embossed Betsy mason jars.  In addition to being especially lovely, the jars are 32 ounces, which means you won't have to fill your bird feeder as often as with smaller containers.

chick feeder base
Step Two:  Buy a screw-on chick feeder base that fits a regular mouth mason jar.  Most feed stores will have them, or you can purchase one online.  I get mine locally from either Tractor Supply Company or Big-R.  Typically, I pay $2.99-$3.99, depending on whether I buy a plastic or a galvanized metal feeder.  There are usually a few colors from which to choose.  My store has red, green, yellow, purple, and the galvanized silver feeders.


drilling a hole in a dish
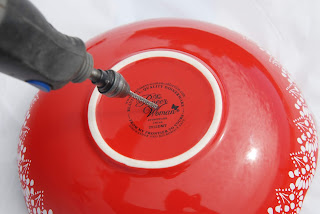
Step Three:  Determine if you are going to hang your feeder or place it on a post.  If you plan to hang your bird feeder, you may wish to use a decorative knob on the canopy (to provide an anchor point for a chain or hanging wire).  The ceramic knob I chose couldn't be glued on, so I used my Dremel and a tile bit to drill a hole in the center of my canopy dish.  The bit worked perfectly and created a very neat little hole for the screw that holds the knob in place.  Tip:  Keep the surface wet and go slow while you are drilling.  Angle the bit slightly.


dish with screw through it
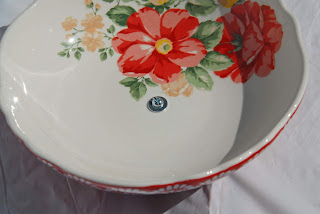
Step Four:  Insert a screw and use two washers (one for the interior screw and one for the exterior knob) to protect the bowl's surface.  I used a 3/4-inch long machine screw (#8) that fit the thickness of the bowl and the knob threads.  Tip:  Be careful not to over-tighten the screw.  You wouldn't want to crack that beautiful bowl (part of the vintage floral pasta bowl set by The Pioneer Woman).  *You can skip steps three and four if you choose a scalloped edge bowl and hook your plant hanger chains between the rounded curves.


mason jar and e6000 glue
Step Five:  Apply E6000 glue on the bottom rim of the mason jar (around the entire rim).  Follow the instructions on the glue label to ensure the best adhesion results.


glass jar attached to dish
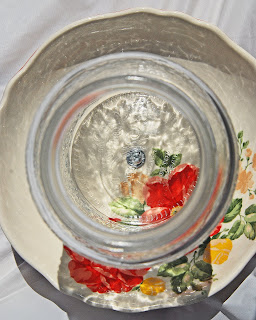
Step Six:  Center bottom of mason jar inside canopy bowl and apply gentle pressure while the glue is bonding.  Set aside for the glue to cure.  Depending on the temperature and weather conditions, curing time can take 1-2 days.  It's important not to rush this step.

*In this photo, you are looking down inside the open mouth of the jar.  You can see how it is centered over the screw for the canopy knob.  Tip: Use a flathead screw so the jar rim can sit flush on the bowl.


diy mason jar bird feeder
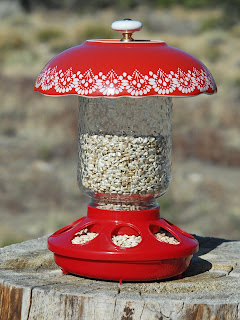
Step Seven:  After the glue is fully cured, fill mason jar with birdseed.  I used safflower seed.  Supposedly, squirrels won't bother a feeder with this kind of seed.  It is also said to keep bully birds from hogging all of the seed.  Safflower seed attracts the kind of birds I am hoping to feed.  I plan to hang my feeder, but decided to wait one extra day to ensure the glue is totally cured.

Because my hummingbirds are attracted to red feeders, I am thoughtfully considering the best location for this bird feeder.  You can see from the introductory photo on this page that the first bird to check out my new feeder was a hummer.

I love how my DIY mason jar bird feeder project turned out (so much so that I am making more than one feeder).  In addition to the Betsy mason jars, the dishes I purchased for the canopies are a part of The Pioneer Woman Collection.  The pattern on the red bowl matches the embossed pattern on the glass jar.  I bought everything at Walmart.

Now I'm excited to see who shows up at the feeder today. 


Note: The author may receive a commission from purchases made using links found in this article. “As an Amazon Associate, Ebay (EPN) and/or Esty (Awin) Affiliate, I (we) earn from qualifying purchases.”

Thursday, May 3, 2018

Driving Miss Norma - Book Review

driving miss norma book cover
Miss Norma and Ringo
Life's defining moments often come when least expected and in ways that were never anticipated.  For Miss Norma, losing her husband of 67 years the very same week she was diagnosed with advanced cancer, meant the life she had known for 90 years was gone in two heartbeats.  Driving Miss Norma is not about loss, however.  It is a moving memoir about the joyful journey that emerges as a result of life-affirming choices that become Miss Norma's defining moments.  Over the course of a year spent on the road with her son, Tim, daughter-in-law, Ramie, and poodle, Ringo, Miss Norma and her family show us what happens when you open yourself up to the very life of life.

At the beginning of this book, Norma Bauerschmidt makes two enormous decisions that drive the stories within her story.  First, when faced with months of draining medical procedures for treatment of what is expected to be terminal uterine cancer, Miss Norma chooses not to undergo surgery, radiation, and chemo.  She decides to live out her life outside the confines of a hospital.  In conjunction with that courageous decision, Bauerschmidt accepts an invitation from Tim and Ramie to take to the road with them in their RV.  It is this coming together that will completely transform all of their lives.

Though the journey begins with the hopes of checking off some of Miss Norma's "Bucket List" items, it is her reluctance to compose such a list that makes for the possibility of a more fulfilling trip.  In the course of taking it one day at a time, one delightful encounter at a time, Miss Norma and her family discover beautiful new ways of communicating and connecting.

As their experiences are shared via social media and national news outlets, Miss Norma becomes an international sensation with over half a million followers on Facebook.  Her life becomes her message, inspiring countless others to truly embrace fullness of living.  Everywhere she goes, total strangers become caught up in wanting to enrich Miss Norma's days.  The lines begin to blur in terms of who is enriching whom.  All that really matters is that Miss Norma's growing sense of wonder creates an energy and magic that draws others in.  By choosing to say yes to life, Miss Norma and family start a powerful chain reaction.

I was drawn to Miss Norma's story by my own family circumstances.  When my mother was diagnosed with multiple cancers, I had this dream of going on the road with her in my RV.  I had a deep desire to be a part of something that might be meaningful for my mom during her season of dealing with mortality and end-of-life issues.  Sadly, I never got to take that trip with my mother.  Reading this book, and vicariously embarking on Miss Norma's journey, has touched my spirit in vital ways.  It has renewed my desire to be a person who makes it possible for these kinds of life-affirming journeys to take place.

We all have the opportunity to be the driver on the journey of life.  I encourage you to read Driving Miss Norma.  It is quite likely to inspire you to hit the road.  I hope to meet up with you along the way.


Note: The author may receive a commission from purchases made using links found in this article. “As an Amazon Associate, Ebay (EPN) and/or Esty (Awin) Affiliate, I (we) earn from qualifying purchases.”

Thursday, April 19, 2018

Best Choice Products 2 in 1 Dog Trailer - Review

2 in 1 dog trailer with dog in it
Finn's New Adventure Mobile
Let's go!  These are the magic words that make my dog's heart sing.  Finn is always thrilled when we head out for an adventure, but his disability requires thoughtful solutions that enable him to enjoy rigorous outdoor activities.  This is why I bought Finn the Best Choice Products 2 in 1 Dog Stroller/Trailer this week. Now he can go on extended hikes and bike rides without hurting or overly stressing his body.

When I adopted Finn a few months ago, the first thing I acquired for him was a standard dog stroller.  That stroller has been an important mobility aid given Finn's limited use of his rear legs, but it has significant issues.  The stroller is tippy and its small wheels can only handle paved surfaces.  Given the rugged terrain where we live and play, it quickly became apparent that we needed a different style of dog stroller.

As I initiated a search for Finn's next adventure mobile, my wish list included the following features: lower center of gravity (closer to the ground); bigger wheels; dual use features (bike trailer option in addition to stroller function); and affordability (many dog trailers cost several hundred dollars).

2 in 1 dog trailer parts
After considering several products, I found one that offered more than I was seeking.  The price was right (two to three hundred dollars less than other models offering fewer features) and the shipping was fast and free.  Everything arrived carefully packed.

Here's what I received in the box (clockwise from bottom center): tool kit; instructions; front swivel wheel and fork; safety flag; handlebars with brake; rear wheels; and trailer body.


large wheels on 2 in 1 dog trailer
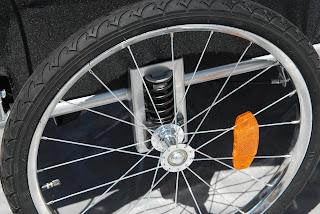
In addition to getting the larger wheels (19-inch) on my wish list, I was especially happy to receive the bonus of a suspension system that will provide shock absorption.  I want Finn to have as smooth a ride as possible.  This is one of the more important features for a dog that cannot balance on all four legs.


wheels on 2 in 1 dog trailer
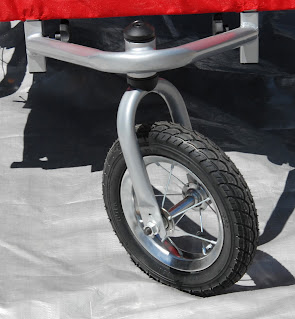
I was ready to purchase another trailer model until I read complaints about the front wheel being stationary.  Because the wheel did not swivel, turning was tedious.  I now realize what a mistake it would have been to go with a stroller that was hard to maneuver around curves and corners.  The front wheel on this model can swivel 360 degrees and is 9.5 inches high.


pockets on 2 in 1 dog trailer
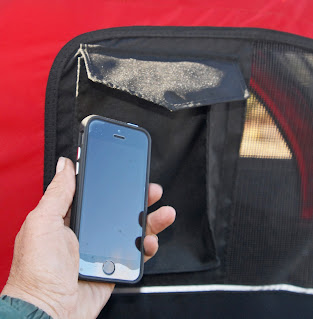
Another complaint about some of the other dog strollers that I initially considered was that they lacked any storage options.  This model has two pockets, one on each side of the trailer body, that are just perfect for storing a cell phone, keys, or a wallet.


2 in 1 dog trailer ready to be transported in truck bed
Though the trailer can be compacted for travel, I find it is easiest to just leave it fully assembled and use the bed of my truck for moving it around.  Even though I have a short bed on my Sport Trac, it is large enough to haul this trailer.  Anyone with a van, SUV, or truck will have plenty of room to easily transport this dog trailer.  The external dimensions are: 30" wide x 46" long x 38" high.  At 37 pounds, I can easily lift and load this stroller/trailer by myself.


dog in 2 in 1 dog trailer
Let's move on to what Finn likes about his new ride.  When I asked him, he wanted to make sure I mentioned his awesome sunroof.  That's pretty much his favorite feature.  I've been keeping the roof open while we're cruising so Finn can keep an eye on my driving.  The sunroof does have a screen and rain guard.  Given that the weather can change every five minutes in Colorado, I'm sure that hatch cover will be put to use.


dog looking out of side window on 2 in 1 dog trailer
Finn also likes the roomy interior of his carriage.  There is plenty of space to lie down comfortably.  The internal dimensions are: 23" wide x 28" long x 22" high.  He also enjoys all of the screened in picture windows.  This is one fabulous room with a view.


Most of all, Finn and I love the anticipation of all the places we will now be able to go.  We highly recommend the Best Choice Products 2 in 1 Dog Trailer.  It's not just for disabled dogs.  Most dogs could benefit from this mobility aid during some season in their lives.  Young pups and senior dogs often tire easily on long walks.  Also, many dogs have periods of time when they are recovering from something that limits their capacity to get around (a surgical procedure, injury, etc.).  It is so hard for a dog to be grounded.  Anything that keeps a dog's spirits up and is good for his overall well-being is so worth the investment.

Stay tuned for updates as we test the bicycle trailer option and take our first road trip.


Note: The author may receive a commission from purchases made using links found in this article. “As an Amazon Associate, Ebay (EPN) and/or Esty (Awin) Affiliate, I (we) earn from qualifying purchases.”


Thursday, April 5, 2018

The Great Alone by Kristin Hannah - Book Review

The Great Alone by Kristin Hannah - Book Review
The Great Alone by Kristin Hannah
Kristin Hannah, author of the runaway bestseller, The Nightingale, has yet another instant New York Times Bestseller in her new novel, The Great Alone.

It's 1974.  Turmoil abounds.  Think Watergate, the Munich Olympics massacre, Patty Hearst's kidnapping, and Vietnam.  Despite the great uneasiness of the times, our country's immense angst is no match for that which churns within Ernt Allbright, recently returned prisoner of war.

In search of escape from what Allbright perceives as external madness, he loads up the VW van and moves his family off-grid to Alaska's remote wilderness.  For a few idyllic weeks of summer, there is bliss in the Allbright's ramshackle cabin.  Just as Alaskan summers are the most fleeting of seasons, the much-needed respite known by Ernt's wife, Cora, and teen daughter, Leni, will disintegrate with the eternal darkness of the Arctic winter.  It is in the midst of Ernt's downward spiral that the women in his life will learn the truest lessons about what it means to survive, to love, and to find yourself.

Hannah's descriptions of Alaska's raw beauty are breathtaking.  It is here that her writing soars.  Having spent significant time immersed in the splendor of the last frontier (her family owns an adventure lodge there), the author has an intimacy that draws the reader into her own authentic wilderness experience.  Even when the circumstances in the story were bleak, or daunting, I found myself wanting to pack up and leave for the Great Alone.

The book's title comes from a poem by Robert W. Service:
"Were you ever out in the Great Alone, when the moon was awful clear, and the icy mountains hemmed you in with a silence you most could hear... "
It is that awful clarity, and the many different kinds of alone, that make this a powerful story of forging the only kind of connectedness that really matters.


Note: The author may receive a commission from purchases made using links found in this article. “As an Amazon Associate, Ebay (EPN) and/or Esty (Awin) Affiliate, I (we) earn from qualifying purchases.”


Thursday, March 29, 2018

Embark Dog DNA Test Review


embark dog dna test
Embark Dog DNA Test Kit

Dogs are such wondrous mysteries.  When we adopt a rescue animal, there is this vast unknown.  It is only natural to have a desire to discover as much as possible about a new family member.  In the quest to uncover a newly adopted fur baby’s history, more and more pet parents are choosing to explore their dog’s breed mix, heritage, and health profiles through DNA analysis.  This is where the Embark Dog DNA Test comes into play.

little black dog
Finn's Disability is Congenital
I have had so many questions about my newest dog, Finn.  Because he was rescued from a situation of extreme neglect, and because Finn has a congenital condition (Medial Patella Luxation), it seemed especially critical to know more about potential health issues.  Of course, like most people who choose to have their dogs tested, I was also excited to gain a greater insight into Finn’s family tree.  One of my biggest questions, with regard to Finn being rescued with a group of dogs (a hoarding case), has centered on what his relationship might be to the other dogs that were trapped in the same household with him.

My decision to send Finn’s DNA to Embark’s veterinary geneticists came about when a fellow adopter of one of the dogs saved with Finn spoke to me about Clark’s DNA results.  I suspected that Finn and Clark might share a Border collie ancestor.  Curiosity led me to go online and order my Embark Dog DNA Test so I could compare Clark and Finn’s results.  Amazingly, my test kit arrived within three business days. 

dna sample
Finn's DNA Sample
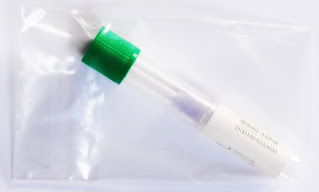
Collecting Finn’s DNA sample took just 30 seconds.  Using the swab in the kit, I soaked up a small amount of saliva and secured the sample in the vial provided for preservation.  Mailing the vial could not have been easier.  A postage paid label and box were provided.

Embark is exceptional when it comes to communication.  At every step along the way, I was notified by email and text message about what was happening with Finn’s DNA sample.  For instance, I knew when it was in the centrifuge, when it was being purified, when the DNA was being replicated (one million copies!), and when the geneticists were beginning to build Finn’s profile chromosome by chromosome. 
Embark Dog DNA Test results
Finn's Health Summary
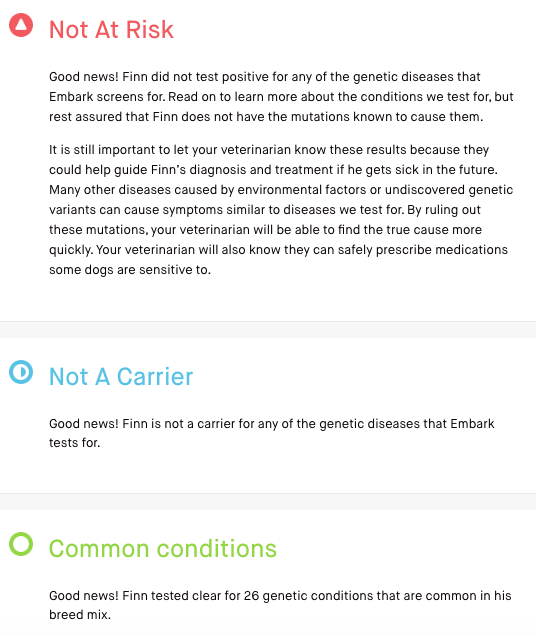
First, I received Finn’s health summary.  I was relieved to see that he is clear of each of the common genetic conditions identified for his breed mix.  Competitors charge extra for each test.  I appreciated the advantage of having all of these genetic disease tests included in the price of the Embark test kit.  As a bonus, a custom report was provided for Finn’s vet.  

dog dna test results


dog dna test results
Finn's Breed Mix
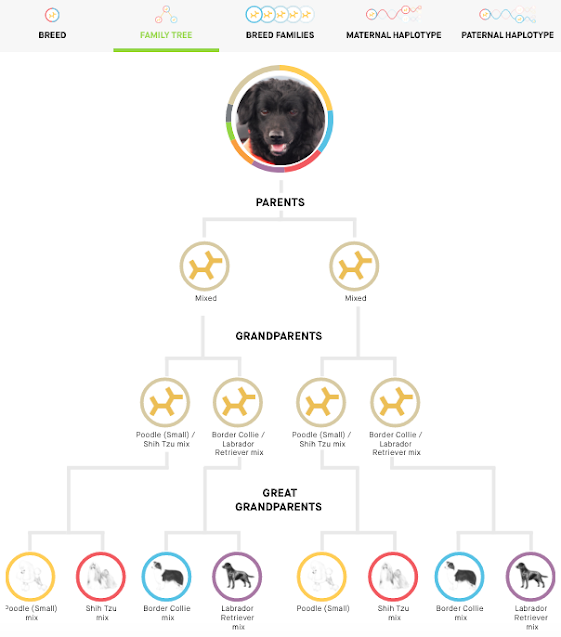
Next, the greatly anticipated breed mix report arrived through my online portal.  Wow!  I was expecting Finn to be part poodle and part Border collie.  That was confirmed.  What I didn’t anticipate were all of the other interesting breed mixes and percentages.  

embark dog dna test results
Finn's Family Tree

There are other advanced features and analyses too involved to cover in this review.  One thing I will mention is that Finn now has the opportunity to contribute to cutting-edge research.  When I chose the Embark Dog DNA Test, one of the factors that appealed to me most was that of the ongoing research which would provide me with continual updates. 

Though there are less expensive DNA tests, with faster results, I am completely sold on Embark's comprehensive package.  I feel the cost was reasonable for what I gained in terms of knowledge about Finn, reassurance about his genetic disease risk, and the fascinating details about canine genes.  I highly recommend Embark's Dog DNA Test.


Note: The author may receive a commission from purchases made using links found in this article. “As an Amazon Associate, Ebay (EPN) and/or Esty (Awin) Affiliate, I (we) earn from qualifying purchases.”


Most Recent Reviews on Review This Reviews


Search for Reviews by Subject, Author or Title

The Review This Reviews Contributors


SylvestermouseSylvestermouseDawn Rae BDawn Rae BMbgPhotoMbgPhotoBrite-IdeasBrite-IdeasWednesday ElfWednesday ElfOlivia MorrisOlivia MorrisTreasures by BrendaTreasures by BrendaThe Savvy AgeThe Savvy AgeMargaret SchindelMargaret SchindelRaintree AnnieRaintree AnnieLou16Lou16Sam MonacoSam MonacoTracey BoyerTracey BoyerRenaissance WomanRenaissance WomanBarbRadBarbRadBev OwensBev OwensBuckHawkBuckHawkDecorating for EventsDecorating for EventsHeather426Heather426Coletta TeskeColetta TeskeMissMerFaeryMissMerFaeryMickie_GMickie_G


Review This Reviews is Dedicated to the Memory of Our Beloved Friend and Fellow Contributor

Susan DeppnerSusan Deppner

We may be apart, but
You Are Not Forgotten


“As an Amazon Associate, Ebay (EPN) and or Etsy (Awin) Affiliate, I (we) earn from purchases.” Disclosure Statement

X