Showing posts with label Recipes. Show all posts

Monday, May 2, 2022

Reviewing Why I Make and Recommend Bannock

Bannock, a type of bread that is made in a skillet or pan on the stovetop or open fire, has been something I have made off and on over the years. But recently, Bannock has been in the forefront. Between being an integral part of a book series I've just read and being what I'm making for breakfast this morning, I thought I'd share with you.


What is Bannock?

After a Google search, it seems that Bannock (with a variety of spellings) was a Gaelic word meaning "morsel" and is believed to have originated in Scotland. It is a flat, unleavened bread and it is thought to have been introduced to North America by Scottish immigrants. 

You'll hear the words fry bread and bannock use interchangeably at times. The Indigenous people of North America make an unleavened fry bread. I believe that the original Scottish bannock used oatmeal and the North American fry bread originated with meal made of corn or nuts. At some point in time, both versions began using flour.

For my personal use and definition, Bannock is a yeastless bread that is made of flour, baking powder, and a liquid and is cooked on an almost dry skillet.  Fry bread is similar but "fried" with a larger amount of oil. I am sure others have their definitions, but this is mine. Bannock is something that hikers, campers, and hunters can easily make while on the trail.

Bannock for Breakfast

Today has turned cold and stormy. Thunder claps and lightning had me rushing to check on the outside animals before crawling back under the blankets. I felt too lazy to make breakfast but I was hungry. When I finally got up and moving, I made bannocks and scrambled eggs with sausage crumbles. 


During the moving process from the apartment to my land, my best friend was helping at one point and made a crack that I had "several" cans of baking powder. When I told him that I planned to be able to make Bannock if I get snowed in on the mountain he understood completely. He is an avid outdoorsman who has also made bannock while camping.

I started making bannock when I was camping in "The Shack" on my land. With only 4 ingredients, it was an easy thing to have on hand in off-grid conditions. As the house build began, I camped in the little shed and conditions were more austere. The shed was such a very small space for camping and storing supplies. But I could make bannock on my single camp stove burner.

I use the version by Liz Thomson. The ingredients are:

  • 1 c flour
  • 1 tsp baking powder
  • 2 TB olive oil
  • 1/2 tsp salt
  • 1/3 c warm water
  • herbs such as rosemary are optional (I use the most minuscule shake of Mrs. Dash)
I use this version because it is the smallest recipe and makes 3-4 small biscuits. I found that olive oil kept well in my off-grid camping situations. There are versions that use butter, lard, bacon grease, and so on. While those version often have more flavor, those ingredients were more difficult for me to make sure I had on hand. 

Not only did I make bannock while I was camping I also made bannock at the apartment. During quarantine and supply chain situations, I sometimes made bannock in lieu of bread. I also made homemade bread that required yeast and time to rise - because I had that time. But bannock is much more quick and easy to make. It was great to have with a can of soup. And as I told my friend, I made sure to buy some (okay, many) cans of baking powder ahead. Now that I've moved to a rural area (a mountain ridge in West Virginia) I could easily be snowed in for a long period of time. Bannock is something that I can make in a pan on top of my woodstove if I am without electricity. So I'm set in that regard.

I highly recommend that people try making bannock in the event they want or need an easy-to-make bread at home or on the trail.

Bannock in the Books


I mentioned that I just read about bannock in a fictional series I was reading. I love to read. It takes my mind off of the issues at work. But I don't have much spare time, focus, or energy. So I need the story to grab me and keep me immersed. 

I am so glad that I read a series that was reviewed by Sylvestermouse Cynthia here on Review This! The series is the Tales from the Highlands series. Book 3 in that series written by Martha Keyes is The Innkeeper and the Fugitive. Ana MacMorran flees her home and an arranged marriage. She does not want to marry the villainous laird of Benleith. During her criminal escape from this contract, she finds herself at Glengour Inn. There she secretly assumes an identity of another in order to try to hide.

At Glengour Inn, travelers stop for a bit of bannock and drink before continuing on their travels.

I enjoyed the Tales from the Highlands series immensely. If you'd like to know more about the series, check out Cynthia's book reviews:


Note: The author may receive a commission from purchases made using links found in this article. “As an Amazon Associate, Ebay (EPN) and/or Esty (Awin) Affiliate, I (we) earn from qualifying purchases.”


Tuesday, April 19, 2022

Air Fryer Crispy Chicken Wing Recipe

 My air fryer crispy chicken wing recipe and method reviewed

Air Fryer Crispy Chicken Wing Recipe

Everybody in our family likes crispy chicken wings. I have never quite mastered crispy wings until I made them in our Ninja Foodi Grill and Air Fryer. So, if you like your chicken wings crispy this is the way to do it.

We had a crowd the day we made these so I used a 5-pound bag of chicken wings. Normally I would do about 2-pounds.

How I prepared the chicken wings:

one gallon zip lock bags
2 tablespoons olive oil per bag
3 to 4 tablespoons baking powder per bag


Seasoning:

1 teaspoon smoked paprika
1 teaspoon garlic powder
1/2 teaspoon cayenne pepper
1 teaspoon onion powder
1 teaspoon brown sugar

All of the above ingredients are per one bag of 15 or 20 wings. The first thing I did was, rinse the wings with cold water and pat them dry with a paper towel.

You can really use any already made chicken seasoning, just add a generous amount to each bag. Place the wings in a zip lock bag, add all the ingredients and mix well. Set the bags in the refrigerator for about 30 minutes.

I sprayed the air fry pan with non-stick cooking spray. Then, I set the air fry temperature to 390 degrees and the timer for 22 minutes. When the air fryer was preheated I added the wings, fitting about 12 to 15 wings in the pan. After 11 minutes I turned the wings over for the remaining 11 minutes.

Preparing the hot sauce:

1 stick of butter (melted)

Mix this together well in a large bowl. If you really like your wings hot add a dash of cayenne pepper. For me, the hot wing sauce is hot enough. Toss the crispy wings in the sauce and enjoy.

Air Fryer Crispy Chicken Wings

These crispy wings are perfect anytime for a snack or party. Your family and friends will love these air fryer wings.


Find more recipes on Review This here:


Note: The author may receive a commission from purchases made using links found in this article. “As an Amazon Associate, Ebay (EPN) and/or Esty (Awin) Affiliate, I (we) earn from qualifying purchases.”


Sunday, March 27, 2022

Homemade Italian Chicken Bow Tie Soup for a Large Family

This soup recipe is basically an assembling of flavors that I know my family likes.

I frequently purchase ready-made roast chicken from Costco and other grocery stores. Our family is large, so I usually buy three chickens.

When we're done with the chickens, I use the carcasses to make chicken soup broth. You can use any chicken broth. However, I've prepared enough food for two days by purchasing or making three roast chickens and then making soup.

A Bowl of Italian Chicken Bow Tie Soup

Italian Chicken Bow Tie Soup Ingredients for a Large Family

  • Chicken Broth (from leftover cooked chickens, or you can use 7 boxes of store-bought chicken broth)
  • Chicken pieces cut up from the above-cooked chickens, or use 3 separate chicken breasts, and oven bake them (don't let them brown), then cut up into small biteable pieces
  • Hot Water
  • 6 Bouillon Chicken Cubes
  • An Entire Medium Sized Bag of Carrots
  • Full stock of Celery
  • 1 Large Onion
  • 7 Garlic Cloves
  • 1 Green Pepper
  • 4 Tablespoons of Butter
  • 500 grams of Pasta Bow Ties (about a box and a half, with a box holding 340grams)
  • 5 Bay Leaves
  • 3 Teaspoons of Oregano (or whatever amount you prefer)
  • 3 Teaspoons of Basil (or whatever amount you prefer)
  • 5 Teaspoons of Parsley (or whatever amount you prefer)
Step One - Get the Broth Ready

In a large pot, prepare the following: (I use about a 14-quart soup pot - seen below). I fill the pot to about 3/4 with homemade soup for our big family.

This big soup pot feeds our large family - I fill it 3/4 full with homemade soup
  • Boil the leftover whole chickens, then screen the meat out through a strainer. Put the meat aside so you can pull off all usable bites to go back in the soup. I let the chicken meat cool, then put it in the soup near the end.
  • If using the chicken carcasses to make the broth, I boil it for several hours.
  • If you're using store-bought chicken broth, put 7 boxes of broth in the pot - you could even use more!
  • Add 6 bouillon chicken cubes
Step Two - The Carrots

I add the carrots next because they take longer to cook. I use a whole bag of medium carrots. Scrape them, cut them into biteable pieces, and then add them to the soup broth.

Step Three - Lightly Fry These Ingredients

In a frying pan, melt 4 tablespoons of butter, then lightly fry:
  • An entire stock of celery, chopped into biteable pieces
  • A large green pepper, cut into biteable pieces
  • A whole large onion, chopped into fine, ground pieces (I use a mini-chopper)
  • 7 whole garlic cloves chopped fine (I put them into the mini-chopper as well)
I usually fry them on medium heat for about ten minutes, constantly stirring. Put the entire mixture into the soup broth. 

Step Four - The Pasta Bow Ties
  • Boil the pasta bow ties separately until nearly fully cooked
  • Drain and rinse the pasta in cold water
  • Put the pasta in the soup broth
I always cook the pasta separately, then rinse them to reduce the amount of starch in the soup.

Step Five - Add the Chicken
  • Use the chicken from the carcass that you set aside or the chicken you made in the oven. If you're using oven-baked chicken, don't let it brown - you want the color of the soup to be light.
  • Be sure to cut the chicken into small biteable pieces
  • If you're using chicken from the carcass, double-check that there are no bones! I catch bones while pulling the meat away from the carcasses and when I cut it into small pieces. The bones reveal themselves when cutting. Take your time, and be extra careful.
Step Six - The Flavoring

I never measure this part; I simply add the amount I think makes the soup taste right for my family. The measurements below are merely for your own guidance.
  • Add 3 teaspoons of Oregano (or whatever amount you want)
  • Add 3 teaspoons of Basil (or whatever amount you want)
  • Add 4 teaspoons of  Parsley (or whatever amount you want)
  • Add 5 Bay Leaves for flavor (don't eat them)
  • Salt to taste (optional - I don't salt, I allow each person to salt their own bowls)
Step Seven - Add The Boiling Water

At this point, I boil water using my tea kettle and pour the boiling hot water into the soup pot until it reaches about three-quarters full from the top of the pot.

Leave it on the stove on low heat, and let everyone eat soup all day long!

Homemade Italian Chicken Bow Tie Soup for a Large Family


Note: The author may receive a commission from purchases made using links found in this article. “As an Amazon Associate, Ebay (EPN) and/or Esty (Awin) Affiliate, I (we) earn from qualifying purchases.”


Friday, March 25, 2022

Ghirardelli Dark Chocolate Brownie Mix with Chocolate Chips in the Mix Reviewed

Brown Mix
I recently tried Ghirardelli Dark Chocolate Brownie Mix made with a special ingredient and loved it!  

My sister, sister-in-law and I went shopping together before Christmas.  When I spotted the Ghirardelli Dark Chocolate Brownie Mix, I commented that I would like to try it because it included the chocolate chips.  While I rarely use baking mixes, I thought using the mix might make the Christmas baking a little easier.

The sales associate of the kitchen shoppe offered to make a batch of her brownies so we could taste them.  She had a special ingredient she added that she thought we would want to try.  I am so glad we accepted her offer.  They were the best brownies I have ever eaten.  

Needless to say, we left the shoppe with several gift bags that included the brownie mix and the shoppe's special ingredient, blood orange olive oil.


Ghirardelli Dark Chocolate Brownie Mix

 Ghirardelli Brownie Mix, Dark Chocolate, 20 ozCheck Price The #1 reason I wanted to try the Ghirardelli mix is because it included chocolate chips and required only 1 egg, water and olive oil to make.  Those are ingredients that are always in my kitchen.

Using the newly discovered blood orange olive oil gives these delicious brownies an extra punch with a slight taste of orange. Everyone in my family loves them!  I definitely look forward to using the blood orange olive oil in additional recipes.

We don't all agree on whether brownies should be iced or not, so I make a small recipe of icing.  Those who want the icing don't agree on whether it should have nuts or not, so I divide the icing in half and mix walnuts or pecans in half of the icing.  Therefore, one batch of brownies makes 3 different treats.  Add a scoop of ice cream and you have the perfect dessert.


Easy Brownie Frosting Recipe

Brownies
*Baking Products are Linked in recipe so you can see recommended product packaging. 
However, prices are based on shipped products. 
Most likely, the items will be much less expensive in your local grocery store.
  1. In a medium mixing bowl, stir powdered sugar and cocoa together.  
  2. Heat butter & milk together in a small saucepan to melt the butter.  
  3. Gradually beat (with a hand mixer) the butter & milk into the cocoa/sugar mixture until smooth.  
  4. Stir in pecans or walnuts, if desired.


Brownies
Pampered Chef Brownie Pan for Perfectly Shaped Brownies


A Note about the Specialty Shoppe We Visited

As far as I know, the Bazaar Orange Olive Oil that we purchased is only sold at the Bazaar store in Collierville, Tn, located in the historic Collierville Town Square.  Sadly, I couldn't find an online resource. 

If you love to cook and are ever in Collierville, Tn, you should definitely plan to spend a few hours in this store.  It isn't a big store, but it is packed with fabulous unique kitchen items, including their specialty oils and vinegars.  I love this kitchen specialty store and their extremely helpful sales associates! 


 Ghirardelli Premium Chocolate Brownie Mix VarietyCheck Price GHIRARDELLI Dark Chocolate Premium Brownie Mix, 20 OzCheck Price GHIRARDELLI Dark Chocolate Brownie MixCheck Price Ghirardelli Chocolate Lovers Dark Chocolate Brownie Mix - Pack of 3Check Price


Check Out More Recipe Reviews at
ReviewThisRecipes.com


Ghirardelli Dark Chocolate Brownie Mix with Chocolate Chips in the Mix Reviewed Written by:
House of Sylvestermouse


© 2021 Cynthia Sylvestermouse


Note: The author may receive a commission from purchases made using links found in this article. “As an Amazon Associate, Ebay (EPN) and/or Esty (Awin) Affiliate, I (we) earn from qualifying purchases.”


Saturday, March 19, 2022

Chautauqua Lake New York Fishing


rainbow over Chautauqua Lake in New York
Chautauqua Lake - Reviewed
If you are an avid fisherman and looking for a new lake to cast your line. Chautauqua Lake just might be the place for you. Come and fish in Chautauqua Lake and you might even see a rainbow or two.

Chautauqua Lake is located in western New York, just east of Erie Pennsylvania, and south of Buffalo New York. The lake is the largest inland lake in western New York. Stretching 17 miles long and 2 miles wide at its widest point, with 42.5 miles of shoreline.

We have lived here since 1989 and consider this our home. We live just two blocks away from the lake and can never get enough of it.

Many fishermen come here to fish for Muskie a North American fresh-water fish, it is the largest fish in the pike family. In the lake, they range from 40 to 50 inches. I've done my share of fishing in Chautauqua Lake, but have never landed a muskie.


Popular Species of Fish in Chautauqua Lake:

  • Muskie
  • Walleye
  • Largemouth Bass
  • Smallmouth Bass
  • Crappie
  • Perch
  • Bluegill 
The north basin of the lake is 75 ft. at its deepest with an average depth of 25 Ft. The south basin is much shallower at 19 Ft. at its deepest with an average depth of 11 Ft. The south basin with its shallow waters and weedy areas make this the perfect environment for bass fishing.

If ice fishing is for you, here in the winter months you will find many colorful fishing huts over the frozen surface of the lake. As for me, you will find me in the house with a warm blanket during the winter. 

There are many fishing tournaments throughout the year at Chautauqua Lake. Click here for a list of the tournaments and much more do here in Chautauqua Lake Region. Then, make your plans,  pack your gear and bring your boat. Maybe I'll see you on the lake.


 Following are some of my recipes for the fresh fish of Chautauqua Lake:


Find more Travel on Review This: ReviewThisTravel.com

Find more Recipes on Review This: ReviewThisRecipes.com

Greater Than a Tourist- Chautauqua Lake Region New York USA: 50 Travel Tips from a Local (Greater Than a Tourist New York Series)Greater Than a Tourist- Chautauqua Lake Region New York USA: 50 Travel Tips from a Local (Greater Than a Tourist New York Series)Greater Than a Tourist- Chautauqua Lake Region New York USA: 50 Travel Tips from a Local (Greater Than a Tourist New York Series)


Note: The author may receive a commission from purchases made using links found in this article. “As an Amazon Associate, Ebay (EPN) and/or Esty (Awin) Affiliate, I (we) earn from qualifying purchases.”


Saturday, March 5, 2022

Air Fryer Sugar Cinnamon Biscuit Bites


Air Fryer Sugar Cinnamon Biscuit Bites
Air Fryer Sugar Cinnamon Biscuit Bites - Reviewed

These air fry sugar-cinnamon biscuits are so easy to make, and what a wonderful little sweet treat and snack. Your family will think that you spent all day making these.

These little beauties are perfect for breakfast or an after-school snack for the kids. I made these last week and they did not last very long at all in our house.

Sweet Biscuit Bites Ingredients:

1 package Pillsbury Grand Biscuits (8 counts)

1 stick (1/2 cup) melted butter

3/4 cup white sugar

2 tablespoons cinnamon

Instructions:

  1. Cut each biscuit into fours
  2. In a bowl add the sugar and cinnamon and mix together
  3. Melt the butter, I used a measuring cup for the melted butter
  4. Spray your air fry pan with non-stick cooking spray
  5. Place them in the air fryer, and space them so they don't touch each other.
  6. Set to air fry at 360 degrees
  7. Set the timer for 3 or 4 minutes. Times could vary with different air fryers. I used our Ninja Foodi Grill and Air Fryer
  8. Remove them with tounges to a plate and let them rest for a couple of minutes.
  9. Dip each one in butter then roll them in the sugar and cinnamon.
Cutting the Biscuits

Cutting the biscuits into fours. You can roll these into little balls if you like to be like donut holes. The yield is 32 little sugar-cinnamon biscuit bites.

Air Fry donut bites

The first batch is done, in the air fryer for 3 minutes at 360 degrees or until they are golden brown. On the 2nd batch, they were done after 2 minutes because the air fryer was already heated. That is something you will have to keep an eye on.

sugar cinnamon biscuit bites

After about 2 minutes I dipped each one in the butter and then rolled in the sugar-cinnamon mixture.

I must say that these are so easy to make, and what a perfect little treat to have on hand for the kids or friends.

Times may vary with different air fryers. I used our Ninja Foodi Grill and Air Fryer. Click here to read my review of the Ninja Foodi.

My friend, Mary Beth also reviewed her new Power XL Air Fryer. Click here to see her review.

Find more recipes on Review This Here: ReviewThisRecipes.com


Note: The author may receive a commission from purchases made using links found in this article. “As an Amazon Associate, Ebay (EPN) and/or Esty (Awin) Affiliate, I (we) earn from qualifying purchases.”


Saturday, February 5, 2022

How to Make a Breakfast Parfait

I am going to review how to make a breakfast parfait.   If you haven't tried a breakfast parfait before then you are in for a treat as it is a delicious way to start your day.


How to make a breakfast parfait
Image photo by Louanne Cox, adapted for this article with Canva

I know that technically it's not a parfait, but I saw someone on Instagram layering yogurt, fruit and a little granola in a tall glass and calling it a breakfast parfait.  I immediately thought of a different option that I could make.

First a little bit about me.   I absolutely love overnight oats and eat these for my breakfast regularly, they taste good, but to be honest they don't look that fantastic.   I also love having berries with my breakfast and when I choose to have proats I will often top them with berries.   I also like to keep my breakfasts both gluten and dairy-free for the majority of the time.

Now let's look at the breakfast parfait.

My Breakfast Parfait Breakdown

I basically have 3 different layers:
  1. Coconut yogurt
  2. Overnight oats
  3. Frozen berries
Let's talk through the overnight oats layer.   I use the following ingredients:

2/3 cups oats (now I use regular oats as I'm not a celiac so the fact that some gluten may be present - oats are naturally gluten-free - isn't something I need to worry about, but obviously you can use any oats)
2 scoops of vanilla protein powder (I use Arbonne's one which is a vegan protein)
1 cup dairy-free milk of choice (I alternate between using coconut milk or unsweetened almond milk)
The rest of the ingredients I don't really measure (confession time I tend to be a throw things together kind of cook as opposed to measuring everything carefully!).
Black chia seeds, flaxseeds, sunflower seeds and pumpkin seeds.

I mix this all together and I'm ready to start making the parfait.   You will note (if you've made overnight oats before) that I don't add as much fluid as usual, this is because I'm adding yogurt and frozen berries so the oats can soak up some of the water from the defrosting process and some of the yogurt.

I use what is called a breakfast smoothie cup to make my breakfast parfait in - I had tried a hurricane glass I have at home, but it wasn't big enough!   I brought mine in K-Mart here in Australia, but you can find similar items on Amazon if you're not in Australia or New Zealand.   Mine has a lid with a hole in it and reusable straw as well as a full lid which is the one that I obviously use and is similar to this one that I found on Amazon - Smoothie Breakfast Cup.

Putting the Breakfast Parfait Together

I place a little yogurt in the bottom of the glass/cup, on top of this I add 1/3 of the overnight oats mixture, then some frozen fruit*, yogurt, 1/3 of the overnight oats mix, frozen fruit, yogurt, remaining overnight oats, a small amount of fruit and a tsp or two of the yogurt (I like to be able to see a little of the oat mixture showing through around the edges when I look at the breakfast parfait, but the aesthetic is up to you.

As far as the frozen fruit I actually use different ones on each layer.  First up I use a mixed blend called the Dark Fruits Mix (it contains blackberries, dark cherries, black currants), next I use a mixed blend called Ruby Fruits Mix (this contains strawberries, dark cherries, red currants), on the top I use frozen blueberries.

To be honest, I would probably mix the fruits up even more, but they've been in short supply in our local supermarket at the moment so I've been using the fruits I've got plenty of.   I do love the variety as I eat so I'll continue to mix it up but I can't wait to be able to get frozen raspberries & blackberries again as I fancy trying a layer of each of the following - raspberries, strawberries & blackberries.

Breakfast Parfait
Photo by Lou16

You can see the different layers showing through in this photo, doesn't it look good?   Let me know if you are going to try this or not.

I share recipes on my Healthy Tips to Feel & Look Your Best Facebook group, you're welcome to join us.


Note: The author may receive a commission from purchases made using links found in this article. “As an Amazon Associate, Ebay (EPN) and/or Esty (Awin) Affiliate, I (we) earn from qualifying purchases.”


Friday, January 21, 2022

Chicken, Broccoli & Rice Dinner Fast & Easy Recipe Reviewed

Knorr Chicken and Broccoli Rice dinner and cans of chicken
I am always searching for fast and easy recipes for dinner.  I enjoy cooking, but I don't always have time to prepare a meal that takes hours to cook.

I recently accidentally purchased the Knorr chicken flavored broccoli and rice packet instead of the chicken flavored broccoli and pasta packet.  Because I hate to waste food, I decided to play around with the rice packet to see if I could create a quick meal.

As with any premixed packet of food, the ingredients are not fresh and it is only chicken flavored.  There is a small amount of broccoli in the packet, but the vegetable itself tastes good.  As it is, it would make a delicious lunch or side.  However, after adding chicken, it becomes suitable to serve as an entree. 

I made it for lunch the first time, but have served it several times since as our evening meal.  It only takes about 15 minutes to throw together and cook.  It is the perfect warm meal at the end of a hard day. 

Plus, it is actually very tasty!


Easy Chicken, Broccoli & Rice Recipe

Swanson canned chicken is a fast way to add cooked chicken to any recipe.  It is packed in water and has no artificial flavors or msg, but I still prefer to drain and rinse the chicken before adding it.  


Prep Time Cook Time Ready In Yields
5 min. 7 min. 15 min. 3-4 servings

Ingredients 

    bowl of chicken,, rice ad broccoli
  • 2 packages Knorr Rice Sides - Chicken Flavor Broccoli
  • 2 cans White Premium Chunk Chicken Breasts, drained & rinsed 
  • 2 Tablespoons Butter
  • 2¼ Cups Water

Directions

  1. Combine Chicken, Water, Butter, and Rice packages in a large saucepan
  2. Bring to a Boil
  3. Stir, reduce heat, cover pan, and simmer for 7 minutes
  4. Let Stand for 2 minutes, then serve!
    It really is that simple to make this delicious dinner.

Check Out More Recipe Reviews at
ReviewThisRecipes.com


Chicken, Broccoli & Rice Dinner Fast & Easy Recipe Written by:
House of Sylvestermouse


© 2021 Cynthia Sylvestermouse


Note: The author may receive a commission from purchases made using links found in this article. “As an Amazon Associate, Ebay (EPN) and/or Esty (Awin) Affiliate, I (we) earn from qualifying purchases.”


Saturday, December 18, 2021

Oatmeal Muffin Day – A Food Holiday Review

Image of Oatmeal Muffins

National Oatmeal Muffin Day is celebrated on December 19th each year. It's one of those minor holidays with no known origin, but since it involves a delicious and healthy muffin, we are happy to celebrate this fun foodie day. 


A Bit of Background


A Muffin, or Quick-Bread, is similar to cupcakes both in size and in cooking method.


Muffins are popular breakfast foods, especially served with coffee.


Muffins come in many varieties and can be savory (like cheese muffins) or sweet like blueberry or banana nut muffins.


Oatmeal muffins have oatmeal as the primary ingredient – which has many health benefits which far outweigh any worry you might have over calories. 


Oatmeal muffin recipes began appearing in American cookbooks as long ago as the mid-1800s. They are made with flour, butter, eggs, OATMEAL, and baking soda as the raising ingredient.


Quick Recipe for Easy Oatmeal Muffins


Image of oatmeal muffins

Ingredients for a quick & easy oatmeal muffin recipe I like that I found on Allrecipes include 1 cup of quick cooking oats, milk, an egg, vegetable oil, flour and salt. Baking powder is added as the raising ingredient. 


You can find the exact list of ingredients and also the directions for mixing this muffin recipe at the Allrecipes site for Easy Oatmeal Muffins


Prep time is about 15 minutes and baking in a preheated oven (at 425 degrees) is 20-25 minutes. Not long at all for a dozen tasty breakfast muffins. A warm, delicious treat on a cold morning. 


Oatmeal muffins in a baking tin


Summary


Oatmeal muffins

So whip up a batch of Oatmeal Muffins, or pick up a few at your local bakery, to celebrate this day with a delicious & healthy breakfast treat.


National Oatmeal Muffin Day

December 19


For more Muffin Reviews, check out ReviewThisReviews: Muffins

For more Holiday Reviews, check out the ReviewThisReviews Holiday Category


*National Oatmeal Muffin Day review written by 

         ~Wednesday Elf


**Images are from Pixabay; Intro image was created with GetStencil. 


Note: The author may receive a commission from purchases made using links found in this article. “As an Amazon Associate, Ebay (EPN) and/or Esty (Awin) Affiliate, I (we) earn from qualifying purchases.”


Wednesday, December 15, 2021

Quick & Easy Livlo Blueberry Scones Keto Baking Mix Review

Ever since I lost nearly 60 pounds last year by following a healthy ketogenic diet, I have continued eating a very low carb diet to maintain that weight loss. As a lifelong lover of baked goods, I love to bake and did a lot of low carb baking while I was on my keto weight loss diet, which helped me stick to my plan. Although I continue to bake keto recipes from scratch when I have the time and inclination, I also appreciate the convenience of a low carb baking mix with clean ingredients when I am short on time or energy. 

I have already shared several keto recipes and low carb baking mix reviews here on Review This Reviews. Today, I am reviewing my newest high quality, low carb baking mix find, 
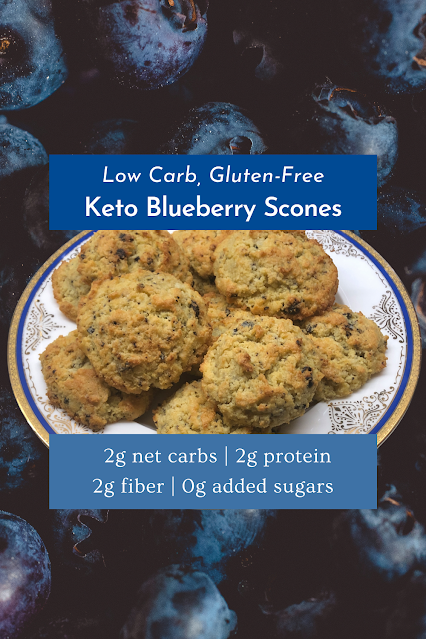
Livlo Blueberry Scones Keto Baking Mix.

Main image: Low carb, gluten free mix Keto Blueberry Scones
Livlo Blueberry Scones Keto Baking Mix contains real blueberries! Just add butter and eggs.

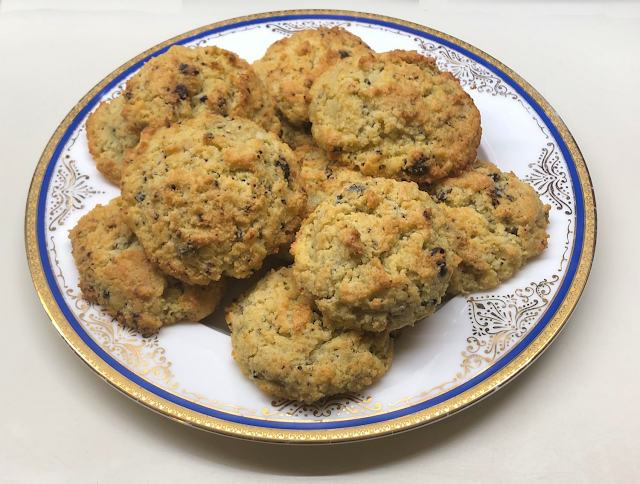
I love being able to throw together a batch of delicious keto blueberry scones in just a few minutes with this low carb baking mix, with minimal time, effort and kitchen cleanup. They're a lovely breakfast treat as well as the perfect "little something" to enjoy during an afternoon tea or coffee break. My husband and I enjoy eating them as is, but they're even better split, toasted and buttered.

Since this Livlo keto baking mix is gluten free and grain free and has no added sugars, it's a great choice for anyone who follows a paleo, diabetic, LCHF (low carb, high fat) or keto diet (as long as they don't have a tree nut allergy, since it contains almond flour). But you don't have to be watching your carbs, sugar, gluten or grain to enjoy these yummy treats.

Note: The official company spelling of this brand is Livlō, ending with a lowercase "o" with a macron (a straight bar over the letter "o" indicating that it should be pronounced as a long vowel).

Livlo Blueberry Scones Keto Baking Mix vs. My Favorite Keto Blueberry Scones Recipes

When I want to make low carb keto blueberry scones from scratch, I use one of two good low carb baking recipes. One is this Keto Blueberry Scones recipe from Carolyn Ketchum at All Day I Dream About Food, whose Ultimate Guide to Keto Baking cookbook is my keto baking bible. The other is this glazed Almond Flour Keto Blueberry Scones recipe from Maya Krampf at Wholesome Yum, whose Wholesome Yum Easy Keto Cookbook is another of my favorites and whose second cookbook, The Wholesome Yum Easy Keto Carboholics' Cookbook: 100 Low Carb Comfort Food Recipes. 10 Ingredients Or Less, is available for preorder. (I preordered mine the day it became available!)

However, when I just want to spend a few minutes making fresh-baked keto blueberry scones without having to measure out all the dry ingredients, wash a bunch of measuring cups and spoons or running out to the store for fresh blueberries, this quick and easy Livlo Blueberry Scones Keto Baking Mix is a great option.

All the ingredients are keto diet friendly and are ones I often use when I make keto baking recipes from scratch: Almond flour, erythritol and monk fruit extract sweeteners, blueberries, corn-free baking powder and fine sea salt. You won't find any unpronounceable preservatives in this keto baking mix!

The Livlo low carb baking mix contains real blueberries, which you can definitely taste in the baked scones, which are buttery, tender and delicious! The blueberry scones I make using this Livlo keto baking mix and ones I make from scratch using the two recipes I mentioned are quite similar, although the texture of each is slightly different. Honestly, the main difference is that the mix uses dried blueberries instead of fresh ones. 

Bake Fresh, Hot Scones in Minutes With This Quick & Easy Livlo Keto Blueberry Scones Mix

Making low carb blueberry scones with this Livlo low carb baking mix is so easy, it would be a fun activity to do with a young helper. 

Ingredients

1 bag Livlo Blueberry Scones Keto Baking Mix

1/4 cup (2 oz. or 1/2 stick) butter, very cold

2 eggs, beaten

Tools, Supplies and Equipment

Baking sheet

Parchment paper (I highly recommend these pre-cut unbleached baking parchment sheets, which are packaged flat and stay that way)

Mixing bowl (I use the 3-quart bowl from my favorite OXO 3-piece stainless steel mixing bowl set with non-skid bottoms)

Chef's knife (I love my 8-inch Victorinox Fibrox Pro Chef's Knife, which was highly recommended by Cook's Illustrated and cuts as well as knives that cost twice as much!)

Pastry cutter (although the package directions say you can use a fork instead, I don't recommend it; if you don't want to use a pastry cutter, I recommend using two knives instead to "cut in" the butter)

Mixing spoon, fork or seamless silicone spoon spatula

Cookie scoop or tablespoon (I use my comfortable, versatile Norpro 50mm/3 Tbsp stainless steel scoop)

Directions

Preheat the oven to 350 °F and line the baking sheet with parchment paper.

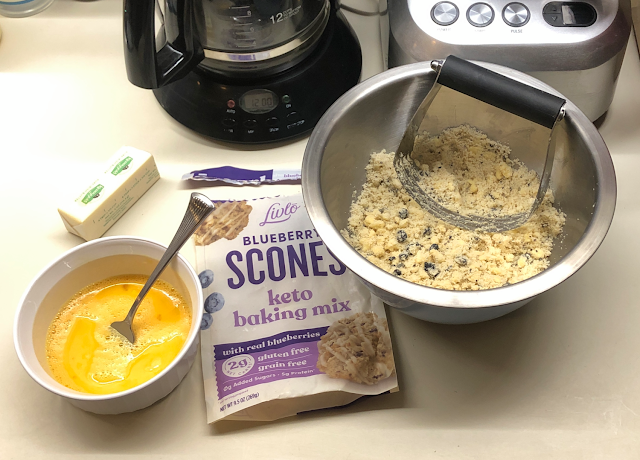
Open the bag of Livlo Blueberry Scones Keto Baking Mix and pour the contents into a mixing bowl. 

Cut the very cold butter into 1/4" or smaller cubes and stir them into the dry mix in the bowl. Then, use a pastry blender to "cut in" the butter until it is in smaller bits and evenly incorporated. 

photo of Livlo blueberry scones mix in bowl with butter bits cut in and the beaten eggs nearby

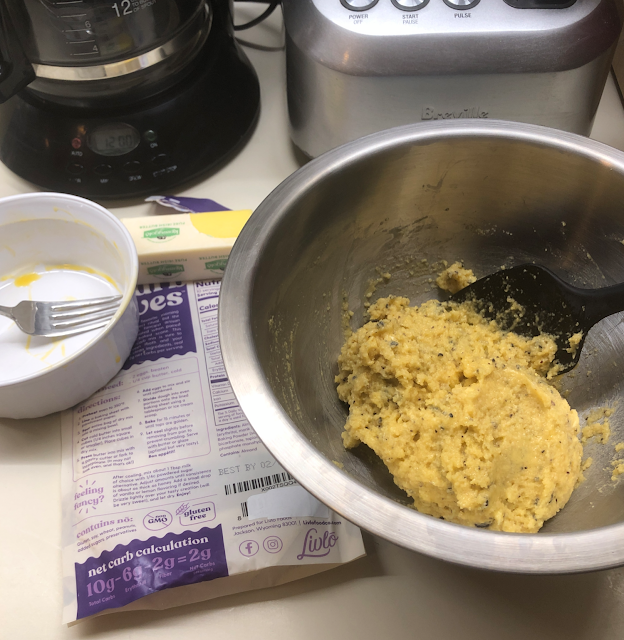
Stir in the beaten eggs and mix well to form a soft but thick dough.

Prepared Livlo Blueberry Scones Keto Baking Mix dough in mixing bowl

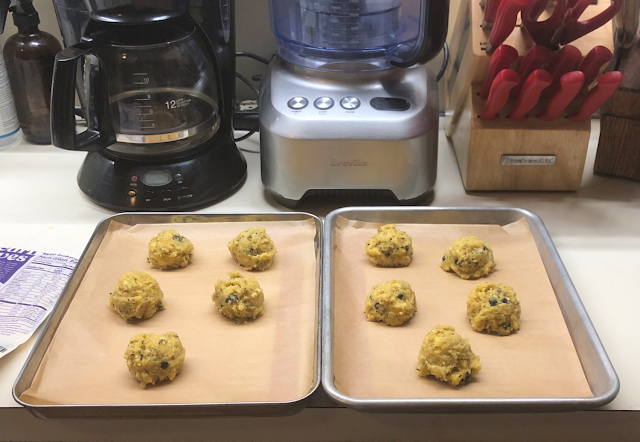
Use the cookie scoop to portion the dough evenly into 10 well-spaced mounds on the parchment lined baking sheet. Since I have only a tabletop oven currently, I baked mine in two batches on two smaller baking sheets.

Mounds of prepared Livlo keto blueberry scones mix dough on parchment lined baking pans

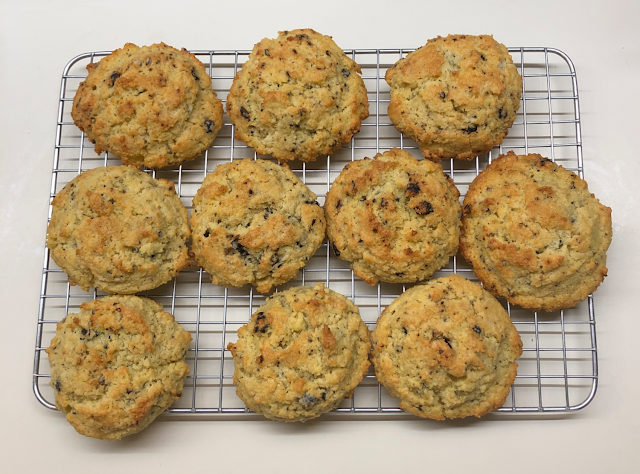
Bake the keto blueberry scones in the preheated oven for about 15 minutes, or until the tops are golden. Let them cool on the baking sheet for 5–10 minutes, then remove them to a cooling rack to finish cooling. (If you don't let them cool before trying to move them or pick them up, they will fall apart.)

Baked keto blueberry scones on a cooling rack

Drizzling them with a glaze is optional. There is a simple recipe on the package (powdered sugar alternative/sweetener mixed with low carb, unsweetened non-dairy milk, plus a drop of vanilla or lemon extract, if desired). However, these keto blueberry scones are also lovely without any glaze, which is how we usually have them.

Freshly baked keto blueberry scones on a serving plate

Optional Add-Ins

Sometimes I'll add a little almond extract along with the eggs when I prepare the dough. I love the flavor combination of almond and blueberry!

Occasionally, I'll amp up the berry flavor even more by adding some fresh or dried blueberries into the dough, which makes these scones even yummier and more nutritious  with very little increase in net carbs per scone. 

If you want to try this variation, I highly recommend adding only fresh or dried blueberries, not frozen ones. The chemistry of keto baking is different from that of conventional baking and the extra moisture from the thawed frozen berries can negatively affect the texture of your scones. 

Fresh, tiny wild blueberries from Maine or Canada, if you can find them where you live, have the best flavor and their small size allows you to distribute them more evenly through the dough. Alternatively, you can uses organic dried wild blueberries with no added sugars or oils. They can be a bit pricey, but fortunately even a small amount packs a big flavor punch.

Quick & Easy Livlo Blueberry Scones Keto Baking Mix Review by Margaret Schindel

Posts About My Keto Diet Journey

My First Year on The Keto Diet

Preparing to Succeed on the Keto Diet, Part One

Preparing to Succeed on the Keto Diet, Part Two

Low Carb Muffins & Cupcakes: Treats to Enjoy on a Keto Diet

Low Carb Keto Chocolate Yogurt Granola Chip Pudding Recipe

Good Dee’s Keto Cookie Low Carb Baking Mix Review

Hamama Microgreens Growing Kit Review & Success Tips

My Favorite Hamama Microgreens Seed Quilt Accessories

Keto Cheddar Cheese Biscuits With Chives Recipe

The Ultimate Keto Hot Chocolate Recipe

The Best Low Carb Keto Gift Ideas: Keto Gift Guide

The Best Low Carb Keto Cinnamon Muffins

Wholesome Yum Keto Bread Mix and Yeast Bread Recipe

The Good Chocolate 100% Organic No Sugar Dark Chocolate Review

The Best Advice to Maintain Your Keto Diet Weight Loss

My New Irresistibly Delicious Keto Cheese Crackers Recipe

Luscious Low Carb Keto Triple Peppermint Cheesecake Brownies Recipe

Quick & Easy Livlo Blueberry Scones Keto Baking Mix Review

Snack Better With The Best Healthy Keto Cookie Dough Bites

The Best Quick and Easy Low Carb Keto Pizza Recipe

The Best Quick and Easy Low Carb Keto Shortcake Cupcakes Recipe

Comparing the Best Keto-Friendly Chocolate Hazelnut Spreads - No Added Sugars

The Best Low Carb Keto Sandwich and Burger Buns Mix

Blueberry Biscuit Scones — New, Easy, Low Carb Keto Recipe

The Best Keto Pizza Crust Mix With 0 Net Carbs

An Unusual, Delicious Strawberry Chocolate Tea With 0 Calories

Delicious Sugar-Free Keto Cookies That OREO Fans Will Love

Healthy Pistachio Cherry Chocolate Chip Marshmallow Cereal Treats Recipe

Easy, Decadent, High Protein, Sugar-Free Rocky Road Cottage Cheese Ice Cream

The Best Quick & Easy Low Carb Sausage and Ricotta Calzones

How to Make Refreshing Vanilla Italian Soda (With or Without Cream)


Reviews of the Keto Diet by Barbara C. (aka Brite-Ideas)

My Personal Keto Testimonial

How I Stayed Committed to the Ketogenic Way of Eating

Read More Recipe Reviews by Our Review This Reviews Contributors

Read More Product Reviews by Our Review This Reviews Contributors

Read More Reviews About Health and Wellness by Our Review This Reviews Contributors


Note: The author may receive a commission from purchases made using links found in this article. “As an Amazon Associate, Ebay (EPN) and/or Esty (Awin) Affiliate, I (we) earn from qualifying purchases.”


Most Recent Reviews on Review This Reviews


Search for Reviews by Subject, Author or Title

The Review This Reviews Contributors


SylvestermouseSylvestermouseDawn Rae BDawn Rae BMbgPhotoMbgPhotoBrite-IdeasBrite-IdeasWednesday ElfWednesday ElfOlivia MorrisOlivia MorrisTreasures by BrendaTreasures by BrendaThe Savvy AgeThe Savvy AgeMargaret SchindelMargaret SchindelRaintree AnnieRaintree AnnieLou16Lou16Sam MonacoSam MonacoTracey BoyerTracey BoyerRenaissance WomanRenaissance WomanBarbRadBarbRadBev OwensBev OwensBuckHawkBuckHawkDecorating for EventsDecorating for EventsHeather426Heather426Coletta TeskeColetta TeskeMissMerFaeryMissMerFaeryMickie_GMickie_G


Review This Reviews is Dedicated to the Memory of Our Beloved Friend and Fellow Contributor

Susan DeppnerSusan Deppner

We may be apart, but
You Are Not Forgotten


“As an Amazon Associate, Ebay (EPN) and or Etsy (Awin) Affiliate, I (we) earn from purchases.” Disclosure Statement

X