Showing posts with label Product Reviews. Show all posts

Friday, June 25, 2021

Mini Increment Measuring Spoons for Tad, Dash, Pinch, Smidgen & Drop

Small Increments Measuring Spoons
When I first started cooking and saw the words pinch or a dash in a recipe, or had verbal instructions to add a pinch of salt to something, I was confused by those words.  Exactly, what is a "pinch" of salt or a "dash" of cinnamon?  

Because I tend to take things literally, I would pinch the salt and drop it into the bowl or grab a shaker and dash the ingredient into the mix.  But, it still bothered me that I didn't know exactly how much to add.

This past Christmas, my sister-in-law gave me a set of mini increment measuring spoons.  I love them!  Now I know how much a pinch of salt is (1/16 tsp) and I have a measuring spoon in that tiny increment. How awesome is that!!!

I prefer to take the mystery out of a recipe so I can duplicate a cooking creation that is perfected.

Also, I love having measuring spoons that are in such tiny increments.  After all, it is pretty hard to measure out 1/16 of a teaspoon!  


Tiny Increment Measuring Spoons

 BERYLER® Measuring Spoons SetCheck PriceThese measuring spoons take the guesswork out of those not so well defined measurements in recipes.  

  • Drop - 1/64 teaspoon
  • Smidgen - 1/32 teaspoon
  • Pinch - 1/16 teaspoon
  • Dash - 1/8 teaspoon
  • Tad - 1/4 teaspoon

I never would have guessed that a drop is only 1/64 teaspoon!  Plus, I never would have been able to accurately measure it.  I would have previously thought a smidgen and a pinch were the same thing.  Clearly, I would have been wrong.

These measuring spoons have the words and the measurement engraved in the stainless steel, which means they won't have the measurement plate knocked off. 

My mini increment measuring spoons are dishwasher safe and come with a ring to keep them together in my kitchen drawer.  I also like the brushed stainless steel appearance. It just looks clean and rugged by design. No need to worry that they could be melted when cooking or cleaning. Plus, I don't have to worry about them picking up smells with years of use.

For those of you who enjoy cooking, I highly recommend these must-have kitchen utensils. Why guess when you can know for sure!

Oh, and they make a great gift!

 Measuring Spoons Set, Heavy Duty Stainless Steel Measuring Spoons, Mini Measuring Spoon for Cooking Baking, Tablespoon Teaspoon for Dry or Liquid Ingredients, Fits in Spice Jar,set of 5Check Price


Read More Product Reviews On
ReviewThisProducts.com


House of Sylvestermouse


Note: The author may receive a commission from purchases made using links found in this article. “As an Amazon Associate, Ebay (EPN) and/or Esty (Awin) Affiliate, I (we) earn from qualifying purchases.”


Friday, June 18, 2021

Webcam Covers that Slide Open or Closed Reviewed

Webcam Covers
I am a huge fan of webcam covers!  

For years, we have been hearing about hackers who can use your webcam to spy on you or your home & office.  Webcam covers allow us to take control of when our webcams can actually see anything.  There is no reason to leave an unwanted "eye" watching everything you do or spying on the activity, or lack thereof, in your home.  

I have webcam covers an all of my devices including my Kindle Fire & Ipad.  When I give electronic devices as gifts, I always include a webcam cover.  

Those little cameras in all of the devices are awesome when I want to take a picture with my device, or see friends & family when I talk to them. But, I don't always want them looking into my life.  

I frequently check my emails, work online, or play my video games without wearing makeup or making sure my hair is photo perfect.  I have no desire to have my "just out of the shower" image captured either.  

With a webcam cover, I decide when I am ready to be viewed.  I simply slide open the little cover to be seen, or otherwise leave it closed.  Just because webcams are built into electronic devices, doesn't mean we have to let them have constant viewing access. We are in control!


Using Webcam Covers

Webcam covers are extremely thin and do not impede your ability to open, close, or cover your laptop or electronic device. 

Upon receipt, you simply pull off the backing and adhere the open webcam cover over the lens of your webcam. You can see the webcam lens if the webcam cover is open, therefore proper placement is easier with the slider open. 

To use the slider, open the webcam "window" into your life when you desire and keep it closed when preferred. 


 Webcam Cover, 6 Pack Ultra Thin Camera Cover Slide Apply to Laptop, Tablet, Smartphone, Protect Your PrivacyCheck Price


Webcam covers may well be one of the best security investments you will ever make!  Plus, they are a very inexpensive accessory that offers tremendous peace of mind.


Read More Product Reviews On
ReviewThisProducts.com


House of Sylvestermouse


Note: The author may receive a commission from purchases made using links found in this article. “As an Amazon Associate, Ebay (EPN) and/or Esty (Awin) Affiliate, I (we) earn from qualifying purchases.”


Wednesday, June 16, 2021

This Easy $3 Hack Prolongs Your Charging Cables' Life

Apple Lightning cables, Thunderbolt cables, and several types of USB cables remain in widespread use, despite the prevalence of Bluetooth wireless technology. You probably own multiple chargers and other types of cables to power, recharge and connect your mobile phones, digital cameras, tablets, e-readers, laptop or desktop computers, wired printers and other electronic equipment and peripherals, whether or not they are Bluetooth-enabled.

If you are frustrated by how often even expensive, top-rated phone chargers and other charging cords and cables need to be repaired or replaced, you’ll appreciate this quick, easy and inexpensive DIY hack that will strengthen and significantly prolong the life of your charging cables and data transfer cables. I’ll show you how to reinforce and extend the manufacturer’s built-in strain relief for the connectors on the ends of these cords with a small, single-use pack of Sugru moldable rubber glue and a few minutes of your time.

There's no way to predict exactly how much longer yours will last with this hack, since there are quite a few possible variables at play. However, I can say that, as someone who tends to be pretty hard on iPhone charging cables, USB cables and other cords for my various electronics and digital devices, using Sugru to strengthen my new cables before I start using them has roughly doubled the useful life of several of mine.
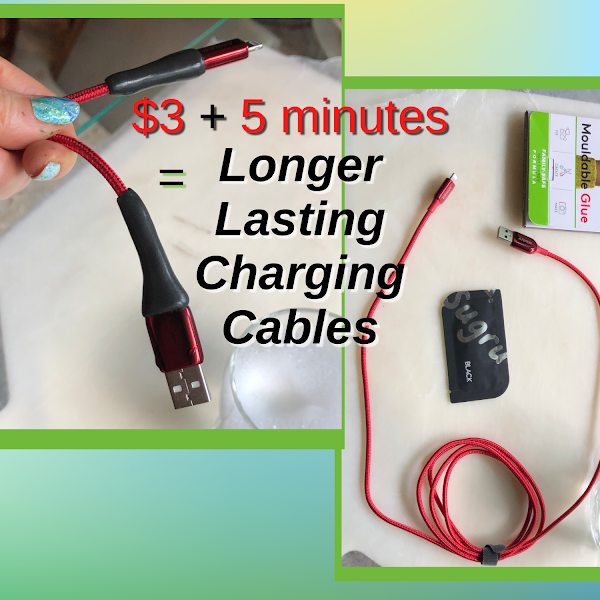
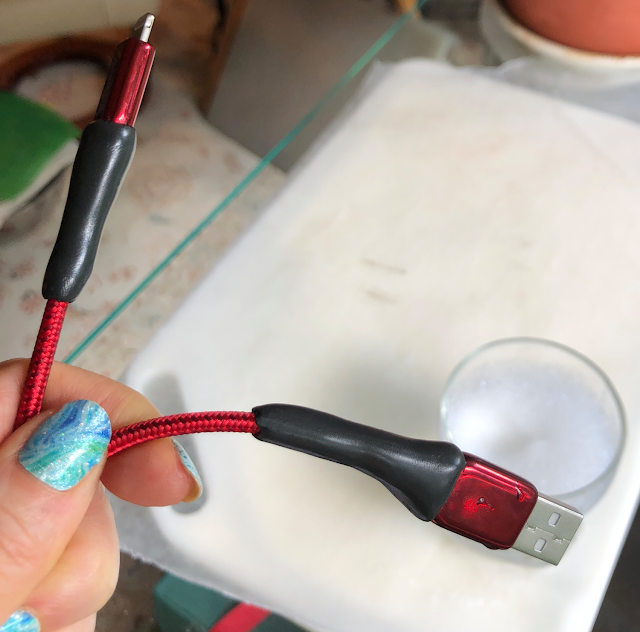
Apple Lightning to USB iPhone charging cables before and after reinforcing the strain relief with Sugru moldable rubber glue
It took only a few minutes and less than $3 worth of Sugru moldable rubber "glue" to reinforce and extend the strain release on this new Anker Powerline+ III Apple Lightning to USB-A charging cable.

How Many Types of Charging Cables Do You Use?

USB cables are ubiquitous home, office and mobile device staples. In addition to charging most of our electronic devices, these cords are also used to transfer files and photos from a digital camera or mobile phone to a desktop, laptop or tablet, send documents, images and other data to a regular, multifunction or 3D printer, electronic cutting machine or other device with a USB port, and to sync files, photos and other data among digital devices, either instead or as an alternative to using Bluetooth or other wireless technology options.

Most households own multiple mobile phones, tablets, computers, printers and other digital devices that require different types of USB charging cables and cords for data transfer. For example, I use both USB-A to Apple Lightning cables and USB-C to Apple Lightening cables to charge my iPhone or transfer data from my iPhone to my Windows laptop and a USB-A to USB-C cable to charge my Fire HD 10 tablet, while my husband’s old Samsung Galaxy S5 Android phone uses a Micro USB Type B to USB-A charging cable. 

An Ounce of Prevention Is Worth a Pound of Cure

High-quality charging cables usually have more substantial, durable and usually molded integral strain relief than cheap ones. However, even on better quality USB charging cords from top brands such as Anker, if care isn’t taken to avoid undue tension or torsion at the connector ends, the strain relief may not be sufficient to prevent a wire in a shielded cable from breaking or stop the insulation, shield and jacket layers that surround those wires from splitting, fraying or separating from the connectors.

Using Sugru moldable glue to repair charging cords when the outer layers fray or split has long been a popular hack. While encasing the cable ends and connectors with this durable, air-cured rubber putty can sometimes extend the lifespan of a cable with relatively minor surface damage, such as a frayed cord or a small tear in the insulation, it can’t fix one that has stopped working because of a loose or broken wire. So, instead of waiting until one of these issues develops and having to attempt a DIY repair or pay a repair service more money to fix the broken cord or charger than it would cost to buy a new one, I highly recommend taking a more proactive approach by using Sugru to reinforce the strain relief the manufacturer has added to a new cable as soon as you remove it from the packaging. It's simple, inexpensive precaution that can significantly extend or even double a laptop, tablet or phone charger's useful life.

At the time of this post’s publication, you can order a 3-pack of Sugru moldable glue on Amazon for $7.99 with free shipping for Amazon Prime members. That equates to $2.66 for each single-use pack, which contains the perfect amount of Sugru for this quick and easy DIY project. So, for less than $3 each, you can beef up the strain relief to prolong the life of your new or lightly used charging cables. 

Since there are so many ingenious and useful Sugru hacks that use this strong, adhesive, self-hardening rubber putty, you may want to order the more economical Sugru moldable multi-use glue 8-pack, available on Amazon for $16.99 with free Prime shipping as write this, which brings down the cost of each pack to just $2.12 per (or even less with the current $3 off coupon).

Another consideration: One single-use pack of Sugru is enough to reinforce two cord ends. I prefer to reinforce both ends of my charging cables, so I use one pack for each cable. However, many people reinforce only one end of each cord, and if that's your preference, you can strengthen the strain relief on two chargers with each single-use pack, 

Note: If you aren’t a Prime member already, I highly recommend taking advantage of the Amazon Prime 30-day free trial. You can take a month to explore and enjoy the wide range of valuable benefits of being an Amazon Prime member—plenty of time to decide whether or not the annual membership fee would be worth it for you and your family.

Sugru: Use It or Lose It

Sugru begins to cure and morph from a soft putty to a hard rubber as soon as it is exposed to air. So, the minute you tear open one of the foil pouches, the clock starts ticking. According to the manufacturer's website, "Once you open your single-use pack, the moisture in the air will trigger the setting process giving you 30 minutes to fix, bond and create before Sugru begins to harden." So, it's important to work quickly so you will have enough time to complete and refine your project within that 30-minute window. [Source]

Since the company has not found yet found a way to extend Sugru's working time once it is exposed to air, make sure you have everything set out and ready to go before you open that airtight, sealed foil pouch. And, if you only need part of the packet's contents for your project—for example, if you only want to reinforce one end of a charging cable—try to plan another project (or two) to use up the remainder of the Sugru during that 30-minute "open time" so none of it goes to waste. 

Even unopened Sugru has a limited shelf life and an expiration date that is marked on the packaging. However, the good news is that Sugru was reformulated last fall and one of the new formula's improvements is that you can increase the product's shelf life as much as three times by storing the single-use pouches in the refrigerator from the time you bring them home until you're ready to use them.

How to Strengthen Your Charging Cables to Prolong Their Useful Life

Follow these simple, step-by-step instructions for reinforcing and extending the manufacturer's existing strain relief collar or band with this easy $3 charging cable Sugru hack.

What You'll Need

  • One or more USB charging cords or other cables, new and unused (preferably) or in excellent condition
  • One 3.5 g (0.12 oz) single-use pack of Sugru Moldable Glue by Tesa for each cable you want to reinforce
  • A countdown timer or timer app (optional but highly recommended), watch or clock
  • PTFE Teflon non-stick sheet to protect your work surface (optional, but highly recommended—see note)
  • A small container of lukewarm water mixed with a drop or two of mild liquid dish soap or hand soap (optional)
    • I use my favorite Puracy natural hand soap gel, which is gentle on my skin and smells wonderful. I buy the large 48-ounce refill bags and refill my hand soap dispensers.

Note: Teflon is one of the few materials that Sugru won't stick to before it cures. Even if you prefer not to cook or bake with it, this nonstick sheet can be extremely useful for crafting and DIY projects. Unfortunately, I couldn't find mine recently when I was photographing this DIY tutorial, so I tried substituting a sheet of wax paper to protect the cutting board I used as my portable work surface. The Sugru glue did stick to the wax paper somewhat, so I don't recommend it. If you don't have (or don't want to buy) a piece of nonstick sheet for crafting and DIY, I suggest trying plastic wrap aka cling film, which might work better.

Materials and supplies needed: charging cable, Sugru moldable glue, optional container of soapy water

Step 1: Set Up Your Workspace With Everything You Will Need Before You Open the Pack of Sugru.

The second the Sugru inside a sealed foil pouch is exposed to air, the clock starts ticking on the 30-minute window of working time before the rubber putty starts to cure. So, it's a good idea to get as much set up as you can to maximize that limited window of opportunity, before the countdown begins.

  • Clear off a flat workspace and cover it with the nonstick sheet.
  • Remove the charging cord (or cords) from its packaging, loosen the hook-and-loop fastener cable tie just enough to pull out the connector end(s) you will be reinforcing for easy access, then re-tighten the cable tie.
  • Fill a small container with lukewarm soapy water, if using.
  • Set a countdown timer or app for 30 minutes, or put your watch. clock, or mobile phone clock where you can see them.
  • Pull out a single-use pack of Sugru moldable glue in the color of your choice, which can match, complement or contrast with the color of the charging cord.
    • For this tutorial, I chose a pack of black Sugru to make it easy to distinguish between the original strain relief collar band of the red Anker Powerline+ III Lightning to USB-A charging cable and the new, longer and thicker Sugru molded rubber reinforcement I added.

When everything is set up and ready to go, start the countdown timer (or make note of the time) and cut or tear open the sealed foil pouch of Sugru. It's show time!
Open pack of Sugru Moldable Glue

Step 2: Remove the Sugru and Divide It in Half.

Lightly roll each half into a ball and then into a log or sausage shape long enough to cover and extend past the charging cable's strain relief collar or band, as shown. 

Rolled tapered logs of Sugru Moldable Glue

Step 3: Taper, Flatten, Wrap and Shape a Sugru Log Around One End of the Charging Cord.

Taper one of the Sugru logs slightly, then gently flatten it with your fingertips until it's just wide enough to wrap around one end of the cable. Align the wider end of the tapered, flattened Sugru log so it overlaps the bottom edge of the connector or plug cover slightly. Then, wrap the edges of the Sugru around the cord, lightly pressing and stroking the soft rubber putty so it conforms smoothly, evenly and snugly and tapers gradually as it extends past the strain relief band and onto the outer cord covering.

When you are happy with the shape of your molded rubber strain relief reinforcement, stroke the surface lightly with a fingertip to smooth out any bumps, seams or uneven edges. 

Red Anker Powerline+ III Lightning to USB A Charging/Sync Cable strengthened with black Sugru moldable rubber glue DIY strain relief reinforcements

If you want to further refine the appearance of your Sugru-enhanced cable strain relief, you can dip your finger into some soapy water for the final smoothing, which will allow your fingertip to glide over the surface of the soft, sticky Sugru rubber to smooth away any fingerprints, lumps, bumps, or unevenness. 

You can see how much smoother and more refined the black Sugru wraps are on this Anker Powerline+ III Lightning to USB-A iPhone charging cable compared to the slightly lumpier, less evenly shaped red Sugru wraps on the Amazon Basics Nylon USB-A to Lightning Cable Cord, MFi Certified Charger for Apple iPhone in the next photo, which I formed without the benefit of any soapy water lubricant. The red Sugru strain relief hack looks fine, too, just a bit less "finished." 

Red Amazon Basics USB-A to Lightning Cable Apple iPhone Charger, with ends and connectors reinforced with rubber Sugru moldable glue

Just make sure to keep and eye on the countdown clock, so you can leave enough time to reinforce, shape and smooth the other end of the charging cord (or a second charging cable) before the Sugru starts to cure and becomes harder to form and refine.

Step 4: Repeat With the Remaining Sugru.

Repeat step 3, using the second log of Sugru to reinforce the other end of the same cable or another charging cord.

Tip: If you are reinforcing both ends of the same cord, be careful not to let the first newly-reinforced cord end bump into anything accidentally while you are working on strengthening the strain relief on the other end, since the Sugru will still be soft and easily marred. One big advantage of working on a PTFE/Teflon sheet is that you can lay the first Sugru-covered end flat on the nonstick sheet, where it can remain undisturbed (if you're careful not to jostle it) as you form the remaining rubber putty around the other end of the cable.

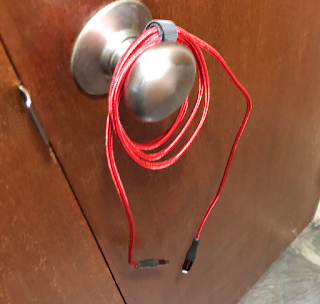
Charging cable with Sugru Moldable Glue reinforced ends hanging from doorknob to dry
Step 5: Allow the Sugru Rubber-Reinforced Charging Cable(s) to Cure, Undisturbed, For 12 to 24 Hours.

If you can arrange the cord(s) so that the reinforced ends lay flat against the nonstick sheet-covered work surface, that's probably the easiest option.

Alternatively, you may be able to hang the cable over a wall hook, shower curtain rod, towel rack, or even a doorknob, as I did, as long as the still-soft Sugru cord ends don't touch anything, including each other until the next day. 

By the following day, the moldable rubber will be fully cured, providing much more robust cord strain relief and helping to prolong the lifespan of the many types of phone chargers and other charging cables that power and connect the devices you rely on for information, education, communication, entertainment, work and play.


This Easy $3 Hack Prolongs Your Charging Cables' Life by Margaret Schindel


Read More of My Product Reviews

Read More Product Reviews by Our Review This Reviews Contributors

Read More DIY Reviews by Our Review This Reviews Contributors


Note: The author may receive a commission from purchases made using links found in this article. “As an Amazon Associate, Ebay (EPN) and/or Esty (Awin) Affiliate, I (we) earn from qualifying purchases.”



Monday, June 14, 2021

Tourna Mini Pickleball Caddy Reviewed

New to pickleball? Thinking of learning the sport? Or have you taken a few lessons and now it is time to practice! The Tourna Mini Pickleball Caddy is here to make learning the sport of pickleball easier, quicker and just more enjoyable.

pickleball caddy banner

Learning a new sport can be frustrating and the old adage that practice makes perfect definitely applies. As my friends and I are learning pickleball this little caddy has become a very useful tool and worth the assembly effort (see below on assembly!) But wait, what is pickleball? 

The Popularity Of Pickleball

The sport is over 50 years old, but has taken off in growth in recent years. The Sports & Industry Fitness Association (SIFA) reports a 21.3% increase in participation for 2020.

A mix between tennis, badminton, ping pong is a general description on a court which resembles a tennis court but is much smaller. The paddle does not have strings like a tennis racquet and is closer to a ping pong paddle in size. Take a peek at the video below for a quick overview of the sport.


If pickleball has gained your attention as a sport you'd like to learn then a pickleball caddy will make your journey just a little quicker and a little easier! The Tourna pickleball caddy is a great purchase for a beginner, but does have its' assembly challenges.

Assembly Challenges

It was a challenge to assemble the Pickleball Caddy! The reviews for this product were correct so you are forewarned. I had read the customer reviews which stated:

1. The directions were very poor. Correct!

2. It was difficult and time consuming to assemble. Correct!

3. The directions stated a 10 minute assembly and the reviewers absolutely disagreed. Correct!

4. Once the caddy is assembled, the product works great. Correct!

5. Even though the product was very frustrating to assemble, no regrets on the purchase. Correct!

The caddy arrives in pieces in a flat box. Keep the box! the directions are very poor (even for the most handy), but the photos of the assembled caddy on the box are helpful to assist with visualizing your goal of a completed caddy.

pickleball caddy


Patience and perseverance are handy when attempting to assemble the caddy.

Practical Pickleball Caddy

The mini caddy holds about 20 outdoor balls or 24 indoor balls. Favorite outdoor ball is the Onyx for crisp and responsive pickleball play.

Once assembled this caddy is very easy to use and very useful for a beginner player. The caddy works like a traditional tennis hopper. The balls are collected by placing the hopper over the ball (or 2 balls) and pressing down on the hopper with a slight pressure so the balls will enter the caddy.

The caddy can then be flipped to stand upright on the court for a waist high basket of pickleballs for easy practicing. Beginner pickleball players can spend a significant time gathering the practice balls and this caddy speeds up the process and saves the back from constantly bending over to pick up practice balls.

The mini caddy is slim and a space saver. It is light weight and can be easily stored in the trunk or interior of the car. 

Recommendation

Despite the challenging assembly - once the caddy is assembled- the reviews are very positive for a practical caddy and an affordable price point. If you are learning the game or just like to practice with a basket of balls the caddy is a recommended purchase.


Note: The author may receive a commission from purchases made using links found in this article. “As an Amazon Associate, Ebay (EPN) and/or Esty (Awin) Affiliate, I (we) earn from qualifying purchases.”


Friday, June 11, 2021

Lasko Portable Electric 42" Oscillating Tower Fan Review

Lasko Fan Review
Several years ago, my husband brought home a Lasko portable electric fan. I didn't think much about it at the time since he purchased it for the garage so he could use it when working on our cars.  However, when I got my recumbent exercise bike, I found that I needed a fan during my workout time.  I saw no reason to chill down the whole house just so I could stay cool while exercising. I stealthily ventured to the garage and "borrowed" his tower fan.  Man, that fan is awesome!

Since then, we have purchased 2 more Lasko tower fans so he has one back in his garage, I have one sitting next to my recumbent exercise bike, and our son has one in his bedroom.

Because it is a 42" tower fan, I don't have to get off the exercise bike to turn it on halfway through my workout when I start to get hot. It sits right next to my bike so I simply reach over and hit the button. Since it oscillates, there isn't a constant flow of cold air on one spot either.  However, oscillation is optional if you don't want it to move.

It is also tall enough to really make a difference beside a bed.  The fan is cooling you, not under the bed or the bed sheets.  The same is true if you are sitting in a recliner.

The Lasko tower fans come with a remote control that the guys use when working in the garage, in bed, or sitting in their recliners. The remote control makes it very convenient to turn on without getting up.

If you know you only want it on for a limited amount of time, like until you go to sleep, there is a built in timer that can be used to shut it off in 30 minutes, or up to 7½ hours.

It is lightweight enough that it is easy to move using the built-in grip handle on the back, which is how I was able to sneak it from the garage without being heard.

My favorite feature of this fan is how quiet it is. Of course, I can hear it, but it is nowhere near as loud as the old round small fan in our attic.


Features of the Lasko Portable Electric 42" Oscillating Tower Fan

I already mentioned the height and how quiet the fan is, but I have yet to mention how slender it is.  The base of the unit is only 13"!  That allows the fan to easily fit in narrow space, even a hallway without taking up much room.  That is very important, especially in a small room, or if you don't want it to detract too much from your lovely decor.

 Lasko Portable Electric 42 inch Tower FanCheck PriceHere is a recap of all of the features:

  • Tall - 42 inches
  • Narrow - Base (the largest section) is only 13"
  • Multiple Speeds
  • Optional Oscillation
  • Timer Option
  • Quiet Fan
  • Lightweight - Easy to move
  • Inexpensive


A fan is a necessity in most homes from time to time.  I've even needed one in my kitchen when I am cooking for extended periods of time, especially if both ovens are on.  As I said earlier, I see no reason to chill down the whole house when only one room, or area, needs to be cooler.

If you need a fan, I highly recommend the Lasko tower fan!


 Lasko Oscillating Tower Fan, Remote Control, Timer, 3 Quiet Speeds, for Bedroom, Living Room and Office, 42Check Price


Read More Product Reviews On
ReviewThisProducts.com


House of Sylvestermouse


Note: The author may receive a commission from purchases made using links found in this article. “As an Amazon Associate, Ebay (EPN) and/or Esty (Awin) Affiliate, I (we) earn from qualifying purchases.”


Friday, June 4, 2021

Durable Insulated Lunch Box Tote - Reusable Cooler Bag Reviewed

insulated lunch box tote cooler bag
Several year ago, I purchased this insulated lunch tote for our son. Even after much use, it still looks new and keeps his water cold!

As we approach the hot days of summer, I am reminded of why I selected this particular lunch tote for our son.  He needed an insulated bag for his bottled water which sustains him throughout his work day.  

Because several bottles of water can be heavy, I wanted a durable tote with a sturdy zipper.  This lunch box tote certainly meets, and exceeds, those basic standards. 

Since it easy holds 3 large (24 oz) bottles of Propel water, I am certain it would hold almost any regular lunch someone wished to carry.  Most importantly, with the thin reusable ice packs I purchased separately, his water stays cold all day.

I selected the black lunch bag for him, but the lunch tote comes in several colors. I especially like the midnight blue, which looks a lot like denim.


Features of The Upper Order Durable Insulated Lunch Box 

As I mentioned above, the zipper is very sturdy and the tote is insulated, but there are several other features to love about this lunch tote bag.  

 Upper Order Durable Insulated Lunch Box Tote
Reusable Cooler Bag
Check Price
  • Insulated
  • Strong, Durable Fabric
  • Strong, Durable Zipper
  • Sturdy, but Fabric is Flexible to Accommodate Bulky Containers
  • Inside Wipes Clean 
  • Outside Wipes Clean of Dust & light dirt/debris
  • Inside Pocket
  • Outside Pocket
  • Carry Handle
  • Detachable Shoulder Strap 
  • Slim Design - 11" x 10" x 3.6"
  • Professional Appearance
  • Inexpensive  

This lunch box tote can easily slip behind his drivers seat (which is pushed back for longer legs) to sit on the floor board for easy access getting in or out of the car.   


Would I buy this insulated lunch box tote again? Absolutely!


 GrayCheck Price UPPER ORDER Reusable Insulated Lunch Box for Men and Women (Black)Check Price BlueCheck Price


Recommended Ice Packs

I purchased a pack of thin ice packs.  Only one is required at a time, therefore 3 are left in the freezer for future use.  We simply alternate them each day.

 Healthy Packers Ice Pack for Lunch Box - Freezer Packs - Original Cool Pack | Slim & Long-Lasting ReusableCheck Price


Read More Product Reviews On
ReviewThisProducts.com


House of Sylvestermouse


Note: The author may receive a commission from purchases made using links found in this article. “As an Amazon Associate, Ebay (EPN) and/or Esty (Awin) Affiliate, I (we) earn from qualifying purchases.”


Tuesday, June 1, 2021

Reviewing Restoring A Metal Garden Swing Seat


restored metal garden swing

We bought a metal garden swing seat recently for a good price as it needed some work and the shop needed the space. 

The swing is all metal and would have originally been painted black. It is very sturdy and quite heavy. It took two strong guys to carry it into our garden. 

My husband and I love this garden seat and like a bit of a challenge, so we embarked on revamping it. 

I always think if the bones are good then most things can be restored to look beautiful and useful again. 


weather garden swing that needs restoration
Original State Of the Garden Swing Seat


From the minute it arrived in our garden albeit quite rusty and certainly neglected and in need of serious tender loving care,  we loved it and it felt like it had been there forever. I love the details of the leaves and flowers and the general shape of the seat.

It is super comfortable as well. The swing has a lovely action and it feels so relaxing to sit on it and gently rock back and forth. It belonged in our garden and we love it! 


Preparation Work For Restoring The Garden Swing. Using Wire Wool Brushes. 

They say that preparation is the most important part of any project and it is important to take your time doing this part. 

While I love to get to the exciting part of making it beautiful, I am happy to accept that this preparation element needs to be given care. 

First, we used wire wool brushes to get rid of any flaking rusty parts. Quite a lot of old rust and flaking damaged parts fell off at this stage! 

We chose quite slim brushes as there were many nooks and crannies to get into that a larger brush would not have been able to reach.

This part of the work was quite hard slow going as it is important to get rid of all the loose sections and make sure it was as clean as possible. 

I am very glad we chose to use brushes with long handles instead of steel wool bundles to hold by hand, as it would have been hard on our hands. Using the brushes our hands were protected and the brushes did a great job.  


Then we wiped down the whole seat with an antibacterial spray to clean it all up and remove any dust particles. We repeated this again before painting.

We initially thought we might have to get in a welder to mend some of the worst parts, especially on this armrest section, but wanted to try out epoxy resin first to see if that would work. 


damaged metal garden swing that needs repair
Damage On The Garden Swing Seat


Repairing The Damaged Metal Sections

The next step was to use epoxy resin sticks to repair some of the damaged areas. Using this is quite easy. Do wear gloves as your skin may react to the epoxy resin. 

You simply cut the wrapping and the tube and I took a small piece and rolled it up in my gloved hands until the two parts were mixed evenly then simply applied it to the metal gap I needed covering.

It reminded me of using plasticine as a child. However, it is advisable to wear gloves when handling epoxy resin and of course, keep away from children and pets. 


repairing a damaged metal swing
Epoxy Resin Use On The Garden Swing Seat


I found you do need to work fairly quickly as it does dry in about 10 minutes. So best to only take what you need from the tube. I would keep any unused in a sealed container to help prevent it from drying out.  

I then smoothed it down and allowed it to dry. It took only about an hour before it was cured but we left it overnight before painting.

I thought I would need to sand it down but actually, on this type of item, it looked just fine as it was. I had taken care to smooth it out as much as possible when applying through. On some projects, you would need to sand down first. 

This type of epoxy resin can be drilled and sanded. It can even be used underwater and is waterproof rather than just water-resistant. We wanted this level of protection as this garden swing seat is too heavy to move around a lot so will be out in all weather. 

We were very pleased with the result. Even on the worst damaged sections of the armrest, the resin had set well and firm and the damaged sections were stable again.


Painting The Garden Swing Seat With Hammerite Paint. 

Once the epoxy resin was set hard we decided to paint the whole swing seat black with Hammerite Direct To Rust Paint.

This paint says it gives up to 8 years of rust protection and can be painted directly onto rust, though I still think sanding down and filling any damaged sections is advisable. I do think that with an outdoor seat like this we will repaint every couple of years to keep it looking good.

It is a great paint for a quick job as it is a primer, undercoat and topcoat all in one. This is very useful for outdoor painting when you are trying to paint when it is not raining for a while! 

You must keep it away from any aquatic life as it could be very harmful to them. Please wear gloves when handling and painting as it can provoke an allergic reaction and it is flammable so be careful where you leave it. 

It is important to keep Hammerite Paint away from children and pets. We even stayed out in the garden to make sure none of the local wildlife went near it until dry! 

Hammerite do many different colours, including gold, copper, white and green but as I eventually want to grow plants and climbers all around this seat we decided on a simple black so that the flowers and greenery will show up against it. I also think that this white would also have looked very stylish.


We have not used Hammerite paint before but we were very happy with the way it went on. It was about the right consistency. It did drip a little if we had too much paint on the brush so we learned to carefully wipe off the excess on the tin then paint.

We found it worked well on the larger sections of the A-frame and the broader metal lengths. It was also quite easy to use on the quite intricate leaves, stems and flowers as long as we did not load the brush up too much.


flower and leaf design on the frame of a metal swing
Beautiful Painted Leaves And Flowers


The Hammerite paint dried to a smooth sheen. It is a slightly glossy look which is what we wanted, rather than the rougher hammered finish of the original Hammerite paint. The finish is of course completely down to personal preference. 

Here is the garden swing seat when we had just painted the main A-frame but not yet painted the seat. 

You can see the difference once painted it looks significantly smarter, the rust is no longer visible and the metal is more protected from the elements. 


painted garden swing
A-Frame Hammerite Painted Garden Swing Seat


I would advise using an old paintbrush that you are happy to throw away afterward as getting Hammerite out of a brush is a difficult task! 

Normally I am not an advocate of throwing things away but in this case, weighing it up, I feel that using the necessary non-environmentally friendly cleaner is probably worse than throwing away the brush. 

The brushes were certainly a mess after use and I think it would have taken a lot of work and product to get them clean enough to use on any other project. 

So we got off the worst of the paint then wrapped the brush in newspaper and took it to the skip for safe disposal. 


The Finished Restoration Of The Garden Swing Seat!

So was it worth all the work? Well, I would say yes absolutely!

We do not mind the work and got quite a lot of satisfaction from restoring a decaying piece of garden furniture into a once again beautiful and useful garden swing.

 After one coat of Hammerite paint we have achieved a good finish. We will do another coat of paint at some point but it has rained part of every day since so it can wait a while. 

Here is the finished product! 


restored metal garden swing
Finished Renovation Of Garden Swing Seat 


It may well have been easier to simply buy a brand new garden swing seat. However, that would have cost us hundreds more. 

This way we have learned new skills, saved a lovely garden seat and now we have a beautiful piece we love sitting on with a nice cup of coffee and are very proud to have in our garden. 

The next stage is to choose suitable plants to position around the garden swing and to beautify it further with plants. 

Then I need to make some cushions for the seat. Now I am not all that handy with sewing. However, once we replace our mattress and memory foam topper, I feel I can cut the old one to size and use it as a garden seat cushion with a simple removable cushion cover. 


Read More Craft and DIY Projects On Review This Reviews Here: Crafts & DIY 


Read More Gardening Reviews On Review This Reviews Here Gardening


Note: The author may receive a commission from purchases made using links found in this article. “As an Amazon Associate, Ebay (EPN) and/or Esty (Awin) Affiliate, I (we) earn from qualifying purchases.”


Most Recent Reviews on Review This Reviews


Search for Reviews by Subject, Author or Title

The Review This Reviews Contributors


SylvestermouseSylvestermouseDawn Rae BDawn Rae BMbgPhotoMbgPhotoBrite-IdeasBrite-IdeasWednesday ElfWednesday ElfOlivia MorrisOlivia MorrisTreasures by BrendaTreasures by BrendaThe Savvy AgeThe Savvy AgeMargaret SchindelMargaret SchindelRaintree AnnieRaintree AnnieLou16Lou16Sam MonacoSam MonacoTracey BoyerTracey BoyerRenaissance WomanRenaissance WomanBarbRadBarbRadBev OwensBev OwensBuckHawkBuckHawkDecorating for EventsDecorating for EventsHeather426Heather426Coletta TeskeColetta TeskeMissMerFaeryMissMerFaeryMickie_GMickie_G


Review This Reviews is Dedicated to the Memory of Our Beloved Friend and Fellow Contributor

Susan DeppnerSusan Deppner

We may be apart, but
You Are Not Forgotten


“As an Amazon Associate, Ebay (EPN) and or Etsy (Awin) Affiliate, I (we) earn from purchases.” Disclosure Statement

X