Showing posts with label Mary Beth Granger. Show all posts

Thursday, July 25, 2019

Photographic Review of Buffalo New York Lighthouse


Buffalo New York Lighthouse photo by mbgphoto

I enjoy photographing lighthouses and on a recent July day we made a stop on our trip east to visit the beautiful lighthouse in Buffalo NY.  This lighthouse is located at the mouth of the Buffalo river at the north entrance to Buffalo harbor.


Brief History of Buffalo Lighthouse


In 1805 Congress designated the Village of Buffalo to be a port of entry into the United States.  It was determined that the port needed a lighthouse but because of the War of 1812 construction was put off.  In 1818 the first lighthouse was built in Buffalo.  As the city of Buffalo grew into a major port a new lighthouse was needed.  The current lighthouse was built in 1833 at a height of 68 feet. You can read more about the history of the lighthouse at the following link Main Buffalo Lighthouse .


Photographs from my Visit


I was hoping to get up close to the lighthouse and had read the instructions online with directions how to get there by walking alongside the coast guard station.  What they didn't say was that this path was only open on Friday, Saturday and Sundays and since it was Wednesday I had to find another way to view the lighthouse.  I got back in the car and drove down the road to the nearest park on the harbor.  I found a charming park with a beautiful rain garden, some delightful wind catchers and paths all along the harbor.  The wind catchers were on a hill and when I climbed the hill, I got a great view of the lighthouse.  I had a 210 mm lens with me and it worked great to zoom in on the lighthouse.  The following photos are of the lighthouse and the park.

wind catchers photo by mbgphoto

Buffalo New York Lighthouse photo by mbgphoto

Buffalo New York Lighthouse photo by mbgphoto

Buffalo New York Lighthouse photo by mbgphoto


Note: The author may receive a commission from purchases made using links found in this article. “As an Amazon Associate, Ebay (EPN) and/or Esty (Awin) Affiliate, I (we) earn from qualifying purchases.”


Thursday, July 11, 2019

Review of Attracting Birds to My Backyard

Black-capped Chickadee on Cardinal Birdfeeder photo by mbgphoto
                                                    

Black-capped Chickadee


I have often been asked how I attract the large variety of birds to our backyard.  In the past  several years I have documented 31 different types of birds.  I believe that the wide variety of food that I put out for the birds helps to attract different types of birds.  These birds provide hours of entertainment for my husband and me.  In this post I will share with you the different types of bird food.

Mixed Variety Bird Seed

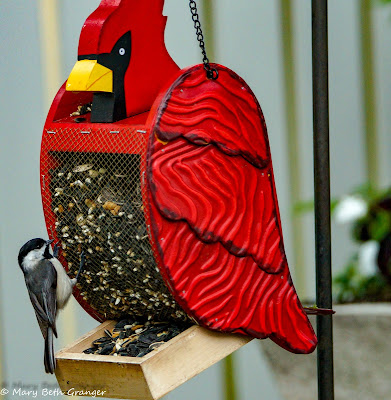
In several of my bird feeders, I use a mixed variety of bird seed. This type of mixture includes sunflower seeds along with other mixed seeds.  I have not found any one brand that seems to be better in attracting birds, so I usually buy whatever is on sale.  Here is the type that I purchased last.


In the photos below you will see the variety of birds that enjoy the mixed bird seed that I keep in several different feeders in our backyard.


female cardinal on cardinal birdfeeder photo by mbgphoto

birds on birdfeeder photo by mbgphoto

birds on birdfeeder photo by mbgphoto


Nyjer Bird Seed

I have a finch feeder that I keep filled with Nyjer seed.  These seeds are small black seeds that don't fall through the small mesh of the feeder.  This feeder attracts many different birds, but it is particularly popular with finches.  In the photo below you will see Goldfinch enjoying the Nyjer seed.

goldfinch on  birdfeeder photo by mbgphoto

The birds in this photo look like they have spotty or dirty looking feathers.  That is due to the fact that this photo was taken in early spring and they were still molting.


Suet Nuggets

This year I have started to put suet nuggets in a feeder.  This food has become very popular with woodpeckers.  Downy woodpeckers are frequent visitors of the nugget feeder.


woodpecker on birdfeeder photo by mbgphoto


I sometimes put whole peanuts in this feeder.  They last longer than the nuggets but I find it hard to tell when the feeder is empty because the empty peanut shells are left behind.  Here is a Red-bellied Woodpecker enjoying the peanuts.


woodpecker on birdfeeder photo by mbgphoto


Suet Cakes

Another popular bird food is suet cakes.  I keep one hanging in my backyard feeding area year round.  They are frequented by a wide variety of birds.  In the photo below you see a Grosbeak that visited the suet cake this spring.

grosbeak on birdfeeder photo by mbgphoto


Hummingbird Feeder

Each spring I look forward to seeing my first Hummingbird of the year.  I hang out the feeder starting in early  April.  I make my own food for the feeder boiling 2 cups of water and 1/2 cup of sugar in my microwave.  After cooling the mixture I add it to the feeder.  It is important to change the mixture every week to ten days and more often in very hot weather.


hummingbird on feeder photo by mbgphoto

Bird Bath

In addition to the various bird feeders I provide a bird bath on our back deck.  This gives the birds a place to get a drink and in the case of Robins to take a bath. This spring I looked out one day to see a whole group of Bluebirds lined up on the edge of the bird bath.

 I love to see the Robins splashing in the bird bath.

robin in birdbath photo by mbgphoto


Note: The author may receive a commission from purchases made using links found in this article. “As an Amazon Associate, Ebay (EPN) and/or Esty (Awin) Affiliate, I (we) earn from qualifying purchases.”


Thursday, June 27, 2019

Visit Missouri-Explore St Louis- Forest Park and the Jewel Box

Forest Park in St Louis photo by mbgphoto
One of my favorite places for photography in St. Louis is Forest Park.  On this page I will be reviewing some of my favorite sites to take photos.

A Bit of Forest Park History and Facts

Forest Park is a public park that covers 1,371 acres in the heart of St. Louis.  It was first opened in 1876.  The park hosted both the 1904 World's Fair and the 1904 Summer Olympics.  An annual balloon race starts in Forest Park and in the summer you can attend wonderful summer theatre at the Muny.
Here are just a few of the wonderful attractions that you can see at Forest Park.

  •  St. Louis Zoo
  •  Science Center
  •  Art Museum
  •  Boathouse
  •  Missouri History Museum
  •  Jewel Box 
  •  World's Fair Pavilion
In addition you can walk or ride the many trails and paths and in the winter you can enjoy the ice skating rink.  

I have many fond memories of Forest Park as a child, as a young Mother bringing my children there and now as a place to bring my grandchildren.  It is also one of my favorite place to take photographs and I will share them with you on the rest of this post.

Jewel Box

Jewel Box in St. Louis photo by mbgphoto
The Jewel Box is located on 17 acres in the park and was first used as a greenhouse.  It has lovely plants, water features and fountains throughout the area and is a great place to take photos.  It is popular with visitors and the building can be reserved for weddings.  Around Christmas the inside of the building is full of poinsettias, which are quite beautiful.

I visited there with my photo club on a recent spring evening and took the photo above and the beautiful daisies that lines the sides of the pond.
white daisies photo by mbgphoto

daisy photo by mbgphoto

Muny

The Muny is a wonderful outdoor amphitheater that holds 11,000 people.  1500 of the seats are free seats making the theatre accessible to people from all walks of life.  Each summer for the past 100 years the Muny has  held a variety of different live productions.  Some of my favorites over the years include: South Pacific, Oklahoma, The Jersey Boys, The Unsinkable Molly Brown, The Beach Boys, and The Wizard of Oz.  I have also enjoyed  taking my two oldest granddaughters to the Muny when they have visited during the summer months.

The first photo on this page and the ones below were taken at the entrance area to the Muny.
Forest Park photo by mbgphoto

Forest Park photo by mbgphoto

The Boathouse

The Boathouse in Forest Park is a favorite gathering place of visitors to the park.  It is located just across the way from the Muny and is especially a favorite place for theatre goers to have a meal before or after the show.  The restaurant has both indoor and outdoor seating.

By the dock is an area where you can rent paddleboats and kayaks to ride around in the great basin. This is a favorite of my granddaughters.
After our photo club outing we met at the outdoor area of the Boathouse to sit by the dock and discuss the photos we took.  Here are a couple of the photos that I took from the docks.
paddle boats at Forest Park photo by mbgphoto

kayaks at Forest Park photo by mbgphoto

Postcards from Forest Park

Here are some postcards I have made from my photos.


Note: The author may receive a commission from purchases made using links found in this article. “As an Amazon Associate, Ebay (EPN) and/or Esty (Awin) Affiliate, I (we) earn from qualifying purchases.”


Thursday, June 13, 2019

Reviewing - Will That Be Regular or Ethyl?

Will That Be Regular or Ethyl? book cover


My cousin's  husband grew up in a small town in mid Missouri.  He recently published a book he wrote about his growing up years.

Growing Up Along Route 66 in 1950's Missouri

This is a delightful book filled with anecdotes about life in a small town in the 1950's.  Remember when: 

  •  Kids rode their bikes all over town
  •  Members of the opposite sex had "Cooties"
  •  Students got their vaccinations at school
  • To research a subject you used the Encyclopedia
  • Some teachers resorted to paddling to keep kids in line
  • Gas for your vehicle was filled by the attendant who also would sell you needed repairs for the car

Lessons for Life

Small town living gave DeWayne many lessons that were to last throughout his life.  Some of these included a strong work ethic built while working in the family chicken hatchery, a church community that is a big part of every day life, and a large family that looked out for each other. 

DeWayne's father also gained some great insights from his father who was a rather quiet man, but taught through his examples.

A job at a gas station on Route 66 was also full of lots of humorous incidents and some good life lessons.


Humorous Incidents

There are many humorous incidents scattered throughout the book as DeWayne gives us a glimpse into his childhood.  Here are just few of the many you won't want to miss.

      •  Cow Patty Softball
      •  Mishap while fishing in frozen pond
      •  Church organist falling asleep when time to play
      •  Mishaps at the service station on Route 66


So, if you are looking for a walk down memory lane and you want to read a book that is sometimes humorous, sometimes sad, but always realistic be sure to pick up "Will that be Regular or Ethyl?".


Book Available on Amazon


Note: The author may receive a commission from purchases made using links found in this article. “As an Amazon Associate, Ebay (EPN) and/or Esty (Awin) Affiliate, I (we) earn from qualifying purchases.”


Thursday, May 23, 2019

Creative Photography- Combining Techniques

pansies through lensball photo by mbgphoto
In this post I will review two techniques I have talked about in previous posts and give tips on how to combine them to create some fun and creative photographs.

Lensball

A lensball is a fun way to break away from the normal photos and get a bit creative. Here is a photo I took of a friend photographing the St. Louis Arch,  I took his photo through a lens ball that was sitting on a tripod next to him.
photographer through lensball photo by mbgphoto
On this post Crystal Photography Ball , I show you basic techniques on using a lensball.  These basic techniques are the first steps in creating the combined technique you see in the introductory photo.


Textured Backgrounds

Whenever you want the background to be different from your photo it is quite simple to change backgrounds in Photoshop.  Some backgrounds I make myself and others I get online.  Whichever method you choose, the tips in this post will help you to change your background. Photoshop Texturing Techniques
African daisy photo by mbgphoto
The photo above is a shot of an African daisy put on a textured background.

Combining Techniques

Now for the fun and creative part. When you take photos with a lensball first of all the photo is upside down and second the background just never seems to look right. At least mine usually doesn't.  I was contemplating this problem when I thought about my textured background technique I love to use and decided I could apply it to my lensball photos.  Here is a photo I created using these combined techniques and then the steps I followed to create the photo.
dipladenia flower through lensball photo by mbgphoto


  • First I took a photo of my new Dipladenia plant and edited it in Lightroom.  I saved the photo on my desktop.
  • Next I took a photo of the same plant using my crystal photo ball.  I put the photo ball stand on a table right next to the plant and focused my camera on the plant image inside the ball.  I brought the photo into Lightroom and inverted the photo so the image in the ball is right side up.
  • Next I opened the first photo in Photoshop.
  • With the first photo open I clicked on File and Place Embedded in Photoshop.
  • This brought the ball photo into photoshop covering the original photo.  I then used the Lasso tool to outline the ball and I clicked on Create and Mask in the top bar.
  • Now I used the slider to get the effect that I wanted.  I used the transparency and the feather sliders.  I next clicked done.
  • Now I click on the little square mask symbol at the bottom of the layers column and again moved the sliders to get the desired effect.
  • Finally I used Save As and named my file and saved it as a JPeg file.
I do this procedure as second nature now, but it took me a lot of practice before I got any results that I was happy with.  I wish you much fun and success in your quest for Creative Photography.


Note: The author may receive a commission from purchases made using links found in this article. “As an Amazon Associate, Ebay (EPN) and/or Esty (Awin) Affiliate, I (we) earn from qualifying purchases.”


Thursday, May 9, 2019

Review of Photographing the St. Louis Arch at Night

St. Louis Arch at Sunset photo by mbgphoto


I have photographed the St. Louis Arch at sunrise, in the morning and during the day but I had never photographed it at sunset and beyond.  When our photography club decided to take a trip across the Mississippi and photograph the Arch from a park on the east side of the river I was ready to go.  I wasn't sure what I was expecting but when we got there I saw this platform that provided a great overlook to photograph the Arch and the riverfront.

The photos below show the ramp and members of our group lined up at the top of the platform eagerly awaiting the sun to set.
photography platform in St Louis

Photographers in St. Louis


Tips for Nighttime Photography


  • Use a tripod...this will help eliminate camera shake in the low light.  This is particularly important once the sun has set.
  • Don't put the horizon in the middle of the photo.  Try getting it somewhere in the bottom third of the photo.
  • Shoot in aperture priority when the sun is still up and switch to manual once the sun sets.
  • Stay longer ( check next paragraph for reason why).
  • Try changing white balance to shade setting for more stunning colors.
  •  Wait for night clouds.  A partly cloudy sky is the best for sunsets.
  • Watch for birds.  They can add interest to the photo.
St. Louis Arch at Sunset photo by mbgphoto
Sunset in St. Louis
Search tips for night photography online and you will find a wealth of information.  The tips above are a few that I thought were particularly good.


Staying after Sunset

When I am photographing in the evening, I see many photographers wait till sunset, take their photos, and then pack up and leave.  If they do they will miss the beauty of the special lighting that often happens 20-30 minutes after sunset.  

Right after sunset you will see some really pretty colors in the sky.  
St. Louis Arch at Sunset photo by mbgphoto
You will note in this photo, taken about 5 minutes after sunset that the sky has some pretty pinks and yellow's to it.  On some evenings this can be even more pronounced, but I still think it was pretty in the photo above.

If you wait till all the colors have gone in the sky, you will then get to the "Blue Hour" where the sky turns a beautiful dark blue.  Many people miss this because they are in too big a hurry to wait.  It is definitely their loss.  I have seen times where there is only a slight darkening of the blue and other times where it is a fantastic deep blue.  It is worth waiting to see what the evening will bring.

In the case of the arch taken from the east, I also wanted to wait till all the lights were on in the buildings around the arch.  The arch is usually lit up but at this time of year those lights were turned off so they didn't interfere with the migration of birds.  Although I would have liked to see the lights on the arch, I will have to save that for another trip and I do believe it made the other lights on the city appear even brighter.  This photo was taken 25  minutes after sunset.
St. Louis Arch at Sunset photo by mbgphoto

See More on the St. Louis Arch

Here is a Review This post on the Arch showing photography at sunrise and during the daytime.

St. Louis Arch on Zazzle

I have made several of my Arch photos into Zazzle products.  Here are a few and you may find more in my zazzle store at Mbgphoto on Zazzle


Note: The author may receive a commission from purchases made using links found in this article. “As an Amazon Associate, Ebay (EPN) and/or Esty (Awin) Affiliate, I (we) earn from qualifying purchases.”


Thursday, April 25, 2019

Review of Texturing Technique in Photoshop

Pink Daisy with texturing technique applied on photo by mbgphoto

A favorite technique of mine in Adobe Photoshop is texturing.  The photo above shows a photo of a flower with a textured background.  This photo is actually a combination of two different photographs that I shot.  The foreground is the daisy flower and the textured background is a photograph of my windshield with ice on it.  On this post I will review some of the steps needed to create this photo and then show some other photographs I created using this procedure.


Creating a Textured Background

There are many places online that you can buy textured backgrounds, but I like to create my own using parts of photographs that I have taken.  Here are a few from my library.  They include a couple of sky images, a brick wall, fire (from my fireplace) and the icy windshield that I used in the introductory photo.


photo background created by mbgphotophoto background created by mbgphotophoto background created by mbgphoto

photo background created by mbgphoto


Steps to Create Textured Photo Composite

The steps below are the ones I used to create my textured background images.  There are several different ways to do different procedures in PS(Photoshop) but these are the ones I find easiest for me.  I have never taken a class on PS, but rather have taught myself through the use of the tutorials on PS (great for the basics) and YouTube tutorials you can find online for many different specialty techniques.  Here then are the steps used to create the photo like the one at the top of this post.
  •   I first Open a background photo in PS. I used my icy windshield background for the photo at the top of this post. I also always make a duplicate copy of the background photo.
  • Next I click on file and then Place Embedded to select the photo that I want in the forefront.  In this case my daisy photo. The new photo will come in on top of the background photo and I will then stretch or reduce it to make it the same size as the background photo.
  • The next step is to pick out the area of the photo that you want to highlight.  In the case of the daisy photo I use the Quick Selection tool to outline the main daisy.  I then click the  button at the top that says Select and Mask.
  • This will open a new window that will give you the opportunity to use sliders to bring in as much of the background texture as you want.  Play with the sliders till you get the desired effect and click done.
  •   This will bring you back to the main screen where you will now click the little square at the bottom of the layers column that adds the layer mask.(when I first started I always got hung up because I forgot this important step.)
  • Next you will tweak the sliders for the layer mask to get exactly the effect you desire.
  • Now you just save your work and you have created a beautiful photo with a textured background.
  • This took a lot of practice for me to get all the steps right so don't get discouraged if at first you don't succeed.

    Samples of my Textured Background Photos

    pink daisies with brick background photo by mbgphoto
    Daisy  with Brick Wall Texture

    Eastern Bluebirds photo by mbgphoto
    Bluebirds with Sky Texture Background

    candle through lensball with textured background by mbgphoto
    Candle in Crystal Ball with Fire textured background

    Photoshop Texture Book on Amazon


 Zazzle Card with Textured Photo


Note: The author may receive a commission from purchases made using links found in this article. “As an Amazon Associate, Ebay (EPN) and/or Esty (Awin) Affiliate, I (we) earn from qualifying purchases.”


Most Recent Reviews on Review This Reviews


Search for Reviews by Subject, Author or Title

The Review This Reviews Contributors


SylvestermouseSylvestermouseDawn Rae BDawn Rae BMbgPhotoMbgPhotoBrite-IdeasBrite-IdeasWednesday ElfWednesday ElfOlivia MorrisOlivia MorrisTreasures by BrendaTreasures by BrendaThe Savvy AgeThe Savvy AgeMargaret SchindelMargaret SchindelRaintree AnnieRaintree AnnieLou16Lou16Sam MonacoSam MonacoTracey BoyerTracey BoyerRenaissance WomanRenaissance WomanBarbRadBarbRadBev OwensBev OwensBuckHawkBuckHawkDecorating for EventsDecorating for EventsHeather426Heather426Coletta TeskeColetta TeskeMissMerFaeryMissMerFaeryMickie_GMickie_G


Review This Reviews is Dedicated to the Memory of Our Beloved Friend and Fellow Contributor

Susan DeppnerSusan Deppner

We may be apart, but
You Are Not Forgotten


“As an Amazon Associate, Ebay (EPN) and or Etsy (Awin) Affiliate, I (we) earn from purchases.” Disclosure Statement

X