A stick blender, also called an immersion blender, is great for puréeing soups
and sauces. Using a lightweight stick blender with a whisk attachment can be a
lot more comfortable to use than a traditional hand mixer for mixing batters
or whipping heavy cream. Several months ago, after the plastic housing and
whip attachment on my 1980s-era Braun MR72 MultiPractic deluxe hand held
blender with variable speed control eventually cracked, I did a lot of online
research before choosing a new stick blender.
|
|
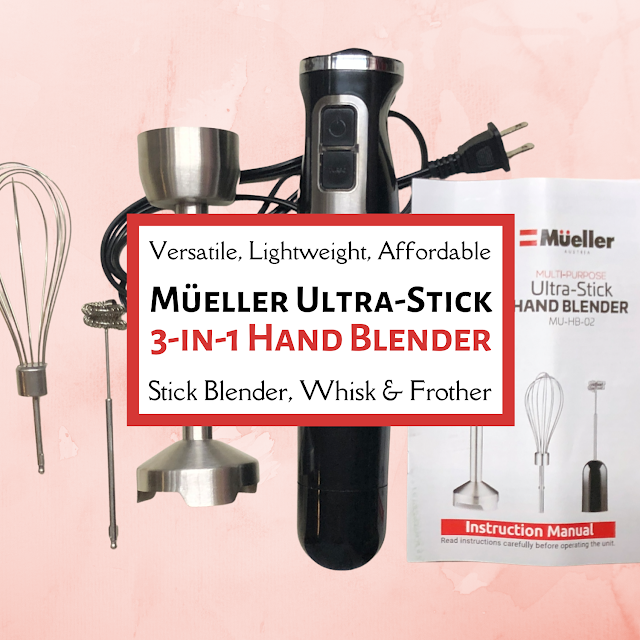
The Müeller Multi-Purpose Ultra-Stick Hand Blender (model
MU-HB-02) is one of my most used kitchen tools. It is also one of the
best kitchen gifts and can replace several small appliances!
|
Ultimately, I purchased a
Müeller Multi-Purpose Ultra-Stick Hand Blender (model MU-HB-02) with
three versatile attachments: an immersion blender, a wire whisk and frother.
Today I'll share my review of this excellent, powerful, lightweight stick
blender.
The Müeller Multi-Purpose Ultra-Stick Hand Blender Is Surprisingly
Powerful
Having used the Braun MR72 MultiPractic stick blender and whisk
attachment for several decades gave me a much better idea of which features
were important to me when choosing my next model of one of these small
appliances. After narrowing down my top contenders for a new immersion
blender, the powerful 500W motor on the Müeller Multi-Purpose Ultra-Stick Hand
Blender (model MU-HB-02) weighed heavily in its favor, since the 150W motor on
my old Braun made it underpowered for my needs.
When using any immersion blender, it's important to hold the blades above the
bottom of the pot, pan or other container and control the tool as the suction
created by the blade and its housing try to force the shaft downward. The
first time I used the blending shaft attachment on my new Müeller hand
blender, I could feel how much more power it has compared to my old Braun
model!

|
|
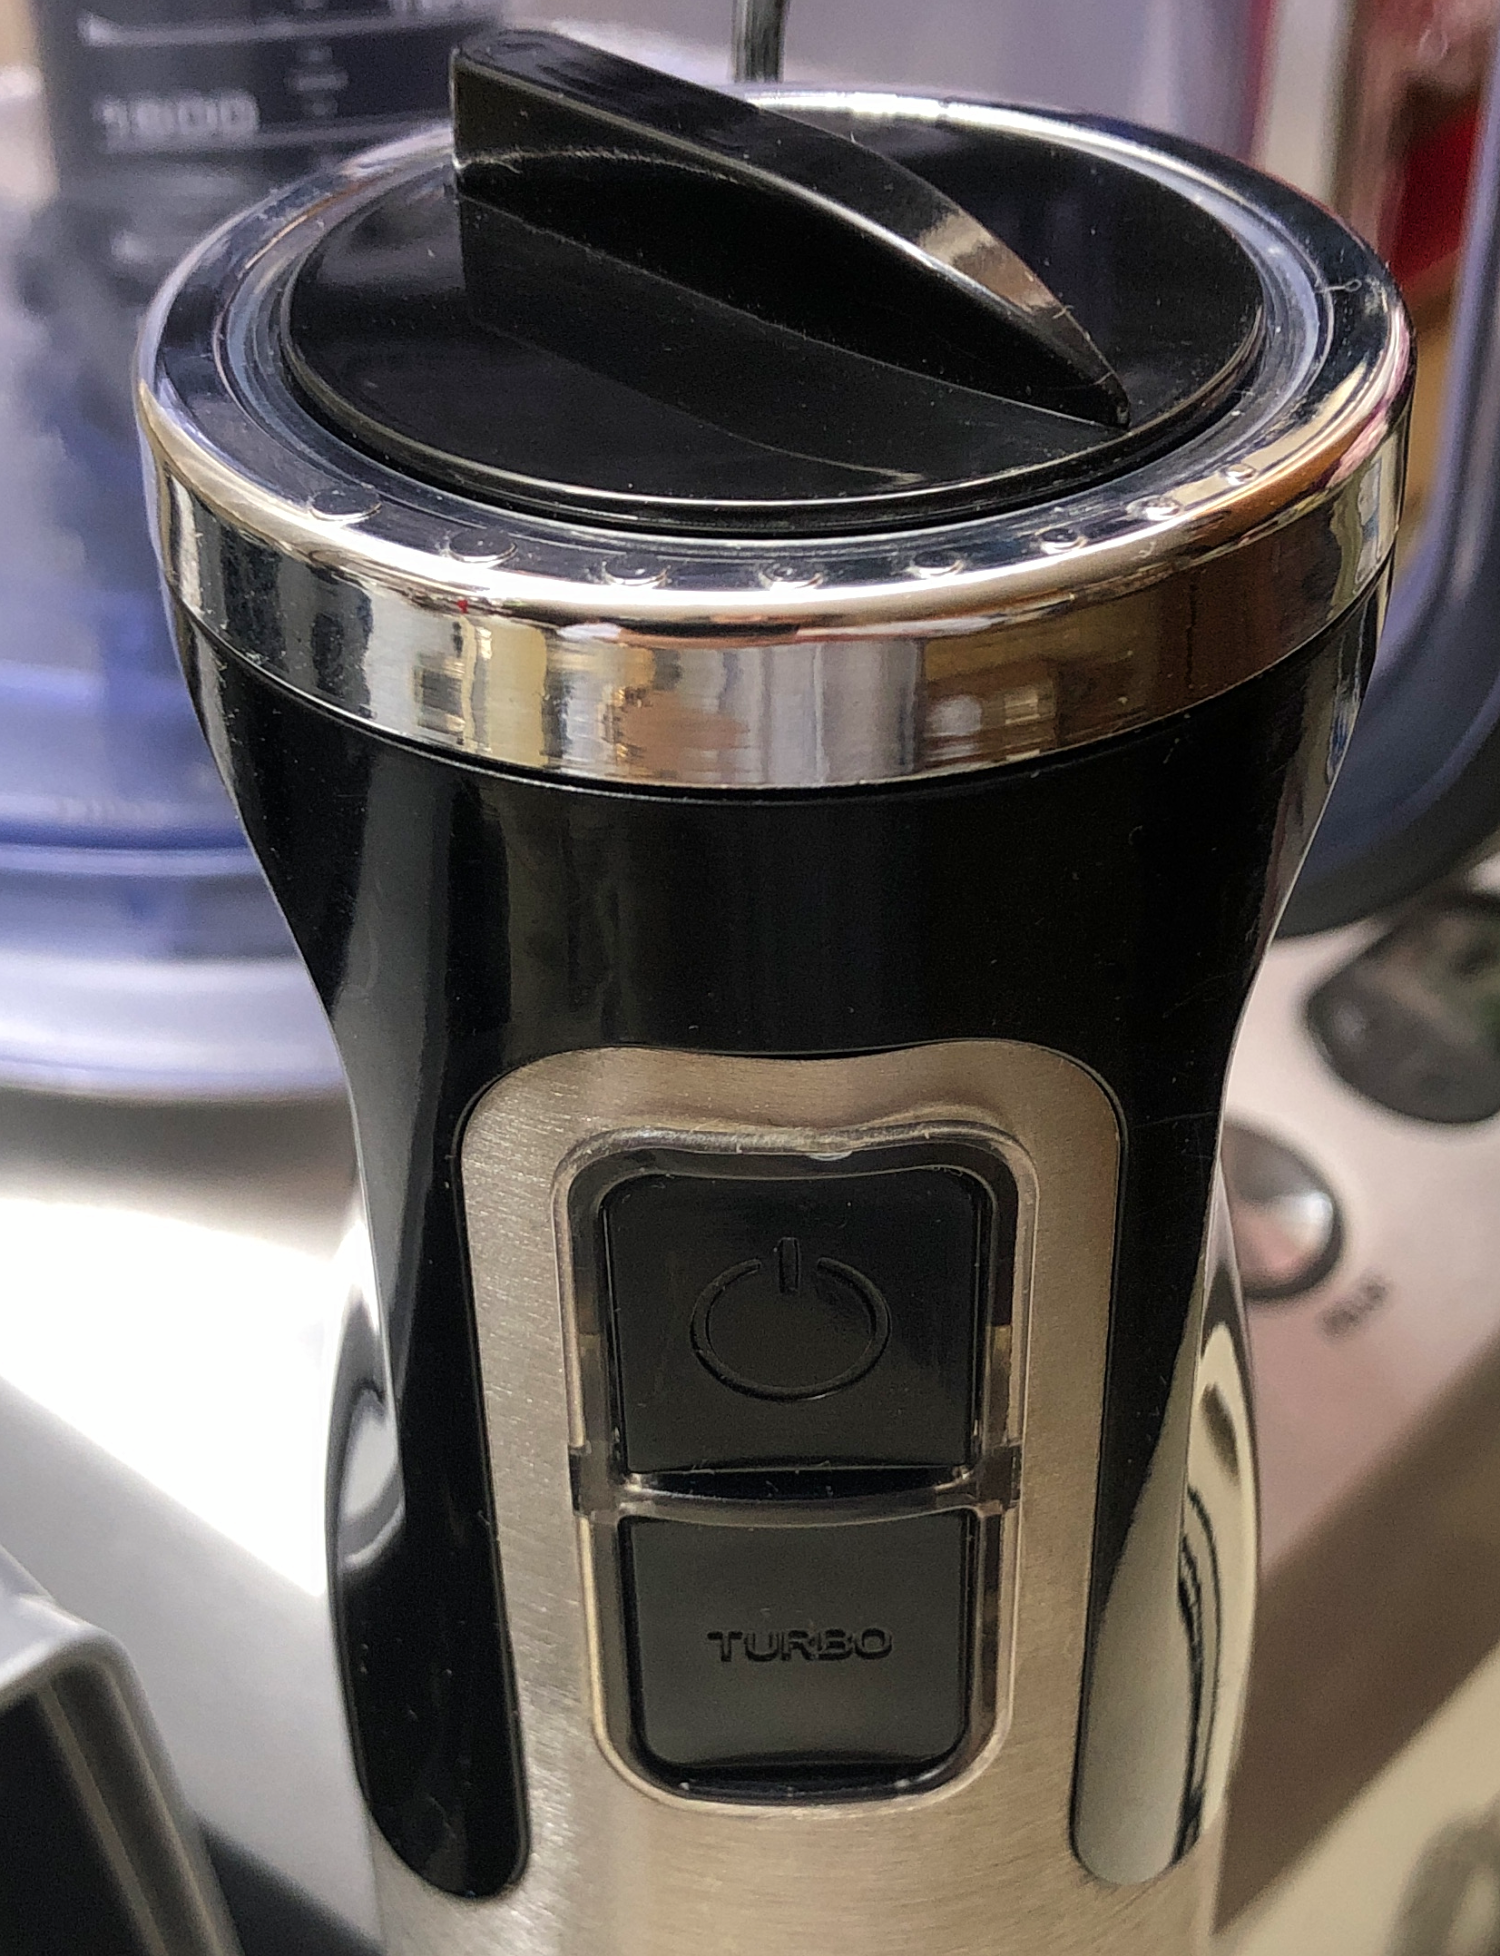
The slim, contoured, ergonomic shape is easy for even a small hand
like mine to hold comfortably. The speed control knob turns
continuously, and the power and turbo buttons require just a thumb
press.
|
Variable Speed Control Knob, One-Touch On/Off Button and Turbo Button Let
You Control That Power Easily
My old model had a variable-speed control dial, but it had only 6 speeds.
That, in combination with the 150W motor, provided a very limited range of
speeds. By contrast, the Müeller Multi-Purpose Ultra-Stick Hand Blender (model
MU-HB-02) offers a choice of 9 speeds, thanks to multiple power and speed
controls that give you more control over its powerful 500W motor.
The top of the motor body housing is the speed control knob. On the side near
the top are two stacked buttons: The power button and the turbo button.
Speed Control Knob: After inserting the desired
attachment—immersion blender, whisk or frother—into the motor body housing,
plug the hand blender into the wall outlet. Then, the speed control dial
clockwise to increase the speed or counter-clockwise to decrease the speed.
Power Button: Press your thumb on the one-touch on/off power
button to turn on the motor and continue to depress it as you blend, whisk or
froth your food or beverage. Release the button to turn off the hand blender.
The company advises not to hold the Power button down for longer than 50
seconds at a time. However, I have not found that to be a limitation, since
the 500W motor provides enough power to complete most tasks I have tried in
less than 50 seconds!
Turbo Button: The Turbo button lets you kick things up a gear when
you need to, whether you are puréeing cooked vegetables or whipping egg whites
or heavy cream. Just slide your thumb down from the Power button to the Turbo
button (directly underneath it) and press it for a quick burst of increased
power.
|
|
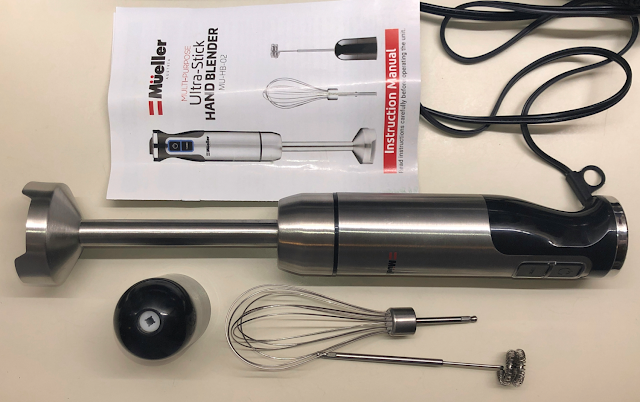
The Müeller Multi-Purpose Ultra-Stick Hand Blender (model
MU-HB-02) with the immersion blending shaft attached, along with the
gear box, whisk and frother attachments and simple instruction
manual
|
Immersion Blending Shaft, Whisk and Frother Attachments Are All Extremely
Useful
Blending Shaft: Attach this to the motor to use the Müeller
Multi-Purpose Ultra-Stick Hand Blender as an immersion blender. Its extremely
sharp, stainless steel S-shaped blade lets you blend shakes or smoothies and
purée soups, sauces or baby food.
Whisk Attachment: I use this lightweight stick blender with the
whisk attachment several nights a week to make fresh whipped cream to serve
with berries, ice cream, or another dessert. The difference in taste between
store-bought whipped cream in a pressurized can and freshly whipped, lightly
sweetened heavy cream with a splash of vanilla is significant. And with my new
Müeller stick blender and wire whisk attachment, I can whip up a small batch
of whipped cream, just enough for my husband and me, in just seconds!
I just pour a few tablespoons of heavy whipping cream into a 2-cup Pyrex glass
liquid measuring cup, add my sweetener of choice and some pure vanilla
extract, then insert my hand blender with the whisk attachment and move the
whisk in circles, holding it slightly above the bottom of the measuring cup. I
start on the slowest speed for 5 or 10 seconds to avoid splattering, then dial
the speed up and finish whipping the cream to the desired consistency. After
spooning the topping over our dessert, I just pull out the which attachment
and wash it and the measuring cup. Easy peasy!
The powerful motor of this hand blender also means I can use it to beat egg
whites or mix cake, cupcake or other thin to medium batters, rather than
pulling out my large, heavy KitchenAid stand mixer (which I now reserve for
mixing thicker, heavier batters and doughs).
Frother Attachment: My husband and I drink Bulletproof coffee (hot
coffee whipped with clarified butter and MCT oil to a creamy, foam-topped
consistency) in the morning. It has several valuable benefits, as I've
discussed in my product review of The Best Affordable Programmable Large- and Small-Batch Coffee Maker. We had already purchased a cordless milk frother for this purpose, but it
devours batteries and is underpowered, which is even more noticeable as the
two AA batteries run down.
The frother attachment to our new Müeller Multi-Purpose Ultra-Stick Hand
Blender is a significant improvement in terms of power (110V vs. 3V), and we
no longer are chewing through AA batteries.
|
|
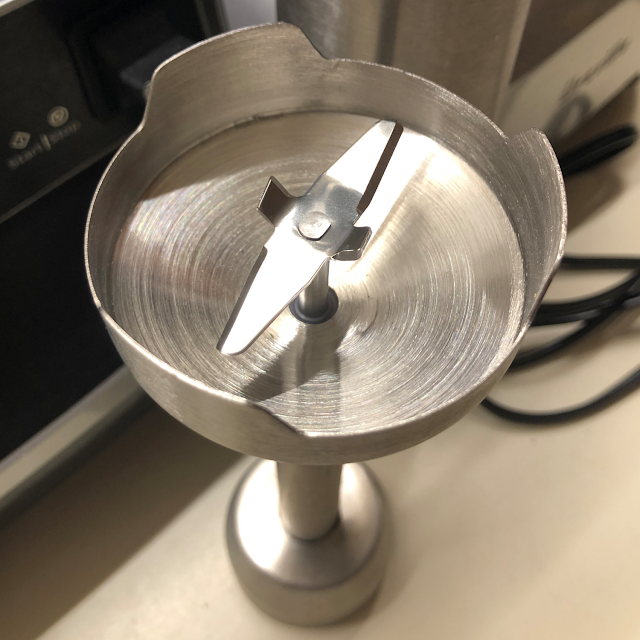
The stainless steel blending shaft has an extremely sharp blade.
Fortunately, it's also dishwasher safe!
|
Easy to Assemble and Disassemble
The plastic whip attachment for my old Braun hand blender was a pain in the
neck to attach and detach from the motor housing. Fortunately, assembling and
disassembling my new Müeller Multi-Purpose Ultra-Stick Hand Blender (model
MU-HB-02) with different attachments is a breeze!
Make sure the motor body is unplugged before attaching or detaching anything
to or from it.
To attach the immersion blending shaft, insert it into the motor body and turn
it counterclockwise so it snaps into the housing (you will hear a click).
To connect the whisk attachment or milk frother, first insert the shaft of the
attachment into the gearbox. Then, insert the gearbox into the motor body and
turn it counterclockwise so it snaps into the housing (you will hear a click).
To remove the immersion blending shaft, whisk or frother after using, simply
reverse the process: Turn the blending shaft or gearbox clockwise and pull
gently to detach it from the motor body housing, then gently pull out the
whisk or frother attachment from the gearbox, if applicable.
Quick and Easy Clean-Up With Dishwasher-Safe Attachments
The motor body housing and gearbox should never be immersed in water, but can
be cleaned easily just by wiping with a sponge or damp cloth.
The blending shaft, whisk and frother attachments can be hand washed in warm
soapy water or put in the dishwasher for easy clean-up.
|
|
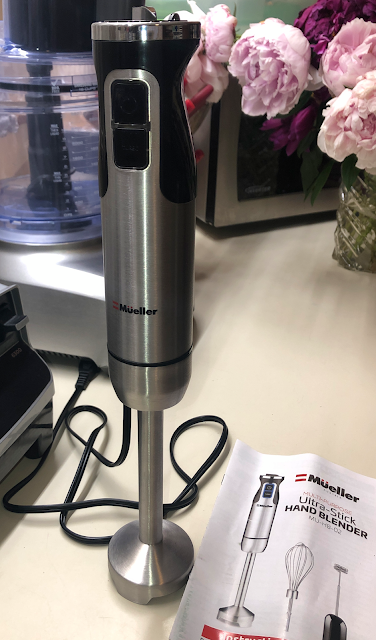
Connect the stainless steel blending shaft to the motor housing for a
powerful immersion blender
|
Lightweight, Slim and Comfortable to Use
The Müeller Multi-Purpose Ultra-Stick Hand Blender model MU-HB-02 weighs only
approximately 1.9 pounds. It is lightweight, slim and has an ergonomic grip
that is comfortable even for small hands like mine.
It is also 12.6 inches tall, so if I'm puréeing hot soup in a stockpot or
Dutch oven, for example, my hand stays comfortably elevated above the heat.
Surprisingly Affordable and an Excellent Value
I could have spent more money on an immersion blender with whisk and other
attachments that had features this one lacks, such as a speed dial that be
operated with the dominant hand while the power is on. However, the
quality/price/performance ratio on this
Müeller Multi-Purpose Ultra-Stick Hand Blender
is quite impressive and it does everything I need it to at an extremely
affordable price—less than $35 at the time of publication.
Since this stick blender with the whisk attachment is made mostly of stainless
steel (unlike many others), takes the place of frother and a hand mixer (and
is much more comfortable to use), can stand in for a regular blender or food
processor in many cases and does a better job than either of those for
blending small amounts of ingredients, it's really a terrific value. The
America's Test Kitchen expert testers also recommended this immersion blender
on the Cook's Illustrated website.
Don’t Use the Immersion Blending Shaft in Nonstick Cookware
The only other feature I could wish for would be a removable pan guard for the
immersion blending shaft's blade housing, like the one on the KitchenAid KHBV53BM Variable Speed Corded Hand Blender, that wouldn't scratch nonstick cookware. However, the pan guard appears to
be plastic, and I wouldn't feel comfortable using a plastic attachment inside
a hot pan or pot of food that's directly on the heat anyway. In addition, that
KitchenAid model has only 180W of power, doesn't come with a whisk or frother
attachment, and the removable immersion blending arm isn't dishwasher-safe.
If I need to purée a soup or sauce, it's easy enough to use a stainless steel
pot or to transfer the contents of a nonstick pot to a stainless steel bowl
for immersion blending and then return the puréed mixture to the pot. This
minor inconvenience is well worth it to have all the advantages and
versatility of the Müeller Multi-Purpose Ultra-Stick Hand Blender, especially
given its affordable price.
An Affordable and Versatile Small Kitchen Appliance Any Home Cook Would
Love

|
Click image to order the
Müeller Multi-Purpose Ultra-Stick Hand
Blender
(model MU-HB-02) on Amazon
|
This is one of those kitchen tools that you don't realize you needed until you
have one. In fact, since I don't do a lot of immersion blending, when my old
Braun stick blender with plastic parts cracked, I thought about not replacing
it. But I really loved being able to whip up a small batch of fresh whipped
cream or whip just one or two egg whites without having to drag out my heavy
KitchenAid stand mixer, which is what prompted me to take a look at getting
another hand blender with a whisk attachment. Finding a lightweight, stainless
steel model with a much more powerful motor at an affordable price made the
decision very easy.
The fact that this stick blender also has a milk frother attachment was a nice
bonus that many gift recipients would appreciate, since lattes, cappucinos and
other frothy drinks have become so popular. And, of course, anyone who drinks
Bulletproof coffee would definitely love such a powerful frother.
I find myself using this versatile stick blender nearly every day, sometimes
multiple times a day, for frothing coffee, making fresh whipped cream, or
puréeing a sauce or gravy to get the lumps out quickly and easily. I'll bet
someone you know would get a lot of use out of this Müeller Multi-Purpose
Ultra-Stick Hand Blender, too.
The Best Powerful, Lightweight Stick Blender With Versatile
Attachments by Margaret Schindel
Read More Product Reviews by Our Review This Reviews Contributors
Read More Kitchen Reviews by Our Review This Reviews Contributors
Read More Gifts Reviews by Our Review This Reviews Contributors
Note: The author may receive a commission from purchases made using links found in this article. “As an Amazon Associate, Ebay (EPN) and/or Esty (Awin) Affiliate, I (we) earn from qualifying purchases.”


.png "Cooking & Baking Prep Tools: Shot Glasses Used As Pinch Bowls")


