Showing posts with label Heather426. Show all posts

Wednesday, September 21, 2016

Review of the KitchenAid Artisan Mixer

KitchenAid Artisan Review, or Why I Love My Blue KitchenAid Artisan Mixer!


My son gave me my KitchenAid Artisan mixer in Cobalt Blue for Christmas in 2006 and I have loved this stand mixer ever since. Of course the most important reason I love it so much is that my son gave it to me! Second would have to be that it's Cobalt Blue, one of my favorite colors! (My kitchen is Blue and White and Stainless Steel.) But even though that is plenty enough to make it one of my favorite appliances in the kitchen, there is so much more to love about the KitchenAid Artisan stand mixer!

Before I got it, I had 2 hand mixers and a food processor and a food grinder, but the KitchenAid stand mixer actually replaces the food processor and the food grinder for me. In fact, with the bread kneading attachment, it takes away the need for a bread maker, really, since the hard part of bread is the kneading. I use my bread kneading attachment all the time in the Winter when I make bread several times weekly. (It came with the mixer.) So that's 4 appliances in one! Cool, right?

And this mixer is strong! They say it has 325 watts of power. (Whatever that means!) What I know is that it whips everything fast with no problem whatsoever! Plus the head tilts back, so easy to get the bowl off the stand.

And about the attachments: Mine came with a wire whisk attachment that will whip cream in a few minutes with ease, the kneading attachment which they call the dough hook, and flat beater attachment that is for things that are truly hard to mix, like stiff cookie dough, or maybe meatloaf. It also came with a shield to keep food from spattering, and a chute for adding in more ingredients. It also comes with a 5-quart polished stainless steel bowl to add to the beauty of this mixer!

In the reviews I read on Amazon, some people noted that this mixer is very heavy so hard to put away and retrieve. Maybe so, but it's beautiful and so useful that it's fine to leave it out on the counter all the time in a place of honor; that's what I do. In fact if you've seen any of my recipes online, you have most probably seen it in some of the pictures, because I don't put it away, ever. It sits on the counter, right next to the wine. Priorities, you know?

KitchenAid Stand Mixer Colors


KitchenAid Stand mixer colors
KtchenAid Stand Mixer Colors


I love Blue, so my son gave me a Blue KitchenAid Mixer, but they are available in an array of colors to go with any kitchen or kitchen theme. You can see in the picture there are different shades of Blue, Red, Green, Yellow, Black, Gray, and even White. (Yes, they have more than one shade of White.) And there are Stainless Steel and Copper too. Here are just a few of the ones available! White, Black, Yellow, Tangerine, Espresso, Watermelon, Ice Blue, Almond, Aqua, Pink, Bayleaf Green, Cranberry, Blue Willow, Boysenberry, Silver, Copper, Cornflower, Blue, French Blue, Apple Green, Red, Gray, Stainless Steel.


*Note about the KitchenAid Mixers Sale


If you are searching for the sale on KitchenAid mixers, it usually happens in January and July. But you don't have to wait to get a great price on one. Amazon always has great deals and you can almost always work out a way to get FREE SHIPPING. On any item, click "More Options" to see other ways to buy it, including free shipping options.


Note: The author may receive a commission from purchases made using links found in this article. “As an Amazon Associate, Ebay (EPN) and/or Esty (Awin) Affiliate, I (we) earn from qualifying purchases.”


Monday, August 22, 2016

Review of Picmonkey Photo Editing Site

Why I Love PicMonkey.com, Plus Tips For Using It

Picmonkey review

Until I discovered PicMonkey, I was stuck with using the free photo editing program that came on my HP laptop, and using Paint, the standard accessory in the Windows platform for computers. But now I am hooked on PicMonkey! It is my favorite free photo editing software! 

I never got around to buying Photoshop, and though I tried to use Gimp, it just was too hard for me to decipher. (Gimp is touted as a free version of Photoshop and many of my friends swear by it, but maybe I am software challenged.) So I thought I would show you some of the ways I use PicMonkey to edit and embellish my photos for articles on the internet and how you can too.

First of all, if you don't have an account,  just go to PicMonkey.com and sign up for an account. Once there you will see a page that varies as far as the image, but at the very top you will always see this:

Picmonkey header photo


You can see that I am signed in, but if you are not, just click on "Log In" on the right, and then you can begin editing.

You can also see the 4 buttons in the center that show where to start your photo editing project. For basic and advanced editing of your own photos, click "Edit." I will cover "Design," and "Touch Up" and "Collage" further down this page.

Once you do, it will show a screen asking you where to get the photo you want to edit. You can choose your computer, Facebook, One Drive, or their own new platform, Hub. Most people are probably going to choose a photo from their own computer so I will explain using that option.

Once you click on "Computer" it will open a window to your own files. Just scroll to your photo folders and click on the photo you wish to edit. That will place it on the screen in PicMonkey.  You will notice that on the left is a row of buttons. At the very top is a symbol of lines and dots and if you hover over that, it says "Basic Edits."  If you click it you see a list of edits you can do.  Here is an example of a photo I uploaded to the editor with the sidebar showing the menu:

PicMonkey tutorial image


The first thing I like to do is open the "Rotate" button. (3rd button down on the left) You can rotate your photo in all directions, to change the orientation from horizontal to vertical and also to change the top to the bottom, just by clicking the arrows. But what I like to do is play with the "Straighten" slider. I guess I don't hold my camera steady as I often have photos that are crooked. But that is an easy fix in PicMonkey. Just slide the arrow till you have a straight photo and click "Apply." It even has guidelines to make it easy for you.
PicMonkey tool


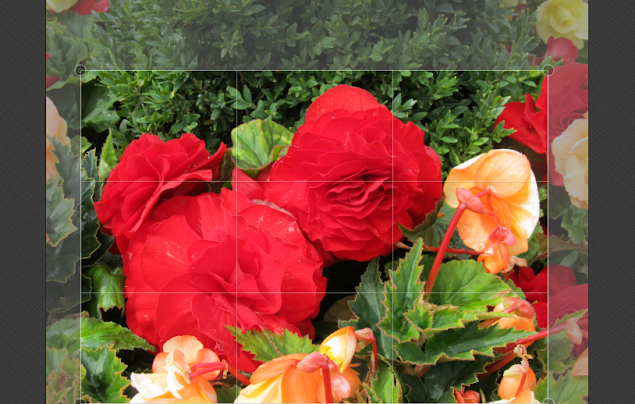
Then I like to open the "Crop" button. The reason I straighten before I crop is that straightening sometimes takes part of the photo off, so I want the whole thing straightened before cropping.  Here you can see the crop lines I am going to use. You can drag the lines around till you are happy with your photo.

roses editing image

Here it is after I clicked on "Crop." You can move the crop lines wherever you want them. When you are satisfied, just click "Apply" and then your photo will be magically cropped like this one.

roses


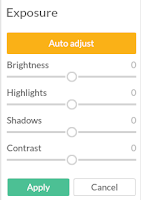
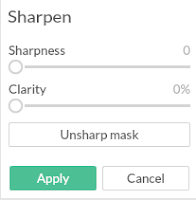
Then I like to do some basic editing so I click on "Exposure." The first thing I do is click on "Auto Adjust." This is often all that I do, as it seems to make my photos pop and look great. But you can also play with all the sliders and if you like the way a photo looks you can click "Apply" and those changes will be done.  When you are satisfied, just close that little window by clicking "Cancel" or "Apply," whichever is the case. Here  are how the other sections look when they are open. On this rose photo I have not done any other edits. I just cropped it and auto adjusted the exposure.

PicMonkey exposurePicMonkey sharpeningPicMonkey colors

If you make a mistake, there is an "Undo" button. At the very bottom of the screen is a backwards arrow. Just click that anytime you are not happy with your design and undo the last step! You can actually keep hitting "Undo" until you get back to a place where you are happy and then continue your design from there.
.
PicMonkey undo

More Tricks for Using PicMonkey


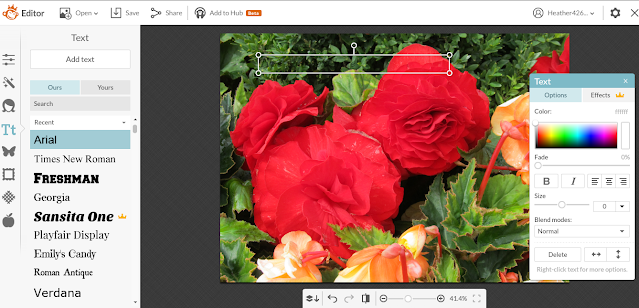
Now besides the  "Basic Edits" you can do a lot of different effects. One I use a lot is the "Text" function to add text to photos. This is great for making photos for Pinterest and other media like Twitter. So just click on "Text" and you will see this: (photo on the right)


font tool


Notice the slider on the right. Use it to scroll through all the choices of Font you can use.


I am going to use Marcelle Script so I just click on it and change the color of the script in the little box that pops up. I will use a very pale shade of blue but you can pick whatever you want. Move the box wherever you want and drag the edges to make it bigger or smaller. Then start adding text in the box. Example is below.

PicMonkey add text tool


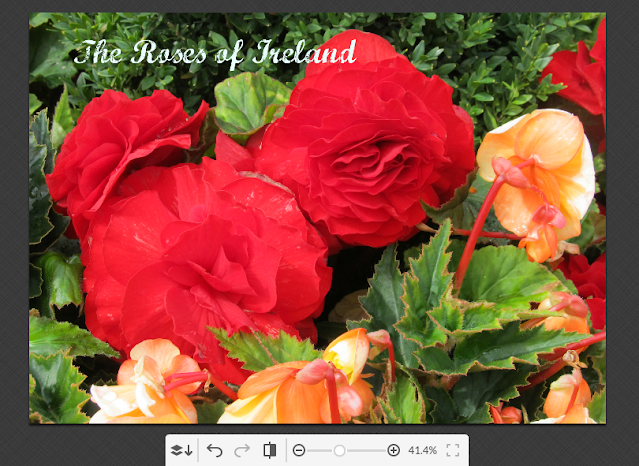
And below is a picture of it after adding the text. Just click on the photo somewhere else besides the text box when you are finished and the text box disappears and your text is there.

roses of ireland


Now let's say I want a background under the text. You can add any number of special effects by clicking the buttons on the left and scrolling till you find a design you like and clicking on the photo to place it. You can also move it around on the photo. Just click on it once and drag it wherever you want it. Here  I have added a ribbon. Once I clicked on it and placed it I changed the color to White. Then I added text over that.

roses image


There are plenty of other effects you can use on the left too. The "Touch Up" ones are great for faces! And if you want a set of photos in a theme, there are lots of themed effects. They have a Zombie theme, Victorian theme, and lots more!  Just click on any of them to see all the things you can do. It would take me hours and hours to go over all the wonderful effects you can create, but the easier and more fun way to learn it is to add a photo and play with all the buttons to see what you can do! PicMonkey also has tutorials explaining how to use all the functions. Just scroll down on the Home page and you will see them.

Here are a few things I did to the image after I got the text and the ribbon trim on it. First are different edges. One is a simple box edge and next is a craft scissors edge.

spring flowers roses

roses post card

Then I added an effect called "Frost" which adds the color of the frame as a brushed effect all around the edges, and on the lower one I added a "Bokeh" overlay to make it sparkly. These are just a few of the effects you can get!

roses - spring flowers banner
State Flowers of the USA Coloring Blog


roses with sparkles


Using PicMonkey for Graphic Design

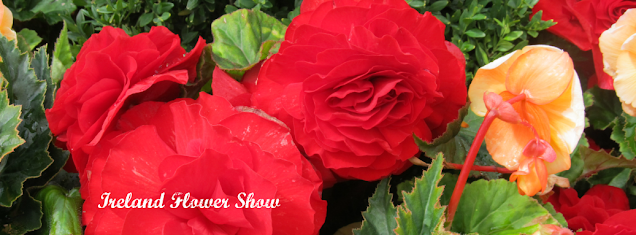
You can also use PicMonkey to design graphics and my favorite, Facebook covers. Up above where it says "Edit, Touch Up, Design, Collage," click on "Design." Then you will see a square, a Facebook cover, different sizes, and a custom option. To do a Facebook cover, just click that option and it opens up a screen with the exact size you need. Next click on "Overlay" on the left. You have your choice of many there, so you can scroll through and have fun designing your own cover by adding a combination of effects on the screen. Or you can add your own, just click on "Your Own" at the top. Here I have used the same photo of roses by clicking on the file in my computer and then dragging the edges out till the whole template is covered. Then I have added some text on top of that. It's now ready to upload to a Facebook page.

roses banner


One more thing that I think is pretty cool is that when you are designing, you can choose your background or even make a transparent background for designs you might be doing for Zazzle or other design platforms. For that you go to "Basic Edits," and click on "Canvas Color." If I wanted to make a round logo for example, I would choose a transparent background and then overlay a circle from the "Geometric Shapes" overlay section. Then I would put whatever design I wanted inside the circle, like text, colors, and/or textures. Once I have saved the design I have a round logo. Here is the one I designed for my Aurora Art Supplies products and website.
aurora art logo
Aurora-ArtSupplies


And here are some Photos I edited in PicMonkey and added banners and text to use on my Amazon ads for my Aurora Art Supplies Colored Pencils and Water Color Pencils.


Using PicMonkey for Website Design 


Okay let's say I want to design a background for a website. And maybe I want a Blue sparkly one. First I would add Blue as my background color. Next I would go to the textures in the "Overlay" section and start adding them till I have an effect I want and then save it. Then I would go to the editor in my Wordpress theme and where it says to add a background, I would upload that file. Voila, a custom background. Here is one I made so you can see. I used a Blue solid color, then "Space" overlay,  then a "Bokeh" overlay. I played with the saturation till I liked it and saved it.

blue star


There are so many effects you could really play for hours and design any number of cool things. And I didn't go into the "Collage" function, but all you do for that one is click on the "Collage" button above, pick a style from the left side menu and add photos to the cells by dragging them to the one you like. You can even design text boxes and add them as one of the photos of the collage. My friend Kim is a master of PicMonkey collages. Here is one she made for her educational site for kids to learn State facts.

coloring banner

A very useful function that I use all the time is the "Resize" function at the bottom of the "Basic Edits."  Just click on it and you can make your photo whatever size you need! Very useful for websites!

So I guess you could say I am a PicMonkey addict now! Try it and I bet you will be too!  But a few of the fonts and effects are premium so you have to pay extra for those. Well I wanted them for a project so I signed up for one month only ($5) so I could make some cool designs. Then I reverted back.  A few days later PicMonkey sent me an email asking me why I cancelled the premium version and one of the answers you could pick was "It costs too much." That's what I picked and then they offered it to me for $33 a year, or less than $3 a month.  So if you want the premium version, that's how you can get it for less. Try it for a month at $5 and then cancel. I love  bargains, don't you? Thank you PicMonkey! 

*Of course, this may have been a one time offer, I can't promise that the offer will always be there. But it doesn't hurt to try, does it? 

Picmonkey banner


Note: The author may receive a commission from purchases made using links found in this article. “As an Amazon Associate, Ebay (EPN) and/or Esty (Awin) Affiliate, I (we) earn from qualifying purchases.”


Monday, August 1, 2016

Review of CreateSpace Self Publishing Platform

Instructions for Publishing Books at CreateSpace.com


 State Flowers of the USA Coloring Book: For Students and Teachers

Ever since I published my 3 books on CreateSpace people have been asking me how to do that and if I recommend them. The short answer to that is yes, I do recommend them.

The other thing people want to know is if it is hard to do. That is not so easy to answer. There is a learning curve for sure, but I do have some free tools you can use to make it easier. All in all, I think CreateSpace is a fantastic tool for first time authors to get themselves published.

*All the books on this page are my own books I have published at CreateSpace.

Getting Started at CreateSpace 


So here I am going to take you step by step through the process to create your first book on CreateSpace and get it published and listed on Amazon and maybe picked up by booksellers who will also distribute it for you. My first book is on the right and got picked up by 12 other sellers besides Amazon including Barnes and Noble and several teacher websites. I am thrilled! 


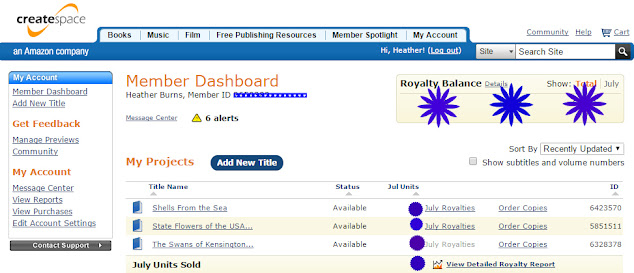
The first thing you will need to do is sign up for a free account. Just go to http://CreateSpace.com  and follow the easy registration instructions. Once you have an account you will be taken to your dashboard. It looks like the image below. The first thing you do to get started on a new book is to press that Blue button that is just about in the middle of the page which says "Add New Title." If you know the title of your new book just go ahead and add it. Don't worry you can change it before you publish, so  just put something and that way you will have access to the rest of the tools. This is the first part of the setup by the way.  After you have a title, you can just hit the button at the bottom that says "Save and Continue." 
screenshot of members dashboard on createspace


screenshot of createspace dashboard tool
Menu 

On the right is a photo of the Menu that is on the left side of the setup process once you add a title. You can see that the different parts of the process are listed and when you complete a section it gives you a Green check mark so you always know what else needs to be done. 

The set up process is a series of pages where it will ask you to put in information about your book, so just do each step and hit save. The next thing it will want to know after the title is the ISBN. Now I am a big fan of "free" so I just use their free ones. The only reason to buy your own ISBN would be if you wanted to have books printed by them and then distribute them yourself. I have no idea why anyone would want to do that work though! Later in the process you will see that CreateSpace gives you the option to have your book distributed by Amazon (they own CreateSpace) and also by other online sellers and even by bricks and mortar stores like Barnes and Noble.  I am a big fan of "easy" too! So just use their free one, and go on to the next step, which is the Interior.

In this step, you pick your size and type of printing. You will see a list of formats and there is a button you can click to see the approximate cost to print too. But to save you time here is a page with a list of the sizes and templates you can download to add your content. https://forums.createspace.com/en/community/docs/DOC-1323

Now the next step is the heart of the matter so to speak; adding all your content. The templates are set up for Microsoft Word, or for OpenOffice. I don't have Word, so I use OpenOffice. (because it's free, LOL, just go to OpenOffice.org and download it! ) I find this to be the hardest part of the process, because you have to make sure your content is exactly the way you want it printed. I have done 2 coloring books and I wanted them to be printed on one side only to make a nicer product for the colorists, so I had to really pay attention to insert a blank page after every image. If you don't know how to use OpenOffice or Word, that is beyond the scope of this article, but I used Google and YouTube and was able to do find tutorials to format everything properly. Just type your question into Google. 
 Shells From the Sea: Coloring Pages and Greeting Cardsbuy button


Once you are happy with your book, save a copy, and then also use the "export as PDF" function to save as a PDF too, because CreateSpace wants you to upload it in PDF form. But if you ever need to edit it later, you might need the original document, unless you have Adobe software and can edit PDF documents. So just to be sure, I always save the original Open Office document and also a PDF document.


If my instructions are not clear, you can also see lots of helpful tips on the page under the Interior button. Also there is a forum with a community of writers who have compiled a list of frequently asked questions. However, many of them are experienced authors and seem to be a little impatient with first time authors, so I just use Google to ask my questions. For example I might ask "how do I  __________ on a createspace template?" You would think CreateSpace would be easier to ask, but no, Google is. 


Designing the Cover of Your Book on CreateSpace


Next is the cover. They have templates for that too, so just scroll through them till you see one you like. Here's a hint. Under each cover there is a scroll bar to see different versions. The typeface and the colors can often be changed so there are a lot more variations than is apparent when you first look through the cover options. Just pick one you like and upload your image if it calls for one. They often have specific requirements for the images, so if your images are not the right size you will need to edit them. Lots of people have Photoshop but I don't, so I use http://Picmonkey.com. (yes, it's free) You can upload an image there, change the file size in a few clicks and then you are good to go!

 The Swans of Kensington Garden: A Photo Book of Swansbuy button

Speaking of images, they have to be at least 300 dpi for CreateSpace so what should you do if yours are not?  If you have Photoshop, this is fairly easy to fix but if you don't, here is a free software program you can use to change them to the correct dpi. Just go to http://www.Irfanview.com and download the free software.  

The program can be used for many other things too, but I only use it for changing the dpi and use Picmonkey for all the other things I do with images, like change the exposure and crop, add text, straighten, etc. Picmonkey is much easier to use for those things. But you can't control the dpi with it. A hint when  you use Picmonkey: save the file as the best quality jpg. They call it Sean. Yes it is a bigger file, but it will make your finished book far more beautiful! 

So once you have your interior and cover done, you are ready to complete your setup. This just involves setting the price, telling CreateSpace where you want it distributed and approving the proof. You will be able to check it page by page to be sure it meets your expectations. Once that is done, CreateSpace will also have to examine your proof to make sure it meets their specifications. They will either approve it, or send you a message that it needs to be changed. Don't worry, they will tell you exactly what needs to be changed. 

Here is a photo of the project page that shows all the steps in a graphic so you can see what is done and what needs to be finished. This is a completed book so all my steps are completed and marked with a Green check mark. (I can't publish a coloring book on Kindle so that one has a red button.)

screenshot of createspace dashboard


Eventually you will get it approved. I say that because it usually takes a few times before they do approve it. But then, wow, you will have published your first book! Good luck! 


Note: The author may receive a commission from purchases made using links found in this article. “As an Amazon Associate, Ebay (EPN) and/or Esty (Awin) Affiliate, I (we) earn from qualifying purchases.”


Monday, June 27, 2016

The Swans of Kensington Garden~Perfect for Swan Lovers!

Review: The Swans of Kensington Garden


Why am I reviewing my own book? Because many people love to give coffee table books as gifts and I am one of them. Who doesn't love a beautiful book of photographs to look at? They make perfect gifts for people who seem to have everything. Plus they are a perfect accessory for the coffee table and a conversation piece when guests come over. With that idea in mind I recently published a coffee table book of my own: The Swans of Kensington Garden.

It all started with a trip to London, England and a visit to the gardens surrounding Kensington Palace. I just could not get over all the beautiful Swans in the lake there so I went home to grab my camera and started snapping away.  My husband and I love birds a lot and Swans in particular so this was a dream day in London for us. In the end I had more than 300 photos of the beautiful Mute Swans that inhabit the lake. When I got home I decided it would be wonderful to share all my photos and some fun facts about the Swans so the book was born.


I used Create Space to publish the book on Amazon. It was actually very easy to do, although there is a learning curve. I think the hardest thing was choosing only 36 photos out of the more than 300 I had taken. Actually maybe the hardest thing was formatting them and the text to fit in the template provided. But I am very happy with how it turned out, and now I have a permanent reminder of that beautiful day in my living room and not only do my guests get to see it, but anyone who purchases the book does too. I might be biased but I think it's a beautiful book and fun to read. I added little tidbits of information about the Mute Swan and several poems so you might even learn a little about Swans that you didn't know.

My friends who have seen my Swan book have all  remarked on the quality of the cover and the photos, so if you ever want to create a permanent memory of a trip and have a wonderful gift to give your friends, I highly recommend using Create Space to create a book very inexpensively. Very soon I will be writing an article explaining how to do that.

Meanwhile, if you love Swans, or know someone who does, my little coffee table book of Swans is sure to please them and would make a wonderful gift.


Note: The author may receive a commission from purchases made using links found in this article. “As an Amazon Associate, Ebay (EPN) and/or Esty (Awin) Affiliate, I (we) earn from qualifying purchases.”


Tuesday, June 14, 2016

Why I Decided to Create Aurora Art Supplies™ Coloring Pencils...

Review of Aurora Art Supplies Colored Pencils

...And why I am writing a review of my own colored pencils.
Aurora Art Supplies coloring pencils
Aurora-ArtSupplies.com

Ever since I published my first coloring book last year I have been getting lots of letters from fans and questions about which colored pencils I recommend. I also color myself, and my artist husband colors his sketches before he paints, so we have a lot of colored pencils at our house. I wanted to find out which ones are best for which types of coloring so I bought a bunch of them. There is quite a variety of coloring pencils, so it can be an adventure to choose the right ones.

Then in the midst of this experiment, I read that due to the worldwide coloring craze going on, stores are having trouble keeping them in stock! Some people in my coloring groups were telling me that they had to wait for over 3 months to get the ones they want.
A light bulb went off in my head. What if I could create some really high quality coloring pencils that are not so costly as the ones available right now?

So I asked around in my groups for a list of what people are looking for in a coloring pencil. Not everyone wants the same thing of course, but there are some common themes. Colorists want creamy coloring pencils with colors that blend easily. They want a variety of colors. They mostly like hexagonal shaped pencils so they won't roll off the table. They want longer ones. Many coloring pencils come in 5 inch lengths, and people feel ripped off. By the time you sharpen them a few times you are dealing with a stubby pencil. And they want them to be strong enough that they won't break easily. A big request was that the pencils be usable as water color pencils by adding water. And they want them to be affordable. Whew! That's a long wish list!

coloring pencils


But I took my list and started talking to suppliers in China. (I really wanted to find an American supplier, but had no luck, so I went to China. Even some of the most expensive coloring pencils are made there, and the factories are already set up so all you have to do is give them your specifications.) One of the first things on my list of specifications was a larger lead inside the pencil so that the lead would be stronger, and the pencils would last longer. (Of course it's not real lead, and it's non toxic!) Then I made sure mine are 7 inches long. All of those factors mean you are already getting more for your money than you would with a lot of coloring pencils. Then I had the supplier give me lots of different formulas to choose from. I selected a formula that is wax based, but with less wax than a lot of them, and more pigment. This makes it possible to add a little water to your pencil and blend so the result is somewhat like the effect of water colors on the finished art.

For my first product, I chose a set of 48 colored pencils, which gives a variety of colors and since they blend easily you can make other colors by blending 2 or more of them. In the future I will add a set of 72, and a smaller set of 36. I will also add different types of coloring pencils, for example, very soft chalk type oil based pencils. (like Prismacolors) I also plan to add colored markers and high quality artist brushes to my line of products. Aurora Art Supplies™ is just getting started as a company, but it's here to stay. Stay tuned for many more products! You can see the company website here: Aurora Art Supplies™

Here is my first set of colored pencils, available now at Amazon. I already have happy customers. You can see for yourself they are vibrant! I included a mini coloring book of flowers hand drawn by me for the first 1000 customers. I hope everyone will love them!


Note: The author may receive a commission from purchases made using links found in this article. “As an Amazon Associate, Ebay (EPN) and/or Esty (Awin) Affiliate, I (we) earn from qualifying purchases.”


Wednesday, April 13, 2016

Let's Review the Best Travel Accessory for Foreign Travel

An Essential Travel Accessory

Why I chose to review this handy little travel accessory/gadget: There are many little travel gifts and travel accessories for the serious traveler, so it's hard to choose just one as the best, but if I had to choose the best gift for a traveler, it would be a travel adapter/surge protector.

The reason I say this is that even though you might think otherwise, every country has their own electricity configurations, and what works in one country will not work in other countries. I wonder who thought up this idea? My guess would be electricians, but I digress.

The USA uses 110 volts, and along with Panama, they are the only countries who do. All the other countries use 220 volts. And as if that weren't enough to fry your electronic devices, they all have different plug configurations! So if you are traveling in Europe, your plug for your computer, phone charger, camera, etc are not going to fit in every country. You really don't want to get in late and try to plug in your computer or phone and find out you can't. Travelling can be stressful enough without that aggravation!

Now many hotels do provide them, but not all do. And even if they do, they almost never have surge protectors and you don't want to fry your laptop now, do you? So it's best to bring your own adapter/surge protector.

Before I left the United States for my around the world tour, I looked into this because I had just purchased a new laptop, and a new camera, and I have an iPhone, so I wanted to be sure I had surge protection in addition to adapters. What I settled on was this handy gadget:


I have been completely happy with it, as there have been times when my hotel did not have the correct  plug for my devices, and there have been other times when the wifi was very "iffy" and sporadic, so I would have been worried but I wasn't, because I had this wonderful gadget with me! It takes up very little room for the piece of mind you get from it, so I think it's my favorite travel accessory of all. I am sure my computer was saved more than once from power surges on our trip.

Note: This is not a voltage converter. Most computers and electronic devices these days will work on either 110 volts or 220 volts but be sure you check before you try to use them in a different country! My phone, camera and computer all worked fine and had no problems. If you aren't sure, check your manufacturer specifications. (And if you threw them away, just "google" them.)

On Amazon this accessory has lots of positive reviews and I noticed one that said they don't travel outside the country but their family hangs out in the living room together with all of them using their own electronic devices and they all need to charge their devices at once so it works for them as it has 6 USB ports. That made me laugh. Family time now means everyone using their devices in one room. Well I guess that's better than no family time at all. I'm still laughing.


Note: The author may receive a commission from purchases made using links found in this article. “As an Amazon Associate, Ebay (EPN) and/or Esty (Awin) Affiliate, I (we) earn from qualifying purchases.”


Friday, February 26, 2016

Review of Hotels.com

How to Find Hotels While Traveling


When I started to think about how to find hotels while traveling on my around the world trip, I researched a few hotel sites and gave them each a trial. I did this by checking prices and booking hotels in a few cities and then cancelling so I could see how hard that would be if I needed to do so. Because besides being able to find hotel deals, I wanted to be able to cancel easily and get a refund easily.


Of course I also checked prices on the exact same hotels to see how much surcharge the sites added to the basic hotel price. Then I read the fine print so see what else could be a factor. Last, I checked the perks of using each site. I wanted to use one site for the whole trip so I could get the most free nights! Hotels.com gives you a free night for every 10 nights you pay for! I love that and took full advantage.

I also wanted to be able to find hotel rates and book from my iPhone on the fly in case we liked a town and wanted to stay as an impromptu adventure. All the sites I checked had this and the prices didn't vary by much so it really came down to customer service, and how easy it was to cancel and get a refund. Based on all these factors I decided to use Hotels.com and I am so glad I did.

Alumudena Cathedral Madrid Spain
Mary and Jesus, Almudena Cathedral, Madrid

Great Customer Service from Hotels.com

Maybe my Madrid story will illustrate why I love Hotels.com so much. First of all, Madrid was the only city where our hotel did not exceed our expectations. But I'm not sure it was the fault of the site anyway. Our "adventure" started a few hours after I booked our room when I got a message from the hotel that was not friendly informing me that I had better not be late or I would be at their mercy and might have to wait up to 4 hours for them to come back and check us in. They explained that they had several properties and would meet us, thus the need for us to be timely. Okay, but we were traveling by train with no control over the train's timeliness, and didn't know how hard it would be to get a taxi or how long we would have to wait for it.

This made me ill at ease so I emailed customer service at Hotels.com that I would like to cancel and get a different hotel because they seemed so nice in the description and then changed into jerks about being on time. But somehow I used the wrong email address and it was not received until the following week so I never got a response.

Madrid Plaza de Cibeles
 Plaza de Cibeles, Madrid, Spain


So we went on to Madrid anyway and actually got to the hotel before we were due but guess who was late? Them!!! The other thing I should mention is that I had emailed them and told them I had a broken ankle and would need to be on the bottom floor or there would need to be an elevator. So guess where they placed us? On the 5th floor!!! And there was no elevator!!! I did manage to climb the stairs to the top but the last straw was that this room looked nothing like the photos that had been posted on Hotels.com. I won't bore you with all the details of how different it was! LOL

This was just too much to deal with so I called customer service even though it was very expensive for me to do so. (Roaming charges are expensive for my carrier!) After telling the representative my sad tale and explaining that the room was nothing like the photos and I thought they had been defrauded by the hotel, the representative put me on hold for just about 2 minutes and said they would be crediting my account $200 and investigating the photo situation. And of course I did not have to stay in a room so high up with no elevator! Yay! Plus I got the correct email address so this would never happen again.

This made our eventual room in Madrid essentially free so we still love Hotels.com. It could have been prevented but they fixed it and paid us back. What more could you ask for?

That is the only bad experience we've ever had anyway! Most of the hotels we booked turned out to be prettier and much nicer than the photos. And we have gotten so many free nights! Plus many of the hotels we stayed in upgraded our room for free. I have never stayed in so many beautiful rooms. I think this is because they want to be on the top of the recommended list at Hotels.com. So they treat its customers really well hoping for good reviews. It works! I'm a very happy customer!


All Photos © Heather Burns, All Rights reserved.


Note: The author may receive a commission from purchases made using links found in this article. “As an Amazon Associate, Ebay (EPN) and/or Esty (Awin) Affiliate, I (we) earn from qualifying purchases.”


Wednesday, February 4, 2015

Review of Skechers Women's Go Walk Impress Memory Form Fit Walking Shoe

Reviewing a Great Walking Shoe


womens walking shoe
All Black Women's Walking Shoe
walking shoe
When you are traveling around the world like I am, you do a lot of walking and that means you need good walking shoes for travel!  So before I left the USA, I researched women's walking shoes, and decided on this brand:  Skechers Women's Go Walk Impress Memory Form Fit Walking Shoes.

I am so happy I did, as they have made my trip so much more comfortable than I thought possible. You see I have a back injury and I was worried about walking but didn't want to miss all the monuments and cool sights I went there to see in the first place. Because of these shoes I haven't missed a thing.

* All of the following shoes are available at Amazon.com by just clicking the photo. 

womens black and white walking shoe
Black and White Women's Walking Shoe


So why do I love the  Skechers Women's Go Walk Impress Memory Form Fit Walking Shoes?

Well you have probably heard of memory foam because it is used in mattresses and pillows worldwide for its comfort.  It is very comfortable in shoes too! The memory foam extends to the heel so the whole shoe is very light! They have rubber soles, and are so well made that my feet have not gotten wet at all even though it has rained a fair amount on our trip. The midsole is cushioned too so that adds to the comfort level.  These shoes are so lightweight and flexible that it's like walking on air.  I love them!

womens grey walking shoe
Grey Women's Walking Shoe

I also love that they are slip on, as opposed to ones that you have to tie. People ask me if they are hard to keep on. No, they are easy to keep on. I have worn slip on shoes for years and  have never had a single problem. Now some people would rather have walking shoes that tie, so if that is you, check out my friend's review of walking shoes here: Inexpensive Home Fitness .


Skechers Walking Shoe Colors


I got mine in blue with a white sole, and believe it or not, the white still looks white! You can see it below. But if you like black,  the shoes are available in all black (meaning the soles are black too) or black with white soles. They are also available in 2 shades of gray. Funny that they call one of the shades gray, and the other one grey. One of these colors is sure to go with your travel wardrobe. I have shown a few of them in this review of women's walking shoes.  Mine also still look almost new and I have worn them every day for more than 3 months now!

womens blue walking shoe
Blue Women's Walking Shoe

So if you want walking shoes for travel that you don't have to tie, I highly recommend these wonderful women's walking shoes!


Bon Voyage!


Note: The author may receive a commission from purchases made using links found in this article. “As an Amazon Associate, Ebay (EPN) and/or Esty (Awin) Affiliate, I (we) earn from qualifying purchases.”


Wednesday, January 21, 2015

Rockland Melbourne 20 Inch Carry On Luggage Review

Best Carry On Luggage!

Since I'm on an around the world tour I decided to buy new carry on luggage for it.  All the airlines have changed the size of allowed carry on luggage in the last year or so, making it a necessity anyway, and besides, I wanted to start my trip with cool luggage. 

*All of the following suitcases are available at Amazon.com by clicking on this photo. 


 Rockland Melbourne Hardside Expandable Spinner Wheel Luggage, Blue, Carry-On 20-InchCheck Price


One thing that I found out is that all the airlines have different standards though, so what one airline will accept as carry on luggage is not necessarily what another airline will accept. So I had to look at my itinerary first and get a list of the allowed sizes and go from there. I took the maximum allowed sizes in all directions for every airline I would be using and used the smallest allowed ones as my maximum to be sure my carry on bag would be okay no matter what.


carry on suitcase
Rockland Melbourne 20 Inch Carry On Luggage

Next I went shopping on Amazon, one of my favorite things to do. What a dizzying array of choices though! So then I went to a couple of local luggage outlets to have a look at the newest innovations in luggage. Wow, I love the new design of the wheeled luggage! Instead of fixed wheels, they spin so it's easy to move your baggage in all directions! 

carry on suitcase
Interior, Rockland Melbourne Carry On Luggage

This made it much easier for me to handle my own luggage on all the trains and airplanes. In fact, instead of wheeling them behind me, I can set them straight up, pull out the handles and wheel them along beside me with my purse sitting on top of one. So easy!  And much easier on my back too! 


carry on suitcase
Rockland Melbourne 20 Inch Carry On Luggage

Why is Rockland the Best Carry On Luggage? 


In the end I went with a Rockland 20 inch Expandable Abs Carry On Suitcase, because it fits the guidelines of all the airline companies I have flown on, and it came in my favorite color: blue. But not to worry if you have a different favorite color, as the suitcases come in 19 colors! (Some of them are shown here in my review.)


carry on suitcase
Rockland Melbourne 20 Inch Carry On 


So here's what I like besides the spinning wheels and blue color. It expands about an inch for the airlines that allow it! You might not think that would be a lot, but trust me, it really is when you are packing a carry on suitcase!

carry on suitcase
Interior, Rockland 20 Inch Carry On 

The material is extremely lightweight and durable so it only weighs 7.3 pounds! The handle is an internal chrome telescoping one with a push button mechanism.  Inside there is a zip pocket on one side and elastic straps for the other side. It comes with a 3 year warranty too, but I doubt it will come close to needing repairs.  It's strong!  


carry on suitcase
Rockland Melbourne 20 Inch Carry On Luggage

I love my Rockland Melbourne 20 Inch Carry On Luggage so much that I've decided to get a matching large suitcase too! So if you need  a new carry on suitcase, I highly recommend a Rockland Melbourne 20 inch one with spinning wheels.

 Bon Voyage!


Note: The author may receive a commission from purchases made using links found in this article. “As an Amazon Associate, Ebay (EPN) and/or Esty (Awin) Affiliate, I (we) earn from qualifying purchases.”


Most Recent Reviews on Review This Reviews


Search for Reviews by Subject, Author or Title

The Review This Reviews Contributors


SylvestermouseSylvestermouseDawn Rae BDawn Rae BMbgPhotoMbgPhotoBrite-IdeasBrite-IdeasWednesday ElfWednesday ElfOlivia MorrisOlivia MorrisTreasures by BrendaTreasures by BrendaThe Savvy AgeThe Savvy AgeMargaret SchindelMargaret SchindelRaintree AnnieRaintree AnnieLou16Lou16Sam MonacoSam MonacoTracey BoyerTracey BoyerRenaissance WomanRenaissance WomanBarbRadBarbRadBev OwensBev OwensBuckHawkBuckHawkDecorating for EventsDecorating for EventsHeather426Heather426Coletta TeskeColetta TeskeMissMerFaeryMissMerFaeryMickie_GMickie_G


Review This Reviews is Dedicated to the Memory of Our Beloved Friend and Fellow Contributor

Susan DeppnerSusan Deppner

We may be apart, but
You Are Not Forgotten


“As an Amazon Associate, Ebay (EPN) and or Etsy (Awin) Affiliate, I (we) earn from purchases.” Disclosure Statement

X