Showing posts with label Gardening. Show all posts

Sunday, June 20, 2021

Caring for A Mother In Laws Tongue As A Houseplant Reviewed


houseplant with many names known as mother in laws tongue, snake plant, or st georges sword

A Houseplant With Many Common Names

This striking plant has a prolific number of strange common names which include Mother In Laws Tongue- supposedly the ends of the leaves looking like the sharp tongue of the mother in law. Now I loved my Mum in law to bits so this does not hold true, but that is folklore...

Its other commons names are Snake plant as it could look a little like a snake and St Georges Sword due to its sword like look. 

In addition it is known as Viper's Bowstring Hemp due to it being one of the sources for plant fibers used to make bowstrings. 

It is also known as the good luck plant! There may well be many more names but that is enough names for one plant!

Its Scientific name is Sansevieria trifasciata. In our home it was always known as Mother In laws Tongue. In this article I will refer to it as the Mother In Laws Tongue or the Snake Plant.

It is a rather bold, striking houseplant with smooth thick sword like leaves hence I can see the St Georges Sword common name. 

The leaves are not soft but neither are they spiky rather firm and bold to the touch. They have I think rather beautiful individual markings which are worth apprecaiting close up and I can totally see why they are given the common name of Snake Plant. 


close up to show markings on a snake plant
Markings that give "Snake Plant" its common name.  


I can tend to these plants without gloves though I would wear gloves to repot. It can grow up to 3 or 4 feet high.  

It does flower but the flowers are insignificant and few people would grow it for its flowers. Neither is it scented. You need to like the shape and colour of the leaves to have this plant in your home. 

We always had two or three of these indoor plants around our home and the ones I have now are decendants or the original from my parents home. I find these house plants to be long lived and trouble free. 

It is essentially a succulent and as such needs a few care pointers which I cover below but is essentially a very easy houseplant to look after. 


Watering And Feeding The Mother In Laws Tongue. 

This plant has adapted to thrive on little water. All I do is to give it a good watering when I remember and let the soil dry out in between waterings. We need to water the soil, never the leaves or the space between the leaves as this will not be good for the plant.  

If we overwater or get too much water into the base of the leaves the signs are obvious. You will see the leaves go soggy to the touch and look damp and with possibly fungal or mold infections. If this plant is in standing water or overwatered for too long it will rot and then be more difficult to save. 

If we underwater and keep in a too sunny position as you can see in this photo the leaves shrivel up and may go brown or a pale sickly yellow. I have found it is a lot easier to rescue this plant if it is suffering underwatering simply by gradually increasing the water given and taking it a few inches away from the window. This is exactly what I will now do with this poorly underwatered plant and it will recover just fine.


mother in laws tongue houseplant in a window
Underwatered Mother In Laws Tongue In Wrong Position

If it is overwatered but not yet rotting, you can try to save it by totally repotting with fresh light well drained compost, leaving it in a light but not too sunny spot and watering lightly.  

We need to fertilise once a month in Spring and summer, but it is not necessary to fertilise in autumn or winter at all. 

Positioning A Snake Plant

It originates from areas of South Africa and Asia where the air is very dry and sunny with a desert like climate. Therefore it likes a light position and can even cope in strong sunlight though I think it does much better with a light spot out of direct sun.

The leaves on mine scorched a little and it never looked very happy when in a very sunny spot on a hot west facing windowsill. Positioned a few inches away from  the window on a table and it was quickly a different much happier plant. 

It needs to be in a dry room, not a bathroom or a kitchen or anywhere that is moist or damp. Perhaps a living or dining area or a study would be best. 


healthy mother in laws tongue, snake plant, or st georges sword
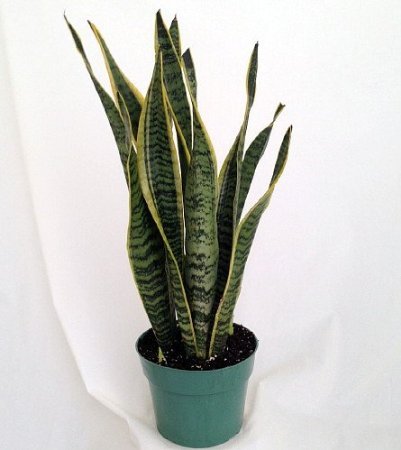
Beautiful Healthy Mother In Laws Tongue Houseplant


Division And Repotting

To make more plants I usually divide the plant in Spring and repot the separate parts. You can also grow from cuttings but I do find division easier and more instantly effective. 

You will know when the plant needs repotting as it will be pushing up against the sides of the pot and roots appearing through the end of th epot. I would advise repotting before you get to this stage as one of mine actually cracked the container it was growing in! 

Soil should be light and free draining so any good compost mixed with pearlight is a good choice for this plant. 


mother in laws tongue leaves show details of color and shape
Mother In Laws Tongue Houseplant Sword Like Leaves

Care Around This Snake Houseplant

Do be careful if you have pets or young children, as it is toxic and if they eat it can cause vomiting and diarrhea and you may need a vet or doctor. We always kept ours in a room the dogs did not go into or higher up on a surface so that no one could not easily reach it. 

To be honest we never had any problems. I was raised in a house where we had many houseplants which could have been toxic but my perents just kept them out of my reach and I learned not to handle them. 

None of our dogs have ever shown the slightest interest in this plant either, but I would still be cautious and exercise common sense, especially with puppies, young pets or children just in case. 


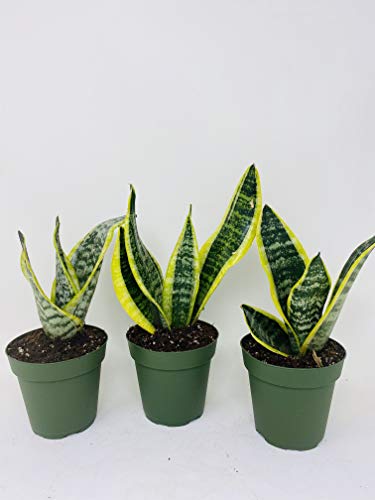
Varieties Of Sansevieria Trifasciata 

There are a few different varieties of the mother in laws tongue. I just have the one variety I inherited years ago from my Mum but more are now available. 

The usual variety is Sansevieria trifasciata ‘Laurentii’, which has very long dark green leaves with golden yellow edges.

There are also other variants  with different leaf colours and shapes such as those variagated with gold or silver. There is one which is almost white ghost like  and one that is verging on black. 

Some have a shorter length of leaf and some have rounder or more fan shaped leaves. Then there are those with smaller slimmer leaf shapes. 


Displaying Your Houseplant

 As this plant grows quite tall and fairly compact it is very useful for light areas of the home where you want some height and grandeur to a display.

 They good on their own but lovely when they are displayed together with other plants with different leaf shapes. If you have several of the different varieties of this plant it can look really stunning. I find this gives a lively, companion like social atmosphere to the display. 

 Another striking and possibly more modern way to display them is to have three or four in a row of the same variety, that can look very effective in its simplicity. I think this looks especially good in a minamilist white room where the shape and dark green colour really stands out as a feature. 

 As with many houseplants this one is very helpful and beneficial to us as it helps to purify and humidify the air thus providing a very useful service in our homes.


It is an excellent  houseplant and an easy guest.I think it is a great gift for a housewarming present or for a student or young professional who likes houseplants but perhaps does not have time to do a lot of caring for them.

It is arguably one of the best houseplants for beginners and busy people and thrives on very little care while still looking good. 


More Gardening Articles

Reviewing The Care Of Living Stone Flowers or Lithops As Houseplants


Note: The author may receive a commission from purchases made using links found in this article. “As an Amazon Associate, Ebay (EPN) and/or Esty (Awin) Affiliate, I (we) earn from qualifying purchases.”


Tuesday, June 1, 2021

Reviewing Restoring A Metal Garden Swing Seat


restored metal garden swing

We bought a metal garden swing seat recently for a good price as it needed some work and the shop needed the space. 

The swing is all metal and would have originally been painted black. It is very sturdy and quite heavy. It took two strong guys to carry it into our garden. 

My husband and I love this garden seat and like a bit of a challenge, so we embarked on revamping it. 

I always think if the bones are good then most things can be restored to look beautiful and useful again. 


weather garden swing that needs restoration
Original State Of the Garden Swing Seat


From the minute it arrived in our garden albeit quite rusty and certainly neglected and in need of serious tender loving care,  we loved it and it felt like it had been there forever. I love the details of the leaves and flowers and the general shape of the seat.

It is super comfortable as well. The swing has a lovely action and it feels so relaxing to sit on it and gently rock back and forth. It belonged in our garden and we love it! 


Preparation Work For Restoring The Garden Swing. Using Wire Wool Brushes. 

They say that preparation is the most important part of any project and it is important to take your time doing this part. 

While I love to get to the exciting part of making it beautiful, I am happy to accept that this preparation element needs to be given care. 

First, we used wire wool brushes to get rid of any flaking rusty parts. Quite a lot of old rust and flaking damaged parts fell off at this stage! 

We chose quite slim brushes as there were many nooks and crannies to get into that a larger brush would not have been able to reach.

This part of the work was quite hard slow going as it is important to get rid of all the loose sections and make sure it was as clean as possible. 

I am very glad we chose to use brushes with long handles instead of steel wool bundles to hold by hand, as it would have been hard on our hands. Using the brushes our hands were protected and the brushes did a great job.  


Then we wiped down the whole seat with an antibacterial spray to clean it all up and remove any dust particles. We repeated this again before painting.

We initially thought we might have to get in a welder to mend some of the worst parts, especially on this armrest section, but wanted to try out epoxy resin first to see if that would work. 


damaged metal garden swing that needs repair
Damage On The Garden Swing Seat


Repairing The Damaged Metal Sections

The next step was to use epoxy resin sticks to repair some of the damaged areas. Using this is quite easy. Do wear gloves as your skin may react to the epoxy resin. 

You simply cut the wrapping and the tube and I took a small piece and rolled it up in my gloved hands until the two parts were mixed evenly then simply applied it to the metal gap I needed covering.

It reminded me of using plasticine as a child. However, it is advisable to wear gloves when handling epoxy resin and of course, keep away from children and pets. 


repairing a damaged metal swing
Epoxy Resin Use On The Garden Swing Seat


I found you do need to work fairly quickly as it does dry in about 10 minutes. So best to only take what you need from the tube. I would keep any unused in a sealed container to help prevent it from drying out.  

I then smoothed it down and allowed it to dry. It took only about an hour before it was cured but we left it overnight before painting.

I thought I would need to sand it down but actually, on this type of item, it looked just fine as it was. I had taken care to smooth it out as much as possible when applying through. On some projects, you would need to sand down first. 

This type of epoxy resin can be drilled and sanded. It can even be used underwater and is waterproof rather than just water-resistant. We wanted this level of protection as this garden swing seat is too heavy to move around a lot so will be out in all weather. 

We were very pleased with the result. Even on the worst damaged sections of the armrest, the resin had set well and firm and the damaged sections were stable again.


Painting The Garden Swing Seat With Hammerite Paint. 

Once the epoxy resin was set hard we decided to paint the whole swing seat black with Hammerite Direct To Rust Paint.

This paint says it gives up to 8 years of rust protection and can be painted directly onto rust, though I still think sanding down and filling any damaged sections is advisable. I do think that with an outdoor seat like this we will repaint every couple of years to keep it looking good.

It is a great paint for a quick job as it is a primer, undercoat and topcoat all in one. This is very useful for outdoor painting when you are trying to paint when it is not raining for a while! 

You must keep it away from any aquatic life as it could be very harmful to them. Please wear gloves when handling and painting as it can provoke an allergic reaction and it is flammable so be careful where you leave it. 

It is important to keep Hammerite Paint away from children and pets. We even stayed out in the garden to make sure none of the local wildlife went near it until dry! 

Hammerite do many different colours, including gold, copper, white and green but as I eventually want to grow plants and climbers all around this seat we decided on a simple black so that the flowers and greenery will show up against it. I also think that this white would also have looked very stylish.


We have not used Hammerite paint before but we were very happy with the way it went on. It was about the right consistency. It did drip a little if we had too much paint on the brush so we learned to carefully wipe off the excess on the tin then paint.

We found it worked well on the larger sections of the A-frame and the broader metal lengths. It was also quite easy to use on the quite intricate leaves, stems and flowers as long as we did not load the brush up too much.


flower and leaf design on the frame of a metal swing
Beautiful Painted Leaves And Flowers


The Hammerite paint dried to a smooth sheen. It is a slightly glossy look which is what we wanted, rather than the rougher hammered finish of the original Hammerite paint. The finish is of course completely down to personal preference. 

Here is the garden swing seat when we had just painted the main A-frame but not yet painted the seat. 

You can see the difference once painted it looks significantly smarter, the rust is no longer visible and the metal is more protected from the elements. 


painted garden swing
A-Frame Hammerite Painted Garden Swing Seat


I would advise using an old paintbrush that you are happy to throw away afterward as getting Hammerite out of a brush is a difficult task! 

Normally I am not an advocate of throwing things away but in this case, weighing it up, I feel that using the necessary non-environmentally friendly cleaner is probably worse than throwing away the brush. 

The brushes were certainly a mess after use and I think it would have taken a lot of work and product to get them clean enough to use on any other project. 

So we got off the worst of the paint then wrapped the brush in newspaper and took it to the skip for safe disposal. 


The Finished Restoration Of The Garden Swing Seat!

So was it worth all the work? Well, I would say yes absolutely!

We do not mind the work and got quite a lot of satisfaction from restoring a decaying piece of garden furniture into a once again beautiful and useful garden swing.

 After one coat of Hammerite paint we have achieved a good finish. We will do another coat of paint at some point but it has rained part of every day since so it can wait a while. 

Here is the finished product! 


restored metal garden swing
Finished Renovation Of Garden Swing Seat 


It may well have been easier to simply buy a brand new garden swing seat. However, that would have cost us hundreds more. 

This way we have learned new skills, saved a lovely garden seat and now we have a beautiful piece we love sitting on with a nice cup of coffee and are very proud to have in our garden. 

The next stage is to choose suitable plants to position around the garden swing and to beautify it further with plants. 

Then I need to make some cushions for the seat. Now I am not all that handy with sewing. However, once we replace our mattress and memory foam topper, I feel I can cut the old one to size and use it as a garden seat cushion with a simple removable cushion cover. 


Read More Craft and DIY Projects On Review This Reviews Here: Crafts & DIY 


Read More Gardening Reviews On Review This Reviews Here Gardening


Note: The author may receive a commission from purchases made using links found in this article. “As an Amazon Associate, Ebay (EPN) and/or Esty (Awin) Affiliate, I (we) earn from qualifying purchases.”


Sunday, May 16, 2021

An Affordable Set of 10 Indoor Flower or Herb Planters


We don't have an outdoor garden and wanted a simple solution for naturally grown herbs for cooking.

I wasn't into getting an outside garden box or leaving planters with herbs on the outside patio table. 

Several years ago I had an outside planter with herbs, and just the mere fact that it was outdoors was inconvenient enough that I rarely went outside to gather them up for cooking. Mostly, I forgot it was there.

Kitchen Window Ledge Featuring Potted Herbs

When cooking, I prefer the grab-and-go solution for using herbs. Grab some parsley, grab some thyme, rinse, and add it to your sauce.

At Costco, we picked up four herb plants in simple black 4.5-inch pots. The herb containers needed a vase with something to catch the water on the bottom.

The above black planter pot fits perfectly inside this vase.

I had no intention of repotting them directly inside the pots. I simply slipped the potted herbs inside the vase.

Since the herbs are positioned on the kitchen window ledge, I didn't want anything made of ceramic or glass. 

Also, I didn't want anything expensive!


Above, four of the plaster planter pots are featured. 

This set of ten planter pots come in various colors.


The two flowers featured above are NOT part of the colored plastic planter pots. There are ten planter pots all in different colors. Above are the extras I'm currently not using. When I get tired of the colors featured on the window, I switch them up.


So there you have it, an inexpensive easy way to have your favorite herbs easily accessible in the kitchen. The four herbs we're using are parsley, basil, rosemary, and oregano. We went with the 5.1 inch vases.

We purchased these plastic vases from Amazon Canada - here. This particular set is showing unavailable on Amazon USA, however I've included a link to another set similar in price and design from Amazon USA here. Note that the vases from Amazon USA are an 8 piece set, versus the 10 piece set I purchased.


Note: The author may receive a commission from purchases made using links found in this article. “As an Amazon Associate, Ebay (EPN) and/or Esty (Awin) Affiliate, I (we) earn from qualifying purchases.”


Wednesday, May 12, 2021

In Two Short Weeks Gardening Will Become Everyone's Favorite Pastime!

For many Gardeners, waiting till the 21st of May is a ritual!

Garden centers all across the United States and Canada will be open for longer periods of time during that First Long Weekend and business will be brisk I'm sure!  Everyone knows that the chances of frost after this date is rare, so the plants you buy now will prosper without worry about weather conditions.

indoor display of plants and flowers


Everyone and their friends will be lined up to buy their bedding plants and vegetables that they plan on planting in whatever space they are gardening in.  

Did you know though, that you could be planning many ways in which to help your seedlings and bedding plants get off to a great start, right now?

How? 

Well let me take this opportunity to help you all become better gardeners and also become more ecofriendly too!

I'm sure that in your household there are many times through the week that you will be preparing eggs, either for breakfast or lunch or maybe in some wonderful baking.  Well, what do you do with the egg shells that are left behind from all this acitivty?

Don't throw them away!  

Egg shells are great in the garden!  

egg shells

If you throw them away, you have lost a great opportunity to feed your plants naturally with what you have at hand.  I keep a metal bowl in my kitchen to catch all those egg shells.  It doesn't matter if I have shells from hard boiled eggs or from fresh eggs that I use in baking or frying.  They all go into the same bowl.  

You can keep some of the egg shells as they are and use them for potting up seeds, The shells will hold soil and you can water them easily, When you plant them in your garden the whole little shell pot goes into the soil.   I personally don't do this but you can without any problems!

When the bowl is full or I'm ready to deal with them, I take the shells and bake them for 30 minutes in an oven set to 350 degrees.  I do this to kill any bacteria (salmonella) that could be present, especially in the raw egg shells.  Once they have been baked, the shells become much easier to pulverize or to break into smaller bits.

You can use either white eggs or brown it makes no difference in the garden, just remember to bake them before adding them to your plants.

broken up egg shells


Now, here's the part that I really like.  Egg shells broken up in small bits like the ones in the picture above can be used around the base of your plants to keep slugs and snails at bay.  They really don't like the sharp edges of the shells on their tender foot!  

Eggs are a great source of calcium and your plants will thrive with that added natural fertilizer and it doesn't cost you anything more than the time to save, break, and bake them.  (Who knows, you might even use breaking up the shells as a therapy for anxiety during these times!)  

But that's not the only use that egg shells have.  If you love birds and have bird feeders in your backyards, add some broken shells into the feeders.  The birds will enjoy an extra treat and again you don't have to spend any money to give them this added bonus.  The calcium in the eggs is great for all outdoor birds.  

Is your soil a little too compacted?  Adding egg shells will act as a natural way to add some aeration to your soil mix too!  If you are like me and add worms to your garden beds, egg shells will feed your worms and the worms will feed your plants.  It's a win-win situation!  

Egg shells are totally organic and there is no need to waste them by throwing them out with the trash.  Do yourself a favor and start using them for the birds and the flowers and veggies that your are growing this year.

Add a worm farm to your garden this year if you really want to up the WOW in natural fertilizing!  I was amazed last year when I added worms to my balcony containers.  My tomatoes and cucumbers just went wild for the added benefits that the addition of the worms made.  

There are many different styles of worm farms available, or you can make your own by following the instructions on YouTube.

If you are looking for a finished worm farm set up, you can get one on Amazon right here!

This one is inexpensive and will do the trick quite nicely!


 If you need worms (the red wiggler ones), let me know I have thousands of them!

We need to become aware of ways in which to garden efficiently and with an eye to being as eco-friendly as possible.   Mother Nature is counting on us to do our part.

If you want to read more about worms and my garden efforts you can do that right here! Then you will understand why you need the red wigglers too!
 
Happy Spring to everyone and Happy Gardening too!


Note: The author may receive a commission from purchases made using links found in this article. “As an Amazon Associate, Ebay (EPN) and/or Esty (Awin) Affiliate, I (we) earn from qualifying purchases.”


Saturday, May 8, 2021

Garden Gnomes Reviewed


A Garden Gnome

Definition of a Gnome: a legendary dwarfish creature supposed to guard the earth's treasures underground. 


Gnomes originally were thought to provide protection of buried treasure and minerals in the ground and were often placed at the entrance to mines.  Today they are used to watch over crops and livestock by placing them in the rafters of a barn or in the garden.  


Gnomes are also known as symbols of good luck.


History and Mythology of Gnomes


A row of  gnomes in a garden
Image Source: Pixabay


From the Latin word genomus, which means 'earth dweller' gnomes are mythological creatures and diminutive spirits in Renaissance magic and alchemy, They were first introduced by Paracelsus in the 16th century 


Gnomes live underground and legend states that they can easily move through the earth. Gnomes are always described as being small and wearing conical hats. Myths claim that gnomes are sensitive to sunlight and some legends remark that the light of the Sun will turn a gnome into stone. 


In the book Gnomes, illustrated by Rien Poortyliet and researched by Wil Juygen, gnomes are thought to be seven times stronger than humans and live to be around four hundred years old.


A gnome next to a tree
Pixabay
Gnomes are described as being 'short of stature', which, being a pint-sized person myself, is probably why I like them. :)  Perhaps there is a correlation between protecting the earth's treasures and being short!


Gnomes Today


For years, the gnome lost it's appeal, but Social Media and the sharing of photos on the web brought back their popularity. Today, people love to share pictures of gnomes visiting places around the world. The gnome is becoming a pop culture giant as the key figure in the sport of “gnome-spotting”. There is even a movie – the 2001 “Amelie”, and major advertising campaigns for Travelocity and Ace Hardware.


Where to Find Gnomes


Fairy Garden Gnomes
Fairy Garden Gnomes


Gnomes are available in many places, including Amazon and many garden centers, and come in a wide variety of styles and poses.  Holiday gnomes and whimsical poses are increasing in popularity.  Gnomes are favorites for backyard gardens and increasingly for Fairy Gardens


Handmade Gnomes


Many Etsy sellers have created gnomes in various mediums for your gardens and for miniature Fairy gardens. Gnomes are also popular on Garden Flags and as Yard Art. And, decorated in many styles and colors, gnomes are also becoming the 'in' thing for kitchen décor. 


Handmade garden gnome
Vintage Resin Outdoor Garden Gnome


This is a vintage resin outdoor garden gnome created by Joshua in a family-run business in Kettering, England.  This cute and colorful fairy garden gnome will spice up your garden.  Check it out in their Etsy Store called Darthomeltd.


Metal yard gnomes
Metal Yard Gnomes


Adorable spring yard gnomes!  Made of 14 gauge steel. 

Gnomes measure a total of 30 inches tall. The spikes that allow the gnomes to stand are 6 inches long which allow for 24 inches above ground level.

Created by Cody of Texas  for the Gillis Metal Works on Etsy. (Handmade metal art created by the owner himself!)


Lemon gnome for your kitchen - an indoor gnome
Kitchen Lemon Gnome

Gnomes can also be adorable indoor decor, as seen by this darling lemon gnome.  
This Lemon gnome will be the decoration of your kitchen or a great addition to your spring and summer decor. Lemon gnome measures 11.8 inches high. Adorable addition to your kitchen decor.  

Lemon gnome is handmade by Marina for her Etsy Store called the Magic Sewing Store.


Related Links:


Garden Gnomes article written by Wednesday Elf


Note: The author may receive a commission from purchases made using links found in this article. “As an Amazon Associate, Ebay (EPN) and/or Esty (Awin) Affiliate, I (we) earn from qualifying purchases.”


Thursday, April 29, 2021

How To Grow Camellias In Your Garden Or Container Reviewed

I have always loved the beautiful Camellia. I see it as the beautiful rose of Springtime. When we first moved here I thought one would look lovely in the garden. 

This one is now twenty years old and about ten foot tall and four foot wide. It has been lightly pruned perhaps four or five times in its life so far. 


stunning camellia in full bloom with pink blossoms


My Top 5 Reasons To Grow A Camellia 

I love them because all year round they are evergreen with thick glossy beautifully shaped leaves. Camellias provide a fantastic structure in the garden all year long and make a superb hedge too

They look stunning when covered in snow as the dark green leaves and the white snow complement each other beautifully.

They have the most stunningly beautiful flowers in Spring that lift your heart and are a perfect shape and come in pinks, whites, creamy yellows and reds mainly.  

They need very little care once established and grow a dense bushy appearance that no one can see through. 

A mature Camellia provides excellent cover for small birds who also like to nest in it. 


Camellia Flower Blossoms

However, for all these marvelous attributes their true moment in the spotlight arrives in early Spring and culminates in April and May.

From early March I am aware of tight fat buds appearing amongst the green leaves, a promise of what is to come. 

Battered by strong winds and rain here they hang on and remain tightly compressed until the weather calms a while and the sun starts to shine and warm up.

Then slowly the fat buds begin to unfurl revealing beautiful pink flower buds. Over the coming weeks more and more unfurl and the green shrub becomes a riot of pink blossom!

It is so stunningly beautiful and something I look forward to every year.

pink camellia blossoms on the bush


Each flower petal is perfect a gorgeous unique soft yet strong flower.

The petals are quite thick and not easily broken or torn and I noticed that the birds often take the fallen petals to use in their nests. I can imagine that each petal is perfect for laying eggs in and is very soft and insulating for the little chicks. 

The sparrows often nest in the Camellia and we often hear them chattering away to each other, squabbling and bonding. Sometimes a huge flock will fly into the Camellia and they disappear into it. 

As the weeks go by the petals begin to fall and the earth around the camellia is littered with a carpet of pink petals like a bride has passed this way and has been showered with flowers. 

Then by summer, we are back to a glossy evergreen shrub.


beautiful pink camellia blooms


Where to Site A Camellia

Camellia generally needs to be sited in a position where there is light sunlight, they are essentially woodland plants so light sun to dappled shade is ideal. They do appreciate a more sheltered site and dislike cold biting winds. 

Never site your Camellia in an East facing spot as they actively dislike it. Also, the buds appear to become damaged by the morning sun when east facing so you will get fewer flowers. South or West facing is the best if possible. 

These shrubs do like acid soil but you may get away with a neutral soil that is slightly acidic. As a woodland shrub, it appreciates a good mulch with leaves each spring. You can also use pine needles or bracken or even fir tree clippings if you have them available. 

Probably the best time to plant is in the Autumn/Fall as the soil is still warm and you may have more rain at this time of year. 

When I first bought ours I planted it on one side of our garden and it basically did nothing for 3 years and looked very unhappy and started to die. So I dug it up and planted it on the other side of the garden where, as you can see it quickly flourished and grew and blossomed. 

I am still not sure why this happened as theoretically this first site was ideal, but there was something the plant did not like. It is worth trying an ailing plant in a different site before giving up. 


Watering Camellia 

When first planting, like any other shrub, do water regularly and deeply every week especially in very hot weather. Do not just sprinkle water on, give it a really good deep drink. Unless it rains heavily I continue to do this with newly planted shrubs for about a year to a year and a half. I find it gives them a good start in life then afterward they are little trouble. 

Light watering will be bad for the plant as it encourages roots to turn upwards to seek the water on the surface. You need to really soak the soil thoroughly so that the water is below the root level and the roots search down and out for water. 

Once it is mature and established you should not need to water at all unless you live in an extremely dry climate or suffer drought conditions. If small buds cease to grow or start to drop, or you do not see any buds, then you know it is suffering drought.


pink camellia blooms in abundance on camellia bush


Pruning Camellia

This is good news for people who do not like pruning! Camellias do not really need much pruning. The only exceptions are if they grow either too big or are growing in a shape you do not like.

If you need to prune only do it immediately after flowering. If you do it any other time you will damage the emerging flower buds. 

Please do not use a hedge trimmer on your gorgeous Camellia. The result is so much better if you carefully prune with secateurs like these Wolf By Pass Secateurs It will take a little time but can be done gradually.

You can deadhead the faded Camellia flowers if you want to. I think this would be possible on a smaller plant. With a Camellia ten-foot high for me, it would be quite a time-consuming task.

Some people will want to do it though to prevent petal fall over the borders. I do not do this as I like to see it naturally fade and I love to see the pink petals fall to cover the earth and the lawn like a bride has just passed by and guests have thrown confetti! Once they have fallen to the ground, I just treat them as very pretty mulch.

Otherwise, you can let it grow and fade at its own pace and time and simply enjoy it.


pink camellia blossoms


Taking Camellia Cuttings

Once you have a mature Camellia I would recommend taking cuttings. This way you can over time have more Cameillas and if you ever move you can start a new plant. They also make lovely gifts. 

Cuttings are easy to take and so far I have had great success with them forming roots and growing on well. They are, however, fairly slow to grow from cuttings so plan ahead. 

Soil Conditions For Camellia

It is advantageous to have acid soil but it can cope with a neutral to slightly acid soil especially if you mulch with acid based materials or an ericaceous compost and feed each spring. 

To check your soil look around at your neighbour's gardens and see what is growing well. If Acers, Azelias, Camellias and Rhododendrons are growing happily in the soil then a Camellia should be just fine. 

The other way to check is to do a soil testing kit available in many places where you can easily test your own soil. 

If your soil is not suitable then do consider growing Camellia in a container with ericaceous compost and using ericaceous plant food.


Growing Camellia In A Pot

I always have a "can do " attitude when it comes to gardening. Many people have smaller plots and less room to grow in the soil so its important we consider any plant that can be grown in a container. 


camellia bush growing in a planting pot


In my experience yes, you can grow Camellia in a container. It will need to be size appropriate and have good drainage holes.

Even if you start with a small cutting which you can pot on in a small container, you will eventually need a large tree pot as they can grow large. You may well need to repot into a larger container every 2 or 3 years.

You will need to provide everything for the shrub in terms of water and food.

The big advantage is that you can move the shrub easily into its perfect position to give it the correct sunlight and shelter positions and you can take it with you if you move to another house. 

Make sure the soil is ericaceous or acid soil as it needs the best conditions to live happily in a container. I generally use this type of ericaceous compost below and every gardener has their own preferences as long as it is suitable for acid loving plants.


You will need to water well at least once a week. This is vital in the autumn/fall as this is when the buds for the flowers are forming. If you do not give it enough water at this time flower buds will not form and that means no beautiful flowers.

Many people chronically underwater Camellia in pots and do not get any flowers and think the shrub is not a good one to grow. This is so easily remedied by simply watering. Especially make sure you water enough in the autumn when buds are forming.

Rainwater from a water butt is best but if you do not have that simply use tap water and ensure you are careful with feeding enough so you maintain the acid balance in the soil.  Feeding is also vital for container grown Camellias and an ericaceous feed is recommended


You may find as I do that a little more pruning is necessary. The one in the container above is in need of both repotting and a prune to reshape slightly so it sits the container better. I will prune it after all the flowers have bloomed. 

I love the Camillia and would recommend growing it. I see it as an early rose-like flower without the thorns of most roses! I love to grow Roses as well but Camellia flowers early before roses are in bloom and gives a beautiful show of lovely colour along with the Spring flowers and bulbs before the summer flowers bloom.

In the ground it is a real low maintenance shrub that can be easily pruned into size and shape. In a container a little more care is required but it is always a pleasure to look after. 


I will always have at least one Camillia in containers and in the garden, but most likely two or three! 


More Gardening Articles

6 Ways To Help Wildlife In The Year Ahead Gardening Articles On Review This Reviews


Note: The author may receive a commission from purchases made using links found in this article. “As an Amazon Associate, Ebay (EPN) and/or Esty (Awin) Affiliate, I (we) earn from qualifying purchases.”


Most Recent Reviews on Review This Reviews


Search for Reviews by Subject, Author or Title

The Review This Reviews Contributors


SylvestermouseSylvestermouseDawn Rae BDawn Rae BMbgPhotoMbgPhotoBrite-IdeasBrite-IdeasWednesday ElfWednesday ElfOlivia MorrisOlivia MorrisTreasures by BrendaTreasures by BrendaThe Savvy AgeThe Savvy AgeMargaret SchindelMargaret SchindelRaintree AnnieRaintree AnnieLou16Lou16Sam MonacoSam MonacoTracey BoyerTracey BoyerRenaissance WomanRenaissance WomanBarbRadBarbRadBev OwensBev OwensBuckHawkBuckHawkDecorating for EventsDecorating for EventsHeather426Heather426Coletta TeskeColetta TeskeMissMerFaeryMissMerFaeryMickie_GMickie_G


Review This Reviews is Dedicated to the Memory of Our Beloved Friend and Fellow Contributor

Susan DeppnerSusan Deppner

We may be apart, but
You Are Not Forgotten


“As an Amazon Associate, Ebay (EPN) and or Etsy (Awin) Affiliate, I (we) earn from purchases.” Disclosure Statement

X