Showing posts with label Decor. Show all posts

Sunday, January 20, 2019

5 Hacks to Make Your Bedroom Look Expensive Without Spending a Fortune

5 Hacks to Make Your Bedroom Look Expensive
Getting Our Homes to Look Anything like the Designs we See on TV or Pinterest Can be Frustrating!

Don't sweat it. Your home should reflect your taste. For most of us it not only reflects our taste, but unfortunately our budget as well.

For us average souls, the budget usually prevents us from spending obscene amounts of money on our décor.

The thing is, with a little creative thinking you can dress up your bedroom without spending oodles of cash. 

Here are 5 Basic Suggestions to Help You Achieve an Expensive Look in Your Bedroom Without Spending a Fortune

1.  Floor to Ceiling Drapes

Even if your bedroom has small windows, bring the curtain rod to one inch below the ceiling and feature long drapes that go to the floor. With floor to ceiling drapes, when your drapes are closed your room will appear large and elegant.

You can also put up drapes wider than the window. In fact, you can put them wall to wall no matter the size of the window.

2. Place a Chair in the Room

Don't use a chair from a table set. Place a chair in the room that has a bit of substance. Something that adds elegant bulk to the space, and something with cloth material. A few examples are featured below. Scroll to view all of them.


3. Add A Thick Luxurious Blanket or Comforter Folded at the End of the Bed

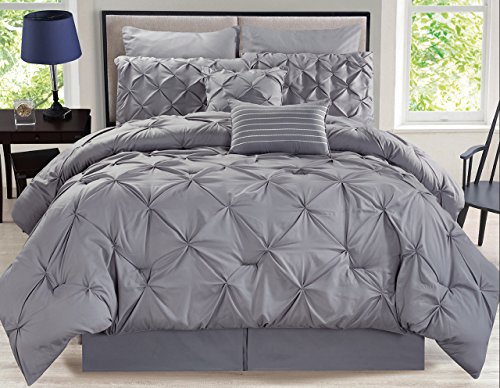
This is a trick I do in my home. Adding a decorative blanket at the end of a bed gives you the opportunity to increase the room's texture, color and style. Depending upon the design of your room, use the blanket to make a statement based on what the space needs.
  1. Does it need more bulk? If so, add a thick soft comforter folded at the end of the bed to give the room that warm lush look.
  2. Does it need more color? If so, add a blanket with a pop of color at the end of the bed.
  3. Does it need a slimmer leaner look? Then add a thin blanket at the end of the bed
The secret to adding blankets to the end of the bed is to have them reach over the sides of the bed by about a foot or so on each side. Don't let it go to the floor though. If you place a blanket that doesn't drape over the side, it looks like an after thought.

Also, make sure it's folded nicely. A blanket in a messy heap loses it's impact and intent. Pull it tight to get all the wrinkles out.

Before you go out and purchase a new 'end-of-the-bed blanket', check your linen closet. You might have something stored away that will work.

4. Upgrade Your Lamp Shades

Plain old lamp shades can drag down a room. Take a look around your space and if the room lacks color, texture or patterns, then lamp shades are the ideal place to add these elements.

However, to keep the room classy don't go for lamp shades that have tassels or pompoms. Keep them conservative in style but interesting in design or texture.

Below are some example lamp shades to help spurn your creativity. Scroll through to view them all.
5. Change the Hardware on Your Dressers

If your furniture needs a pick-me-up, change the hardware.

Add elegant interesting handles on your end tables and dressers. With aged and tired furniture, let the hardware do the talking. Draw the eye to the new fixtures by using a metal that pops rather than blends.

If these five tips are not option, check out this article on how to decorate a bedroom without any money....


Note: The author may receive a commission from purchases made using links found in this article. “As an Amazon Associate, Ebay (EPN) and/or Esty (Awin) Affiliate, I (we) earn from qualifying purchases.”


Sunday, January 13, 2019

Add Love in Your Home Decor for Valentine's Day

Add Love in Your Home Decor for Valentine's Day
Love Themed Home Décor Items
Love Décor for the Entire Year

Most of us rarely think about adding home décor that relates to a love theme. It's a beautiful way to honor our families and each other.

Here are some ideas for you:

1. Add a Heart Themed Rug to a Room

The nice thing about a heart themed rug is that it works no matter what time of year it is. If you have someone celebrating a birthday in February, it makes a terrific original gift. You'll notice there are many styles and colors in heart rugs to choose from. One of my personal faves is the pompom heart rug for a child's room. Be sure to check them out, you can find them here.

2. Add a Love Themed Wall Decal to a Room

There are countless wall decals that speak about family and love. A famous quote we've heard over and over is "All Because Two People Fell in Love". Add this quote to any room in the home, including a child's room. In fact, if someone you know is having a baby, this wall decal makes an excellent gift. You can find several featured here.

3.  Redecorate a Room with a Love Themed Bedding Set

With spring coming up, you may be feeling the itch to redecorate. If so, why not create a room that's all about love.

It can be a child's room, a guest room, or the master bedroom. Love themed bedding will stand the test of time. If you're not into changing your existing comforter, put a new duvet over it. That way when you tire of the love themed bedding, you can remove the duvet and get your room back to it's original state.

A guest room or child's room is an ideal place to go to town with a love theme. In fact you can incorporate the rug and wall decal suggestions featured here to complete the look. Check out a few lovely bedding sets here.

4. Put a Kindred Hearts Light Box in a Room

These are great! They serve a double purpose, ambient lighting and inspiration.

It's a decorative box that lights up. However, the best part is you can collect pre-made quotes and art to insert inside the box.

Collect a bunch of them and change them up for every holiday or special occasion. There are countless inserts to collect: birthdays, holidays, inspirational quotes, valentines day, Easter, Christmas, fun, jokes, patriotic holidays and more.

The inserts make an excellent small gift to bring to someone who you know has the light box already. Keep adding to their collection. Place one of these light boxes in your love themed bedroom and feature a quote about love.


Note: The author may receive a commission from purchases made using links found in this article. “As an Amazon Associate, Ebay (EPN) and/or Esty (Awin) Affiliate, I (we) earn from qualifying purchases.”


Sunday, January 6, 2019

Maximizing Space in a Small Living Room

The New Year normally brings about the urge to tidy up and get organized.

3 Ways to Maximize Space in a Small Living Room
If you're working with a small space or have recently downsized, utilizing every nook and cranny is the secret to effective space management.

Going vertical is a smart and common way to use every bit of space in a tiny room. However, choosing furniture with a dual purpose is often the forgotten alternative.

With small space living becoming more popular, you may be surprised that just about every piece of furniture in a home can double as something else.

Below are three examples where you can choose pieces for your room that aren't just pretty, but are also storage and sleeping solutions.

Furniture Pieces that Maximize Space in a Living Room

1. Chairs that Convert to a Bed

You've heard of the pull-out-couch, but have you heard of the pull-out-chair? They come in multiple styles and colors. A chair that converts to a bed is exactly that, it unfolds and becomes an extra place to sleep. If a sofa bed isn't something you want to include in your small living room, but still require an extra place for guests to sleep, then consider including one or more sleeper chairs. You won't be disappointed when you look at the variety of designs available. The styles range from funky and modern to traditional. Be sure to check them out.

2. End Tables that Double as Storage or Filing Cabinets

Trunk end tables are very attractive. Perhaps you've seen some or have one in your home. They come in multiple designs, sizes and color choices.  The boxy industrial appeal to this look make it ideal in a room where substance in accessories is needed. These pieces tend to be solid and heavier in appearance. Place them on the ends of a sofa, or in a corner as a stand alone piece.

You can also get end tables that double as a filing cabinet. If you're furnishing a small apartment, these end tables are perfect as a place to store your most important and used files. Since they don't take up a lot of space, you can put them anywhere in the home or apartment. Like storage trunk end tables, they can be used in pairs or as stand alone furniture pieces.

3. Coffee Tables that Double as a Desk and Storage

Did you know that a coffee table doesn't just have to be a coffee table? Coffee tables that double as a work surface are called lift tables. The tops lift up and you're able to bring them closer to you and use the surface as a work area for your laptop or papers. Best of all, these tables offer storage as well. Each lift table is unique in design and color and the amount of storage available. Choose the one that best fits your space.

In summary, picture a living room featuring all of the above items. You've accounted for extra sleeping space, extra storage space, a place for files, a desk with storage, and all of it discretely blends into one room.


Note: The author may receive a commission from purchases made using links found in this article. “As an Amazon Associate, Ebay (EPN) and/or Esty (Awin) Affiliate, I (we) earn from qualifying purchases.”


Wednesday, November 28, 2018

Christmas Inflatables Make Decorating Easy and Fun

In a Heartbeat, Thanksgiving is over and everyone is in Full Christmas Holiday mode!

Part of the whole fun of Christmas is decorating, both indoors and out!  I know many people are just chomping at the bit to get their Christmas trees up and decorated, so that they and their families can enjoy this holiday for as long as possible.
 
christmas tree display

Photo courtesy of my niece Tara Hocaliuk! One very talented lady!
(Please do not copy without permission)

 
Children love getting into the "spirit" of the holidays too!  Schools and Church groups are busy making Christmas decorations or preparing for those Christmas pageants that every parent and grandparent love to attend.  Videos and pictures will grace everyone's favorite social media and the joy of our children will be shared everywhere.

For years we decorated not only the inside of our homes, but we would put up Christmas lights and boughs of evergreens on our porch with the Most Beautiful Wreath on our front door!  These sights would greet all our friends and family as they came for visits over the holidays and we had lots of visitors! 


Today, I would not ask my other half to get up on a ladder to attach lights to our gutters, even though he did this for years.  Decorating outdoors has become much easier!  Thank goodness for the ability to share ideas on Pinterest and other social media as well.  If you have the time, these ideas are all very doable and need not cost an arm and a leg.

If you don't have the time, then there is another alternative!  And it does not require anyone getting up on a ladder either!  

Christmas inflatables have become very popular and they are so easy to install and enjoy.  If you have a power source, you are ready to decorate in minutes.  You just need to take the inflatable out of it's box, and plug it in.  Done!  It can't be any easier and there are so many different styles to choose from.

The larger the inflatable, the more expensive they become.  Don't be discouraged, these inflatables can start at very affordable prices and make a big impact!  Santas and snowmen, trains and sleighs, polar bears and penguins are all very popular motifs for the holidays.  Many of them will come in several different sizes, ready to fit your decor ideas.  

Inflatables are a lot of fun, easy to install and enjoy.  Again the choices are many and varied.  Some of these inflatables are animated as well.  That just adds another whole dimension of enjoyment. The biggest problem (I hate to admit there might be one) is that someone may be tempted to steal it from your front lawn.  This is easy to remedy with a little forethought and a handyman or woman.  All you need to do is get a few metal tent pegs and a couple of holes drilled in the base of your inflatable.  Hammer the stakes into the ground and your worries are over.

The children and the adults as well will enjoy the sights that you have so thoughtfully prepared for the Holidays.  I'm sure more than one person will stop to admire your handiwork!  The best part, you didn't have to get up on a ladder and worry about falling off!

Christmas home decor is one of the fun parts of getting ready for the best holiday of the year.  Take a little time and let the whole world know that you still believe in the Magic of Christmas!


Note: The author may receive a commission from purchases made using links found in this article. “As an Amazon Associate, Ebay (EPN) and/or Esty (Awin) Affiliate, I (we) earn from qualifying purchases.”


Sunday, November 4, 2018

4 Non-Traditional Ways to Use Perfume

If you have relatively inexpensive perfume that you're not utilizing, or rarely use, here are four creative ways ideas on how to stretch their use.

Of course you can use your favorite perfume scents as well.

1. Floor Vent Filters: 

I've purchased scented vent filters before, and prefer certain scents. Lemon or fresh clean scents are my faves. My perfume choices generally reflect those aromas.

Presuming your perfume is an aroma you love, you can make your own vent filters. There are two ways to do this:
  • You can purchase unscented ready-made vent filters and spray them with your favorite perfume before you place them inside your vents. 
  • Or you can cut cheesecloth to fit just inside your floor vents and spray them with your favorite scented perfume.
  • Don't use them in every vent in your home. Doing so can restrict air flow. Pick and choose the places that would best be suited.

2. Make Your Own Spray for Linens:

In a spray bottle, dilute a little bit of perfume with water. Base the amount of perfume on the strength of aroma you're going for. Start with a very small amount (less than a teaspoon) of perfume then increase it from there.

Once you have your linen spray to the aroma you prefer, you can spritz it on your bedding, pillows and drapes. Spray your couches and chairs only if the material permits.


3. Closet Fresheners:

You can make your own closet fresheners with perfume. Here's how:
  • Soak cotton balls with your favorite perfume
  • Let them dry out
  • Place them in a cloth bag similar to a small make-up bag
  • Put the bag in a closet or drawer

4. Bubble Bath and Bath Oil:

Most of us use scented bubble bath. However, if you're fussy about the aromas you choose, you can make your own. 

Choose unscented bath oil or unscented bubble bath and add your favorite scented perfume to the bottle. Give it a shake, and you've created your own personal bath products. If you'd rather not add perfume to the bottle, add your appropriate amount directly into the bath water.

Note: If anyone in your family has allergies, depending on their allergies, it's best not to use perfume scented anything.


Note: The author may receive a commission from purchases made using links found in this article. “As an Amazon Associate, Ebay (EPN) and/or Esty (Awin) Affiliate, I (we) earn from qualifying purchases.”


Tuesday, October 23, 2018

Whimsical Throw Pillow Covers Reviewed

Fun Ways To Cover Your Pillows

throw pillows
Pillows image from Pixabay.com
Today, I would like to show you a fun option to cover your throw pillows in an economical and whimsical way. If you are like me, you have several around the house that could be changed with your mood or even the season of year. 

I love the thought of covering pillows that I already have instead of having to go out and buy more pillows. Getting a few pillow cases that match the size of my pillows is an easy solution. 

I should mention that if you don't have many throw pillows, you can purchase the cover and a form to use. That just is not a problem in our home because I own more pillows than most already. 

For less than ten greenbacks you can surely find at least one pillow cover that you like. The option that I found has 43 different patterns to chose from. There are several that have a phrase about books and reading but there are also some for the different holidays during the year like Easter and Christmas and even some nice ones with an autumn theme. 

The cases or covers that I found fit 18 by 18 inch pillows and do not come with the pillow insert. They are made from a cotton linen fabric and are machine washable. The printing is on one side only and did I mention that they are really inexpensive? I did? Well, it was worth noting again. 

These are so fun that not only will I be getting one or two for myself but they will make a great gift for Christmas or a house warming party. 

What do you think? Do you like the idea of being able to have a few pillow covers to change the look of your throw pillows? 


Note: The author may receive a commission from purchases made using links found in this article. “As an Amazon Associate, Ebay (EPN) and/or Esty (Awin) Affiliate, I (we) earn from qualifying purchases.”


Sunday, October 21, 2018

5 Creative Household Pillowcase Hacks

Review of Multiple Ways to Use Pillowcases for Sorting, Storing, and Decorating

1. Use Pillowcases to Cover the Backs of Chairs

Last week I featured how to use a pillowcase to make a No-Sew Halloween Chair Cover

You can also use it to cover the backs of ratty or damaged armless desk chairs.

The worn faux leather desk chair in my son's room started to shed some of it's material. The pieces were making a mess on the floor. 

So not being in the mood to buy a new chair, I covered the back of it with a pillow case. The width of this particular chair was perfect. The pillowcase fit snuggly keeping all the worn pieces neatly inside. I simply tucked the excess pillowcase at the bottom of the chair into the seat.

2. Use Pillowcases to Line Baskets and Boxes

Have you ever been to the store and thought you'd love one of those lined hampers or decorative storage baskets but after seeing the price, changed your mind? 

You can make your own.

This no-sew pillowcase hack is very easy. Put the pillowcase inside the basket and pull it over the sides. For smaller baskets, just tuck the excess pillowcase up the side up and create a thicker border edge. If you want, use sticky double sided velcro strips under the pillow case border edge to keep it in place.

You could also put the excess in the bottom part of the basket.

3. Use Pillowcases to Cover Your Clothes

Instead of using plastic garment bags, cut a hole in the top of a pillowcase and pull it over your clothes on a hanger.

It's a handy way to store kids clothes. Place three or four items together under one pillowcase, tie it at the bottom. When you're ready to pass them down, they're neatly together in the closet.

Pass them down in a decorative way: Use pretty pillowcases and tie the bottoms with a satin ribbon.

4. Use Pillowcases to Organize Bed Sheets

How many times have you had to look for the sheets matching pillowcases? This hack is the best, it's my personal favorite. 

Put your sheets and other matching pillowcases that go with the set, folded inside one of the matching pillowcases! Best of all, your linen closet looks super organized. When you need your bedding, it's all together.

5. Use Pillowcases to Cover Stools and Create a Skirt

For taller stools this is especially simple. Pull the pillowcase over the stool. Take a ribbon or other decorative piece of material and tie it just under the seat part. The excess material will create a skirt. If there's room under the seat, you could also attach the material by using a heavy duty staple gun.

If the stools are small, use the smallest pillowcases you have. You may have to cut and hem them, or use a bit of creativity to pull the excess material up and then tie the tie below the seat.

These make a lovely decorating hack for parties and special events.

Have fun!


Note: The author may receive a commission from purchases made using links found in this article. “As an Amazon Associate, Ebay (EPN) and/or Esty (Awin) Affiliate, I (we) earn from qualifying purchases.”


Sunday, September 16, 2018

5 Items for the Home to Ward off Evil Spirits

Halloween is on the Way! Time to think Protection, Protection, Protection

O.k. not really, but just in case here's a review of items for the home that are said to protect your humble abode from all things evil.

1. Horseshoe Home Décor Accessories

When it comes to protecting your home, the best place to put a horseshoe is on your front door as a door knocker. However, if you're unable to place it on the door, go ahead and place them inside your home. A horseshoe in the home is said to attract good fortune, and in doing so, evil gets knocked on it's butt. Some people believe it's better luck to hang the horseshoe with the ends pointing up so that all the good energy has a place to pool inside the horseshoe.

2. Use Cinnamon Scents in Home

Did you know that Cinnamon is associated with prosperity. Besides baking, you can incorporate cinnamon in your home using cinnamon oil or cinnamon sticks. During the holiday season include cinnamon scented pine cones in a center piece, or decorate using cinnamon sticks in wreaths. Place cinnamon Crystal Allies Materials: 1lb Bulk Rough Black Tourmaline Crystals from Brazil - Large Raw Natural Stones Reiki Crystal HealingWholesale LotCrystal Allies Materials: 1lb Bulk Rough Black Tourmaline Crystals from Brazil - Large Raw Natural Stones Reiki Crystal sticks in all your wreaths. If you don't want to see the sticks, simply tuck them in so they're not visible.

3. Feature a Rosemary Wreath

For those who enjoy the history of witches, witches believed that hanging rosemary on your front door would ward off burglars and intruders. It was also used as a way to rid a room of illness during the time of the plague. If nothing else at all, between the rosemary and cinnamon in your wreaths, your home will smell lovely.

4. Display Gemstones Throughout Your Home

The topic of gemstones is a rather in-depth one. Feature in a centerpiece or in a lovely decorative bowl the following gemstones to ward off bad energy: Tourmaline, Agate, Emerald, Labradorite, Black Onyx, Peridot and Emerald. If you need to pick one, choose Tourmaline as it's said to be the most effective for dark energy.

5. Smudge Your Home With Sage

I know a few people who do this in their home. It's derived from the Native American belief that the smoke from sage will cleanse a space and clear negative stagnant energy. Spread the sage clockwise around your home and while doing so, visualize positive intentions as you clear every room. Reiki Practitioners are known to clear the energy in their home or office with Sage after a session with a client. It clears the energy for the next client so their treatment can begin anew from a cleansed room.


Note: The author may receive a commission from purchases made using links found in this article. “As an Amazon Associate, Ebay (EPN) and/or Esty (Awin) Affiliate, I (we) earn from qualifying purchases.”


Friday, September 14, 2018

How to Easily Paint & Refinish Metal Outdoor Furniture

How to Easily Paint & Refinish Metal Outdoor Furniture
Renew Your Outdoor Furniture with Rust-Oleum Spray Paint

For the last few seasons, our outdoor furniture has started looking worn and tired.  Metal outdoor furniture is too expensive to throw away and replace, but it was definitely time to restore the beauty of the pieces.  

Last spring my husband started refinishing our outdoor furniture one piece at a time.  He choose our wrought iron table as his first project.  With a few cans of black Rust-Oleum and less than an hour, our outdoor table looked brand new again!  

Since then, he has refinished the chairs that match that table and the whole set is beautiful again. 

Last week, he refinished our wrought iron glider.  I love all of our outdoor furniture and appreciate its durability.  But, that glider is the one I use the most.  I am thrilled to have it restored to its original beauty.

My new slogan for wrought iron metal outdoor furniture:  Restore, Don't Replace!


Refinish Metal Outdoor Furniture
Refinished Wrought Iron Patio Table & Chairs
He also painted my little ghost  in the background with a can of White Rust-Oleum - Getting him ready for Halloween


How to Refinish Wrought Iron Outdoor Furniture

Time:  45 mins
Cost:  $25.00

Compared to the Cost of a New Glider:  $300.00

Because the refinishing of the metal table and chairs had been so successful, when my husband said he was going to refinish the glider, I grabbed my camera.  I wanted to make sure I had everything I needed to tell you exactly how to repaint your metal outdoor furniture too.

  How to Easily Paint & Refinish Metal Outdoor FurnitureItems Needed:
  • Cans of Rust-Oleum
  • Plastic Drop Cloth 
  • Tent Pegs
  • Plastic Gloves
  • Long Sleeve Shirt
  • Old Shoes & Old Painting Clothes
Step 1:  Clean the piece - remove all dust & dirt

Step 2:  Cover an area in the yard with a large, thick plastic drop cloth  (2.0 mil preferred)

Step 3:  Use tent pegs to hold the drop cloth down.  We used old army tent pegs at all four corners, but you could use bricks instead to weigh down the corners.

How to Easily Paint & Refinish Metal Outdoor Furniture Step 4:  Shake up the Rust-Oleum spray paint

Step 5:  Turn the piece over and start spraying the underside

Step 6:  Turn the piece right side up and spray the entire surface from every angle in order to cover it completely and evenly

It took about 45 minutes and 4 cans of Rust-Oleum to spray paint the glider.  That short amount of time spent renewing our glider will give us many more years to enjoy the beloved glider.  Plus, the Rust-Oleum spray paint helps to prevent rust.


Restoring Wrought Iron Metal Outdoor Patio Furniture


Additional Spray Painting Tips: 


Wear disposable gloves  (see products below)

Wear long sleeves to protect your skin

You may need to wear protective eyewear and disposable masks

Keep the spray can moving as you are painting to avoid runs.

You should do all of your painting on any individual piece within an hour.  

This spray paint, in our experience, tends to self- level any heavy areas of application as it drys, within reason.

Let the furniture piece completely dry for 24 hrs. before use.

 
How to Easily Paint & Refinish Metal Outdoor Furniture
My Wrought Iron Glider Beautifully Restored


Project Items Needed for Refinishing Metal Outdoor Furniture

 Rust-Oleum 245196 Universal All Surface Spray Paint, 12 oz, Gloss BlackCheck Price Trimaco 04301 Slip Resistant Dropcloth Stay Put Vinyl Drop Cloth, 9' x 12'Check Price 12 Pack Tent Stakes, 7075 Ground Metal Camping Aluminum Tent PegsCheck Price Dealmed Brand Nitrile Medical Grade Exam Gloves, Disposable, Latex-Free, 180 Count, Size Extra LargeCheck Price


 See More Crafts & DIY Reviews On
ReviewThisCrafts.com!


House of Sylvestermouse


Note: The author may receive a commission from purchases made using links found in this article. “As an Amazon Associate, Ebay (EPN) and/or Esty (Awin) Affiliate, I (we) earn from qualifying purchases.”


Sunday, September 2, 2018

How to Position Twin Beds to Create Separate Areas in a Room

Reviewing How to Layout Twin Beds So They're Separate from Each Other

The standard room layout for twin beds, is to place them side by side with a nightstand in-between.

However, there are creative ways to define areas in a shared room.

Below are three typical bedroom shapes you'll find in most homes: Rectangular, Square and L-Shaped.

Furnishings for a room with twin beds tend to be two beds, two nightstands, two desks, one or two dressers and or storage trunks and accessories.

Tip: If the room has a decent sized walk-in closet, put the dressers inside of it. You can place dressers under a section of clothes, and use the area above the dresser to hang smaller items.

1. Suggested Layout for Twin Beds in an L-Shaped Bedroom:

An L-Shaped room is the easiest floor plan to distinguish separate sleeping areas.

This floor plan makes the twin beds appear almost hidden to each other. Both areas have a nightstand, a desk and in this design a shared dresser. Again, if possible, put the dresser in the closet.

Floor Plan Layout by Funkthishouse

2. Suggested Layout for Twin Beds in a Rectangular Shaped Bedroom:

With a rectangular shaped room the tendency is to assume the beds have to be positioned side-by-side. That's absolutely not the case.

If the room is narrow, and doesn't allow for a lot of furniture, then use twin sized beds with drawers built in the bottom. That way you've eliminated the need for a dresser. Or again, if there's a walk-in closet, put the dresser in the closet.

When space is very tight, choose beds with built-in drawers. Here are a few examples:


Remember, if you decide to get beds with drawers, a nightstand positioned incorrectly can block the opening of those drawers. Twin beds with storage can also come in a large number of designs including some with storage in the headboard. If the headboard doesn't offer built-in lights, add creative strip lighting.

Floor Plan Layout by Funkthishouse.com

3. Suggested Layout for Twin Beds in a Square Shaped Room:

This layout will depend upon where the doors and windows are positioned in the room. However, you can still create defined areas by thinking outside the box.

In a square room, our design instinct is to place twin beds side-by-side. But don't let that thinking stop you from setting up defined areas. Even square rooms can have separate areas for twin beds.

In the floor plan below you'll notice the room was split in half. The position of the main door allowed for that. Essentially one half of the room is allocated to one twin bed area and the other half for the second bed.

In this design there wasn't room for a dresser, but as mentioned above, there are multiple ways to accommodate storage. Here you'll see a storage trunk at the end of each of the beds. The beds can have drawers, or a dresser can go inside of a large closet.

Floor Plan Layout by Funkthishouse.com

BONUS TIP: Small Bedrooms and Selling Your Home

During my real estate years frequent comments were about bedroom size. Most people feel that an empty room is larger than a furnished room. It isn't.

An empty room looks small.

People tend to need a visual to gage what will fit into a space. If the room is small, use bed and wall storage to illustrate how efficient the space can be.

Measurements to give you a sense of bed sizes and space:
  1. Standard king size beds measure 76 inches wide by 80 inches long. (6.33ft by 6.66ft)
  2. California king size beds measure 72 inches wide by 84 inches long. (6ft by 7ft)
  3. Standard queen size beds measure 60 inches wide by 80 inches long. (5ft by 6.66ft)
  4. California queen size beds measure 60 inches wide by 84 inches long. (5ft by 7ft)
  5. Standard double size beds measure 54 inches wide by 75 inches long. (4ft by 6.25ft)
  6. Standard twin size beds measure 39 inches wide by 75 inches long (3.29ft by 6.25ft)
  7. Extra long twin size beds measure 39 inches wide by 80 inches long. (3.29ft by 6.66ft)
Next, learn how to affordably convert twin sized beds into a king bed...


Note: The author may receive a commission from purchases made using links found in this article. “As an Amazon Associate, Ebay (EPN) and/or Esty (Awin) Affiliate, I (we) earn from qualifying purchases.”


Sunday, August 12, 2018

How to Get Your Bed to Look Like a Professional Decorator Made It

Photo Design by Funkthishouse.com
photos via Pixabay
The problem for most of us is that our bedding lacks style, quality and most probably, fluffiness!

If we're being honest, we tend to keep our Comforter/Duvet Sets for much too long without changing them. When we're stuck with the same bedding, we're stuck with the same drab look.

Beyond the bedding color, pattern and design, there are certain items that can give your bedroom a pick-me-up.

Below are a list of basic items or variations of them that you'll need in order for your bed to look like a high priced decorator assembled it.

Duvets Versus Comforters - Which One is Better?

With a Duvet, you buy the fluffy insert separately and it's the quality fluffiness that gives your bed it's professional look. The benefit of buying an insert separately is that you can choose one that's long lasting and of higher quality: The higher the quality the longer it will stay fluffy.

Since it's an insert, you can change the actual duvet cover, and thus the look of your room, anytime you want.

Next you'll want duvet clips to secure the Insert to the Cover so it's free of lumps, bumps and wrinkles.

Comforters are all-in-ones, in that the comforter and insert are one piece thus eliminating the need to buy an insert or duvet clips. Also, they usually come with pillowcases, a comforter, a bed skirt and sometimes bed sheets.

However, the downside to a comforter is that if the quality is lower (and many times they can be), it will lose it's fluffiness and start to look flat on the bed (like a bed sheet does).
Here's an 8 Piece COMFORTER Set (Not a Duvet Set) Rochelle Pinched Pleat Gray Comforter Set QueenHere's an 8 Piece COMFORTER Set (Not a Duvet Set) Rochelle Pinched Pleat Gray Comforter Set Queen
A flat comforter will take away from that professional look you're going for, unless of course you're aiming for a simple almost Japanese look to your room.

Pillows Finish the Bed's Look:

Have you noticed that a bed with a duvet or comforter looks decoratively unfinished with only two pillows on the bed? Especially on a king size bed.

To give a bed that professional decorator look, you'll want to have at least four standard or king size pillows, and then finish the pillow-look with a few decorator pillows.

Bolsters also work. They're a long oval pillow you can use against the bed frame or the wall for the other pillows to lean against.

They do exactly what their name says, 'they bolster' the pillows in front so you have a fuller look of pillows on the bed. If you don't have a bed frame, they're also a way to get pillows off the wall. However, even if I have a bolster, and I do, I still use 4 pillows.

Make sure the pillows are fluffy as well. Flat, over-used pillows will make the bed look drab. So if your pillows aren't fluffy and you can't go out and buy more, put two old pillows, or even three old pillows inside one pillowcase. I've done this several times and it works well.

I've overstuffed the pillowcases at the back, and put two new fluffy pillows at the front. That way I only had to buy two new pillows instead of four, saving a bit of cash while still maintaining that fluffy full look.

Pillowcases, Don't be Afraid to Mix and Match:
With pillowcases you can go two ways. 
Either they can exactly match the duvet or they can be complimentary in pattern and color to the duvet. 
If you have a lot of extra pillow cases, you may already have some that are complimentary with your new duvet thus saving you the expense of having to purchase extra pillowcases. 

Bed Skirts for Duvet and Comforter Sets:
Some people like bed skirts, and some don't. 

My mom isn't a fan of bed skirts, so rather than a duvet or comforter, her bed has a bedspread. A bedspread goes right to the floor to hide the box spring, thus removing the need for a bed skirt. 

However, if you don't like to see any part of the box spring when the bed is unmade, then even with a comforter, you'll want a bed skirt.

Bed Sheets - They Don't Have to Match the Duvet or Comforter
This is misunderstood by many bed makers.

If you already own bedsheets that are complimentary to the duvet/comforter set you purchased, then use them!

That way you can focus on buying the most important elements to making your bed look professional: A high quality duvet insert, duvet clips and at least four pillows, decorator cushions and a bed skirt if you don't already have one.

Use an existing bed skirt if you have one that's complimentary! Again, it doesn't have to match exactly.

Pull it All Together:
  1. You have your fluffy bedding - either a comforter set or a duvet set with a quality insert and duvet clips
  2. You've got a bed skirt to hide the box spring
  3. You've got at least four standard (or King) pillows and a couple of decorative pillows.

However, Making the Bed is Where it Will Get that Final Professional Look:
  1. Fold down the top part of the duvet so the reverse side is showing by about six to twelve inches. You can even fold it down a couple of feet if you have a lot of pillows and you want some of the bed sheets exposed because of their design and quality. However, the standard fold down of the top portion of the duvet/comforter is about one foot.
  2. Pull the wrinkles out of the comforter/duvet
  3. Make sure the comforter/duvet is even all the way around
  4. Details matter, don't let the bed sheets hang past the duvet cover/comforter on the sides or ends. If they're too long, tuck them in

There you have it! Think fluffy and you'll nail it.


Note: The author may receive a commission from purchases made using links found in this article. “As an Amazon Associate, Ebay (EPN) and/or Esty (Awin) Affiliate, I (we) earn from qualifying purchases.”


Sunday, July 29, 2018

Egyptian Cotton Sheets Really Are THAT Awesome!

Photo by Funkthishouse.com - A Personal Review
100% Egyptian Cotton Sheets are Incredible to Sleep In

I've never been one to fuss about the quality of our bed sheets. If the sheet set was on sale, then it likely made it's way into our home.

However this past weekend my mother gifted me a set of 100% Egyptian Cotton Sheets and my husband and I are shocked at how amazingly comfortable they are.

The thread count on these sheets is quite high: If I had to guess I'd say approaching 1000tc.

If you've ever stayed in a quality hotel with those Hotel Bed Sheets, these sheets fall into the same category.

Mom purchased the sheets a few years ago, but because she didn't like the way they wrinkled after washing, she never used them. In fact, she had them dry cleaned and kept them hanging in her closet unused.

When I arrived home from my visit with Mom, I washed and dried the sheets, and yes they did wrinkle, but once on the bed, they were fine.

The wrinkles really don't bother me. Of course I googled how to get the wrinkles out, but have no intention of doing any of the suggestions. For my taste, they really don't wrinkle enough to worry about it.

Crisp and Cozy

That's how I'd describe these sheets. In my opinion they're worth every penny. 
Thread Spread True Luxury 100% Egyptian Cotton 1000 Thread Count 4 Piece Sheet Set Dark Grey QueenThread Spread True Luxury 100% Egyptian Cotton 1000 Thread Count 4 Piece Sheet Set Dark Grey Queen, King, & California King
The crisp feeling of the sheets make you want to stay in bed and never get out. Even my husband who could care less about bed sheets has been going on about how comfortable they are.

Apparently the sheets will get softer as they go through additional wash and dry cycles. However, I prefer their new and 'crisp' feeling on my skin. 

If you want to soften them quicker, you can always try these suggested tips from WikiHow.

Flannel and Jersey Bed Sheets - Also Awesome

Although we're not terribly fussy about our sheets (until the Egyptian Cotton Sheets!), we have always liked Flannel Sheets and Jersey Sheets for the winter months. 

There's nothing more comfy cozy than crawling into a bed with flannel sheets on a cold winters night.

Jersey sheets are similar to flannel, just a little thinner. Their bonus feature is how the fitted sheet easily stretches over the mattress ends. If you've never tried jersey sheets, you should, they're pretty awesome, and not that expensive.

So in summary, all the hype you've heard about 1000 Thread Count Egyptian Sheets, in my opinion, is justified; total comfort!


Note: The author may receive a commission from purchases made using links found in this article. “As an Amazon Associate, Ebay (EPN) and/or Esty (Awin) Affiliate, I (we) earn from qualifying purchases.”


Monday, July 9, 2018

Reviewing Handmade Rag Rugs

Handmade denim rag rugs by StudioAtRedTopRanch
I love rag rugs and have always loved rag rugs. Occasionally, I have made my own using strips of recycled cloth (bed sheets) and a super large crochet hook. Recently, I have learned about the hand-woven rag rugs made by StudioAtRedTopRanch. They are such beautiful rugs that I wanted to share with you.


StudioAtRedTopRanch on Etsy


This Etsy shop offers hand-woven placements, table runners, and rugs. The rugs are my personal favorite. 

Tracy is the owner/artist at StudioAtRedTopRanch.  About the rugs, she writes:


"I began making handmade rag rugs as a way to use up leftover and unloved fabric. As I studied rugmaking, it became a way to learn and preserve an art developed by women who made-do by repurposing clothes and curtains because they had no other materials available..."

One of the reasons I love her rugs is because they look a little more "finished" than my crocheted rag rugs do. I guess because hers are woven they lay flatter and looked more finished than my lumpy, thick rugs.

Another reason I really like these rugs is because they are handmade - but didn't take me weeks to make!  I enjoy making my own crafts but I just don't make much time for crafts and I have the attention span of a flea. 

One more reason I like these handmade items is because I like to support women who have small, home businesses. Besides, when someone is making something they love, and something that is meaningful to them, the quality is so much better. 

These rugs, runners, and placements are perfect gifts for people who have a country farmhouse or rustic cabin living style. Or a perfect gift for yourself - adding a touch of "home" in your favorite room. My favorite "color" (and style) is the denim rug but she offers many colors to choose from.


some of the color options at StudioAtRedTopRanch


Note: The author may receive a commission from purchases made using links found in this article. “As an Amazon Associate, Ebay (EPN) and/or Esty (Awin) Affiliate, I (we) earn from qualifying purchases.”


Most Recent Reviews on Review This Reviews


Search for Reviews by Subject, Author or Title

The Review This Reviews Contributors


SylvestermouseSylvestermouseDawn Rae BDawn Rae BMbgPhotoMbgPhotoBrite-IdeasBrite-IdeasWednesday ElfWednesday ElfOlivia MorrisOlivia MorrisTreasures by BrendaTreasures by BrendaThe Savvy AgeThe Savvy AgeMargaret SchindelMargaret SchindelRaintree AnnieRaintree AnnieLou16Lou16Sam MonacoSam MonacoTracey BoyerTracey BoyerRenaissance WomanRenaissance WomanBarbRadBarbRadBev OwensBev OwensBuckHawkBuckHawkDecorating for EventsDecorating for EventsHeather426Heather426Coletta TeskeColetta TeskeMissMerFaeryMissMerFaeryMickie_GMickie_G


Review This Reviews is Dedicated to the Memory of Our Beloved Friend and Fellow Contributor

Susan DeppnerSusan Deppner

We may be apart, but
You Are Not Forgotten


“As an Amazon Associate, Ebay (EPN) and or Etsy (Awin) Affiliate, I (we) earn from purchases.” Disclosure Statement

X