Showing posts with label DIY. Show all posts

Tuesday, December 7, 2021

Kawaii Craft Life - Book Review

Kawaii Craft Life book sitting on a stand

Super-cute projects for home, work & play


Kawaii


The word Kawaii means “cute” in Japanese.  It has the power to make you smile. It is the precious, the cuddly, and the silly.  Kawaii is all things super-cute.


The Kawaii Craft Life Book


Kawaii Craft Life book cover

The first part of the Kawaii Craft Life craft book lists the tools you need for each craft (Needlecraft Essentials), plus materials lists and hand-stitching basics, with illustrations and directions on how-to-do each craft.  Then the book is divided into sections filled with patterns and instructions.


The sections include:


Feltcraft 


Rainbow Cloud Plushie, project in craft book


These include tiny plushies, woodland critters, coasters, pencil toppers and more.


Counted Cross-Stitch


Cross stitch crafts in Kawaii Craft Life Craft Book


Patterns include cute animals wineglass charms, gift tags, greeting cards, cupcake toppers, napkin rings, magnets and even earrings.  Color charts of a seal, a penguin, a panda and a cat, bunny, frog, acorns and mushrooms, and even designs of Sushi food, are among the cute designs to cross stitch or use in other needlework crafts.


Embroidery


Stitch a cheerful blooms coin purse, an apple pie apron, tea towels and and a Little Monster onesie.  Embroider a tote or a dragon bookmark.  Stitch cute veggies on napkins or create a magic unicorn wall art.  Woodland critters look darling on just about anything. 


The Authors


The authors of Kawaii Craft Life are Sosae and Dennis Caetano.  Years ago they began their crafting journey with needle and thread and found it was a wonderful way to deal with stress – a way to unwind and express their creativity.  They began to design needlecraft projects – from felt animals to cottage ornaments to Kawaii monsters. Whether they are creating a pattern or stitching it to life, needlecraft brings them happiness.  Sosae & Dennis hope that with this Kawaii Craft Life book it does the same to you.


Summary


craft examples in Kawaii Craft Life craft book

Examples of project in the Kawaii Craft Life craft book

Kawaii Craft Life is a fun crafting book filled with home décor and playtime pals, all with the  'cuteness factor'.  It will bring “adorable” and “lovable” into your crafting world. Few can resist the charm of Kawaii, so come create a cute and cuddly craft. 


Kawaii Craft Life book cover

For more craft reviews, check out ReviewThisCrafts.com 


For more book reviews, check out ReviewThisBooks.com


*Kawaii Craft Life Book Review written by

Wednesday Elf


Note: The author may receive a commission from purchases made using links found in this article. “As an Amazon Associate, Ebay (EPN) and/or Esty (Awin) Affiliate, I (we) earn from qualifying purchases.”


Wednesday, November 24, 2021

Winter Time and Birds, Some Good Advice Regarding Pigeons! A DIY Project!

Every Winter the Birds Come Calling! 

I guess that's because we (my other half and I) love to see and feed the birds during the coldest months of the year.  There is something wonderful in seeing even the plain little sparrows munching on suet cakes that we have made or bought. The winter months can be tough on little birds as they need a lot of energy just to keep their tiny bodies warm.

birdhouse with icicles


Image by Kurt Bouda from Pixabay

There is one bird though, that I do not want on my balcony!  I do NOT want pigeons!

Why?  Pigeons are very dirty birds.  They like to make their homes in high spaces!  If they can find a spot out of the wind and elements, they will call that spot home!  They will also chase away any of the smaller birds that I really do like having around my balcony in the winter months.  So what can I do?
pigeon


Well, I was checking out ways to keep the pigeons from even wanting to come onto my balcony, but the availability of food for the smaller birds is what is attracting them.  So if there is no food there will be no birds and I will miss out on some really fun times watching these little critters. I need to do something else that will make the pigeons look for other lodgings.

Pigeons are spooked easily,  so one method of deterring them is to hang windchimes and balloons so that there is always movement and sound happening.  Hopefully they will find a quieter place to call home!

While thinking about this problem and the solutions I had an idea that would do the trick. I came across a whole stack of old CD disks that we no longer needed or wanted.  Old operating systems on CD's were taking up space and were really not necessary for our computer operations.  One side of the disk has a label on it and the other side has beautiful rainbow colors!   So I took a dozen or so of these disks and set to work.

I drilled a hole in the disk about an inch inside the outer rim!   Then just thread some wire or garden twine through the hole and leave enough string/rope to make a loop big enough to pass the disk through it. You can hang them all at the same level or vary the lengths as you please.   Then take all of your strung CD's outside and hang them with the loop around a cord or light string.  .  

At our home we have a string of lights on our balcony because we love to sit out there evenings during the summer months!  This string of lights is now lit for the holidays and it looks amazing with my hanging CD's!  Just check out the short video I took!  You can see the effect it has in the daytime and at night!  


The sunlight plays on the discs sending light all around the balcony!  It does not take much wind to make them spin and when they are spinning light beams are playing all around the balcony.  I am so pleased with the outcome.  They are quite pretty with their rainbow colors and they themselves are not at all noisy!  Even in the windiest of days if the CD's bang around, you just hear a little clicking sound.  


Evenings on the balcony are so pretty with rainbow hues being seen from all corners.  I have a mirror on the one side and my lights and the disks are nicely reflected in it.  It makes it seem like I have twice as many lights and CD's on the balcony!  I personally love the look!

What do you need to accomplish this for yourself?  A DREMEL TOOL is great for drilling the holes or you can use a regular drill with a fairly small bit (depending on the size of your cord).   If you don't have lights to hang these from, you can make a line with any kind of twine and fasten it with some hooks to where ever you want these hanging. .You can also use Christmas hooks to hang these from an eaves-trough.  Vary the lengths of the cords or keep them all the same, that is up to you entirely.  

What I have found in just the short time that these have been up, is that the little birds are not scared of the light show, but the pigeons are not coming to roost anymore.  Hopefully this will keep them away. 

I checked into other methods of keeping pigeons off the balcony, but they involve either hurting the birds or making the railings uncomfortable not just for the birds but for us as well.  I don't want to hurt anything, but don't want to encourage those pigeons to roost on my balcony.  

I will let you know how it works, but, for right now it seems to be doing the trick!  No pigeons were harmed during this trial and I suspect they won't be hurt or harmed in any other way while these are on my balcony!


Note: The author may receive a commission from purchases made using links found in this article. “As an Amazon Associate, Ebay (EPN) and/or Esty (Awin) Affiliate, I (we) earn from qualifying purchases.”


Wednesday, October 20, 2021

The Best Acrylic Fabric Paints for Painting Clothes and Accessories

Acrylic fabric paints, iron-on appliques and other embellishments are a fun and easy way to transform ordinary t-shirts, sweatshirts, denim jackets and jeans into special, one-of-a-kind clothing designs. 

Even if you don’t feel especially artistic, it’s extremely easy to add striking hand painted designs to basic wardrobe items by applying acrylic fabric paint through a stencil with a foam pouncer. 

Embellishing clothing with fabric paints is also a wonderful project to do with kids. Both my fashionista niece and her younger brother used to love taking solid color T-shirts and creating their own hand painted and stenciled designer tees, which they wore with pride.

Some fabric paints also work well on other materials, including leather and vinyl, so they’re great for painting shoes, sandals, handbags, belts and other accessories to give them a whole new look with fresh colors, color blocking, patterns or painted accents.

I have researched and used different types, brands and formulas of fabric paints in different price ranges. In this review I will share my favorite acrylic fabric paints for decorating clothing and accessories. 

The Best, Most Versatile Acrylic Fabric Paints for Embellishing Clothing & Accessories

Why Use Acrylic Fabric Paints?

Acrylic fabric paints, also called acrylic textile paints, are formulated specifically for use on fabric clothing and other textiles. Unlike fabric dyes and alcohol-based textile paints or inks, they do not spread and saturate the fibers. Most work best on untreated or pre-washed, natural fabrics and synthetic fabrics whose fiber content contains at least 50% natural fibers. 

Acrylic textile paints are usually thinner, penetrate fibers better and dry more flexible than standard acrylic paints formulated for art or craft uses. Fabric paints also contain a binder that helps them adhere much better to natural fibers after the paint dries and is heat-set (usually with an iron). This binder makes the painted designs more durable, so they can better withstand repeated washing and resist cracking, peeling or flaking when the fabric is gently stretched or folded, such as when you put on, move around in, take off or put away your painted clothing.   

More transparent colors usually have a thinner consistency and are softer to the touch when dry compared to more opaque fabric paints. They are great for lighter color fabrics, since the color of the clothing will show through them. For the same reason, opaque fabric paints will show up much better on darker clothing, although they are slightly thicker and will dry a bit stiffer than more transparent formulas.

Good Quality Fabric Paints Give the Best Results

Jacquard makes moderately priced, high-quality, highly pigmented paints, dyes, mica powders and other art and craft supplies. Jacquard's Textile, Neopaque and Lumiere lines are my go-to acrylic paints for painting fabrics.

Jacquard Textile acrylic paints "Exciter Pack" assortment

Jacquard Textile 

Jacquard Textile paints have a medium- to light-bodied consistency and come in 39 semi-transparent colors. Mixing any of the other colors with 123 White will create a pastel shade. You can make any color more transparent without affecting the quality or consistency by mixing it with Jacquard Textile 100 Colorless Extender. (Another option, which I don’t recommend, is diluting the paints with up to 25% water, since it will reduce their viscosity and negatively affect the quality.)  Mixing any other Jacquard Textile color with #220 Super Opaque White will make it more opaque. 

The Jacquard Textile Color Exciter Pack is an economical assortment that includes small bottles of nine of the most useful colors in the line. It's a great way to try these paints without investing a lot of money.

Jacquard Textile colors can also be mixed with Jacquard Lumiere, Neopaque or Dye-Na-Flow paints or with Jacquard Pearl Ex Powdered Pigments to create custom colors and effects.

Jacquard Neopaque and Lumiere

Neopaque is Jacquard’s line of light-bodied, opaque acrylic paints. They come in 21 colors plus a Flowable Extender medium that can be used to make the colors more transparent without altering the paint’s texture, consistency, adherence and other key properties. Lumiere is a companion line of 33 beautiful metallic and pearlescent paint colors designed to complement the Neopaque solid colors and have similar characteristics. My favorite Lumiere paints are the color-shifting duo-chrome colors!

Even though the Jacquard Neopaque and Jacquard Lumiere lines have not been optimized specifically for painting on fabrics, like the Jacquard Textile line, they have many of the same characteristics and are also considered fabric paints. After they have dried and been heat-set, both Neopaque and Lumiere paints adhere to textiles very well, remain flexible and resist cracking, peeling and chipping. I have used them to paint fleece sweatshirts, both freehand and with stencils, and they have withstood many washings well.

Both formulas are opaque, highly pigmented and provide good coverage, even on dark fabrics. You can mix any Neopaque or Lumiere shade with Neopaque Flowable Extender to make it more transparent without changing its consistency, thickness, flexibility, adherence or other important characteristics. 

Similarly to the Jacquard Textile line, you can mix pastel shades by blending a small amount of Neopaque White into any of the other Neopaque colors.

Jacquard Neopaque and Lumiere acrylic paints
I've been using my first Jacquard Neopaque and Lumiere acrylic paint Exciter Packs for many years. 

There are also a Lumiere Exciter Pack with 9 pearlescent and metallic colors and a Lumiere & Neopaque Exciter Pack with 7 metallic Lumiere shades plus black and white Neopaque. As with the Textile line, these two Exciter Packs are a great way to get a nice variety of colors in smaller quantities for a very affordable price. I have purchased both of these Exciter Packs as well as full-size bottles of the Neopaque black and white and Lumiere duo-chrome colors I use most. I recently bought another of the Lumiere assortments because some older colors have been discontinued and newer ones added.

Another advantage of Jacquard Lumiere and Neopaque acrylic paints is that they adhere well to a wide range of surfaces including paper, wood, rubber, vinyl, leather and rubber, in addition to fabric, and can be used for many different types of projects. I have gotten more than my money’s worth out of mine. 

For example, I completely transformed an old pair of boring, frumpy, beige comfort sandals by painting the leather with Lumiere for the uppers and black Neopaque to edge the sole, and then sewing on some faux jeweled trim. 

Beige sandals before and after being painted with aqua and blue Jacquare Lumiere acrylic paints

Heat-Set Fabric Painting Medium 

You also can achieve successful results by mixing permanent, highly pigmented art or craft acrylic paints 50/50 with a good quality fabric medium, such as Golden GAC 900 Heat-Set Fabric Painting Medium or Martha Stewart Tintable Fabric Medium. 

Pébéo Setacolor

If you are painting a very special piece of clothing or textile, you may want to consider the Pébéo Setacolor line. These superb fabric paints come in an extensive range of beautiful colors and finishes. Although they are more expensive than the Jacquard fabric paints, superior quality, performance and product selection make Pébéo Setacolor products a favorite among many professional painted clothing artists and enthusiasts. 

Pébéo Setacolor Light Fabrics are transparent and include 44 matte, metallic, glitter, and fluorescent shades. Pébéo Setacolor Opaque comes in 77 matte and “shimmer opaque” shades with glitter, pearlescent, metallic and iridescent finishes that dry softer, smoother and more flexible than most other opaque textile paints. There are also Pébéo Setacolor 3D fabric paints that come in tubes with small nozzles that are great for adding raised outlines or dimensional accents to your painted clothing designs. 

The most affordable way to try these terrific paints is with one of the 10-color introductory sets, the Pébéo Setacolor Light Fabrics Discovery Kit or the Pébéo Setacolor Opaque Discovery Kit

Use Fabric Paints and Stencils for Beautiful, Affordable, One-of-a-Kind Handmade Gifts 

Stencils are made in just about any pattern or theme you could want and require no artistic talent to use.

I have used inexpensive fabric stencils of flowers, gardening tools and bees to decorate a sweatshirt for my mother-in-law who loves to garden. 

One of my husband’s favorite gifts from me is a forest green sweatshirt I purchased for him many years ago and stenciled with a cascade of metallic and pearlescent autumn leaves. It has been worn and washed so many times that the fleece is pilling, and the color has faded. By now, the paint isn’t quite as bright or shiny as it once was, either, but it’s still hasn’t cracked, flaked or worn off, and he still wears it proudly.

Man wearing dark green sweatshirt with a stenciled metallic autumn leaves design
My husband still loves and wears this sweatshirt I stenciled for him many years ago. 

You can use alphabet stencils to personalize a T-shirt, hoodie or other garment with the gift recipient’s name or add a meaningful word or message. 

Older children will also love using fabric paints and stencils to turn simple, inexpensive pieces of clothing into personalized gifts for special friends and family members.

Stenciled or hand painted tablecloths, napkins, placemats and table runners also make wonderful gifts. Painting them with snowflakes, pointsettias and other seasonal designs makes any holiday a bit more festive. 

I hope I have inspired you to give fabric paints a try!

The Best Acrylic Fabric Paints for Painting Clothes and Accessories


The Best Acrylic Fabric Paints for Painting Clothes and Accessories by Margaret Schindel


Read More Crafts Reviews by Our Review This Reviews Contributors

Read More DIY Reviews by Our Review This Reviews Contributors


Note: The author may receive a commission from purchases made using links found in this article. “As an Amazon Associate, Ebay (EPN) and/or Esty (Awin) Affiliate, I (we) earn from qualifying purchases.”


Wednesday, June 16, 2021

This Easy $3 Hack Prolongs Your Charging Cables' Life

Apple Lightning cables, Thunderbolt cables, and several types of USB cables remain in widespread use, despite the prevalence of Bluetooth wireless technology. You probably own multiple chargers and other types of cables to power, recharge and connect your mobile phones, digital cameras, tablets, e-readers, laptop or desktop computers, wired printers and other electronic equipment and peripherals, whether or not they are Bluetooth-enabled.

If you are frustrated by how often even expensive, top-rated phone chargers and other charging cords and cables need to be repaired or replaced, you’ll appreciate this quick, easy and inexpensive DIY hack that will strengthen and significantly prolong the life of your charging cables and data transfer cables. I’ll show you how to reinforce and extend the manufacturer’s built-in strain relief for the connectors on the ends of these cords with a small, single-use pack of Sugru moldable rubber glue and a few minutes of your time.

There's no way to predict exactly how much longer yours will last with this hack, since there are quite a few possible variables at play. However, I can say that, as someone who tends to be pretty hard on iPhone charging cables, USB cables and other cords for my various electronics and digital devices, using Sugru to strengthen my new cables before I start using them has roughly doubled the useful life of several of mine.

Apple Lightning to USB iPhone charging cables before and after reinforcing the strain relief with Sugru moldable rubber glue
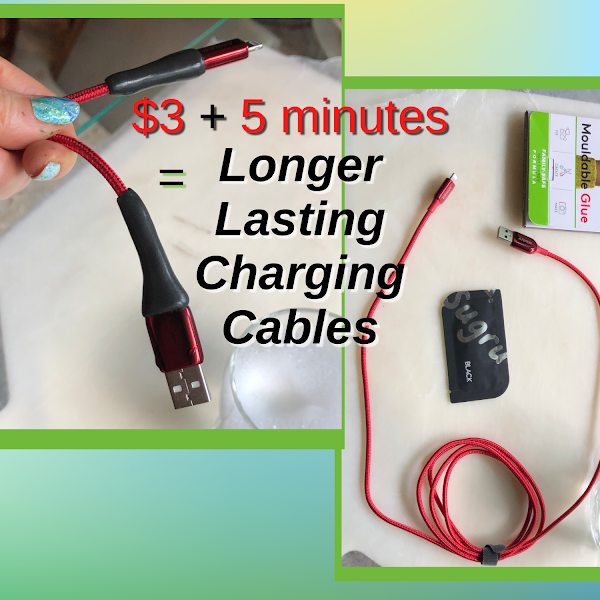
It took only a few minutes and less than $3 worth of Sugru moldable rubber "glue" to reinforce and extend the strain release on this new Anker Powerline+ III Apple Lightning to USB-A charging cable.

How Many Types of Charging Cables Do You Use?

USB cables are ubiquitous home, office and mobile device staples. In addition to charging most of our electronic devices, these cords are also used to transfer files and photos from a digital camera or mobile phone to a desktop, laptop or tablet, send documents, images and other data to a regular, multifunction or 3D printer, electronic cutting machine or other device with a USB port, and to sync files, photos and other data among digital devices, either instead or as an alternative to using Bluetooth or other wireless technology options.

Most households own multiple mobile phones, tablets, computers, printers and other digital devices that require different types of USB charging cables and cords for data transfer. For example, I use both USB-A to Apple Lightning cables and USB-C to Apple Lightening cables to charge my iPhone or transfer data from my iPhone to my Windows laptop and a USB-A to USB-C cable to charge my Fire HD 10 tablet, while my husband’s old Samsung Galaxy S5 Android phone uses a Micro USB Type B to USB-A charging cable. 

An Ounce of Prevention Is Worth a Pound of Cure

High-quality charging cables usually have more substantial, durable and usually molded integral strain relief than cheap ones. However, even on better quality USB charging cords from top brands such as Anker, if care isn’t taken to avoid undue tension or torsion at the connector ends, the strain relief may not be sufficient to prevent a wire in a shielded cable from breaking or stop the insulation, shield and jacket layers that surround those wires from splitting, fraying or separating from the connectors.

Using Sugru moldable glue to repair charging cords when the outer layers fray or split has long been a popular hack. While encasing the cable ends and connectors with this durable, air-cured rubber putty can sometimes extend the lifespan of a cable with relatively minor surface damage, such as a frayed cord or a small tear in the insulation, it can’t fix one that has stopped working because of a loose or broken wire. So, instead of waiting until one of these issues develops and having to attempt a DIY repair or pay a repair service more money to fix the broken cord or charger than it would cost to buy a new one, I highly recommend taking a more proactive approach by using Sugru to reinforce the strain relief the manufacturer has added to a new cable as soon as you remove it from the packaging. It's simple, inexpensive precaution that can significantly extend or even double a laptop, tablet or phone charger's useful life.

At the time of this post’s publication, you can order a 3-pack of Sugru moldable glue on Amazon for $7.99 with free shipping for Amazon Prime members. That equates to $2.66 for each single-use pack, which contains the perfect amount of Sugru for this quick and easy DIY project. So, for less than $3 each, you can beef up the strain relief to prolong the life of your new or lightly used charging cables. 

Since there are so many ingenious and useful Sugru hacks that use this strong, adhesive, self-hardening rubber putty, you may want to order the more economical Sugru moldable multi-use glue 8-pack, available on Amazon for $16.99 with free Prime shipping as write this, which brings down the cost of each pack to just $2.12 per (or even less with the current $3 off coupon).

Another consideration: One single-use pack of Sugru is enough to reinforce two cord ends. I prefer to reinforce both ends of my charging cables, so I use one pack for each cable. However, many people reinforce only one end of each cord, and if that's your preference, you can strengthen the strain relief on two chargers with each single-use pack, 

Note: If you aren’t a Prime member already, I highly recommend taking advantage of the Amazon Prime 30-day free trial. You can take a month to explore and enjoy the wide range of valuable benefits of being an Amazon Prime member—plenty of time to decide whether or not the annual membership fee would be worth it for you and your family.

Sugru: Use It or Lose It

Sugru begins to cure and morph from a soft putty to a hard rubber as soon as it is exposed to air. So, the minute you tear open one of the foil pouches, the clock starts ticking. According to the manufacturer's website, "Once you open your single-use pack, the moisture in the air will trigger the setting process giving you 30 minutes to fix, bond and create before Sugru begins to harden." So, it's important to work quickly so you will have enough time to complete and refine your project within that 30-minute window. [Source]

Since the company has not found yet found a way to extend Sugru's working time once it is exposed to air, make sure you have everything set out and ready to go before you open that airtight, sealed foil pouch. And, if you only need part of the packet's contents for your project—for example, if you only want to reinforce one end of a charging cable—try to plan another project (or two) to use up the remainder of the Sugru during that 30-minute "open time" so none of it goes to waste. 

Even unopened Sugru has a limited shelf life and an expiration date that is marked on the packaging. However, the good news is that Sugru was reformulated last fall and one of the new formula's improvements is that you can increase the product's shelf life as much as three times by storing the single-use pouches in the refrigerator from the time you bring them home until you're ready to use them.

How to Strengthen Your Charging Cables to Prolong Their Useful Life

Follow these simple, step-by-step instructions for reinforcing and extending the manufacturer's existing strain relief collar or band with this easy $3 charging cable Sugru hack.

What You'll Need

  • One or more USB charging cords or other cables, new and unused (preferably) or in excellent condition
  • One 3.5 g (0.12 oz) single-use pack of Sugru Moldable Glue by Tesa for each cable you want to reinforce
  • A countdown timer or timer app (optional but highly recommended), watch or clock
  • PTFE Teflon non-stick sheet to protect your work surface (optional, but highly recommended—see note)
  • A small container of lukewarm water mixed with a drop or two of mild liquid dish soap or hand soap (optional)
    • I use my favorite Puracy natural hand soap gel, which is gentle on my skin and smells wonderful. I buy the large 48-ounce refill bags and refill my hand soap dispensers.

Note: Teflon is one of the few materials that Sugru won't stick to before it cures. Even if you prefer not to cook or bake with it, this nonstick sheet can be extremely useful for crafting and DIY projects. Unfortunately, I couldn't find mine recently when I was photographing this DIY tutorial, so I tried substituting a sheet of wax paper to protect the cutting board I used as my portable work surface. The Sugru glue did stick to the wax paper somewhat, so I don't recommend it. If you don't have (or don't want to buy) a piece of nonstick sheet for crafting and DIY, I suggest trying plastic wrap aka cling film, which might work better.

Materials and supplies needed: charging cable, Sugru moldable glue, optional container of soapy water

Step 1: Set Up Your Workspace With Everything You Will Need Before You Open the Pack of Sugru.

The second the Sugru inside a sealed foil pouch is exposed to air, the clock starts ticking on the 30-minute window of working time before the rubber putty starts to cure. So, it's a good idea to get as much set up as you can to maximize that limited window of opportunity, before the countdown begins.

  • Clear off a flat workspace and cover it with the nonstick sheet.
  • Remove the charging cord (or cords) from its packaging, loosen the hook-and-loop fastener cable tie just enough to pull out the connector end(s) you will be reinforcing for easy access, then re-tighten the cable tie.
  • Fill a small container with lukewarm soapy water, if using.
  • Set a countdown timer or app for 30 minutes, or put your watch. clock, or mobile phone clock where you can see them.
  • Pull out a single-use pack of Sugru moldable glue in the color of your choice, which can match, complement or contrast with the color of the charging cord.
    • For this tutorial, I chose a pack of black Sugru to make it easy to distinguish between the original strain relief collar band of the red Anker Powerline+ III Lightning to USB-A charging cable and the new, longer and thicker Sugru molded rubber reinforcement I added.

When everything is set up and ready to go, start the countdown timer (or make note of the time) and cut or tear open the sealed foil pouch of Sugru. It's show time!
Open pack of Sugru Moldable Glue

Step 2: Remove the Sugru and Divide It in Half.

Lightly roll each half into a ball and then into a log or sausage shape long enough to cover and extend past the charging cable's strain relief collar or band, as shown. 

Rolled tapered logs of Sugru Moldable Glue

Step 3: Taper, Flatten, Wrap and Shape a Sugru Log Around One End of the Charging Cord.

Taper one of the Sugru logs slightly, then gently flatten it with your fingertips until it's just wide enough to wrap around one end of the cable. Align the wider end of the tapered, flattened Sugru log so it overlaps the bottom edge of the connector or plug cover slightly. Then, wrap the edges of the Sugru around the cord, lightly pressing and stroking the soft rubber putty so it conforms smoothly, evenly and snugly and tapers gradually as it extends past the strain relief band and onto the outer cord covering.

When you are happy with the shape of your molded rubber strain relief reinforcement, stroke the surface lightly with a fingertip to smooth out any bumps, seams or uneven edges. 

Red Anker Powerline+ III Lightning to USB A Charging/Sync Cable strengthened with black Sugru moldable rubber glue DIY strain relief reinforcements

If you want to further refine the appearance of your Sugru-enhanced cable strain relief, you can dip your finger into some soapy water for the final smoothing, which will allow your fingertip to glide over the surface of the soft, sticky Sugru rubber to smooth away any fingerprints, lumps, bumps, or unevenness. 

You can see how much smoother and more refined the black Sugru wraps are on this Anker Powerline+ III Lightning to USB-A iPhone charging cable compared to the slightly lumpier, less evenly shaped red Sugru wraps on the Amazon Basics Nylon USB-A to Lightning Cable Cord, MFi Certified Charger for Apple iPhone in the next photo, which I formed without the benefit of any soapy water lubricant. The red Sugru strain relief hack looks fine, too, just a bit less "finished." 

Red Amazon Basics USB-A to Lightning Cable Apple iPhone Charger, with ends and connectors reinforced with rubber Sugru moldable glue

Just make sure to keep and eye on the countdown clock, so you can leave enough time to reinforce, shape and smooth the other end of the charging cord (or a second charging cable) before the Sugru starts to cure and becomes harder to form and refine.

Step 4: Repeat With the Remaining Sugru.

Repeat step 3, using the second log of Sugru to reinforce the other end of the same cable or another charging cord.

Tip: If you are reinforcing both ends of the same cord, be careful not to let the first newly-reinforced cord end bump into anything accidentally while you are working on strengthening the strain relief on the other end, since the Sugru will still be soft and easily marred. One big advantage of working on a PTFE/Teflon sheet is that you can lay the first Sugru-covered end flat on the nonstick sheet, where it can remain undisturbed (if you're careful not to jostle it) as you form the remaining rubber putty around the other end of the cable.

Charging cable with Sugru Moldable Glue reinforced ends hanging from doorknob to dry
Step 5: Allow the Sugru Rubber-Reinforced Charging Cable(s) to Cure, Undisturbed, For 12 to 24 Hours.

If you can arrange the cord(s) so that the reinforced ends lay flat against the nonstick sheet-covered work surface, that's probably the easiest option.

Alternatively, you may be able to hang the cable over a wall hook, shower curtain rod, towel rack, or even a doorknob, as I did, as long as the still-soft Sugru cord ends don't touch anything, including each other until the next day. 

By the following day, the moldable rubber will be fully cured, providing much more robust cord strain relief and helping to prolong the lifespan of the many types of phone chargers and other charging cables that power and connect the devices you rely on for information, education, communication, entertainment, work and play.


This Easy $3 Hack Prolongs Your Charging Cables' Life by Margaret Schindel


Read More of My Product Reviews

Read More Product Reviews by Our Review This Reviews Contributors

Read More DIY Reviews by Our Review This Reviews Contributors


Note: The author may receive a commission from purchases made using links found in this article. “As an Amazon Associate, Ebay (EPN) and/or Esty (Awin) Affiliate, I (we) earn from qualifying purchases.”


Monday, June 7, 2021

Reviewing Farmhouse Decor Ideas: Character Wood and Metal

I have a small home that is currently under construction. The exterior is purposefully barn-like. The siding is sheet metal and the side facing the road is windowless. I plan for the interior to also suggest (suggest or scream - I'm not quite sure yet) barn interior. While shopping and planning I have found that the look I am imagining is not always easy to find examples of but my plans are slowly coming together.

on ReviewThisReviews


One problem I have had while shopping and researching decor ideas is that search words such as "rustic", "country" and "cabin" brings results of bears, moose, mountains, bentwood, and plaids. All very lovely, and very appropriate for the mountain ridge where my home is being built, but not quite the look I am going for. Many "farmhouse decor" searches yield lovely photos that include monotone white decor and flower bouquets. Again, quite gorgeous but not exactly what I'm going for. 

I am looking for barn doors, concrete floors, metals and wood combinations. While there are entire books written on other home styles; contemporary, coastal, southwestern, industrial, and more, the books on the "rustic" style comes closest to my goal. But aren't quite what I'm after.

One of our contributors is an incredibly talented DIYer. Lucky for me, Renaissance Woman shares projects that are exactly what I'd like to make for my future home. She shared how she made a DIY Pallet Book Nook. In that project she utilized character wood (from pallets) and corrugated metal to turn a small, odd space in her home into a uniquely wonderful spot to read, hangout, and relax. She shares the definition of character wood; "weathered wood that captures your imagination." This style is very much what I'm imagining.


Renaissance Woman's DIY Pallet Book Nook

If you enjoy her DIY Pallet Book Nook article, you can find more of her reviews under her tab here. She is quite talented.

This wine rack is a much smaller example of barnhouse decor. In this example, it can be purchased fully assembled. But people with DIY talent could easily make their own.


Rustic Barn Door Wine Rack


Not everyone needs or wants a wine rack. But most everyone likes to have a wall clock in plain view for convenience. And how much better if that wall clock compliments the decor.  This wood and metal clock is a wonderful example of my definition of barnhouse decor.


Vintage Farmhouse Clock

Sliding barn doors are one of the most notable farmhouse (barnhouse) features. They are so popular that not only are they functional doors but they are also a part of furniture, wall-hangings, featured in paintings, and more. I have even seen printed shower curtains that mimic wooden barn doors.

I want a barn door. I have watched video tutorials and hope to make my own sliding barn door to cover at least one window. There are versions that do not required angled cuts and I think I can manage simple straight cuts and assembly. I am hoping for both functionality (blocking sun on hot days in that south-facing window) and visual appeal (a barn door hung in my barn). 

If I decide I am unable to build my own sliding barn door there are many options for purchase. This is just one example:

sliding barn door kit; assembly required

While I've never shopped at Pottery Barn, I have noticed that some of their wood furniture fits my idea of the farmhouse style. If you don't already shop there, you may want to take a peek.

If you are looking for some barnhouse inspiration, I hope these ideas spark your imagination. 


Note: The author may receive a commission from purchases made using links found in this article. “As an Amazon Associate, Ebay (EPN) and/or Esty (Awin) Affiliate, I (we) earn from qualifying purchases.”


Monday, May 31, 2021

How to Install a New Faucet


How to install a new faucet
How to install a new faucet - Reviewed

It was time to replace that old bathroom faucet. It was an old single lever push, pull-type, and was difficult to turn on and off, especially for our youngest grandson.

Replacing a faucet whether it is a bathroom faucet or a kitchen faucet is not that difficult. But sometimes Murphy’s Law takes over, and what can go wrong, will go wrong. The problem I had was my shut-off valves were frozen so I could not turn off the water under the sink. This was not a problem, I just had to turn off the main water supply and replace the shut-off valves and supply lines under the sink. But this review will only instruct you on how to install a new faucet.

 I am by no means an expert and I am not a plumber by trade. I can tell you how to do this because I have done it many times before.

Installing a new Faucet Step-by-Step:

Step 1

The first thing you need to do is to turn off the water supply. Most bathroom and kitchen sinks have shut-off valves under the sink, if not you will have to turn off the main water supply.

Step 2

Once you are sure the water is off, turn the faucet on to let the water out. Then, remove the hot and cold supply lines using an adjustable wrench. You will also have to unlatch the sink stopper lever from to ball lever on the drain. Leave the ball lever in the drain, as you will need to attach the new sink stopper lever to it later.

Step 3

Now remove the retaining nuts that are holding the old faucet, a basin wrench is the handiest tool for this task. After removing the old faucet measure the hole pattern on the sink. Make sure you purchase a new faucet that will fit the hole pattern in your sink.

Step 4

After removing the old faucet, clean any residue left behind with a tub and tile cleaner and paper towels. If you must use a putty knife, use a plastic one.

Step 5

Your new faucet will have a built-in gasket, but you will still need a bead of caulk or plumber’s putty around each hole. This is needed to make a good seal.

Step 6

Place the new faucet and fasten the retaining nuts to hold it in place. It’s always a good idea to have somebody hold the new faucet in place while you get the new basin nuts snug. Be careful not to over tighten, you can use the basin wrench, but I like to just hand tighten.

Step 7

Now fasten the hot and the cold-water supply line to the new faucet. You may need to wrap Teflon tape around the new faucet threads. Follow the manufacturer's instructions on the new faucet. Now, it is time to connect the sink stopper lever to the ball lever in the drain. You will find several adjustments on the sink stopper lever.

Step 8

Remove the aerator from the new faucet and turn on the water supply. Then, turn on the cold water. The aerator is the little screen inside the faucet spout. This is to make that it does not clog with any debris that may be in the water lines. Replace the aerator and check for leaks. That is all there is to it.

Find more  Crafts & DIY projects on Review This here: ReviewThisCrafts.com

This basin wrench will be your best friend when replacing a faucet.

Superior Tool 03811 Eleven Inch Basin Wrench-Infinitely Adjustable 11Superior Tool 03811 Eleven Inch Basin Wrench-Infinitely Adjustable 11Superior Tool 03811 Eleven Inch Basin Wrench-Infinitely Adjustable 11


Note: The author may receive a commission from purchases made using links found in this article. “As an Amazon Associate, Ebay (EPN) and/or Esty (Awin) Affiliate, I (we) earn from qualifying purchases.”


Thursday, May 6, 2021

Stitching Wood With Copper Wire


Stitching Wood With Copper Wire

For those who see beauty in imperfection, wood stitching is an appealing art form.  When I recently found a cracked tabletop, my first inclination was to replace it with something less damaged.  However, as I further considered the nature of this wood piece, I realized it was the crack that gave the table its real character.  

As Leonard Cohen expressed in his song "Anthem," forget your perfect offering, there is a crack, a crack in everything.  So, I thought, why not highlight rather than hide the flaw?  The flaw is the offering... is the song.

I had never attempted to stitch wood with copper wire before today, but I've been wanting to try this technique.  I am learning through trial and error what works.  I'll share my process here and a few tips.

First, I didn't care for the glossy wood finish, or the cheap look of the table itself.  Sanding alone did not fix that.  Torching everything took care of it.  It's a method known as Shou Sugi Ban.  Fire is a sure way of taking something lacking a wow factor and making it instantly memorable.

drilling holes in wood


drilling holes in wood

After charring the tabletop, I drilled holes in preparation for the wire stitching.  Using my butane torch, I burned the wood inside and around the holes (so the raw wood wouldn't show).

flattening copper wire

Using a steel block and hammer, I flattened the copper wire.  The copper looks better when it lies flush with the wood surface.

lacing pattern for stitching wood with copper wire

Now, I am experimenting with lacing patterns.  The trick, it seems, is to double back and bring two stitches up through a single hole.  I have discovered that the wire has to be carefully handled after being pounded flat.  A few pieces of wire have snapped in half when I started stitching the wood.  Lesson learned.  (And I have gone back and sanded down the indentations left by the drill around the holes pictured above.)

I am intrigued, so far, with my project.  The uniqueness of what is being created from something others might consider broken is what draws me to this work in progress.  This table is reminding me that there is beauty to be found in brokenness.  The crack is where the light gets in.

Stay tuned for the part two final reveal.  I can't wait to see it myself, as these kinds of projects tend to take on a life of their own.  I never know ahead of time just where the wood and other elements will lead me.  It's the adventure of it all that keeps me coming back for more.


Note: The author may receive a commission from purchases made using links found in this article. “As an Amazon Associate, Ebay (EPN) and/or Esty (Awin) Affiliate, I (we) earn from qualifying purchases.”


Tuesday, July 21, 2020

Easy Wall Decor Ideas


Easy Wall Decor Ideas
Easy Wall Decor Ideas Reviewed

We decided to downsize a few years back. With the kids all grown up, we didn't need a large two-story house just for the two of us. So, we found a nice one-story house with two and a half baths, and as luck would have it a full finished basement.

We furnished our new finished basement with the living room furniture from our old house, So, now we had to go out and buy new furniture for the living room or live in our new basement. By the way, our finished basement is a perfect place for our grandchildren to play when they visit.

Our previous home had two built-in wall shelves between a window in the living room. This allowed us to display pictures, knick-knacks, and books.

We don't have any built-in shelves in the new house. We had to look for some inexpensive ideas to add some accents to the walls other than just picture frames.

Easy Wall Decor Ideas: 

The above picture is a simple wall shelf and candleholder we had in storage. We added this to our dining area. I looked on-line and found 48-inches as a recommended height from the floor. That seemed way too low, so, I set it at 65-inches from the top of the shelf to the floor. It is perfect to display our tea set. So far zero dollars spent.

Easy Wall Decor


This shelf is another one we had in storage. this one we added to the living room, But Fran didn't like the color of this one so I painted it to match walls. This is a perfect shelf for some candle holders and a small picture. Once again zero dollars spent.

Easy Wall Decorations


Now the wall at the end of the hallway that leads to the bedrooms was blank. This photo memory quilt filled that space quite nicely. With pockets for small photos, this is a great way to display some fun memories.

Simple wall shelves are a great and inexpensive way to add some accents to your walls and display your collectibles and photos. Some other ideas for wall decor are Pictures, wall clocks, and so many choices of Peel and Stick vinyl wall decor.


Here are some inexpensive ideas for wall shelves

Amada Floating Shelves Wall Mounted, Rustic Paulownia Wood Wall Shelves Set of 3 for Bedroom, Bathroom, Living Room, Farmhouse Kitchen, GrayAmada Floating Shelves Wall Mounted, Rustic Paulownia Wood Wall Shelves Set of 3 for Bedroom, Bathroom, Living Room, Farmhouse Kitchen, GrayCheck the PriceBAMFOX Floating Shelves,Wall Shelf Set of 3,Wall Mounted Floating Shelf with Large Storage for Bedroom Bathroom Living Room Kitchen OfficeBAMFOX Floating Shelves, Wall Shelf Set of 3, Wall Mounted Floating Shelf with Large Storage for Bedroom Bathroom Living Room Kitchen OfficeCheck the Price


SEe


Note: The author may receive a commission from purchases made using links found in this article. “As an Amazon Associate, Ebay (EPN) and/or Esty (Awin) Affiliate, I (we) earn from qualifying purchases.”


Most Recent Reviews on Review This Reviews


Search for Reviews by Subject, Author or Title

The Review This Reviews Contributors


SylvestermouseSylvestermouseDawn Rae BDawn Rae BMbgPhotoMbgPhotoBrite-IdeasBrite-IdeasWednesday ElfWednesday ElfOlivia MorrisOlivia MorrisTreasures by BrendaTreasures by BrendaThe Savvy AgeThe Savvy AgeMargaret SchindelMargaret SchindelRaintree AnnieRaintree AnnieLou16Lou16Sam MonacoSam MonacoTracey BoyerTracey BoyerRenaissance WomanRenaissance WomanBarbRadBarbRadBev OwensBev OwensBuckHawkBuckHawkDecorating for EventsDecorating for EventsHeather426Heather426Coletta TeskeColetta TeskeMissMerFaeryMissMerFaeryMickie_GMickie_G


Review This Reviews is Dedicated to the Memory of Our Beloved Friend and Fellow Contributor

Susan DeppnerSusan Deppner

We may be apart, but
You Are Not Forgotten


“As an Amazon Associate, Ebay (EPN) and or Etsy (Awin) Affiliate, I (we) earn from purchases.” Disclosure Statement

X