Showing posts with label Crafts & DIY. Show all posts

Tuesday, January 4, 2022

Modern Amigurumi for the Home – Craft Book Review

Modern Amigurumi for the Home Book Cover


Amigurumi is the Japanese art of crocheting small, cute dolls. It comes from the Japanese words ami (crocheted) and nuigurumi (stuffed toy).  

*As defined by Google 


Amigurumi Crochet Designs


Modern Amigurumi for the Home book cover

From Annie's Crochet comes this Modern Amigurumi for the Home crochet leaflet with 8 adorable designs to crochet in the Amigurumi style.


Handmade Amigurumi cat
Amigurumi Cat on Etsy


Amigurumi Birds - patterns from Modern Amigurumi for the Home Craft Pattern Book
Amigurumi Birds on Etsy

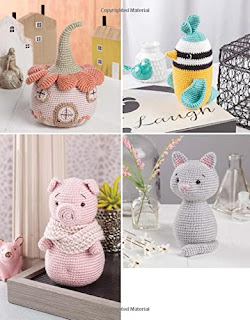
Designs include two cute cats, two birds and a rooster, Petunia the Pig a darling dog, and an adorable Fairy House.

This crochet leaflet includes color photos of finished items and full instructions to create your favorites from this collection. Author Elisa Sartori has named each of these cute designs with the names Madge, Esther, Felix, Mr. Rico, Petunia, Poppy and Luna. The Fairy House goes by the name Le Petit Maison


Summary


This craft pattern leaflet is available on Amazon where it is ranked #164 in the Stuffed Animal Crafts category. It is also available online at Annie's Craft Store and at yarn stores such as JoAnn's and Hobby Lobby. 


Amigurumi is a really fun style of crochet which can vary in size. There are no restrictions about size or look, so whatever type of yarn or hook you use, the end result can vary in size. The world of amigurumi is sweet, cuddly, and smiley.


So, add a little fun to your home décor with these adorable Amigurumi designs to crochet from Modern Amigurumi for the Home! 


Book Cover of Modern Amigurumi for the Home

Back cover of the pattern book Modern Amigurumi for the Home


Related Craft Book Reviews


For more reviews of Crafts & DIY, go to ReviewThisCrafts.com


*Modern Amigurumi for the Home crochet craft pattern leaflet review written by

~Wednesday Elf


Note: The author may receive a commission from purchases made using links found in this article. “As an Amazon Associate, Ebay (EPN) and/or Esty (Awin) Affiliate, I (we) earn from qualifying purchases.”


Wednesday, November 24, 2021

Winter Time and Birds, Some Good Advice Regarding Pigeons! A DIY Project!

Every Winter the Birds Come Calling! 

I guess that's because we (my other half and I) love to see and feed the birds during the coldest months of the year.  There is something wonderful in seeing even the plain little sparrows munching on suet cakes that we have made or bought. The winter months can be tough on little birds as they need a lot of energy just to keep their tiny bodies warm.

birdhouse with icicles


Image by Kurt Bouda from Pixabay

There is one bird though, that I do not want on my balcony!  I do NOT want pigeons!

Why?  Pigeons are very dirty birds.  They like to make their homes in high spaces!  If they can find a spot out of the wind and elements, they will call that spot home!  They will also chase away any of the smaller birds that I really do like having around my balcony in the winter months.  So what can I do?
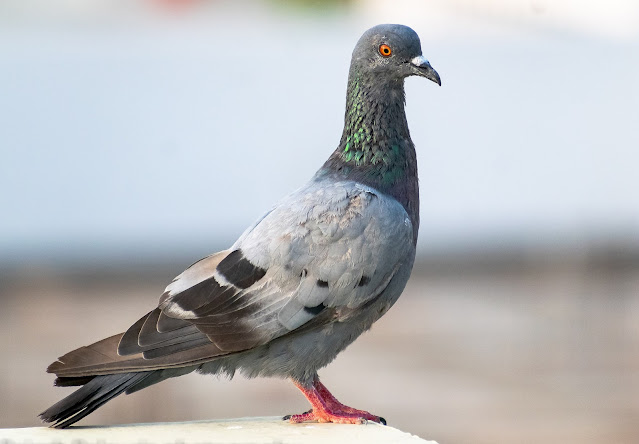
pigeon


Well, I was checking out ways to keep the pigeons from even wanting to come onto my balcony, but the availability of food for the smaller birds is what is attracting them.  So if there is no food there will be no birds and I will miss out on some really fun times watching these little critters. I need to do something else that will make the pigeons look for other lodgings.

Pigeons are spooked easily,  so one method of deterring them is to hang windchimes and balloons so that there is always movement and sound happening.  Hopefully they will find a quieter place to call home!

While thinking about this problem and the solutions I had an idea that would do the trick. I came across a whole stack of old CD disks that we no longer needed or wanted.  Old operating systems on CD's were taking up space and were really not necessary for our computer operations.  One side of the disk has a label on it and the other side has beautiful rainbow colors!   So I took a dozen or so of these disks and set to work.

I drilled a hole in the disk about an inch inside the outer rim!   Then just thread some wire or garden twine through the hole and leave enough string/rope to make a loop big enough to pass the disk through it. You can hang them all at the same level or vary the lengths as you please.   Then take all of your strung CD's outside and hang them with the loop around a cord or light string.  .  

At our home we have a string of lights on our balcony because we love to sit out there evenings during the summer months!  This string of lights is now lit for the holidays and it looks amazing with my hanging CD's!  Just check out the short video I took!  You can see the effect it has in the daytime and at night!  


The sunlight plays on the discs sending light all around the balcony!  It does not take much wind to make them spin and when they are spinning light beams are playing all around the balcony.  I am so pleased with the outcome.  They are quite pretty with their rainbow colors and they themselves are not at all noisy!  Even in the windiest of days if the CD's bang around, you just hear a little clicking sound.  


Evenings on the balcony are so pretty with rainbow hues being seen from all corners.  I have a mirror on the one side and my lights and the disks are nicely reflected in it.  It makes it seem like I have twice as many lights and CD's on the balcony!  I personally love the look!

What do you need to accomplish this for yourself?  A DREMEL TOOL is great for drilling the holes or you can use a regular drill with a fairly small bit (depending on the size of your cord).   If you don't have lights to hang these from, you can make a line with any kind of twine and fasten it with some hooks to where ever you want these hanging. .You can also use Christmas hooks to hang these from an eaves-trough.  Vary the lengths of the cords or keep them all the same, that is up to you entirely.  

What I have found in just the short time that these have been up, is that the little birds are not scared of the light show, but the pigeons are not coming to roost anymore.  Hopefully this will keep them away. 

I checked into other methods of keeping pigeons off the balcony, but they involve either hurting the birds or making the railings uncomfortable not just for the birds but for us as well.  I don't want to hurt anything, but don't want to encourage those pigeons to roost on my balcony.  

I will let you know how it works, but, for right now it seems to be doing the trick!  No pigeons were harmed during this trial and I suspect they won't be hurt or harmed in any other way while these are on my balcony!


Note: The author may receive a commission from purchases made using links found in this article. “As an Amazon Associate, Ebay (EPN) and/or Esty (Awin) Affiliate, I (we) earn from qualifying purchases.”


Wednesday, November 3, 2021

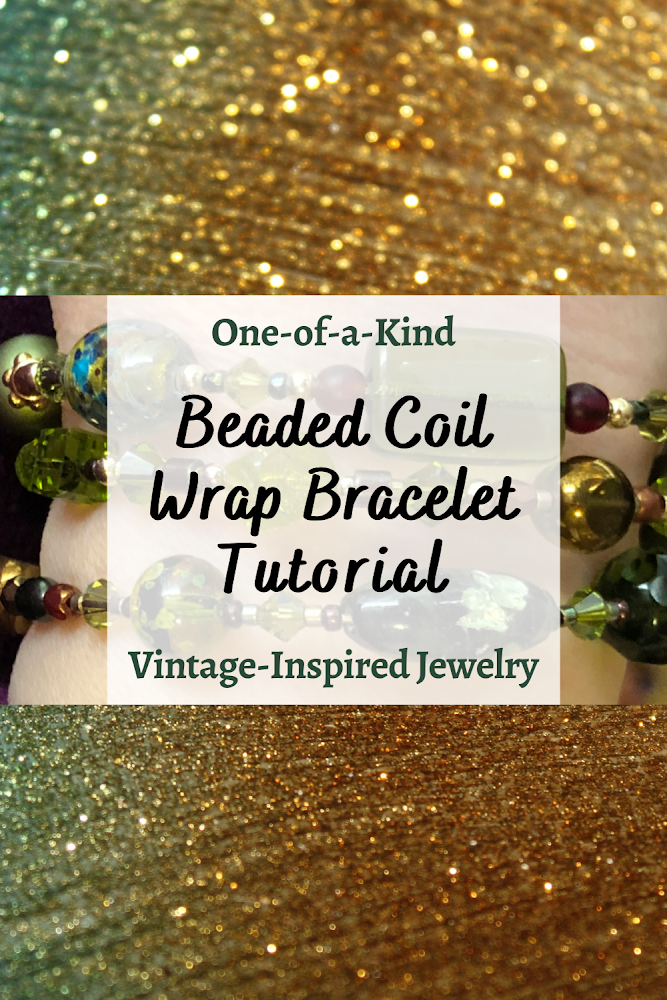
How to Make a Stylish Beaded Coil Wrap Bracelet

Main image: Beaded Coil Wrap Bracelet Tutorial

Beaded bracelets are wonderful accessories that can add a pop of color to any outfit. Unlike necklaces and earrings, bracelets allow you to enjoy looking at them throughout the day while you’re wearing them. Vintage beaded coil wrap bracelets from the 1940s and 1950s designed by top jewelry icons of that era, such as Miriam Haskell and Robert DeMario, are coveted by vintage jewelry collectors. They have also come back into fashion repeatedly, for good reason.

While bracelets with clasps can be quite challenging to fasten and unfasten, even with a bracelet helper tool, beaded coil wrap bracelets made with memory wire are a cinch to put on and take off your wrist. During my three decades of designing, making and, periodically, selling one-of-a-kind beaded jewelry, my coil wrap bracelets featuring vintage beads have remained among my most popular jewelry designs, regardless of fashion trends.

In this jewelry tutorial, I’ll review how I made my most recent memory wire coil wrap bracelet with a mix of contemporary and vintage beads, which is a birthday gift for a very dear friend. The friend for whom I made this one owns several beaded coil wrap bracelets I’ve designed for her in different colors. She loves wearing them so much that when I asked her what type of jewelry she would like me to make as her birthday gift this year, she requested another coil wrap bracelet, this time in shades of olive green.

These beautiful, classy, distinctive bracelets make wonderful gifts for any jewelry lover (including yourself), and especially for someone who has difficulty putting on or taking off her favorite bracelets with clasps. 

Beaded Memory Wire Wrap Bracelet Tutorial

Materials, Tools and Supplies You Will Need

  • Assorted beads in a range of sizes, shapes, materials and surface finishes.
    • I used a combination of rare vintage glass beads, vintage Swarovski crystals, contemporary glass beads, including Japanese and Czech seed beads and glass pearls, and small (2mm and 3mm) 14k gold-filled beads. 
    •  I've written an article on The Best Sources for Vintage Beads, Findings and Jewelry Components, if you are interested in using vintage beads in your memory wire beaded coil wrap bracelet designs. Buying beaded jewelry at thrift stores, auctions and estate sales and taking them apart can be a great way to buy more unusual and vintage beads less expensively. 
    • You can also make beautiful bracelets with inexpensive beads from the crafts store, if you prefer. 
  • A bead board.
    • While not strictly required, a bead board will make it much easier to plan out, play "what if" and rework parts of your design. 
    • The BeadSmith bead board I use has three channels for designing multi-strand bracelets and necklaces, a flocked surface to help keep beads from rolling around too much as you are laying out your jewelry designs, six recessed compartments of different sizes to hold and organize beads, findings and other jewelry components, and a plastic cover to protect your work-in-progress from dust and keep your laid-out design in place in between work sessions. 
  • Steel bracelet memory wire. 
  • Memory wire cutters.
    • Memory wire is extremely hard steel wire that will ruin the cutting jaws regular jewelry wire cutters intended for softer metal wire, such as silver, gold or copper. I highly recommend using either memory wire cutters made specifically for this purpose or a heavy-duty wire cutter from the hardware store.
      • An old, heavy-duty toenail clipper with straight or slanted (but not curved) jaws that you don't mind ruining is another option.
  • Bead stoppers.
    • These are steel coil spring clamps that prevent beads from slipping off stringing wire. I find they are also useful when stringing beads on memory wire bracelets.
    • I have both the basic Beadalon wire bead stoppers, which I am showing in this project because they are less expensive, and the cushioned Soft-Flex wire bead stoppers, which I prefer because they are more comfortable to use and less likely to escape from your fingertips.
    • As an alternative, you can try using ribbed clear silicone ear wire clutches, if the holes fit your memory wire.
  • Memory wire end caps.
    • Memory wire end caps are half-drilled metal beads that are glued onto the trimmed ends of the memory wire to keep the rest of the beads in place on the finished memory wire wrap bracelet and leave a smooth, rounded end that won't scratch or snag on clothing.
    • Choose silver-plated or gold-plated end caps to match your wire or spacer/accent beads.
    • Alternatively, you can use heavy-duty memory wire looping pliers to turn a small loop at each end of the wire. Finishing the ends with small loops also gives you the option of making and attaching beaded dangles to them.
  • Strong, two-part epoxy glue that dries clear. 
  • Wooden toothpicks and scrap cardboard.
    • Toothpicks and pieces of cardboard cut from shipping cartons or cereal boxes are the perfect disposable mixing tools and palettes for preparing and applying small amounts of clear two-part epoxy to the ends of the wire.
  • Close-fitting latex or nitrile exam gloves.
    • You'll wear these to protect your fingers while sliding small spacer beads and memory wire end caps onto the epoxy-coated wire ends. Choose gloves that are aren't too large, too loose or too thick to maintain the dexterity required to hold the small memory wire end cap beads securely and quickly maneuver the wire into the small holes before the epoxy sets.
    • I find that unpowdered nitrile exam gloves work great for this purpose. 
  • Ultra-fine point permanent marker.
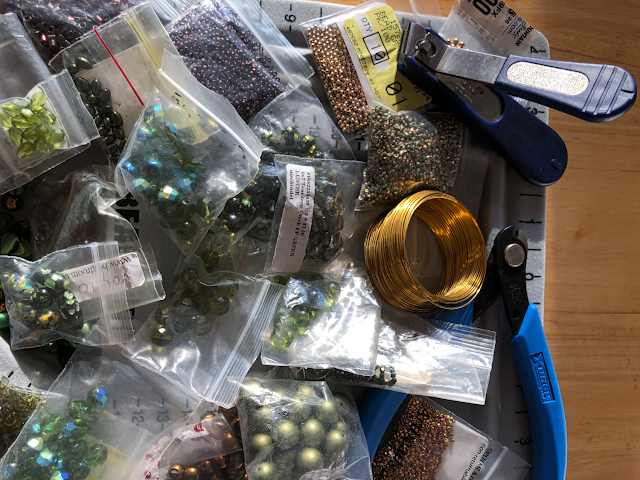
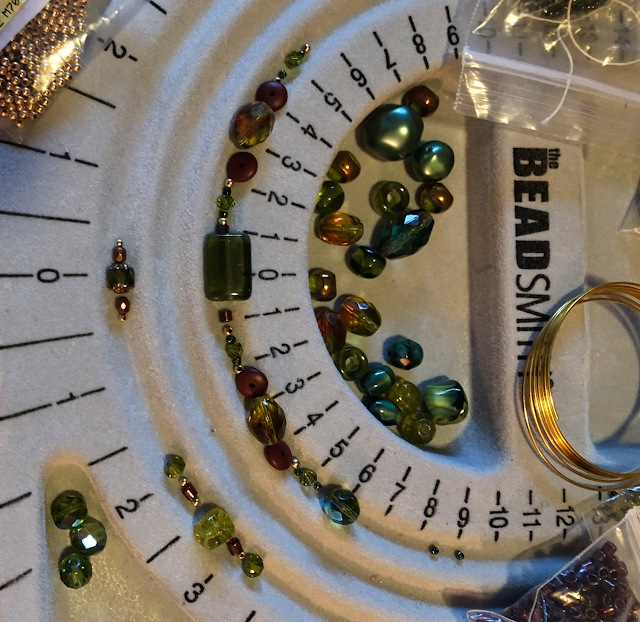
Bead board with assorted beads and jewelry making tools

Step 1: Choose Your Color Scheme and Assemble a Varied Selection of Beads to Design With

First, decide what your main color will be. Choose a wide variety of beads in different shades of that color, sizes, shapes and finishes. Then, decide on a couple of complementary accent colors. Start with a broader selection than you think you will need. I find that I can never predict exactly which beads will end up in my final design, and the more choices you have to play with, the more creative you can be.

My friend wanted the dominant color of her bracelet to be olive green. This photo shows just some of the light to dark olive-toned vintage and contemporary beads I selected from my very large collection for this design, along with some small accent beads in gold, bronze and deep red shades, from garnet to cinnabar.

Bead board with coil of bracelet memory wire and memory wire cutters

Step 2: Cut Your Memory Wire to the Desired Finished Number of Coils, Plus Some Extra 

A memory wire wrap bracelet can have as few as two coils or as many as you can fit on your arm! I usually prefer to make by beaded coil wrap bracelets either three or five coils wide.

Although it's possible to leave the entire memory wire coil uncut until you have finished stringing all your beads from one end, I find it much easier to cut the purchased memory wire coil to a more manageable length and add beads from both ends, since I always make multiple design adjustments as I go along.

It's important to cut the wire longer than you want your finished bracelet to be, for a few reasons. You need enough extra wire at both ends to hold onto as you get closer to stringing the last of your beads and to allow space to clamp the wire ends with the bead stoppers so the beads won't slide off one end while you are adding beads to the other end. Also, the width of the beads will increase the diameter of the coils, so if you start with just three coils of wire you might end up with only two coils once the beads have been added. Wider or longer beads also prevent the memory wire from curving as much, which also enlarges the beaded coils and takes up more of the wire. 

So, if I'm planning to make a three-wrap beaded coil bracelet, especially if I will be including 8mm and larger focal beads in the center of my groupings, I will usually cut five or  six coils memory wire and then trim the excess after all my beads have been strung and I am happy with the design.

Remember to use either a memory wire cutter or another heavy-duty wire cutter whose cutting jaws won't be ruined by this very hard wire!

Bead board with beads laid out in beginning of design

Step 3: Begin Playing With Design Ideas

You can string your beads in a random pattern, if you wish. The most important thing is to have a harmonious mix of bead colors, shapes, sizes and finishes. 

I prefer creating memory wire wrap bracelet designs that combine apparent randomness with symmetry. I do this by creating "bead stations," small groupings of odd numbers of beads in symmetrical patterns, usually featuring a larger bead in the center flanked by smaller and medium-size beads interspersed with tiny spacer beads. I find that this creates a pleasing "rhythm" and "flow" to the design.

Occasionally, I will include a larger grouping of symmetrically arranged beads, such as the one I experimented with in the upper channel of the three-strand bead design board shown in the photo above.

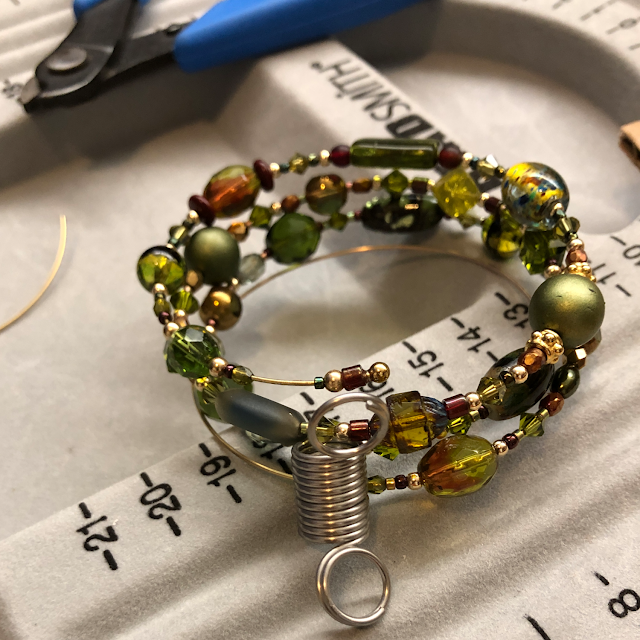
Beads strung on memory wire held in place with a bead stopper clamp

Step 4: Start Stringing Your Beads Onto the Memory Wire

Once you feel comfortable with the initial direction of your beaded coil wrap bracelet design, it's time to start stringing your beads onto the memory wire. Clamp a bead stopper about half a coil away from one end, then start stringing the beads in your desired order or pattern.

I usually repeat some of the smaller and medium-size spacer beads from one "bead station" grouping when designing the adjacent grouping, making slight changes and using a different center focal bead for each successive pattern. 

Beads strung onto bracelet memory wire

Step 5: Adjust as Needed So the Bead Stations Complement Their Neighbors, Both to the Sides and On the Other Coils

I've found that it's nearly impossible to create a final multi-strand beaded coil wrap bracelet design before stringing the beads on the memory wire. 

While the mechanics of cutting memory wire, stringing beads and finishing the ends are fairly simple, designing the bracelet so that the colors, sizes, shapes and patterns of each bead grouping complement not only the ones to either side on the same coil but also their counterparts on the adjacent coils is definitely a challenge (a bit like playing the three-dimensional chess game from Star Trek, lol). 

As you can see from the photos, my final design turned out to be significantly different from the initial pattern groupings I was experimenting with at the beginning in order to get all three parallel beaded coils to fit together nicely.


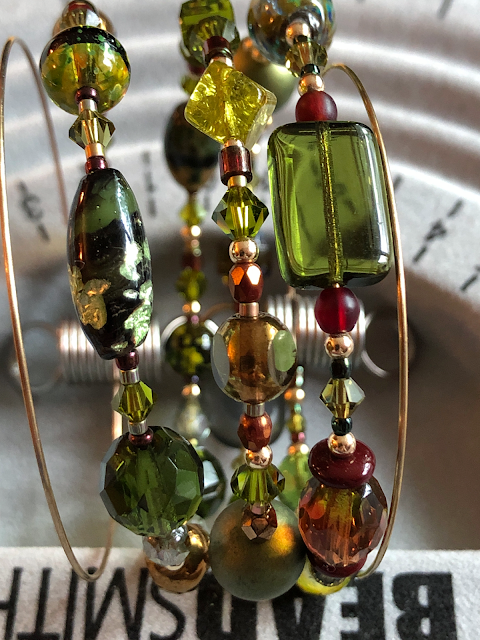
Extreme close-up of final beaded coil wrap bracelet design before trimming and finishing the wire ends

Step 6: Do a Final Alignment Check

Snug the beads down firmly, gently stretching the coils apart and adjusting the bead stopper clamps, if necessary, to ensure there are no gaps where the wire shows between the beads.

Then, do a final check to make sure you're happy with the way the beads on each coil align with those on the other coils. Even though I am careful to keep re-snugging the beads as I go, I usually have to make a few minor adjustments after snugging the beads one last time.

Gluing the last few beads to one end of the memory wire

Step 7: Glue The Last Several Beads to One End of the Bracelet, Then Trim the Memory Wire and Glue on the End Cap

Place one end of the memory wire into the jaws of the memory wire cutter. Using just enough force on the handles to compress the wire without cutting through it, make adjacent, parallel grooves along the first 1/2-inch of one end of the memory wire. This will create some "tooth" on the smooth metal surface to help the epoxy adhere better. Use an ultra fine point permanent marker to place a small mark about 3–4 mm from the tip of the wire.

Next, prepare a very small amount of the J-B Weld clear two-part epoxy. Put on your exam gloves, then squeeze equal amounts from both sides of the syringe dispenser onto a scrap of cardboard and mix them together thoroughly and quickly with a clean toothpick.. 

Clean off the tip of the toothpick, then use it to pick up a drop of the prepared epoxy mixture and apply it to the small section of wire where you made the grooves, starting at the mark you made about 3–4 mm from the tip and spreading it inward along the remainder of the grooved section. Quickly remove the bead stopper clamp and slide the last several beads down onto the glued section of wire, taking care not to get any of the epoxy on the last 3–4 mm of the grooved end of the wire. Slide one more bead down next to the glued beads, replace the bead stopper next to it to keep the glued beads in place while the epoxy sets, then prop the bracelet with the exposed tip of the wire facing upward.

When the epoxy has not only set but also cured, tug firmly on the glued beads to make sure they are securely attached. Then, slide a memory wire bead cap onto the clean end of the memory wire to gauge how much of the wire to trim. Remove the end cap and use the memory wire cutters to remove the excess length. 

Helpful Tip

Trim a little less wire from the end than you think you need to. Removing a bit more, if necessary. However, if you trim off too much, there won't be enough wire to allow the epoxy to bond it securely to the end cap. It's better to leave the wire a smidge too long and have a tiny gap between the last bead and the end cap than to trim it too short.
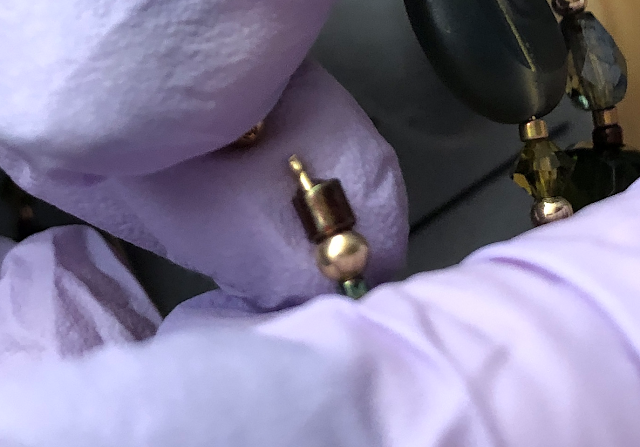
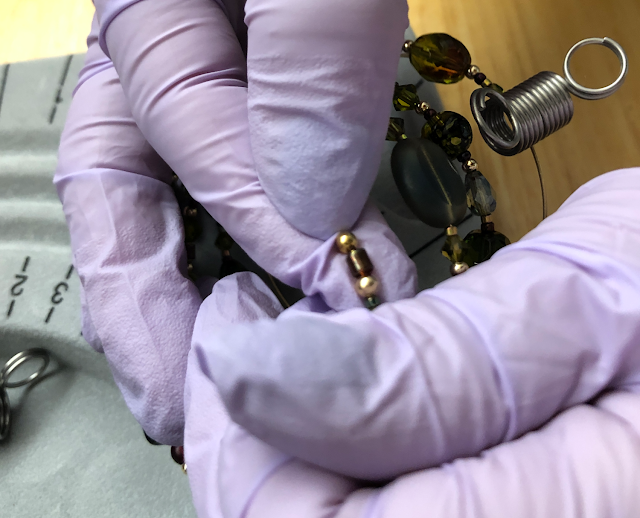
Close-up of gloved fingers aligning the hole of the memory wire end cap to the glued, trimmed wire end
Coat the tip of the trimmed and ridged wire end with a dab of epoxy and align the end cap hole.

Close-up of pressing the end cap onto the glue-coated wire end
Then, quickly and carefully, push the end cap firmly onto the glued tip of the memory wire.

Using a fresh piece of cardboard and a fresh toothpick, prepare another small amount of two-part epoxy. Quickly apply a dab to the exposed end of the trimmed wire, align the hole of the memory wire end cap and guide it onto the wire tip. Hold the end cap securely in place for at least 60 seconds, applying pressure from the end with a clean, gloved fingertip. Slowly and carefully remove the pressure, then prop the bracelet with the freshly glued end pointing upward, so that gravity continues to pull it down onto the clipped wire tip. 

Allow the epoxy to cure fully, then give the end cap a tug to make sure it is firmly secured to the end of the wire before moving on to Step 8.

Step 8: Trim and Glue the Other End of the Bracelet

Finishing the second end is a bit trickier than the first. Slide the loose beads down the bracelet wire, snugging them firmly against the glued beads at the other end. Use the ultra fine point permanent marker to mark the wire at the last loose bead. Then, carefully slide several beads off that end of the wire and place them in order in a channel of the flocked bead board, making note of which end of the row of beads was at the end of the wire.

Use the memory wire cutters to indent parallel lines into the section of memory wire adjacent to the remaining strung beads, as before. Put on the exam gloves, prepare a small amount of epoxy, re-snug the beads and apply the glue to the section of exposed wire between the end of the strung beads and the mark you made. Quickly slide the beads you removed back onto the wire in the correct order and snug them down onto the glued section. Wipe off any visible epoxy that might have squeezed out onto the adjacent exposed wire. Replace the bead stopper and allow the epoxy to cure fully.

When the glue has cured, carefully remove the bead stopper and tug firmly on the glued beads to ensure that they remain firmly attached to the wire. Examine the adjacent wire carefully, scraping off any tiny areas of cured epoxy residue with a utility blade. 

Trim the excess wire, testing the length of the remaining exposed wire at the tip with the memory wire end cap and leaving just slightly more than the depth of the end cap bead hole. If necessary, use the memory wire cutter to impress additional closely-spaced parallel indents into the exposed wire end.

Prepare a small amount of epoxy and glue on the bead cap, applying pressure with a gloved fingertip for at least 60 seconds as before, then prop the bracelet with the freshly glued tip facing up and allow it to cure fully.

Tug on the end cap bead to ensure it is well secured to the end of the wire.
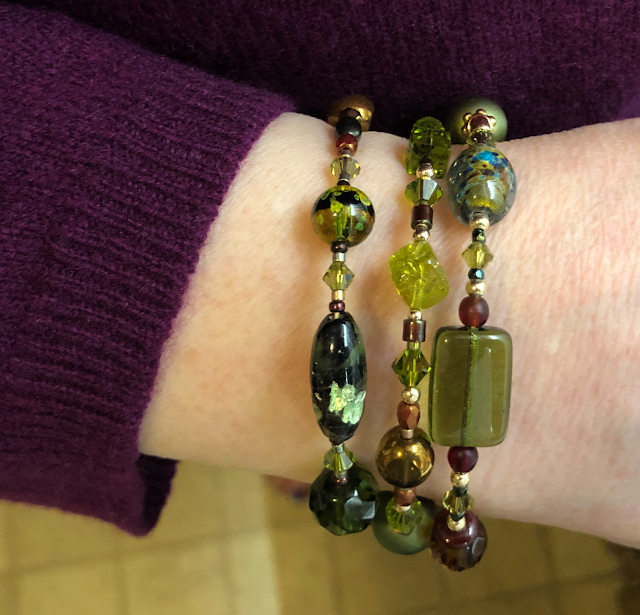
Finished beaded coil wrap bracelet being worn on woman's wrist
I'm modeling the finished, one-of-a-kind, vintage beaded memory wire wrap bracelet I designed and made as a birthday gift for my dear friend Sally.

Wear or Give Your Beaded Coil Wrap Bracelet With Pride! 

Although I collect rare vintage glass beads and Swarovski crystal beads and love to use them in my jewelry designs, making beautiful beaded memory wire coil wrap bracelets can be as easy or challenging and as inexpensive or costly a project as you decide to make it. 

Wouldn't it be fun to get some inexpensive beads from craft stores and find and disassemble beaded jewelry at bargain prices from yard sales and thrift shops, then pick up some memory wire, a heavy duty wire cutter and some epoxy and invite your favorite teens or college students over for a jewelry making "play date?"

I hope you decide to give this beaded coil wrap bracelet project a try. If you do, I would love to see what you make!


How to Make a Stylish Beaded Coil Wrap Bracelet by Margaret Schindel

Read More Crafts & DIY Reviews by Our Review This Reviews Contributors

Read More Gifts Reviews by Our Review This Reviews Contributors


Note: The author may receive a commission from purchases made using links found in this article. “As an Amazon Associate, Ebay (EPN) and/or Esty (Awin) Affiliate, I (we) earn from qualifying purchases.”

Sunday, October 10, 2021

What to Write in a Birthday Card

For decades I've been putting together articles on what to write in cards - here's one listing funny suggestions to write in a goodbye card. I've even put together a collection of funny sayings you can have written on a birthday cake.

It's crazy, but I have this weird ability to create sayings, quotes, poems, and even riddles. You can find all of this quirkiness in my books available on Amazon.

I've often wondered where these sayings in my head come from? Honestly, I can sit in front of a blank computer screen, create a topic for card sayings, and pump them out quickly!

 I'll do it now:

Twenty Funny Things to Write in a Birthday Card:

  1. Just stop getting more fantastic year after year; we're tired of your perfection. Cut us average folk some slack!
  2. So you think you're special? Ok, fine, you're unique, and I'm just the person constantly pointing it out. Whatever. Are you that insecure?
  3. Take a break; it's your big day - do something that makes you feel good about yourself. Clean my house.
  4. For your birthday I'm cooking you dinner, taking you shopping and giving you cash - Don't believe that, I'm losing it. You're welcome for the card.
  5. Aren't you tired of getting older? Or are you just constantly tired because you're old? Fair question?
  6. You know I love you, so get with the program and love me back. Hurry.
  7. Today you're allowed to do anything you want. Call me when it's over: I'll bail you out.
  8. Dance, sing and be merry all day long. Then stop because nobody I know can stand all that positivity.
  9. Be miserable on your birthday - that'll confuse everyone for sure. Actually, you'll fit right in with our crowd.
  10. In a world of crazies, you're the original crazy. Happy birthday you big nut.
  11. Observe that fire hazard on your cake. Do not go gently into that good night - look away!
  12. Your lit-up birthday cake would come in handy during a power outage. Just saying.
  13. Someone your age should never have your age in individual candles put on a cake ... unless the cake is three feet by three feet - then go ahead, melt that icing!
  14. I'm the reason we're celebrating your birthday today, nobody else remembered - not because they don't like you, but because they're older than you by a country mile!
  15. You're young and have the world by the tail! Let go for a minute so some of us regular folk can get a piece of that - oh wait, lousy wording?
  16. Growing up is hard to do. I suspect that's why so many people haven't done it yet. At least you're a part of the in-crowd.
  17. You're popular. I'm not. Happy birthday to the one everyone loves, whoopee - like you need more attention.
  18. Start your day with a smile - today is the day you were born - about 150 years ago, right?
  19. When you feel tired, you should celebrate the fact that you can still feel something!
  20. I cried today. It's your birthday, and you still look 20 years younger than all of us. Happy forever, young day to the one who makes everybody cry.
So there you have it, twenty quick funny things to write in a birthday card.

Below is a book I've written featuring 260 other sayings you can write in a birthday card. It's handy for those of us who have blank cards kicking around the house. 

When you need a little inspiration on what to write in one of those blank cards, use these sayings as is, or just use them to inspire you to write the words you really want to say.


What to Write in a Birthday Card - Available on Amazon

Note: This book of sayings is for personal use only (not for commercial use). 


Note: The author may receive a commission from purchases made using links found in this article. “As an Amazon Associate, Ebay (EPN) and/or Esty (Awin) Affiliate, I (we) earn from qualifying purchases.”


Monday, October 4, 2021

Gift Baskets for every Occasion - Reviewed


Gift Baskets
Photo By Pixabay

The idea of giving gifts in baskets is centuries old, gifts delivered in baskets have been around ever since someone figured out how to weave a basket.


The Holiday season is without a doubt the most popular time of the year to give a gift basket. In the Holiday season, many corporations send gift baskets to their valued customers as a way of saying thank you for your business.

 Many companies give their employees gift baskets during the season, or all year long as a way of saying, “great job”.


The Holiday season is a time to bring family and friends together, but sometimes that’s not always possible, as family members or friends move away. Sending a gift basket to a faraway family member or friend is a perfect solution for gift giving.


Gift baskets are a practical gift, as the basket or container can be used after the gifts are consumed. Many Holiday basket containers can be used after there’re empty, by filling them with some sort of festive Holiday décor and placing it as a centerpiece on a table.


The Holidays are not the only time of the year to give someone a gift basket. The gift basket industry has grown into a multibillion-dollar business a year. Today you can find or make a gift basket for any theme or occasion.


Here are some other popular times to give a gift basket, Valentine’s Day, Mother’s Day, Father’s Day, Easter, Halloween, New Home, New Baby, Birthday’s. I guess that I could go on and on, but I think you get the idea. As they say, Gift Baskets are for all occasions.


Making your own Gift Baskets:


Making your own gift baskets is fun and easy. For one thing, you can choose the items in the basket to be specific to the person you are giving them to. For example, a coffee or tea basket, a chocolate lovers’ basket, how about a fruit of a cheese basket. Here is a neat idea, A Bakers Basket for someone who loves to bake.


Here is something that many of you may not know. Some years ago, when I was out of work for a while, I started making and selling gift baskets.


No, I didn’t get rich or turn it into a thriving business, but I sure did have fun making and selling gift baskets. I finally had to give it up when I got a new job but I still enjoy making my own gift baskets.


Here is an article that I wrote on my review site. Make a Halloween Gift Basket. It is a gift basket for kids, look and see just how creative you can get with the different ideas for items. The instructions in this article would apply to any gift basket that you want to make.

As I said, making your own gift basket is fun, easy, and creative. So, you can make your own or buy one. Either way gift baskets are a great gift giving idea.


More Gift Ideas from ReviewThis here: ReviewThisGifts.com

Wine Country Gift Baskets Gourmet FeastWine Country Gift Baskets Gourmet FeastCheck the PriceSpa Baskets for Women, Spa Luxetique Spa Gifts for Women, 8pcs Rose Bath Gift Set Includes Bath Bombs, Bath Salts, Bubble Bath, Best Gift Set for WomenSpa Baskets for Women, Spa Luxetique Spa Gifts for Women, 8pcs Rose Bath Gift Set Includes Bath Bombs, Bath Salts, Bubble Bath, Best Gift Set for WomenCheck the Price


Note: The author may receive a commission from purchases made using links found in this article. “As an Amazon Associate, Ebay (EPN) and/or Esty (Awin) Affiliate, I (we) earn from qualifying purchases.”


Thursday, September 2, 2021

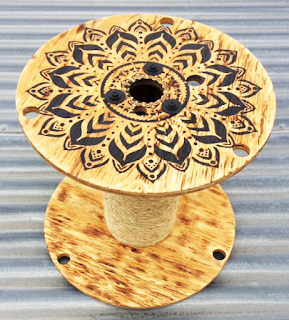
DIY Cable Spool Cat Scratching Post


DIY Cable Spool Cat Scratching Post
Stenciled Cable Spool

I'm that person who can't pass up an abandoned cable spool.  When I saw this little spool, I knew it wanted to go home with me.  So, I adopted it, spiffed it up, and gave it a new life.  Here's how to turn a cable spool into a cat scratching post or mini table for your porch or patio.  


recycled cable spool
Recycled Cable Spool

Step 1: Pick up a small spool anywhere wires or cables are used or sold.  I found this one at a big box home improvement store.


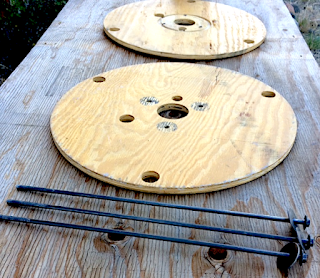
cable spool taken apart for refinishing
Spool Parts Ready for Prepping

Step 2: Separate the parts in preparation for sanding, painting, and finishing the wood.  All I had to do was unscrew the top bolts to release the three sections.


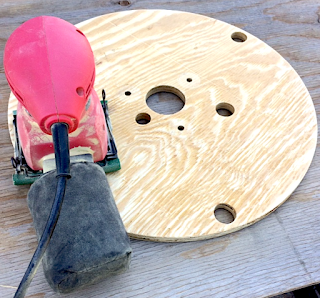
sanding a cable spool
Sanding the Spool

Step 3: Sand the spool's top and bottom wood sections.

Step 4: Decide how you want to treat the wood.  I chose to lightly torch the wood to accent the grain and give it nice warm tones without stain.


wood sealant
Sealing the Wood - Spar Urethane

Step 5: Seal the wood and cardboard spool parts with an indoor/outdoor Spar Urethane.  I used a spray application to make it quick and easy (and fast-drying).  


medallion stencil
Boho Medallion Stencil

Step 6: Decorate the spool top if desired.  I happened to have the perfect sized stencil (Boho Medallion) on hand for another project.  I chose to use a charcoal colored chalk spray paint that was a lovely balance to the natural wood (and a match with the metal spool bolts).  


sisal rope wrapped around a cable spool
Sisal Rope Wound Around Spool

Step 7: Reassemble the spool.  Wrap sisal rope around the cylinder.  It took a little bit more than 50-feet of 3/8" sisal.  


completed DIY Cable Spool Cat Scratching Post
Recycled Cable Spool (After)

This was a really enjoyable DIY project.  Though I imagine using this recycled spool as a scratching post for my rescue cats, I can also see using it as a small end table on my porch.  I'm picturing it as a coffee table situated next to my Adirondack chair, or as a sweet little piece of furniture for the catio I'm building.

Who says it has to have only one use?  How do you envision it?  I'd love to hear your ideas in the comments below.


Note: The author may receive a commission from purchases made using links found in this article. “As an Amazon Associate, Ebay (EPN) and/or Esty (Awin) Affiliate, I (we) earn from qualifying purchases.”


Thursday, August 5, 2021

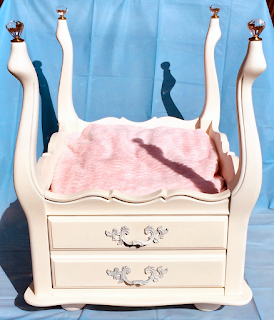
Upcycled DIY End Table Pet Bed

Upcycled DIY End Table Pet Bed
Upcycled End Table Pet Bed

As a continuation of my DIY series on repurposed furniture projects, I present to you my latest pet bed creation.  These upcycled end table dog or cat beds are extremely popular with both fur babies and their pet parents.  I speak from direct experience.  My animals spend nearly all of their time in these beds.  

The four-poster pet bed featured here can be easily completed in a weekend.  Here's a quick rundown of the process I used to bring new life to a vintage end table.  

Supplies Needed: 

  1.  Vintage End Table
  2.  Sand Paper or Sanding Sponge
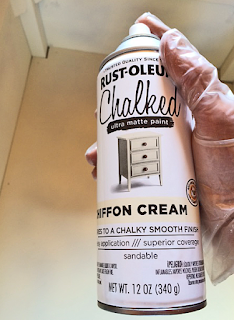
  3.  Paint (I used Rust-Oleum Chalked Spray Paint - Chiffon Cream)
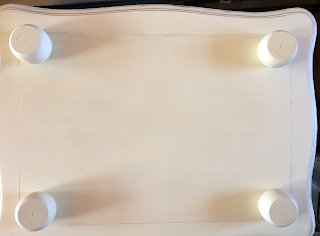
  4.  Bun Feet (optional)
  5. Finials (I used crystal drawer knobs; lamp finials are another great option)
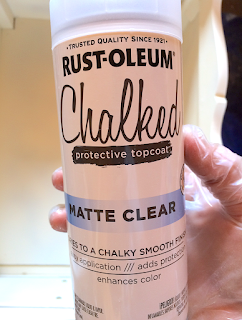
  6. Clear Coat Sealer (I used the Rust-Oeum Chalked Paint Matte Topcoat)
Tools Used:
  1. Screwdriver
  2. Hack Saw
  3. Sander
  4. Drill
  5. Pliers
  6. Brad Nailer

vintage end table
Vintage End Table (Before)

I started with a quick shopping trip to the Habitat for Humanity ReStore and the Goodwill Store.  This vintage end table was perfect for my project and easy on my budget (eight dollars).  It's nice to get a bargain while supporting a cause near and dear to my heart.

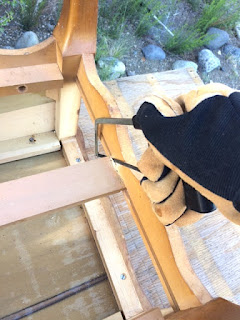
Step One: Flip table. Pull out drawer. Remove inner drawer supports to clear space for bed. I simply used a mini hack saw to cut the cross piece and then a screwdriver to remove the two side supports. 

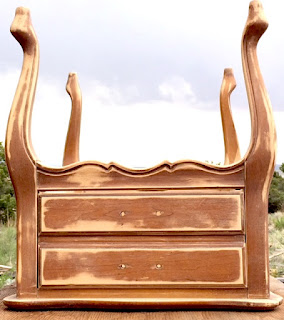
upside down end table with drawers removed
End Table With Drawer Removed


cutting out the drawer base of a vintage end table
Cutting Out Drawer Brace


removing screws
Unscrewing Side Drawer Support


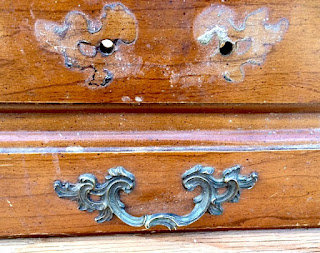
Step Two: Remove drawer pulls by unscrewing inside hardware.  Save parts for later.

removing handles
Removing Drawer Pulls

Step Three: Pull off the plastic leg disks used for leveling and protecting the floor.  Discard.

removing plastic leg disks
Removing Plastic Leg Disks

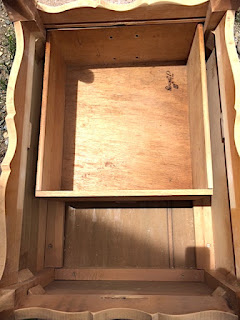
Step Four: Cut off the back part of the drawer and reinstall drawer front (I cut it with a hacksaw leaving an inch of the drawer's side and then used a brad nailer to affix it).  As you can see from the second photo, the drawer takes up room needed for the pet bed.  However, the drawer face is needed for the front side of the cabinet.  I considered using the drawer to make a little step up into the princess bed.  That would be a fun option if you have a tiny dog that could use a boost.


vintage end table prepared for refinishing
Drawer Front/Side After Cut-Off


end table drawer
Drawer Inside Table (Before)

Step Five: Install supports and false bottom for bedding area.  The wood pieces will provide enough depth to drill in the bolts for the bun feet (from the other side). The veneer of the end table top was too thin for the bolts and bolt inserts, hence the wood blocks covered by a sheet of masonite.

false bottom of vintage end table
Supports For False Bottom

masonite covering
Masonite Covering Bottom Supports

Step Six: Sand wood in preparation for two fresh coats of paint.

preparing and sanding a vintage end table
Paint Prep - Sanding

Step Seven: Prime and paint with two coats of Rust-Oleum Chiffon Cream chalked paint.

spray paint
Chiffon Cream Spray Paint

Step Eight: Seal the paint with a clear finish. I used the Rust-Oleum matte topcoat.

clear topcoat
Clear Topcoat Protective Finish

Step Nine
: Attach bun feet. This was done by drilling holes for the bolt inserts.

bun feet
Bun Feet Installed With Threaded Inserts

Step Ten: Screw in finials atop the legs.  I love the rainbows that wash over the bed when sunlight shines through the prisms.

crystal finials
Crystal Finials Installed

Step Eleven: Reattach the drawer pulls after painting them.  I used the same creamy chalk paint.

painted drawer pulls on painted end table
Painted Drawer Pulls Back In Place

Step Twelve: Select fabric and make a cozy bed cushion/pillow.  I used foam cushions and two fabric selections: one is a fleece damask pattern in pink and chocolate; one is a super soft ribbed pink chenille.  Which do you like best?  

fleece bed cushion
Damask Fleece Bed Cushion

chenille bed cushion
Pink Ribbed Chenille Bed Cushion

So there you have it.  Upcycling is a fun way to exercise your imagination while feeling great about saving an item from a premature demise.  Why send something to the landfill when it has plenty of life left in it?  

I like to think this old end table is pretty pleased to be looking better than ever and to be enfolding the life of a beloved pet.  There's nothing like being needed and valued.  

Interested in more pet bed demos?  Check out my DIY upcycled dresser drawer beds.  My cats adore them.

Stay tuned for upcoming DIY demo projects.  Up next is an antique door hall tree and a vintage metal suitcase coffee table (recent Habitat for Humanity ReStore finds that I could not resist).


Note: The author may receive a commission from purchases made using links found in this article. “As an Amazon Associate, Ebay (EPN) and/or Esty (Awin) Affiliate, I (we) earn from qualifying purchases.”


Most Recent Reviews on Review This Reviews


Search for Reviews by Subject, Author or Title

The Review This Reviews Contributors


SylvestermouseSylvestermouseDawn Rae BDawn Rae BMbgPhotoMbgPhotoBrite-IdeasBrite-IdeasWednesday ElfWednesday ElfOlivia MorrisOlivia MorrisTreasures by BrendaTreasures by BrendaThe Savvy AgeThe Savvy AgeMargaret SchindelMargaret SchindelRaintree AnnieRaintree AnnieLou16Lou16Sam MonacoSam MonacoTracey BoyerTracey BoyerRenaissance WomanRenaissance WomanBarbRadBarbRadBev OwensBev OwensBuckHawkBuckHawkDecorating for EventsDecorating for EventsHeather426Heather426Coletta TeskeColetta TeskeMissMerFaeryMissMerFaeryMickie_GMickie_G


Review This Reviews is Dedicated to the Memory of Our Beloved Friend and Fellow Contributor

Susan DeppnerSusan Deppner

We may be apart, but
You Are Not Forgotten


“As an Amazon Associate, Ebay (EPN) and or Etsy (Awin) Affiliate, I (we) earn from purchases.” Disclosure Statement

X