Showing posts with label Crafts & DIY. Show all posts

Thursday, September 2, 2021

DIY Cable Spool Cat Scratching Post


DIY Cable Spool Cat Scratching Post
Stenciled Cable Spool

I'm that person who can't pass up an abandoned cable spool.  When I saw this little spool, I knew it wanted to go home with me.  So, I adopted it, spiffed it up, and gave it a new life.  Here's how to turn a cable spool into a cat scratching post or mini table for your porch or patio.  


recycled cable spool
Recycled Cable Spool

Step 1: Pick up a small spool anywhere wires or cables are used or sold.  I found this one at a big box home improvement store.


cable spool taken apart for refinishing
Spool Parts Ready for Prepping

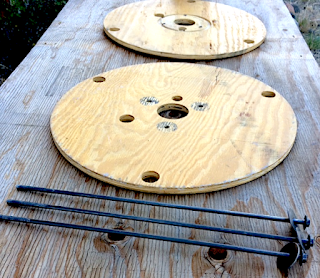
Step 2: Separate the parts in preparation for sanding, painting, and finishing the wood.  All I had to do was unscrew the top bolts to release the three sections.


sanding a cable spool
Sanding the Spool

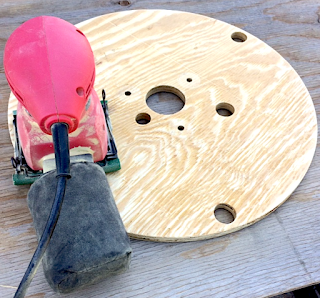
Step 3: Sand the spool's top and bottom wood sections.

Step 4: Decide how you want to treat the wood.  I chose to lightly torch the wood to accent the grain and give it nice warm tones without stain.


wood sealant
Sealing the Wood - Spar Urethane

Step 5: Seal the wood and cardboard spool parts with an indoor/outdoor Spar Urethane.  I used a spray application to make it quick and easy (and fast-drying).  


medallion stencil
Boho Medallion Stencil

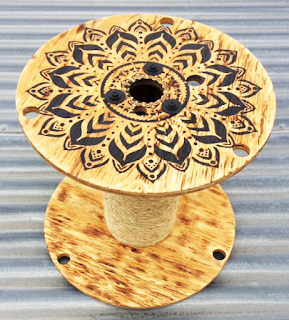
Step 6: Decorate the spool top if desired.  I happened to have the perfect sized stencil (Boho Medallion) on hand for another project.  I chose to use a charcoal colored chalk spray paint that was a lovely balance to the natural wood (and a match with the metal spool bolts).  


sisal rope wrapped around a cable spool
Sisal Rope Wound Around Spool

Step 7: Reassemble the spool.  Wrap sisal rope around the cylinder.  It took a little bit more than 50-feet of 3/8" sisal.  


completed DIY Cable Spool Cat Scratching Post
Recycled Cable Spool (After)

This was a really enjoyable DIY project.  Though I imagine using this recycled spool as a scratching post for my rescue cats, I can also see using it as a small end table on my porch.  I'm picturing it as a coffee table situated next to my Adirondack chair, or as a sweet little piece of furniture for the catio I'm building.

Who says it has to have only one use?  How do you envision it?  I'd love to hear your ideas in the comments below.


Note: The author may receive a commission from purchases made using links found in this article. “As an Amazon Associate, Ebay (EPN) and/or Esty (Awin) Affiliate, I (we) earn from qualifying purchases.”

Thursday, August 5, 2021

Upcycled DIY End Table Pet Bed

Upcycled DIY End Table Pet Bed
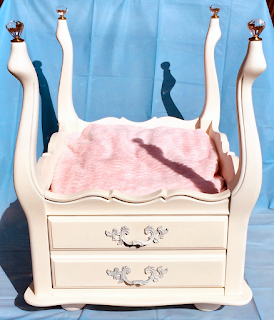
Upcycled End Table Pet Bed

As a continuation of my DIY series on repurposed furniture projects, I present to you my latest pet bed creation.  These upcycled end table dog or cat beds are extremely popular with both fur babies and their pet parents.  I speak from direct experience.  My animals spend nearly all of their time in these beds.  

The four-poster pet bed featured here can be easily completed in a weekend.  Here's a quick rundown of the process I used to bring new life to a vintage end table.  

Supplies Needed: 

  1.  Vintage End Table
  2.  Sand Paper or Sanding Sponge
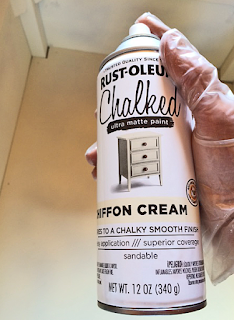
  3.  Paint (I used Rust-Oleum Chalked Spray Paint - Chiffon Cream)
  4.  Bun Feet (optional)
  5. Finials (I used crystal drawer knobs; lamp finials are another great option)
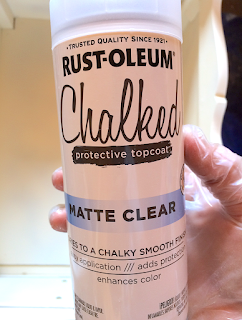
  6. Clear Coat Sealer (I used the Rust-Oeum Chalked Paint Matte Topcoat)
Tools Used:
  1. Screwdriver
  2. Hack Saw
  3. Sander
  4. Drill
  5. Pliers
  6. Brad Nailer

vintage end table
Vintage End Table (Before)

I started with a quick shopping trip to the Habitat for Humanity ReStore and the Goodwill Store.  This vintage end table was perfect for my project and easy on my budget (eight dollars).  It's nice to get a bargain while supporting a cause near and dear to my heart.

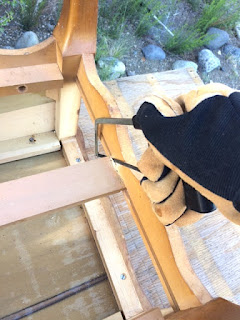
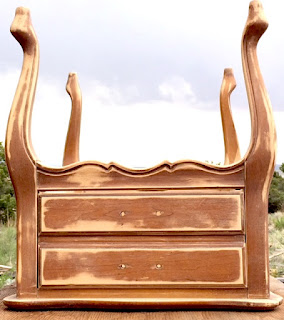
Step One: Flip table. Pull out drawer. Remove inner drawer supports to clear space for bed. I simply used a mini hack saw to cut the cross piece and then a screwdriver to remove the two side supports. 

upside down end table with drawers removed
End Table With Drawer Removed


cutting out the drawer base of a vintage end table
Cutting Out Drawer Brace


removing screws
Unscrewing Side Drawer Support


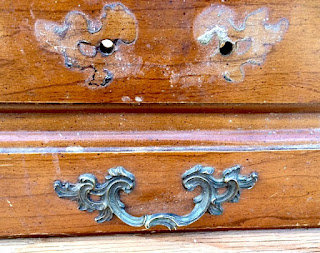
Step Two: Remove drawer pulls by unscrewing inside hardware.  Save parts for later.

removing handles
Removing Drawer Pulls

Step Three: Pull off the plastic leg disks used for leveling and protecting the floor.  Discard.

removing plastic leg disks
Removing Plastic Leg Disks

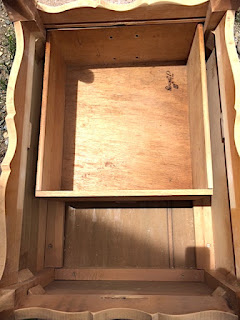
Step Four: Cut off the back part of the drawer and reinstall drawer front (I cut it with a hacksaw leaving an inch of the drawer's side and then used a brad nailer to affix it).  As you can see from the second photo, the drawer takes up room needed for the pet bed.  However, the drawer face is needed for the front side of the cabinet.  I considered using the drawer to make a little step up into the princess bed.  That would be a fun option if you have a tiny dog that could use a boost.


vintage end table prepared for refinishing
Drawer Front/Side After Cut-Off


end table drawer
Drawer Inside Table (Before)

Step Five: Install supports and false bottom for bedding area.  The wood pieces will provide enough depth to drill in the bolts for the bun feet (from the other side). The veneer of the end table top was too thin for the bolts and bolt inserts, hence the wood blocks covered by a sheet of masonite.

false bottom of vintage end table
Supports For False Bottom

masonite covering
Masonite Covering Bottom Supports

Step Six: Sand wood in preparation for two fresh coats of paint.

preparing and sanding a vintage end table
Paint Prep - Sanding

Step Seven: Prime and paint with two coats of Rust-Oleum Chiffon Cream chalked paint.

spray paint
Chiffon Cream Spray Paint

Step Eight: Seal the paint with a clear finish. I used the Rust-Oleum matte topcoat.

clear topcoat
Clear Topcoat Protective Finish

Step Nine
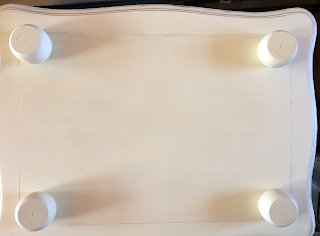
: Attach bun feet. This was done by drilling holes for the bolt inserts.

bun feet
Bun Feet Installed With Threaded Inserts

Step Ten: Screw in finials atop the legs.  I love the rainbows that wash over the bed when sunlight shines through the prisms.

crystal finials
Crystal Finials Installed

Step Eleven: Reattach the drawer pulls after painting them.  I used the same creamy chalk paint.

painted drawer pulls on painted end table
Painted Drawer Pulls Back In Place

Step Twelve: Select fabric and make a cozy bed cushion/pillow.  I used foam cushions and two fabric selections: one is a fleece damask pattern in pink and chocolate; one is a super soft ribbed pink chenille.  Which do you like best?  

fleece bed cushion
Damask Fleece Bed Cushion

chenille bed cushion
Pink Ribbed Chenille Bed Cushion

So there you have it.  Upcycling is a fun way to exercise your imagination while feeling great about saving an item from a premature demise.  Why send something to the landfill when it has plenty of life left in it?  

I like to think this old end table is pretty pleased to be looking better than ever and to be enfolding the life of a beloved pet.  There's nothing like being needed and valued.  

Interested in more pet bed demos?  Check out my DIY upcycled dresser drawer beds.  My cats adore them.

Stay tuned for upcoming DIY demo projects.  Up next is an antique door hall tree and a vintage metal suitcase coffee table (recent Habitat for Humanity ReStore finds that I could not resist).


Note: The author may receive a commission from purchases made using links found in this article. “As an Amazon Associate, Ebay (EPN) and/or Esty (Awin) Affiliate, I (we) earn from qualifying purchases.”

Wednesday, July 14, 2021

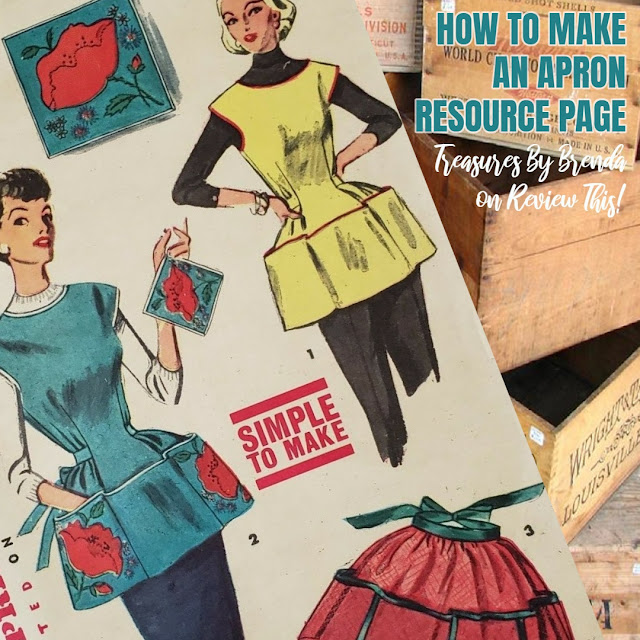
How to Make an Apron Resource Page

A page full of ideas of aprons to craft. If you love aprons and sewing, you will be inspired, for sure!

A PAGE FULL OF RESOURCES TO HELP YOU MAKE AN APRON


This page is packed with resources for anyone wanting to make an apron. Whether you want to make one for yourself or for someone else, you've come to the right spot. It will point you in the direction of some wonderful resources that are available online for making your very own aprons.

I have included a few Youtube videos that show you how to make aprons, including one from Angel Fleece Aprons and one from the Missouri Star Quilt Company. I have also included links to pages with great apron how-tos an interesting apron-making book from Amazon.

The aprons shown above are from a vintage 1950s Simplicity pattern, number 4492. I love the turquoise blue one and the big pockets! You can find it on eBay by clicking here.

I hope this page inspires you to make an apron.

HOW TO MAKE AN APRON VIDEO FROM ANGEL OF FLEECE


This first video is inspired by the Baking Outside the Box cookbook. Angel of Fleece steps you through the creation of an elegant apron.


HOW TO MAKE AN APRON VIDEO FROM A TEA TOWEL BY THE MISSOURI STAR QUILT COMPANY (PARTS 1 & 2) 


HOW TO CREATE A RETRO APRON BY CINDY TAYLOR OATES

Cindy Taylor Oates has written a few retro-themed pattern books in this series that offers well written instructions and excellent illustrations. The patterns need to be traced because they are printed on two-sided paper but doing so is, according to reviewers, worth the effort. The author includes ways to make the apron look retro and ways to make it look contemporary so no matter your style, the aprons in this book can be adopted to suit. Click here to find these Retro Aprons books on eBay.

HOW TO SEW A FULL APRON VIDEO FROM PROFESSOR PINCUSHION


HOW TO SEW A SIMPLE APRON FROM MELANIE HAM


HOW TO MAKE AN UPCYCLED DENIM APRON FOR CHILDREN


BLOGS & POSTS DEDICATED TO MAKING APRONS


His and Her Aprons
Blogger Make it and Love It shares, His and Her Aprons.

Romantic Cottage or Shabby Chic Style Apron
Blogger Sew4Home shares how to make a romantic cottage or shabby-chic style apron.

How to Make an Apron on eHow.com
This page at eHow will step you through ow to make a simple bib-style apron. It is a good project for beginners.

Make A Make Do Apron
Mary Jane shows you how to make an apron out of a shirt. That reminds me of the aprons my great grandmother crafted from a worn out dress.

How to make an apron with one yard of fabric. 

An easy-to-make pattern.

An awesome project for a new sewer.

No pattern needed for this kitchen apron.

Martha Stewart shows you how.

A FEW APRON FACTS


Previous polls on this page when it appeared elsewhere online showed that 40 percent of the people who visited owned an apron and that 43 percent were looking for a new project or an apron inspiration. Only 19 percent of the visitors said that they ALWAYS don an apron when they're in the kitchen but 30 percent of them said that they should but only do so when cooking a particularly messy item. That is where I fit, in that last 30 percent. How about you? Do you usually wear an apron? Are you looking to craft a new one?

See you in the kitchen.
Hopefully, with your apron on!
Brenda

MORE APRON READING:


Note: The author may receive a commission from purchases made using links found in this article. “As an Amazon Associate, Ebay (EPN) and/or Esty (Awin) Affiliate, I (we) earn from qualifying purchases.”


Sunday, July 4, 2021

The Apron Book: Making, Wearing and Sharing a Bit of Cloth and Comfort Book Review

The Apron Book: Making, Wearing, and Sharing a Bit of Cloth and Comfort by EllynAnne Geisel Book Review

When I was a child, I had the privilege of knowing and spending time with my great grandmother, who raised her family during the Great Depression. In those years, she was forced to be very frugal and learned some interesting tricks to stretch the family income that she later attempted to pass on to my sister and I. The time that I remember best is when she showed us how to turn an old dress into an apron. I could not do so today but I guess having participated in that activity with my great grandmother when I was a child created a fond spot in my heart for aprons.

It is very interesting to me then that aprons, both vintage and modern, are turning up everywhere from movies and television shows to magazines and shops the later of which cannot keep trendy aprons on the shelves. Many people collect them including celebrities like Julia Roberts and ordinary folk like you and I though my collection is small and well used. 

This book, The Apron Book: Making, Wearing, and Sharing a Bit of Cloth and Comfort by EllynAnne Geisel, is a guide to old and new aprons. It features photographs of both new and vintage aprons, patterns for four basic styles and still more information including tips for collectors, instructions for preservation and even some apron stories.

Amazon calls this book a celebration of the apron and says that it reminds us of why we love this humble item. Homemaker's Magazine says, "this book provides easy-to-follow instructions, interesting facts and vintage illustrations which make it charming" and the Denver Post says "this book restores dignity to a domestic symbol and is part how-to and part history, which is comforting."  Finally, NPR says, "it unfolds like a bolt of fabric, the pattern of a life remembered through a homey object."

The Apron Book: Making, Wearing, and Sharing a Bit of Cloth and Comfort is a top ranking apron book. Originally published in 2006, it is still widely available in your choice of format be that hardback, paperback or Kindle. 

 If you are interested in making or even just reading about aprons, you can buy your new or pre-owned copy on Amazon by clicking right here though I was delighted to see that it is available for less than five dollars including shipping on eBay. See for yourself what is available on eBay today by clicking right here.

Are you an apron collector?

See you in the kitchen!
Hopefully, with an apron on.
Brenda

MORE READING:


Note: The author may receive a commission from purchases made using links found in this article. “As an Amazon Associate, Ebay (EPN) and/or Esty (Awin) Affiliate, I (we) earn from qualifying purchases.”


Sunday, June 6, 2021

The Easiest and Best Way to Clean Silver


In December 2018, I wrote another article on how to clean silver. 

In that article, I discovered a product my husband uses to clean the chrome on his tires called Mothers Mag and Aluminum Polish. The product is excellent for cleaning silver, but the way I'm about to divulge is far superior.

The Easiest Way to Clean Silver that Doesn't Involve Manual Labor

In the 1980's I purchased an Electrolytic Silver Cleaning Plate

The directions for using that cleaning plate are simple: 

Put the plate in the bottom of your kitchen sink, fill the sink with boiling hot water, then add Calgon water softener. Rest the silver piece so that it's touching the plate, and leave it for a few minutes to fifteen minutes, then wipe clean.

However, I could no longer find Calgon (except for a ridiculous price on Amazon), so I began to do a bit of Google research.

There Are Many Ways, According to Articles on Google, on How to Clean Silver

Some articles involve dish soap and vinegar. However, I found the instructions on these methods to be too cumbersome.

I figured, if a silver plate with Calgon can clean silver, there has to be an equivalent DIY alternative method. Thanks to Google research, yes, there is.

Here's the Easiest and Best Way to Clean Silver

Items Needed:

  • Your kitchen sink
  • Baking Soda (several boxes depending on how much silver you have to clean). I'd pick three boxes, so you don't run out
  • Tinfoil
  • Boiling Hot Water

Directions:

1. Put the drain plug in your sink.

2. Line your entire sink with tin foil, shiny side up. Don't leave any sink exposed. Instead, bring the tin foil right up the sides of your sink all the way around. However, if you're only cleaning silverware and small pieces, you could try just lining the bottom of the sink.

3. Pour boiling water into the sink. I used mostly boiling water from the kettle, but I ran super hot tap water when the water needed more heat. However, just keep boiling water coming. I re-filled the kettle and boiled more water every time I emptied the kettle.

4. I filled the sink to the highest level because I had many silver pieces to clean, with some pieces being quite large.

5. Place a piece or pieces of silver in the sink touching the tin foil. For larger pieces, just rotate them so that all the sides get covered with water at some point. If the piece isn't in the water, it won't clean.

6. Pour baking soda into the sink. I poured it on top of the silver in the water, but I don't think that matters. Since I had a lot of silver to clean, I used several boxes of baking soda. On the first silver items, I probably dumped half a box in the water. I wanted to make sure it worked. Next, I cleaned a silver tea service, silver platters, silver candles, and a silver serving dish to clean. Judge for yourself how much baking soda you need. If you feel it's not cleaning fast enough, simply get the water up to boiling again, and add more baking soda.

7. The cleaning process takes care of itself. You don't have to scrub anything (just wipe it off when you take it out of the sink). In fact, it's interesting to watch the silver clean itself right before your eyes.

8. Dry, wipe and shine up your silver with a cloth. That's it, you're done.

9. I cleaned all these pieces in less than an hour. 

I prefer the above method because it uses everything I have in the house; a sink, hot water, tin foil, and baking soda - boom, that's it. Oh, and it's unbelievable how clean the silver turns out.


Here are the pieces I cleaned (and they were completely tarnished before):


This tea set was so tarnished it looked brassy-black. The tray was tricky to clean in the kitchen sink, but I managed to clean it simply by turning it around and around until all the areas were submerged.


The piece on the top left was also severely tarnished with dark black, as were the two serving dishes in the bottom middle.


Note: The author may receive a commission from purchases made using links found in this article. “As an Amazon Associate, Ebay (EPN) and/or Esty (Awin) Affiliate, I (we) earn from qualifying purchases.”


Monday, May 31, 2021

How to Install a New Faucet


How to install a new faucet
How to install a new faucet - Reviewed

It was time to replace that old bathroom faucet. It was an old single lever push, pull-type, and was difficult to turn on and off, especially for our youngest grandson.

Replacing a faucet whether it is a bathroom faucet or a kitchen faucet is not that difficult. But sometimes Murphy’s Law takes over, and what can go wrong, will go wrong. The problem I had was my shut-off valves were frozen so I could not turn off the water under the sink. This was not a problem, I just had to turn off the main water supply and replace the shut-off valves and supply lines under the sink. But this review will only instruct you on how to install a new faucet.

 I am by no means an expert and I am not a plumber by trade. I can tell you how to do this because I have done it many times before.

Installing a new Faucet Step-by-Step:

Step 1

The first thing you need to do is to turn off the water supply. Most bathroom and kitchen sinks have shut-off valves under the sink, if not you will have to turn off the main water supply.

Step 2

Once you are sure the water is off, turn the faucet on to let the water out. Then, remove the hot and cold supply lines using an adjustable wrench. You will also have to unlatch the sink stopper lever from to ball lever on the drain. Leave the ball lever in the drain, as you will need to attach the new sink stopper lever to it later.

Step 3

Now remove the retaining nuts that are holding the old faucet, a basin wrench is the handiest tool for this task. After removing the old faucet measure the hole pattern on the sink. Make sure you purchase a new faucet that will fit the hole pattern in your sink.

Step 4

After removing the old faucet, clean any residue left behind with a tub and tile cleaner and paper towels. If you must use a putty knife, use a plastic one.

Step 5

Your new faucet will have a built-in gasket, but you will still need a bead of caulk or plumber’s putty around each hole. This is needed to make a good seal.

Step 6

Place the new faucet and fasten the retaining nuts to hold it in place. It’s always a good idea to have somebody hold the new faucet in place while you get the new basin nuts snug. Be careful not to over tighten, you can use the basin wrench, but I like to just hand tighten.

Step 7

Now fasten the hot and the cold-water supply line to the new faucet. You may need to wrap Teflon tape around the new faucet threads. Follow the manufacturer's instructions on the new faucet. Now, it is time to connect the sink stopper lever to the ball lever in the drain. You will find several adjustments on the sink stopper lever.

Step 8

Remove the aerator from the new faucet and turn on the water supply. Then, turn on the cold water. The aerator is the little screen inside the faucet spout. This is to make that it does not clog with any debris that may be in the water lines. Replace the aerator and check for leaks. That is all there is to it.

Find more  Crafts & DIY projects on Review This here: ReviewThisCrafts.com

This basin wrench will be your best friend when replacing a faucet.

Superior Tool 03811 Eleven Inch Basin Wrench-Infinitely Adjustable 11Superior Tool 03811 Eleven Inch Basin Wrench-Infinitely Adjustable 11Superior Tool 03811 Eleven Inch Basin Wrench-Infinitely Adjustable 11


Note: The author may receive a commission from purchases made using links found in this article. “As an Amazon Associate, Ebay (EPN) and/or Esty (Awin) Affiliate, I (we) earn from qualifying purchases.”


Thursday, May 20, 2021

DIY Cat Bed Fit for a Queen


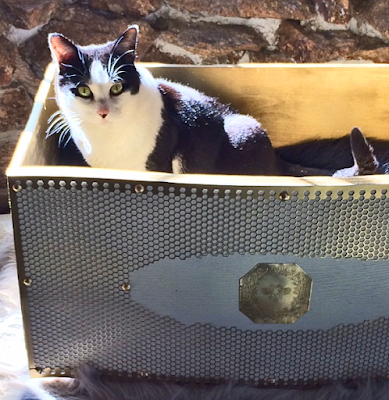
cat in her drawer bed

The ruler of my household happens to be a cat of a certain age known as Miz Grizz.  She is The Queen, and as such, deserves royal treatment.  I noticed that Her Royal Highness is quite fond of the reimagined drawer beds I made for Gracie and Minnie (two Kingdom of Grizz subjects).  The time has come to honor Her Majesty with a cat bed fit for a queen.

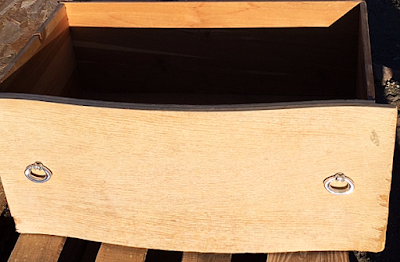
open drawer

I still had a drawer left over from my first foray into creating upcycled pet beds, so I claimed it for this project.  As I looked around the house for additional inspiration, and potential supplies, a theme quickly presented itself.  One of the first items I found was a metal honeycomb that I decided to use as a stencil for the sides and back of the bed.  Now that I knew I was going with a queen bee motif, it was time to get started.  First, I removed the drawer's hardware.  Then, I sanded all of the surfaces to prep for painting (and filled holes).  

close up of drawer wood

Next, I primed everything with spray paint.  On the outside of the drawer, I used Rust-Oleum Chiffon Cream Chalked Paint.  The drawer's inside surfaces were painted with Rust-Oleum Metallic Gold.  Choosing to go with a metallic finish provided an unexpected, and very appealing, outcome.  How I love the way the underlying wood grain is highlighted by the shimmery play of light.

painted drawer exterior


metal honeycomb sheet

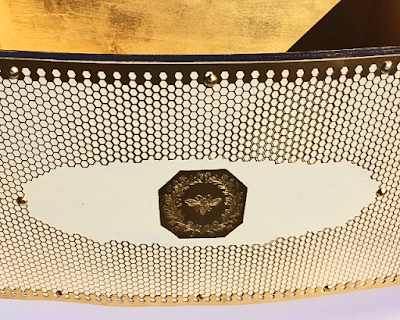
Following the application of the first coats of paint, I used the metal honeycomb sheet to overlay the creamy background with metallic hints of ongoing hive activity.  While working to evoke this effect, an additional idea came to mind.  If I modified the metal sheet for use on the front of the Queen's new bed, it could frame a name plate.

honeycomb sheet attached to wood as decor


That is when I began to envision another feature: an acid-etched brass bee emblem.  Though I had recently experimented with etching copper, I wasn't sure if the same method would work with other metals.  I discovered that the technique worked perfectly with brass.  My new etching became the centerpiece of The Queen's nameplate.

painted jars used as feet

In keeping with the bee theme, I used decorative jelly jars (think royal jelly) for the legs of the bed.  It was just a matter of painting the jars and then attaching the lids to the bottom of the drawer.

DIY Cat Bed Fit with cat inside

Finally, I added a luxurious faux fur mattress fit for a queen.  Miz Grizz works hard keeping everyone in line and has more than earned an extra measure of comfort.  I hope Her Majesty is pleased with my humble offering.  Though it is a small gift, it was made with great love.  She is the Queen of My Heart.

New Demo: Four-Poster Upcycled End Table Pet Bed


Note: The author may receive a commission from purchases made using links found in this article. “As an Amazon Associate, Ebay (EPN) and/or Esty (Awin) Affiliate, I (we) earn from qualifying purchases.”


Thursday, May 6, 2021

Stitching Wood With Copper Wire


Stitching Wood With Copper Wire

For those who see beauty in imperfection, wood stitching is an appealing art form.  When I recently found a cracked tabletop, my first inclination was to replace it with something less damaged.  However, as I further considered the nature of this wood piece, I realized it was the crack that gave the table its real character.  

As Leonard Cohen expressed in his song "Anthem," forget your perfect offering, there is a crack, a crack in everything.  So, I thought, why not highlight rather than hide the flaw?  The flaw is the offering... is the song.

I had never attempted to stitch wood with copper wire before today, but I've been wanting to try this technique.  I am learning through trial and error what works.  I'll share my process here and a few tips.

First, I didn't care for the glossy wood finish, or the cheap look of the table itself.  Sanding alone did not fix that.  Torching everything took care of it.  It's a method known as Shou Sugi Ban.  Fire is a sure way of taking something lacking a wow factor and making it instantly memorable.

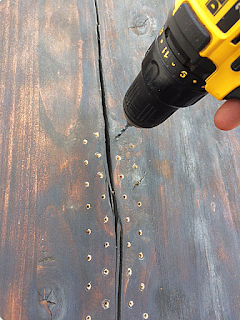
drilling holes in wood


drilling holes in wood

After charring the tabletop, I drilled holes in preparation for the wire stitching.  Using my butane torch, I burned the wood inside and around the holes (so the raw wood wouldn't show).

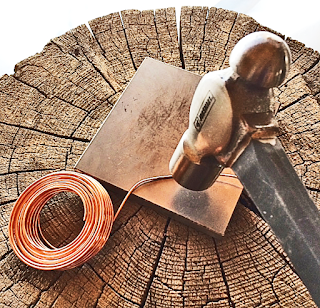
flattening copper wire

Using a steel block and hammer, I flattened the copper wire.  The copper looks better when it lies flush with the wood surface.

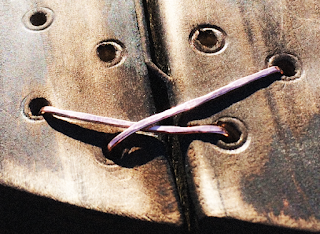
lacing pattern for stitching wood with copper wire

Now, I am experimenting with lacing patterns.  The trick, it seems, is to double back and bring two stitches up through a single hole.  I have discovered that the wire has to be carefully handled after being pounded flat.  A few pieces of wire have snapped in half when I started stitching the wood.  Lesson learned.  (And I have gone back and sanded down the indentations left by the drill around the holes pictured above.)

I am intrigued, so far, with my project.  The uniqueness of what is being created from something others might consider broken is what draws me to this work in progress.  This table is reminding me that there is beauty to be found in brokenness.  The crack is where the light gets in.

Stay tuned for the part two final reveal.  I can't wait to see it myself, as these kinds of projects tend to take on a life of their own.  I never know ahead of time just where the wood and other elements will lead me.  It's the adventure of it all that keeps me coming back for more.


Note: The author may receive a commission from purchases made using links found in this article. “As an Amazon Associate, Ebay (EPN) and/or Esty (Awin) Affiliate, I (we) earn from qualifying purchases.”


Tuesday, May 4, 2021

How to Maximize Space in a Small Bedroom


How to maximize space in a small bedroom
Making the best of a small room - reviewed

We have a nice 3 bedroom home with plenty of room. Although, one of the bedrooms happens to be a small 8' x 10' room. This is the room that our granddaughters stay in when they come for a visit.

We had a bookcase full of books and toys, along with a tote full of toys and a full size bed in this small room. This did not leave much room for the girls to play.

Fran decided that it was time for a makeover in this room. First she emptied the bookcase and got rid of it. We needed to make the best of this space so the girls had room to play. For those of you who don't know who Fran is, she is my better half forever.

This small room makeover was all Fran, all I did was assemble all of the furniture and place it where she wanted it. 

Maximize Space in a small room:

Ellen Corner DeskEllen Corner DeskCheck the Price


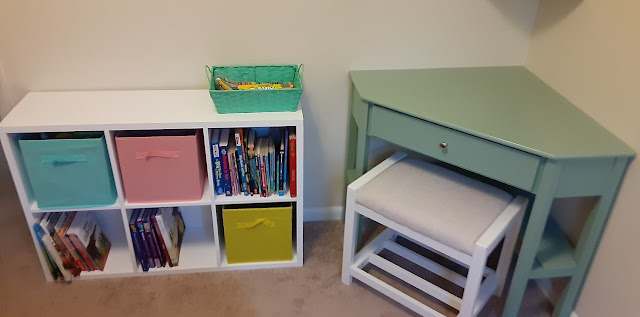
First Fran wanted a space where the girls could do some projects such as crafts, drawing, coloring, or reading.

We moved the full-sized bed to one corner of the room and placed this corner desk in the opposite diagonal corner of the room.

The corner desk measures 42" across and has a drawer and shelves for storage. 


Vanity StoolVanity StoolCheck the Price


Since a desk chair would take up too much space, Fran decided on this vanity stool.

This stool fits perfectly under the desk when it is not in use. When it is pulled out for use there is still plenty of room to get by between the stool and the bed. Did I mention that the cushion top is very comfortable.


Storage CubeStorage CubeCheck the Price

Now, it was time to clean up all of that clutter and empty that tote full of small toys, crayons, and makers. Fran picked out this cube storage organizer.

This was a perfect fit next to the desk and along the wall to fill the space to the entrance door of the room.

These storage cubes are a great idea for craft rooms, bedrooms, playrooms, or a small office.

The cube has six storage spaces and each space will hold 60 pounds.


Sorbus Foldable Storage CubeSorbus Foldable Storage CubeCheck the Price


To store all of those little things Fran found these colorful foldable storage cubes.

They fit perfectly into the cubes of the storage organizer. These a perfect for games, crayons, makers, and small toys.


Fran hand picked every one of these items for a specific purpose in this small bedroom. She created a comfortable and useable space for our granddaughters. This was an easy project for me, as I said earlier all I had to do was assemble. All of these items were easy to assemble and all had excellent assembly instructions.

child sitting at a corner desk

Here is a photo of our youngest granddaughter hard at play using their new corner desk. They are very happy with the new changes to their room away from home.

Find more reviews on this topic on Review This Here:


Note: The author may receive a commission from purchases made using links found in this article. “As an Amazon Associate, Ebay (EPN) and/or Esty (Awin) Affiliate, I (we) earn from qualifying purchases.”

Most Recent Reviews on Review This Reviews


Search for Reviews by Subject, Author or Title

The Review This Reviews Contributors


SylvestermouseSylvestermouseDawn Rae BDawn Rae BMbgPhotoMbgPhotoBrite-IdeasBrite-IdeasWednesday ElfWednesday ElfOlivia MorrisOlivia MorrisTreasures by BrendaTreasures by BrendaThe Savvy AgeThe Savvy AgeMargaret SchindelMargaret SchindelRaintree AnnieRaintree AnnieLou16Lou16Sam MonacoSam MonacoTracey BoyerTracey BoyerRenaissance WomanRenaissance WomanBarbRadBarbRadBev OwensBev OwensBuckHawkBuckHawkDecorating for EventsDecorating for EventsHeather426Heather426Coletta TeskeColetta TeskeMissMerFaeryMissMerFaeryMickie_GMickie_G


Review This Reviews is Dedicated to the Memory of Our Beloved Friend and Fellow Contributor

Susan DeppnerSusan Deppner

We may be apart, but
You Are Not Forgotten


“As an Amazon Associate, Ebay (EPN) and or Etsy (Awin) Affiliate, I (we) earn from purchases.” Disclosure Statement

X