Showing posts with label Crafts & DIY. Show all posts

Tuesday, May 4, 2021

How to Maximize Space in a Small Bedroom


How to maximize space in a small bedroom
Making the best of a small room - reviewed

We have a nice 3 bedroom home with plenty of room. Although, one of the bedrooms happens to be a small 8' x 10' room. This is the room that our granddaughters stay in when they come for a visit.

We had a bookcase full of books and toys, along with a tote full of toys and a full size bed in this small room. This did not leave much room for the girls to play.

Fran decided that it was time for a makeover in this room. First she emptied the bookcase and got rid of it. We needed to make the best of this space so the girls had room to play. For those of you who don't know who Fran is, she is my better half forever.

This small room makeover was all Fran, all I did was assemble all of the furniture and place it where she wanted it. 

Maximize Space in a small room:

Ellen Corner DeskEllen Corner DeskCheck the Price


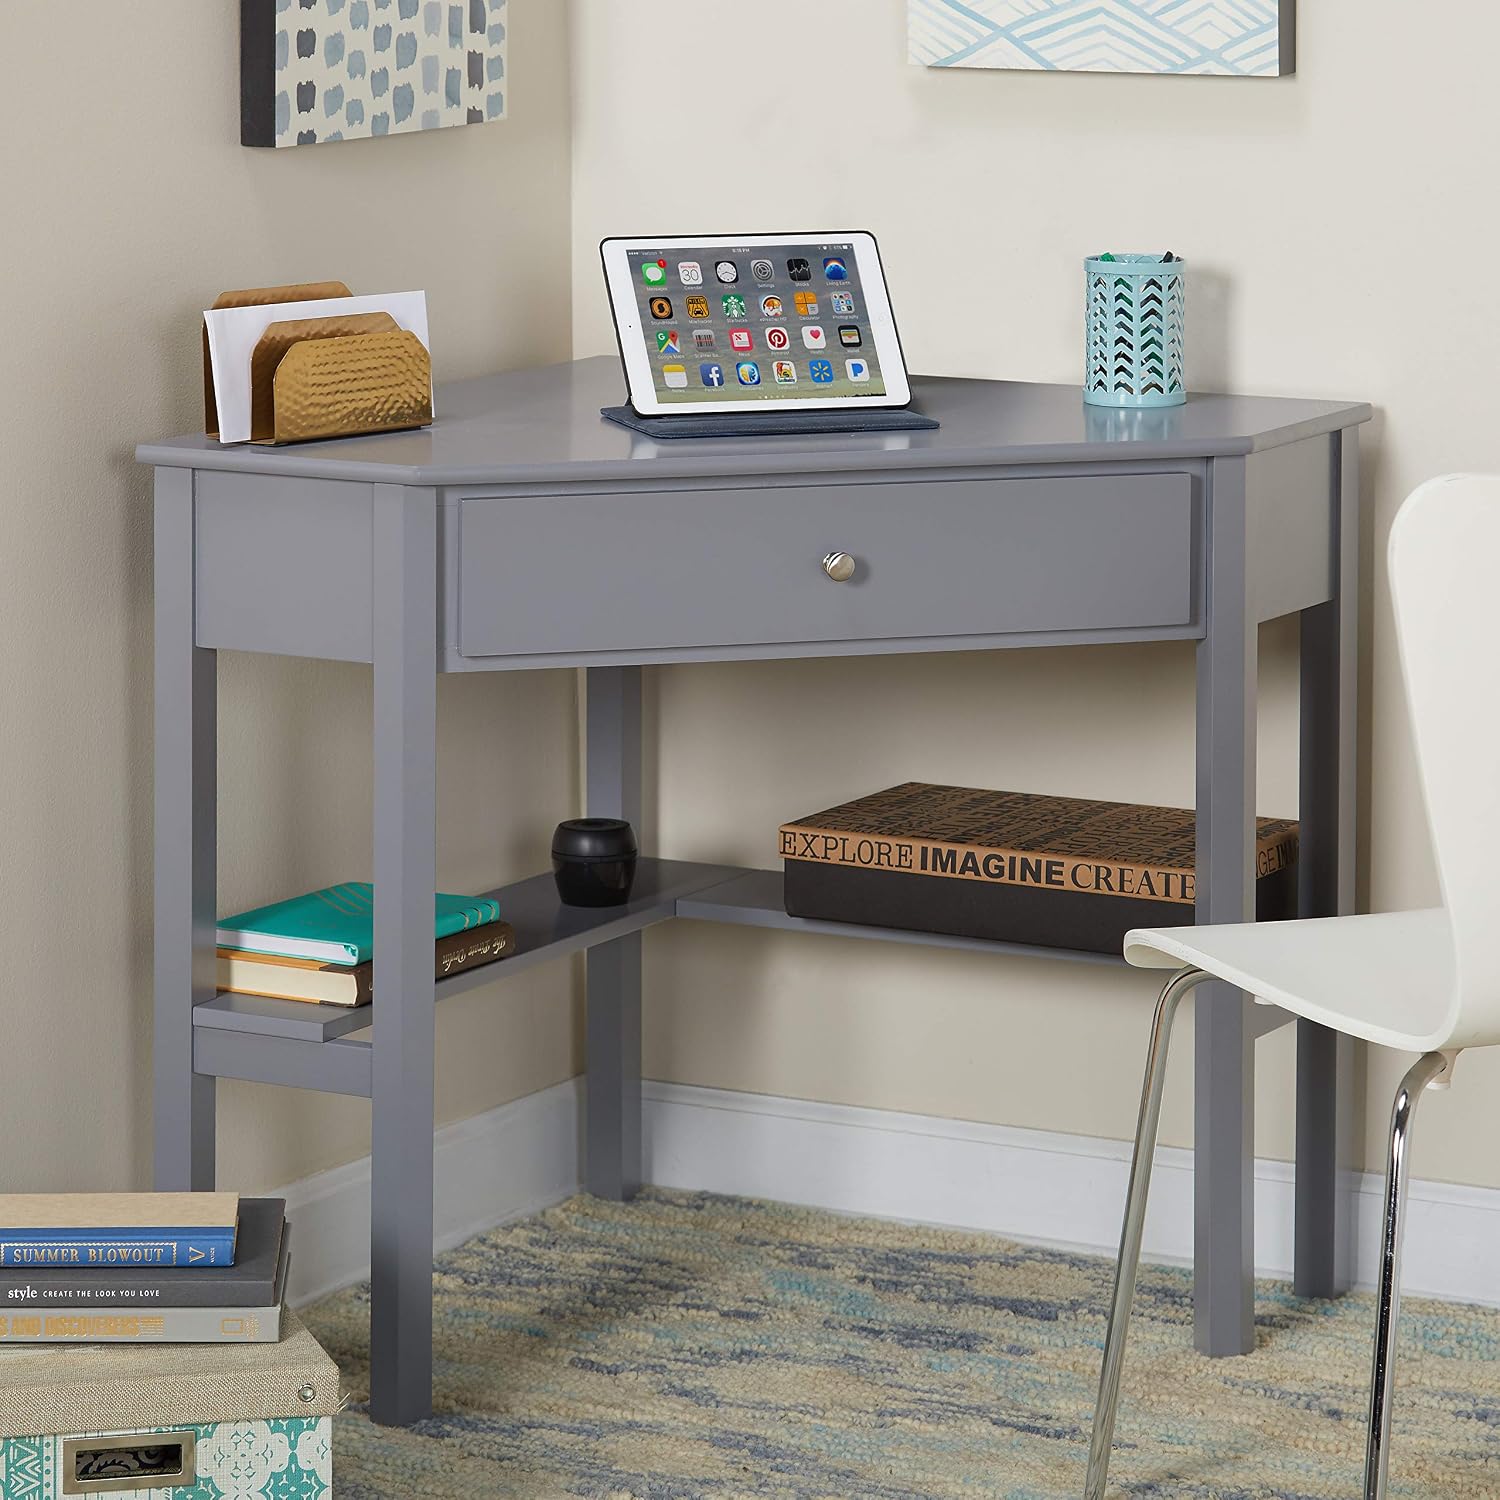
First Fran wanted a space where the girls could do some projects such as crafts, drawing, coloring, or reading.

We moved the full-sized bed to one corner of the room and placed this corner desk in the opposite diagonal corner of the room.

The corner desk measures 42" across and has a drawer and shelves for storage. 


Vanity StoolVanity StoolCheck the Price


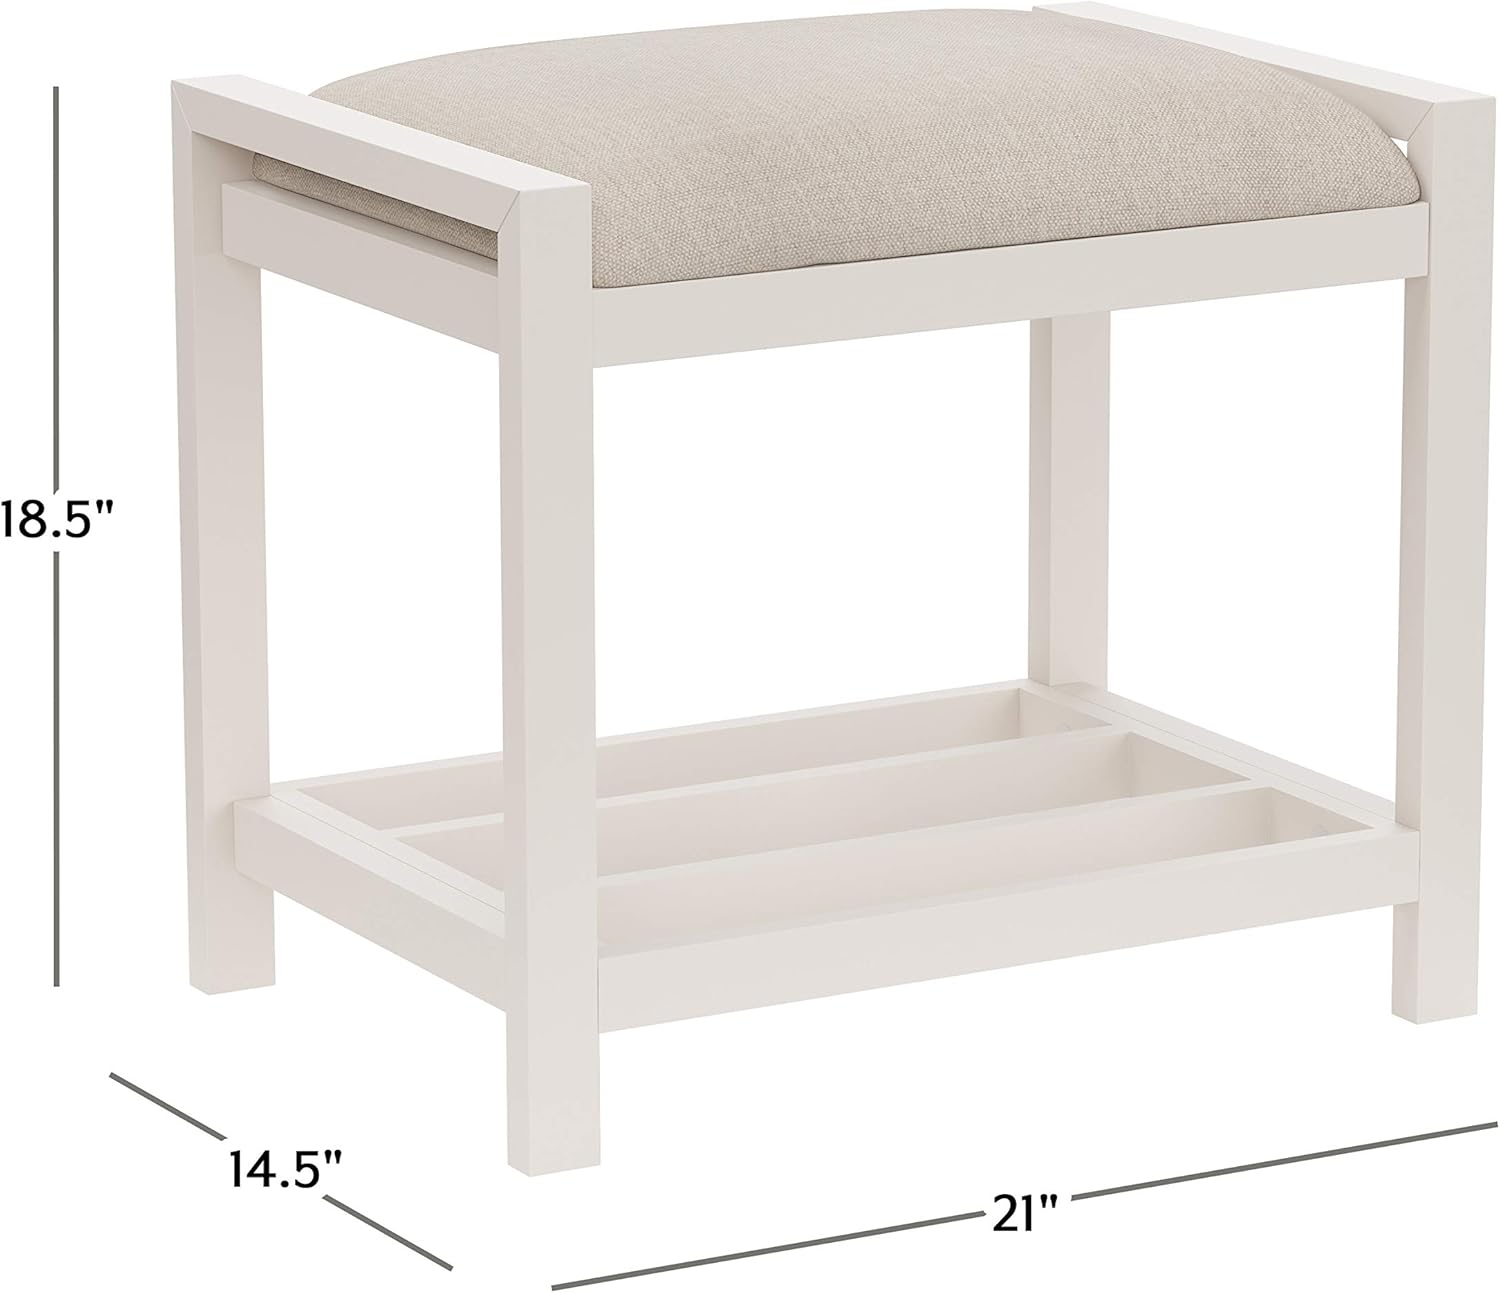
Since a desk chair would take up too much space, Fran decided on this vanity stool.

This stool fits perfectly under the desk when it is not in use. When it is pulled out for use there is still plenty of room to get by between the stool and the bed. Did I mention that the cushion top is very comfortable.


Storage CubeStorage CubeCheck the Price

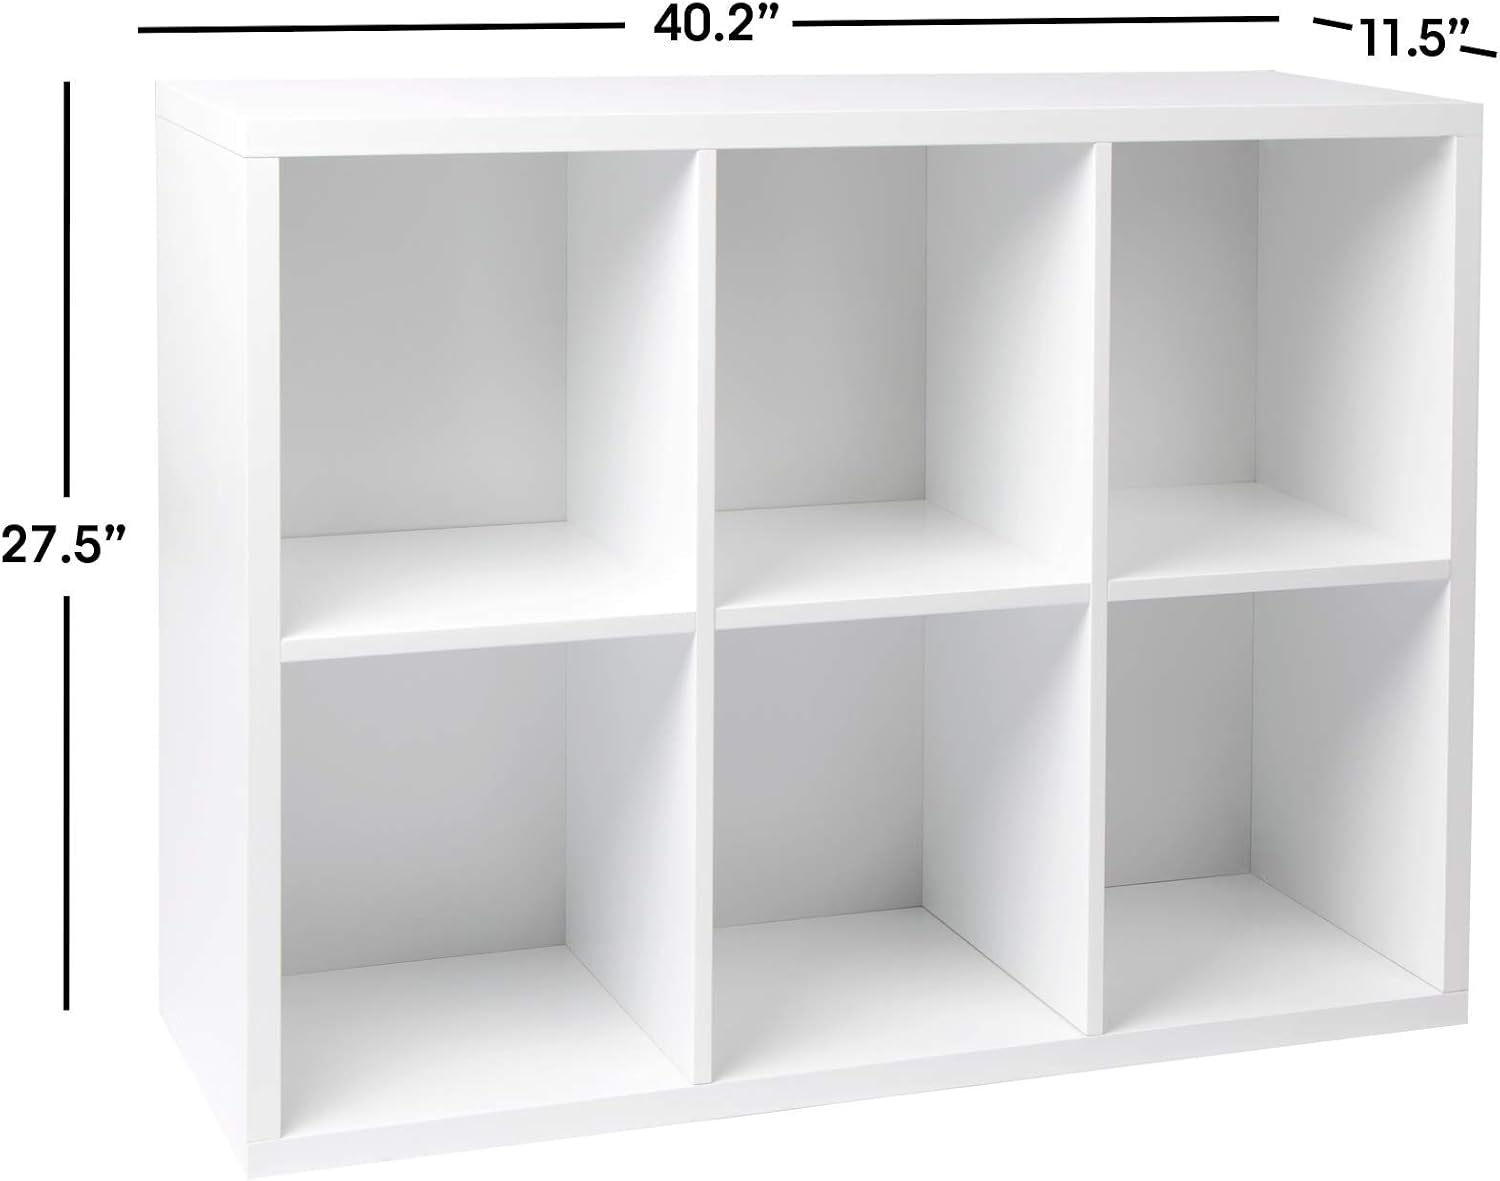
Now, it was time to clean up all of that clutter and empty that tote full of small toys, crayons, and makers. Fran picked out this cube storage organizer.

This was a perfect fit next to the desk and along the wall to fill the space to the entrance door of the room.

These storage cubes are a great idea for craft rooms, bedrooms, playrooms, or a small office.

The cube has six storage spaces and each space will hold 60 pounds.


Sorbus Foldable Storage CubeSorbus Foldable Storage CubeCheck the Price


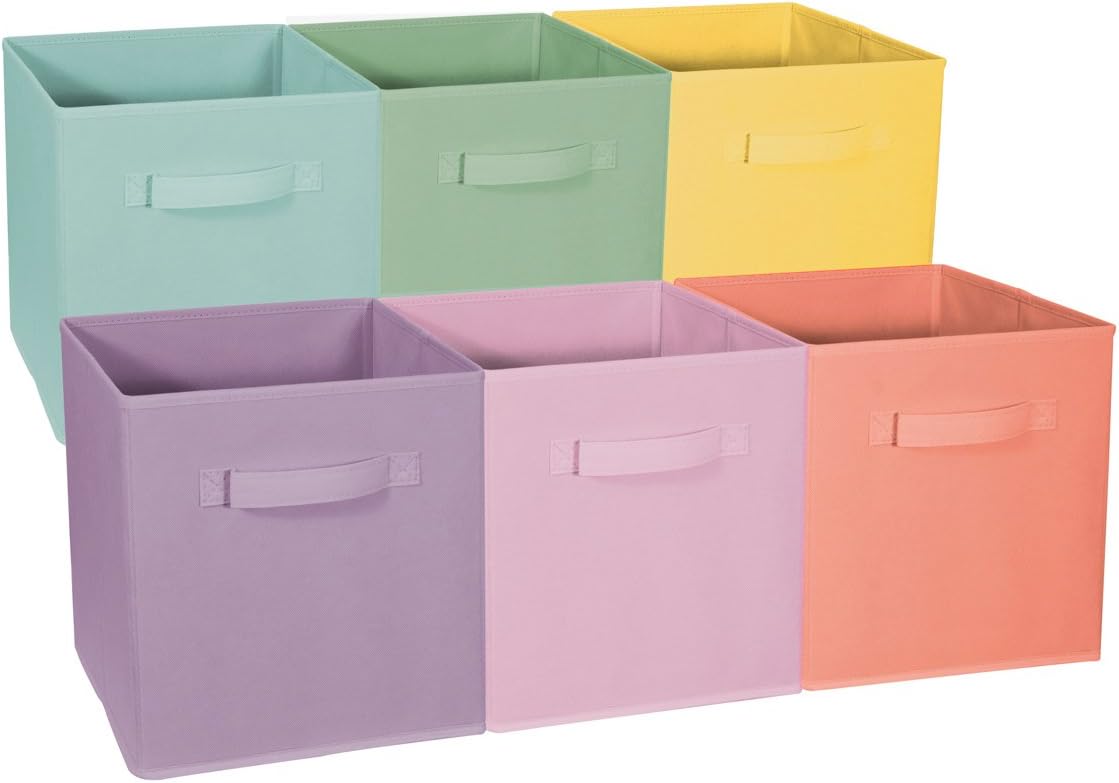
To store all of those little things Fran found these colorful foldable storage cubes.

They fit perfectly into the cubes of the storage organizer. These a perfect for games, crayons, makers, and small toys.


Fran hand picked every one of these items for a specific purpose in this small bedroom. She created a comfortable and useable space for our granddaughters. This was an easy project for me, as I said earlier all I had to do was assemble. All of these items were easy to assemble and all had excellent assembly instructions.

child sitting at a corner desk

Here is a photo of our youngest granddaughter hard at play using their new corner desk. They are very happy with the new changes to their room away from home.

Find more reviews on this topic on Review This Here:


Note: The author may receive a commission from purchases made using links found in this article. “As an Amazon Associate, Ebay (EPN) and/or Esty (Awin) Affiliate, I (we) earn from qualifying purchases.”


Tuesday, April 20, 2021

Restoring Lawn Furniture


Restoring Lawn Furniture
Restoring Lawn Furniture - Reviewed

Here is how I restored some old wooden lawn furniture. My parents bought this furniture back in the 80s for their new patio and used it for many years.

Many years ago I was helping my mother clean out her basement where this furniture was stored. I told her that I would carry it up to the patio and she said no I'm just going to throw it away.

 I wouldn’t hear of it, so she said if you want it, to take it to your house. I had the two chairs and one lounge chair stored in my garage for a couple of years. Then, I decided it was time to take it out and use it on my deck.

At that time all this furniture really needed was cleaned up. After several years of use on my deck, the furniture was in need of some tender loving care. Pictured are the two chairs all restored and ready for the summer.

Materials I used to restore this lawn furniture:

·         Fine Sandpaper (120 Grit)

·         Tack Cloth

·         Exterior Deck and Patio PaintSpray Paint 

·         New Lawn Furniture Cushions

Tools I used for this DIY:

Wire Brush

Screwdriver

Socket Set

3-inch nylon paintbrush

Here is how I restored my lawn furniture:

1. Over the years some of the screws and bolts began to loosen. Using a screwdriver and socket set I tightened all of the screws and bolts.
2. I then wire brushed all of the springs under the cushions to remove the rust. Then, made sure they were all secured to the wooden sides of the furniture.
3. Using the wire brush again. I Wire brushed all of the wood surfaces to remove any of the loose paint.
4. The last step of preparation, I sanded all of the wooden surfaces with fine sandpaper. I used 120 Grit. Then take the tack cloth and wipe the surfaces to remove any dust or sanding residue.
5. I painted the furniture with a latex deck and patio paint that you can buy at any hardware store. I carefully painted the furniture with a 3-inch nylon paintbrush.

About every three or four years I follow the same process to keep this lawn furniture looking good. This lawn furniture is over 40 years old and we are still using it and it is so comfortable.

More ReviewThis DIY Projects Here: ReviewThisCrafts.com

Here are a few of the simple tools that I used for this project:

Wire Brush,Heavy Duty Stainless Steel Wire Scratch Brush for Cleaning Rust with 10Wire Brush,Heavy Duty Stainless Steel Wire Scratch Brush for Cleaning Rust with 10Check the PriceLLNDEI 3/8”Drive Impact Socket Set,Standard SAE(5/16 to 3/4-Inch) Metric Size(8-22mm), 95 Piece, CR-V Steel Deep&Shallow Kit, Adapters, Ratchet Handle, Screwdriver Bit Set, Spark Plug Socket, 6 PointLLNDEI 3/8”Drive Impact Socket Set,Standard SAE(5/16 to 3/4-Inch) Metric Size(8-22mm), 95 Piece, CR-V Steel Deep&Shallow Kit, Adapters, Ratchet Handle, Screwdriver Bit Set, Spark Plug Socket, 6 PointCheck the Price6 in 1 Screwdriver set with Comfortable Non-Slip Grip, Multi-tool Screw Driver Bit Set multipurpose, All in 1 Nut Driver with Phillips/Slotted Super Quality Steel Bits, with Built-in bit holder6 in 1 Screwdriver set with Comfortable Non-Slip Grip, Multi-tool Screw Driver Bit Set multipurpose, All in 1 Nut Driver with Phillips/Slotted Super Quality Steel Bits, with Built-in bit holderCheck the Price


Note: The author may receive a commission from purchases made using links found in this article. “As an Amazon Associate, Ebay (EPN) and/or Esty (Awin) Affiliate, I (we) earn from qualifying purchases.”


Thursday, April 15, 2021

How to Etch Copper - DIY Review


etched copper with bee design

Have you ever found yourself admiring a gorgeous piece of etched copper jewelry?  I know I have.  A few months back I decided I wanted to learn how to create my own custom copper gifts.  As a maker, I crave opportunities to pursue new avenues of artistic expression.  

After exploring various techniques for etching copper, I chose to try a method that appeared to be one of the very best for beginners.  Having just experienced a successful first experiment, I wanted to share the process for the benefit of other aspiring copper artisans.  Here's a list of the supplies you will need:

  1. Small sheet of copper (or copper blank).
  2. Ferric chloride (I used Radio Shack PCB Etchant Solution).
  3. Rubber stamp (a link to the bee stamp featured here).
  4. Ink pad (I prefer the StazOn Solvent Ink Pad).
  5. Black permanent marker.
  6. Clear shipping tape.
  7. Two small plastic containers.
  8. Water.
  9. Baking soda.
  10. Chemical-resistant gloves.
  11. Eye protection.
  12. Brillo pad.
  13. Fine steel wool.
piece of copper and steel wool

Step One
: Prep the copper.  It must be clear of fingerprints, tarnish, etc., to make a good etching.  I used fine steel wool to clean up my copper blank.  You will want to wear gloves during this step (to ensure you don't leave prints on the surface of the metal).


drawn stencil on copper

Step Two
: Select your design and transfer it to the copper (either freehand using a fine permanent marker, or with the use of a rubber stamp).  Allow adequate time for the ink to fully dry.

Step Three: Using a permanent marker, completely ink over the back of the copper blank (and the side edges).  Anything that is not protected with an ink resist will etch.  Once the ink has dried, overlay it with clear packing tape.  Then, tape a piece of styrofoam to the back side of the copper ( to help it float and to provide you with a handle for safely lifting the copper out of the etching acid).


etching solution

Step Four
: In a well ventilated area (outdoors is best), pour an inch or so of the ferric chloride solution into a shallow plastic container (wearing chemical protective gloves and eye protection).  Carefully set your copper (design side down) on the surface of the etching solution.  You want it to float on the surface.

Step Five: Depending on how pronounced you want your etched design to be, you will leave the copper in the etchant solution for anywhere from 30 minutes to an hour.  Gently stir the solution every 15 minutes.  I went the full hour for my etching and was really pleased with the result.

acid solution for etching copper

Step Six
: In a clean plastic container, mix warm water with two tablespoons of baking soda (I used about a cup and a half of water).  Wearing protective gear, carefully remove the copper from the acid solution and gently set it into the water bath.  It will start bubbling as the acid is neutralized by the baking soda.  This step takes less than five minutes.


etching copper

Step Seven
: Remove the copper from the soda bath and rinse with clean water.  When dry remove the packing tape from the back side.


remove ink residue from stenciled copper

Step Eight
: Using a Brillo pad, rub off the ink residue on both sides of the copper.  

Step Nine: Use fine steel wool to brighten up the copper and reduce minor scratches.

Step Ten: You may wish to apply an optional patina to the copper and/or a protective seal coat to keep the copper from tarnishing.  Some copper artisans like the darker antique look achieved using liver of sulphur.  

stenciled design on copper

As you can see, with the right supplies and just a few hours of effort, it is fairly easy to produce a very satisfying result.  I am pleased with this copper etching method and will most definitely take it to the next level with a more advanced project.

If this has stirred an urge to create something unique, you may be interested in my article about painting on copper with fire.  No matter what you decide to do, the important thing is to find your own outlet for creative expression.  There is so much beauty just waiting to be released into the universe.  Let the beauty of who you are be what you release into the world.


Note: The author may receive a commission from purchases made using links found in this article. “As an Amazon Associate, Ebay (EPN) and/or Esty (Awin) Affiliate, I (we) earn from qualifying purchases.”


Tuesday, February 2, 2021

Home Storage Cabinet

Home Storage Cabinet
Home Storage Cabinet - Reviewed

Sometimes finding more storage space in your home can be a real challenge. As a Christmas gift, our daughter got us three sets of large bath towels.

Now, the challenge for us was where to put them. We decided on a small storage cabinet for our bathroom. I measured the space we had available and we began to search.

We decided on this Bar Cabinet with wine storage from Bush Industries. Now I know this sounds crazy you are probably wondering why on earth would we buy a wine storage cabinet for bath towels.

Well, let me tell you why. This is the most versatile storage cabinet I have ever seen. It measures 32-inches wide which is a perfect fit for the space we had available. The 42-inches high was great because Fran did not want a tall cabinet, and 16-inches deep makes it a perfect fit for the large towels.

This cabinet is designed to be used for a variety of uses. You can use this cabinet as a Coffee Bar, or Wine Cabinet, or general storage in an office, kitchen, or bathroom. So, if you are looking for some added storage around the house this cabinet will fit the bill.

Wine and Storage Cabinet Features:

Two accented glass doors with tempered glass.

Three fixed shelves.

Four adjustable shelves.

The Stemware rack will hold a dozen 12-ounce wine glasses.

The shelves will hold nine bottles of your favorite wine.

Wine Storage Cabinet

Bush Industries is a leading manufacturer of ready-to-assemble furniture for your home, office, or business. Offering a variety of desks, workstations, bookcases, storage furniture and so much more.

The unit was very well packaged, I found no damaged parts. Every part was labeled and easy to read. Each piece of hardware was packaged separately and labeled with the part numbers so there was no guesswork as to what screw went to what part.

The instructions were quite easy to follow and they tell you what steps to skip if you’re just setting the cabinet up as a storage cabinet.

The above photo is from the instruction sheet. On the left, it shows just a storage cabinet, on the right, it shows the wine cabinet.

When I first saw this I was concerned, I thought how am I going to know how to set this up without the wine storage. 

But not to worry, as I stated above the instructions tell you what steps to skip to set the cabinet up for just storage.

After we set this up as our bathroom storage for the towels. I assembled the adjustable shelves with the wine racks and set them on shelves in my basement. Now I have a wine rack for nine bottles of wine.

Bush Furniture Bar Cabinet with Wine Storage, Pure WhiteBush Furniture Bar Cabinet with Wine Storage, Pure WhiteCheck the Price

 p


Find more product reviews here: ReviewThisProducts.com

For more Decor Ideas on ReviewThis: ReviewThisDecor.com


Note: The author may receive a commission from purchases made using links found in this article. “As an Amazon Associate, Ebay (EPN) and/or Esty (Awin) Affiliate, I (we) earn from qualifying purchases.”


Tuesday, January 19, 2021

How to Plan for a Move


How to Plan for a Move
How to Plan for a Move - Reviewed
Getty free images

Moving is a daunting and stressful task. I've read that moving is one of the most stressful things that you'll ever do. So, if you’re going to be moving here are some helpful tips and tricks that I’ve learned from doing this several times myself. I’m by no means a professional mover; these ideas are based on my own experiences.

 Moving from one end of town to the other is stressful enough. When you move away from your home to another town it’s really tough. There are many more things to consider.


There are so many things to consider, where do you start?

My best advice is to start by making a list of things that you'll need to do. In other words, begin to make a plan. These things don’t need to be in any specific order right now, just start to write things down. 

Following are some things that you’ll need to consider:

  • If you're hiring a moving company make sure to read and understand all of their policies. Look for online reviews and make sure they are reputable. 
  • A new school for your children, this was always number one on our list. Especially if you're moving to another city. When we moved from Pennsylvania to Western New York this was a high priority for us. You'll need to get all of their school records transferred to the new school.
  • New Doctor and Dentist for you and your children. You'll need to transfer all medical records.
  • Change your address and forward mail to the new address.
  • Finding a new neighborhood, everybody wants to live in a nice area. Find a local realtor in the new city to help with this.
  • New bank or credit union for checking and banking.

Moving companies will do everything including packing for you. packing is something we always did ourselves. Most people don't want strangers packing their belongings.

Things you'll need are boxes, packaging material, such as bubble wrap, or kraft paper and tape. My preferred packaging material is bubble wrap and it is expensive. 


Packaging Material Tip:

To save some money, check with small to mid-sized manufacturers in your area. Most times these places receive materials with packaging such as bubble wrap and often throw it away. Most times all you have to do is ask and you can get it for free.

Double Wall 18x18x28Double Wall 18x18x28" Heavy-Duty BoxesCheck the Price

For dishes and breakable items, you'll want to use these double-wall corrugated boxes. The double-wall gives you added protection for anything that's breakable.

Wrap dishes in paper or bubble wrap and place them on end, not flat and stacked. Cups and glasses should be standing up.

Make sure that you fill all empty spaces with paper or bubble wrap so dishes, cups, and glasses can't move.

These boxes are expensive so, you only want to use them for kitchen breakables and other breakables such as lamps, vases, and pictures.


Small Moving Boxes - 16x10x10 - Cardboard BoxSmall Moving Boxes - 16x10x10 - Cardboard BoxCheck the Price


These are the perfect size boxes for heavy items. Such as books, tools, CD's, silverware, canned goods.

The idea here is that the box is small so it will fill up fast and the box won't be too heavy to handle. The last thing you want to do is overload a box.

You can also use these boxes for pots and pans since they are not breakable items.


For blankets, sheets, pillows, and clothing look for wardrobe boxes 20 x 20 x 34 with a bar for hanging clothing. These are much larger but the items are light. These boxes are also expensive. You hang your clothing and then pack pillows and blankets on the bottom.

Moving within your current area is one thing but if you're moving to another city or state it takes a little more planning. If you're planning a move I hope you find these tips and tricks helpful.


Find more DIY tips on ReviewThis Here: ReviewThisCrafts.com

You'll need to decorate your new home see these decorating tips on Review This Here: ReviewThisDecor.com


Note: The author may receive a commission from purchases made using links found in this article. “As an Amazon Associate, Ebay (EPN) and/or Esty (Awin) Affiliate, I (we) earn from qualifying purchases.”


Wednesday, November 11, 2020

Home Made with Love, Christmas Crafts to Blow Your Mind

Christmas has already exploded on the scene and I usually don't jump on board until the First Week of Advent!  But, if you are crafting, you need to start before then!  Cricut, a product review!

christmas tree and christmas stocking on the mantel


Cricut is a platform that lets you make and style so many different materials that you can use to enhance the decor in your home for just about any occasion.

Because we are so close to Christmas, we will focus on this holiday for now.  Rest assured though, that Cricut is not just for Christmas.  You can craft all kinds of things for other holidays too.

So what exactly is Cricut?  

Cricut is a machine that cuts several different types of materials, from fabric, to vinyl and even some thin wood products.  You can cut letters, designs, logos and so much more with this handy machine.  

Paired with your computer, you can make your own designs and within the day have a whole series of items made with that design splashed on T-shirts, mugs, windows and more.  Your imagination is the starting point.

Personalized gifts are easy and the WOW FACTOR is what makes your gifts stand out.  

Do you need inspiration?  There are limitless possibilities with a Cricut, but if you are stumped there are literally hundreds of Videos available to twig your imagination into overdrive.


Any new technology can cause some trepidation, but once you own a machine you will find many videos on YouTube to help you get started.  There are so many videos available and also  help from Cricut itself.  There are idea books, downloads and more to help you organize and execute your first project without any difficulty!

I'm sure you have seen those beautiful signs with Quotes that just make your heart melt!  Well you can make your own using the Cricut machine.  

Merry Christmas written on chalk board


Cricut even has it's own blog, so that if you are stumped or need some extra encouragement, it is right there for you! 

You can join the Cricut family and open an account.  That will help you to see what is possible with your new machine. They will keep you informed on all kinds of new techniques and materials.  Everything from wall art, decals, t-shirts, mugs, greeting cards and more can be done with your new machine.  

The only thing that will be necessary is a willingness to learn and the time to execute your ideas.  Once you get started though, I'm sure you won't be able to stop!  

Just think of all the Holidays that you can make special with a touch of your creativity and the help of a Cricut.

Chirstmas, Valentine's Day, Easter, Spring, July 1st or 4th, Hanukkah, Kwanzaa and so many more holidays.  And then there are the special occasions too that will have you crafting something wonderful.  An engagement, wedding, baby, new home, new job.  Birthday markers like 20, 30 and beyond, all of them are crafting times and a great way to use your new tools.  

I don't like to spend my money on a craft that I will only do once!  Cricut is a craft that you will do all year long and for a myriad of reasons!  

The beauty is, that if you can imagine it, you can also craft it and make it your own!  There are endless ways to make your home and surrounding a reflection of your own personal tastes.  Grab hold of some wonderful ideas and run with them.  I bet all your friends will be amazed at what you can do.

miracles quote


You might even find yourself using your spare time to create beautiful things to make and sell.  Before you know what happened, your hobby has now turned the corner and you could be enjoying self employment.  You just never know what can happen when you start to create with your Cricut and show the world what you have made.


The picture used in this post is my niece's home!  She has made signs, stockings and pillows to help her fill her home with Christmas!  And that is just a small sample of the things she has made.   What is stopping you?

Shop The Best Machine Prices of the Year 

Happy Holidays and Let's Get Creating Some Beauty!


Note: The author may receive a commission from purchases made using links found in this article. “As an Amazon Associate, Ebay (EPN) and/or Esty (Awin) Affiliate, I (we) earn from qualifying purchases.”


Monday, November 2, 2020

Reviewing Beginning Soap Making Molds

My soap-making adventures began recently. Two weeks ago I wrote a Beginning Soap Making Supplies review recommending melt and pour soap bases for people like me who have wanted to make soaps but are intimidated by the hot and cold processes that use lye. It is true that soaps made with those processes can more easily be textured or their colors swirled. That made me feel as though I would be missing out on making pretty soaps. I was wrong. I cannot do color swirls as easily with melt and pour soaps but I can make beautiful soaps using these silicone molds.


If I am making soaps for myself, the simple rectangular molds (as pictured in my previous post) are perfect. But when thinking about making soaps for gifts or for sale, I quickly wanted more interesting molds. 
I made the decision to purchase more silicone molds since the rectangular bar soap silicone mold made such nice soaps. 

The reasons I purchased these most recent molds:

  • Silicone molds produce smooth soaps 
  • silicone molds come in a variety of shapes, sizes, and designs
  • the withstand the heat of the hot soap bases
  • they do not crack or break
  • soaps are easy to pop the finished bar out of the flexible mold
  • I have not yet learned how to measure the soap mix to fit into a "loaf" pan - I do not feel as concerned about having the right amount of "batter" for these single-bar molds
  • the silicone is super easy to clean. I pick off any larger bits of soap remaining on the tops of the mold (the "overflow" or drops of soap I left behind) then I run the mold under hot water. Voila, the mold is clean and ready for the next use.

My first choice of fancy molds were the flower molds. And I couldn't be more pleased. With these soaps I shave a bit of a solid color bar (using Shea or Goat Milk base) I made (using the plain single bar molds). Then pour over those shavings with a clear soap base. 

I think the flower molds are gorgeous! And I've only used the flower that looks like a Dahlia thus far. This mold includes three different flower styles. To me they appear to be a sunflower, a daffodil, and a dahlia. 


I also purchased the ocean waves silicone mold. It produces a larger bar of soap with a "wave" or engraved style top. In this example, I used one of the clear bases and stirred in fragrance, bits of tea leaves, and a mica powder that creates sparkle. 


I do not feel experienced enough to give the instructions for using Melt and Pour soap bases. There are many tutorials online (written and video). I strongly recommend watching a variety of tutorials before diving in. 

Many people enjoy receiving or buying handmade items. Crafts such as soap-making is a great way to spend quality time with kids (note: the melted oils are HOT, please supervise children closely). Whether you have considered making soaps for yourself or for others, these molds add something special to your project. 

Related Links - Make your own with these craft supplies:

My Beginning Soap Making Supplies review. I was happily surprised at how few supplies it takes to make Melt and Pour soaps. However, once you begin, if you are like me, you will soon want many different molds, fragrances, and bases. 

The holidays are approaching. These Easy Christmas Ornaments from beads have been a favorite and a requested activity over the years. Kids (and adults) love using tri-beads and pipe cleaners to make these beautiful ornaments. 

Margaret wrote a wonderful step-by-step tutorial showing us how to make beaded, dangling earrings. Her earrings are a beautiful Romantic, Beaded Heart pair but you can use a variety of bead colors and shapes.                                             

Our own Ms. Sylvestermouse also loves crafts and making things. Her Ebay store, House of Sylvestermouse, is a great place to find "a variety of crafts, craft kits, patterns, books, and supplies...".  I especially like the beaded craft kits and the cross-stitch kits. Oh, if only there were more hours in each day... 

Related Links - Some Handmade Items for sale: 

If you want to give handmade items as gifts but do not have the time or inclination to make them, there are plenty of options from our contributors and friends.

Ms. Elf creates crochet (including amigurumi animals) and needlework gifts and offers them for sale at CoastalCrochetCrafts.  Ms Elf's daughter-in-law also has an Etsy shop names Cute PurseNalities that offers "handmade purses, lanyards, coin purses, and table runners".  The seasonal prints are adorable and I especially like the season print purses/tote bags. 


Note: The author may receive a commission from purchases made using links found in this article. “As an Amazon Associate, Ebay (EPN) and/or Esty (Awin) Affiliate, I (we) earn from qualifying purchases.”


Monday, October 19, 2020

Reviewing Beginning Soap Making Supplies

 I have always wanted to learn soap-making but have been intimidated by the recipes and working with lye. This year I tried an even more basic soap-making process with Melt & Pour soap base. I completed two batches using this easy method. It was an excellent start and required only a short list of supplies.


I ordered the Honey Melt & Pour Soap Base, a silicone soap mold, and a mixing cup with a pour spout. I already had essential oil, inexpensive mixing spoons, a spray bottle with rubbing alcohol, a cutting board and a knife.  The only other thing needed is a heat source. Most people use their microwaves for this process and some use a double boiler pan on the stove. 

The shortened version of melt & pour soap-making is:

  • purchase a melt & pour soap base
  • cut that base into small chunks and melt in the microwave using very short bursts of time
  • once melted, add in a very small amount of essential oil 
  • stir very gently (in order to avoid making bubbles)
  • pour into a soap mold
  • spritz the top of the soaps with alcohol (this removes the bubbles and is not a required step)
  • allow soaps to dry before removing from the molds

The Melt & Pour soap bases come in a variety of ingredients. I chose the honey base first. And so far it has been my favorite. I have since used a Shea Melt & Pour base. 

I used this silicone soap bar mold and I like it a lot. It came in a pack of 3. 


With the silicone soap mold, the bars popped out easily (pushing them from the back side) once they dried. Also, with 3 molds, I didn't feel pressured to make then pour the exact amounts needed for the mold. I just poured bars of soap until my mixture ran out. I made small batches so that was only about 6 bars of soap. 

Using Melt & Pour soap base is a great way to get over your fear of beginning soap-making. After I made 2 batches of soap using this process, I did move on to making a batch of soap using lye.

Soap making with lye can be done using either a hot process or a cold process. I used the cold process as it seemed the next natural step after using melt & pour. Someday I'll advance to the hot process of soap-making using lye.

In addition to using Melt & Pour as a beginning step in learning soap-making as a hobby, I highly recommend this as an activity to do with the children. Note: the melted soap base is very hot so children should be fully supervised and assisted. But like cooking and baking, making soap would be a great quality time activity with the kids. 

I do not feel qualified to instruct you in making Melt & Pour soap. There are many video tutorials if you search using the terms "melt and pour". I do highly recommend the honey base I've shown and the silicone molds I purchased. The initial cost for these items is not too high. And when finished, you'll have your own soap to use. 

With a little creativity, you can personalize your soaps. I used my favorite spiced orange essential oil in one batch. In another batch, I added some pulverized tea leaves and aloe vera from my plant. That batch ended up as an ugly bar of soap in appearance but I LOVE what it does for my skin. Melt & Pour is limited in that you cannot add large amounts of additional ingredients or you will change the ratio that is what makes it soap. However, just a few drops of essential oils goes a very long way. 

If you have been wanting to try soap-making, but haven't yet, consider giving Melt & Pour a try.

My first batch of soap: Honey Melt & Pour base.


Note: The author may receive a commission from purchases made using links found in this article. “As an Amazon Associate, Ebay (EPN) and/or Esty (Awin) Affiliate, I (we) earn from qualifying purchases.”


Wednesday, September 16, 2020

When is the Best Time to Learn Something New? September Sewing Month

September is Sewing Month and a Great Time to Learn Something New!

Fall Season has arrived and the evenings are getting so much cooler that spending lots of time outdoors isn't quite as appealing as it was in July.  So what are you going to do with all those evening hours?

If Television isn't your thing, then learning a new craft just might be.  I know I love to keep my hands busy and sewing is one of the ways I do just that.
stuffed animals in a wicker basket
                                                  
Image by Larisa Koshkina from Pixabay

Now, I must admit to you that sewing had been a big part of my life.  Before my retirement I was a designer/dressmaker for many, many years.

I was taught the craft by my mother, and by several courses taken from my early teens and beyond.  Each course building on what was taught previously.  

My grandfather used to say, "Learn something that you can do with your hands so that if need be, you would have a "job" using your talents. No one can take that away from you."    I think he was pretty wise with those thoughts.

Sewing is a talent that everyone can develop if they have the will to do so.  I know my very first attempts at learning how to sew, were used to make my room, mine.  I loved pillows and crazy colors.  So with my need to personalize, my mother wisely let me choose some fabrics that I loved and encouraged me to experiment with her sewing machine.  Of course I had her help (I was only seven or eight years old at the time). 

My point is that if a child shows a willingness to learn something, we as parents or grandparents can help them along by imparting our knowledge to them.  Arts of any kind require an inquisitive mind.  Children are always curious about all kinds of things.  It's a great time to teach and have fun without pressure!  At the same time, our kids learn that originality and creativity can go hand in hand in many different ways.  

While sewing and sewing skills are geared more for girls, I think that boys should have the ability to learn too, if they are so predisposed to do so.  Many of our esteemed fashion designers are men!

To help with this avenue for creativity, there are several kits available that girls and boys may find interesting.  I like these two for a starting point.  Pictures feature both girls and boys making and sewing their own creations.


The first book is geared to teaching some hand sewing techniques, while the second book includes the use of a sewing machine as well.  Depending on your children's motor skills and how well they can handle each task, you may like one better than the other.  **I will add a caution hereParents and/or Grandparents should be able to sit with the children while they are making these items.  There are sharp instruments involved and extra precautions should also be in place.**

If they are new to sewing, start with the first book and then when they have mastered or expressed that they really like this kind of craft, you can move to the second in the series.

Who knows if you will be the one to spark a new hobby, that could lead to much bigger and more beautiful creations.  

What started out as a pillow in my case ended up with me designing and executing some beautiful gowns, dresses, suits and so much more.  I made a nice living doing something that I enjoyed and also gave pleasure to my many customers over the years.

You never know the power you have to guide and form a new designer, they could end up on Making the Cut! (Our own Tracey, did a review on this show and it is quite a revelation in how many got started in the sewing and tailoring business)

Children love to learn new concepts and this is one that they can take with them into adulthood.  Mending and remaking clothes for the budget conscious may just become a "vogue" idea again.  Our days of "throw away everything" have got to stop.  Who knows where and when these skills will be put into practice as our children grow.  One thing is certain, there will always be a need for clothes and if you learn how, you can become quite a master!


I went from Pillows and Bedroom Decor to making beautiful gowns like this one!  Just one gown from my archives!  This was for a graduation and it's still one of my favorites.
yellow formal dress

Whatever you do, don't underestimate the joy that spending quality time with your children and grandchildren can have.  It will be memories for you and for them and teach them a really important life skill.  


Note: The author may receive a commission from purchases made using links found in this article. “As an Amazon Associate, Ebay (EPN) and/or Esty (Awin) Affiliate, I (we) earn from qualifying purchases.”


Sunday, September 13, 2020

Craft Reviews, DIY & Craft Tutorials on Review This Reviews!

Craft and DIY Tutorials reviewed
Treasures from the Archives of Review This Reviews! 


We are blessed to have several experienced crafters on Review This Reviews!  Not only are we home to a few crocheters & stitchers, but we are quite proud of our contributors who make their own DIY craft projects.  We all get pretty excited when a new and original craft tutorial is published here.   It is awesome to be surrounded by such creative talent.

If you would like to make an original cat bed, Renaissance Woman shared her very own creation and tutorial.  She has also taught us how to make a gorgeous birdbath and bird-feeder for our gardens.

If you prefer creating beautiful crafts from kits, our contributors have reviewed some pretty awesome kits that make crafting easier for anyone.  Some are made just for kids, while others will appeal more to adults.  Children can enjoy painting rocks or make a water globe, to name a few, while adults may prefer the challenge of a Quilt Magic kit or beaded ornament kits.  Plus, Bev reviewed a paper flower kit that is recommended for children, but adults would also enjoy.

If you don't wish to be confined to the contents of a kit and would rather select your own fabrics & embellishments, you will find multiple tutorials for creating a craft using your own materials & supplies.  Dawn shared a very popular detailed tutorial for making easy Christmas ornaments, while Mickie shared how to make a mosaic flower pot with tiles, broken dishes or pottery.

In addition to kits and tutorials, a few of our contributors have opened Etsy stores and sell their own handmade items.  They make awesome gifts and home decor.


Plus, there are many craft books, patterns, craft supplies, and featured offsite craft projects reviewed right here on Review This Reviews.  


Join us in our creative world of Crafts, DIY & Tutorials!


A Review This Reviews Pinterest Board - Craft Reviews, DIY & Craft Tutorials


The board below features 30 of our most recent reviews.


Note: The author may receive a commission from purchases made using links found in this article. “As an Amazon Associate, Ebay (EPN) and/or Esty (Awin) Affiliate, I (we) earn from qualifying purchases.”


Most Recent Reviews on Review This Reviews


Search for Reviews by Subject, Author or Title

The Review This Reviews Contributors


SylvestermouseSylvestermouseDawn Rae BDawn Rae BMbgPhotoMbgPhotoBrite-IdeasBrite-IdeasWednesday ElfWednesday ElfOlivia MorrisOlivia MorrisTreasures by BrendaTreasures by BrendaThe Savvy AgeThe Savvy AgeMargaret SchindelMargaret SchindelRaintree AnnieRaintree AnnieLou16Lou16Sam MonacoSam MonacoTracey BoyerTracey BoyerRenaissance WomanRenaissance WomanBarbRadBarbRadBev OwensBev OwensBuckHawkBuckHawkDecorating for EventsDecorating for EventsHeather426Heather426Coletta TeskeColetta TeskeMissMerFaeryMissMerFaeryMickie_GMickie_G


Review This Reviews is Dedicated to the Memory of Our Beloved Friend and Fellow Contributor

Susan DeppnerSusan Deppner

We may be apart, but
You Are Not Forgotten


“As an Amazon Associate, Ebay (EPN) and or Etsy (Awin) Affiliate, I (we) earn from purchases.” Disclosure Statement

X