Showing posts with label Crafts & DIY. Show all posts

Monday, April 6, 2020

Crochet: Using Those Leftover Yarn Balls

As soon as I crocheted the first afghan for my grandbaby I had thoughts of using that leftover scrap yarn to make a throw. A sentimental way to keep pieces of their blankets for myself. Now is the perfect time to do it and I've made huge progress on my own afghan. I want to share the super-easy idea with you.

using my scrap yarn to make something special for myself

I crocheted afghans with VERY different colors for my three grandbabies. As a result, I kept my idea of using all of the scrap yarn (orange, purple, white, pink, and a variety of "under the sea" colors of tans, blues, and greens) in one project to myself. I adore rag rugs. So I suppose it wasn't a far jump to crocheting a blanket with this odd color combination. It was just a matter of finding the crochet pattern I'd want to use. But this kind of wild color combination...who does that?

Apparently, a lot of people do! 

There is even a name for this particular blanket - Scrapghan.

In searching for patterns, I find that making scrapghans is a fairly popular thing to do. And using a wide variety of colors that may not typically go together can lead to some beautiful projects. In addition, these projects save odd bits of yarn from being wasted and ending up in the local dump.

Personally, I have the best luck with learning new projects via video crochet tutorials. Sometimes it is a bit frustrating finding a video with someone whose teaching style matches my learning style but I've always managed to find someone eventually. If you have thought about using your scrap yarn to make a blanket, Ophelia tells us about her scrap blanket (and uses the Granny Stripe).

Ophelia Talks About Making a Scrap Blanket (Ophelia Talks):


If you are interested in learning the Granny Stripe stitch, I recommended viewing  How To Crochet Granny Stripes, episode 246 (Fiber Flux):


I prefer the look of the "granny stripe" patterns with the different colors of scrap yarns. In addition to creating a wide stripe of each color, the pattern works up very quickly. I also personally think that a granny stitch creates a "softer" blanket than a straight single stitch. I already know that this is a project that will create a functional and meaningful blanket I will treasure.

Related Links:

Colors from Ardin, Harper, and Bentley's blankets
For my grand-daughter's baby blanket, I used the Bernat Pipsqueak yarn. The yarn is unbelievably soft!  And when used with worsted weight yarn, in a lined pattern, the Pipsqueak creates a soothing sensory texture.  To see my Pipsqueak review click here. Notice that in 2017 I was already planning on using that yarn in a project for myself!

In two of the grandbaby blankets I made, I used the Done in a Day pattern by Dabbles & Babbles. I LOVE that pattern. It is easily adjusted for any size afghan and any size yarn. You can see my review of that pattern here

Of the three grandbaby blankets I made, I used the Under The Sea pattern for my grandson who is already on his way to being a marine wildlife expert! You can find my review for that fun crochet project here.


Note: The author may receive a commission from purchases made using links found in this article. “As an Amazon Associate, Ebay (EPN) and/or Esty (Awin) Affiliate, I (we) earn from qualifying purchases.”


Thursday, March 19, 2020

Make Your Own Public Restroom Survival Kit Reviewed

Make Your Own Public Restroom Survival KitProtect Yourself in Public Restrooms! 


My husband and I enjoy making day trips as well as traveling. What I hate most about traveling whether for a day, or even a week, is the necessity to use public restrooms.  

By now, we have all heard that you should use a paper towel to open the bathroom doors since so many people do not wash their hands before touching the door knobs.  As if that is not enough to make you cringe, I was recently told that drug addicts will clean their needles by poking them in the toilet paper in the restroom stall.  This takes things to a whole new level of contamination concern.  

To be fair, I did check Snopes to determine if needle cleaning in public restrooms is a valid concern and found that none of the health services questioned had ever heard of that happening.  Still, it made me hesitate to trust the provided toilet paper in public restrooms.

For me and my family, I have decided better safe than sorry.  After all, we know there are germs in any restroom.  With the flu, a multitude of viruses, and the concern for cleanliness, why take the risk if not absolutely necessary? 

Some might consider this an extreme and unnecessary precaution.  Perhaps it is.  But, like any other precautionary measure, if it gives you peace of mind, why not.  You are certainly not hurting anyone else by carrying your own public restroom survival kit.


Items Needed for Your Public Restroom Survival Kit

Make Your Own Public Restroom Survival Kit
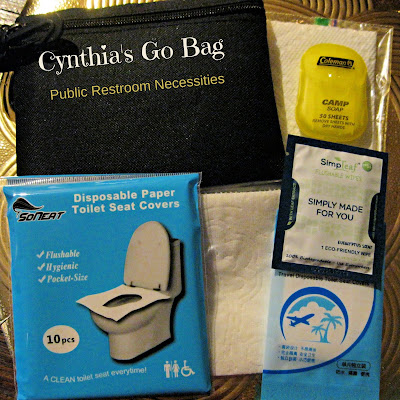
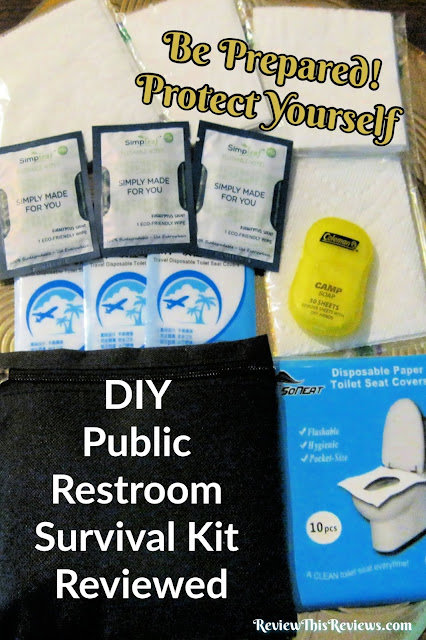
I assemble my own public restroom survival kit.  I include individually wrapped toilet seat covers, my own toilet paper in a sandwich bag, flushable single pack wet wipes, camp soap sheets, and a few of my own paper towels. 

I carry two different types of toilet seat covers.  One is the typical paper cover that you see in many public restrooms.  The other is a plastic toilet seat cover.  The plastic seat cover is not flushable, but I find it required in some public rest stops.  Even though it is made to encase the seat cover, I simply lay it on the seat.  If I won't sit on it, I certainly will not lift that seat to "gift wrap" it.

You all can stop laughing now!  No, I am not a germaphobe, but over the years I have truly seen some pretty nasty things in public restrooms.  I won't go into the graphic details and descriptions.  Suffice it to say, I've seen enough to know I believe in the proverbial "ounce of prevention".  In this case, I would alter that saying slightly to state an ounce of protection.

If you think I am alone in this concern, allow me to point out that Amazon.com even offers a pre-assembled public toilet kit.


In a pinch, I would totally invest in that "go bag"!  Because I have time to prepare my own survival kits packed with my preferred supplies, I don't mind putting them together myself.  

If you plan on traveling by plane, you may prefer a clear bag for supplies in your carry-on.  There are no liquids in my public restroom survival kit, but a clear bag might keep baggage inspectors from opening it and touching everything.  Hand sanitizer would need to go in your clear liquid carry-on bag.  If you are traveling by car, you can choose any tote bag.

I prefer a tote bag that will clip to my jeans belt loops or my camera backpack loops.   This is a nice inexpensive trio that I found.  I only need the medium sized bag in this set for my restroom survival kit, but I can always find different uses for the other two.
 

 50PCS Travel Disposable Toilet Seat CoversCheck Price Charmin Ultra Soft Cushiony Touch Toilet PaperCheck Price Simpleaf Flushable Single Pack Wet Wipes | Eco- FriendlyCheck Price Coleman Camp Soap Sheets, Travel Soap Sheets - 50 countCheck Price


How Do I Know I Am Not a Complete Germaphobe?


A real germaphobe would recommend two more items!  After all, the dirtiest places in a public restroom are the floors, the toilet handle, and the faucet.

Eek!  Perhaps I should rethink this!   After all, I do wear my shoes in the car and in my home!  And, those gloves and shoe covers are disposable.

 Dealmed Medical Exam Gloves – 200 Count Small Nitrile Gloves, Disposable GlovesCheck Price Blue Shoe Guys Professional Grade Disposable Boot & Shoe Covers BootiesCheck Price


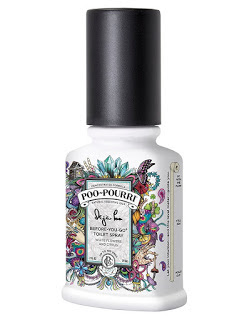
And if you really want to do things right, be sure to include your Poo-Pourri! It was previously reviewed by Dawn Rae and would make a fabulous addition to your public restroom survival kit. 
 
poo pourri

When you are out and about, be sure to be prepared, stay safe, and "rest" protected in those public restrooms!


Read More Health Related Reviews
Here On Review This Reviews!


House of Sylvestermouse


Note: The author may receive a commission from purchases made using links found in this article. “As an Amazon Associate, Ebay (EPN) and/or Esty (Awin) Affiliate, I (we) earn from qualifying purchases.”


Tuesday, March 17, 2020

DIY Hand Sanitizer Reviewed

Make Your Own Hand Sanitizer

Chances are you can't find hand sanitizer on your local shelves. Let me review how to make your own to use when soap and water aren't available to you. It is much easier than you might think!

hand sanitizer
DIY Hand Sanitizer
image courtesy of pixabay.com

We are all in the same boat with the flu & various viruses that terrorize the world. The importance of keeping our hands clean and the surfaces around us goes without saying. When it comes to being able to keep a bottle of hand sanitizer with us on those occasions that we have to go out for supplies is pretty much impossible. The hoarders and the opportunists have cleared the shelves across the nation. Not to worry, you can actually make your own.

What You Will Need:

  • 1 empty hand soap or sanitizer dispenser
  • Isopropyl alcohol (rubbing alcohol) 99% alcohol volume
  • Aloe Vera Gel
  • Essential Oil or lemon juice to make it smell nice (optional)
  • Large measuring cup with spout to mix and pour from

Hand Sanitizer Recipe:

3/4 cup isopropyl (rubbing alcohol)
1/4 cup aloe vera gel
10 drops of essential oil or lemon juice

Pour all of the ingredients into a large bowl or a measuring cup with a spout. Mix together with a spoon first and then whisk the solution to form a gel. Pour the mixture into an empty bottle for easy use and transport and then label it with the words "Hand Sanitizer".

That's it, it is that easy. Just a reminder that it is still better to wash your hands with soap and water for at least 20 seconds. Use the sanitizer when you are out and can't wash your hands. I like to place a dab on a tissue to wipe off the handle of the grocery cart before I place my own hands on it. 

Not sure how long the 20 seconds is? Sing the Birthday song through two times while washing your hands. Remember to pay attention to the tips of your fingers and between your fingers. 

Stay safe, follow the guidelines and we will all get through this together as a nation. 


Note: The author may receive a commission from purchases made using links found in this article. “As an Amazon Associate, Ebay (EPN) and/or Esty (Awin) Affiliate, I (we) earn from qualifying purchases.”


Friday, March 6, 2020

March is National Craft Month

Reviewing the Wonderful World of Crafting!

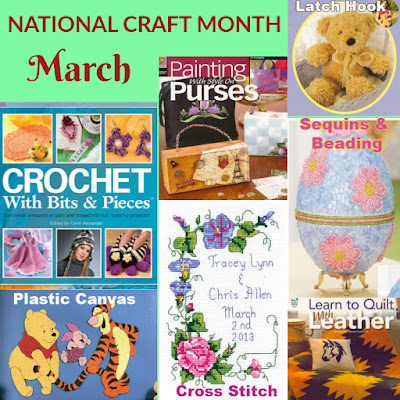
March is National Craft Month
As an avid crafter, I am thrilled to have a month for celebrating crafts.  Since March is filled with cold days kissed by spring, it seems like the perfect month for crafting.  

It is exhilarating to look out the windows at the beautiful days.  It fills us all with the desire and energy to do something.  However, March weather is not often cooperative, or conducive to outdoor activity. 

In my region, you never know what weather you will wake up to on any given day.  Some days we have beautiful spring weather bursting with new life in our flower beds.  Then the following day we can find ourselves thrown back into winter with ice and snow.

The spring days make you want to go outside, breathe in the fresh air, and have fun "running with the wind".  Unfortunately, when those days are followed by freezing weather, you find yourself stuck in the house still feeling that desire to do something.  I turn to my crafts and harness that energy while I wait for the warm weather to return. 


Fun Crafts - There's Something for Everyone


The wonderful thing about crafts is that there is a craft project for everyone.  For those of us who love needlework, there are a variety of options.  Sewing, quilting, cross-stitch, or embroidery fall under the category of needlework.  The beauty of many needlework kits is that they are often small and portable.  

Several of my fellow contributors enjoy crochet and working with yarn instead of thread.  That is also a craft that is portable.  Both Wednesday Elf and Dawn Rae have Etsy stores where they sell their beautiful creations.  

Avid crafters, like myself, tend to skip from one craft project to another.  Not only do we enjoy needlework, crochet or knitting, but we also explore the world of stenciling, painting, decoupage, flower arranging, latch hook, mosaics, beaded crafts, and many more.  

Regardless of the craft, it is always a creation made by our own hands.  Hours of love are often poured into whichever craft we choose and many finished projects turn into treasures for a lifetime and passed down for generations. For such a worthy endeavor, a month is not really enough time to celebrate, but it is a great beginning.

Here are a few websites you might enjoy visiting when you are ready to select a craft, kit, or pattern.  The tutorials on Crafter's Kingdom will make it easier to learn a new craft too.


The Business of Crafts


Because of my own love for a variety of crafts, like Wednesday Elf and Dawn Rae, I also opened an online store 19 years ago.  My craft supplies store is on eBay, which predated Etsy.  I love both sites and highly recommend either for selling or buying.


All of the craft kits, patterns, or books featured in the introduction photo, are available in The House of Sylvestermouse eBay store


House of Sylvestermouse


Note: The author may receive a commission from purchases made using links found in this article. “As an Amazon Associate, Ebay (EPN) and/or Esty (Awin) Affiliate, I (we) earn from qualifying purchases.”


Friday, January 3, 2020

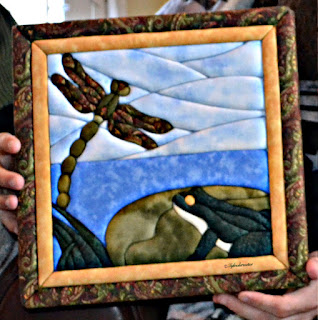
How to Make a Quilt Magic Kit Wall Hanging Reviewed

Last year I made a Quilt Magic wall hanging for each of my children for Christmas.  They turned out to be really beautiful gifts and a surprise that I hope my children will treasure.  

How to Make a Quilt Magic Kit Wall Hanging Reviewed
Quilt Magic Kits are awesome! They make a great beginner craft, as well as a unique project for more experienced crafters.  The kits take more time than you might expect, but that is part of the value of a finished project. 

I am well accustomed to working with fabric.  After all, I have been sewing since my early teens.  As an experienced crafter, I enjoy taking on new crafting challenges.  I tend to consider any new craft technique a call to action.  The Quilt Magic kits caught my attention immediately and seemed to beckon me.  Needless to say, I answered the call.

I immediately purchased a fabulous Quilt Magic wall hanging to make for our son.  However, I needed one for our daughter.  It took me two years to find the right kit for her, but as soon as I laid eyes on the elephant Quilt Magic Kit, I knew I had finally found the right one.  Then the fun began!


Quilt Magic Kits


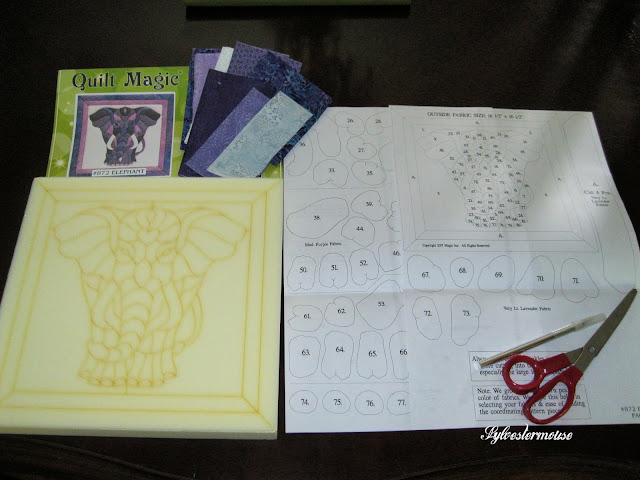
The kits include almost everything you need.  You will also need scissors, an iron, and a punch tool for pushing the fabric into the form.  You can use a dull kitchen knife, but I highly recommend purchasing the Quilt Magic punch tool separately.  A standard kitchen knife doesn't have a pointed end, which you need for some corners.


How to Make a Quilt Magic Kit Wall Hanging Reviewed
Kits Include:  Pre-cut Form, Easy to Follow Pattern, & Fabric Pieces (to cut)


How to Make a Quilt Magic Kit Picture


How to Make a Quilt Magic Kit Wall Hanging
I know you will be excited to get started on the project, but you need to iron the fabric first.  This is extremely important!  You will not want the fabric to be creased.  You need it to lay flat when "punching" it into the form. 

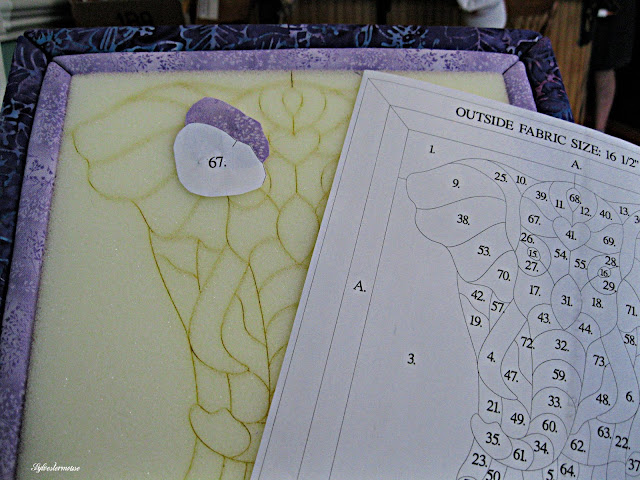
I cut out the pieces from each fabric, pinned their numbered pattern piece to the cut fabric, and placed them in a baggy until I was ready to add the piece.  I had a separate baggy for each fabric.

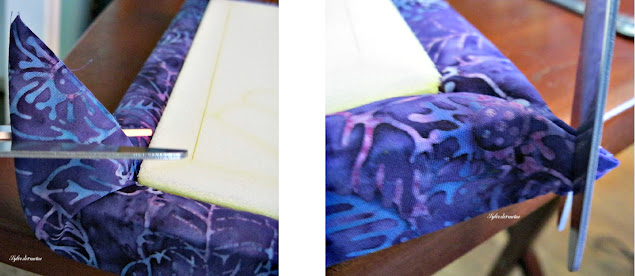
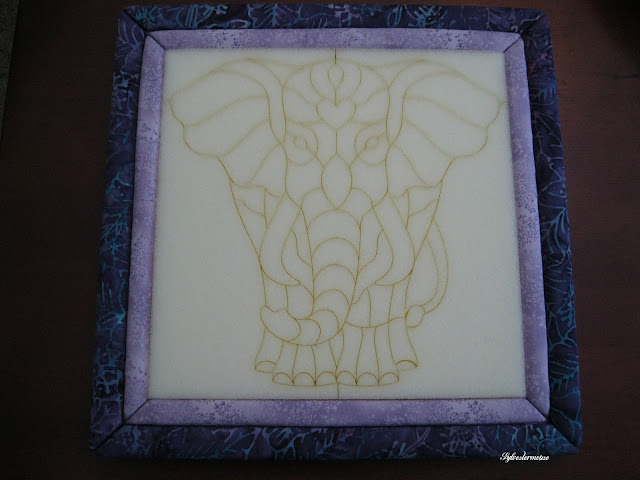
Start with the border & back.  The back piece is one large piece that you attach to the form by folding the ends over the front side and pressing the edges in the border grooves.  You will need to trim the fabric at the corners twice to make the fabric slip into the cut corner grooves.  Be careful not to cut too much off.  There is no extra fabric included for mistakes.

Note:  The corners of the form are not pre-cut deep enough to hold the fabric.  You will need to cut the corner form groove with a sharp knife per the enclosed instructions.  Otherwise, all of the grooves are pre-cut for you.

trimming the fabric corners
   
quilt magic border is finished

From here on, it is pretty smooth sailing.  You simply match the number on the piece to the number on the pattern and push the fabric into the pre-cut grooves for each section.


How to Make a Quilt Magic Kit Wall Hanging


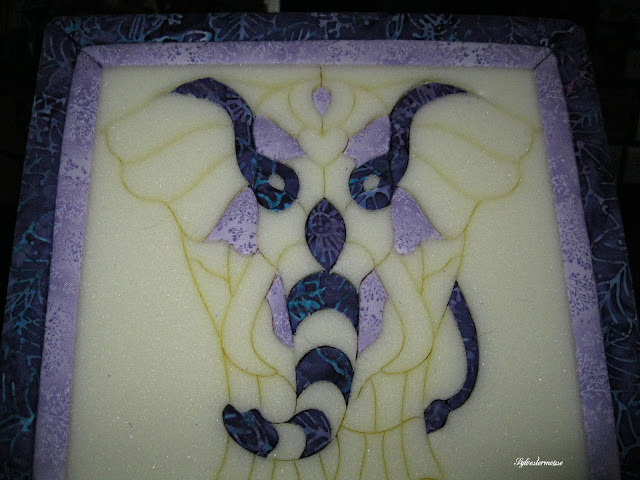
I opted to add the the pieces cut from each fabric all at one time.  However, you may prefer to add the pieces section by section, left to right, or whatever type of layout organization works best for you.  I have friends who would rather see the project come to life one area at a time.


making a quilt magic elephant kit


adding the cut fabric pieces to a quilt magic picture

 
The Quilt Magic no-sew kits are easy, but they do take longer than advertised to make.  Each picture kit took several days to cut and assemble, but the end results were definitely worth the time.

How to Make a Quilt Magic Kit Wall Hanging Tutorial
Quilt Magic Wall Hanging Gift for My Son
 
How to Make a Quilt Magic Kit Wall Hanging Tutorial
Quilt Magic Wall Hanging Gift for My Daughter

You may or may not wish to frame your finished Quilt Magic wall hanging.  Both of my children opted for a Quilt Magic Frame for easy hanging.  But, they are not necessary.


A Variety of Quilt Magic Kits Are Available


Quilt Magic Kits are available in many different styles, colors and themes. There are even holiday Quilt Magic Kits for those who enjoy holiday wall decor.

 Quilt Magic 12-Inch by 12-Inch Butterfly Kit, 11.75Check Price Quilt Magic 12-Inch by 12-Inch Happy Home KitCheck Price Quilt Magic Lion Kit, LionCheck Price Quilt Magic 10-Inch by 19-Inch Lighthouse KitCheck Price


See More Quilt Magic Kits by Clicking Here!


 Read More Crafts & DIY Reviews On
ReviewThisCrafts.com!


House of Sylvestermouse


Note: The author may receive a commission from purchases made using links found in this article. “As an Amazon Associate, Ebay (EPN) and/or Esty (Awin) Affiliate, I (we) earn from qualifying purchases.”


Thursday, November 7, 2019

DIY Pumpkin Succulent Centerpiece


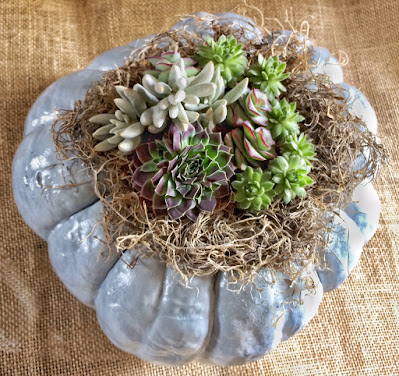
diy Pumpkin Succulent Centerpiece

It's pumpkin season!  Now is the perfect time to round up some pumpkins and create unique centerpieces as a festive touch for your holiday celebrations.  A DIY pumpkin succulent mini garden will be the perfect addition to your Thanksgiving decor.  Not only will it be a real attention-getter when you host guests for the holidays, but you will have the benefit of enjoying your new container garden long after you finish all those turkey left-overs.

Here's What You Need:
  1. One large flat pumpkin 
  2. A variety of succulents
  3. Clear gel glue
  4. Spray adhesive
  5. Moss
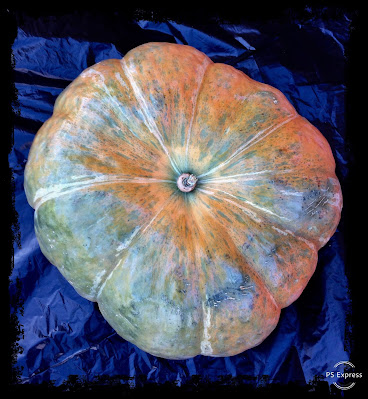
real pumpkin
It's best to use a flat pumpkin with a slightly indented center .
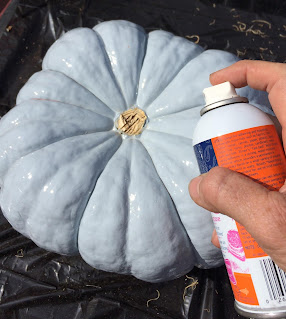
While I prefer to use a pumpkin in its natural state, I chose to paint mine for this demo project.  I used a lovely Solstice Blue paint color (a subtle blue-gray) that will blend in with the woodland theme I am using for my holiday decorations.  It reminds me of the beautiful shadows you see on fresh snow.  A neutral colored pumpkin better accents the succulents.

removing a pumpkin stem for diy project
Removing the Stem

Once the paint was dry, I used my Dremel with a cut-off wheel to remove the pumpkin stem. 

spraying on craft bond
Spraying on Elmer's Craft Bond 
I then sprayed adhesive on the center top of the pumpkin where the moss will be placed. 

pressing and gluing  moss on pumpkin
Press Moss Into the Adhesive
While the adhesive was still fairly wet and tacky, I pressed a nest of moss onto the sticky surface.  It seems I got a little moss happy.  Could have used a bit less moss, but it would have made a big mess to attempt to remove it.  I let the adhesive set for several minutes before moving to the next step.

cactus with roots showing
Preparing the Roots for Planting

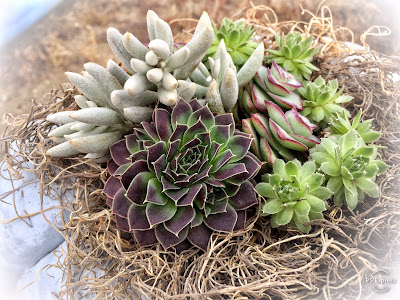
While the adhesive was setting up, I gently removed the soil from the cacti roots in preparation for planting them on the surface of the moss.  I also separated the succulent clusters so I would have more options for spreading out individual plants.

Pumpkin Succulent Centerpiece
Vary Succulent Colors, Textures, and Heights
Start your succulent placement with your largest plant.  Visually, it is most pleasing to the eye to position the first cactus off-center and toward the edge of the pumpkin.  It is also a good idea to group your taller cacti near that first featured plant.  You will use clear gel glue to fasten your succulents to the moss.  Don't worry!  The glue won't hurt your succulents.

mist the moss on a pumpkin centerpiece
Time to Lightly Mist the Moss
Once your pumpkin succulent centerpiece is complete, carefully give the moss a light misting of water.  You will provide moisture to the moss about once a week.  It's important not to let water pool under your plantings.  It will lead to premature rot.  Simply tip your pumpkin slightly to the side to drain any excess water after each misting.  

To extend the life of your pumpkin, and to give your succulents what they need, carefully choose a location away from heaters.  Try to situate your succulent container garden such that your cacti get the sunlight they need without getting too much heat on the pumpkin.  Likewise, take care to protect your succulents from freezing if you will be displaying your centerpiece on a porch or outdoors.

One last tip:  Place your pumpkin on a piece of cork or thick cardboard to keep the bottom from early decay (especially if placed in a location where surface dampness occurs).  Take care to protect your indoor furniture with the use of a waterproof planter mat.

With proper care, your pumpkin succulent centerpiece should last several weeks.  Once the pumpkin has reached the end of its season of life, you can either cut off the top of the pumpkin and plant it on top of appropriate cacti soil, or transplant the newly rooted succulent cuttings to another container.  Of course, you may also choose to use a faux pumpkin to eliminate this step.

It's easy to see why these pumpkin centerpieces are so popular.  Besides being unusual and visually stunning, they let you take your creativity to a whole new place.  This DIY centerpiece is sure to be a fun conversation-starter at your next gathering.  Why not make one to share for a hostess gift?  Who wouldn't love such a thoughtful gesture? 

Enjoy this project and my best wishes to you for a blessed holiday season.


Note: The author may receive a commission from purchases made using links found in this article. “As an Amazon Associate, Ebay (EPN) and/or Esty (Awin) Affiliate, I (we) earn from qualifying purchases.”


Tuesday, September 10, 2019

Flower Art For Kids Reviewed

Kids Making Flower Art

I found some flower art for kids to give to my youngest granddaughter for her birthday this year. She enjoys doing all sorts of crafty things so after reviewing some options, the kit that I purchased just seemed like a perfect match for her age and her personality.

flower-art
Flower art by mother nature
image courtesy of pixabay.com

The kit is called Random Acts of Flowers and fits my little sweet pea (pun intended) to a "t". I can see her making a small bunch of flowers to give to someone in a random act of kindness. She is so in tune with the emotions people are experiencing around her and would delight in making someone smile with a little gift.


Teaching Kindness With Crafts


The kit includes 75 sheets of tissue paper, 12 floral stems, 12 gift tags, a hanging vase and a bandit mask. Why the mask? This is supposed to be random and anonymous...besides kids love it. What is not included is a pair of scissors and you will also have to supply the kind soul of a child or adult. It is the most important ingredient in the mix!

So, making these flowers and then finding a place to hang them so that people can smile as they take one from the hanging bouquet is only part of the fun. Those gift tags that can be attached to a flower are supposed to have a message on them. The encouraged message is that whoever takes the flower is supposed to go do something nice for someone else. Don't you just love that?

Added to the benefit of spreading kindness one little action at a time is the fact that every purchase of one of these kits pays it forward a little more. A donation is made to a charity that takes re-cycled flowers along with words of encouragement to health care facilities to promote the emotional well-being to residents. I love that!


A Gift that Keeps Giving


Another thing I loved about this flower art for kids kit is that it plants that seed of kindness but it doesn't have to stop once the original supplies are used up. It is so very easy to buy more tissue paper. The children can make their own little gift tags and flower stems can be replenished. The hanging vase might be taken away but they can use their imagination to make another one. 

What do you think? Would you give a child a gift like this?


Note: The author may receive a commission from purchases made using links found in this article. “As an Amazon Associate, Ebay (EPN) and/or Esty (Awin) Affiliate, I (we) earn from qualifying purchases.”


Sunday, May 19, 2019

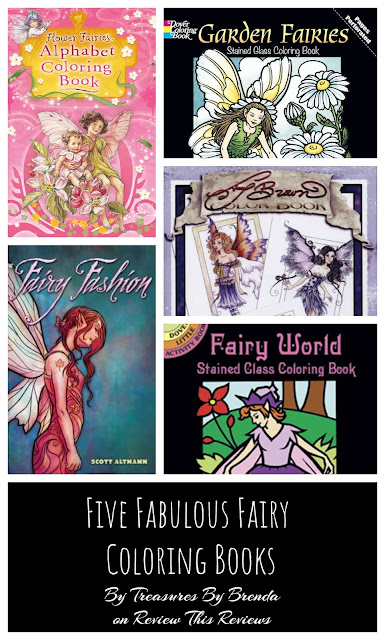
Five Fabulous Fairy Coloring Book Reviews

Five Fabulous Fairy Coloring Book Reviews
Fairies are so enchanting and the coloring books gathered here on this page are lovely. They will please both the children and adults in your life who love to color. They will not just please your child but will also let her develop her imagination while she has fun coloring the drawings. Some of these books will keep the user occupied for hours; others for a lesser time frame.

Any one of the coloring books on this page would be a great idea for Christmas gifts and stocking stuffers or even for birthday party favors at a fairy themed birthday party. There is bound to be a faerie coloring book here that your child will love and there are even some here that you will love. If you're giving one as a gift, be sure to include a box of crayons.

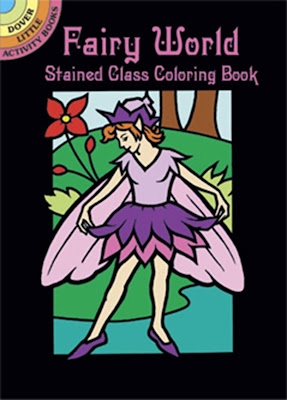
Fairy World Stained Glass Coloring Book


The first book shown here, Fairy World: Stained Glass Coloring Book, is a Dover Little Activity Book. It's a cute little book with thin pages that is recommended for individuals who are between the ages of Kindergarten and Grade 5. The pages are thin so that when you hold them before a light source, the light shines through, giving a stained glass effect.

As a Dover Little Activity Book, it is indeed a small book and not a full-size coloring book and it only has a few images. There is nothing wrong with that as long as you are aware of the fact and don't expect a full-size book.  It's also very affordable at just under $2, making it perfect for those stocking stuffers and party grab bags. Click here to find this Fairy World Stained Glass Coloring Book from Amazon.

Fairy World Stained Glass Coloring BookGarden Fairies Stained Glass Coloring Book

Garden Fairies Stained Glass Coloring Book


Darcie May has created this second beautiful Dover coloring book with fairies nestled among the garden. Once again once they are colored in you can take them to a light source and the stained glass will come to life. Beautiful and bound to be a huge success.

The Garden Fairies Stained Glass Coloring Book is suitable for children over 6 years of age. It has 16 pages done in black and white on parchment paper. Click here to find the Garden Fairies coloring book online.

Amy Brown Fairies Coloring BookFlower Fairies Alphabet Coloring Book

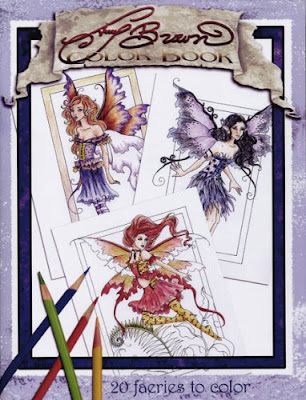
The Amy Brown Fairies Coloring Book


Amy Brown has been painting fairies for more than 20 years. Her artwork features detailed illustrations of fairies. Whether you are a little girl or a grown-up girl who is interested in fairies, you will enjoy this fairy coloring book, which is suitable for children of all ages. It has twenty one-sided pages that measure 8.5 by 11 inches. Click here to find Amy Brown's coloring book on Amazon.

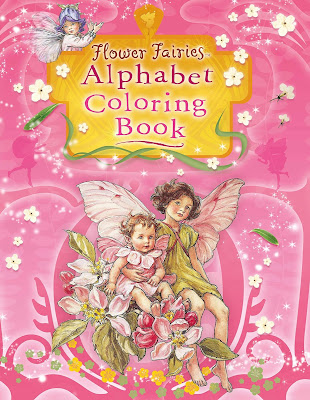
Flower Fairies Alphabet Coloring Book


Your youngster will learn her alphabet and the names of 24 of the most popular flower fairies as she colors in the beautiful pictures presented in the Flower Fairies Alphabet Coloring Book, which features the artwork of Cicely Mary Barker. This book has 24 pages and is recommended for children from Kindergarten age to Grade 2.  Click here to find the Flower Fairies Alphabet coloring book on Amazon.

Fairy Fashion Coloring Book

Fairy Fashion Coloring Book

The Fairy Fashion colouring book presents pretty fairies dressed in the height of fairy fashion. Your fan will love spending time bringing these images to life with color. There are also plenty of cats, squirrels, birds and their friends keeping them company.

The artwork in this book is by Scott Altmann. The Amazon customer reviews bounce around a bit so make sure to check them out before you buy. Many of the issues are with varying tastes for the style of the illustrations.

The Fairy Fashion Coloring Book is recommended for individuals 5 years of age and up. It is a Dover Coloring Book and has 32 pages. Click here to find the Fairy Fashion coloring book on Amazon.

Do you believe in fairies? Do you like fairies? What about coloring books?

See you
at the book store!
Brenda
Treasures By Brenda

More Fairy Reading:


Fairy Tale: A True Story Movie Review
A lovely family-friendly movie about fairies.

Were The Cottingley Fairies Real or Fake?
In 1917 in Cottingley, Yorkshire, England, a pair of young ladies named Elsie Wright (16) and Frances Griffiths (10) believed that there were fairies in their garden...

Abby Cadabby: Create A Sesame Street Fairy Gift Set

A Few Fairies on eBay
Discover a few select fairy-themed items in my eBay store, Treasures By Brenda.

Fairy Coloring Book


Note: The author may receive a commission from purchases made using links found in this article. “As an Amazon Associate, Ebay (EPN) and/or Esty (Awin) Affiliate, I (we) earn from qualifying purchases.”


Friday, March 29, 2019

Needle Minders for Needlework & Sewing Enthusiasts Reviewed

Needle Minders for Needlework & Sewing Enthusiasts
A few years ago, I was gifted with a beautiful needle minder.  At the time, I had no idea what a needle minder was, but I quickly learned what a fabulous aid a needle minder can be for those of us who love to sew and do needlework.

The best description of a "needle minder" that I can think of would be to refer to it as a needle magnet that attracts and holds needles.  

I couldn't begin to guess at how many needles I have dropped, and lost, over the years.  I have even been know to wash them simply because they were attached to a blouse I was wearing while sewing.  Let's face it, when we sew, we get interrupted.  The needle is stuck quickly into "something".  We may not get back to our work within the hour, or even on the same day and we have totally forgotten what we did with our needle.

Therefore, I now consider a needle minder an essential sewing & needlework tool. 


My Needle Minder


Needle Minders for Needlework & Sewing Enthusiasts Reviewed
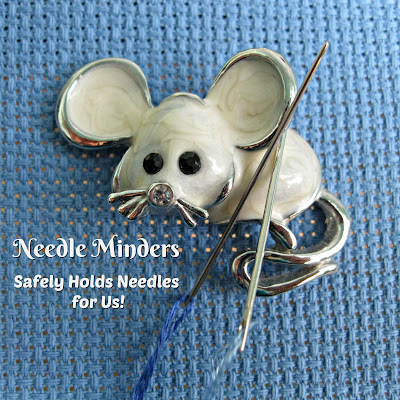
My needle minder is a lovely mouse, which is totally appropriate to me.  Clearly, the gift giver knew me well.  

When I am sitting behind the sewing machine, I attach my needle minder to my shirt like a brooch.  When I am cross stitching, I attach it to the aida cloth itself.  

Magnetic needle minders do not damage clothing or fabrics.  They are ingenious designs with a strong magnet that holds the needle minder from the back side.  

The magnet "attracts" needles and holds them for us.  When we return to our work, we know exactly where to look for our needles. So much better than randomly poking them somewhere and finding them later, often by surprise, when they stick you.  

I am currently working on a cross stitch design that requires dozens of different floss colors.  I frequently thread several needles in different colors so I can continue cross stitching without having to change the floss on one needle too often.  As you can see in the photo, my mouse needle minder hangs onto the multiple needles nicely, and all in one place.


Needle Minders Available Online


There are several places online that offer needle minders.  I happen to know that mine came from True North Needleminders on Etsy because it arrived attached to the store's business card.  She has a large variety of choices available so you can select the character that best reflects your preferences and personality.

Here are a few that are currently available at True North Needleminders, but you can click the store link above to see the entire collection. 

I can tell you from experience, they make awesome gifts for needlework and sewing enthusiasts.  I am most grateful to Olivia for giving me mine.


 See More Crafts & DIY Reviews On
ReviewThisCrafts.com!

  and

More Gift Ideas for Needlework & Sewing Enthusiasts


House of Sylvestermouse


Note: The author may receive a commission from purchases made using links found in this article. “As an Amazon Associate, Ebay (EPN) and/or Esty (Awin) Affiliate, I (we) earn from qualifying purchases.”


Most Recent Reviews on Review This Reviews


Search for Reviews by Subject, Author or Title

The Review This Reviews Contributors


SylvestermouseSylvestermouseDawn Rae BDawn Rae BMbgPhotoMbgPhotoBrite-IdeasBrite-IdeasWednesday ElfWednesday ElfOlivia MorrisOlivia MorrisTreasures by BrendaTreasures by BrendaThe Savvy AgeThe Savvy AgeMargaret SchindelMargaret SchindelRaintree AnnieRaintree AnnieLou16Lou16Sam MonacoSam MonacoTracey BoyerTracey BoyerRenaissance WomanRenaissance WomanBarbRadBarbRadBev OwensBev OwensBuckHawkBuckHawkDecorating for EventsDecorating for EventsHeather426Heather426Coletta TeskeColetta TeskeMissMerFaeryMissMerFaeryMickie_GMickie_G


Review This Reviews is Dedicated to the Memory of Our Beloved Friend and Fellow Contributor

Susan DeppnerSusan Deppner

We may be apart, but
You Are Not Forgotten


“As an Amazon Associate, Ebay (EPN) and or Etsy (Awin) Affiliate, I (we) earn from purchases.” Disclosure Statement

X