Showing posts with label blogger tips. Show all posts

Friday, August 5, 2016

How to Create a Static Home Page on Blogger

how to create a static home page on blogger
Blogger is a great blogging platform that is perfect for beginners, as well as experienced bloggers.   However, as our blogs grow, we need to find ways to make them easier to navigate.  We want our older posts to be easier to find by our readers.

Those of us who write on blogs already know that the newest article will be featured at the top of the blogger site.  The older articles will be shoved down the blog landing page and eventually to the "next" page.  Depending on the frequency of publishing, that can actually happen pretty fast.  Articles that are still very relevant are no longer seen on the landing page and become harder to find.  One could almost even say they are "hidden" by the newer content.  So, what can we do?  

We take navigation very seriously on Review This!  In addition to having every article listed in our drop down tabs, we have a "Quick View Home Page".  Each week, our contributors select articles to feature on that page.  It looks & feels like a Home Page on a website.  

We opted to have our Quick View Home Page set up as a separate page that our readers can easily visit, as opposed to setting it as our static home page.  However, you can certainly set one up just like it to be the landing page for your blog. 


Step by Step Instructions for Creating a Blogger Static Home Page 


Blogger has a default "Home" that takes any guests to the "line up" of published articles.  It is necessary to do a redirect in order to have a static home page on Blogger. 

1)  Create a new page with an appropriate title and Publish it.

create a new page

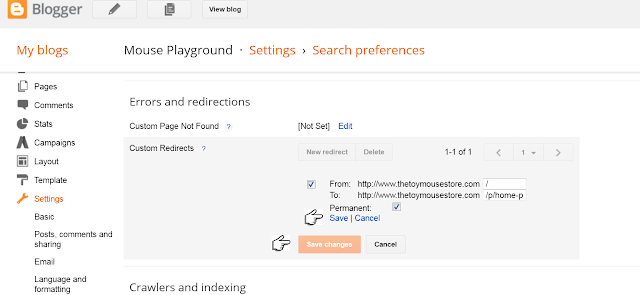
2)  Set the Redirect on your Blogger Dashboard.  Go to Setting > Search Preferences > Custom Redirects

Fill in the blank squares.  The site url is auto-filled:  
  They will look something like this.  Be sure to add the / at the end of your current home url

      From:  www.CurrentHomeURL.com/
      To:   http://www.YourSiteName.com/p/home-page.html 


Redirect on your Blogger Dashboard
 
 
3)  Check Each of the Boxes Click Save

4)  Click Save Changes

5)  Check the main url link to make sure it is properly redirecting to your new home page.

6)  Go Back to the Page you created at the beginning of this tutorial and add the content you want showing on your new Home Page.


You Now Have A Static Home Page on Blogger!


★ ★ ★ ★ ★

Click the button below to see the Review This Quick View Home Page.  Each week, I use EPD, Easy Product Displays, to generate the code for the page that allows the images with captions to be set side by side.  

I have published a step by step guide "Using EPD to Create Home Page Featured Articles" in a separate post.  Please click this link to see that companion tutorial.
 
quick view home page


Note: The author may receive a commission from purchases made using links found in this article. “As an Amazon Associate, Ebay (EPN) and/or Esty (Awin) Affiliate, I (we) earn from qualifying purchases.”


Friday, June 17, 2016

How to Change a Blogger URL to a Custom Domain URL

Custom Domain URL on Blogger - Easy Instructions

Easy Instructions for Changing a Blogger URL with Photos

There are several reasons why you might want to redirect a blogger url to a custom domain url.  In my case, I didn't want to transfer all of the articles on blogger to a new site just to have the custom domain url.  Custom domains are easier to remember since they most often match the site name.  They also don't require readers to remember the "blogspot" part of the url.  It is so much easier to tell friends, family, and readers to visit ReviewThisReviews.com than it is to tell them ReviewThisPersonalReviews.blogspot.com.  Now that our site has been redirected, either the old url or the new custom domain url will land you here.

Even though we have owned the custom domain name for years, I was hesitant to make the redirect.  I feared all kinds of evils would befall us.  I worried that we might even be offline for hours or days.  All of those concerns were unfounded.  Nothing bad happened and within 30 minutes, our custom domain was completely set and our site was redirected.

Now, let me share our extremely easy directions for redirecting a blogger site to a custom domain.  These instructions are written with bloggers in mind, not computer web designers.  The instructions are written in plain, easy to understand English and I have included lots of screenshots so you can see exactly what I am talking about in each step. 

Instructions for Redirecting a Site URL


If you follow these instructions, they will work.  Some steps may require waiting time for the DNS settings to activate, but that does not mean you have made a mistake.  Simply be patient and allow the internet to process your commands. 

1) Purchase Custom Domain - I use Namecheap, so these instructions will show their dashboard 

2) On the Blogger Dashboard, click Settings > Basic 

3) Click the link "+ Setup a 3rd party URL for your blog" 

Easy Instructions with Photos for Changing a Blogger URL to Custom Domain


4)  Go to the Namecheap Dashboard and click "Manage" by the url you wish to use, then select "Advanced DNS" from the top tabs.
 
Easy Instructions for How to Change a Blogger URL to a Custom Domain URL

Easy Instructions for How to Change a Blogger URL to a Custom Domain URL


5)  Copy the domain url, go back to the blogger dashboard, and paste the domain url in the box.   
BE SURE TO START THE DOMAIN URL WITH www.      
example:  www.thetoymousestore.com      
(If there is a / at the end, remove it)
 
Easy Instructions for How to Change a Blogger URL to a Custom Domain URL

6)  Click Save - This will auto-populate the information you need for the next step.
 
Easy Instructions for How to Change a Blogger URL to a Custom Domain URL

7)  Copy the destination (ghs.google.com) and Go Back to the Namecheap Dashboard.  Paste ghs.google.com in the CNAME record value box replacing "free.park-your-domain.com."  Make sure the www is in the Host section  

8)  Click "add a new record" and select to add another CNAME Record (See Screenshot Below)  

9)  Paste the second line of letters and numbers in the appropriate CNAME boxes  

Easy Instructions for How to Change a Blogger URL to a Custom Domain URL

10)  Click all of the check marks - they will disappear and little trash cans will appear 

11)  Go back to the Blogspot dashboard and click Save.   (If it doesn't save right away, wait 15 - 20 min and try again.   One of my blogs took about  15 min for the DNS settings to activate so I could save it.) 

12)  Once saved, confirm the new domain url is working by viewing your actual blogLook at the address to confirm url change.
 
Easy Instructions for How to Change a Blogger URL to a Custom Domain URL


13)  One last VERY IMPORTANT STEP!   

On the Blogger dashboard, under Settings > Basic, click the "edit" link beside the new url and check the box beside "Redirect 'YourSiteName'.com to www.'YourSiteName'.com.    This ensures that the www.  is not required in the url to find your site.   (This may also take a few minutes before it will allow you to save it)  

Easy Instructions with photos for changing a blogger url to a custom domain url


Congratulations!   
You are done, so go Celebrate!!!


You may also enjoy seeing our new Quick View Home Page here on Review This!  This page features articles you may have previously missed, while also providing excellent examples of the types of reviews published on our site.  

I will be sharing instructions on how to create your own Quick View Home Page for your blog soon.


Quick View Home Page on Blogger


How to Change a Blogger URL to a Custom Domain URL written by:
House of Sylvestermouse


Note: The author may receive a commission from purchases made using links found in this article. “As an Amazon Associate, Ebay (EPN) and/or Esty (Awin) Affiliate, I (we) earn from qualifying purchases.”


Friday, April 10, 2015

How to Embed Your Pinterest Board in Your Blog Post

how to embed a pinterest board
I am always looking for new ways to improve and increase the ways I can easily create displays for my websites and blog posts. I recently discovered how to embed a Pinterest Board in a blog post here on Blogger, as well as on websites.

I love using Pinterest! It is not only a great way for me to share my photos, articles and favorite craft tutorials, but it is also an excellent way for me to find new ideas and products.

Being able to create a specific niche board on Pinterest is really awesome. Being able to share that board with others via a blog post, is most excellent!


How to Create and Embed the Pinterest Board HTML Code


You are going to laugh at how easy it is to create and embed your individual Pinterest board. It takes only a moment to do either of these displays!


To Create This Pinterest Board, Simply


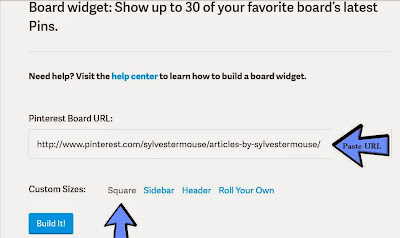
make a pinterest board to embed
  • Click Here
  • Then, copy the Pinterest Board URL that you wish to display and paste it in the box. 
  • Select the size of your display from the Custom Sizes ~ Square is Shown Above
  • Click "Build It"
  • Copy and Paste the Generated Code into the html section of Your Blog Post
  •  


To Create This Pinterest Board, Simply


create a pinterest board display to embed
  • Click Here
  • Then, copy the Pinterest Board URL that you wish to display and paste it in the box. 
  • Select "Roll Your Own" in the Custom Sizes options
  • Select Image Width 80, Board Height 400, Board Width 800
  • Click "Build It"
  • Copy and Paste the Generated Code into the html section of Your Blog Post
  •  
There are several size options available or you can play with the display size by simply changing the numbers in the "roll your own" section.   The size I used here was the board size that I thought looked best on this particular site.

These boards are generated feeds and the looks will change each time you add a new pin to your board.


Using an Embedded Pinterest Board   


There are many ways and places that online writers might wish to use an embedded Pinterest board.  One example that immediately comes to me is if you are publishing a recipe article, you could embed your recipe Pinterest board at the bottom of  your article to show additional recipes.

If a reader clicks on one of the pictures on the embedded board, it will allow them to immediately repin the original pin, which means they could easily repin every image link showing on the board without ever leaving your article.

If a reader clicks on the "See on Pinterest" button at the bottom of the embedded board, the link will take them to the actual board on Pinterest and they can explore all of your recipes / articles on that board.

Personally, I think this is a fabulous tool for online writers and I would highly recommend trying it out.  You may well see a huge increase in not only your Pinterest traffic and repins, but also in the traffic to your other articles showing on a displayed board.


Now, just for fun, 

Here is a Gifts for Mothers Shopping Board just in time for you to make your selections for 

Mother's Day!


Pinterest Board is hosted by Sylvestermouse, but Includes
GIFT SUGGESTIONS FROM MULTIPLE CONTRIBUTORS

(Image Weight: 100, Board Height: 350, Board Width: 600)


Note: The author may receive a commission from purchases made using links found in this article. “As an Amazon Associate, Ebay (EPN) and/or Esty (Awin) Affiliate, I (we) earn from qualifying purchases.”


Most Recent Reviews on Review This Reviews


Search for Reviews by Subject, Author or Title

The Review This Reviews Contributors


SylvestermouseSylvestermouseDawn Rae BDawn Rae BMbgPhotoMbgPhotoBrite-IdeasBrite-IdeasWednesday ElfWednesday ElfOlivia MorrisOlivia MorrisTreasures by BrendaTreasures by BrendaThe Savvy AgeThe Savvy AgeMargaret SchindelMargaret SchindelRaintree AnnieRaintree AnnieLou16Lou16Sam MonacoSam MonacoTracey BoyerTracey BoyerRenaissance WomanRenaissance WomanBarbRadBarbRadBev OwensBev OwensBuckHawkBuckHawkDecorating for EventsDecorating for EventsHeather426Heather426Coletta TeskeColetta TeskeMissMerFaeryMissMerFaeryMickie_GMickie_G


Review This Reviews is Dedicated to the Memory of Our Beloved Friend and Fellow Contributor

Susan DeppnerSusan Deppner

We may be apart, but
You Are Not Forgotten


“As an Amazon Associate, Ebay (EPN) and or Etsy (Awin) Affiliate, I (we) earn from purchases.” Disclosure Statement

X